10 Inspiring Walk-In Closet Organization Ideas and Layout Ideas
- Closet Organization
 Ben
Ben- 0
- 52 minutes read
You finally have a walk-in closet, but it looks like a tornado mated with a yard sale. I’ve been there.
My first walk-in was supposed to be a dream come true, but within three months it became a nightmare of piled clothes, scattered shoes, and that one corner where things went to die.
Having space and using it wisely are two completely different things, and I learned this lesson the expensive way.
The irony of walk-in closets? People often keep them MORE disorganized than small closets because “there’s plenty of room.” Plot twist: more space just means more room for chaos unless you organize intentionally.
I’ve reorganized my walk-in three times (stubborn much?), helped design five others for friends, and finally cracked the code on what actually works versus what just looks good in magazines.
What transformed my approach? Realizing that walk-in closet organization is about creating boutique-like zones rather than just shoving everything inside.
Ready to turn your walk-in from chaotic warehouse into personal shopping paradise? Let’s talk about the organization ideas that genuinely deliver.
Double-Hanging Closet System
Double hanging rods revolutionize walk-in closet capacity without sacrificing accessibility. I installed a double-rod system on one entire wall of my walk-in, and suddenly I had space for literally twice as many hanging items. This single upgrade transformed my closet from cramped to spacious.
The beauty of double hanging is how it maximizes vertical space for shorter items. Most shirts, blouses, pants, and skirts don’t need 6 feet of hanging space. Stacking two rods means you use the full height efficiently instead of wasting 3 feet of air below your clothes.
Optimal Double-Rod Configuration
Here’s how I set up my double hanging system:
- Top rod positioned at 80-84 inches from the floor
- Bottom rod at 40-42 inches for balanced access
- Each section spans 4-6 feet for easy browsing
- Reserve one wall section as single-height for dresses and coats
- Install heavy-duty rods that support significant weight
I made the mistake of using cheap rods initially, and they sagged within weeks under the weight of my clothes. Now I use commercial-grade closet rods rated for at least 50 pounds, and they’re rock solid.
Strategic Item Placement
Maximize your double-rod efficiency:
- Top rod: shirts, blouses, lightweight jackets
- Bottom rod: pants, skirts, more shirts, shorts
- Organize by category, then by color within each section
- Keep frequently worn items at eye level
- Use uniform hangers for visual calm
I organize my top rod by garment type (all shirts together, all blouses together), then arrange each category by color. This system means I can find any specific item in under 10 seconds.
When NOT to Double-Hang
Some sections work better single-height:
- Areas for long dresses, gowns, or maxi items
- Coat storage (especially long winter coats)
- Sections where you want floor space for shoes or drawers
- Areas with lower ceilings or odd dimensions
I kept one 3-foot section single-height specifically for my dresses and long coats. This mixed approach gives me flexibility while maximizing overall capacity.
Built-In Shoe Display Wall
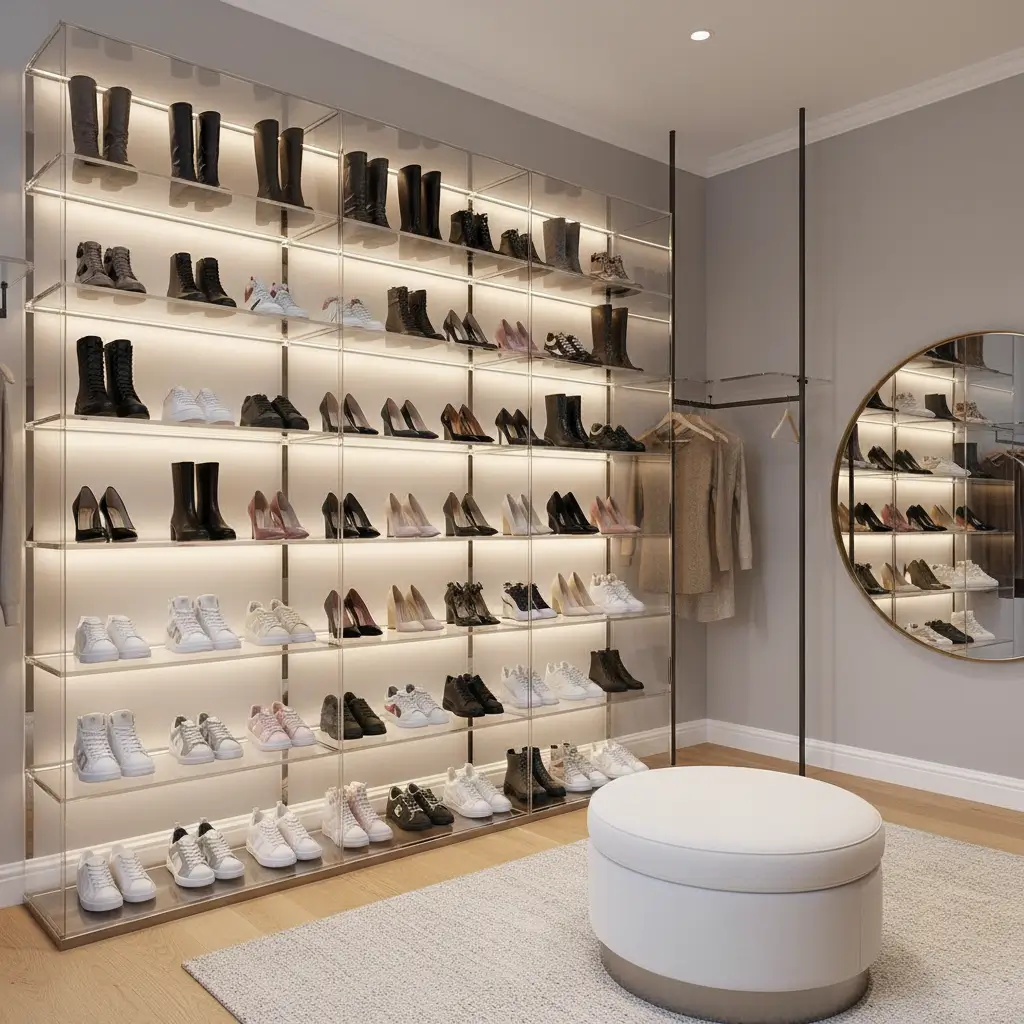
A dedicated shoe display wall turns your collection into visual art while keeping everything accessible. I built a floor-to-ceiling shoe wall in my walk-in, and it’s hands-down the best organizational decision I’ve made. Every pair is visible, nothing gets crushed, and getting dressed became way more fun.
The key difference between a shoe wall and random shoe storage is intentionality. Each pair gets its designated spot, creating accountability that prevents shoe chaos from creeping back in.
Designing Your Shoe Wall
My shoe wall specifications that work perfectly:
- Angled shelves (15-20 degrees) for better visibility
- 7-8 inch spacing between shelves for most shoes
- 10-12 inch spacing for boots or heels
- 12-14 inch depth for average shoe sizes
- Full wall coverage from floor to ceiling
I installed angled shelves instead of flat ones, and the difference is massive. With flat shelves, I could only see toe boxes. With angled shelves, I see entire shoes at a glance, making selection infinitely easier.
Organizing Your Shoe Collection
Display strategies that work:
- Organize by shoe type (heels, flats, boots, sneakers)
- Arrange by color within each category
- Keep everyday shoes at eye level
- Store seasonal shoes on higher shelves
- Display special occasion shoes as decor
My most-worn shoes occupy the middle three shelves where I can grab them without bending or reaching. Seasonal boots live up top during off-season, and fancy heels I rarely wear get bottom shelves.
Budget-Friendly Shoe Wall Alternatives
Can’t do built-ins? Try these:
- IKEA LACK shelves create affordable shoe displays
- Floating shelves installed in rows
- Modular cube systems stacked and secured
- Clear acrylic boxes on existing shelves
- Retail-style shoe racks from restaurant supply stores
I helped my sister create a shoe wall using 12 IKEA LACK shelves for under $100. We installed them in three columns of four shelves each, and it looks completely custom.
Seasonal Rotation Storage
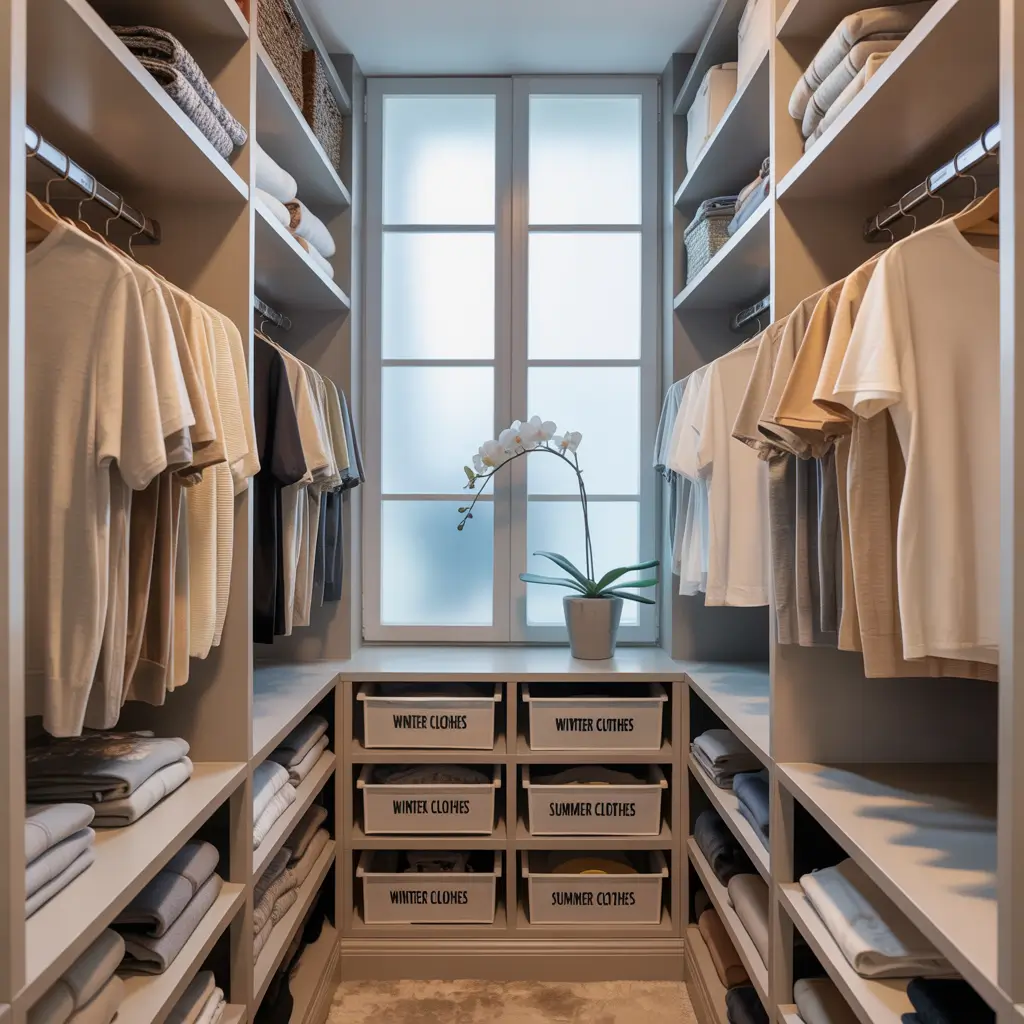
Seasonal rotation keeps your walk-in closet focused on currently wearable clothes instead of holding an entire year’s wardrobe simultaneously. I rotate my wardrobe twice yearly, and this habit keeps my walk-in feeling spacious and organized instead of stuffed and chaotic.
The mental clarity of seasonal rotation is underrated. When everything visible is actually wearable right now, getting dressed becomes decision-making with 50% fewer options. This sounds limiting but actually feels liberating.
Creating Rotation Zones
How I designate space for rotation:
- Active zone: Current season front and center
- Transitional zone: Year-round versatile pieces
- Storage zone: Off-season items packed away
- Accessible archive: Last season gradually transitioning out
- Deep storage: Two seasons away, fully packed
My walk-in has three distinct zones. The main area holds current season clothes I wear now. The top shelves store off-season items in labeled bins. One small section holds transitional pieces I might need year-round.
Rotation Timing and Process
When and how to rotate effectively:
- Spring rotation in April when weather stabilizes
- Fall rotation in October before cold hits
- Gradual two-week transition period
- Clean and assess everything during rotation
- Donate items you didn’t wear all season
I spend one Saturday in April and one in October doing my rotations. I pull out next season’s clothes, check for damage or needed repairs, and pack away the previous season. This built-in review prevents wardrobe creep.
Off-Season Storage Solutions
Where off-season items live:
- Labeled bins on top shelves
- Vacuum-sealed bags for bulky winter items
- Garment bags for delicate dresses or suits
- Under-bed storage if closet space is limited
- Cedar storage for wool and cashmere
I use clear bins labeled with season and contents on my top shelves. Winter coats go in garment bags, and bulky sweaters get vacuum-sealed. Everything stays clean, protected, and easy to find when rotation time comes.
Also Read: 10 Creative Small Closet Organization Ideas and Decor Touches
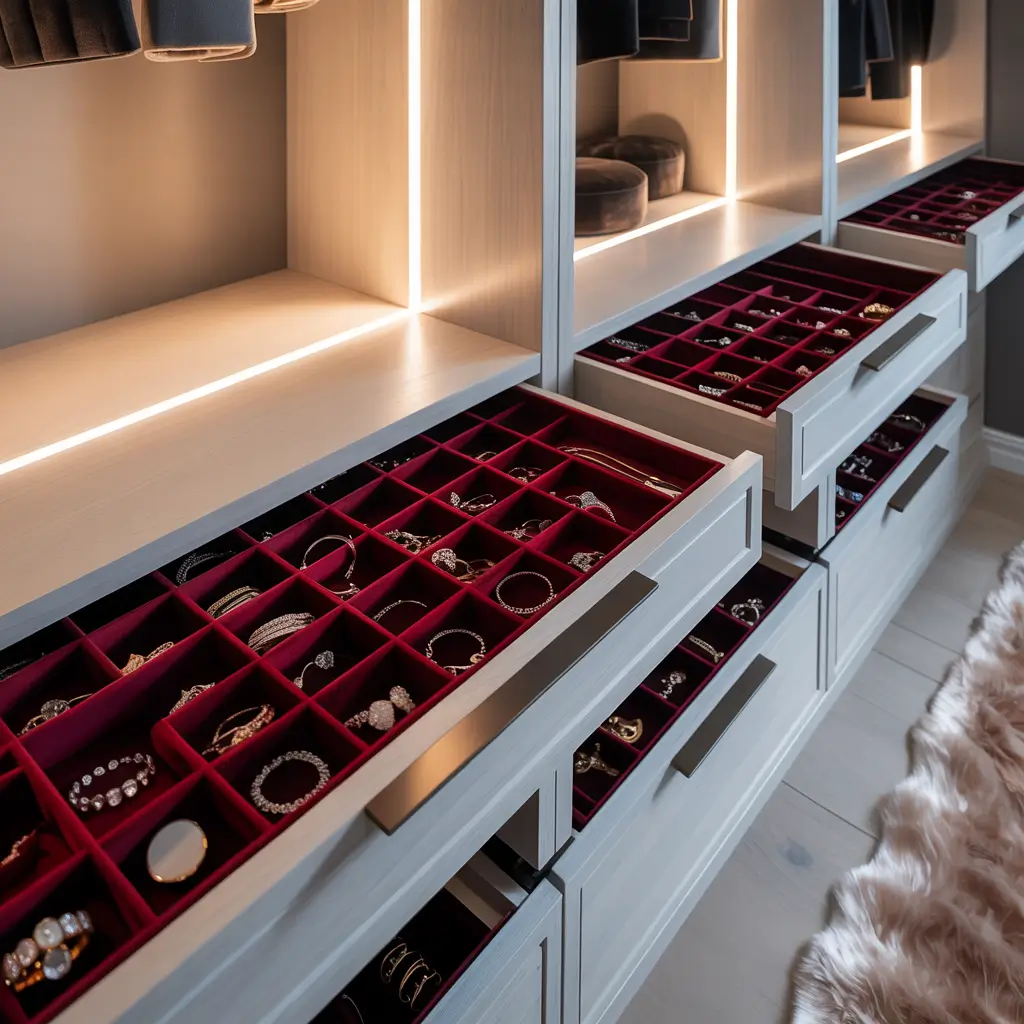
Accessory Drawer Dividers

Drawer dividers transform jumbled accessory chaos into organized, visible, accessible storage. I added custom dividers to all my closet drawers, and the improvement was instant. No more digging through tangled jewelry or searching for matching socks.
The psychology behind dividers is simple: when everything has a designated spot, you actually put it back there. Without dividers, drawers become catch-all disasters within weeks.
Types of Drawer Dividers
Divider options for different needs:
- Adjustable dividers that customize to your drawer size
- Velvet jewelry trays for delicate items
- Acrylic organizers for visibility
- Bamboo dividers for eco-friendly organization
- Custom foam inserts for expensive accessories
I use different divider types for different drawers. My jewelry drawer has velvet trays, my sock drawer has bamboo dividers, and my sunglasses drawer has acrylic organizers. Matching the divider to the contents makes everything work better.
Organizing Different Accessories
Category-specific organization:
- Jewelry: separate compartments by type (rings, necklaces, earrings)
- Watches: individual cushioned slots
- Sunglasses: padded sections to prevent scratching
- Belts: rolled or laid flat in divided sections
- Socks and underwear: individual squares for each pair
My jewelry drawer has 16 small compartments. Earrings live in one section, rings in another, bracelets in a third. This separation prevents tangling and makes finding specific pieces instantaneous.
DIY Divider Solutions
Budget-friendly divider options:
- Cut cardboard boxes to create custom sections
- Use small gift boxes as ready-made compartments
- Repurpose ice cube trays for tiny items
- Install tension rods as vertical dividers
- Cut foam board to exact specifications
I created custom dividers for my T-shirt drawer using foam board cut to size. Total cost: $4. The result rivals those expensive drawer organizing systems that cost $50+.
Open Shelving with Baskets
Open shelving with coordinated baskets creates flexibility and visual cohesion in walk-in closets. I converted two walls to open shelving with woven baskets, and the combination of accessibility and aesthetics is perfect.
The beauty of basket systems is how they hide clutter while keeping things accessible. You can toss items into baskets quickly (important for maintaining organization long-term), but everything still looks neat and intentional.
Choosing the Right Baskets
Basket selection criteria that matters:
- Uniform size and style for cohesive look
- Labeled baskets for easy identification
- Sturdy construction that won’t collapse
- Measurements that fit your shelf dimensions exactly
- Neutral colors that won’t visually overwhelm
I chose natural woven baskets in three sizes: large for bulky items, medium for most things, and small for accessories. All the same style and color, creating visual harmony across 12 baskets.
What Goes in Baskets
Perfect items for basket storage:
- Workout clothes and gear
- Loungewear and pajamas
- Seasonal accessories (gloves, scarves, hats)
- Handbags and clutches
- Underwear and socks
My basket system includes one basket for yoga clothes, one for running gear, one for scarves, and one for off-season accessories. Everything has a home, and I can pull out entire baskets when packing for trips.
Labeling Systems
Make baskets functional:
- Chalkboard labels for changeable contents
- Printed labels for permanent categorization
- Color-coded tags for quick identification
- Photo labels showing exactly what’s inside
- Handwritten tags for personal touch
FYI, I use a label maker for all my baskets, and it’s one of my favorite closet organizing tools. Clear labels mean everyone in my household (okay, just me and my partner, but still) knows exactly where things belong.
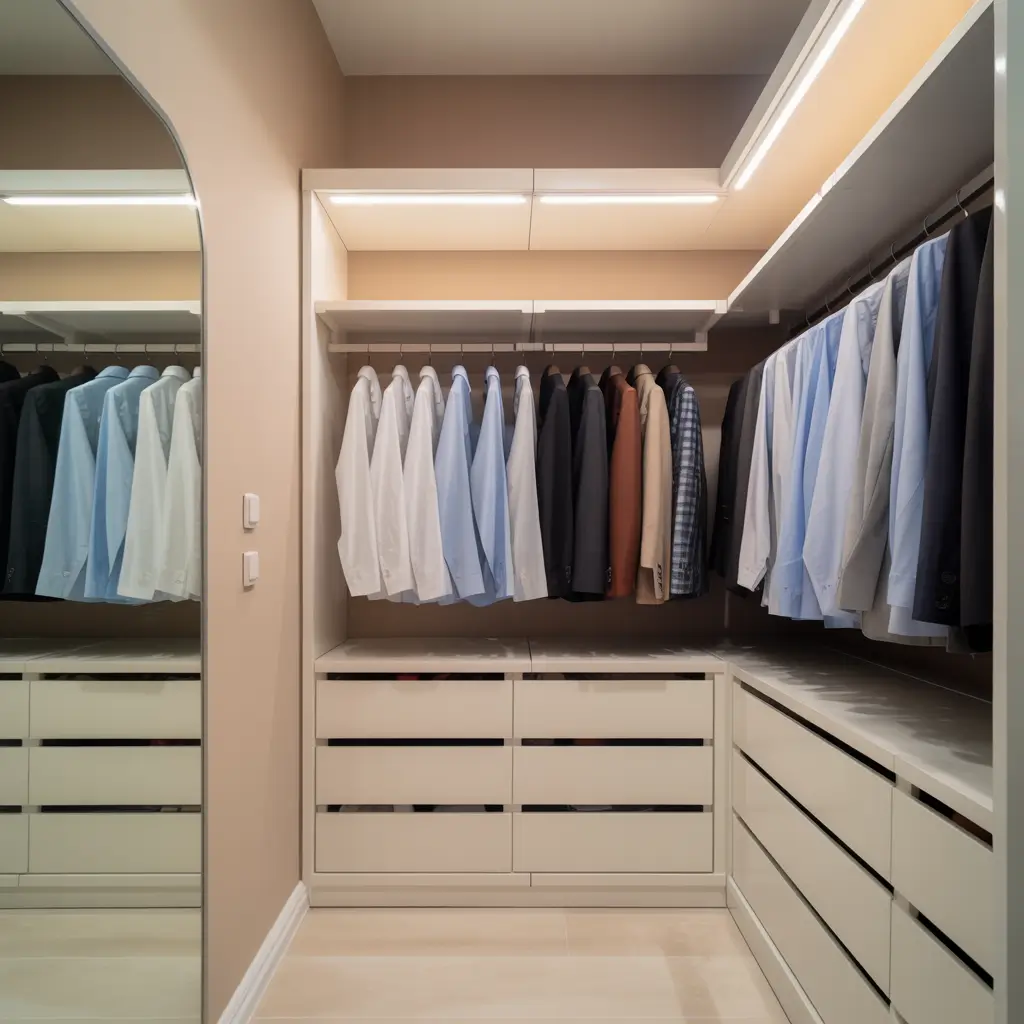
Pull-Out Pants and Tie Racks
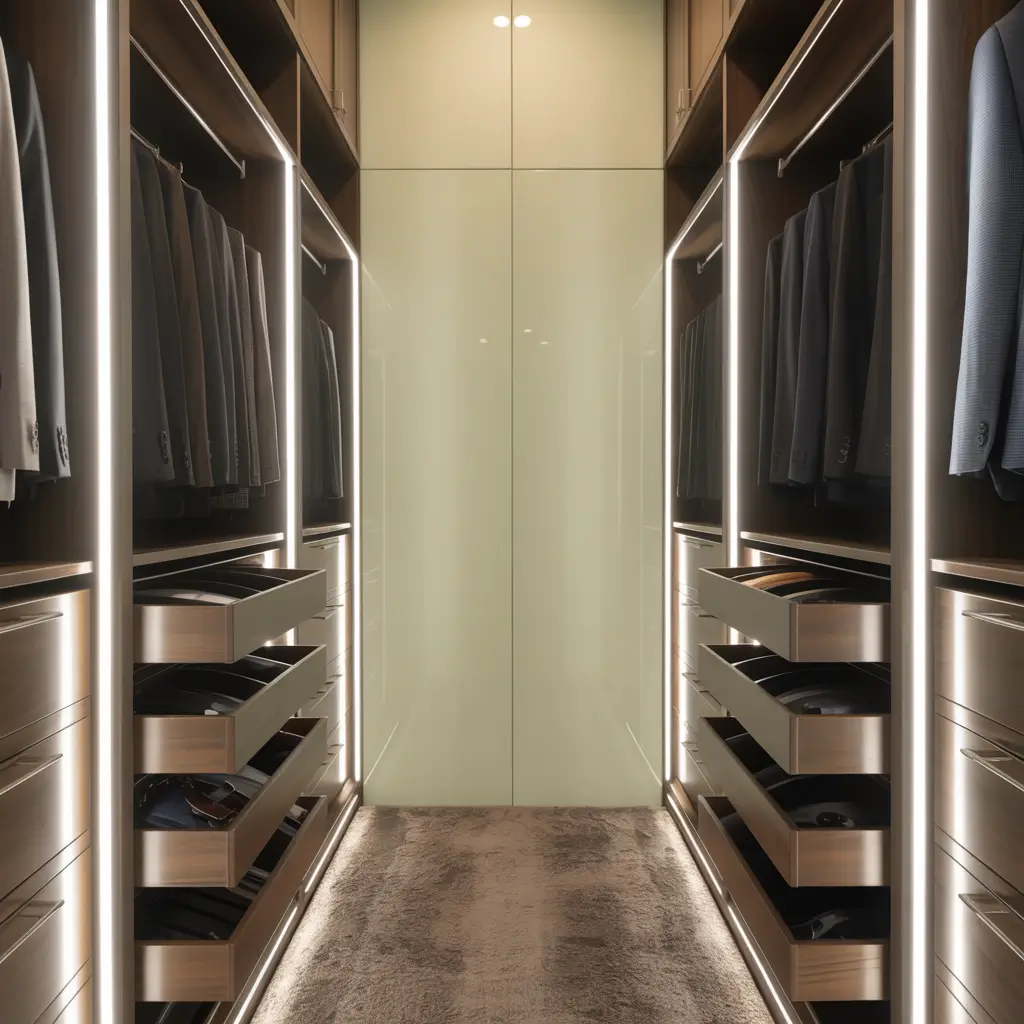
Pull-out racks bring specialized storage for items that don’t hang or fold well. I installed three pull-out pants racks and one tie rack in my walk-in, and these might be my favorite organizational elements. Everything stays wrinkle-free and perfectly accessible.
The sliding mechanism means you can see every item without removing anything else. This visibility is crucial for actually wearing your entire wardrobe instead of just the items you can easily see and reach.
Pull-Out Pants Rack Benefits
Why pants racks outperform other storage:
- Prevents creases from traditional hangers
- Allows you to see all pants at once
- Saves horizontal hanging space
- Keeps pants organized by type or color
- Accommodates more pants in less space
I can fit 12-15 pairs of pants on one pull-out rack that takes up only 14 inches of closet width. The same pants on hangers would require at least 3 feet of rod space.
Tie and Belt Rack Organization
Specialized storage for accessories:
- Rotating tie racks hold 20+ ties in compact space
- Pull-out belt racks keep belts unwrinkled and visible
- Side-mount options for narrow closet sections
- Non-slip surfaces prevent items from sliding
- Easy installation on most closet systems
My motorized tie rack (yes, it’s extra, but I love it) spins at the push of a button, displaying all 30 ties. This definitely wasn’t necessary, but watching it rotate makes me happy every time 🙂
Installation Considerations
Getting pull-out racks right:
- Ensure full extension for complete accessibility
- Install at comfortable height (waist to shoulder)
- Choose quality slides rated for the weight
- Measure depth carefully to avoid door clearance issues
- Consider soft-close mechanisms for luxury feel
I installed my pants racks at 48 inches from the floor, which is perfect for my height. The full-extension slides mean I can access every single pair without removing the rack.
Also Read: 10 Stunning Closet Organization Ideas and Luxury Walk-In Looks
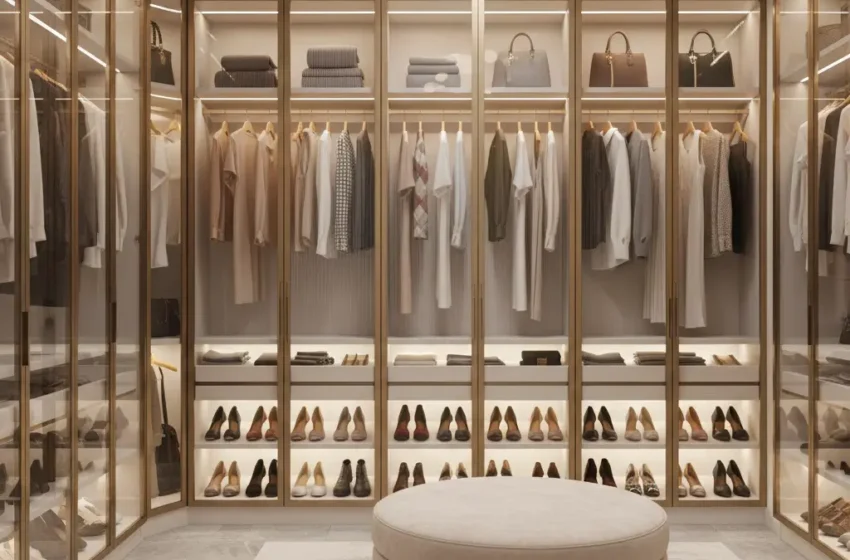
Glass Door Wardrobe Cabinets
Glass-front cabinets add boutique sophistication while keeping items dust-free and visible. I replaced some solid cabinet doors with glass fronts, and the transformation elevated my entire walk-in from basic to luxe.
The psychological benefit of glass doors is accountability. When you can see everything, you maintain organization better because disorder is immediately visible and annoying.
Glass Door Benefits
Why glass fronts upgrade closets:
- Display beautiful items like designer handbags or shoes
- Keep contents dust-free and protected
- Create visual interest and depth
- Motivate you to keep things organized
- Make smaller closets feel more open
My glass-front cabinets display my handbag collection, and honestly, they function as decor now. The bags look intentional and curated rather than randomly stored.
Frosted vs. Clear Glass
Choosing the right glass:
- Clear glass for items you want fully visible
- Frosted glass for partial concealment with style
- Textured glass for vintage or character looks
- Tinted glass for subtle sophistication
- Mirrored glass for maximum light reflection
I chose frosted glass for some cabinets and clear for others. Clear glass showcases my nice bags and shoes, while frosted glass hides more utilitarian storage without completely concealing contents.
What to Display Behind Glass
Items worthy of glass display:
- Designer handbags and accessories
- Shoe collections in pristine condition
- Folded sweaters in coordinated colors
- Hats and special accessories
- Vintage or collectible items
My clear glass cabinets display my six “investment” handbags that I want to see and appreciate daily. Everything else lives in regular cabinets or on open shelves.
Hidden Jewelry Compartments
Hidden jewelry storage combines security with sophisticated organization. I installed a pull-out jewelry cabinet behind a mirror, and it’s my favorite secret feature. Guests have no idea it’s there until I reveal it (which I do constantly because I’m extra proud of it).
The hidden aspect isn’t just for security – it’s about maintaining clean visual lines in your closet while having comprehensive storage behind the scenes.
Pull-Out Jewelry Cabinets
Features of great jewelry storage:
- Velvet-lined compartments prevent scratching
- Individual sections for different jewelry types
- Ring rolls for secure ring storage
- Necklace hooks to prevent tangling
- Mirror integration for trying on pieces
My pull-out cabinet has 24 compartments, six necklace hooks, two ring rolls, and a full-length mirror on the outside. Everything I own fits perfectly organized, and it takes up only 6 inches of wall depth.
Wall-Mounted Mirror Cabinets
Dual-purpose mirror storage:
- Full-length mirror on the outside
- Complete jewelry organization inside
- Mounts flush to the wall
- Locks for security
- LED lighting for visibility
I mounted mine on a wall section that otherwise would’ve been dead space. Now that area serves triple duty: mirror for outfit checks, jewelry storage, and the LED lighting illuminates that corner of my closet.
Drawer-Based Hidden Storage
Alternative hidden storage:
- False-bottom drawers with jewelry compartments
- Pull-out sections within existing drawers
- Toe-kick drawers at floor level
- Behind-door storage that swings out
- Under-shelf sliding trays
Vertical Hanging Space for Handbags
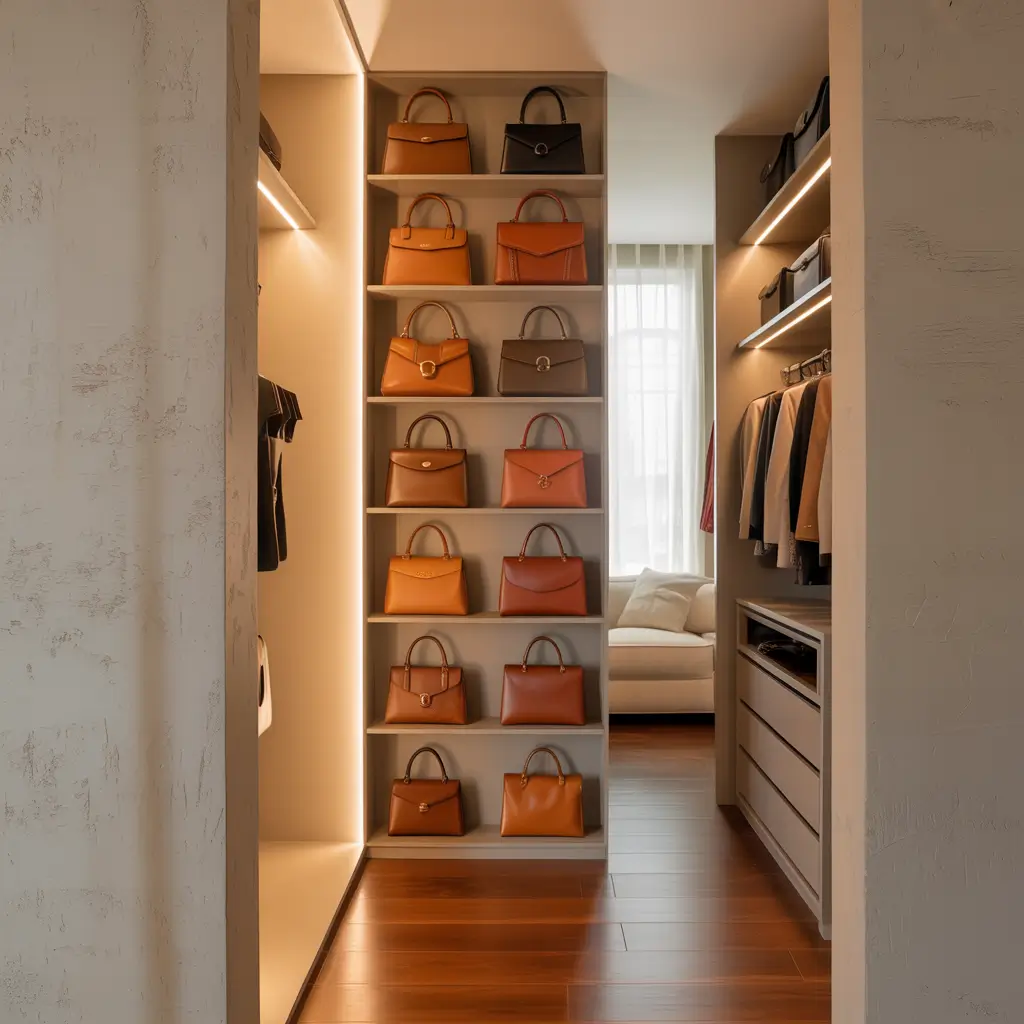
Vertical handbag storage keeps bags visible, accessible, and in perfect shape. I dedicated one wall section to vertical handbag organization using shelf dividers, and my bag collection has never been happier or more used.
Stacking bags damages them, and storing them in dustbags means you forget what you own. Vertical display solves both problems while looking like a boutique.
Shelf Divider Method
How I organize bags vertically:
- Install dividers every 6-8 inches on shelves
- Stand bags upright between dividers
- Stuff bags with tissue to maintain shape
- Organize by size, color, or frequency of use
- Keep dust covers for long-term storage only
My handbag shelf has 14 dividers creating 15 slots. Each bag stands upright, fully visible from the front. I can see every bag I own at a glance and grab whichever one I want without disturbing others.
Purse Pillows and Stuffers
Maintaining bag shape:
- Purse pillows designed specifically for bags
- Bubble wrap for budget-friendly stuffing
- Tissue paper for lightweight bags
- Pool noodle sections cut to size
- Original dust bags for special occasions only
I use purse pillows for my expensive bags and tissue paper for everything else. The shape maintenance is crucial – collapsed bags look sad and develop permanent creases.
Alternative Hanging Solutions
Other vertical handbag storage:
- Hooks mounted at different heights
- Pegboard systems with adjustable hooks
- Acrylic shelves for see-through storage
- Hanging organizers with individual pockets
- Ladder-style displays leaning against walls
IMO, the shelf divider method works best for most people because it’s affordable, customizable, and keeps bags in perfect condition while being completely visible.
Also Read: 12 Simple Kids Closet Organization Ideas That Stay Tidy
Lighting-Enhanced Mirror Section
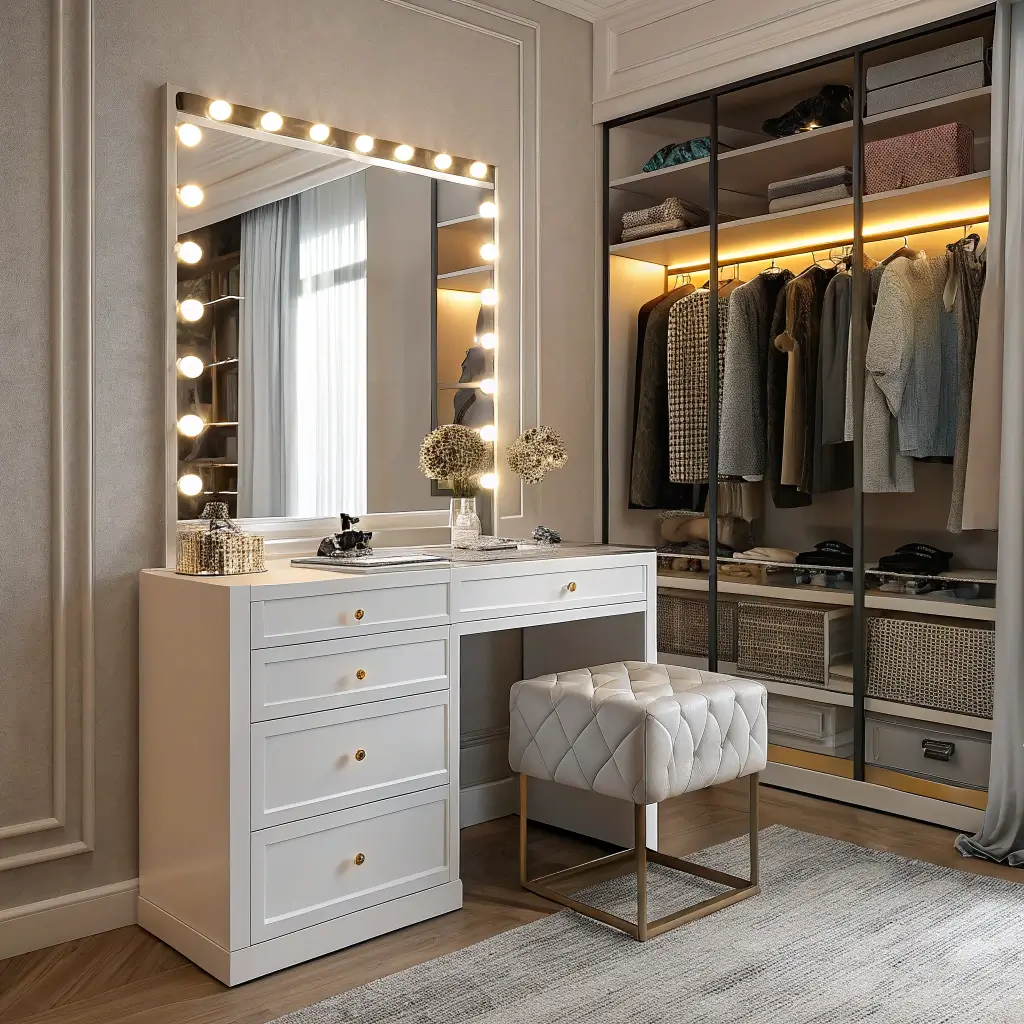
Strategic lighting around mirrors transforms your walk-in into a functional dressing room. I created a dedicated mirror section with professional lighting, and getting ready went from frustrating to genuinely enjoyable.
The lighting makes the real difference. A mirror in dim lighting is basically useless for outfit checking, makeup, or detail work. Proper lighting is game-changing.
Layered Lighting Approach
My walk-in lighting strategy:
- Overhead ambient lighting for general illumination
- Task lighting around mirrors for detail work
- Accent lighting on shelves and displays
- LED strips under hanging rods
- Dimmer switches for mood control
I installed three separate lighting circuits in my walk-in, each controlled independently. This lets me use bright task lighting when getting ready but soft ambient lighting when just grabbing something quickly.
Mirror Lighting Options
Best lighting for mirrors:
- Backlit LED mirrors for even illumination
- Sconces mounted beside mirrors at face height
- Overhead vanity lights above mirrors
- Ring lights for professional makeup application
- Natural light simulation bulbs for accurate colors
My mirror has sconces on both sides at 60 inches from the floor (eye level for me). The bilateral lighting eliminates shadows that overhead lights create, making outfit evaluation and makeup application way more accurate.
Creating a Dressing Zone
Complete mirror section elements:
- Full-length mirror (minimum 60 inches tall)
- Proper lighting from multiple angles
- Small bench or ottoman for sitting
- Hooks nearby for outfit consideration
- Good ventilation if applying products
I carved out a 4-foot section of my walk-in specifically as my dressing zone. Mirror, lighting, small upholstered bench, and a hook for hanging outfit options I’m considering. This dedicated space makes getting ready feel less rushed and more intentional.
Bringing Your Walk-In Together
After organizing multiple walk-in closets, here’s my truth: the best walk-in isn’t the biggest – it’s the most intentionally organized.
I’ve seen massive walk-ins that are total disasters and modest ones that function like precision machines.
The key is creating zones for different categories, maintaining visual cohesion, and designing systems you’ll actually maintain long-term.
Your walk-in closet should make you happy every time you enter it, not stressed about the chaos.
Start with one wall or one category. Get that section working perfectly before moving to the next area. Walk-in closet organization is a marathon, not a sprint, and gradual improvements create lasting results.
Your walk-in has serious potential – time to unlock it and create the organized, beautiful space you actually deserve. Trust me, future-you will thank present-you for taking action now!