12 Creative Bathroom Sink Organization Ideas and Tidy Counter Tips
- Bathroom Design
 Ben
Ben- 0
- 31 minutes read

Picture this: It’s 7 AM, you’re half-awake, and your bathroom counter looks like a beauty supply store exploded.
Tubes of toothpaste mingle with hair ties, that expensive serum hides behind three bottles of lotion, and somewhere in the chaos lurks your favorite lip balm. We’ve all been there, fighting the daily battle against bathroom sink chaos.
I used to think messy bathroom counters were just part of adulting. Then I stayed at a friend’s place where everything had its spot, and finding my toothbrush didn’t require an archaeological dig.
That’s when I realized bathroom sink organization isn’t about being a neat freak – it’s about making mornings less painful and actually finding your stuff when you need it.
After testing countless organization methods (and failing spectacularly at some), I’ve discovered what actually works.
These aren’t those impossible Instagram-perfect setups that require a personal organizer on speed dial. These are real solutions for real bathrooms – you know, the ones where multiple people fight for sink space every morning.
1. Tiered Tray Counter Organizer
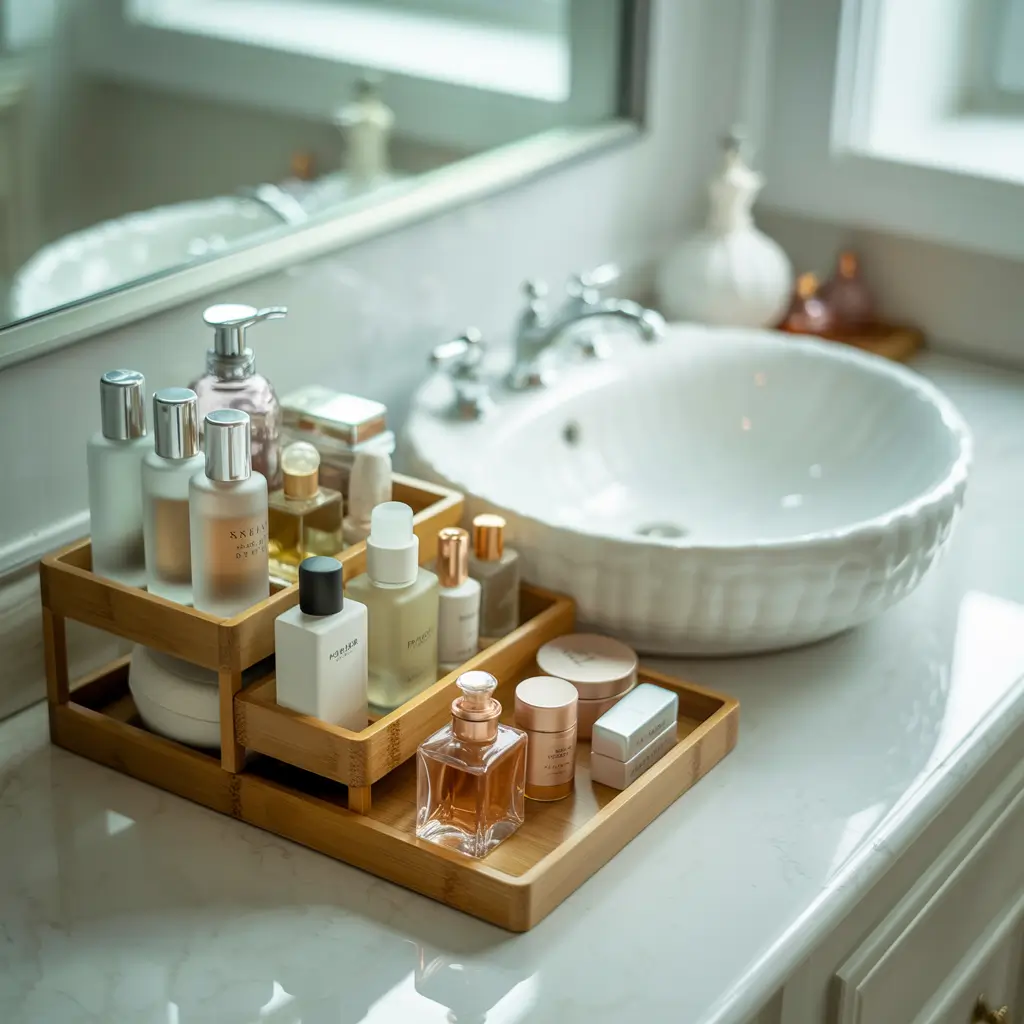
Ever notice how kitchen organization gets all the cool gadgets while bathrooms get forgotten? Tiered tray organizers fix this injustice, bringing vertical storage to your bathroom counter without eating up precious space.
I discovered tiered trays when my counter situation hit rock bottom. My partner and I were basically playing Jenga with skincare products every morning. A simple two-tier tray changed everything. The bottom tier holds daily essentials like face wash and moisturizer, while the top tier manages smaller items like lip balm and eye cream.
Why Tiered Trays Beat Regular Organizers
Here’s what makes them brilliant:
• Vertical storage maximizes limited counter space
• Open design means you see everything at once
• Easy to clean – just lift and wipe underneath
• Portable – move the whole setup when deep cleaning
The key to making tiered trays work? Group products by routine. Morning skincare on one tier, evening routine on another. Or separate by person if you’re sharing space. My setup costs about $15 from any home goods store, though you can definitely splurge on fancier versions if that’s your thing.
2. Pull-Out Under-Sink Drawers

That cabinet under your sink probably holds untold treasures – or at least it would if you could actually reach them. Pull-out drawers transform that dark cave into accessible, organized storage that actually makes sense.
Installing pull-out drawers sounds complicated, but I promise it’s not. I put mine in during a particularly ambitious Sunday afternoon, armed with nothing but a drill and determination. The whole process took about an hour, including the time I spent reading instructions three times because I’m paranoid about messing up.
Making the Most of Pull-Out Storage
The magic happens when you organize these drawers strategically:
• Top drawer for daily items you grab constantly
• Middle drawer for weekly-use products
• Bottom drawer for backups and bulk items
• Consider drawer height – tall bottles need tall drawers (learned this the hard way)
My pull-out system holds everything from cleaning supplies to extra toilet paper. The best part? No more crawling on the bathroom floor trying to reach that bottle in the back corner. Everything slides out smoothly, making even the deepest corners accessible.
3. Hanging Mesh Storage Baskets
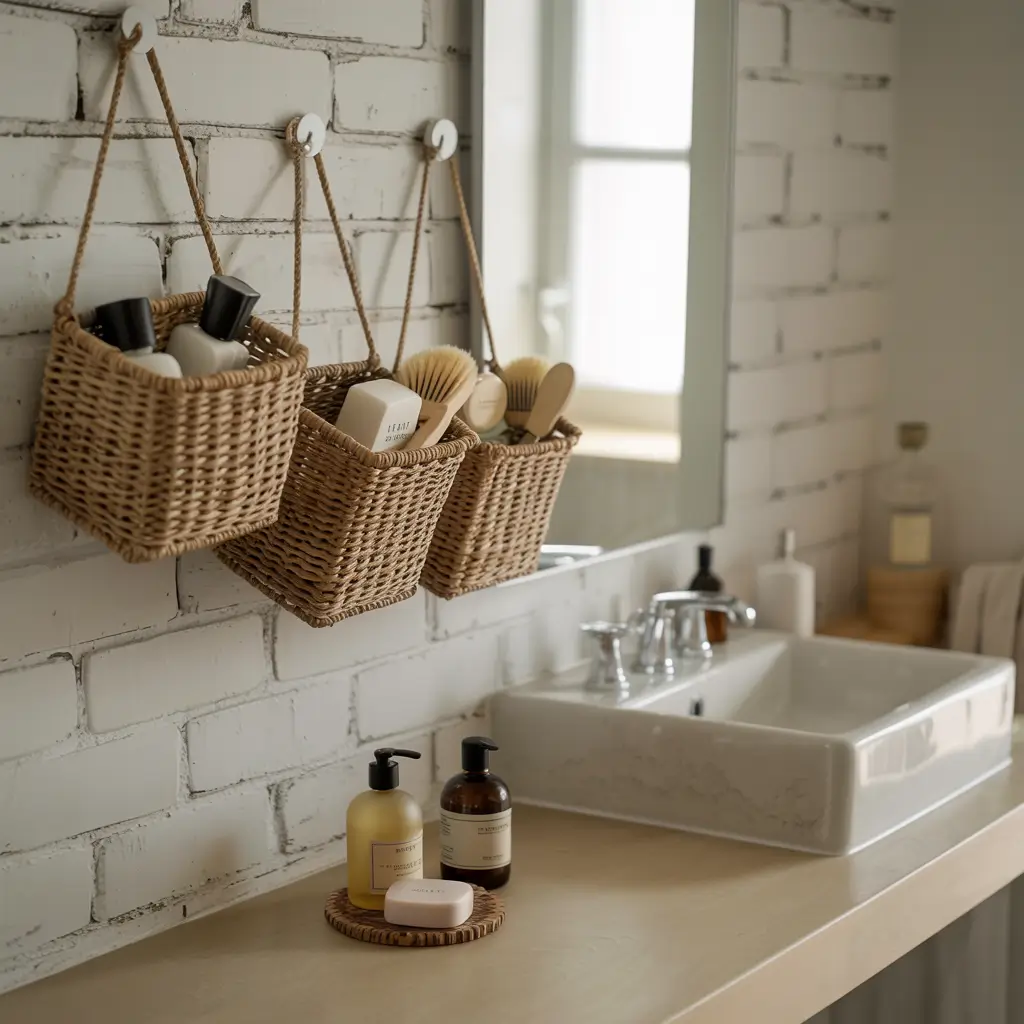
Who says walls are just for looking at? Hanging mesh baskets turn unused wall space into storage gold, and they’re basically foolproof to install. Plus, that mesh design means everything air-dries properly – crucial in humid bathrooms.
I stumbled onto mesh baskets while desperately searching for somewhere to put my hair tools that didn’t involve tangles cords everywhere. Three mesh baskets later, my bathroom walls work harder than I do on Monday mornings.
Strategic Mesh Basket Placement
Location matters more than you’d think:
• Next to the mirror for daily makeup and skincare
• Inside cabinet doors for hidden storage
• Above the toilet for extra supplies
• Near the shower for overflow bath products
My favorite setup uses three baskets of different sizes mounted vertically. The large bottom basket holds hair tools, the medium one manages skincare, and the small top basket catches all those random items like hair ties and bobby pins. Total cost? Under $25 for all three baskets and mounting hardware.
Also Read: 10 Genius Bathroom Organization Under Sink Ideas for Clean Spaces
4. Magnetic Strip for Metal Tools
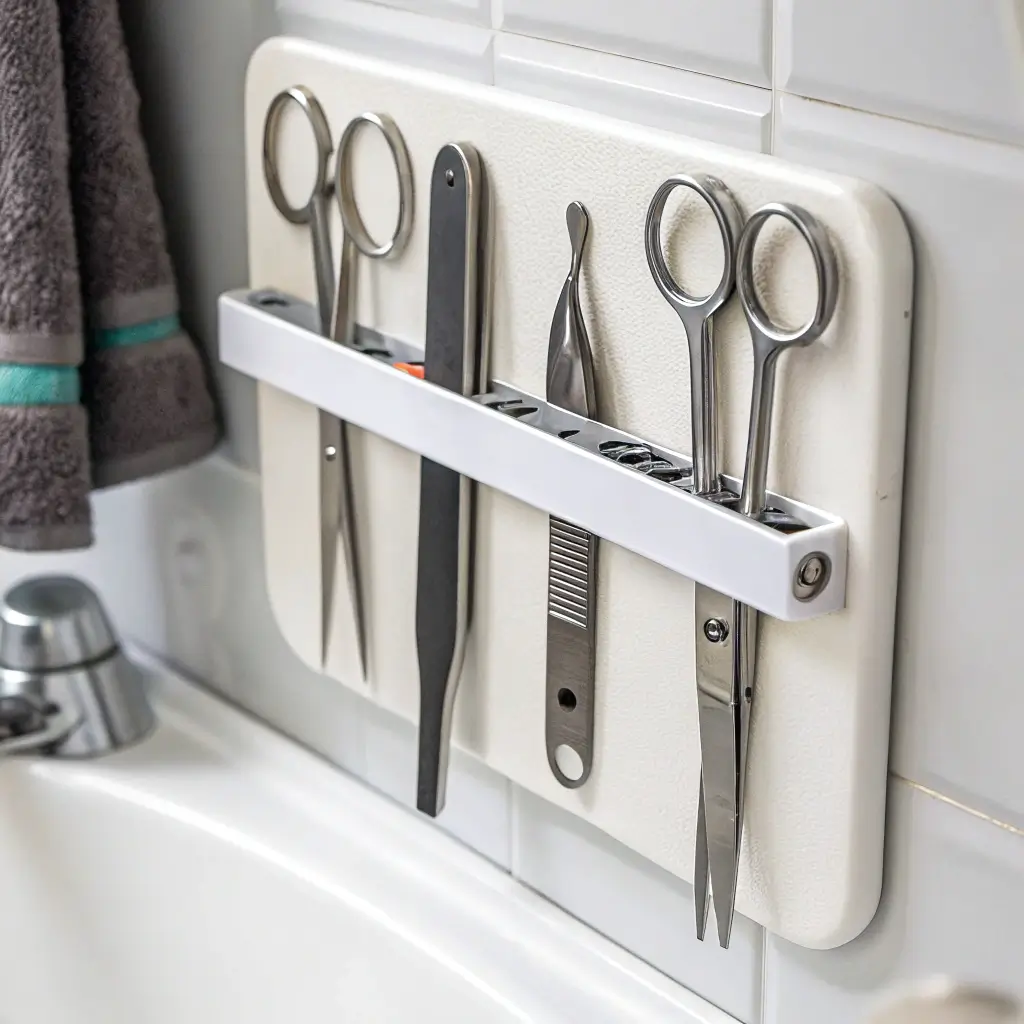
Okay, this one’s genius and I can’t believe more people don’t do it. A simple magnetic strip holds all your metal tools – tweezers, nail clippers, scissors, bobby pins – right where you need them. No more digging through drawers!
I discovered this hack accidentally when I bought a magnetic knife strip for my kitchen but ordered two by mistake. Instead of returning it, I slapped it inside my medicine cabinet. Game. Changer. Every metal tool now has its designated spot, and I haven’t lost tweezers since.
Magnetic Strip Installation Tips
Here’s how to make it work perfectly:
• Mount inside cabinet doors for hidden storage
• Position at eye level for easy grabbing
• Space items out to prevent clustering
• Choose strong magnets – weak ones drop everything (trust me)
The strip I use costs about $10 and holds everything from nail tools to that tiny screwdriver for fixing glasses. Pro tip: stick a small metal tin on the strip to hold bobby pins and hair clips. It’s like inception for organization.
5. Lazy Susan for Toiletries
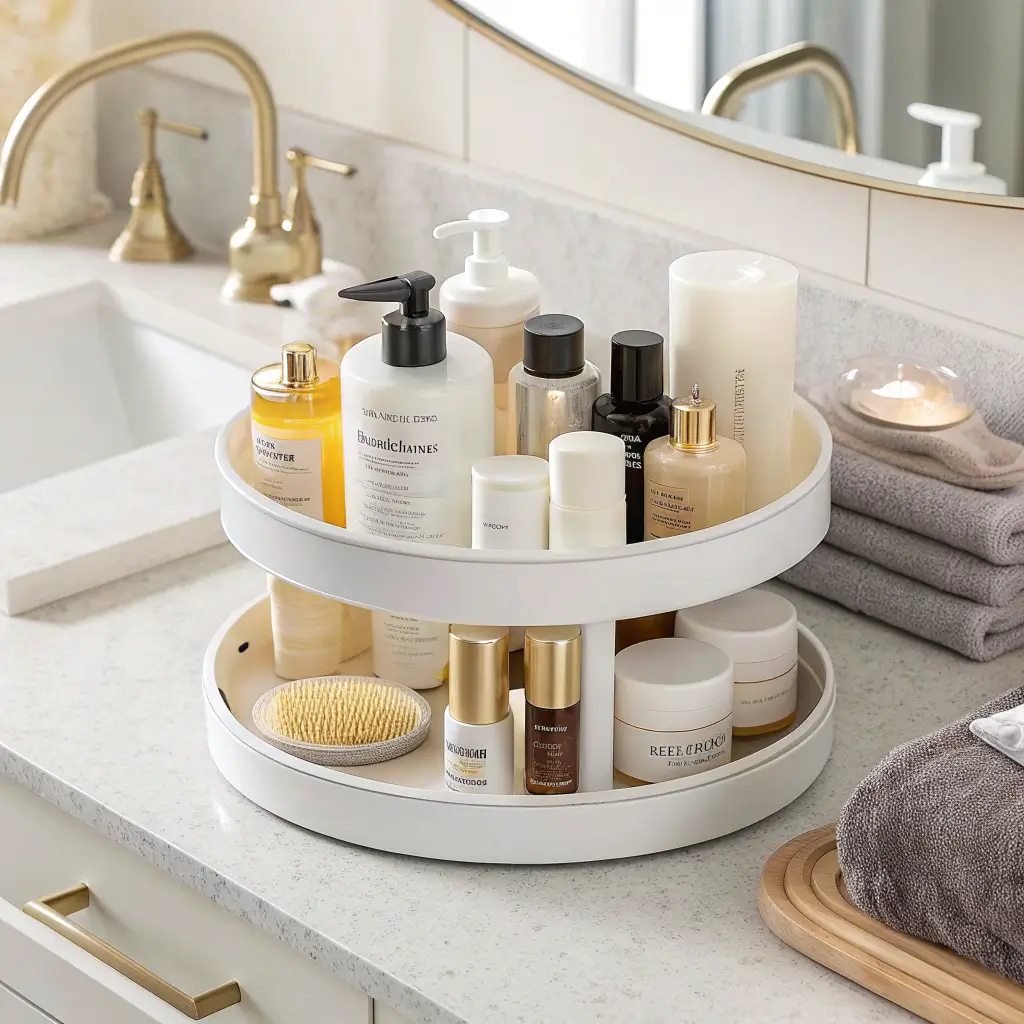
Remember when Lazy Susans revolutionized kitchen cabinets? Well, they’re about to revolutionize your bathroom sink area too. One spin brings everything into view – no more knocking over bottles trying to reach that one product in the back.
My Lazy Susan journey started with frustration. Every morning, I’d knock over at least three things reaching for my face wash. A $12 turntable solved this problem instantly. Now everything spins into reach, and my mornings involve significantly less swearing.
Optimizing Your Lazy Susan Setup
Success comes down to smart arrangement:
• Group similar items together – all hair products in one section
• Arrange by height – tall bottles on the outside
• Use small containers for tiny items that might roll
• Leave some space between items for easy grabbing
I keep two Lazy Susans now – one on the counter for daily products and one under the sink for extras. The counter one is clear acrylic so it doesn’t visually clutter the space. The under-sink version is basic white plastic because nobody sees it anyway 🙂
6. Clear Acrylic Drawer Dividers
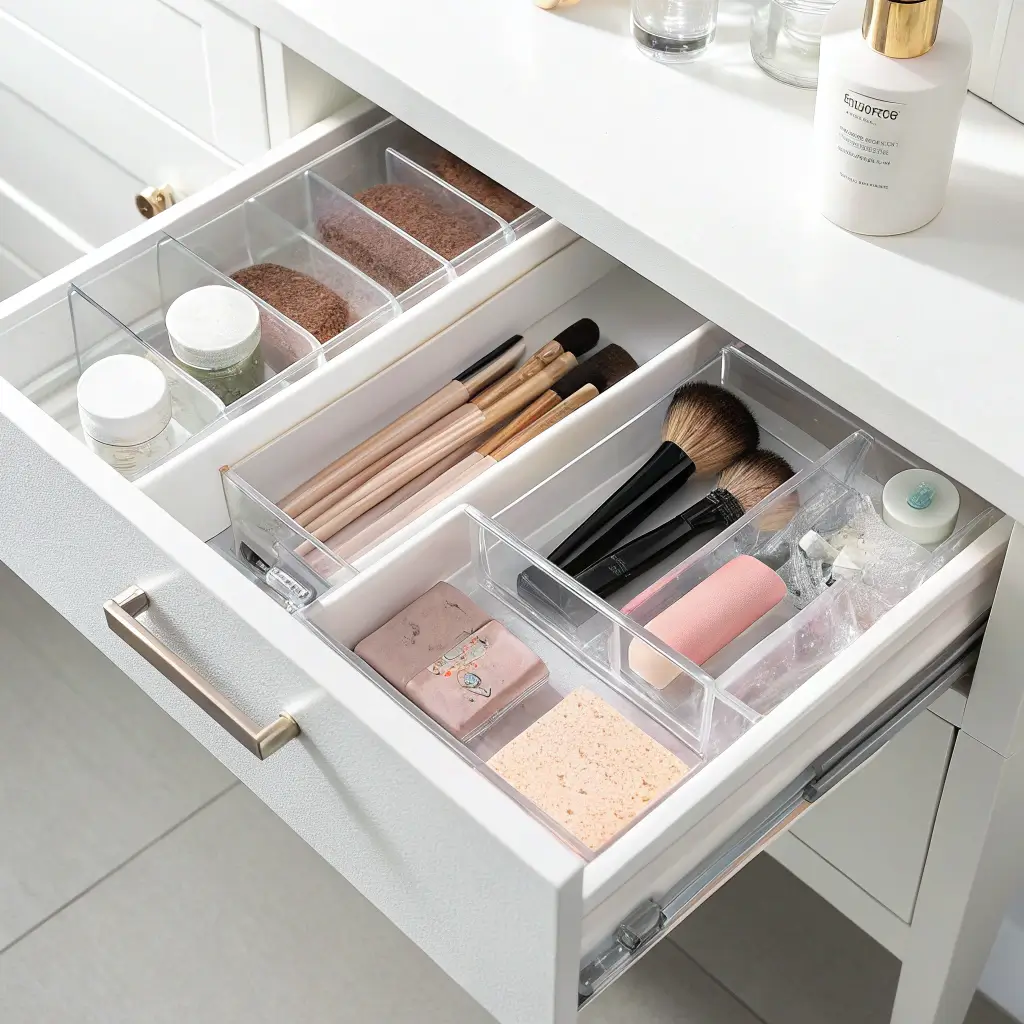
Drawers without dividers are where good intentions go to die. Clear acrylic dividers create defined spaces for everything, and the transparency means you never lose track of what’s where.
I resisted drawer dividers for years, thinking I could just… be organized without them. Spoiler alert: I couldn’t. The day I installed adjustable acrylic dividers, my bathroom drawers went from chaos to calm. Every item has its zone, and somehow, everyone in my house actually respects the system.
Creating Your Perfect Drawer Layout
The trick is customizing to your actual needs:
• Measure your drawers first – don’t guess dimensions
• Start with larger sections then subdivide as needed
• Dedicate sections by category – dental, hair, skincare
• Leave room for growth – your collection will expand
My top drawer uses four dividers creating five sections: toothbrush/toothpaste, floss/mouthwash, hair ties/clips, everyday makeup, and miscellaneous small items. The dividers cost about $20 for a set, and they’re completely adjustable as needs change.
Also Read: 12 Modern Pedestal Sink Bathroom Ideas for Apartments
7. Over-the-Sink Shelf Rack
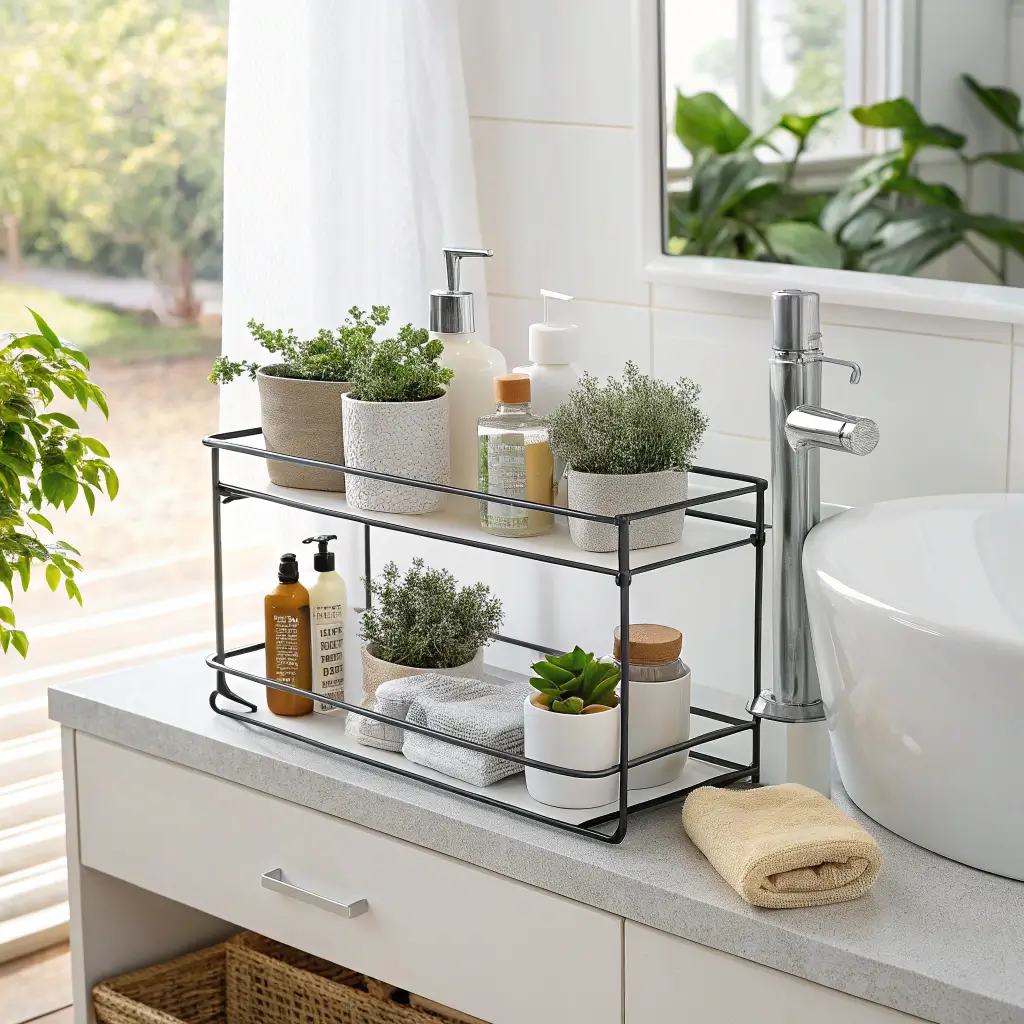
Vertical space above your sink is prime real estate that most of us ignore. An over-the-sink shelf instantly doubles your storage without taking up any counter space. It’s like finding free square footage in your bathroom.
I installed my over-sink shelf after watching my counter gradually disappear under products. This simple addition created room for everything that used to crowd the counter – hand soap, lotion, even a small plant that somehow survives the bathroom humidity.
Choosing the Right Over-Sink Storage
Not all shelf racks are created equal:
• Expandable width to fit different sink sizes
• Rust-resistant coating for bathroom moisture
• Multiple tiers for maximum storage
• Non-slip feet to protect your counter
My current shelf has two tiers and expands from 16 to 27 inches. The bottom shelf holds daily essentials while the top manages decorative items and overflow storage. Best $30 I’ve spent on bathroom organization, hands down.
8. Mason Jar Cosmetic Holders
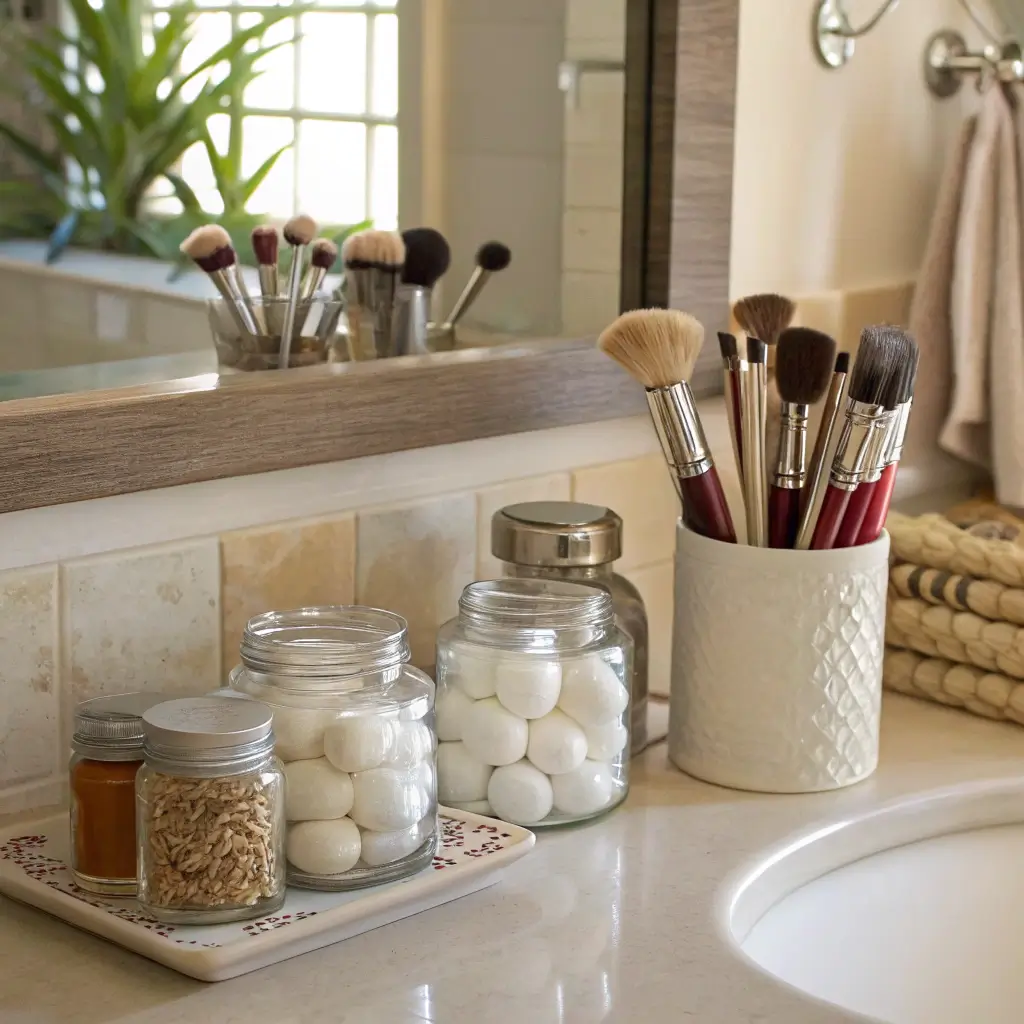
Mason jars aren’t just for Pinterest crafts and hipster restaurants anymore. These versatile containers make perfect bathroom organizers, and they look way more expensive than they actually are.
My mason jar phase started ironically – I was making fun of how everything becomes “mason jar something” these days. Then I tried using them for makeup brushes and… yeah, I’m converted. They’re the perfect height, easy to clean, and weirdly satisfying to look at.
Mason Jar Organization Ideas
Get creative with your jar setup:
• Different sizes for different items (brushes vs cotton swabs)
• Add labels for that organized-person aesthetic
• Paint the lids to match your bathroom decor
• Group in a wooden tray for easy moving
I use three mason jars on my counter: large for makeup brushes, medium for toothbrushes (each person gets their own section), and small for lip products. Total investment? About $10 for jars that’ll last forever.
9. Wall-Mounted Toothbrush Organizer
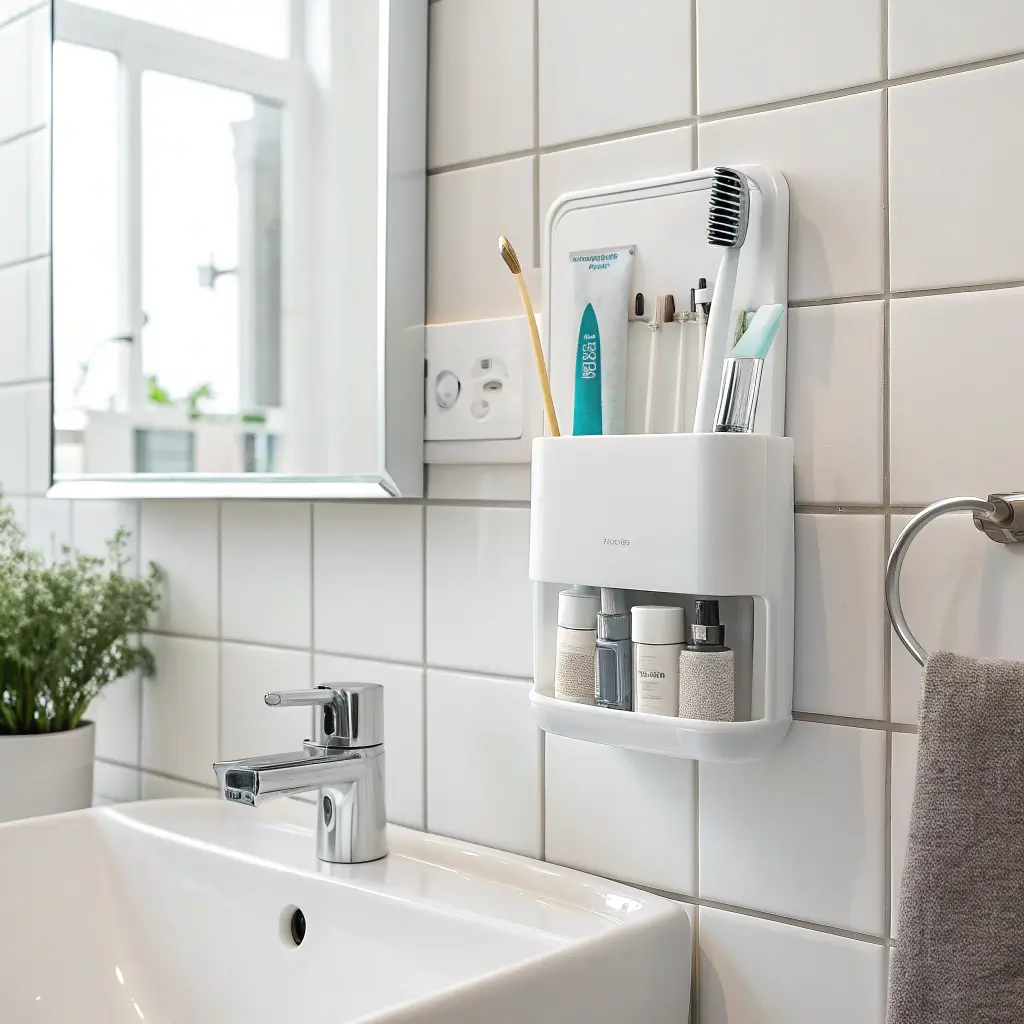
Can we talk about how toothbrush holders take up valuable counter space for literally no reason? Wall-mounted organizers free up that space while keeping toothbrushes more hygienic (no counter germs!).
I switched to wall-mounted after reading some horrifying article about bathroom bacteria. Now our toothbrushes live safely on the wall, and I’ve reclaimed about 6 square inches of counter space. Doesn’t sound like much until you’re working with a tiny bathroom.
Wall-Mount Installation Without Drama
Here’s how to do it right:
• Choose the right location – near the sink but not in splash zones
• Consider height – accessible for all users
• Use quality mounting – adhesive for renters, screws for permanence
• Include toothpaste storage – get an all-in-one unit
My organizer holds four toothbrushes plus toothpaste, all mounted inside the medicine cabinet door. Out of sight, off the counter, still convenient. FYI, the adhesive versions actually work if you follow the instructions about cleaning the surface first.
Also Read: 10 Beautiful Double Sink Bathroom Vanity Ideas for Family Bathrooms
10. Pull-Down Cabinet Door Hooks
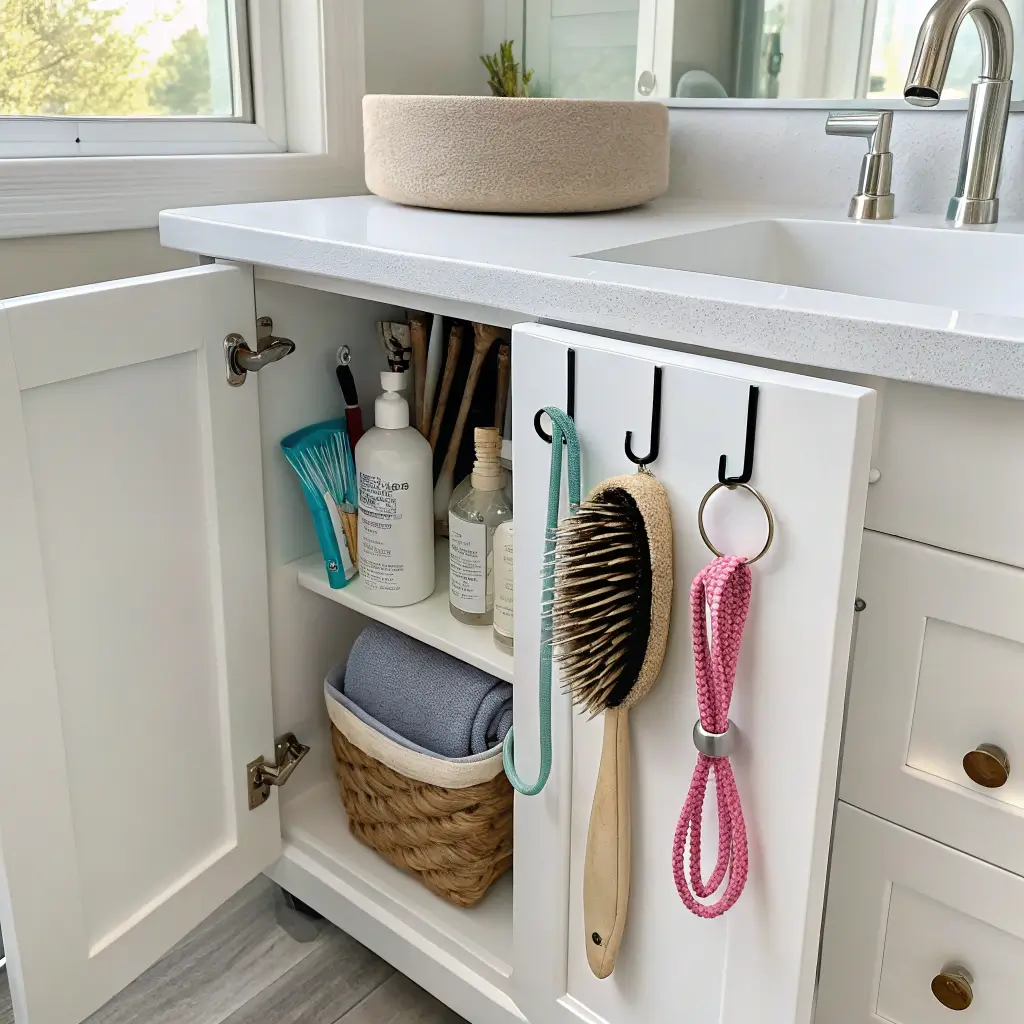
The inside of cabinet doors is basically free storage that everyone ignores. Pull-down hooks maximize this space for everything from hair tools to cleaning supplies.
I discovered door hooks during a particularly frustrating morning when my hair dryer cord tangled with everything else under the sink. Installing hooks on the cabinet door created dedicated spots for all my tools, and the pull-down feature means they’re actually accessible.
Smart Hook Placement Strategy
Make every hook count:
• Vary heights for different tool sizes
• Leave cord room – tools need space to hang properly
• Group by frequency – daily items at eye level
• Consider weight – heavy items need sturdy hooks
My setup includes four hooks: hair dryer, flat iron, curling wand, and one for cleaning gloves (random but useful). The whole system cost about $15 and took five minutes to install.
11. Stackable Bins for Small Items
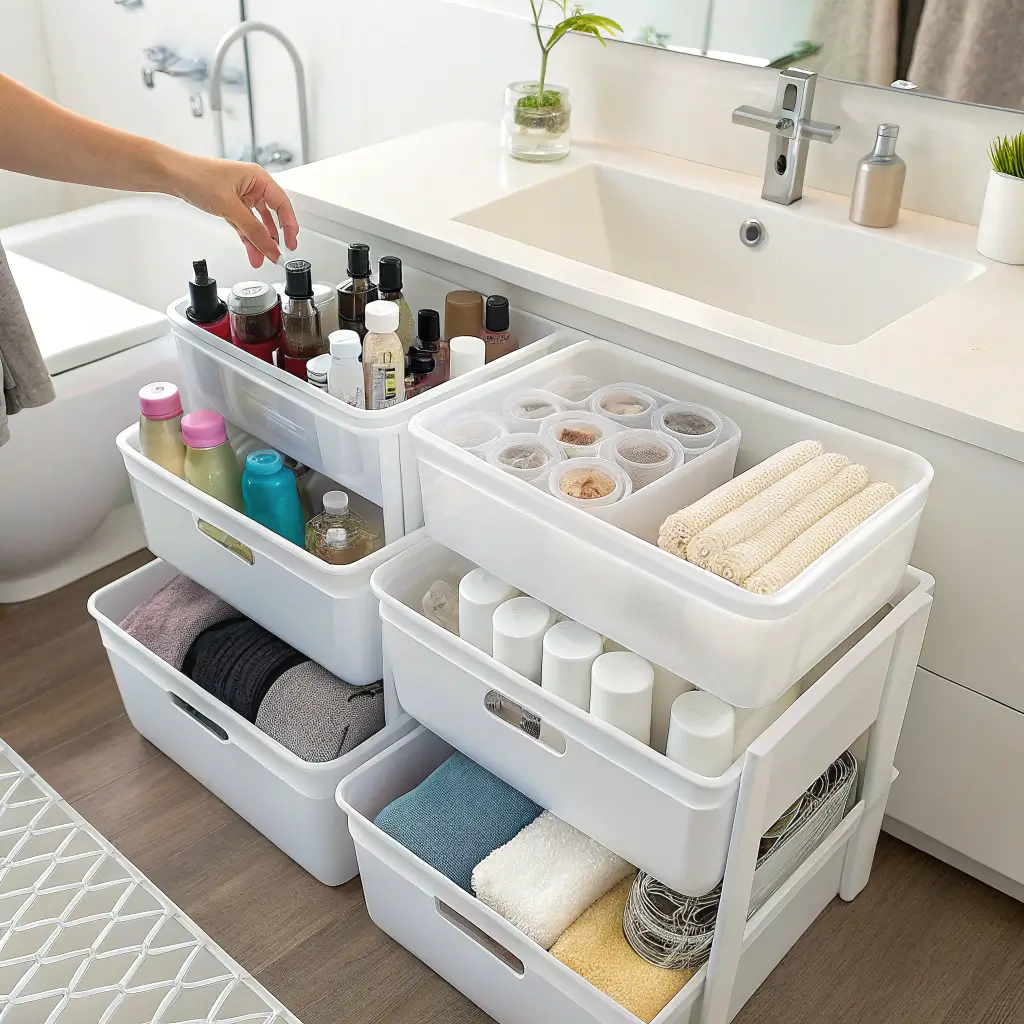
Small items are the enemy of bathroom organization. Bobby pins, hair ties, cotton swabs – they all end up everywhere except where they should be. Stackable bins contain the chaos while keeping everything visible and accessible.
I went through approximately 47 different small-item solutions before landing on stackable bins. These modular containers grow with your needs and can be reconfigured whenever your storage requirements change.
Building Your Stackable System
Start simple and expand:
• Begin with 3-4 bins to avoid overwhelming yourself
• Label everything – future you will thank present you
• Stack by frequency – daily items on top
• Keep bins shallow – deep bins become junk drawers
My current tower has five bins: hair accessories, dental care extras, first aid basics, nail care, and random bathroom stuff (we all have that category). Each bin costs about $3, making this incredibly budget-friendly.
12. Minimalist Floating Counter Tray
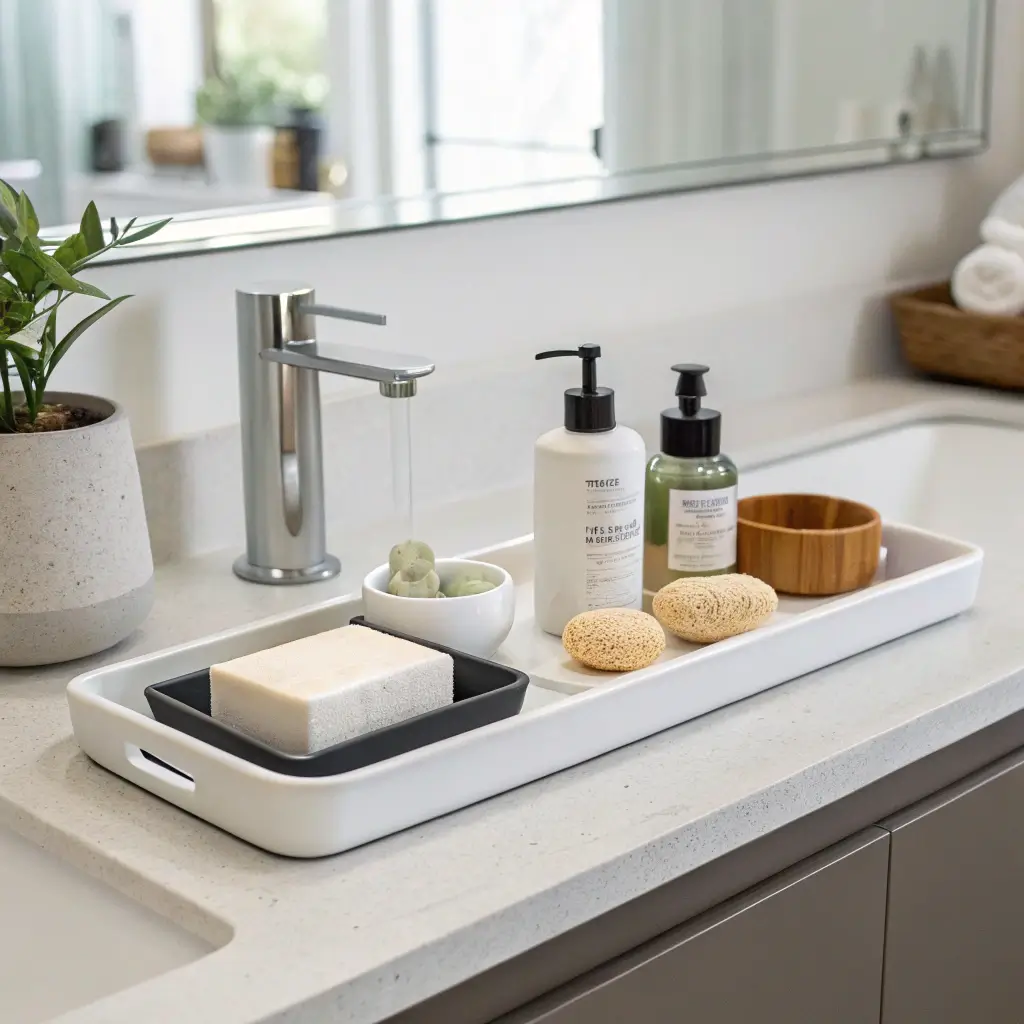
Sometimes the best organization is the simplest. A single floating tray on your counter creates a defined space for daily essentials while maintaining that clean, minimal aesthetic everyone wants but nobody achieves.
I fought the minimalist trend for years because I thought it meant getting rid of everything. Turns out, minimalist organization just means being intentional about what stays visible. My floating tray holds exactly five items – the things I use every single day.
Creating Your Minimalist Setup
Less really is more:
• Choose a tray that fits your counter – not too big, not too small
• Limit items ruthlessly – only true daily essentials
• Maintain empty space – the tray shouldn’t be full
• Hide everything else – out of sight but still organized
My tray holds face wash, moisturizer, toothbrush holder, hand soap, and one decorative item (currently a tiny succulent that’s somehow still alive). Everything else lives in organized hiding spots. The mental calm from this setup? Priceless.
Making Your Bathroom Sink Organization Stick
So there you have it – 12 bathroom sink organization ideas that actually work in real bathrooms with real people making real messes every day.
The secret to success isn’t implementing all of these at once. Pick one or two that address your biggest pain points and start there.
For me, the game-changers were the tiered tray and wall-mounted toothbrush holder. They solved my two biggest issues: counter clutter and the morning product shuffle.
Your game-changers might be completely different, and that’s exactly how it should be.
Remember, the best organization system is the one you’ll actually maintain. Don’t create something so complex that keeping it up becomes another chore on your already endless list.
Start small, build gradually, and adjust as you figure out what works for your specific bathroom situation.
Here’s my challenge: pick one idea from this list and implement it this week. Just one.
That single change will motivate you to tackle another, and before you know it, your bathroom sink area will be the organized oasis you’ve been dreaming about.
And when you finally achieve that perfectly organized bathroom sink? Take a moment to appreciate it every morning.
Because starting your day in an organized space instead of chaos? That’s the kind of small victory that makes everything else feel more manageable. Trust me on this one – your future stressed-out self will thank you.