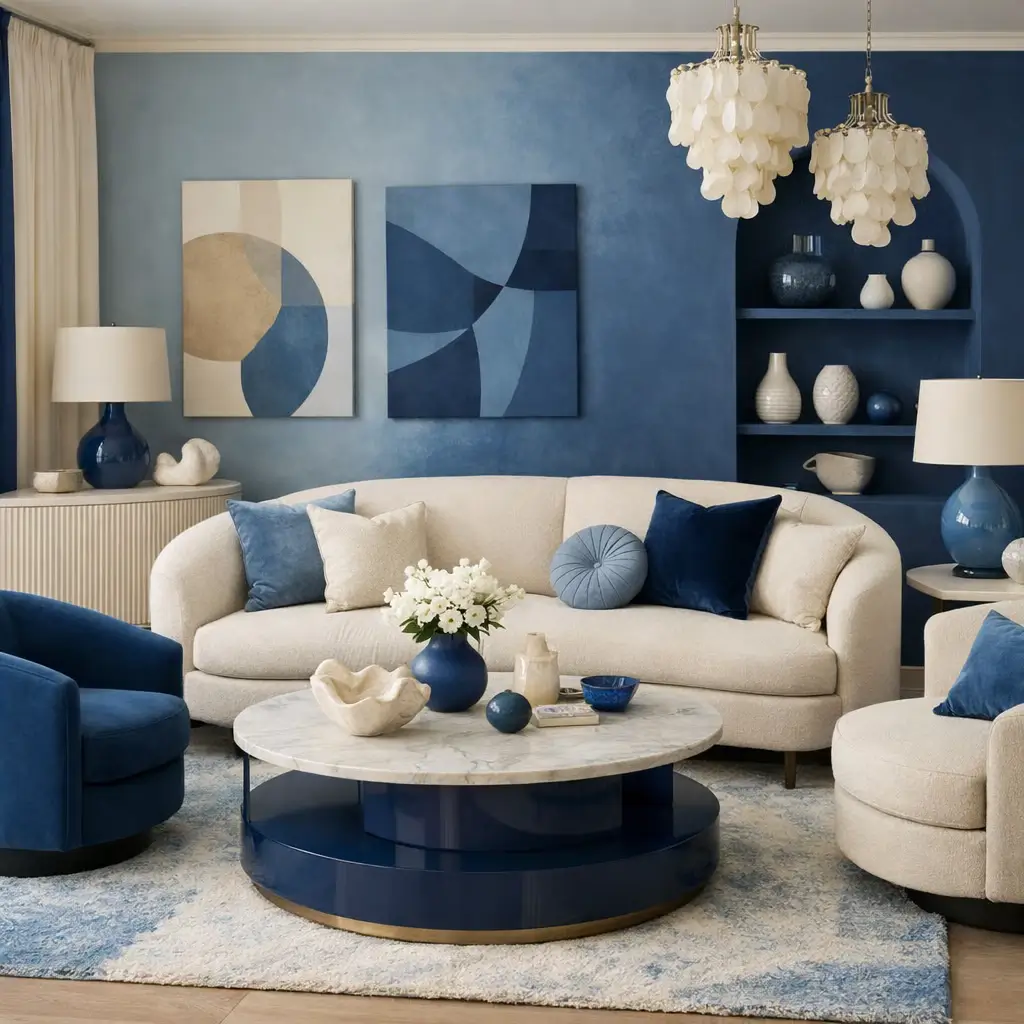
12 Inspiring Aesthetic Room Decor DIY Ideas for Every Room
- Bedroom Design
 Ben
Ben- 0
- 71 minutes read

Your room is basically screaming for help, and scrolling through aesthetic room TikToks at 2 AM isn’t actually decorating.
Trust me, I’ve been there—saving approximately 847 pins to a board called “Dream Room” while my actual room looked like a beige nightmare with commitment issues.
Here’s the thing about creating an aesthetic room: you don’t need to drop your entire paycheck at Urban Outfitters or possess some supernatural crafting gene.
After transforming my own space from “where creativity goes to die” to something that actually makes me excited to wake up (a miracle, honestly), I’ve learned that aesthetic vibes come from intentional DIY projects, not expensive shopping sprees.
Whether you’re chasing that cozy boho aesthetic, minimalist zen, or dark academia vibes, these 12 aesthetic room decor DIY ideas will help you create a space that looks like you hired a designer but actually just spent a few creative weekends getting crafty.
Let’s turn that basic room into the aesthetic sanctuary you’ve been dreaming about.
1. Macrame Wall Hanging Art
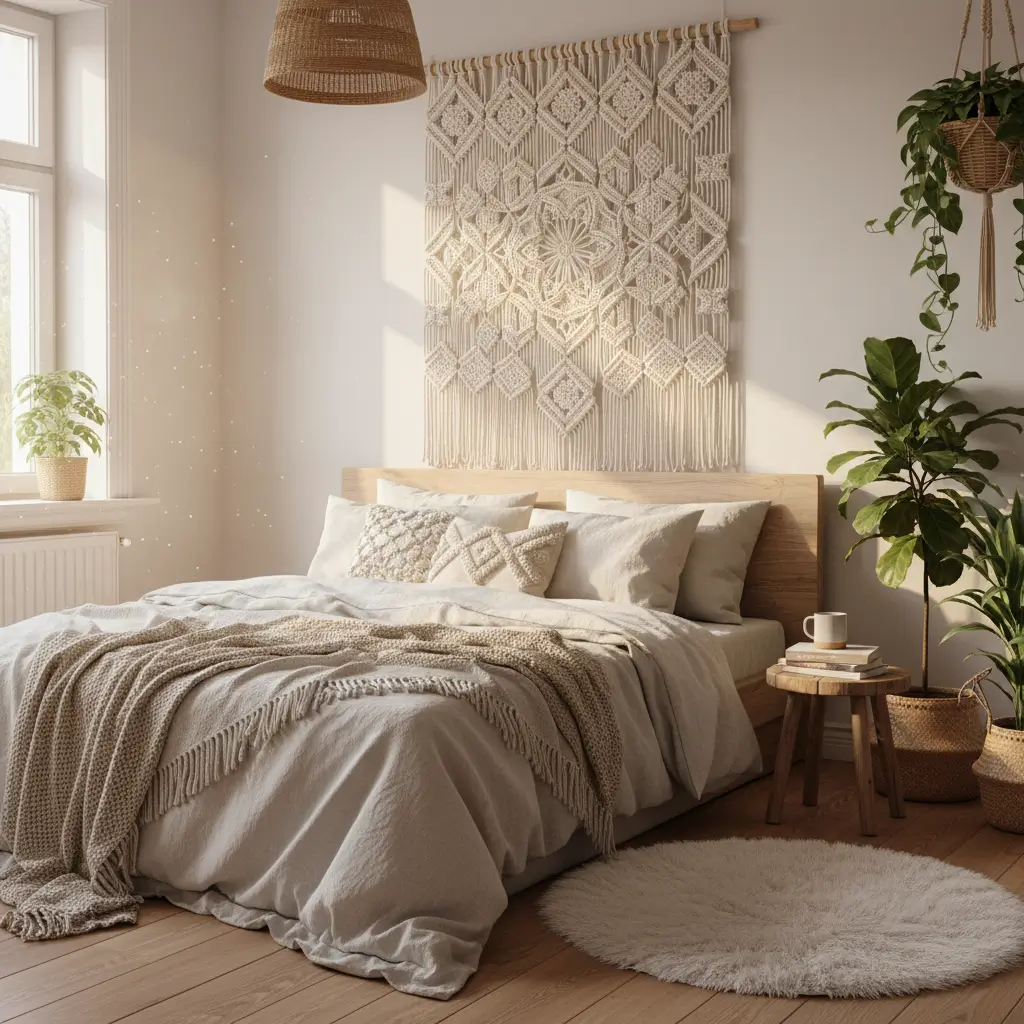
Let’s start with the craft that single-handedly brought back the 70s in the best way possible. Macrame wall hangings are like the little black dress of aesthetic room decor—they work with basically every vibe and instantly make your space look more intentional.
Why Macrame Hits Different
Macrame creates instant texture and dimension on those sad blank walls that have been judging you. The boho vibes are immaculate, and there’s something weirdly therapeutic about knotting rope into beautiful patterns while listening to your favorite playlist.
I’ll be honest—my first macrame attempt looked like a rope had a nervous breakdown. But here’s the secret: you literally only need to learn three basic knots, and suddenly you’re creating art. My current wall hanging gets more compliments than anything I’ve actually purchased, and people assume I paid big money for it. Nope, just $15 in supplies and a YouTube tutorial.
Getting Started Without Losing Your Mind
Essential supplies that won’t break the bank:
- Cotton macrame cord (start with 3mm or 4mm thickness)
- Wooden dowel or driftwood for that natural vibe
- Scissors (the sharper, the better)
- Measuring tape (or just eyeball it like I do)
- Patience (not sold in stores, unfortunately)
Beginner-Friendly Patterns
Start simple and level up:
- Basic wall hanging with fringe (easiest starter)
- Simple plant hanger (dual purpose!)
- Small keychain to practice knots
- Feather design (looks complex, actually isn’t)
- Mini dreamcatcher hybrid
Making It Uniquely Yours
Customization ideas that slap:
- Dye the cord with natural dyes for custom colors
- Add wooden beads for boho texture
- Incorporate dried flowers or pampas grass
- Mix different cord thicknesses
- Create ombre effects with gradient colors
- Add small mirrors or crystals
Ever wonder why macrame suddenly feels modern again? It’s all about the styling—pair it with minimalist furniture and contemporary colors, and boom, it’s 2024, not 1974.
2. Floating Bookshelf with LED Lights
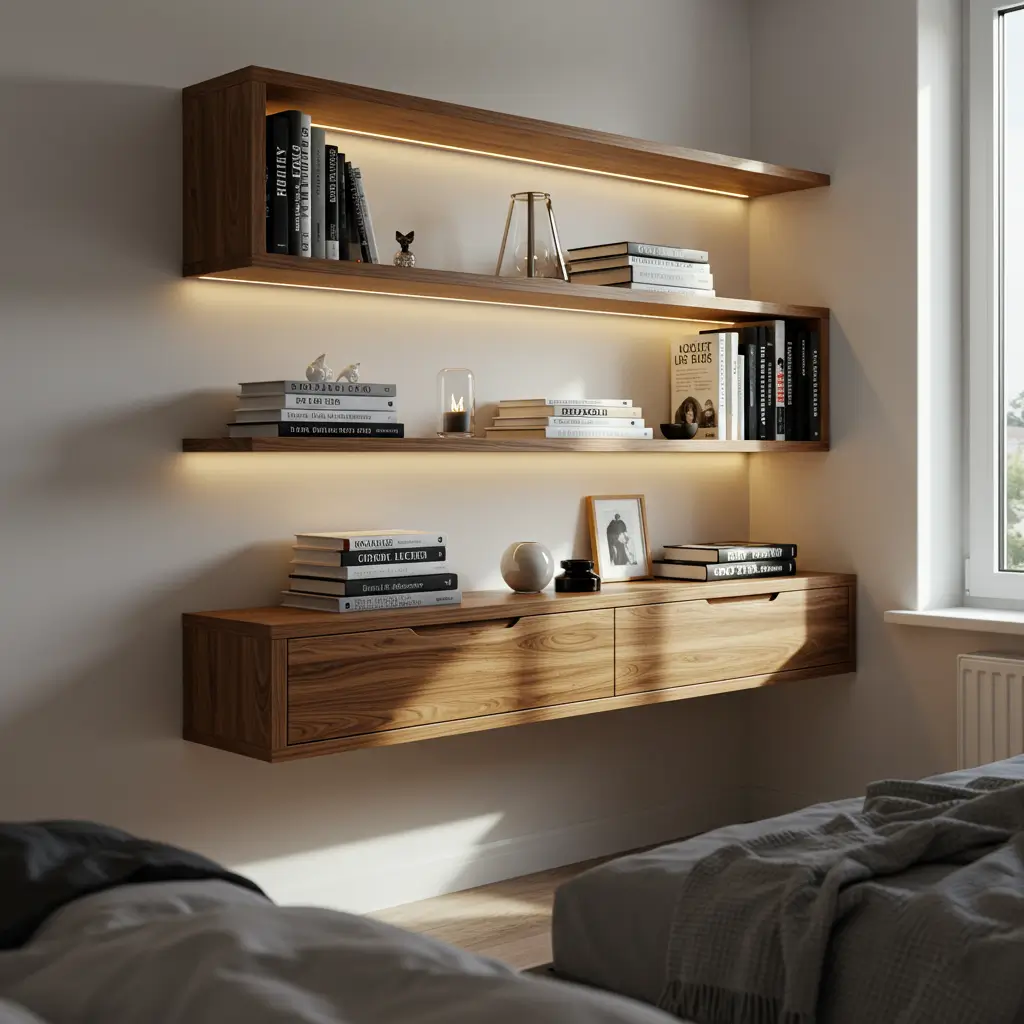
Floating bookshelves are cool. Floating bookshelves with LED lights underneath? That’s next-level aesthetic energy that makes your book collection look like it belongs in a modern art museum.
The Glow-Up Your Books Deserve
LED-lit shelves create ambient lighting that transforms your space from “I live here I guess” to “this is my curated sanctuary.” The soft glow makes everything look more expensive and intentional, even if your book collection is 90% unread self-help books (no judgment).
I installed LED strips under my floating shelves last year, and my room went from needing all the overhead lights to having this perfect warm glow that actually helps me wind down at night. My electricity bill also thanks me for using 10% of the energy.
Installation Made Simple
You’ll need:
- Floating shelf brackets (hidden mount type)
- Wooden boards cut to your desired length
- LED strip lights (warm white for cozy vibes)
- Adhesive or small screws for LED attachment
- Level (unless you like crooked shelves)
Styling Your Lit Shelves
Make them Instagram-worthy:
- Alternate books with decorative objects
- Use bookends that match your aesthetic
- Add small plants for life and color
- Display your favorite crystals or trinkets
- Create height variation with stacked books
- Leave intentional empty space (negative space is aesthetic)
LED Strip Pro Tips
Getting the lighting right:
- Choose warm white over cool white for coziness
- Hide the power cord behind books or furniture
- Use a remote-controlled strip for easy adjustments
- Consider color-changing LEDs for mood flexibility
- Cut strips to exact shelf length for clean look
3. DIY Neon Light Signs

Real neon signs cost approximately one kidney. DIY neon signs using LED neon rope? Way cheaper and you keep both kidneys. Plus, nothing says “aesthetic room” quite like a glowing neon sign with your favorite quote or symbol.
Custom Neon Without the Price Tag
LED neon rope lets you create custom signs that look exactly like real neon but cost a fraction of the price. You can literally spell out anything—your name, favorite lyrics, motivational quotes, or just pretty shapes that make you happy.
My DIY neon “good vibes only” sign cost $30 and three hours of careful bending. The equivalent real neon sign? $300+. The satisfaction of making it myself and everyone asking where I bought it? Priceless.
Materials for Faux Neon
Shopping list:
- LED neon rope light in your chosen color
- Clear acrylic board for mounting
- Wire or zip ties for securing rope
- Power adapter (usually included)
- Pencil for sketching design
- Strong adhesive or small clips
Design Ideas That Work
Popular aesthetic options:
- Cursive words or phrases
- Simple line drawings (moon, star, heart)
- Zodiac symbols
- Music notes or headphones
- Lightning bolts or clouds
- Your initials in fancy script
Assembly Tips
Making it look professional:
- Sketch your design on the acrylic first
- Work slowly when bending the rope
- Secure rope at regular intervals
- Hide connection points strategically
- Test the light before final mounting
- Consider dimmer switches for ambiance control
Also Read: 10 Unique DIY Crafts Room Decor Ideas for a Trendy
4. Boho Tassel Garland
Tassel garlands are the decorative confetti of the aesthetic room world—they add movement, color, and that effortless boho charm that makes spaces feel lived-in and loved.
The Power of Playful Texture
Tassel garlands create visual interest without overwhelming your space. They’re perfect for those who want color and personality but don’t want to commit to painting walls or buying furniture. Plus, making them is oddly meditative and satisfying.
I made my first tassel garland during a rainy weekend when I was bored out of my mind. Used yarn I already had, spent two hours making tassels while binge-watching a show, and suddenly had decor that people genuinely thought I’d bought from some expensive boutique. The trick? Making enough tassels that it looks intentional, not sad.
Creating Your Garland
Simple supplies needed:
- Yarn or embroidery floss in your color palette
- Twine or ribbon for stringing tassels
- Scissors for cutting
- Cardboard (optional, for consistent tassel sizes)
Tassel-Making Basics
The process is easier than you think:
- Wrap yarn around your hand or cardboard
- Tie off the top to secure
- Cut the bottom loops
- Wrap a piece near the top for the “head”
- Trim ends evenly
- Repeat until you hate yourself or have enough
Styling Your Garland
Perfect placement ideas:
- Above bed as headboard accent
- Across window for boho curtain vibes
- On walls to create visual lines
- Draped over mirrors or frames
- Along shelves for color pops
- In doorways for whimsical transitions
Color Combination Magic
Aesthetic palette ideas:
- Neutrals with one pop color
- Ombre effect from light to dark
- Rainbow for maximalist vibes
- Monochrome in different textures
- Pastels for soft aesthetic
- Earth tones for natural boho
FYI, the “perfectly imperfect” look is what makes handmade tassels charming. Embrace the wonkiness—it’s called character.
5. Resin-Coated Decorative Trays
Resin crafts look intimidating, but decorative trays are actually a perfect beginner project. You get to create custom pieces that look like expensive art while organizing your chaos.
Functional Art You Can Actually Use
Resin trays combine beauty and utility in a way few other DIY projects achieve. They hold your jewelry, crystals, or whatever aesthetic trinkets you’ve collected while looking like museum pieces.
My resin journey started with watching too many satisfying resin videos on TikTok at midnight. Three weeks later, I had made trays for myself, my friends, and possibly some strangers (gifts got out of hand). The process is genuinely fun once you get over the fear of messing up.
Resin Basics for Beginners
What you’ll need:
- Epoxy resin kit (read instructions carefully)
- Silicone mold or form for shaping
- Decorative elements (dried flowers, glitter, shells)
- Mixing cups and stir sticks
- Protective gear (gloves, ventilation)
- Level surface for curing
Design Ideas That Impress
Creative combinations:
- Pressed flowers with gold leaf
- Geode-inspired with alcohol inks
- Ocean waves with blue pigments
- Glitter and iridescent flakes
- Embedded crystals or stones
- Marble effect with white and gold
The Resin Process
Step by step:
- Prepare your mold and decorations
- Mix resin according to package directions
- Pour first layer, add decorations
- Pour final layer to seal
- Remove bubbles with heat gun or torch
- Let cure for 24-72 hours
- Demold and admire your creation
Safety First
Don’t skip these:
- Work in well-ventilated area
- Wear gloves (resin sticks to everything)
- Protect your work surface
- Follow mixing ratios exactly
- Don’t rush the curing process
6. Minimalist Wall Grid Organizer
Wall grids are the solution to the eternal struggle between wanting minimalist aesthetics and actually needing to organize your life. They’re functional, stylish, and infinitely customizable.
The Organized Aesthetic
Wall grids let you display and organize without the visual clutter of traditional organizers. Everything has its place, but it looks intentional and curated instead of chaotic.
I installed a wall grid above my desk, and my productivity actually improved because I could see everything I needed without digging through drawers. Plus, it looks like I have my life together, which is a nice illusion to maintain.
Grid Setup Essentials
Materials list:
- Metal grid panel (black or gold are most aesthetic)
- S-hooks or clips for hanging items
- Command strips or wall anchors for mounting
- Small baskets or containers (optional)
- Decorative elements to personalize
What to Display
Functional and pretty items:
- Polaroid photos with clips
- Small plants in hanging containers
- Art supplies in jars
- Jewelry on hooks
- Notes and inspiration cards
- Headphones or small accessories
Styling for Maximum Impact
Make it cohesive:
- Stick to a color scheme
- Balance heavy and light items
- Create zones (work, personal, decor)
- Leave some grid space empty
- Change items seasonally
- Mix functional and decorative
Grid Placement Ideas
Perfect spots:
- Above desk for workspace organization
- Beside bed for nighttime essentials
- In closet for accessories
- By front door for keys and bags
- In kitchen for utensils and recipes
Also Read: 10 Stylish Easy DIY Room Decor Ideas for Modern Rooms
7. Painted Geometric Accent Wall
Accent walls are commitment, but geometric painted designs are commitment with personality. They transform a boring wall into a focal point that defines your entire room’s aesthetic.
The Statement Maker
Geometric walls create visual impact without needing expensive wallpaper or professional painters. It’s you, some tape, paint, and a vision. The result? A custom wall that looks like you hired a designer.
My geometric wall project took one Saturday, $40 in supplies, and approximately seven measurements before I trusted myself to paint. Now it’s the background of every video call, and people constantly ask if it’s wallpaper. Nope, just patience and painter’s tape.
Planning Your Design
Before you paint:
- Sketch your pattern on graph paper first
- Choose 2-3 colors max for cohesion
- Measure and mark lightly with pencil
- Use level and ruler for straight lines
- Start simple if it’s your first time
- Test colors on poster board first
Popular Geometric Patterns
Aesthetic options:
- Mountain ranges (minimalist vibe)
- Color block sections
- Diagonal stripes
- Hexagon honeycomb
- Triangle patterns
- Half-painted walls
- Abstract organic shapes
Painting Process
Getting it right:
- Tape off your design carefully
- Paint base color first
- Let dry completely
- Tape for second color
- Paint and remove tape while wet
- Touch up any bleeds
- Step back and admire
Tape Tips for Clean Lines
Professional-looking results:
- Use quality painter’s tape
- Press edges firmly before painting
- Remove tape at 45-degree angle
- Pull while paint is still slightly wet
- Touch up with small brush if needed
IMO, imperfect lines add character. Don’t stress about making it perfect—the overall effect is what matters.
8. Hanging Plant Display with Rope
Plants make everything better, and hanging plants make everything better while saving precious surface space. DIY rope hangers let you create a vertical garden on any budget.
The Green Aesthetic
Hanging plants add life literally and figuratively to your room. They purify air, boost mood, and make you look like someone who can keep things alive (even if you’re faking it with hardy pothos).
My hanging plant collection started with one macrame hanger and a plant I was convinced would die within a week. Plot twist: both survived, and now I have a mini jungle hanging from my ceiling. My room went from sterile to living ecosystem.
DIY Plant Hanger Styles
Simple to complex:
- Basic rope hanger: Four cords, some knots
- Beaded boho: Add wooden beads
- Minimalist leather: Simple leather straps
- Layered cascade: Multiple plants, one hanger
- Wall-mounted: Attach to wall instead of ceiling
- Shelf-style: Rope creates hanging shelf
Best Plants for Hanging
Low-maintenance winners:
- Pothos (literally cannot kill it)
- Spider plant (produces babies!)
- String of pearls (delicate but tough)
- Philodendron (trailing beauty)
- Succulents in light
- Air plants (no soil needed)
Installation Without Damage
Renter-friendly methods:
- Heavy-duty command hooks
- Tension rods between walls
- Over-door hooks repurposed
- Existing ceiling hooks
- Shepherd’s hooks placed strategically
Creating Plant Vignettes
Styling multiple hangers:
- Vary heights for dimension
- Group in odd numbers
- Mix trailing and upright plants
- Consider sight lines from seating
- Coordinate planter colors
- Ensure adequate light for all
9. DIY Scented Candle Holders
Candles create ambiance, but custom candle holders create ambiance with personality. This project combines aesthetics with aromatherapy for the ultimate cozy vibes.
Glow Up Your Candle Game
Custom candle holders elevate basic candles into decor pieces. The right holder makes even a cheap candle look expensive and intentional. Plus, the process of making them is actually pretty zen.
I started making candle holders after realizing I was buying expensive ones just to hold cheap candles. Now I make holders from thrifted glasses, jars, and random containers, and people assume my whole candle setup cost a fortune. The secret? It’s all about the styling.
Materials and Methods
Creative holder ideas:
- Painted glass jars: Use glass paint for custom colors
- Concrete holders: Modern industrial vibes
- Clay and pottery: Hand-molded personal touch
- Wrapped with twine: Rustic boho aesthetic
- Pressed flowers: Delicate vintage look
- Geometric wire: Minimalist modern
Safety Considerations
Don’t burn your house down:
- Use heat-resistant materials
- Ensure stability (no tipping)
- Keep away from flammables
- Never leave candles unattended
- Use proper candle sizes for holders
- Consider LED candles for worry-free ambiance
Styling Candle Displays
Creating candle vignettes:
- Group in odd numbers (3, 5, 7)
- Vary heights and sizes
- Place on decorative trays
- Surround with complementary decor
- Consider mirror placement for reflection
- Use unscented and scented strategically
Personalization Ideas
Making them uniquely yours:
- Add dried flowers to wax surface
- Paint custom designs
- Wrap with ribbon or fabric
- Add crystals around base
- Use themed colors for seasons
- Include personal symbols or initials
Also Read: 12 Stylish Room Decor Ideas DIY Ideas to Try Today
10. Washi Tape Wall Patterns
Washi tape is basically magic in roll form—it’s removable, repositionable, comes in infinite patterns, and requires zero artistic skill to create impressive wall designs.
The Commitment-Free Art
Washi tape lets you be bold without permanence. Hate it tomorrow? Peel it off. Want to change it seasonally? Go ahead. It’s the perfect solution for renters, commitment-phobes, and anyone who changes their mind as often as I do (which is constantly).
My washi tape wall started as a “I’ll just try this one pattern” experiment and evolved into a full geometric installation. Cost: $15 for tape. Time: one afternoon. Compliments received: too many to count. The best part? I can change it whenever I want.
Creative Washi Tape Designs
Pattern possibilities:
- Geometric shapes: Triangles, hexagons, diamonds
- Faux frames: Outline spaces like picture frames
- Headboard alternative: Create bed backdrop
- Quote displays: Spell out words or phrases
- Grid patterns: Modern and architectural
- Border accents: Frame walls or doors
- Abstract art: Free-form creative designs
Application Tips
Getting it right:
- Plan design with pencil marks first
- Use level for straight lines
- Press firmly as you apply
- Overlap corners neatly
- Step back frequently to check
- Start small if you’re nervous
Where to Use Washi Tape
Beyond walls:
- Furniture edges for color pops
- Light switches as accents
- Mirror frames for decoration
- Laptop or phone cases
- Notebooks and planners
- Door frames for definition
Removal and Changes
The beauty of temporary:
- Peels off cleanly (usually)
- Test on small area first
- Remove slowly at an angle
- Clean any residue with rubbing alcohol
- Change designs seasonally
- Experiment without fear
11. Fabric-Covered Bulletin Board
Bulletin boards don’t have to scream “office supply store.” Cover them in fabric that matches your aesthetic, and suddenly they’re functional art that organizes your life.
Organized Meets Aesthetic
Fabric-covered boards combine pretty and practical in a way few other items achieve. They hold your photos, notes, and inspiration while looking like intentional decor instead of an afterthought.
My bulletin board transformation involved a yard of fabric, a staple gun, and decorative pins I definitely overpaid for. But now my collection of concert tickets, polaroids, and random inspiration sits on something beautiful. The organized chaos finally looks intentional.
Creating Your Board
Simple process:
- Choose cork or foam board as base
- Select fabric matching your aesthetic
- Wrap and staple fabric around back
- Add decorative trim (optional)
- Mount on wall with appropriate hardware
- Style with coordinating pins
Fabric Selection Strategy
Choose wisely:
- Match your room’s color palette
- Consider pattern scale for size
- Think about long-term appeal
- Cotton works best for wrapping
- Avoid stretchy fabrics
- Pre-wash fabric to prevent shrinking
Functional Styling
Using boards effectively:
- Create zones (tasks, memories, inspiration)
- Update regularly to keep fresh
- Use washi tape to make sections
- Include small pockets or hooks
- Mix photos with functional notes
- Leave intentional white space
Alternative Board Ideas
Beyond basic rectangle:
- Hexagon shape: Modern geometric
- Circle: Soft and unexpected
- Multiple small boards: Grid display
- Map background: Travel memories
- Photos printed on fabric: Ultra personal
12. Mason Jar Fairy Light Lanterns
Mason jars and fairy lights are the peanut butter and jelly of aesthetic room decor. Together, they create magical ambient lighting that makes any space feel cozy and intentional.
The Ultimate Cozy Creator
Fairy light lanterns transform basic jars into glowing orbs of ambiance. They’re perfect for people who hate harsh overhead lighting (me) and love atmosphere that doesn’t require effort.
I made my first set during winter when my room felt like a cave. Five jars, battery-operated lights, and suddenly my windowsill looked like something from a cozy aesthetics Pinterest board. The soft glow completely changed my room’s vibe for under $20.
Assembly Instructions
Super simple process:
- Clean jars thoroughly
- Coil battery-operated fairy lights inside
- Hide battery pack behind or inside jar
- Optional: add decorative elements first
- Group multiple jars for impact
- Place strategically for ambiance
Customization Options
Make them unique:
- Paint jars: Spray paint or glass paint
- Add rope: Wrap around rim for texture
- Include seasonal items: Pinecones, flowers, sand
- Use colored lights: Match your aesthetic
- Frost the glass: Create diffused glow
- Add handles: Make them portable lanterns
Perfect Placement Ideas
Where they shine:
- Windowsills for evening glow
- Bedside tables instead of lamps
- Bathroom counters for spa vibes
- Floor grouped for ambient lighting
- Shelves as decorative accents
- Outdoor spaces (weather permitting)
Maintenance Tips
Keeping them magical:
- Replace batteries monthly
- Dust jars to maintain glow
- Rotate seasonal decorations
- Check lights for any damage
- Consider rechargeable batteries
- Use timers for automatic on/off
Making Your Aesthetic Room a Reality
Here’s what nobody tells you about creating an aesthetic room: it’s a process, not a one-weekend project.
After countless DIY attempts (some successful, some… learning experiences), I’ve discovered that the best aesthetic spaces evolve over time as you figure out what actually makes you happy versus what just looks good in photos.
Start with one or two projects that genuinely excite you instead of trying to tackle everything at once. I made that mistake and ended up with half-finished projects creating more chaos than aesthetic vibes.
Pick your favorites, commit to completing them, and build from there.
The beauty of DIY aesthetic decor is that nothing’s permanent. Made a macrame piece you hate? Take it down. Washi tape design not working? Peel it off.
The low commitment actually frees you to experiment without the pressure of expensive mistakes.
Whether you’re team boho with plants everywhere or minimalist zen with clean lines, remember that your room should make you happy first and Instagram-worthy second.
If something brings you joy but wouldn’t photograph well, keep it anyway. Your space, your rules, your aesthetic.