10 Modern POP False Ceiling Design Ideas for Living Rooms
- Ceiling Design
 Ben
Ben- 0
- 24 minutes read
POP false ceilings completely changed my perspective on what a room could look like. I used to think ceilings were just there to keep the rain out – until I helped my sister install a gorgeous layered POP ceiling in her living room.
Suddenly, her boring rental apartment looked like it belonged in an interior design magazine. That’s when I realized we’ve been ignoring the fifth wall for way too long.
Here’s what nobody tells you about POP (Plaster of Paris) false ceilings: they’re like makeup for your room. They hide all the ugly stuff – wires, pipes, uneven surfaces – while creating architectural drama that makes everything else look more expensive.
Plus, they’re way more affordable than you’d think and surprisingly DIY-friendly if you’re brave enough to try.
I’ve since experimented with POP ceilings in four different spaces, made some spectacular mistakes (note to self: measure twice, cut once), and learned exactly what works in real homes versus what just looks good in photos.
Let me share ten POP false ceiling designs that actually deliver on their promises.
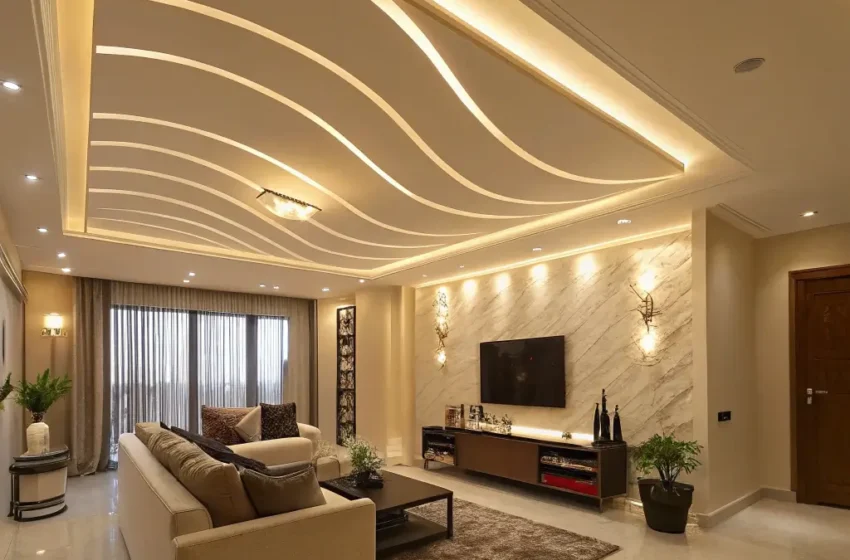
1. Minimal Floating POP Ceiling
The minimal floating POP ceiling became my gateway drug into ceiling design. I installed one in my bedroom, and the transformation from “meh” to “wow” happened literally overnight. The design creates this incredible illusion that your ceiling is hovering, thanks to hidden LED strips around the perimeter.
What makes this design so effective is its simplicity. No fancy curves or complicated patterns – just clean lines and strategic lighting. The POP border drops down about 6 inches from the main ceiling, creating a shadow gap that houses LED strips. When lit, the entire ceiling appears to float weightlessly above your head.
Making the Float Effect Work
The key to a convincing floating ceiling lies in the shadow gap width. Mine is exactly 4 inches – wide enough to hide the LED strips completely but narrow enough to maintain the illusion. Too wide and it looks like a construction mistake. Too narrow and you lose the dramatic effect.
Choose your LED color temperature carefully. I went with tunable whites that shift from energizing daylight to warm candlelight throughout the day. The ability to change the mood with lighting makes this simple design incredibly versatile.
Don’t cheap out on the POP work quality. Smooth, even edges are crucial for the floating effect. Any bumps or irregularities break the illusion. I learned this after my first contractor’s sloppy work made my “floating” ceiling look more like it was having a bad day.
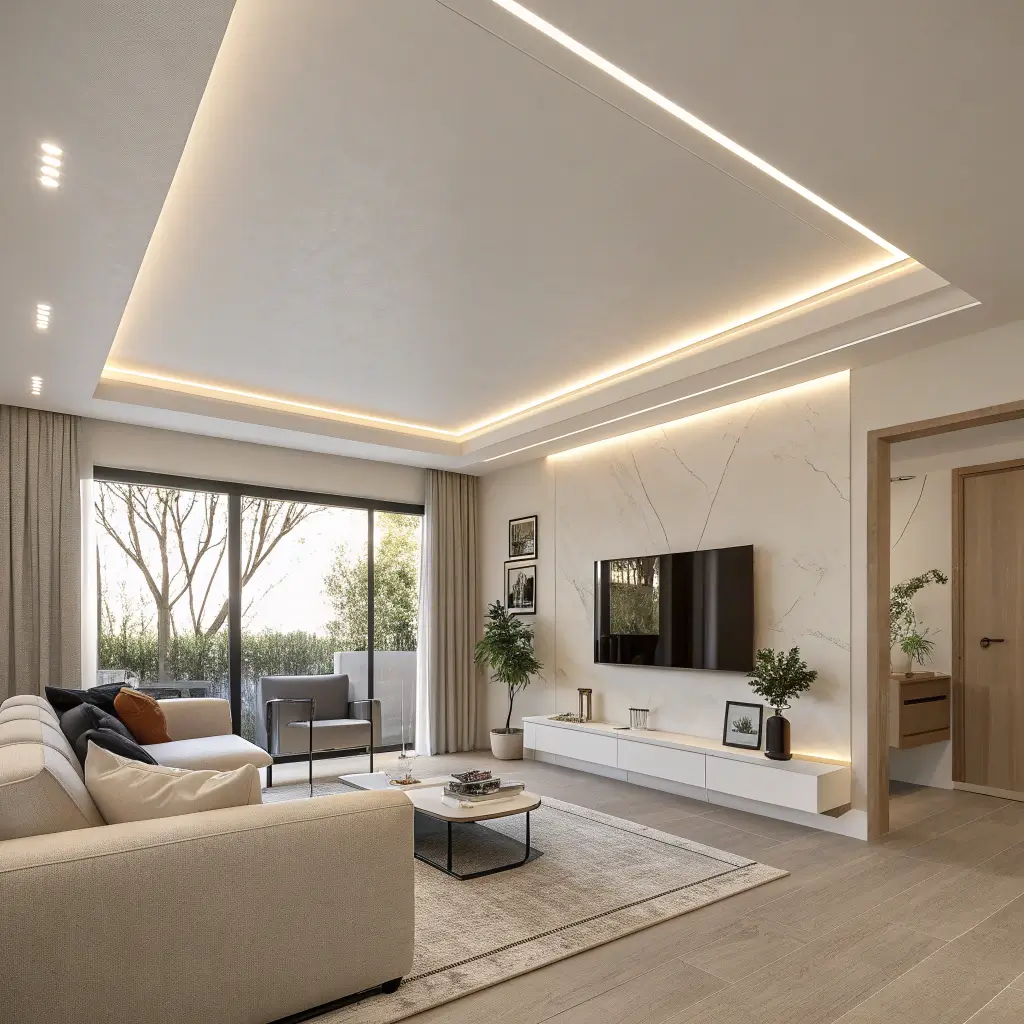
2. Modern Cove Lighting POP Design
Cove lighting POP ceilings create the most sophisticated ambiance I’ve ever experienced in a home. My living room features a stepped POP design with integrated cove lighting, and every evening feels like I’m relaxing in a high-end hotel lounge.
The design involves creating recessed channels in the POP work where LED strips hide and cast light upward. The result is soft, indirect lighting that eliminates harsh shadows and makes everyone look good. No more unflattering overhead bulbs ruining your selfies.
Perfecting the Cove Effect
Plan your cove placement based on room function. I created three zones in my living room – one for the TV area, one for reading, and one for general ambiance. Each cove has separate controls, so I can adjust lighting for any activity.
The depth of your cove channels matters enormously. Mine are 3 inches deep, which provides perfect light diffusion without the LEDs being visible from normal viewing angles. Shallow coves create hot spots; deep ones waste light.
Layer your lighting types for maximum flexibility. Cove lighting alone can feel too ambient for tasks. I combined mine with recessed spotlights for reading and pendant lights over the dining table. The combination creates infinite mood possibilities.
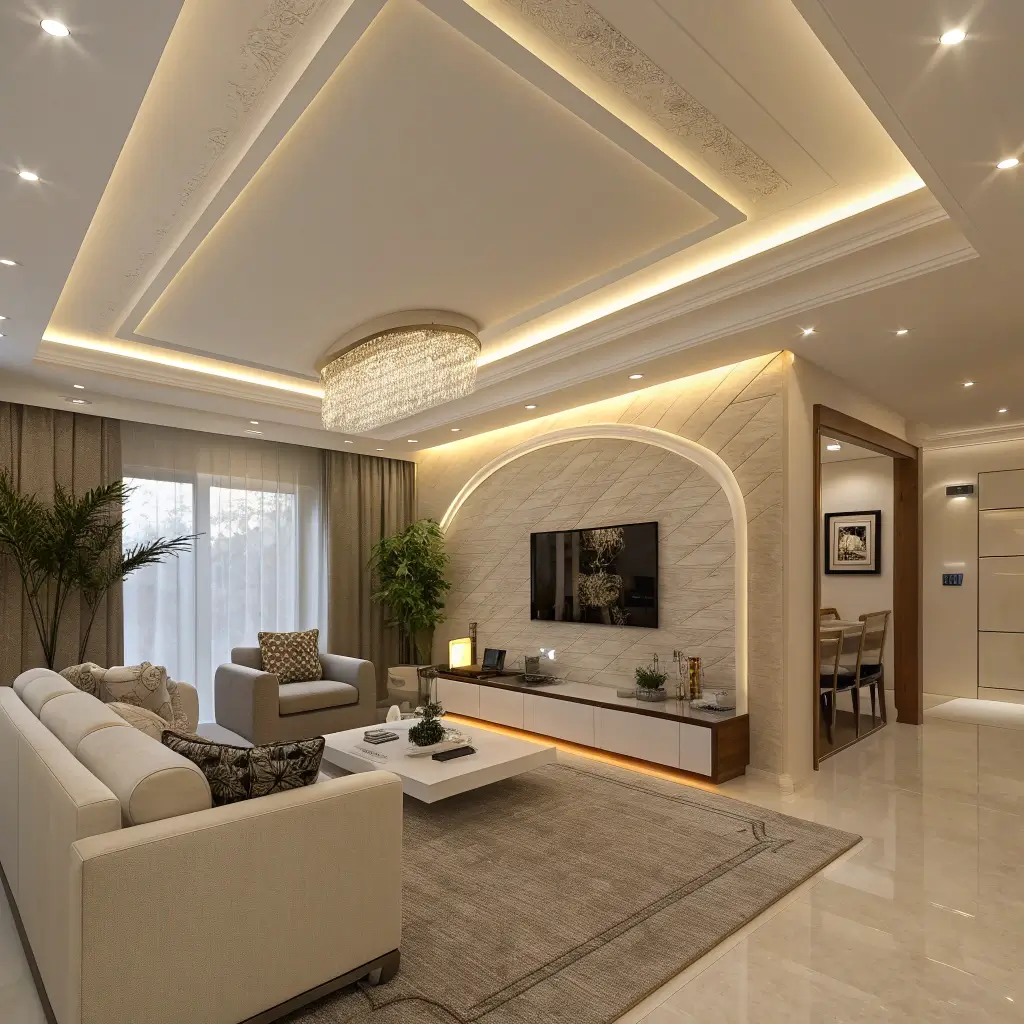
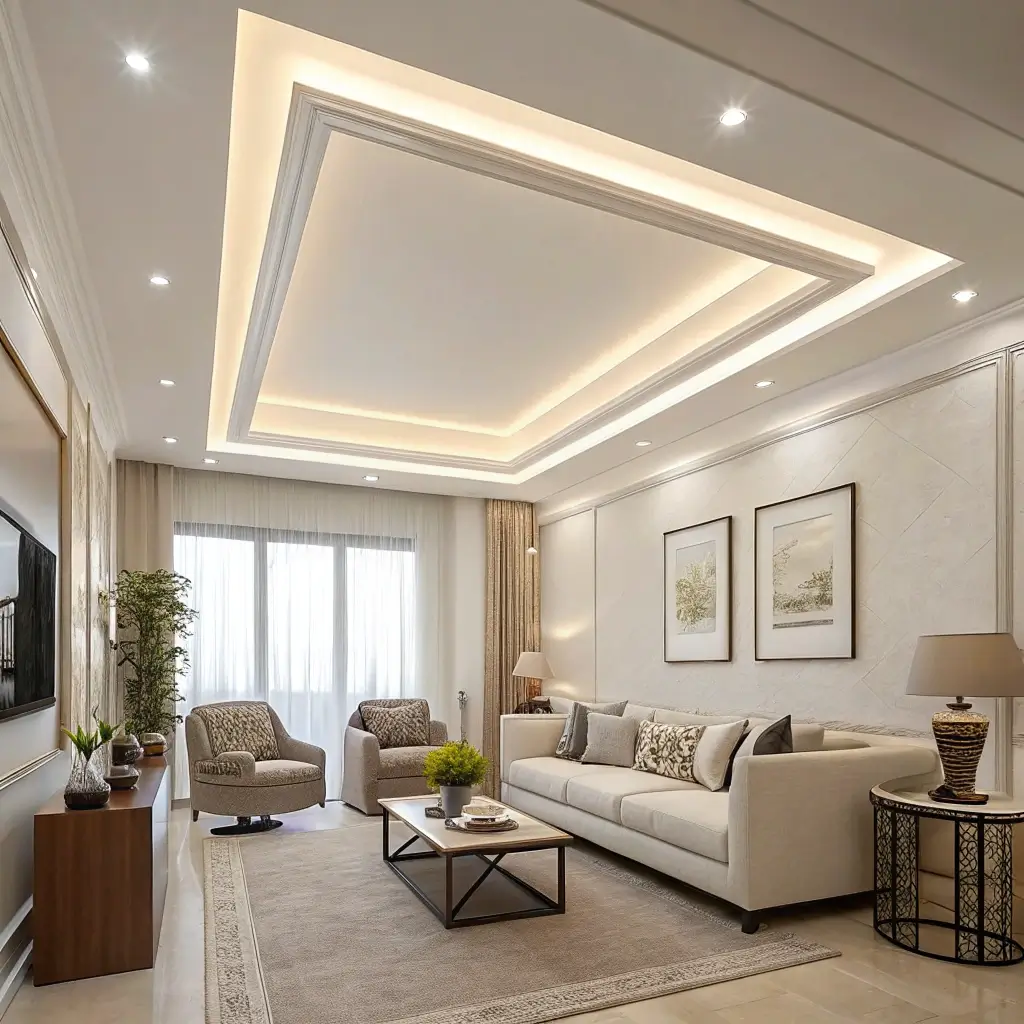
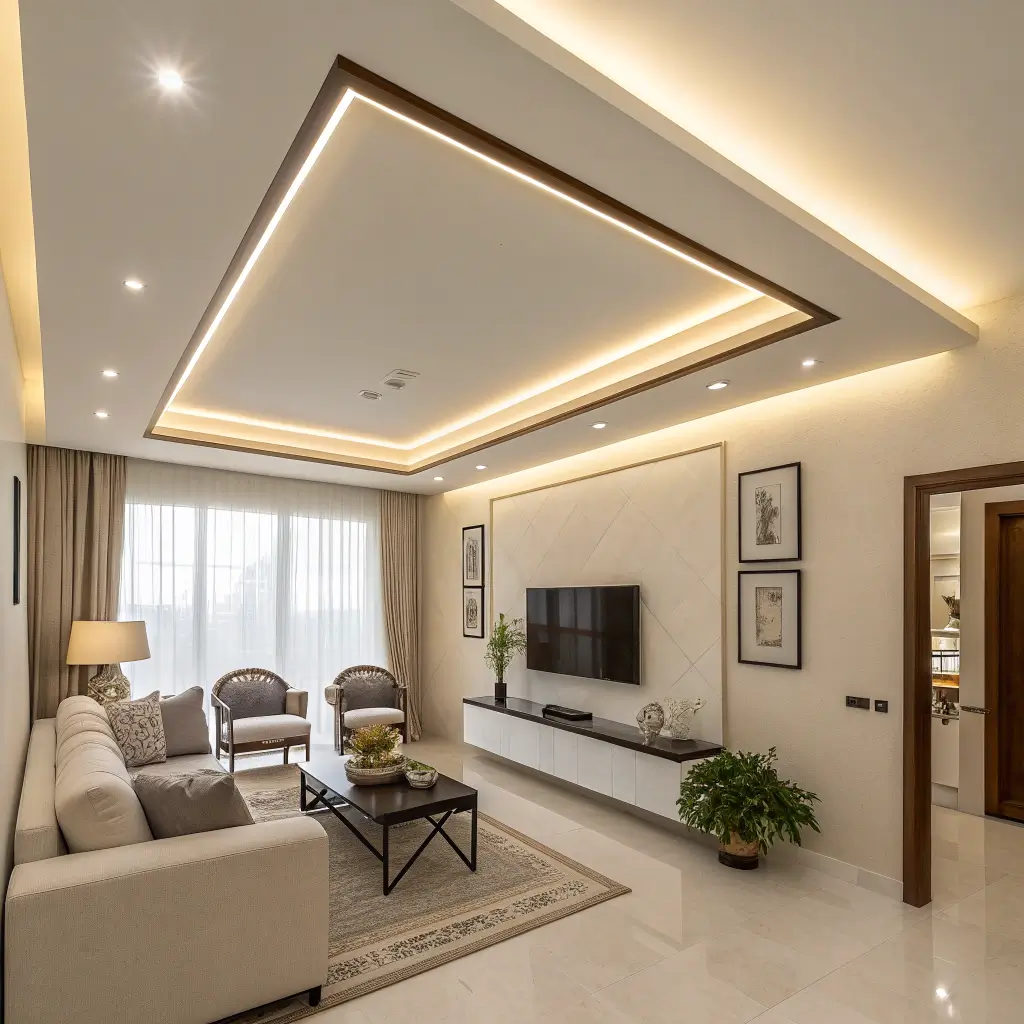
3. Layered Square POP Ceiling
Layered square POP ceilings add architectural depth that makes standard rooms feel custom-designed. My dining room features three square layers stepping down toward the center, and it completely transformed the space from basic to sophisticated.
Each layer serves a purpose beyond aesthetics. The outermost layer hides curtain tracks and speakers. The middle layer houses general lighting. The innermost layer frames my chandelier perfectly. Form meets function in the most elegant way.
Creating Successful Layers
Keep your layer height differences subtle for sophisticated impact. My layers drop 2, 4, and 6 inches respectively. Dramatic drops can work in high-ceiling rooms, but most homes benefit from restraint. The goal is architectural interest, not a wedding cake ceiling.
Use lighting to emphasize each layer. I installed LED strips between layers, creating this gorgeous stepped lighting effect at night. The shadows and highlights add dimension that paint alone could never achieve.
Consider your room’s proportions when planning layers. My 12×14 dining room handles three layers perfectly. Smaller rooms might need just two layers, while larger spaces could accommodate more complex designs.
Also Read: 10 Inspiring Ceiling Design Living Room Ideas for Every Style
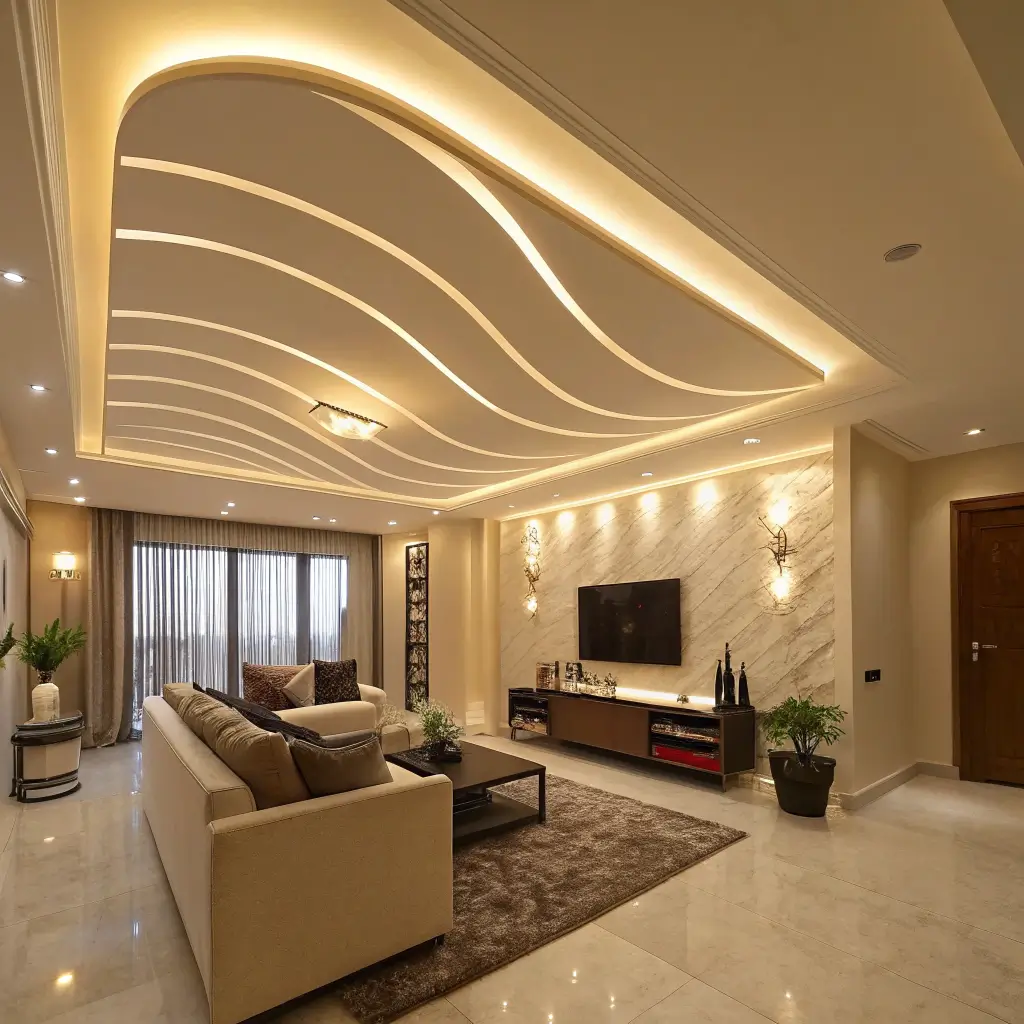
4. Curved Edge POP False Ceiling
Curved POP ceilings break up all those rigid right angles that dominate modern homes. I installed gentle curves in my hallway, and the flowing design guides visitors naturally from the entrance to the living area. It’s like having architectural choreography overhead.
The beauty of curved POP work lies in its organic feel. While straight lines feel manufactured, curves feel natural and welcoming. My hallway went from a boring corridor to an elegant transition space that everyone comments on.
Mastering the Curve
Start with gentle curves if you’re new to this. My first attempt at dramatic S-curves looked more like a mistake than a design choice. Subtle waves or single directional curves work better for beginners and most spaces.
Use flexible LED strips that follow your curves perfectly. Rigid LED bars create awkward straight sections in curved designs. I learned this the expensive way and had to replace all my lighting after the initial installation looked terrible.
FYI, curved ceilings work best in transitional spaces like hallways, entryways, and passages. I tried curves in a square bedroom once – it looked weird and made furniture placement awkward. Know your space’s personality.
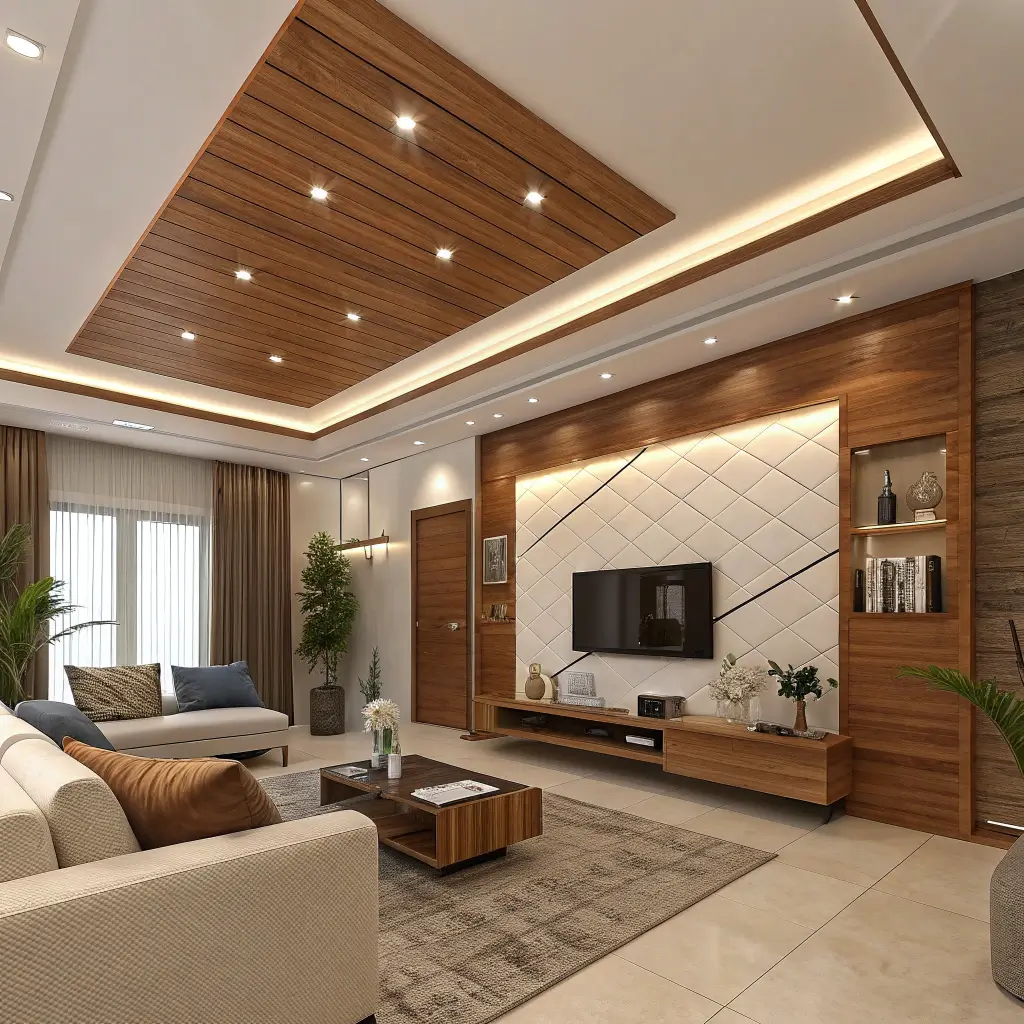
5. Wooden Accent POP Ceiling
Combining wood accents with POP creates warmth that pure plaster can’t match. My home office features POP framework with wooden slat inserts, and the combination brings together modern sophistication with natural warmth.
The wood doesn’t have to be real – high-quality wood-look panels work beautifully and cost a fraction of solid wood. My “teak” panels are actually laminate, but they look so realistic that my carpenter friend was fooled until he touched them.
Blending Materials Successfully
Choose wood tones that complement your existing decor. My office has oak floors, so I selected matching oak-look panels for the ceiling. The continuity makes the room feel cohesive and intentionally designed.
Use POP to frame wooden sections rather than mixing materials randomly. My design has clean POP borders defining each wooden panel. This approach looks architectural rather than like someone couldn’t decide between materials.
Consider maintenance when mixing materials. Wood sections need different care than POP. I sealed my wooden panels to match the POP’s easy-clean surface. Now everything wipes down the same way.
6. Geometric Pattern POP Ceiling
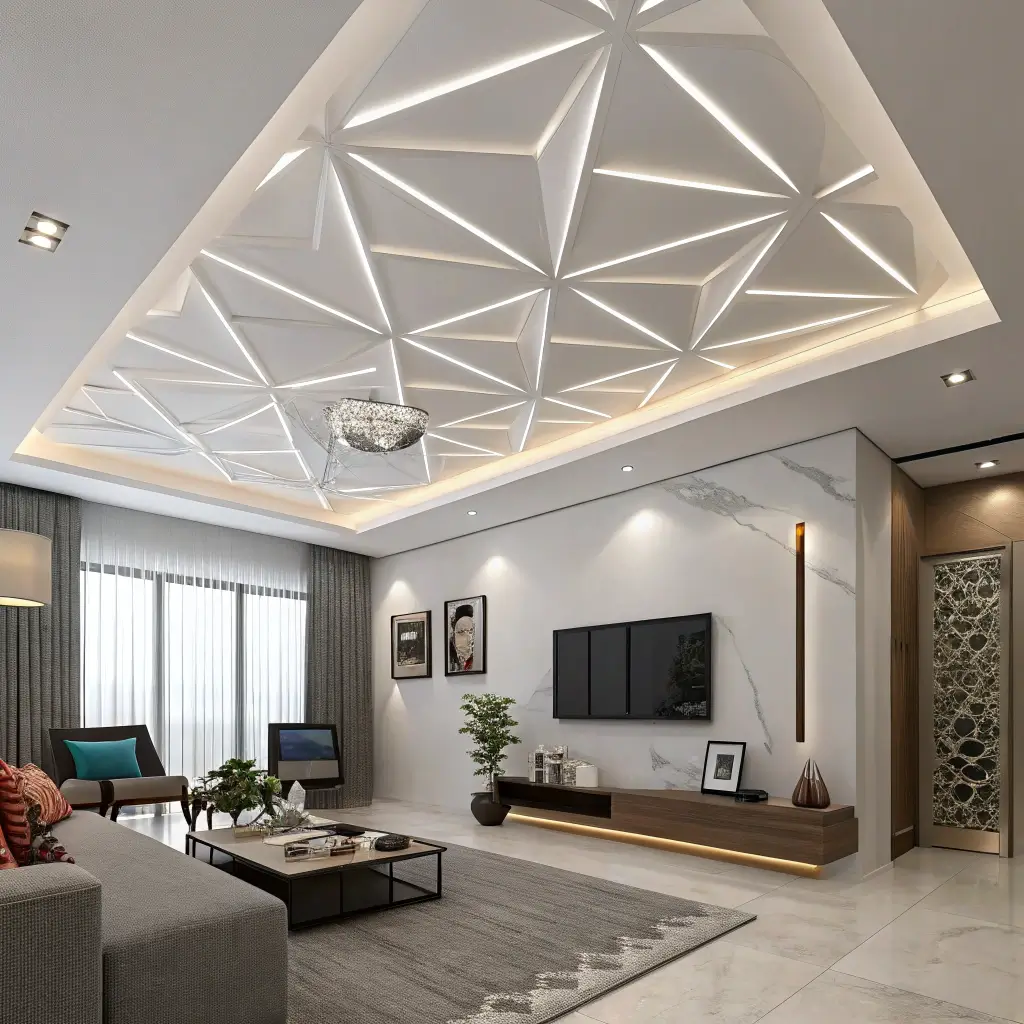
Geometric POP patterns turn boring ceilings into three-dimensional art installations. My guest bedroom features interlocking hexagons at varying depths, and the play of shadows throughout the day creates constantly changing visual interest.
The pattern you choose says everything about your style. Hexagons feel organic and modern. Triangles create dynamic energy. Squares offer classic sophistication. I spent weeks sketching patterns before landing on my hexagonal design.
Geometry That Actually Works
Map your pattern on paper before starting any POP work. What looks amazing in your head might feel overwhelming full-size. I created cardboard templates and taped them to my ceiling for a week. Living with the pattern helps you know if you’ll love it long-term.
Consider how your pattern interacts with room lighting. I installed micro-spotlights at key intersections of my hexagons. The focused light creates dramatic shadows that emphasize the geometry. Without proper lighting, even the best pattern looks flat.
Scale your pattern to room size. Large patterns in small rooms feel oppressive. Tiny patterns in huge spaces disappear. My 11×13 guest room has medium-scale hexagons that feel proportional and impactful.
Also Read: 12 Modern PVC Ceiling Design Ideas to Upgrade Interiors
7. Single Frame POP Ceiling Design
Sometimes simple is best, and single frame POP ceilings prove it. My powder room features one rectangular POP frame with integrated lighting, and it completely transformed the tiny space from afterthought to design statement.
The single frame approach works brilliantly in smaller rooms where complex designs would overwhelm. The clean rectangle defines the space while the integrated lighting eliminates shadows that make small rooms feel cramped.
Framing Success
Position your frame to enhance room proportions. My powder room frame runs parallel to the longer walls, making the narrow space feel wider. Frames that fight your room’s natural proportions create visual tension.
Use the frame to hide functional elements. My frame conceals the exhaust fan, electrical junction, and even a small speaker. Everything disappears into the design, leaving clean lines and perfect function.
Light the frame perimeter for maximum impact. LED strips around the inside edge create a glowing border that makes the ceiling feel higher. The effect is subtle but transformative in small spaces.
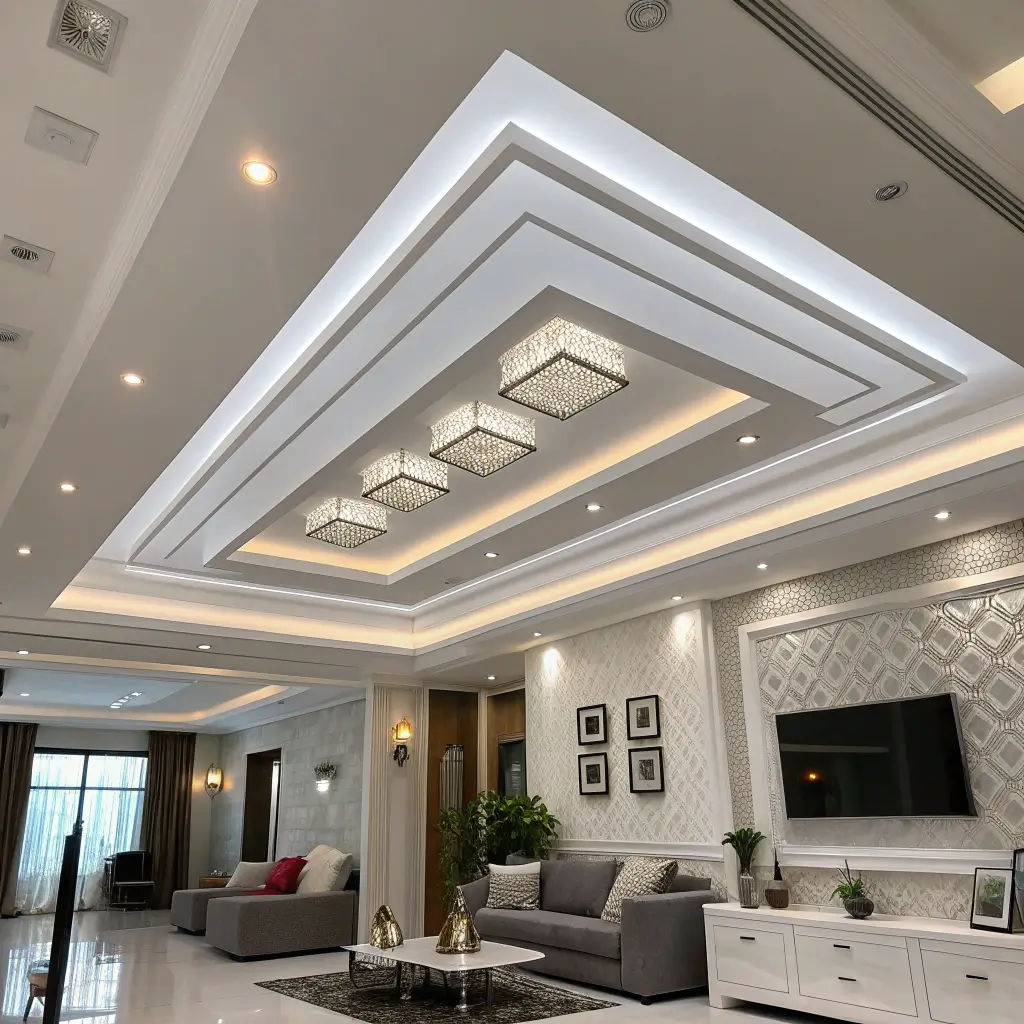
8. Recessed Panel POP Ceiling
Recessed panel POP ceilings create depth and sophistication that flat surfaces simply can’t match. My formal living room features nine recessed squares arranged in a grid, and the coffered effect makes the room feel like it belongs in a luxury hotel.
The recessed panels aren’t just decorative – they improve acoustics by breaking up sound reflections. My living room went from echo chamber to acoustically pleasant space just by adding the textural variation.
Panel Perfection
Plan your panel layout based on room dimensions. My 15×18 living room divides perfectly into nine equal squares. Awkward partial panels at edges ruin the effect. Measure carefully and adjust panel sizes to fit your space exactly.
Paint strategy makes or breaks recessed panels. I painted the recessed areas a shade darker than the raised sections, creating shadow effects that emphasize depth. This technique costs nothing but adds incredible visual impact.
Don’t forget crown molding details. Each panel needs proper trim to look finished. I used lightweight polyurethane molding that looks like traditional wood but installs easily and costs way less.
9. Linear Strip POP Ceiling
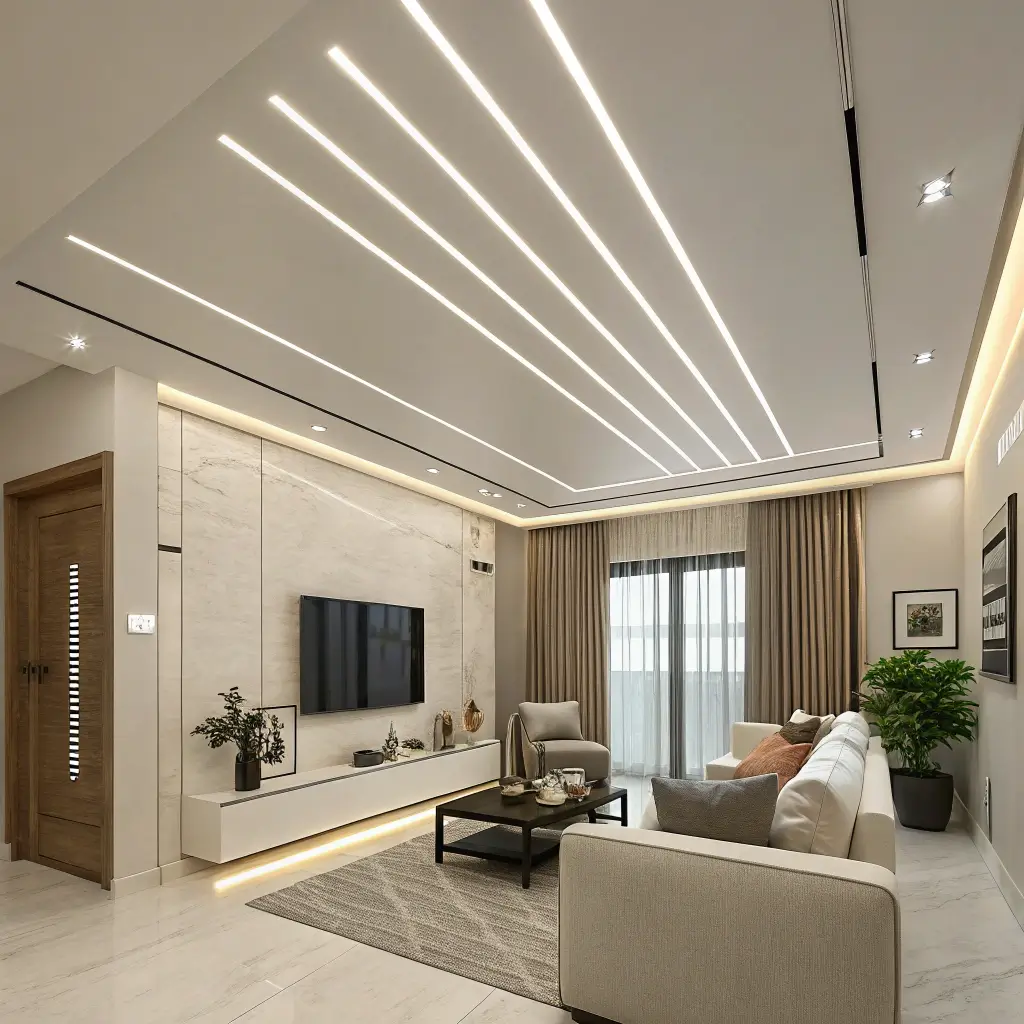
Linear strip POP ceilings create rhythm and movement that makes rooms feel larger and more dynamic. My kitchen features parallel strips running the length of the room, and the linear pattern makes the galley layout feel spacious rather than cramped.
The strips serve multiple purposes beyond aesthetics. They hide track lighting, define work zones, and even conceal under-cabinet lighting transformers. Every strip earns its place through both form and function.
Lines That Work
Direction matters enormously with linear designs. Strips running parallel to the longest wall emphasize length. Perpendicular strips widen narrow spaces. I chose length emphasis to make my galley kitchen feel less corridor-like.
Vary strip widths for visual interest. My kitchen combines 4-inch, 6-inch, and 8-inch strips in a repeating pattern. The variation prevents the institutional look that identical strips can create.
Integrate lighting within strips for seamless illumination. Each of my strips houses LED tape that provides task lighting without visible fixtures. The clean lines continue uninterrupted while delivering perfect kitchen lighting.
Also Read: 10 Cozy Ceiling Design Modern Ideas for Stylish Living Spaces
10. Contemporary Ring POP Ceiling
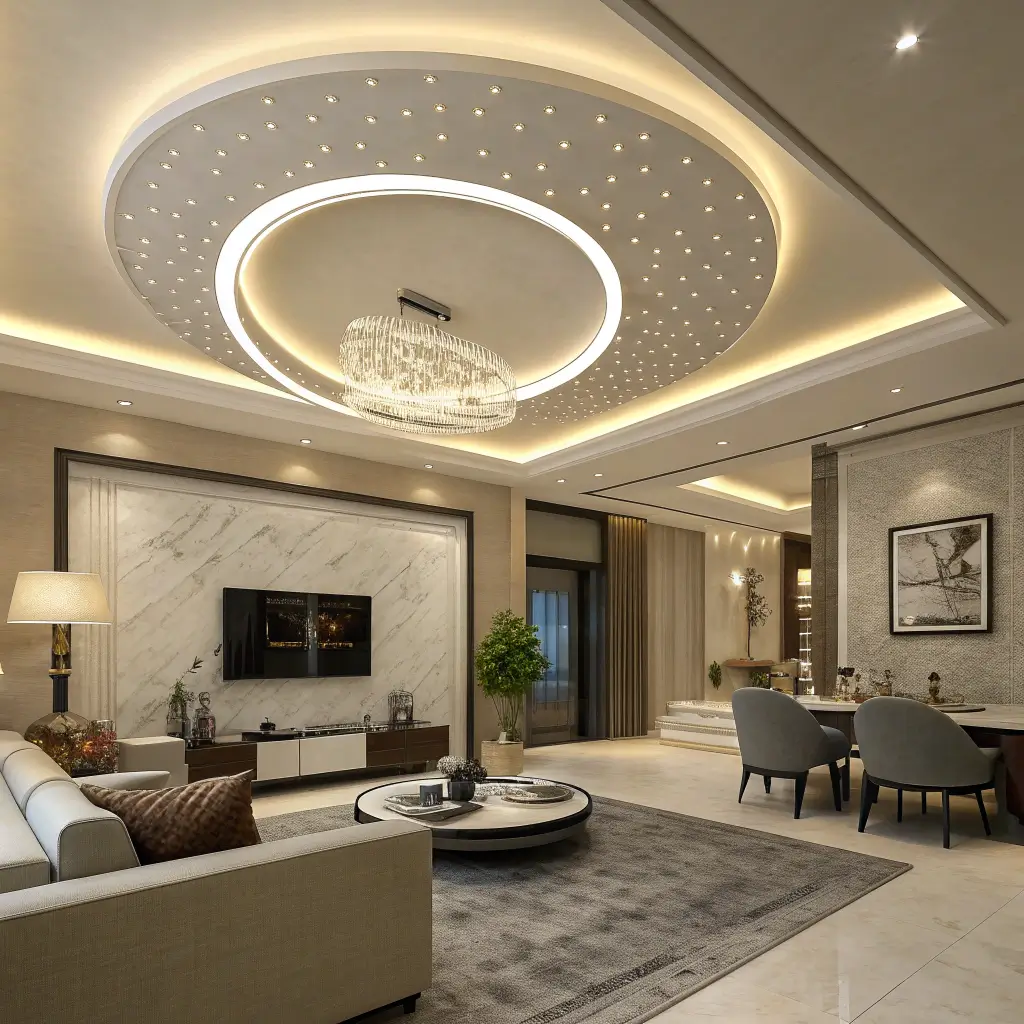
Ring POP ceilings create focal points that draw the eye upward and define spaces within larger rooms. My open-concept living area features a large ring over the seating area, and it creates intimate conversation space within the larger room.
The ring doesn’t just look good – it improves the room’s acoustics by creating a defined sound zone. Conversations stay within the ring area rather than echoing throughout the open space.
Ringing in Success
Size your ring proportionally to the space it defines. My seating area ring is 8 feet in diameter over a 10-foot conversation area. The ring should feel related to the furniture arrangement below, not randomly placed.
Use the ring to house dramatic lighting. I installed a statement chandelier in the center with LED strips around the ring perimeter. The combination creates both task and ambient lighting while emphasizing the architectural feature.
Consider multiple rings for larger spaces. My friend’s great room has three overlapping rings of different sizes, creating a dynamic composition that defines multiple zones. Single rings work best in more intimate spaces.
Bringing POP Design to Life
There you have it – ten POP false ceiling designs that prove this versatile material can transform any room from ordinary to extraordinary.
The beauty of POP lies in its moldability and affordability. You can create custom architectural details that would cost thousands in traditional materials for a fraction of the price.
The best POP ceiling design for your space depends on your room’s size, function, and your personal style. Start with one room and one design that speaks to you.
My journey began with that simple floating ceiling and evolved into increasingly complex designs as my confidence grew.
Remember that POP ceilings aren’t just about aesthetics. They hide ugly mechanicals, improve lighting, enhance acoustics, and can even help with climate control.
The investment pays off in both beauty and function every day.
Don’t let fear of complexity stop you from exploring POP ceiling options. Even simple designs create dramatic improvements. Start with something manageable, work with experienced contractors, and remember that every ceiling project teaches you something for the next one.
IMO, once you experience the transformation a well-designed POP ceiling brings, you’ll never look at flat ceilings the same way again 🙂


