10 Simple Profile Light Ceiling Design Ideas with Soft Glow
- Ceiling Design
 Ben
Ben- 0
- 30 minutes read
Profile light ceilings are basically the secret weapon of interior design that nobody talks about enough. I installed my first profile lighting system last year after living with boring overhead lights for way too long, and honestly?
The transformation was so dramatic that my friend walked in and asked if I’d hired a professional lighting designer (I hadn’t—just spent hours watching YouTube tutorials and crossing my fingers).
Here’s the thing about profile lights: they’re sleek LED strips housed in aluminum channels that create this clean, modern glow without the bulky fixtures that scream “I bought this at a big box store in 2010.”
After helping four friends install profile lighting in their homes (yes, I’ve become that person everyone calls for lighting advice), I’ve discovered exactly what works, what doesn’t, and what makes people walk into a room and immediately ask “how did you do that?”
Ready to discover how profile light ceilings can transform your space from basic to absolutely stunning? Let’s explore ten ideas that actually work in real homes where people live, work, and occasionally forget to turn off the lights.
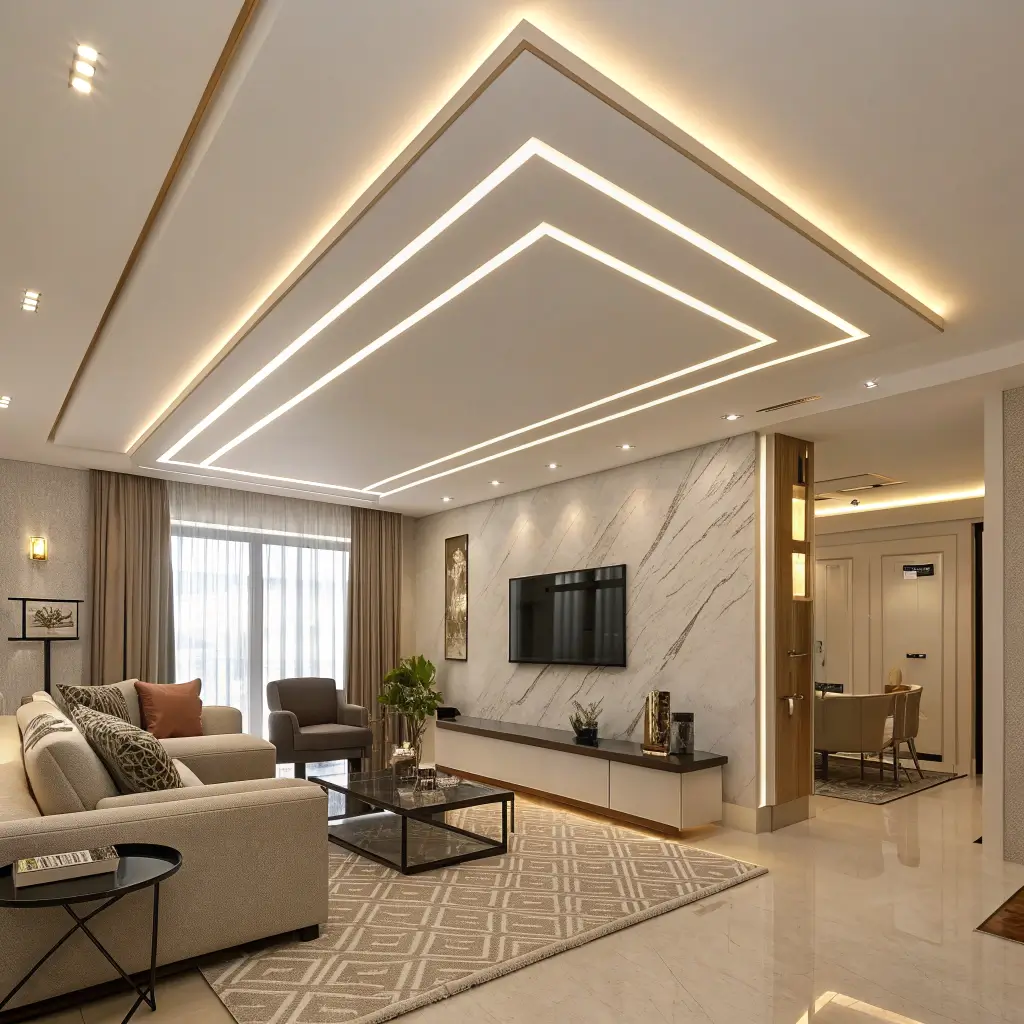
1. Floating Linear Profile Light Ceiling
Floating linear profile lights create this incredible illusion that your ceiling is literally hovering. I installed this in my living room, and the effect is so cool that I sometimes just sit there staring up like I’m at a planetarium (don’t judge).
Creating the Floating Effect
The magic happens when you install LED profile strips around the ceiling perimeter, leaving a small gap between the ceiling and wall. The light washes upward and creates this soft glow that makes the ceiling appear to float. My installation uses a 6-inch drop from the main ceiling with profile lights hidden in the recess.
The floating effect works because:
- It adds depth without taking up floor space
- Creates ambient lighting that’s easy on the eyes
- Makes rooms feel taller and more spacious
- Hides all the wiring beautifully
- Looks expensive but isn’t (mine cost around $400 for materials)
Choosing the Right Profile
Not all LED profiles work for floating ceilings. I learned this after buying the wrong ones first (they were too wide and looked clunky). You want slim profiles—ideally 15-20mm wide—that disappear into the architecture. I use frosted diffusers rather than clear ones because they create a smooth, continuous glow instead of visible LED dots.
The key is mounting them facing upward at a slight angle, not straight up. This angle ensures the light spreads across the ceiling evenly rather than creating a bright spot directly above the profile.
2. Minimal Edge Glow Ceiling Design
Minimal edge glow designs are perfect for people who want modern lighting without making a huge statement. My friend installed this in her minimalist apartment, and it provides just enough light to create ambiance without overwhelming her simple aesthetic.
The Minimalist Approach
Edge glow designs use ultra-slim LED profiles installed at the very edge of the ceiling where it meets the walls. The profiles are so subtle that you barely notice them during the day, but at night they create this beautiful perimeter glow. My friend’s installation uses profiles that are only 10mm wide—they’re basically invisible.
This design works brilliantly in:
- Small apartments where every inch counts
- Minimalist spaces that avoid clutter
- Bedrooms where you want soft lighting
- Modern offices needing focused ambiance
- Any room where less is genuinely more
Installation Challenges
Installing edge profiles requires precision. I helped with my friend’s installation, and we spent three hours just making sure the profiles were perfectly level. Any deviation shows immediately because the light reveals every imperfection. We used a laser level (borrowed from her dad) and took our time measuring.
Pro tip: Paint the ceiling before installing profiles. Trying to paint around installed LED strips is a nightmare I wouldn’t wish on anyone.
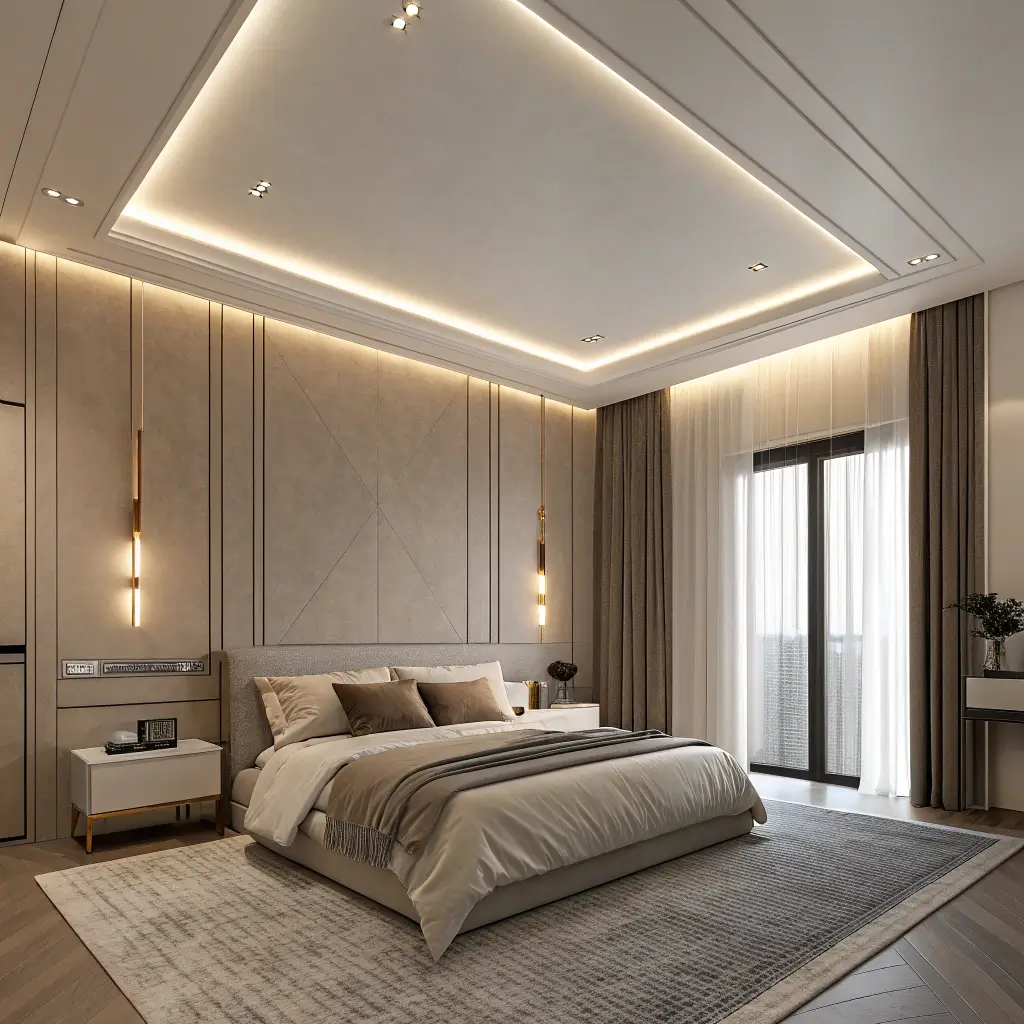
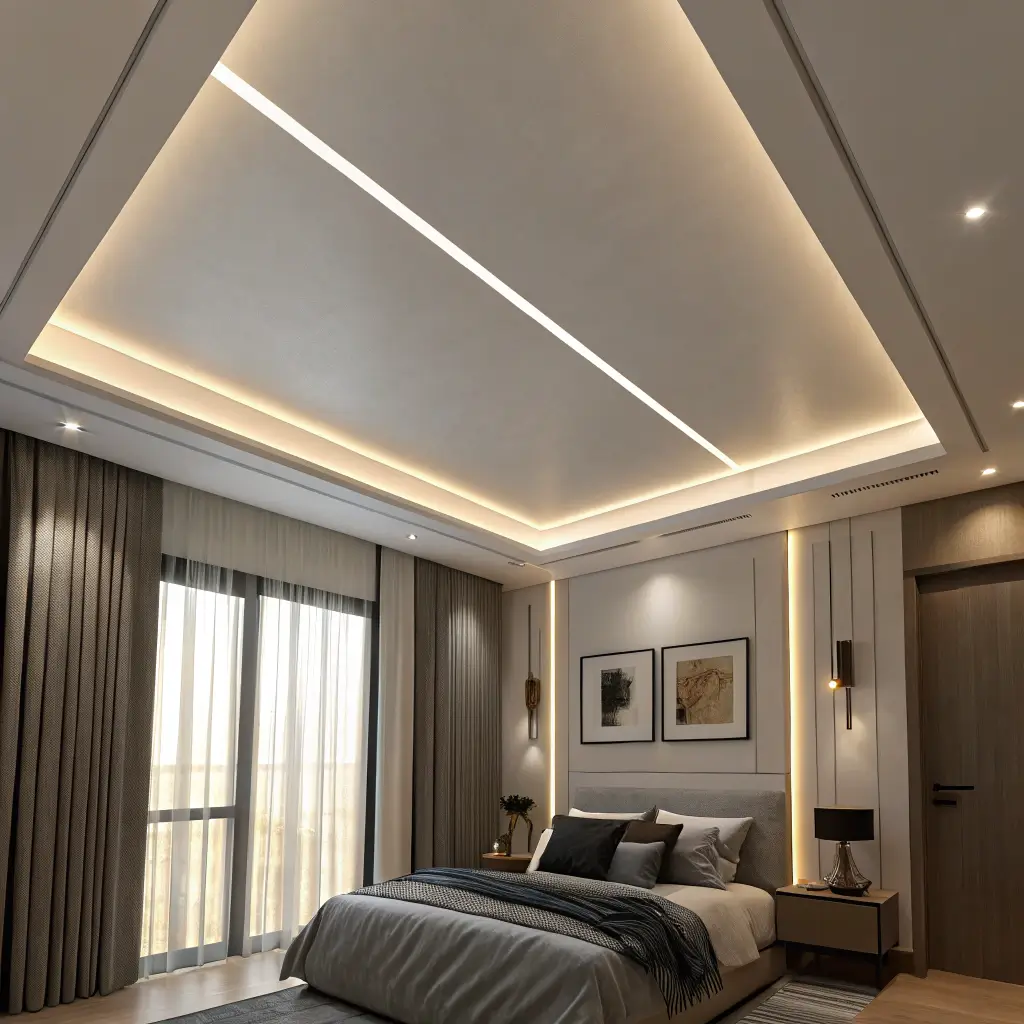
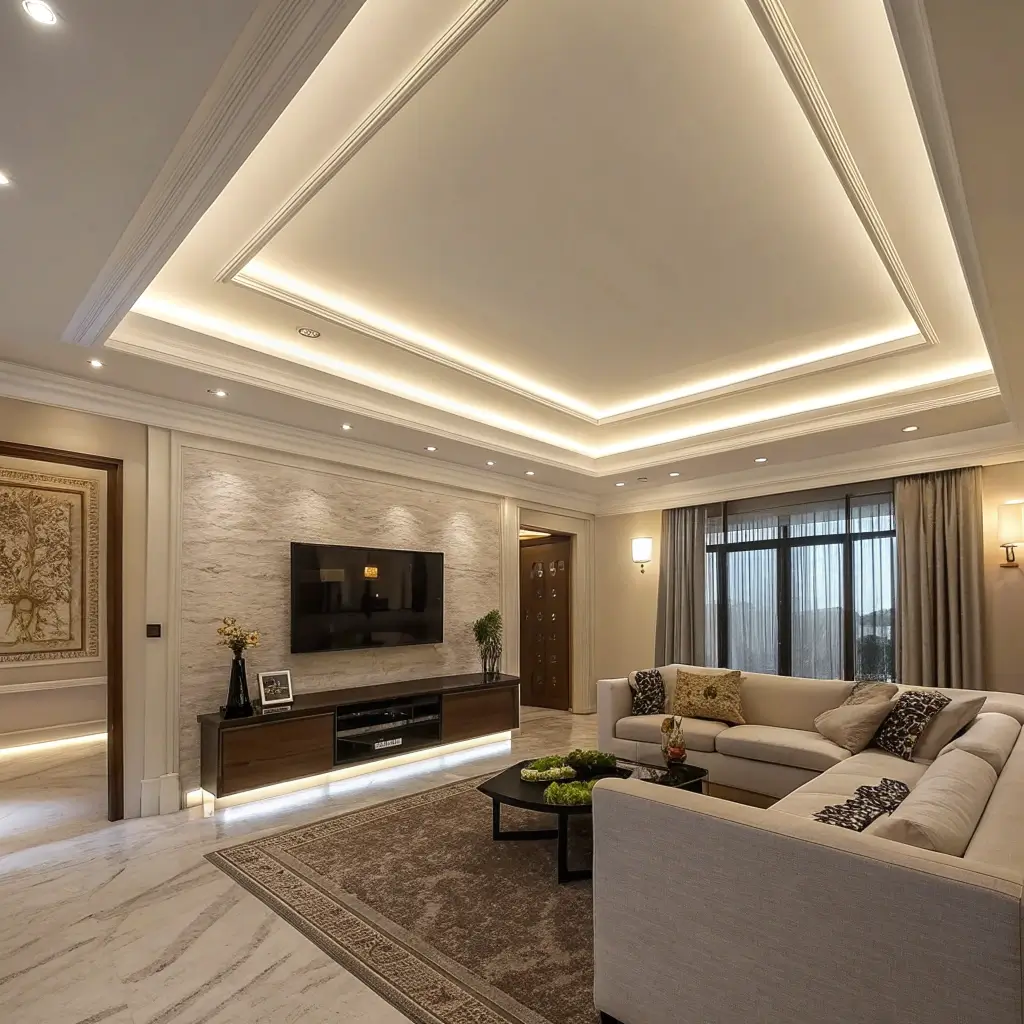
3. Hidden Perimeter Profile Light Ceiling
Hidden perimeter lighting creates dramatic effect without visible fixtures. I installed this in my bedroom, and the indirect lighting is perfect for creating mood without harsh overhead lights that make you feel like you’re in an interrogation room.
Creating the Hidden Effect
The trick with hidden perimeter lighting is creating a ledge or cove where you mount the LED profiles completely out of sight. My bedroom has a 4-inch ledge all around the perimeter where the profiles sit, facing upward. You see the glow but never the actual light source—it’s like magic.
I designed my ledge using simple L-shaped brackets and drywall. Total cost for materials? About $150 plus the LED profiles. A contractor quoted me $800 for the same work, so DIY saved serious money (though I did put a hole in the drywall once—we don’t talk about that).
Controlling the Mood
Hidden perimeter lights need dimmers. This is non-negotiable. I installed a smart dimmer that I control with my phone, and being able to adjust the brightness from bed is genuinely life-changing. Movie night? Dim. Reading? Bright. Middle-of-the-night bathroom trip? Just enough light to not wake up fully.
The color temperature matters too. I use 3000K (warm white) in my bedroom because cooler temperatures make it hard to relax. My home office uses 4000K for focus. Getting the temperature wrong makes the whole installation feel off.
Also Read: 12 Beautiful POP Ceiling Design Ideas and Cozy Home Interiors
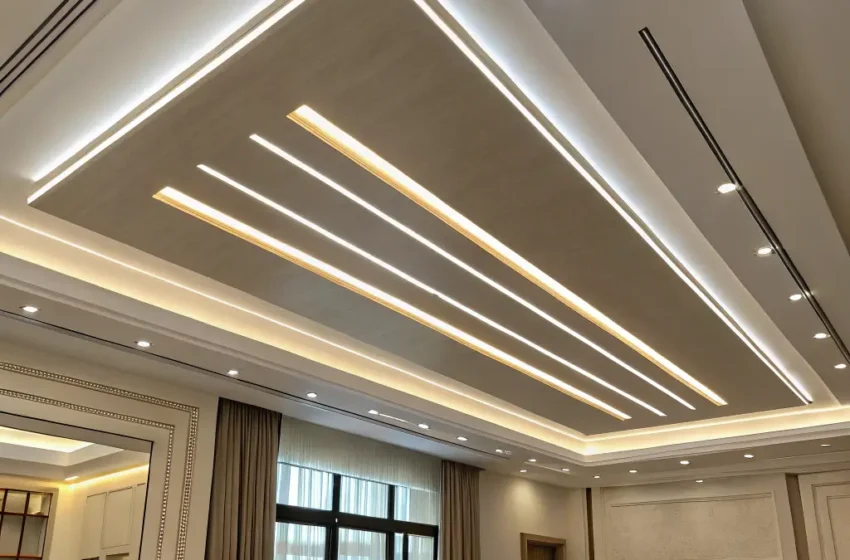
4. Parallel Line Profile Light Layout

Parallel line layouts create this sleek, contemporary look that screams modern design. My neighbor installed parallel LED profiles running the length of his living room, and the geometric pattern adds incredible visual interest to what was previously just a blank white ceiling.
Planning Your Lines
The key to parallel line layouts is getting the spacing right. My neighbor’s ceiling has three parallel profiles spaced 3 feet apart, running the 15-foot length of his room. The spacing creates rhythm without feeling crowded. Too close together looks busy; too far apart looks random.
We spent an entire afternoon with painter’s tape on his ceiling, trying different spacings before committing. The tape trick saved us from permanent mistakes—highly recommend this planning method.
Installation Complexity
Installing multiple parallel profiles requires serious precision. Each profile needs to be perfectly straight and exactly parallel to the others. Any wobble or deviation becomes glaringly obvious when the lights are on. We used chalk lines and lots of patience.
The electrical wiring for multiple profiles gets complicated fast. My neighbor hired an electrician for this part (smart move), and the pro wiring ensures everything runs smoothly without overloading circuits.
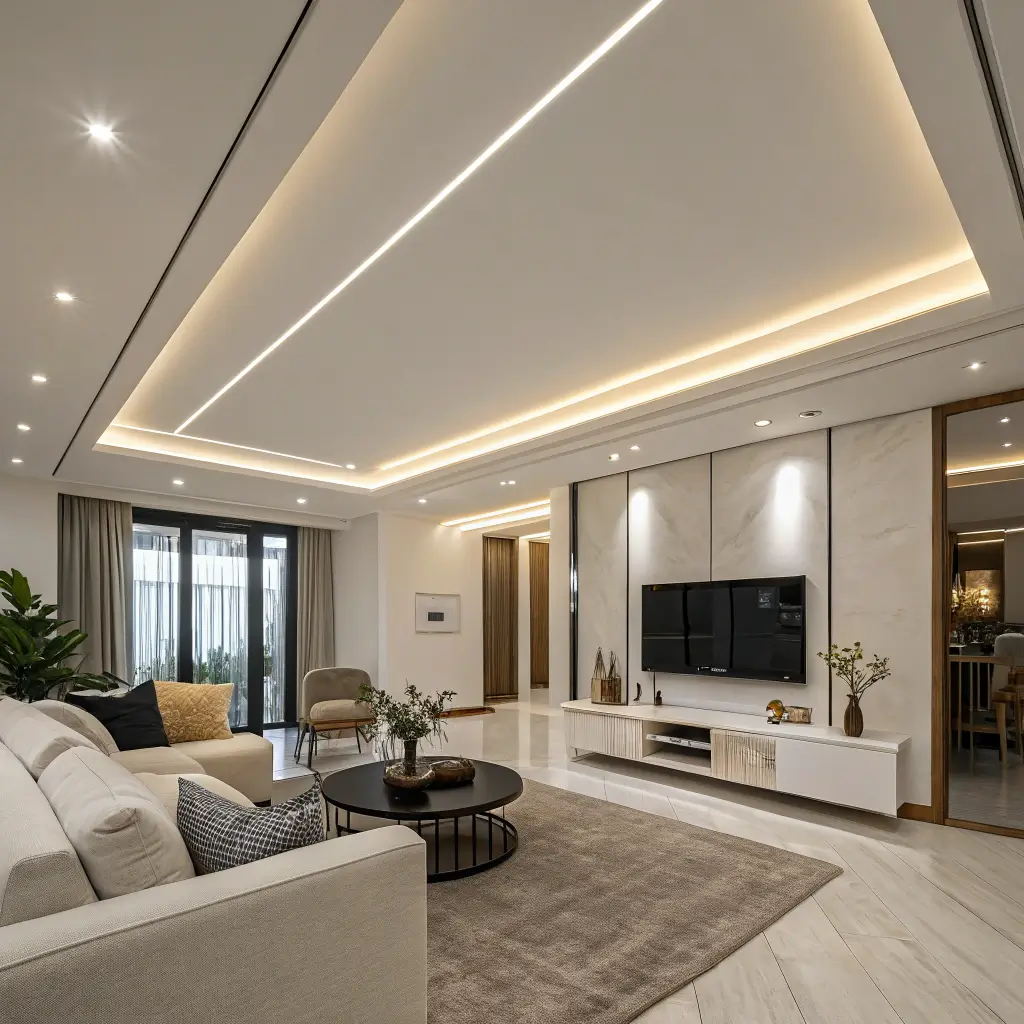
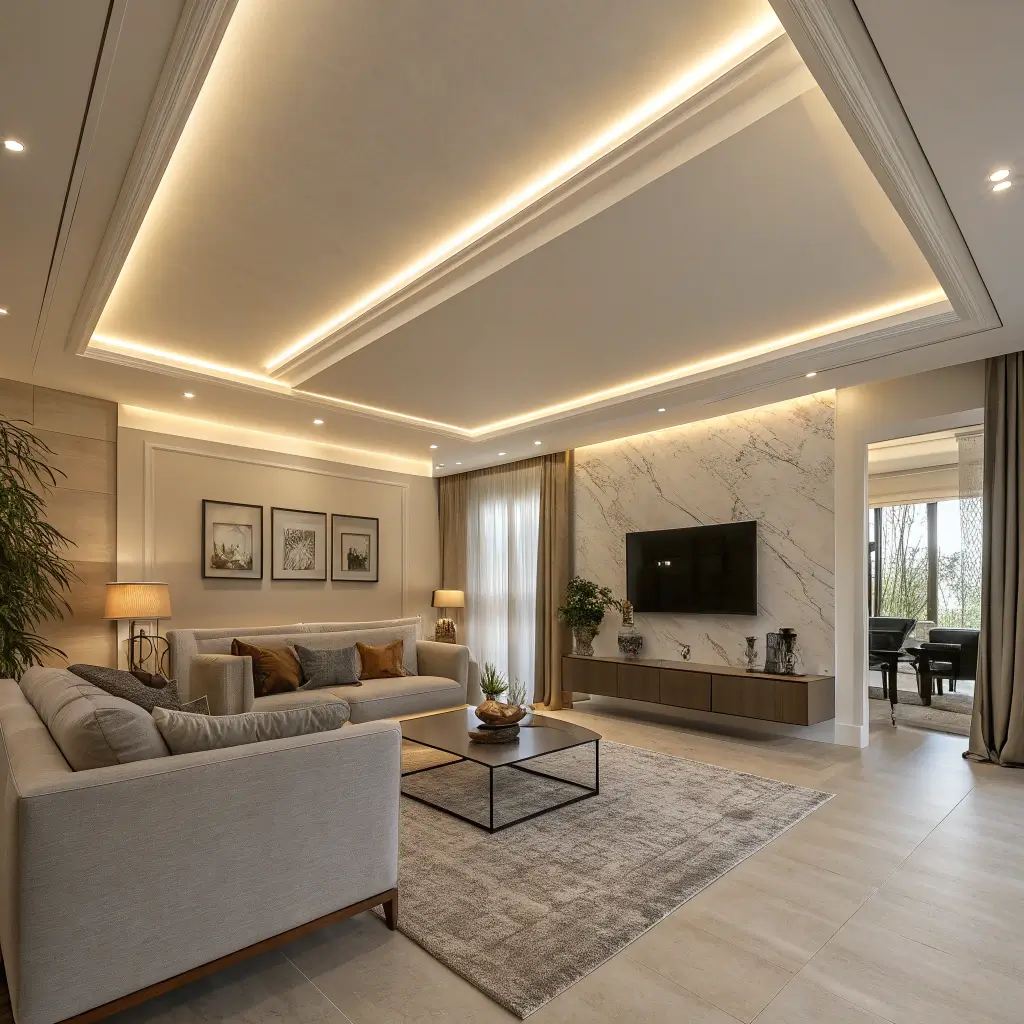
5. Frame Style Profile Light Ceiling
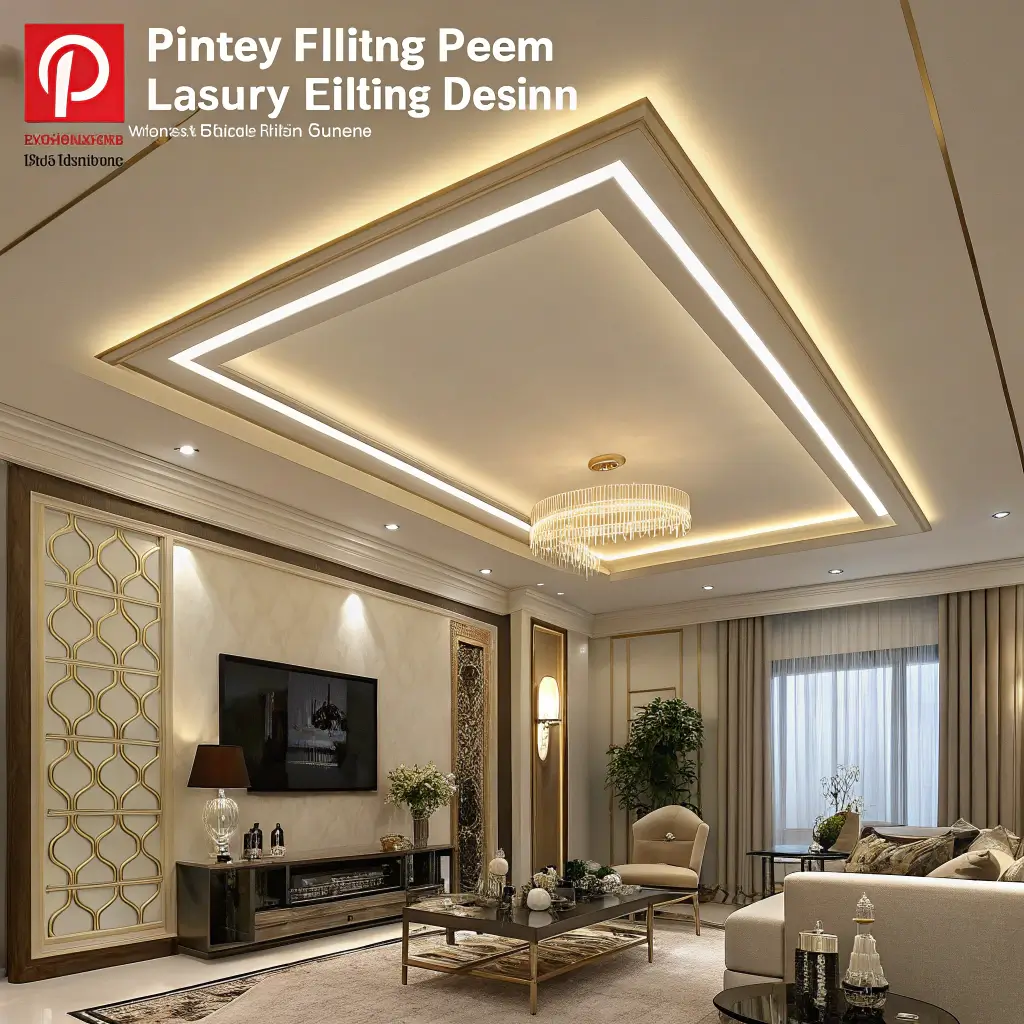
Frame-style profile lighting creates the illusion of a framed ceiling panel. I designed this for my dining room, and the rectangular frame of light makes the space feel defined and special—perfect for a room where you want to create a focal point.
Creating the Frame
My dining room frame uses LED profiles arranged in a rectangle around the perimeter of the dining table area. The frame is about 8×10 feet, suspended slightly below the main ceiling. The light washes both upward (illuminating the ceiling) and downward (lighting the dining area).
The frame effect works because:
- It defines the dining zone clearly
- Creates layered lighting (ambient + task)
- Adds architectural interest
- Makes the ceiling less boring
- Coordinates beautifully with the table below
Sizing Your Frame
The frame should relate to your room proportions and furniture placement. My frame extends about 2 feet beyond my dining table on all sides. This creates visual connection between the ceiling and the table while maintaining balance.
I’ve seen people make frames too small (looks like a mistake) or too large (defeats the purpose of defining space). The sweet spot is usually 1.5-2 feet beyond your key furniture piece.
6. Center Spine Profile Light Design
Center spine designs run a single line of profile lighting down the center of your ceiling. My home office uses this design, and the central line creates direction and focus—perfect for a workspace where I need to concentrate.
The Single Line Strategy
One strong line down the ceiling center creates symmetry and order. My office ceiling has a single LED profile running the 12-foot length, positioned exactly center. The profile faces downward, providing task lighting for my desk while also washing light across the ceiling.
This design is surprisingly versatile:
- Works in narrow hallways (guides you through)
- Perfect for home offices (creates focus)
- Great in kitchens (lights the work surface)
- Ideal for modern bedrooms (simple and clean)
Practical Benefits
Beyond aesthetics, the center spine provides excellent task lighting. I positioned my desk directly under the profile, and the even, shadow-free light is perfect for working. No more harsh desk lamps or weird shadows on my screen.
FYI, running electrical to a ceiling center point can be tricky in existing homes. I had to fish wires through the ceiling, which wasn’t fun. New construction makes this way easier.
Also Read: 10 Creative Wooden Ceiling Design Ideas for Modern Spaces
7. Asymmetrical Profile Light Ceiling
Asymmetrical layouts break the rules and create dynamic, artistic ceilings. My friend’s architect designed an asymmetrical pattern for her loft, and while I was skeptical during installation, the finished result is genuinely stunning—like modern art overhead.
Embracing Asymmetry
Asymmetrical designs place LED profiles in non-uniform patterns. My friend’s ceiling has profiles of varying lengths positioned at different angles, creating this flowing, organic pattern. It sounds chaotic, but executed well, it’s sophisticated and unique.
The challenge with asymmetry is making it look intentional rather than random. Her architect used design software to plan the layout, ensuring the asymmetry had rhythm and balance despite the irregular placement.
When Asymmetry Works
Asymmetrical designs work best in:
- Large, open spaces with high ceilings
- Lofts or studios with artistic vibes
- Contemporary homes embracing bold design
- Spaces where you want a statement ceiling
- Rooms with architectural quirks to highlight
This isn’t a design for everyone. If you prefer clean symmetry, asymmetrical layouts will drive you crazy. Know yourself before committing to chaos (even intentional chaos).
8. Grid Pattern Profile Light Ceiling
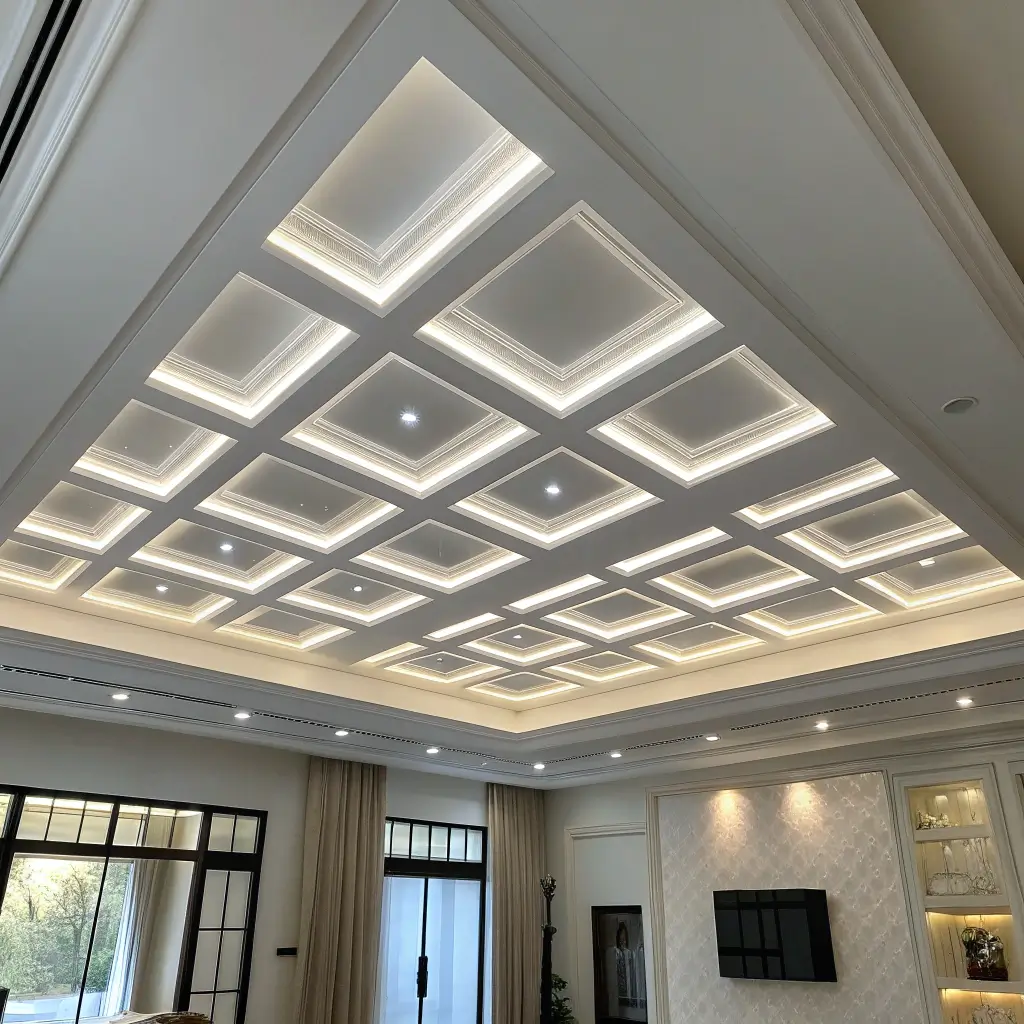
Grid patterns create structure and order with intersecting profile lights. I installed a simple grid in my kitchen, and the geometric pattern provides excellent task lighting while looking incredibly modern and organized.
Creating Your Grid
My kitchen grid uses profiles arranged in a 3×3 pattern, creating nine equal squares across the ceiling. Each intersection creates a visual focal point, and the overall effect is clean, organized, and contemporary. The grid provides even illumination across the entire kitchen—no dark corners.
Planning a grid requires math (unfortunately). I measured my ceiling dimensions, divided into equal sections, and mapped everything out on graph paper before drilling a single hole. The planning prevented the grid from looking lopsided or randomly placed.
Lighting Benefits
Grids provide incredibly even illumination. Unlike single fixtures that create bright spots and shadows, the grid distributes light uniformly. My kitchen has zero dark corners now—everything gets lit evenly, which is genuinely helpful when cooking.
The installation complexity increases with grid size. My 3×3 grid required nine separate LED profiles and lots of electrical connections. A larger grid means more profiles, more wiring, and more opportunity for things to go wrong.
9. Recessed Strip Profile Light Ceiling
Recessed strip profiles sit flush with the ceiling, creating seamless lines of light. I used this design in my bathroom, and the flush installation looks incredibly clean and modern—no protruding fixtures to collect dust or break the visual flow.
Flush Installation Process
Creating recessed profiles requires cutting channels into your ceiling (or building them into new construction). My bathroom renovation included planning these channels before installing the ceiling, so the LED profiles sit perfectly flush. You see light, but the fixtures themselves disappear into the architecture.
This design requires:
- Careful planning before ceiling installation
- Precise channel dimensions for your profiles
- Professional help (cutting channels in existing ceilings is risky)
- Quality profiles designed for recessed installation
- Proper heat dissipation planning
The Seamless Look
Recessed profiles create the cleanest, most minimal aesthetic possible. My bathroom ceiling looks like it’s glowing from within—no visible fixtures, no hardware, just beautiful, even light. It’s the ultimate in minimalist lighting design.
The downside? Recessed profiles are basically permanent. You can’t easily change them or move them around. Choose your layout carefully because you’ll live with it long-term.
Also Read: 12 Amazing Simple Ceiling Design Ideas for Cozy Interiors
10. Soft Cove Profile Light Ceiling

Cove lighting creates the softest, most romantic ambient light. I installed cove profiles in my master bedroom, and the gentle, indirect glow is perfect for creating a relaxing atmosphere after long days of dealing with life’s nonsense.
Building the Cove
Cove lighting requires creating a ledge around your ceiling perimeter where LED profiles sit, facing upward. The light bounces off the ceiling and creates this soft, diffused glow. My bedroom cove is about 8 inches wide and 6 inches deep, running around the entire room.
I built my cove using crown molding (for aesthetics) and simple wood framing (for the ledge). The LED profiles sit on the ledge, completely hidden from view. You only see the beautiful glow reflecting off the ceiling.
Creating the Right Atmosphere
Cove lighting is all about ambiance. I use dimmable warm white LEDs (2700K) that create this cozy, hotel-like atmosphere. Full brightness provides good ambient light for getting dressed; dimmed down creates perfect mood lighting for relaxation.
The indirect nature of cove lighting means it’s not ideal for task lighting. You’ll need additional lights for reading, working, or applying makeup. But for general ambient lighting that makes a room feel welcoming? Cove lighting is unbeatable.
Making Profile Light Ceilings Work for You
After exploring these ten profile light ceiling designs, here’s what I know: the right lighting transforms everything.
Whether you go minimal and subtle or bold and geometric, profile lighting adds sophistication that traditional fixtures simply can’t match.
The key is choosing designs that fit your space, style, and skill level. Start by assessing your ceiling height—rooms under 8 feet need careful planning to avoid making ceilings feel lower.
Consider your technical skills—some designs are definitely DIY-friendly, while others require professional installation.
Plan your electrical carefully. I made the mistake once of designing a beautiful layout without thinking about power sources, and retrofitting electrical was a nightmare.
Know where your power comes from and how you’ll connect everything before you start installing anything.
Budget realistically. Basic LED profile systems start around $50-100 for a simple 6-foot run. Complex installations with multiple profiles, dimmers, and smart controls can easily run $500-1000+ for a single room.
My living room’s floating ceiling cost about $600 total (DIY), while my friend’s professionally installed parallel lines cost $1,200.


