10 Creative Shoe Storage Ideas Closet Ideas for Busy Homes
- Shoe Storage
 Ben
Ben- 0
- 33 minutes read
Your closet looks like a shoe bomb went off, doesn’t it? I see you nodding. We’ve all been there—shoes piled on top of each other, that one missing sneaker that’s probably living its best life in some alternate dimension, and the daily struggle of finding a matching pair without destroying the entire situation.
But here’s the good news: you don’t need a mansion-sized walk-in closet to get your shoe game organized.
I’ve spent way too much time (and money, let’s be honest) experimenting with different closet shoe storage solutions. Some worked brilliantly, others were complete disasters that I pretend never happened.
After all that trial and error, I’ve figured out what actually makes sense for real people with real closets. So let’s talk about 10 shoe storage ideas that’ll transform your closet from chaotic nightmare to actually functional space.
1. Floating Wall Shoe Shelves

Floating shelves are like magic for closet walls—they create storage out of thin air. I installed these in my closet about a year ago, and honestly, I should’ve done it way sooner.
The concept is simple: mount shelves directly to your closet walls at whatever height works for you. You’re using vertical space that was just sitting there doing nothing, and suddenly you’ve got organized shoe storage that looks clean and intentional. No bulky furniture eating up floor space, just sleek shelves holding your shoes exactly where you can see them.
Here’s why floating shelves are brilliant:
- Customizable height: Mount them wherever makes sense for your closet layout
- No floor clutter: Your closet floor stays completely clear
- Easy to see everything: No more digging through piles or boxes
- Looks expensive: Even cheap shelves look good when they’re floating
I went with three shelves on one wall, each about 12 inches deep. That depth accommodates most shoes perfectly—sneakers, heels, boots (if you lay them sideways), the whole collection. The key is spacing them far enough apart that you can actually grab shoes without knocking everything off the shelf above.
Installation is pretty straightforward if you’re comfortable with a drill and wall anchors. I watched approximately 47 YouTube videos before attempting it because I’m paranoid about shelves falling, but it’s really not that complicated. Just make sure you find the studs in your wall or use proper anchors—nobody wants their shoe collection crashing down at 3 AM.
2. Over-the-Door Hanging Organizer
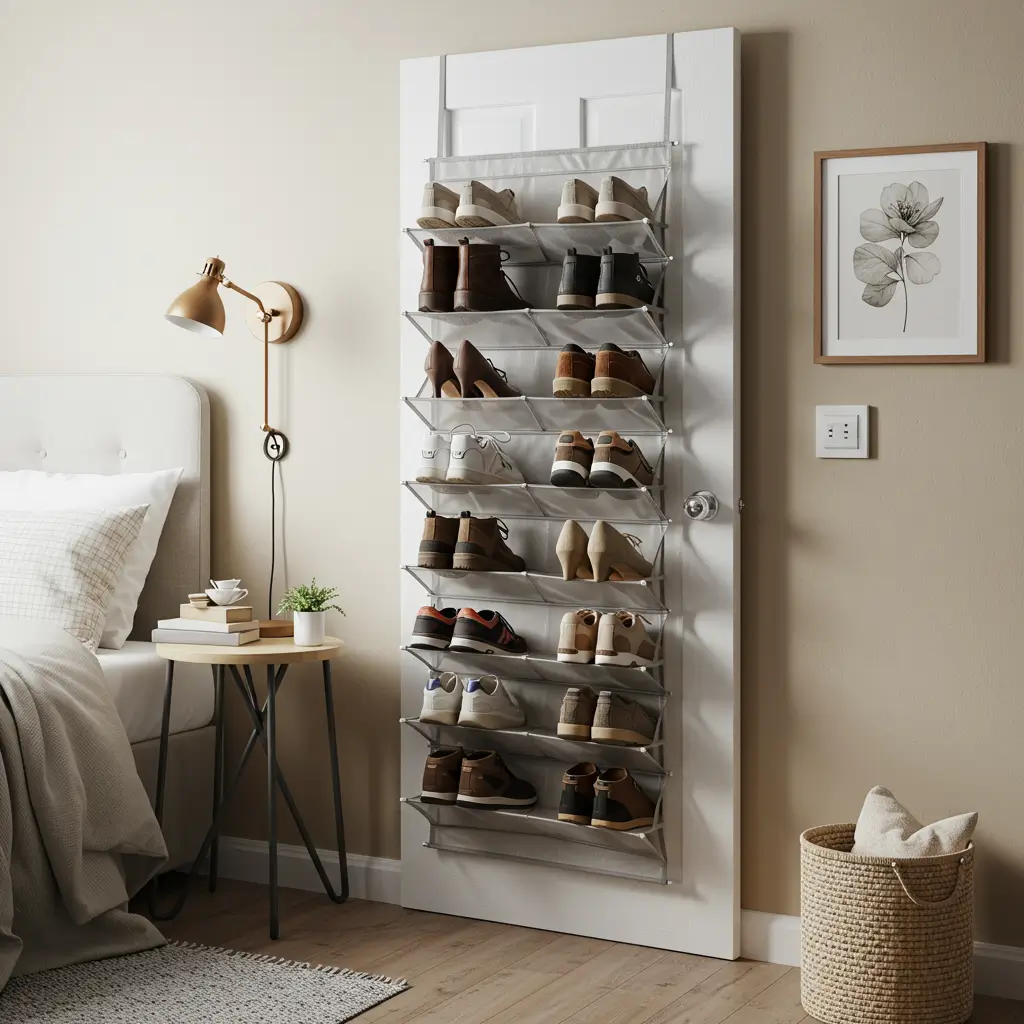
Okay, I resisted these for the longest time because they felt so… college dorm. But then my shoe situation reached critical mass, and I caved. Best $15 I’ve ever spent, hands down.
Over-the-door organizers are perfect for closets because they use space you’re not using anyway—the back of the door. You hang it up, load it with shoes, and boom. You’ve just added storage for 20+ pairs without touching your actual closet space. It’s almost too easy.
What makes these surprisingly awesome:
- Zero installation: Just hook it over the door and you’re done
- Massive capacity: Most hold 20-24 pairs easily
- Clear pockets: You can see exactly what you have
- Perfect for renters: No holes, no damage, no problems
The clear pocket versions are clutch. I organized mine by shoe type—all my sneakers in the top rows, flats and sandals in the middle, and fancy shoes I never wear at the bottom. Now I can actually find what I’m looking for without a 10-minute archaeological dig through my closet.
One pro tip: make sure your closet door can close properly with the organizer on it. My first attempt added about 5 inches to the door thickness, and it wouldn’t close all the way. I had to get a slimmer version, which worked perfectly. Learn from my mistakes, people.
3. Clear Acrylic Stackable Boxes
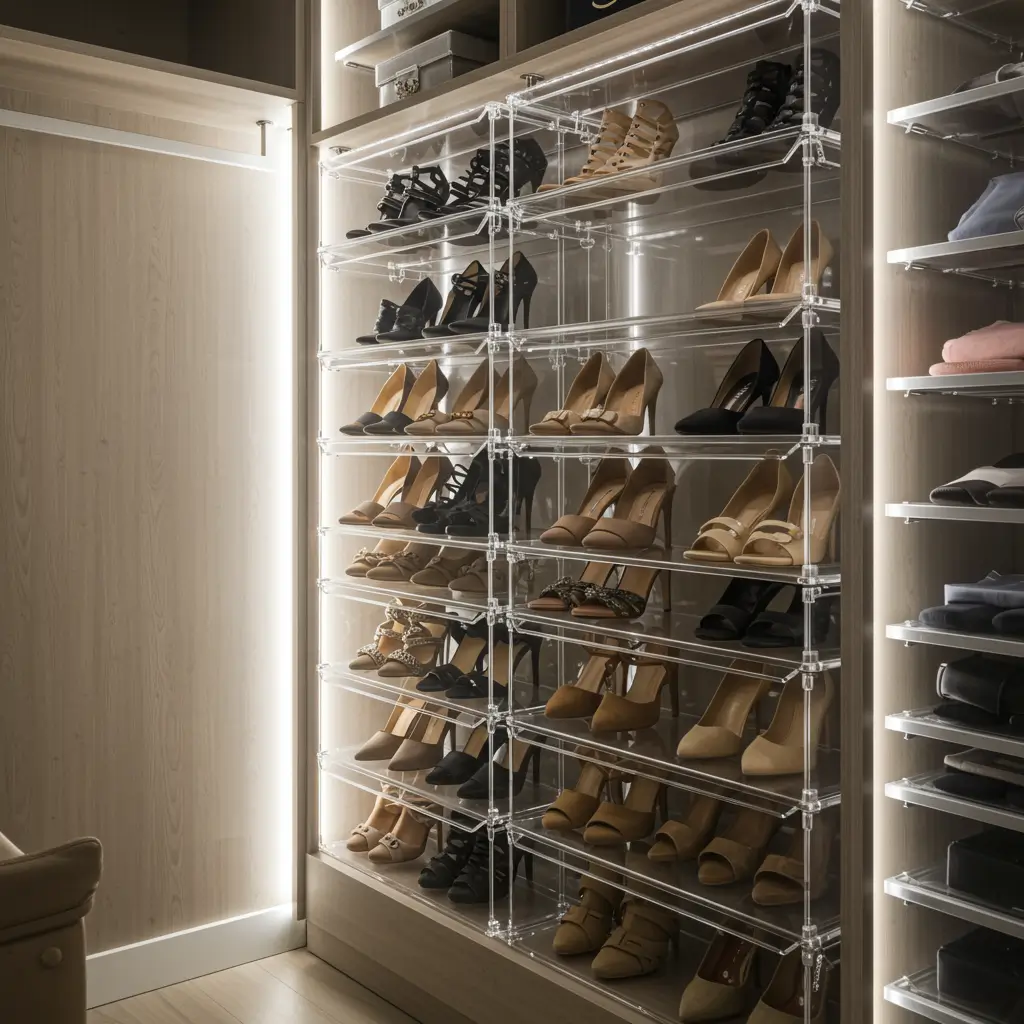
If you want your closet to look like it belongs on Instagram, clear acrylic boxes are your answer. I’ll admit, these are pricier than other options, but there’s something incredibly satisfying about seeing your entire shoe collection neatly displayed in matching transparent boxes.
Each shoe gets its own box, which you stack however you want. It’s like giving each pair its own little apartment. The clear design means you can see everything at a glance, and stacking them vertically maximizes your closet height. Plus, they protect your shoes from dust, which is surprisingly important if you have nice shoes you don’t wear often.
Why acrylic boxes are worth considering:
- Dust protection: Your shoes stay clean and pristine
- Stackable design: Build storage up instead of out
- Uniform appearance: Everything looks cohesive and organized
- Easy access: Pull out the box you need without disturbing others
I started with a set of 12 boxes for my most-worn shoes. The investment hurt a bit (these aren’t cheap), but the aesthetic payoff is real. My closet went from “why are you like this” to “okay, I see you” pretty much overnight.
The downside? They take up more space per shoe than other storage methods. Each box has its own footprint, so you need decent closet space to make this work. If you’re working with a tiny closet, this might not be your best option. But if you’ve got the space and want that clean, boutique vibe? Absolutely worth it.
Also Read: 12 Stylish Entryway Shoe Storage Ideas for Small Spaces
4. Pull-Out Closet Shoe Drawers
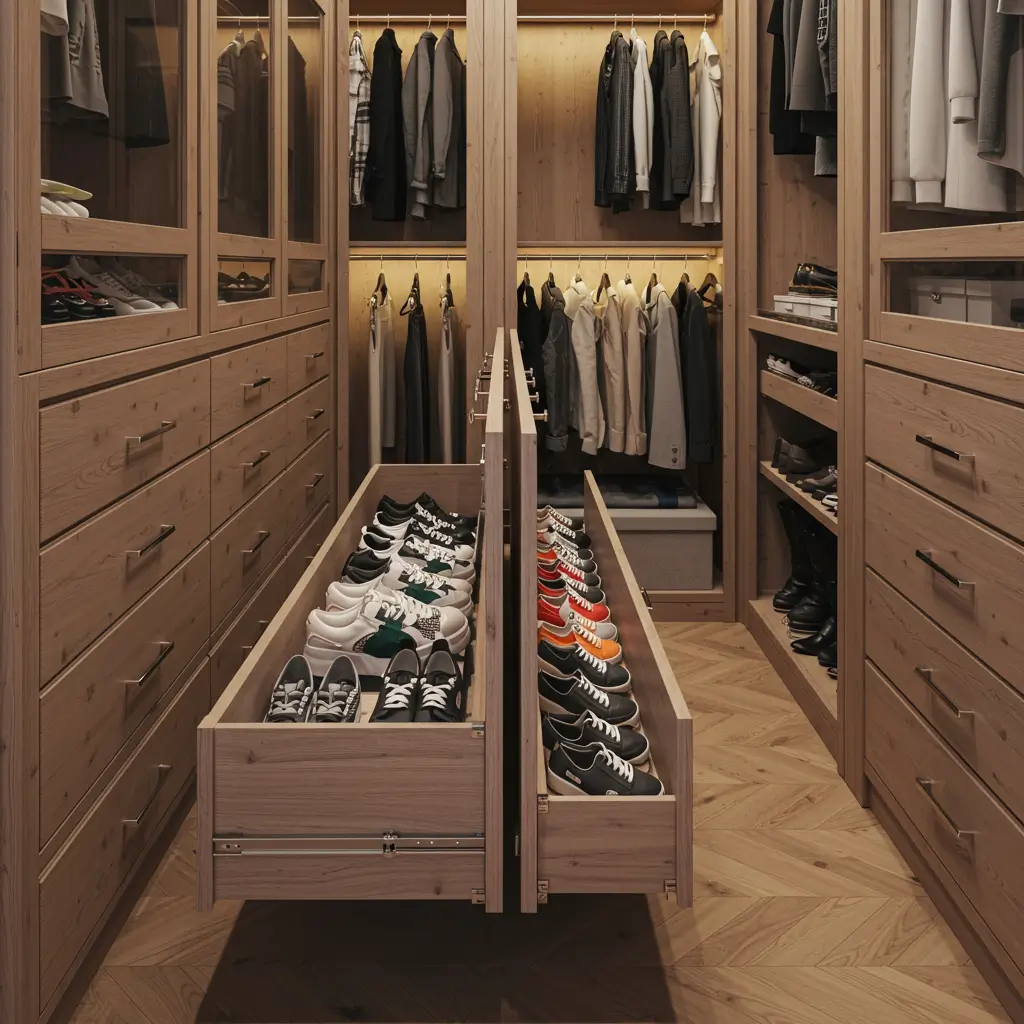
This is the Cadillac of closet shoe storage—smooth, efficient, and slightly fancy. Pull-out drawers that slide out from your closet shelving give you that custom closet feel without the custom closet price tag.
I installed a pull-out drawer system in the bottom of my closet, and it’s genuinely changed my morning routine. Instead of crouching down and pawing through shoes, I just pull out a drawer and pick what I need. Everything’s organized, visible, and accessible. It’s the kind of upgrade that makes you feel like you’ve got your life together, even when you definitely don’t.
The benefits are legit:
- Smooth access: Gliding drawers are satisfying to use
- Organized sections: Divide drawers into compartments
- Maximizes depth: Uses the full depth of your closet
- Professional look: Feels like a custom closet system
You can buy pre-made drawer systems or DIY it if you’re handy. I went the DIY route using drawer slides from the hardware store and some plywood. Cost me about $60 total, versus $300+ for the fancy pre-made systems. Same function, way less money.
The installation requires measuring carefully and mounting drawer slides level, which can be fiddly. I may have remounted mine three times because I’m a perfectionist (or just bad at measuring, honestly). But once they’re in? Chef’s kiss. FYI, measure your closet depth first—you need enough space for the drawers to fully extend without hitting anything.
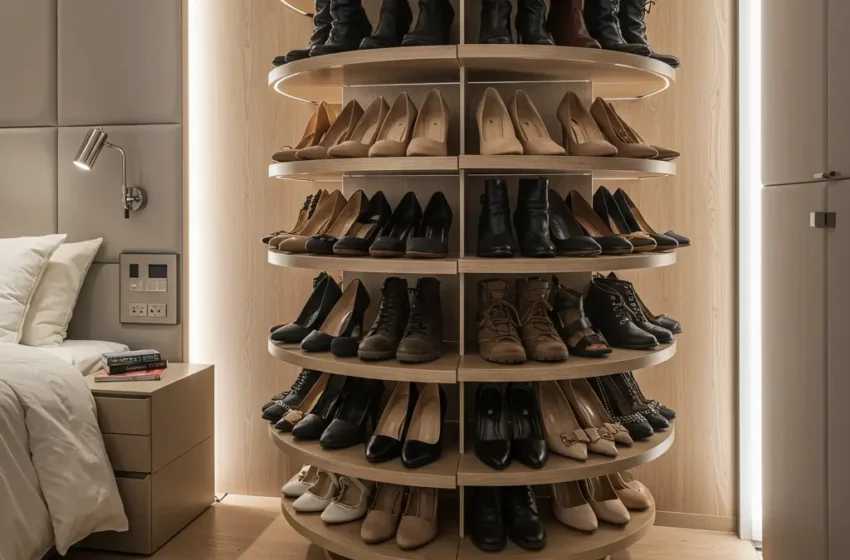
5. Rotating Shoe Carousel Rack
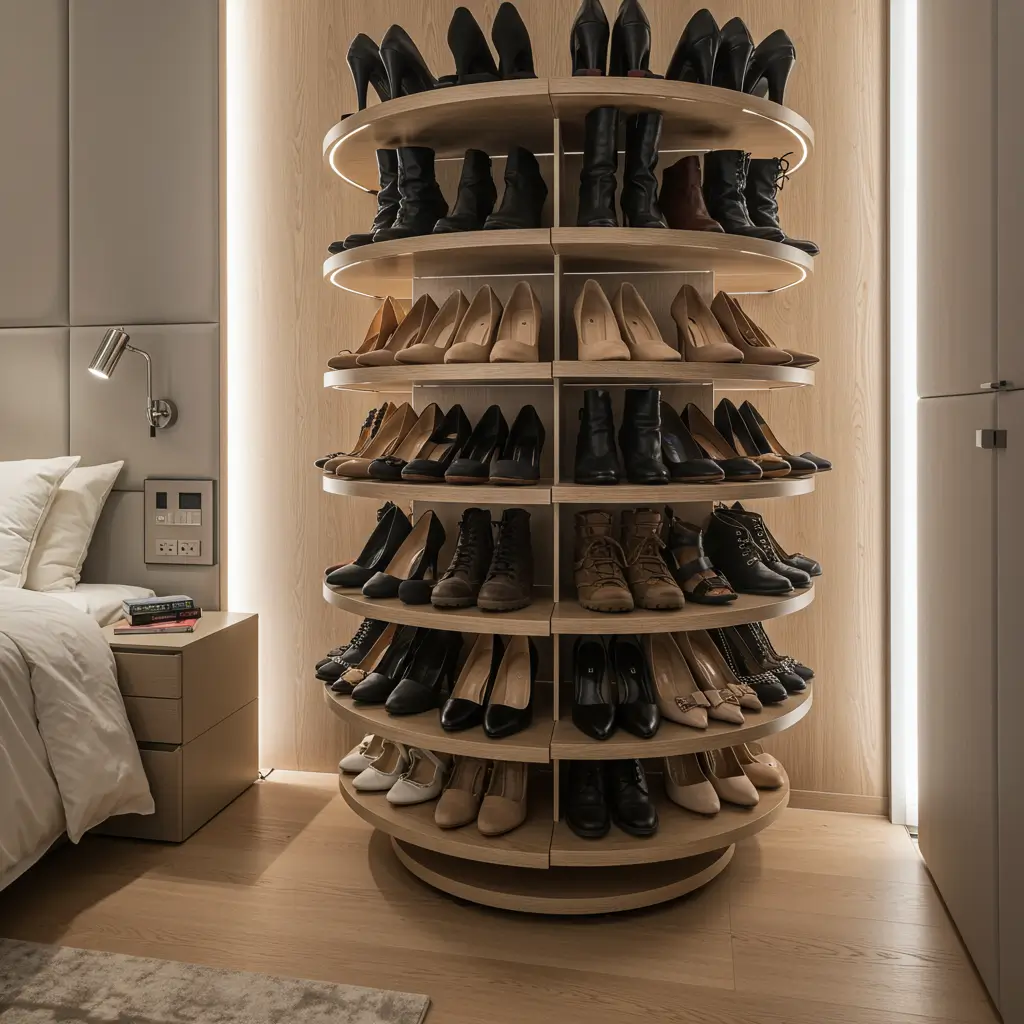
Ever seen those rotating spice racks and thought, “but make it shoes?” That’s basically what a rotating shoe carousel is, and it’s weirdly genius for closet corners that would otherwise be wasted space.
I was skeptical about these until I saw one in action at a friend’s place. You spin it like a lazy Susan, and all your shoes rotate into view. It holds a surprising number of pairs—usually 20-30 depending on the size—and fits in corners where traditional storage wouldn’t work. It’s practical and slightly fun, which is a rare combo.
Why carousel racks are underrated:
- Corner-friendly: Maximizes awkward corner spaces
- 360-degree access: Spin to find what you need
- Compact footprint: Takes up minimal floor space
- Kind of entertaining: Spinning it never gets old 🙂
Most carousel racks have adjustable tiers, so you can customize the spacing for different shoe heights. I keep flats and sandals on the tighter-spaced tiers and sneakers on the wider ones. It’s like a Ferris wheel for footwear, except actually useful.
The main consideration is stability. Cheaper versions can be wobbly, especially when fully loaded. You want something sturdy with a weighted base, or it’ll tip when you’re aggressively spinning it looking for that one specific pair of shoes. Trust me, I knocked mine over exactly once before I upgraded to a sturdier model.
6. Under-Bed Slide-Out Storage
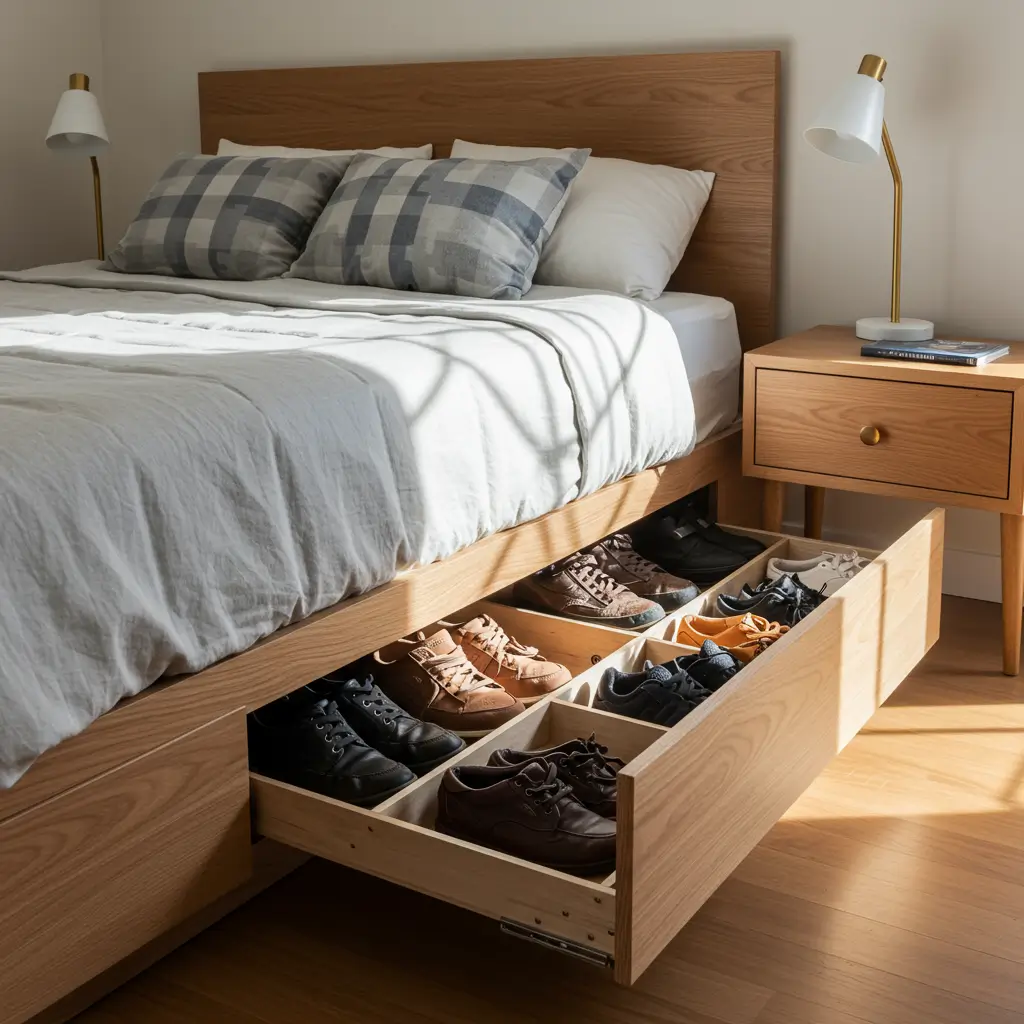
Plot twist: your closet isn’t the only place you can store shoes. If your closet is genuinely maxed out, under-bed storage is a sneaky solution that uses space you’re probably wasting anyway.
I use rolling bins that slide under my bed for seasonal shoes I’m not currently wearing. Winter boots in summer? Under the bed. Summer sandals in winter? Same deal. It keeps my closet focused on shoes I actually need right now while still having everything accessible when seasons change.
What makes under-bed storage practical:
- Seasonal solution: Perfect for rotating shoes in and out
- Out of sight: Keeps your bedroom looking clean
- Easy to access: Wheels make sliding them out effortless
- Protects shoes: Enclosed bins keep dust away
The key is getting containers that actually fit under your bed. Measure your under-bed clearance first—some beds sit low, and you need slim containers. Others have more room, and you can use taller bins. I learned this the hard way when I bought bins that were half an inch too tall. So close, yet so useless.
I also recommend clear-top bins so you can see what’s inside without opening them. Or at least label them clearly. Nothing’s worse than pulling out every bin trying to find your snow boots when you’re already running late.
Also Read: 10 Smart IKEA Shoe Storage Ideas for Tiny Apartments
7. Ladder-Style Shoe Display
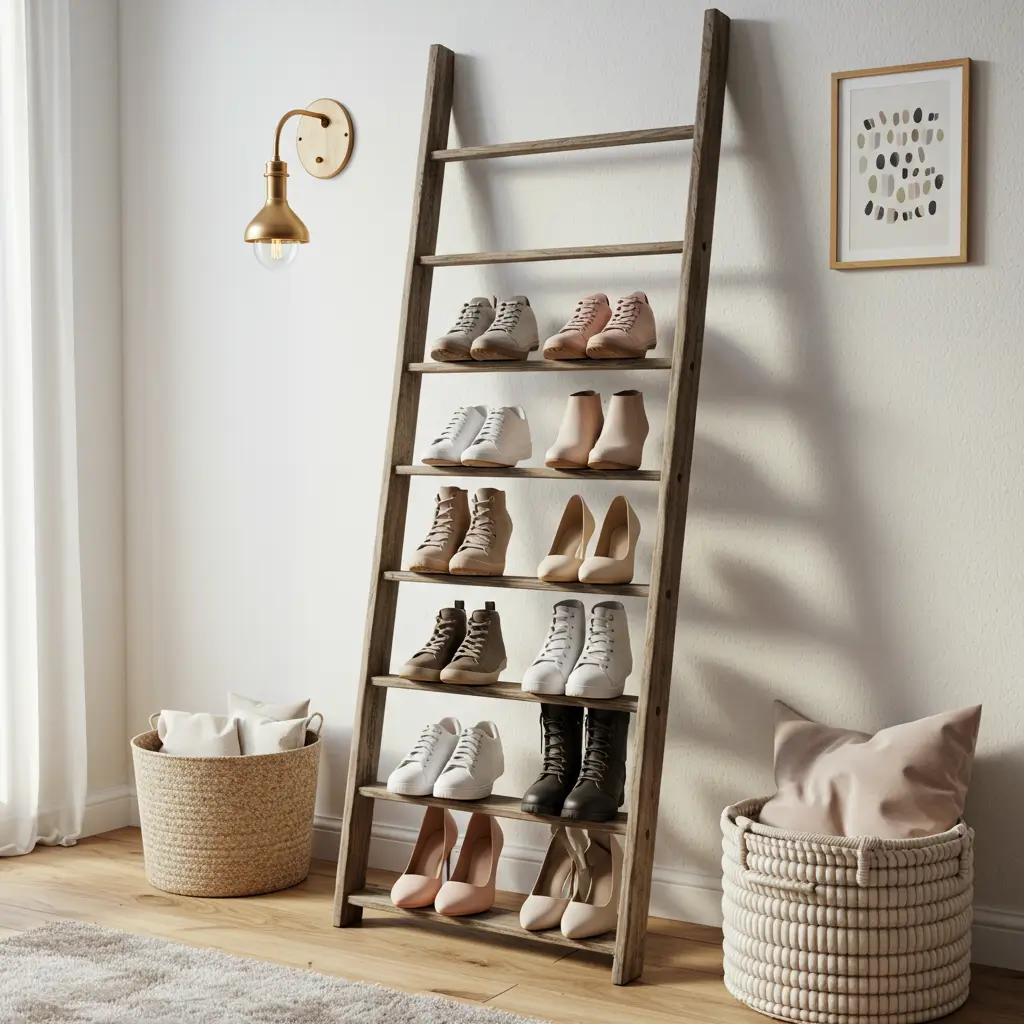
Ladder shelves have been trending forever, and there’s a reason—they look good and actually work. The angled, leaning design is perfect for closets because it doesn’t require any installation, and you can position it wherever makes sense.
I’ve got a five-tier ladder shelf in my walk-in closet (okay, “walk-in” is generous—it’s more of a “squeeze-in”), and it holds about 20 pairs. The angled design means each tier is visible, so I can see everything at once. No more forgetting about shoes because they’re hidden in the back somewhere.
Why ladder shelves work in closets:
- No mounting required: Just lean it against the wall
- Open design: Shoes are visible and accessible
- Modern aesthetic: Looks intentional, not cluttered
- Portable: Move it around whenever you reorganize
The graduated tier depths are perfect for different shoe types. Boots go on the wider bottom shelves, everyday shoes in the middle, and smaller items like sandals up top. It’s functional organization that happens to look good, which is basically the dream.
One thing to watch for: make sure the ladder is stable. The angle needs to be right, or it’ll tip forward when you’re grabbing shoes. I secure mine to the wall with a small bracket at the top, just for peace of mind. Paranoid? Maybe. But I’m not risking an avalanche of shoes and metal shelving.
8. DIY Pegboard Shoe Wall

If you’re even slightly crafty, a pegboard shoe wall is a game-changer. I created one on my closet wall using a 4×4 pegboard sheet, some hooks, and about two hours of my Saturday. The result? Customizable shoe storage that looks way more expensive than it actually was.
Pegboards are endlessly flexible. You can arrange hooks however you want, hang shoes by their heels or back loops, and rearrange everything whenever your collection changes. It’s like the Lego of storage—infinitely configurable and oddly satisfying to organize.
What makes pegboard walls awesome:
- Total customization: Arrange hooks exactly how you want
- Easy to modify: Move hooks around anytime
- Works for any shoe type: Hang anything with a back loop or heel
- Budget-friendly: Materials cost under $50
I painted my pegboard a charcoal gray to match my closet color scheme, which elevated the whole look. Without paint, pegboard can look a bit workshop-y, but a fresh coat makes it look intentional and stylish. Game-changer move right there.
Installation is straightforward—mount the pegboard to your wall with spacers behind it (so hooks can go through), add hooks, and start hanging. I keep my most-worn sneakers on the pegboard because they have great back loops for hanging. The visual display makes getting dressed way easier because I can see all my options at once.
9. Cubby Storage Bench
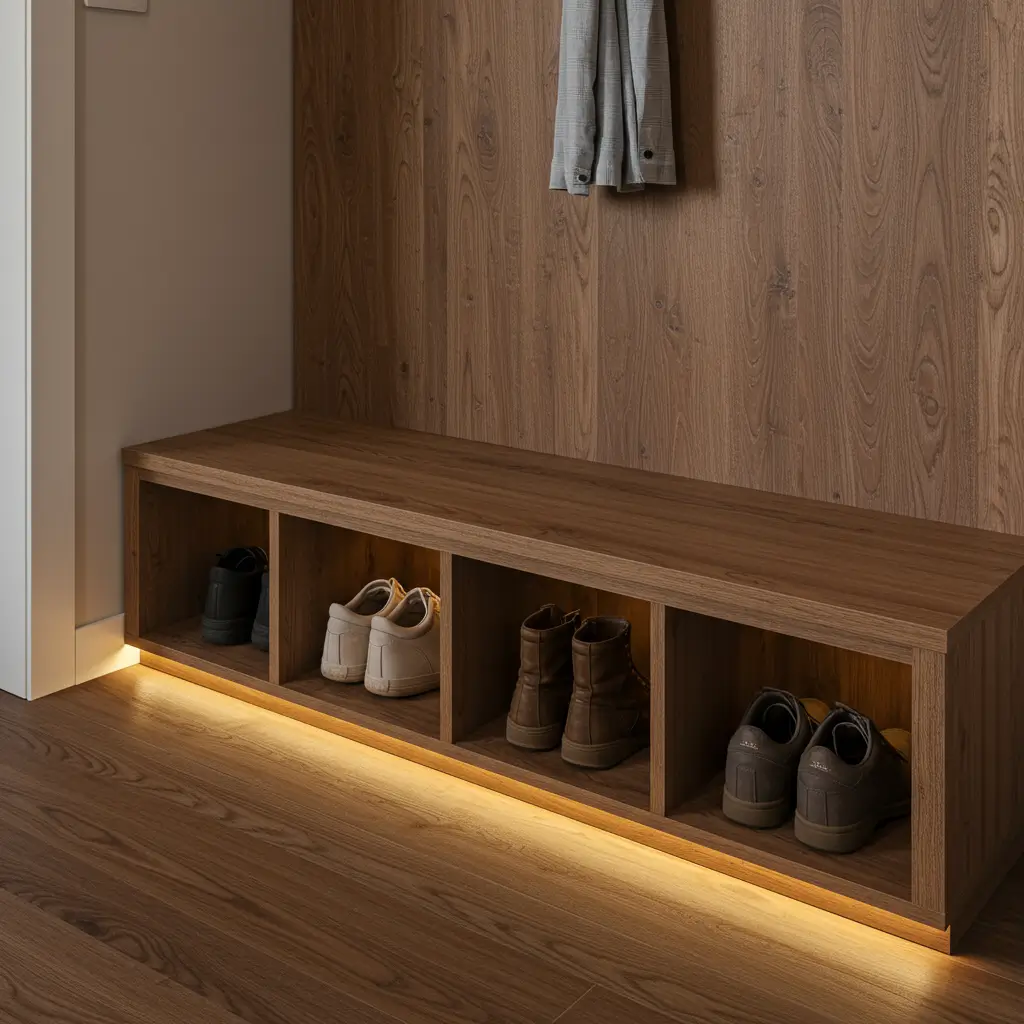
Here’s where function meets comfort—a cubby bench gives you shoe storage plus a place to sit. I installed one along the bottom of my closet, and it’s become my favorite spot for putting on shoes without doing that awkward one-legged balance dance.
The bench has open cubbies underneath where each pair of shoes gets its own compartment. The top provides seating (with a cushion, if you’re fancy), and suddenly your closet is both organized and comfortable. It’s practical furniture that actually enhances your daily routine.
Why cubby benches are smart:
- Dual purpose: Storage and seating in one unit
- Individual compartments: Each shoe has its designated spot
- Prevents pile-ups: No more shoe avalanches
- Makes closet comfortable: Sitting while dressing is underrated
I built mine using basic lumber and cube storage inserts from Target. Total cost was about $80, which beat the $200+ price tag on pre-made versions. Mine isn’t perfect (there are some wobbly joints I don’t talk about), but it works great and holds around 12 pairs comfortably.
The cushion on top is crucial. I added a foam pad covered in fabric that matches my closet, and it transformed the bench from functional to actually nice. IMO, if you’re going to build furniture, make it comfortable. Life’s too short for uncomfortable seating.
Also Read: 12 Affordable DIY Shoe Storage Ideas for Any Home
10. Tiered Corner Shoe Rack
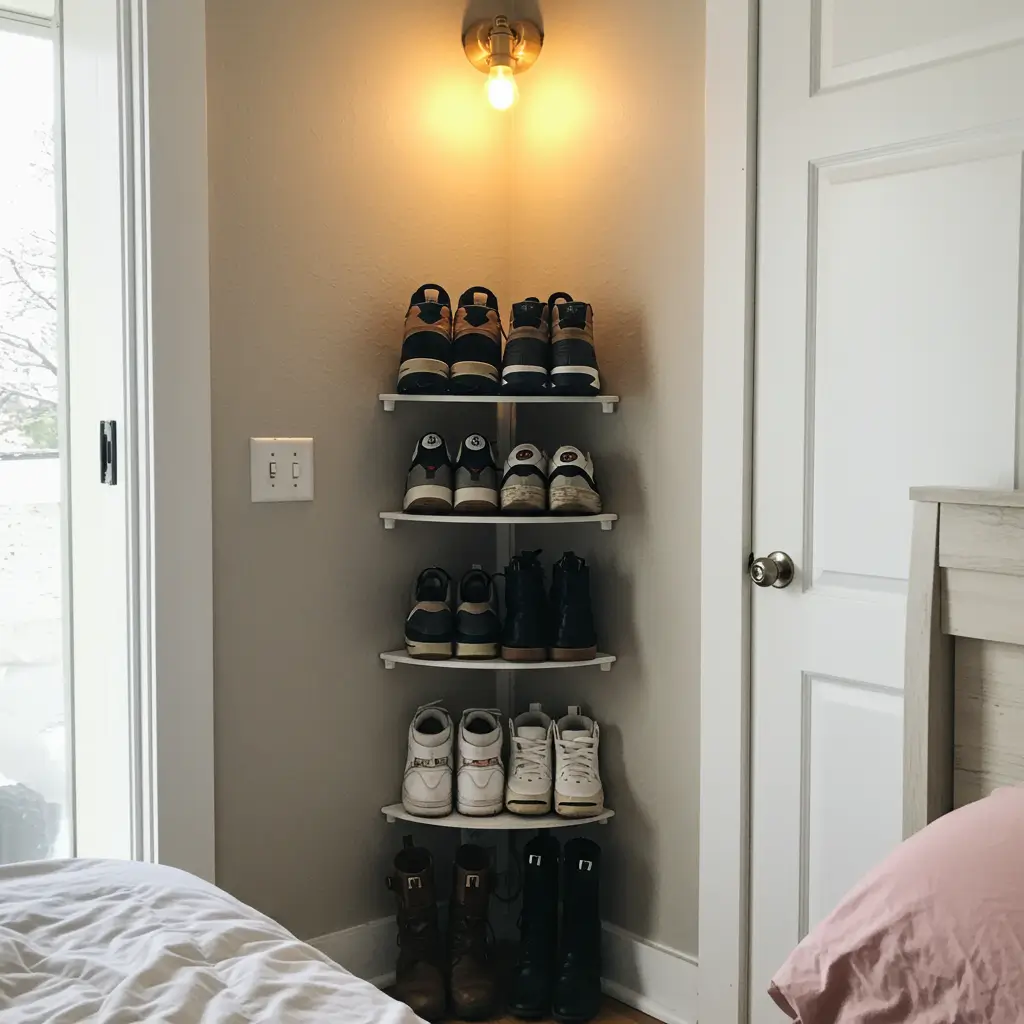
Corners are the most wasted space in any closet. A tiered corner rack is specifically designed to fit into those awkward angles and maximize every inch. I’ve got one in my closet corner that would otherwise just collect random stuff I don’t know what to do with.
These racks are usually triangular to fit perfectly into corner angles, with multiple tiers that gradually expand as they go up. You can fit a shocking number of shoes—usually 15-20 pairs—in a space that’s maybe 2 square feet of floor space. That’s some impressive spatial efficiency.
The corner rack advantages:
- Uses dead space: Corners finally have a purpose
- Vertical storage: Stacks multiple tiers high
- Compact footprint: Minimal floor space required
- Easy assembly: Most are simple to put together
I keep my everyday shoes on the lower, more accessible tiers, and special occasion shoes up higher. This way, the shoes I wear most are right at hand level, and the fancy heels I wear twice a year can hang out up top where I need a slight reach to grab them.
The only real downside is access to the back of each tier. Shoes in the very back corner can be slightly annoying to reach, depending on the rack design. I learned to put shoes I wear less frequently toward the back and keep my go-to pairs toward the front. Simple adjustment, huge difference in daily functionality.
Making It All Work Together
Listen, you don’t have to pick just one of these solutions. My closet uses a combination—floating shelves on one wall, an over-the-door organizer, and a corner rack. Mix and match whatever makes sense for your space and collection.
Start by assessing what you actually have. Count your shoes (yes, all of them, including those lonely single shoes that lost their partners).
Then measure your closet shoe space—every dimension matters. That information tells you what’s realistically going to fit and what’s just wishful thinking.
Think about your routine too. Which shoes do you wear constantly? Those should be the most accessible. Which ones are seasonal or occasional? Those can go in less convenient storage.
Organizing by frequency of use makes way more sense than organizing by color or type, at least in terms of daily functionality.
And here’s the real talk: whatever system you choose only works if you maintain it. I spent weeks organizing my closet beautifully, then immediately went back to kicking shoes off wherever they landed.
It took genuine effort to build the habit of putting shoes back in their designated spots.
But once that habit stuck? Life-changing. No more frantic morning searches, no more tripping over loose shoes, just organized calm.
Your closet can be organized without requiring a Pinterest-perfect level of commitment. Start with one storage solution that addresses your biggest pain point.
For me, that was the over-the-door organizer because I desperately needed more capacity. Once you solve that first problem, you can layer in other solutions as needed.
The goal isn’t perfection—it’s functionality that works for your actual life. Some shoe storage systems look amazing in photos but are annoying to use in reality.
Go for solutions that make your daily routine easier, not ones that just look good on Instagram. Though if it’s both? Even better.
You’ve got this. Your closet is about to go from disaster zone to actually functional space, and honestly? That feeling of opening your closet and seeing organized shoes instead of chaos is worth every bit of effort.
Now go forth and conquer that shoe storage situation. Your future self will thank you every single morning.


