10 Spectacular Night Wedding Decor Ideas for Perfect Photos
- Wedding Decor
 Ben
Ben- 0
- 31 minutes read
Picture this: You’re scrolling through Instagram at 2 AM (we’ve all been there), and you stumble upon those jaw-dropping night wedding photos where everything looks like it belongs in a fairytale. The lights are magical, the atmosphere screams romance, and you can’t help but wonder how they pulled it off. Well, grab your coffee because I’m about to spill all the secrets that’ll transform your evening celebration into a photographer’s dream!
Let me tell you something – night weddings hit differently. I’ve shot dozens of weddings over the years, and there’s something absolutely enchanting about the way lights dance against the darkness. The best part? You don’t need a Hollywood budget to create Instagram-worthy moments that’ll make your guests’ jaws drop.
Twinkling Fairy Light Canopy
Okay, let’s start with the absolute showstopper – the fairy light canopy. Trust me when I say this is the single most transformative element you can add to your night wedding. I remember the first time I walked into a reception with a full fairy light canopy overhead. My immediate thought? “Did I just step into a Disney movie?”
Here’s what makes this setup absolutely brilliant for photos:
- Creates a soft, romantic glow that flatters everyone’s skin tone
- Adds depth and dimension to every single shot
- Works as both ambient lighting and a stunning backdrop
- Makes even the simplest venue look like a million bucks
Setting Up Your Fairy Light Paradise
The trick isn’t just stringing up some lights and calling it a day. You want to create layers and texture with your fairy lights. Start with a base grid pattern across your ceiling or tent structure. Then add draping strands at varying heights to create that dreamy, cascading effect.
Pro tip from experience: Mix warm white and cool white lights for added dimension. Most people stick to one temperature, but that subtle variation? Chef’s kiss for photos! Also, consider using lights with different bulb sizes – the variety adds visual interest that cameras absolutely love.
Don’t forget to test your setup with actual camera equipment before the big day. What looks good to the naked eye might photograph completely differently. I learned this the hard way when what looked perfect in person created harsh shadows in photos. 🙂
Lantern-Lined Aisle
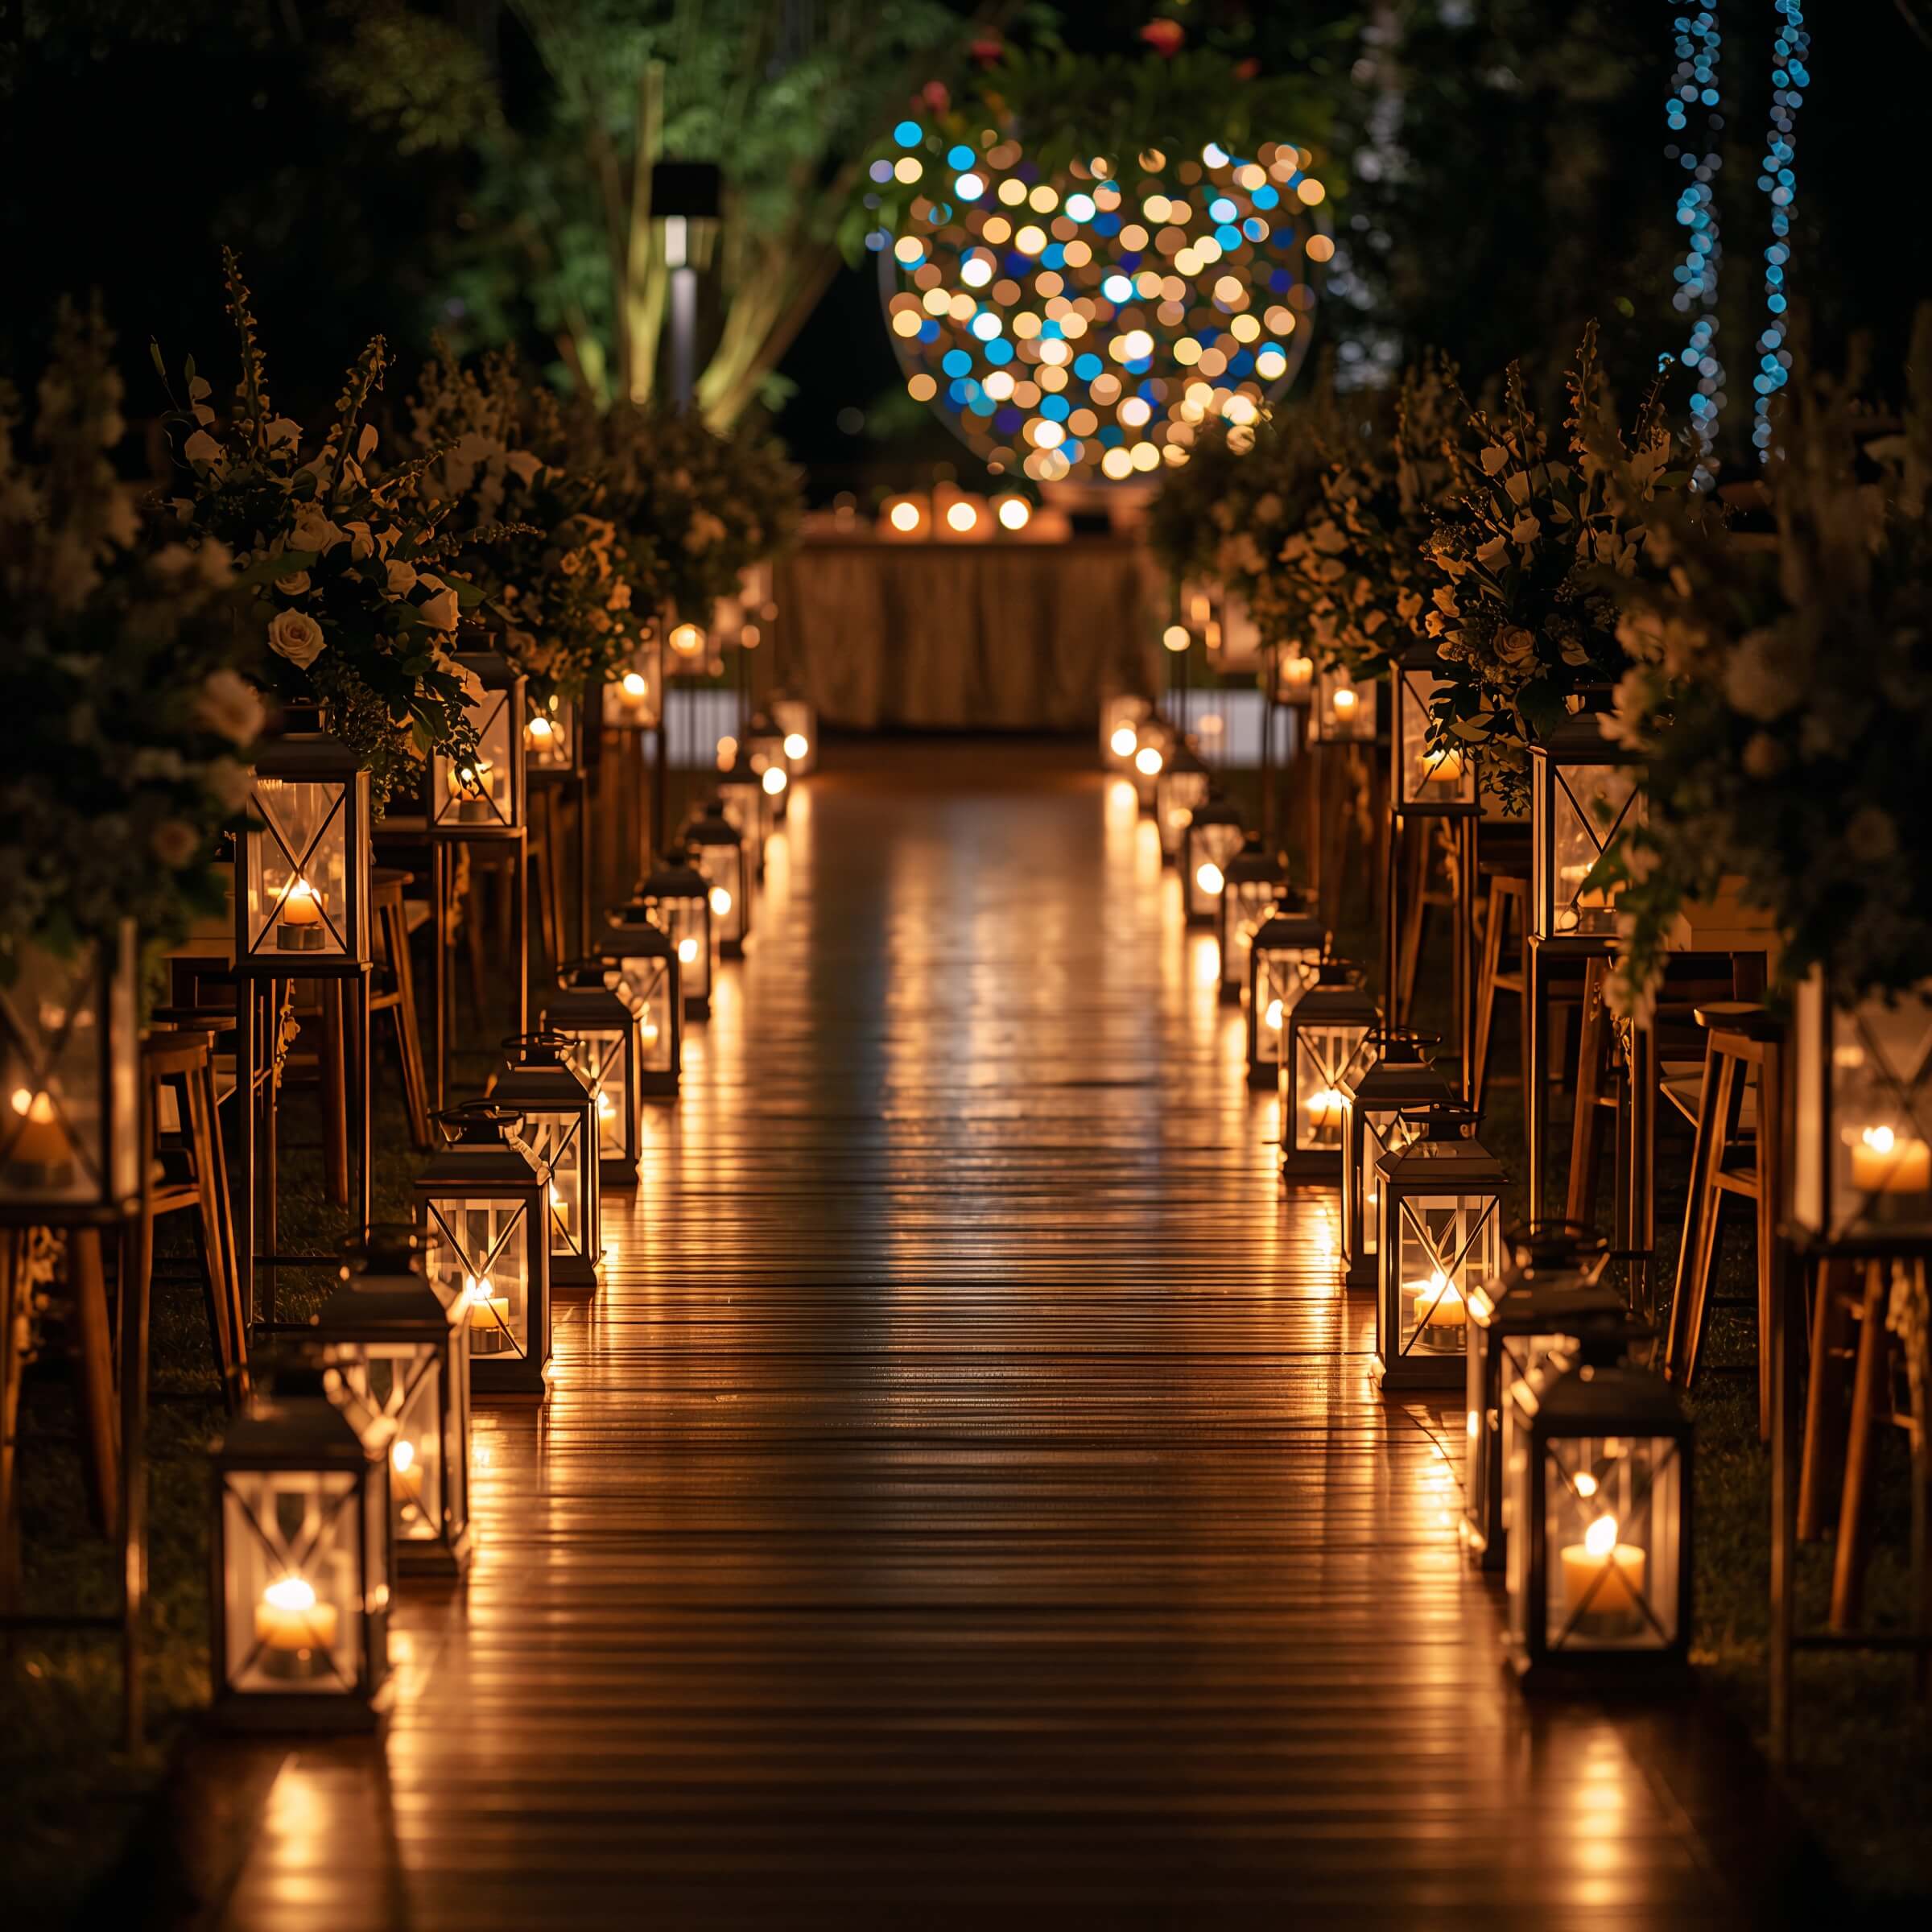
Ever wondered why lanterns have been used in celebrations for centuries? They create this incredible pathway of light that naturally draws the eye exactly where you want it – on you walking down that aisle! Plus, they’re ridiculously photogenic from every angle.
I’ve seen couples use everything from classic paper lanterns to Moroccan-style metal ones. Each style tells a different story. Paper lanterns scream whimsical garden party vibes, while metal lanterns with intricate patterns cast the most incredible shadows that’ll make your photographer weep with joy.
Making Your Lantern Aisle Pop
Here’s where most people mess up – they space their lanterns too far apart. You want them close enough to create a continuous corridor of light, not random dots in the darkness. Think every 2-3 feet max. Yes, that means more lanterns, but the visual impact? Totally worth it.
Consider these killer combinations:
- Alternating lantern heights for a dynamic look
- Mixing candles and LED lights for safety without sacrificing aesthetics
- Adding flowers or greenery around the base of each lantern
- Using colored glass lanterns for a subtle pop of your wedding colors
FYI, battery-operated candles have come a LONG way. The flickering ones nowadays? You literally can’t tell the difference in photos, and you won’t have to worry about Great Aunt Martha’s dress catching fire.
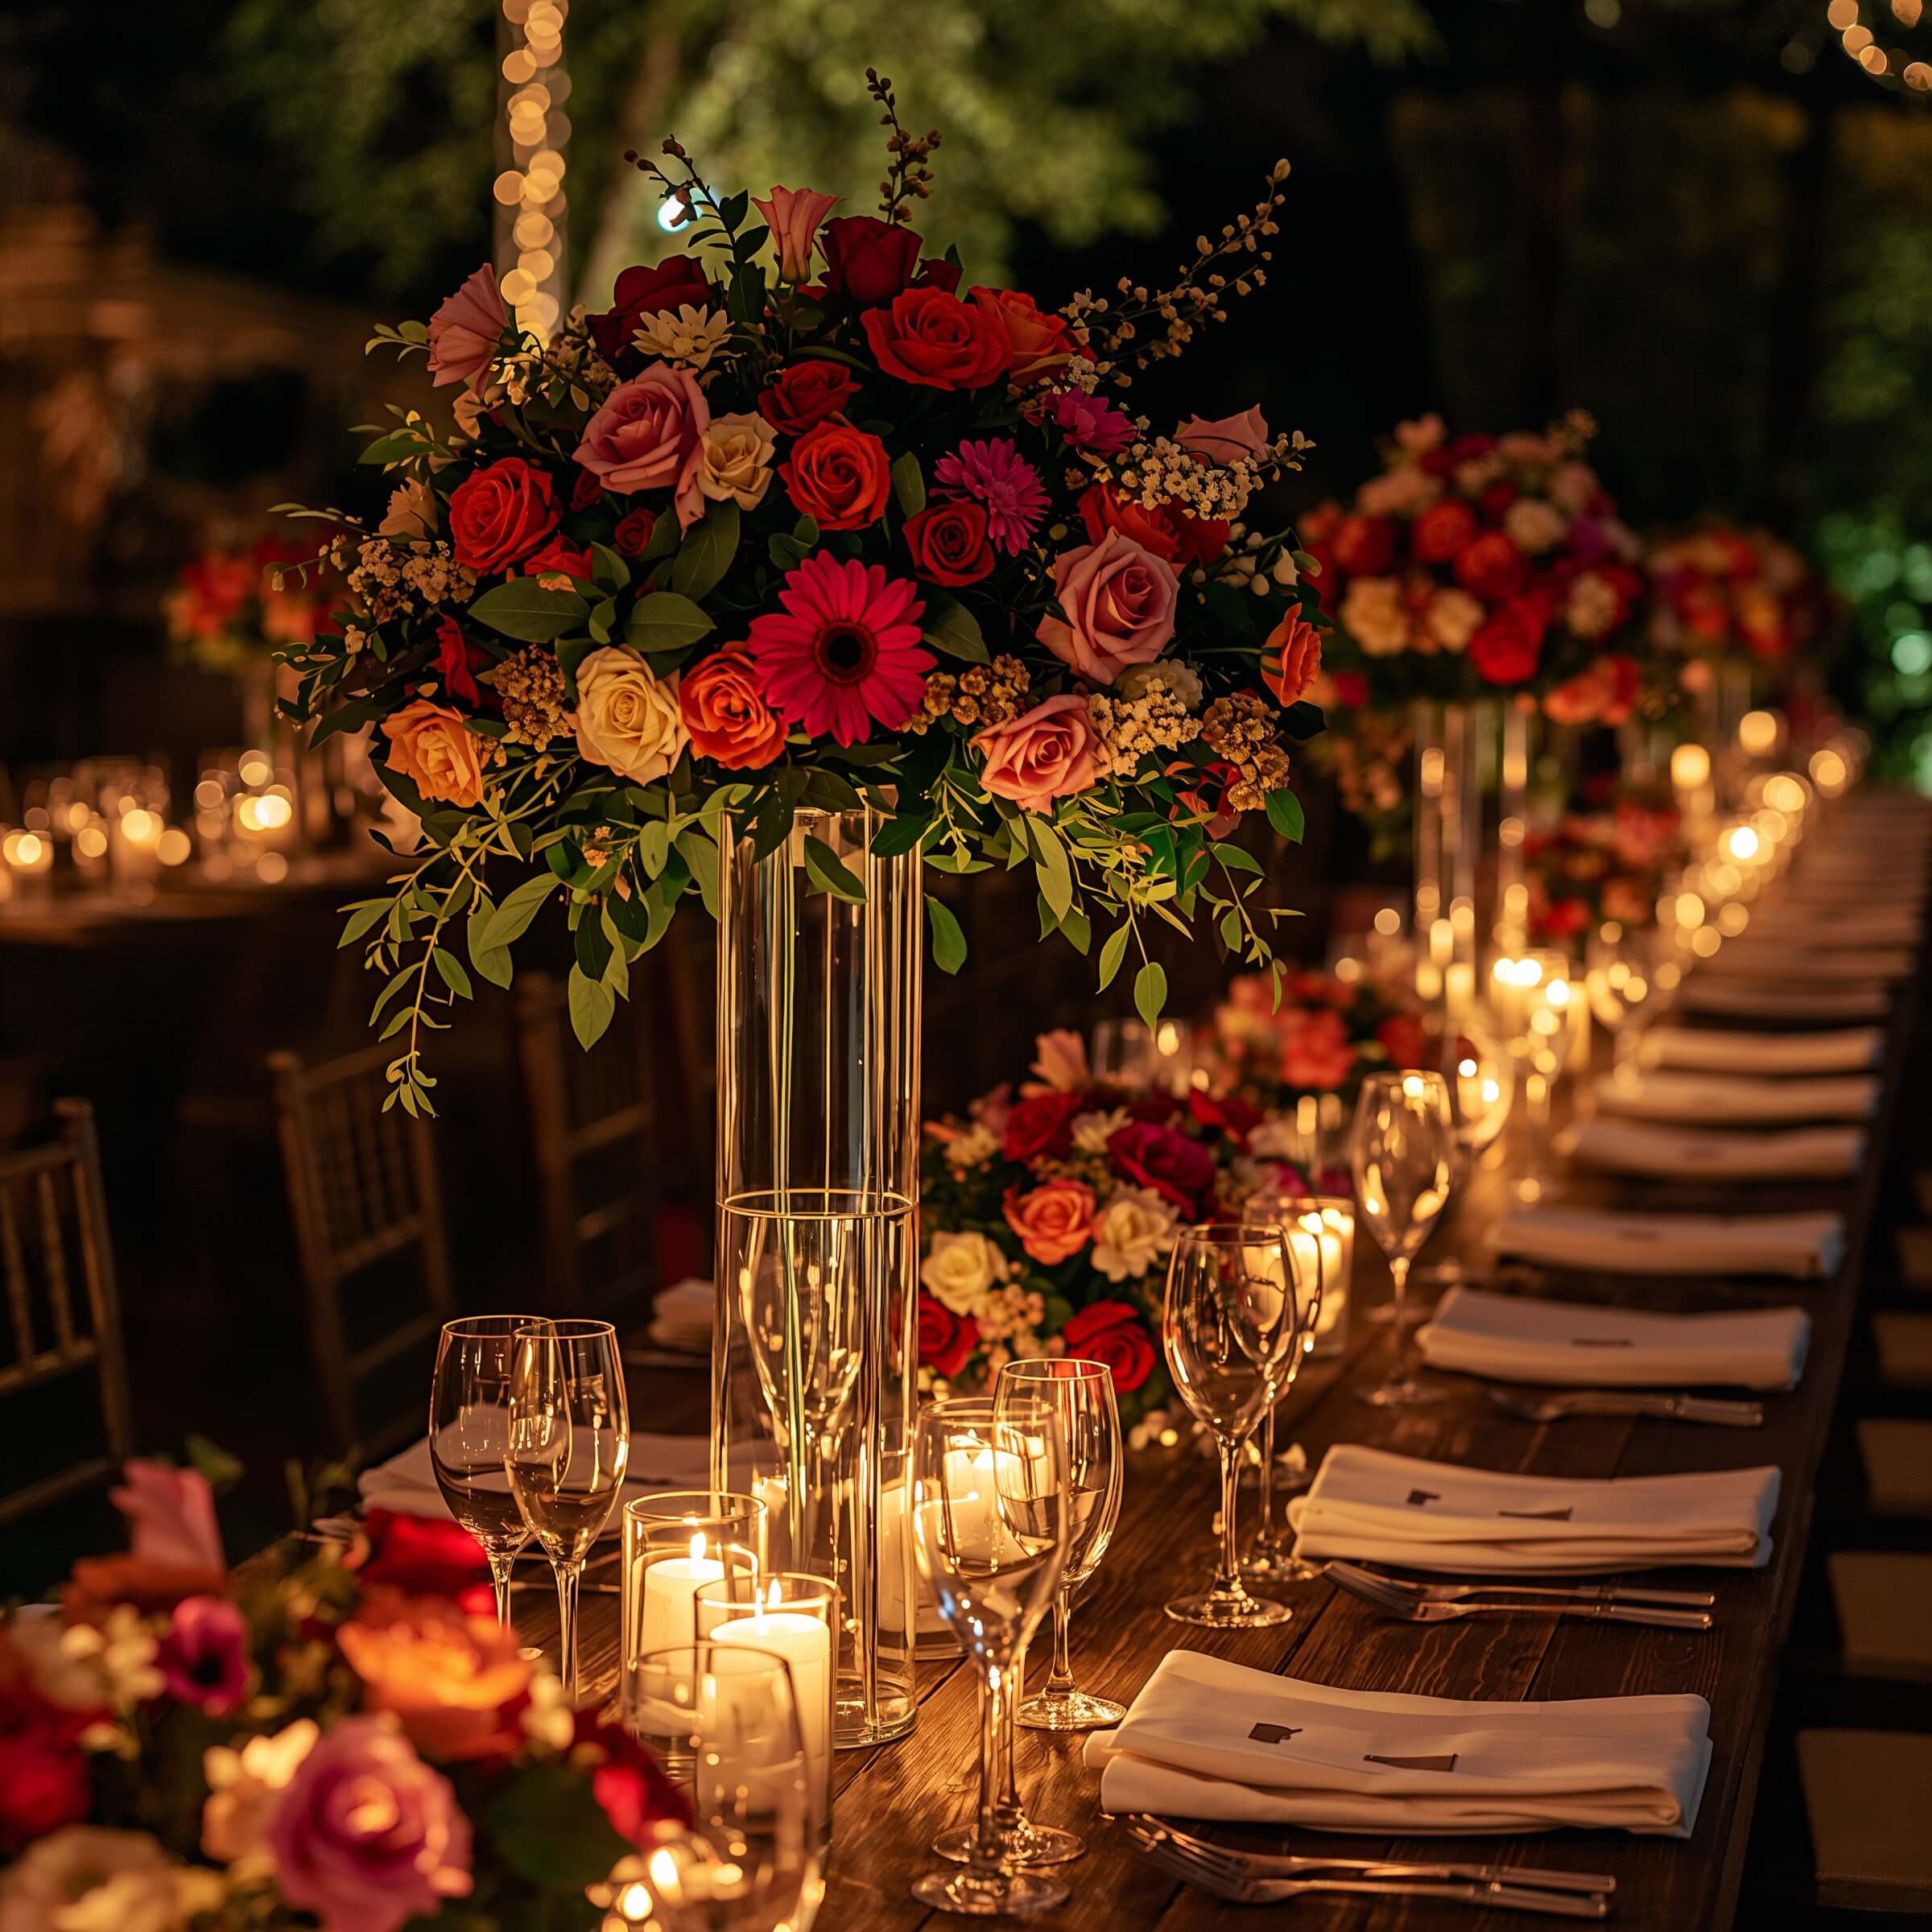
Candlelit Rustic Tablescape
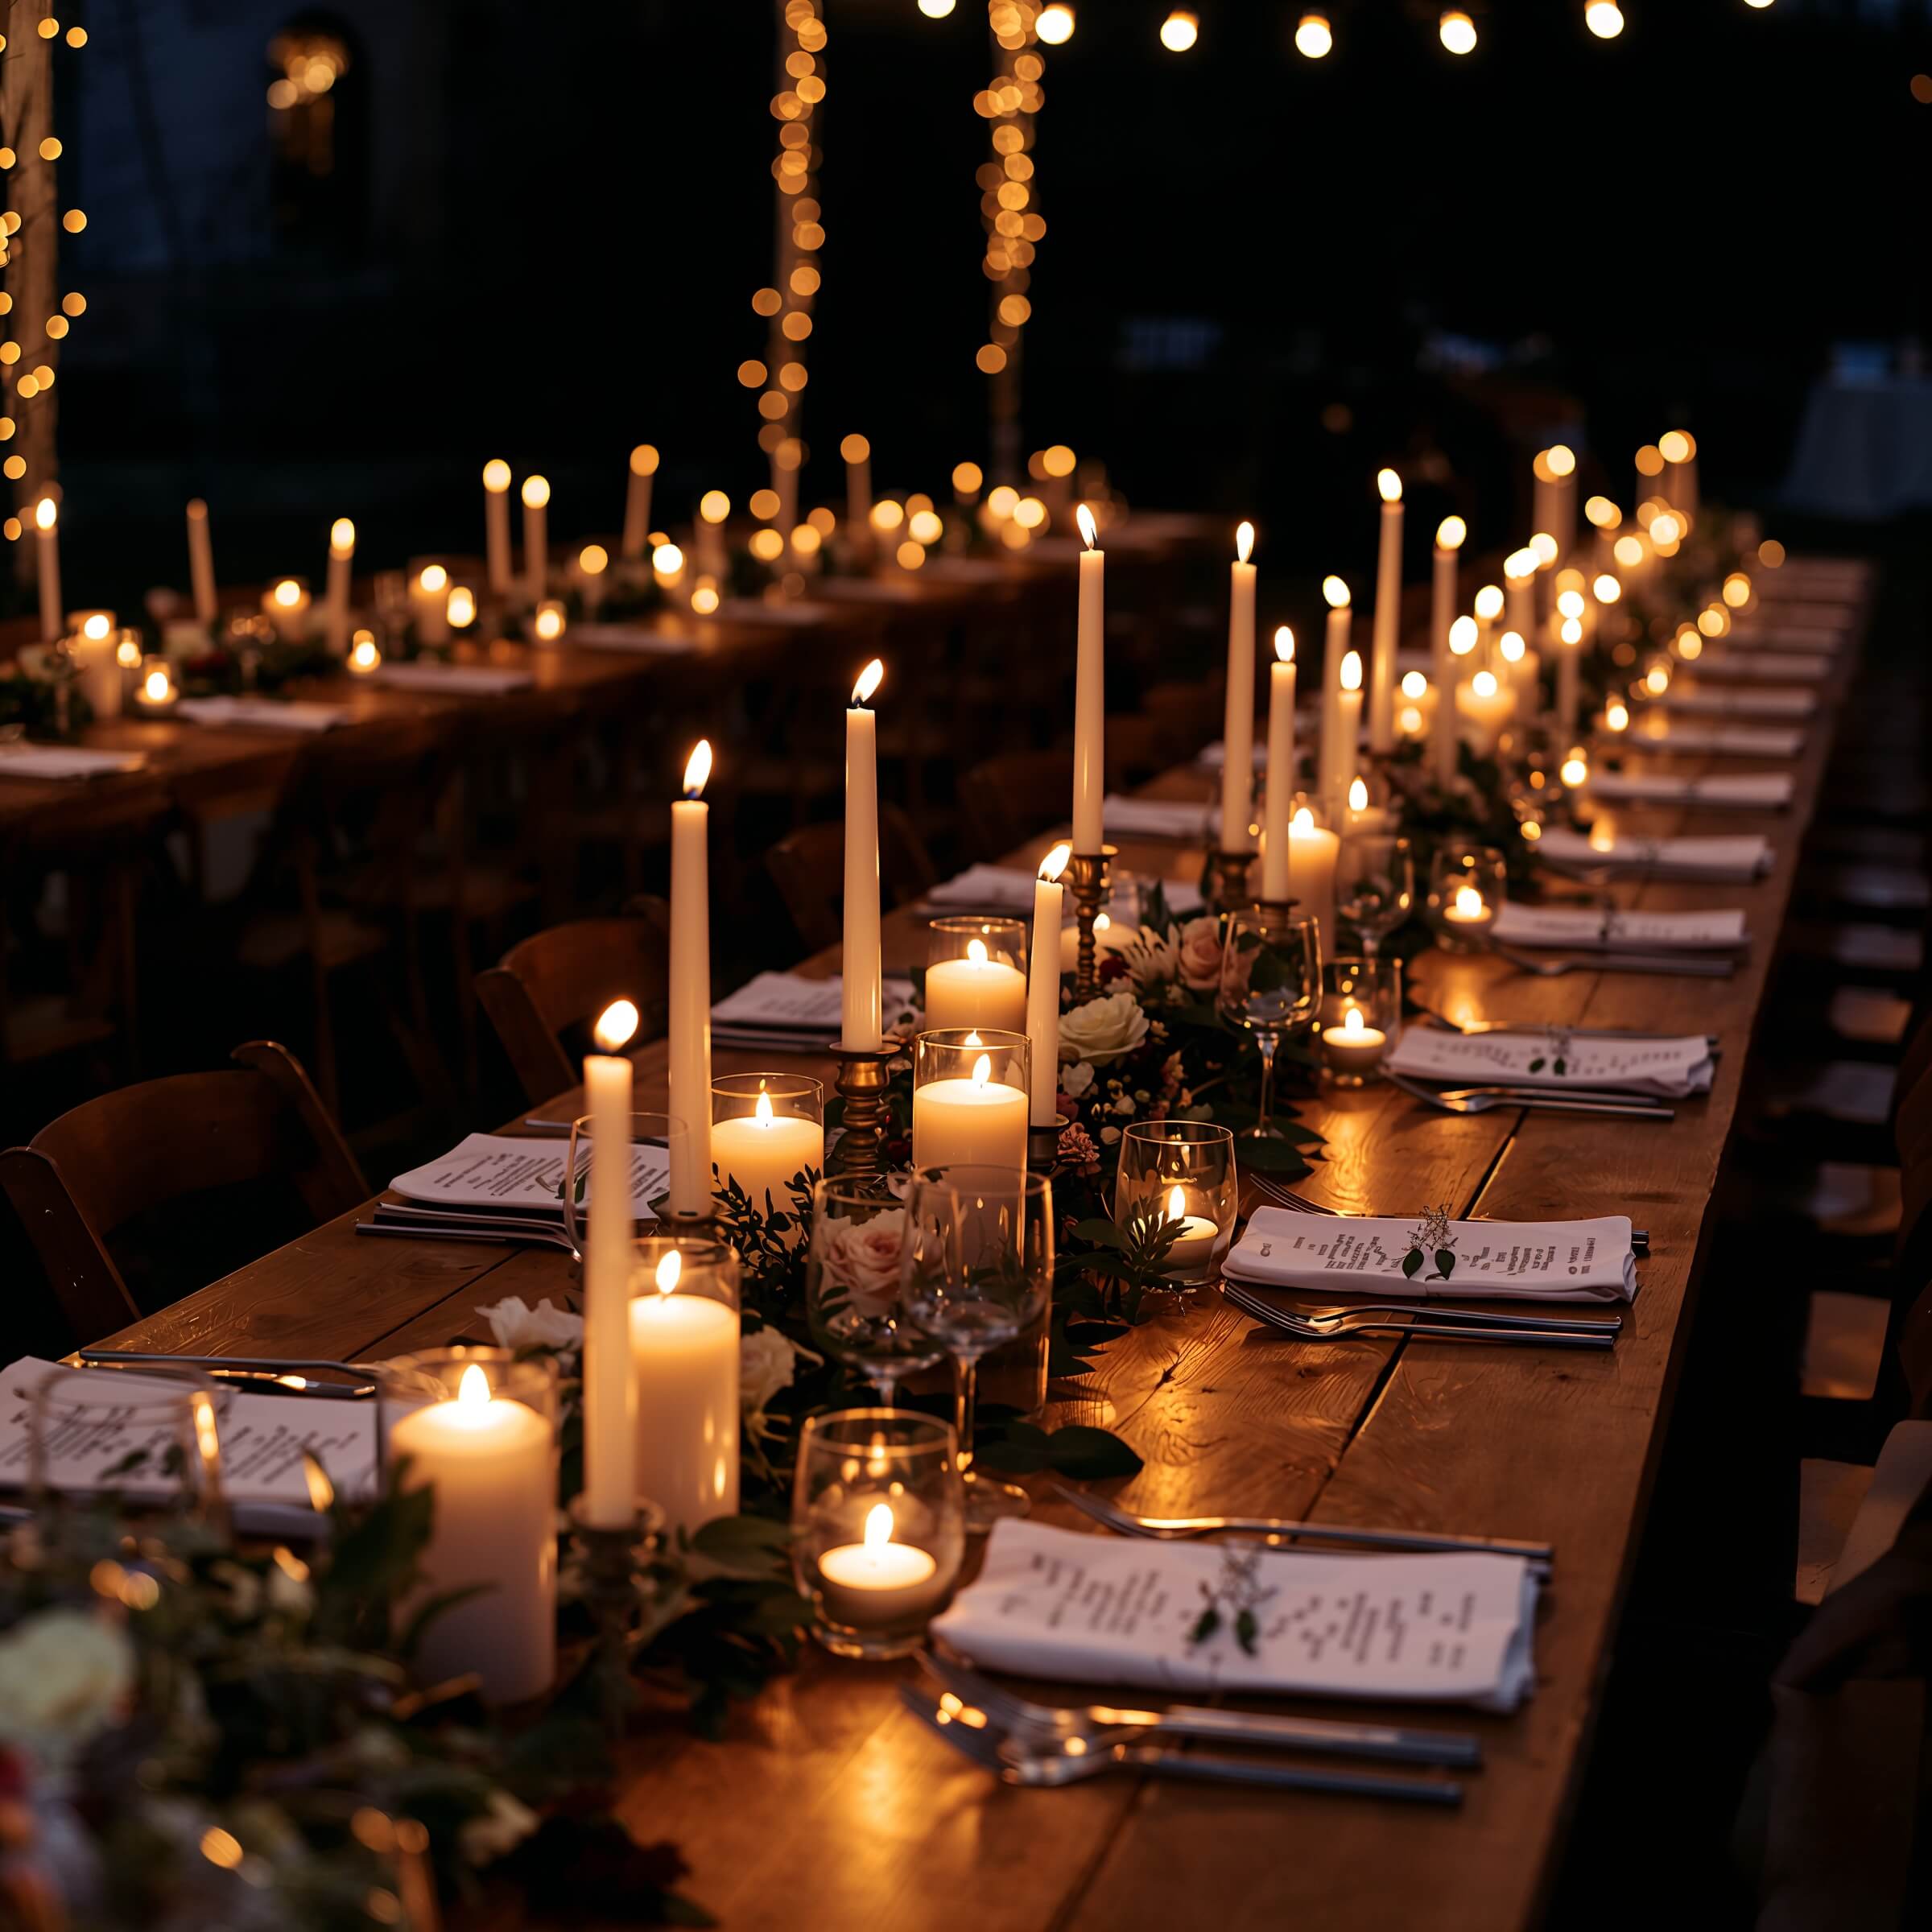
Nothing says intimate romance quite like a table covered in candles. But here’s the thing – execution is everything. I’ve seen candlelit tables that look like someone raided the clearance section at HomeGoods, and I’ve seen ones that make you want to propose all over again.
The secret sauce? Varying heights and holders. Mix pillar candles, votives, tapers, and tea lights. Use holders made from different materials – glass, metal, wood, even carved-out fruits if you’re feeling adventurous. This variety creates visual interest and prevents that “funeral home” vibe nobody wants at their wedding.
Candle Placement Strategy
Think of your table as a landscape that needs peaks and valleys. Your tallest candles should create focal points, while shorter ones fill in the gaps. Here’s my go-to formula that works every single time:
Place your statement pieces (tall tapers or pillars) first. Then add medium-height elements around them. Finally, scatter tea lights and votives to fill empty spaces. The result? A table that looks professionally designed but effortlessly romantic.
Don’t forget about the reflection factor. Mirrors or metallic chargers under your candles will literally double your light output. Your photographer will thank you when they’re not struggling with dark, underexposed table shots.
Also Read: 10 Delightful Simple Wedding Table Decor Ideas for Rustic Charm
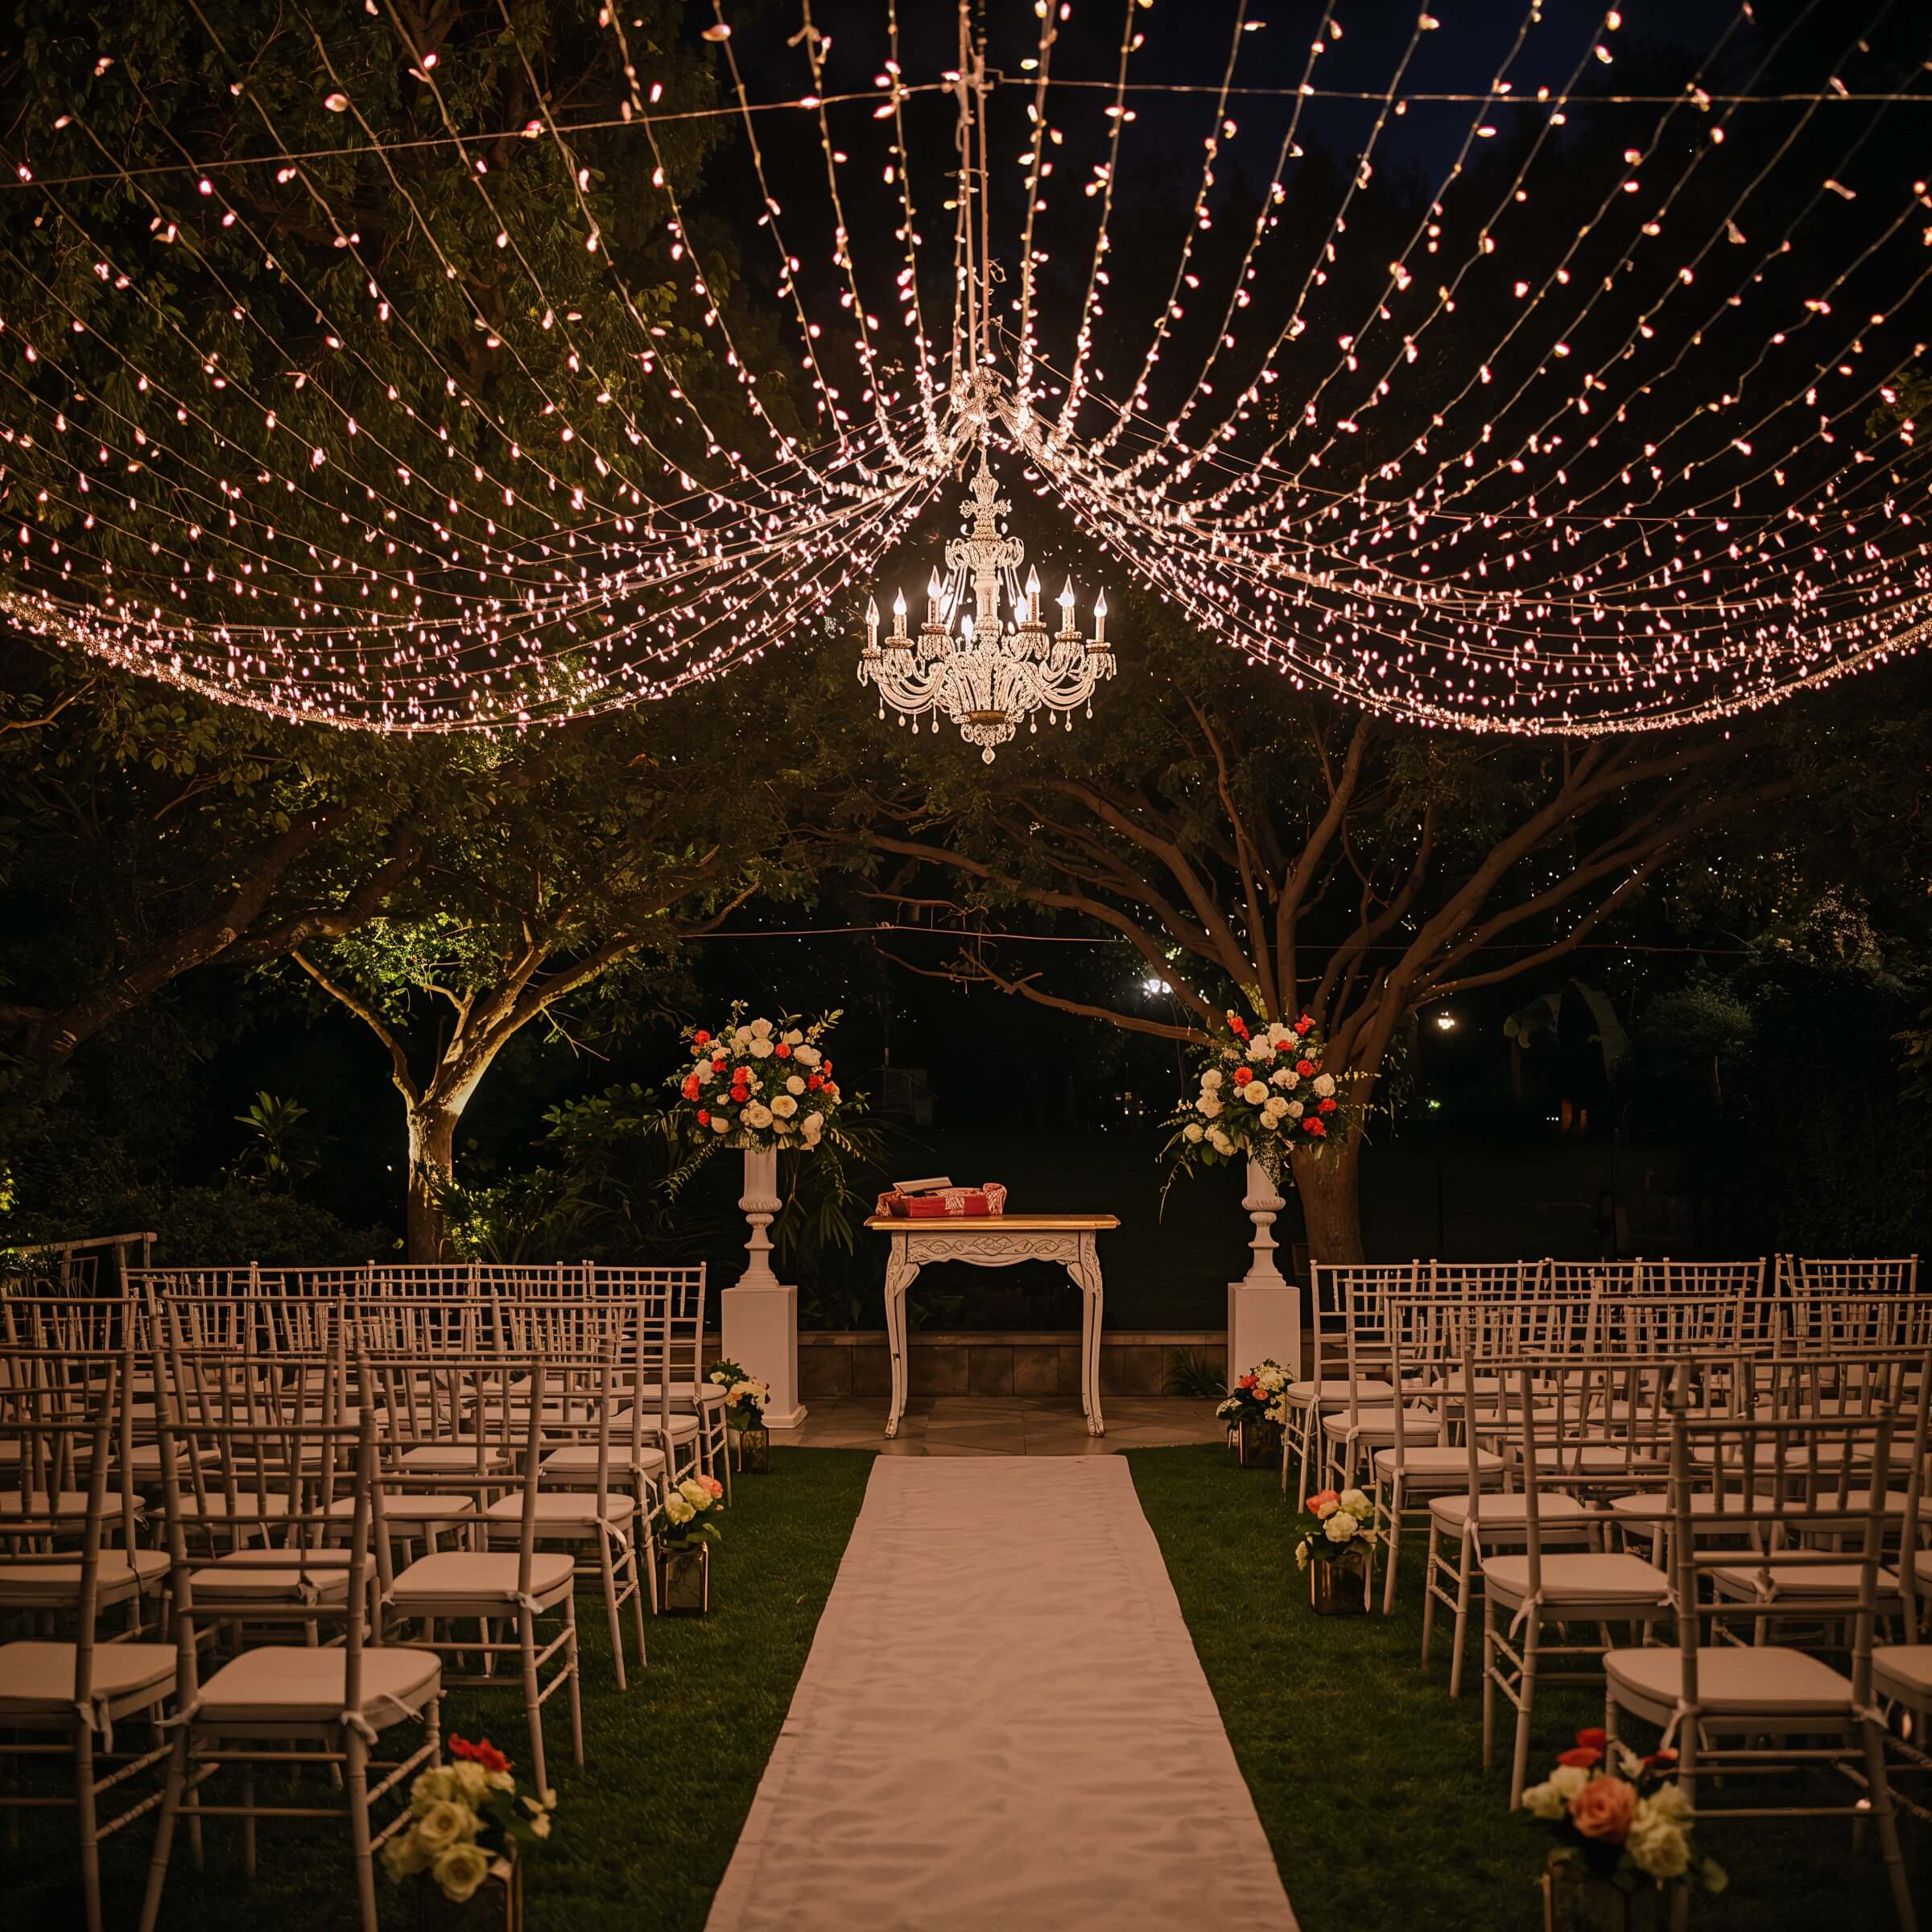
Hanging Crystal Chandeliers Outdoors
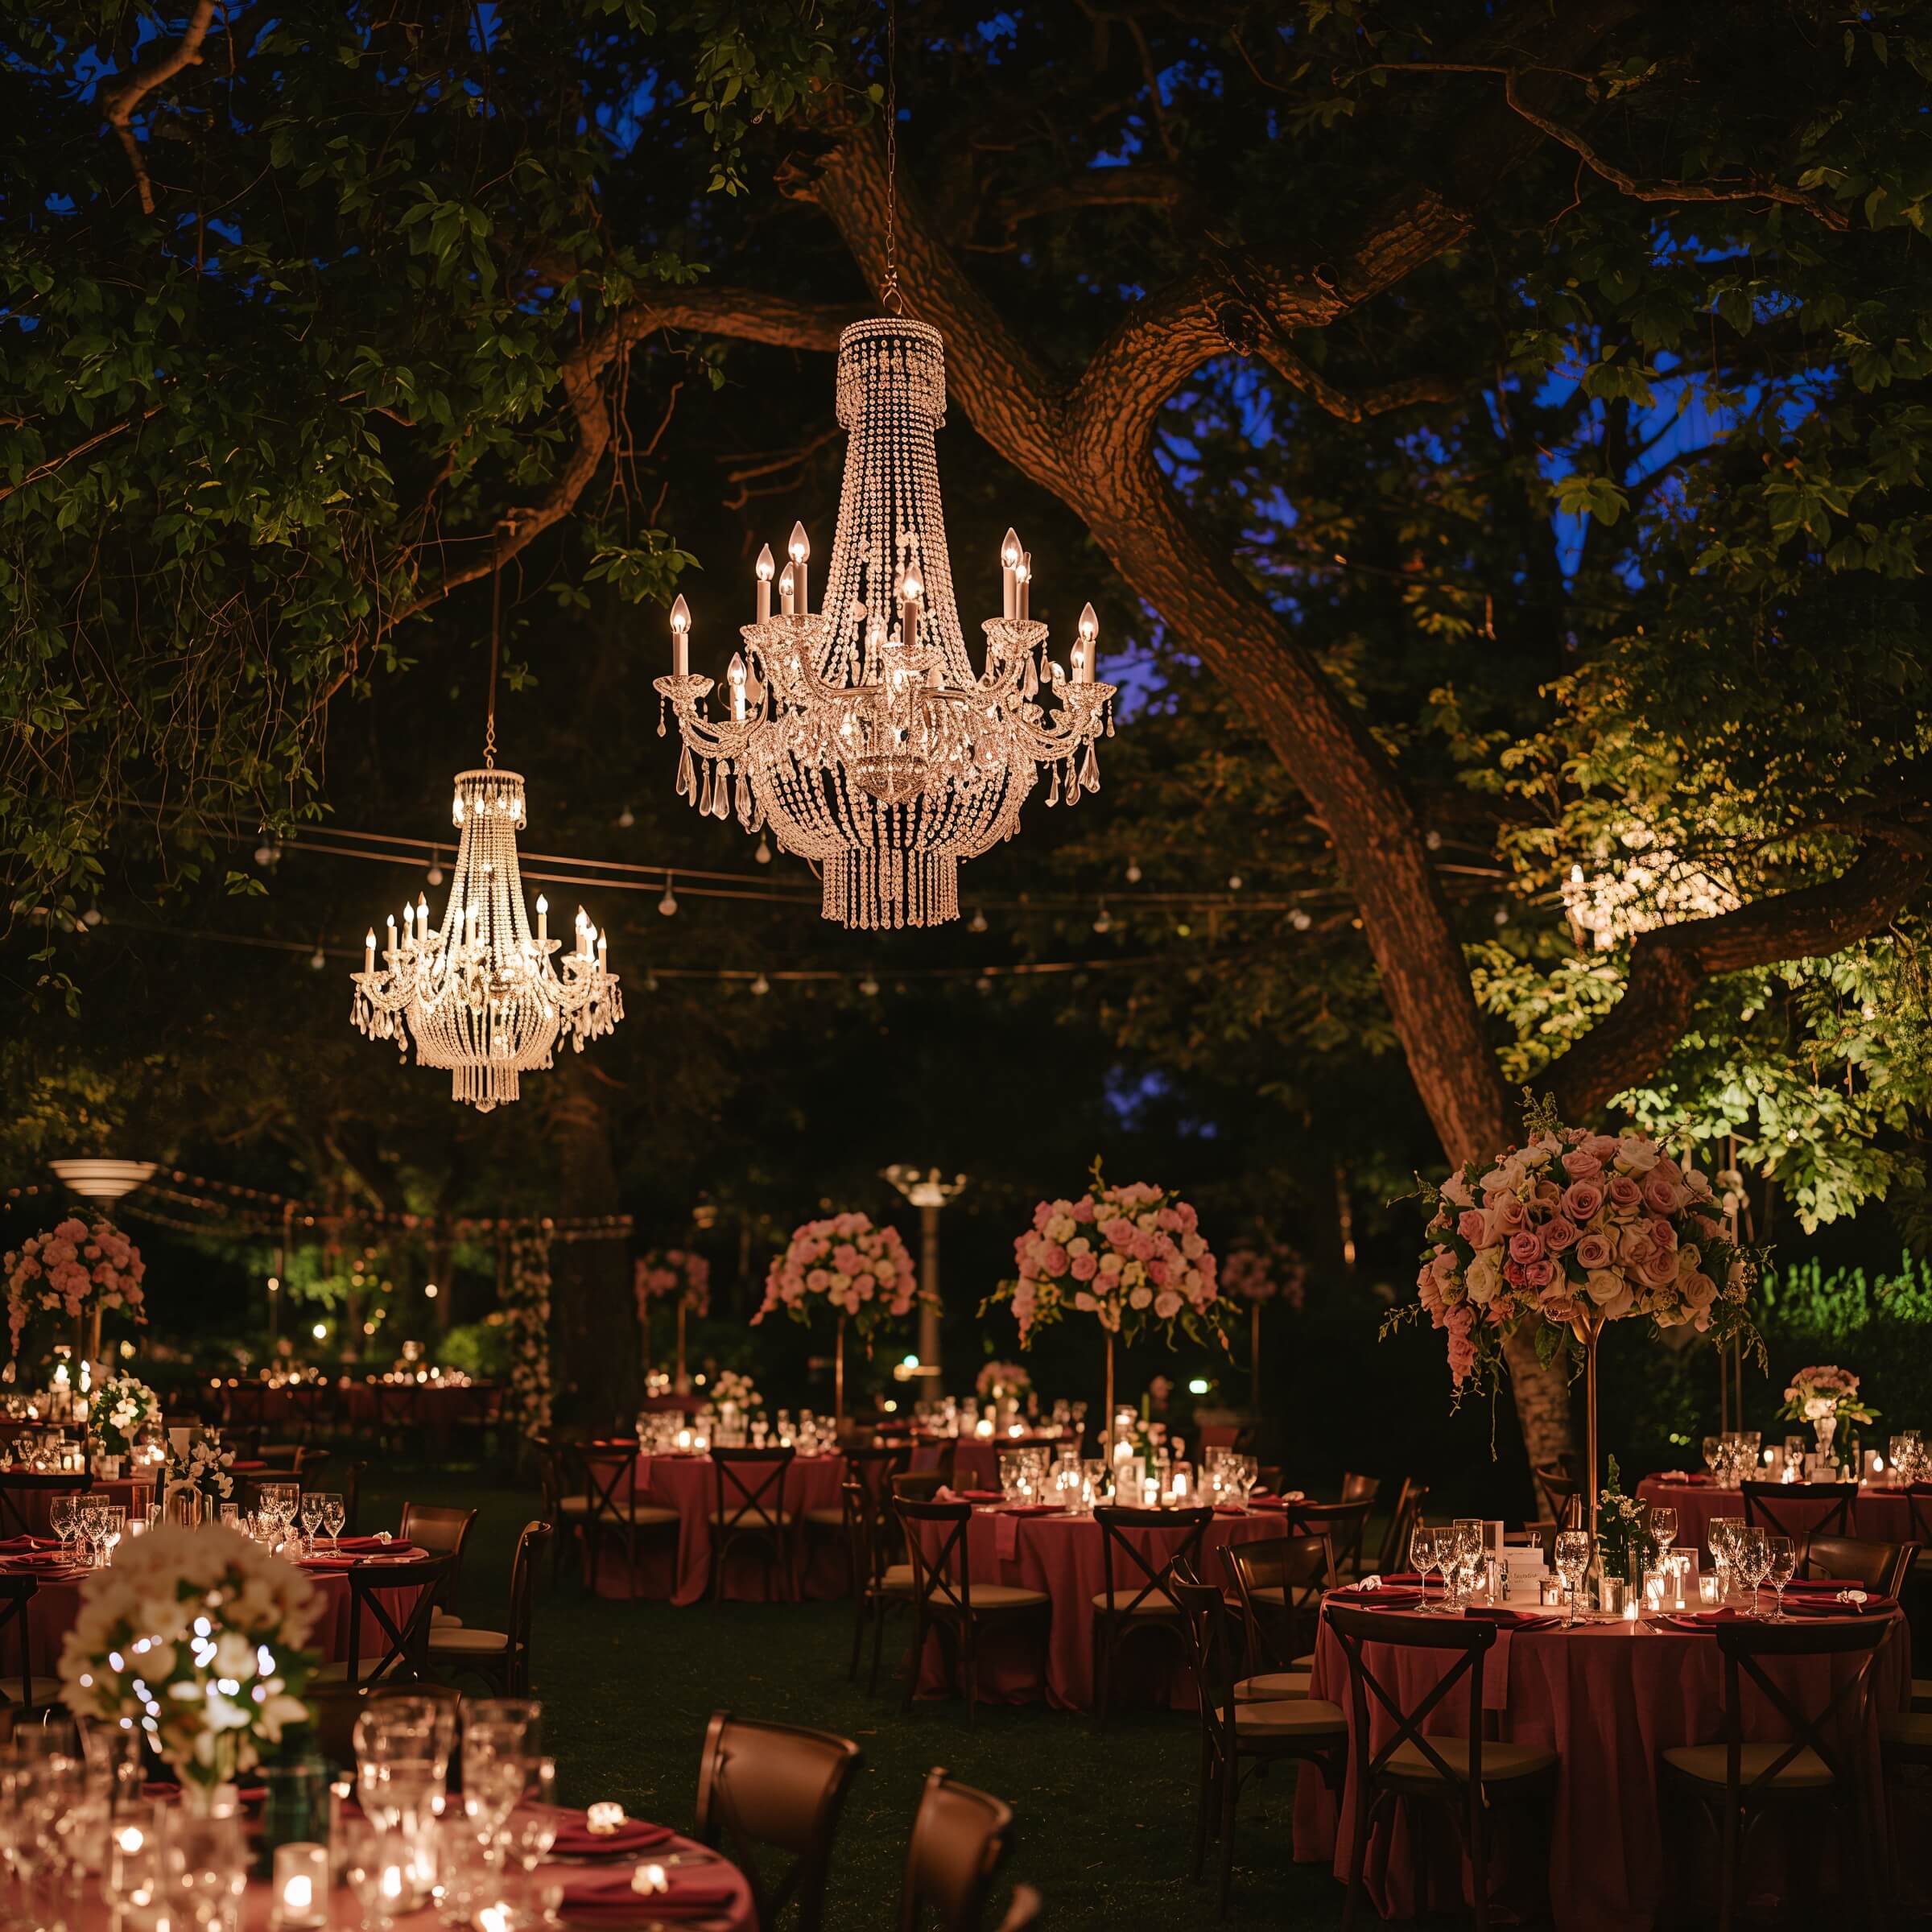
Who says chandeliers belong indoors? Taking these glamorous fixtures outside creates the most unexpected elegance that’ll have your guests talking for years. I helped a friend hang three massive chandeliers from tree branches for her backyard wedding, and let me tell you – the photos looked like something out of Vogue.
The juxtaposition of formal crystal against natural elements? Pure magic for photography. The crystals catch every bit of ambient light and create these incredible sparkles in photos that you just can’t replicate with regular lighting.
Making Outdoor Chandeliers Work
First things first – you need sturdy support structures. Trees are great, but test those branches! Nobody wants a chandelier crashing down during the father-daughter dance. If trees aren’t an option, invest in proper rigging or shepherd’s hooks designed for heavy fixtures.
Consider these game-changing tips:
- Use battery-operated LED chandeliers to avoid electrical nightmares
- Hang them at varying heights for a whimsical floating effect
- Add greenery or flowers wrapped around the chains for a softer look
- Position them strategically over key areas like the dance floor or sweetheart table
The best part about outdoor chandeliers? They create natural gathering spots for those candid group photos everyone loves.
Neon Wedding Sign Décor
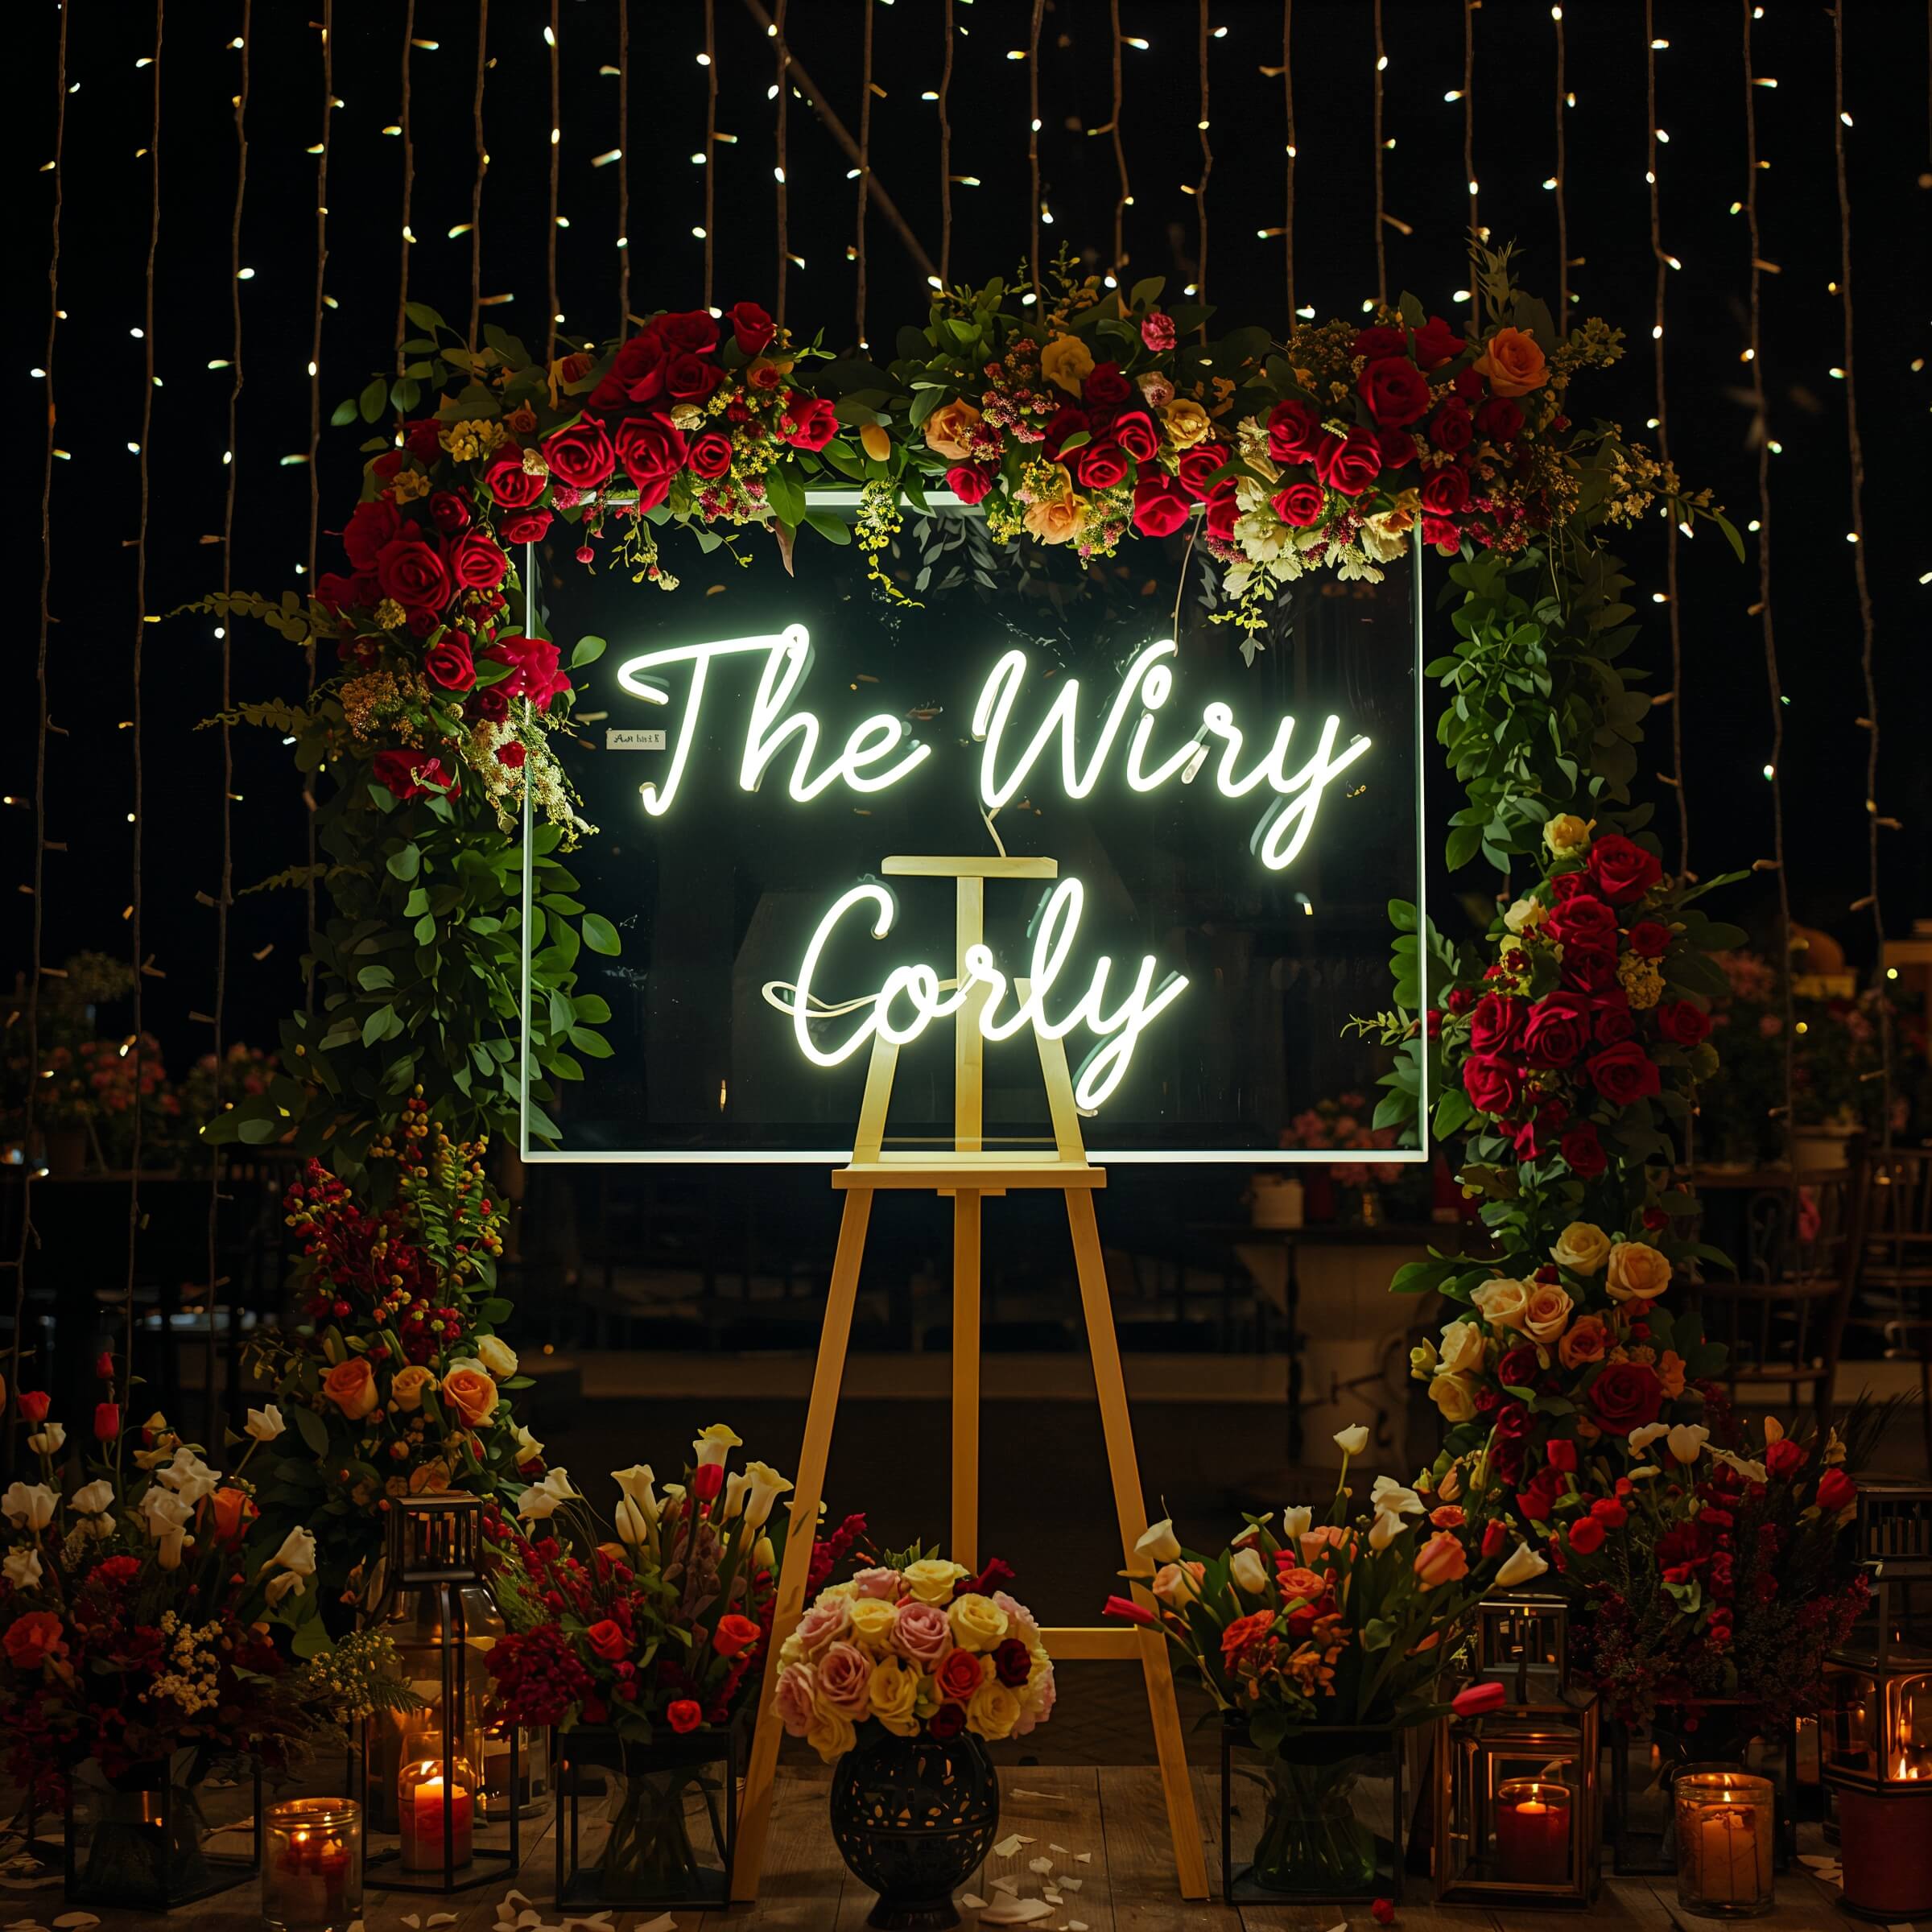
Alright, let’s talk about the trend that’s absolutely exploding right now – neon signs. And before you roll your eyes thinking “too trendy,” hear me out. Neon signs are having a moment for a reason. They’re bold, they’re fun, and they photograph like a dream.
I’m not talking about tacky Vegas-style signs (unless that’s your vibe – no judgment!). Modern wedding neon comes in elegant scripts, minimalist designs, and yes, even classic romantic phrases that don’t make you cringe. “Better together,” “Until death do us party,” or simply your names in gorgeous cursive – the options are endless.
Neon Sign Photography Gold
Here’s what makes neon signs absolutely killer for night wedding photos – they’re self-illuminating focal points. Your photographer can use them as the primary light source for dramatic portraits, or as background elements that add depth and interest to reception shots.
The real magic happens when you:
- Place them behind your sweetheart table for constant photo opportunities
- Use them as ceremony backdrops for that modern twist
- Create a dedicated photo spot with your neon sign as the centerpiece
- Mix neon with natural elements like greenery for unexpected contrast
IMO, the best neon signs are the ones that reflect your personality. Skip the generic “love” signs and go for something uniquely you. Inside jokes, favorite song lyrics, or meaningful dates all make for conversation starters and memorable photos.
Glowing Floral Arrangements
Now this is where things get really interesting. Illuminated florals are having a major moment, and once you see them in person, you’ll understand why. Picture your favorite blooms literally glowing from within, creating these ethereal centerpieces that look like they belong in a fantasy novel.
There are several ways to achieve this magical effect. You can weave LED wire lights through your arrangements, use water-activated LED lights in vase water, or go full dramatic with UV-reactive flowers under black lights (trust me, it’s cooler than it sounds).
Creating Your Glowing Garden
The key to stunning illuminated florals is subtlety. You want a soft glow, not a Christmas tree. Here’s what I’ve learned works best:
Start with flowers that naturally catch light well – roses, peonies, and ranunculus are phenomenal choices. Their layered petals create beautiful shadows and depth when lit from within. Avoid densely packed arrangements; you need space for light to filter through.
Consider these lighting techniques:
- Submersible LED lights in clear vase water for an underwater glow
- Fiber optic strands woven through bouquets for a starry effect
- LED branches mixed with real flowers for height and drama
- Uplighting placed under frosted glass vases
The result? Centerpieces that transform throughout the night and create different moods as other lighting changes.
Also Read: 10 Magical Thrifted Wedding Decor Ideas for Perfect Style
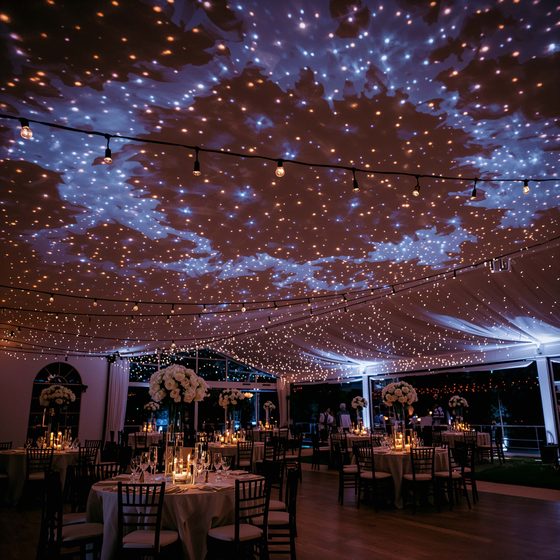
Starry Sky Projection Ceiling

Want to literally dance under the stars at your indoor venue? Projection mapping technology has made this dream surprisingly affordable and absolutely stunning. I attended a wedding last year where they projected a slowly moving galaxy across the entire ceiling, and honestly? I spent half the night just staring up in awe.
Modern star projectors aren’t those cheesy rotating balls from the ’90s. Today’s versions create incredibly realistic night skies complete with constellations, shooting stars, and even the Northern Lights if you’re feeling extra.
Setting Your Celestial Scene
The trick with projection ceilings is getting the brightness balance right. Too bright, and it overwhelms everything else. Too dim, and it doesn’t photograph well. You want that sweet spot where guests can see it clearly, but it doesn’t wash out other lighting elements.
Here’s how to nail it:
- Test your projector in the actual venue during similar lighting conditions
- Use multiple projectors for large spaces to avoid dark spots
- Consider programmable projectors that can change throughout the night
- Layer with other lighting – stars alone can feel cold without warm accent lights
For photos, this creates the most incredible atmospheric backdrop. Every shot, from first dance to cake cutting, gets this dreamy celestial quality that you literally can’t achieve any other way.
LED Pathway Markers
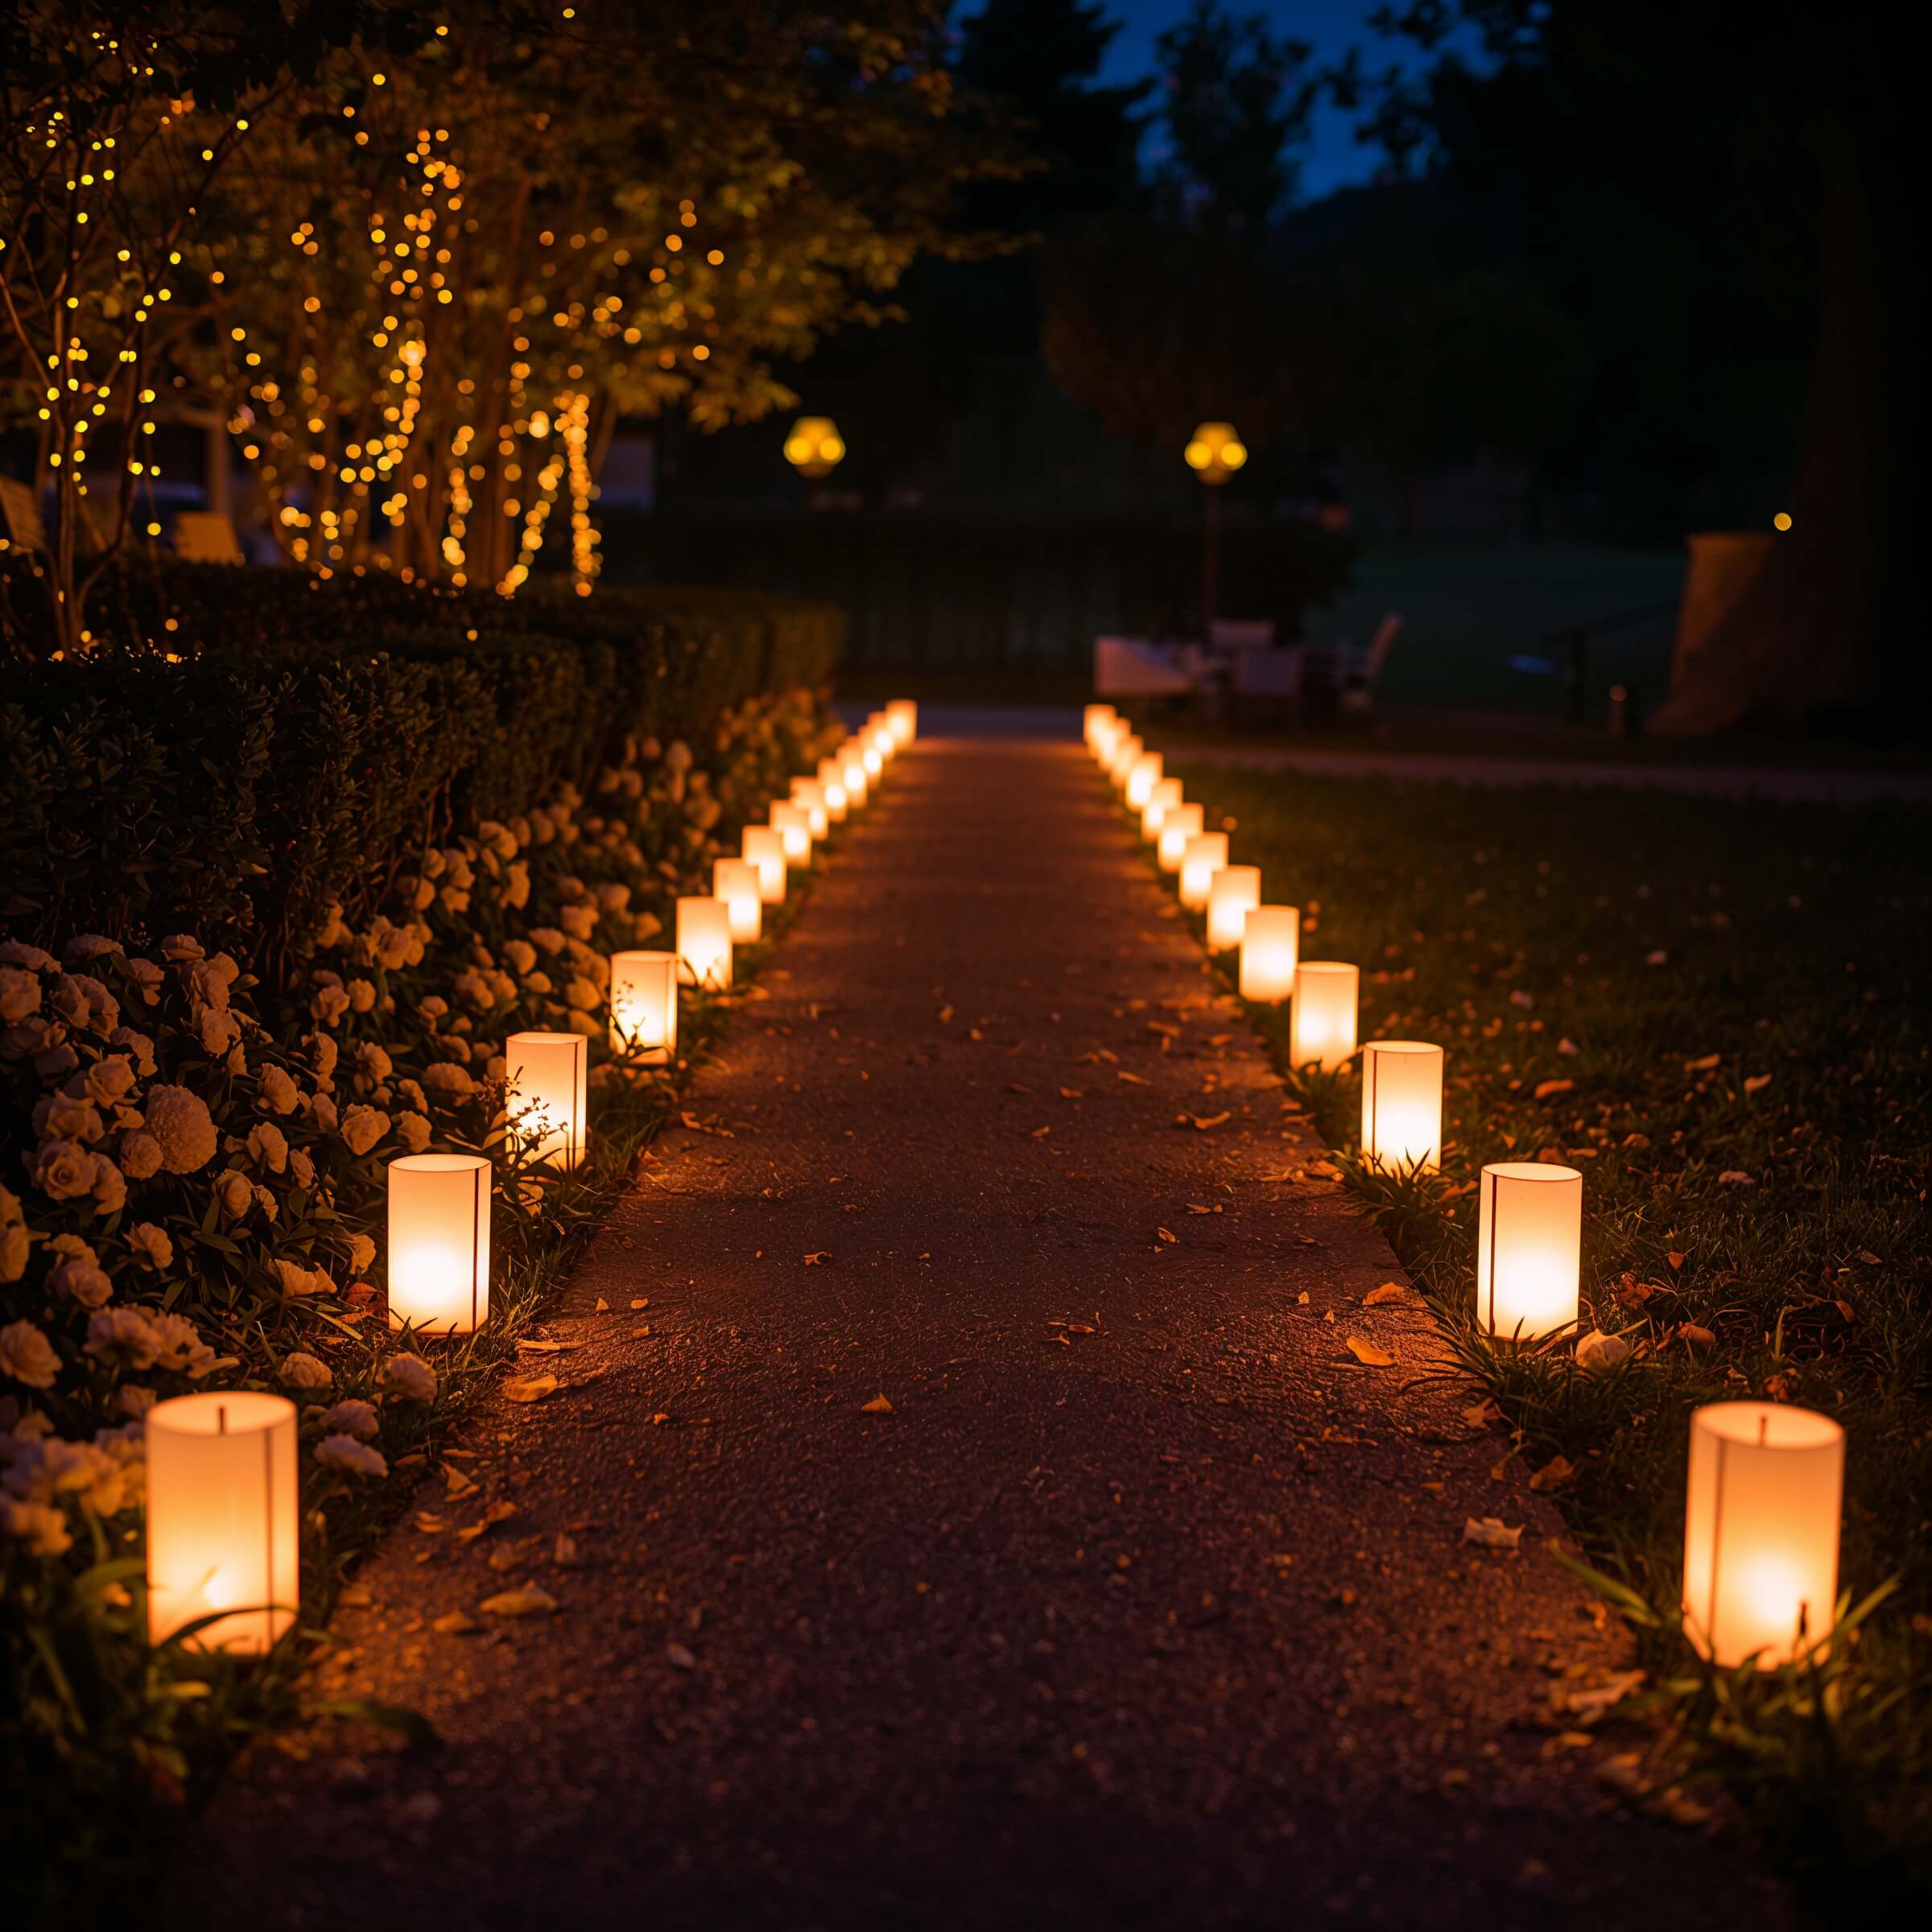
Let’s get practical for a second – your guests need to see where they’re going, but that doesn’t mean your pathway lighting has to be boring. LED pathway markers are the unsung heroes of night wedding photography, creating leading lines that guide both feet and eyes exactly where you want them.
I’ve seen everything from simple stake lights to elaborate illuminated sculptures lining walkways. The best setups tell a story as guests move through your space. Maybe they change colors as you get closer to the reception, or they incorporate elements from your love story.
Pathway Lighting That Pops
Here’s what separates average pathway lighting from photography gold:
First, consistency is key. Whatever style you choose, stick with it throughout. Mixed styles look chaotic in wide shots. Second, height variation adds interest – not every light needs to be ground level.
Consider these winning combinations:
- Solar stake lights with mason jar luminaries on shepherd’s hooks
- LED rope lights outlining pathways with lanterns at corners
- Projected patterns on walkways (hearts, initials, dates)
- Illuminated balloons or spheres creating a floating path
The goal? Creating depth in your photos. Well-lit pathways add layers to images, making even simple venue shots look professionally composed.
Romantic Candle Arch Entrance
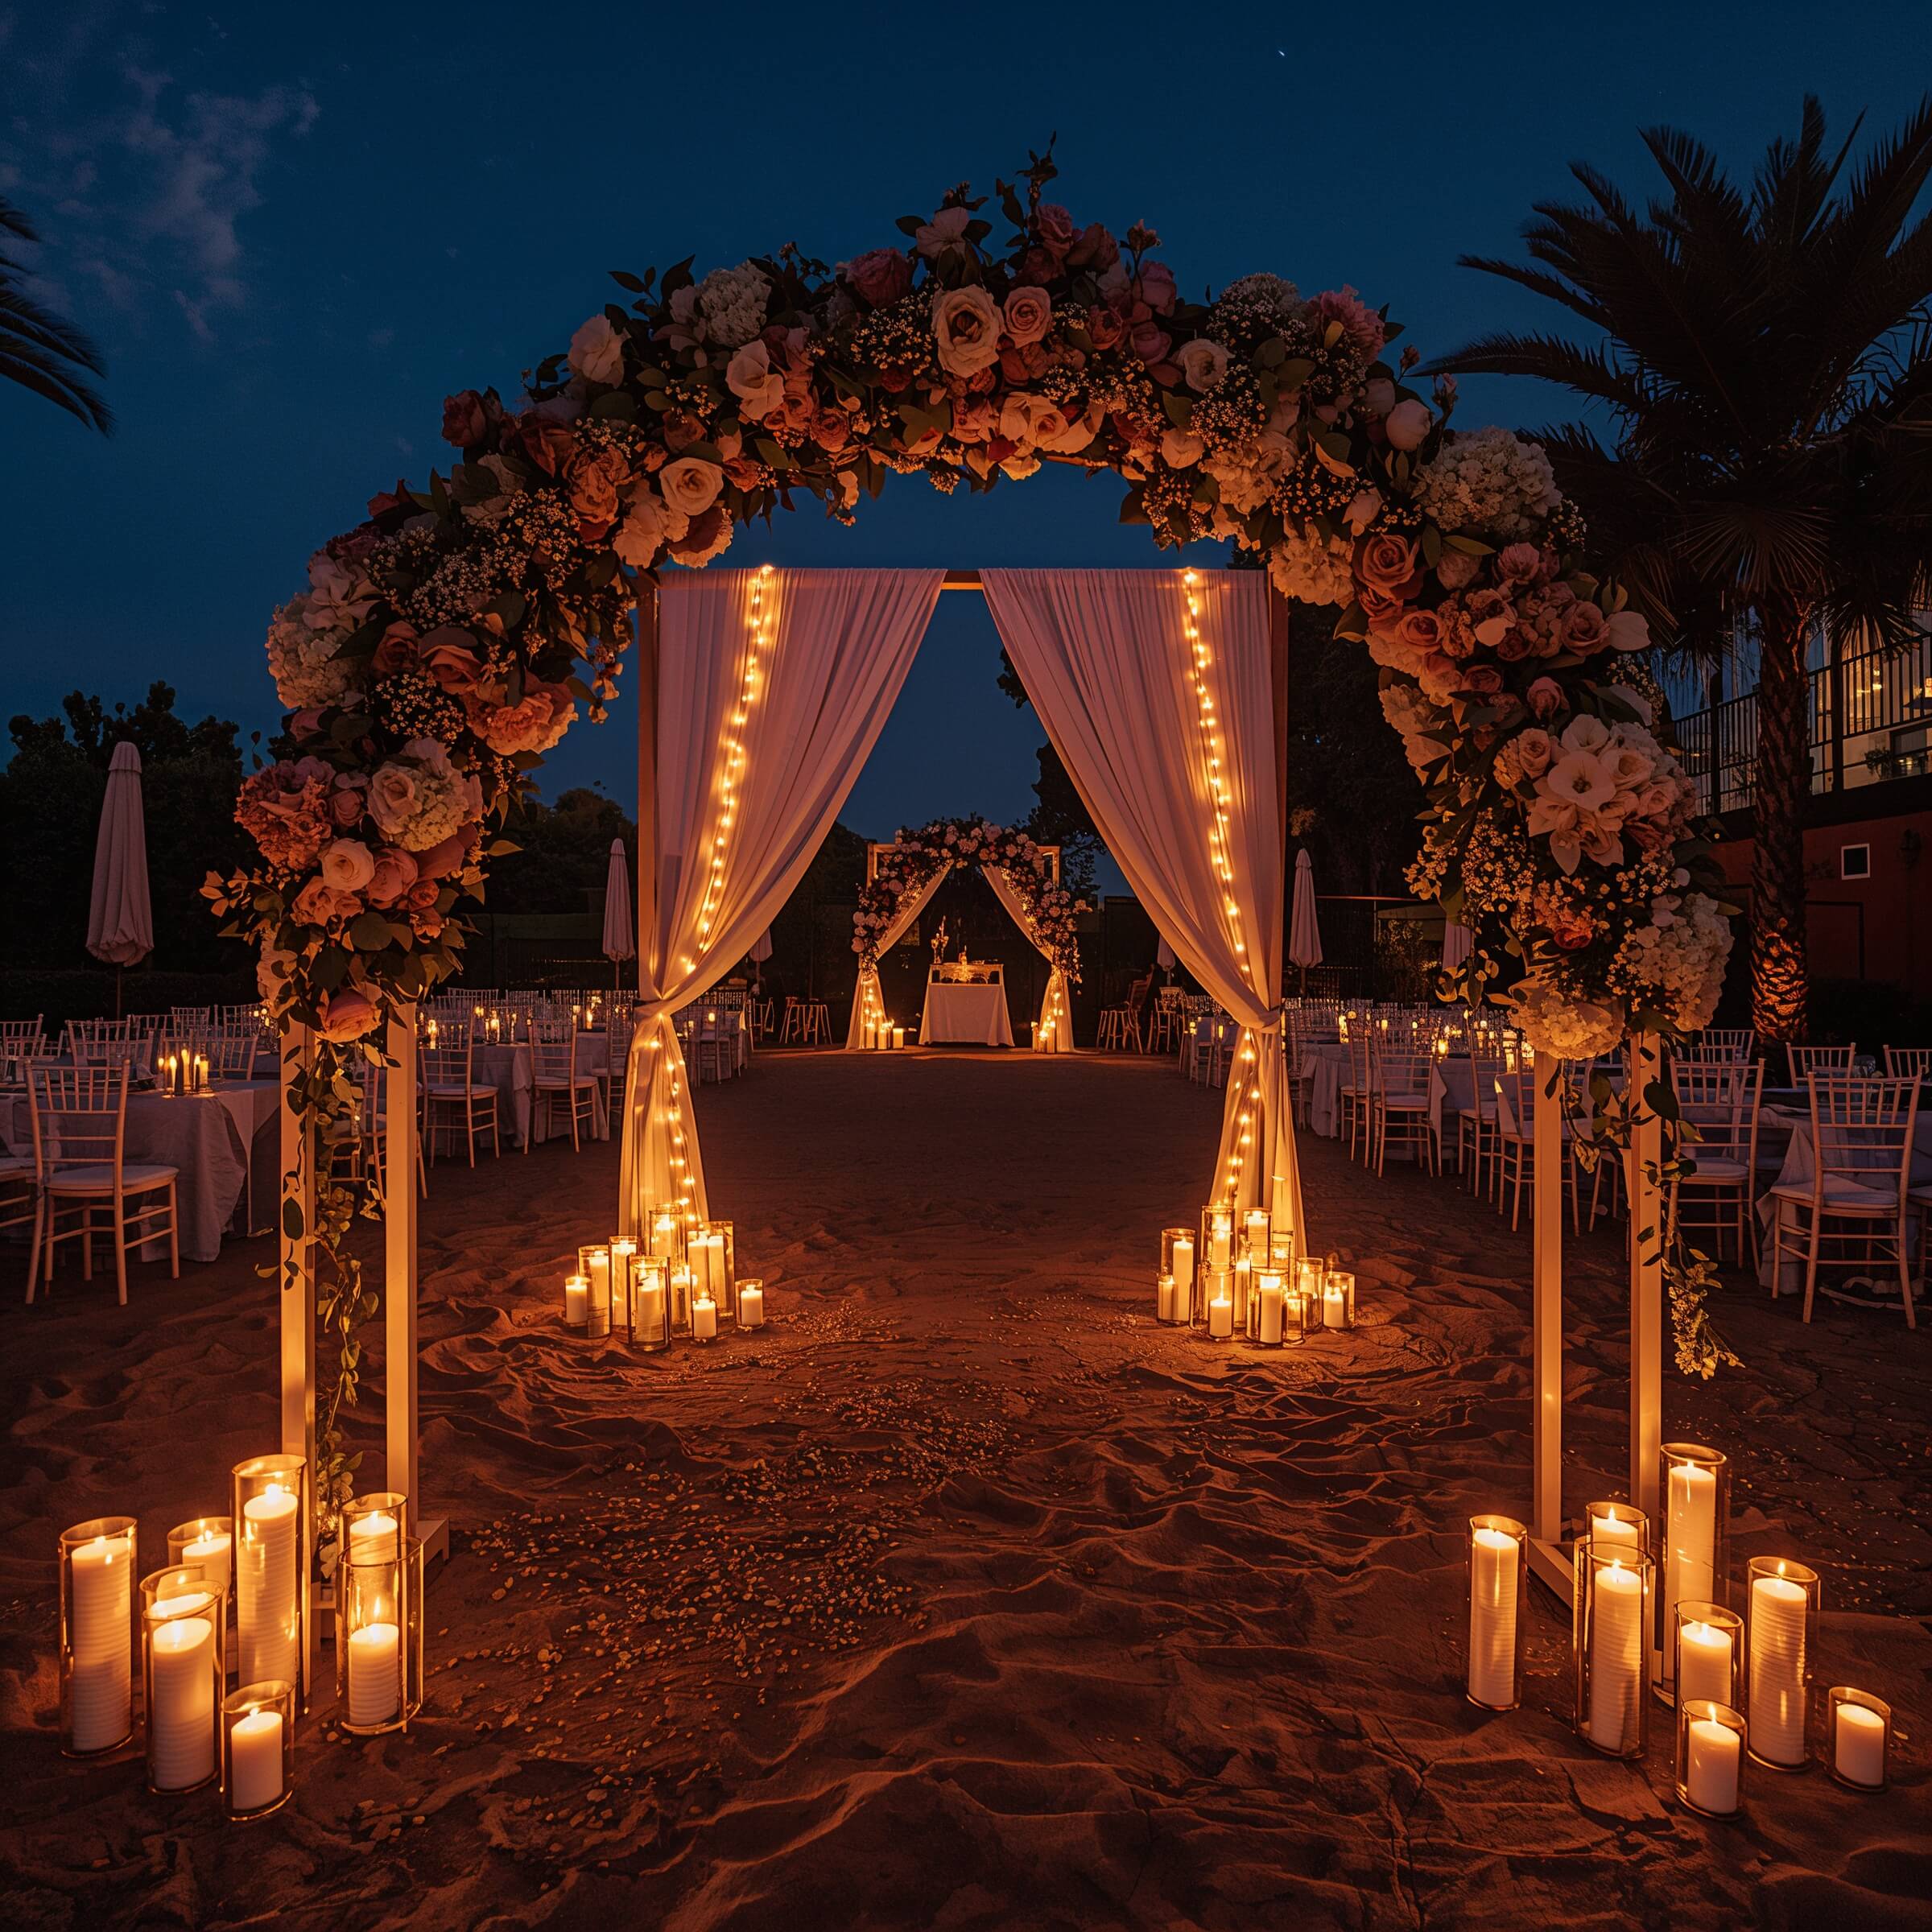
Talk about making an entrance! A candle-lit archway at your reception entrance sets the mood before guests even step inside. It’s like walking through a portal into your own personal fairy tale – cheesy? Maybe. Effective? Absolutely.
The beauty of a candle arch is its versatility. You can go full romantic with hundreds of pillar candles, modern with geometric holders, or rustic with mason jars and twine. Each style creates a completely different vibe while maintaining that warm, inviting glow everyone loves.
Building Your Flame Gateway
Safety first, people! Real candles in an archway can be risky, especially with flowing dresses and excited guests. LED candles have become so realistic that I honestly recommend them 90% of the time. The other 10%? When you have professional handlers and a very controlled environment.
Here’s how to create maximum impact:
- Use varying candle heights to create movement and interest
- Incorporate greenery or flowers between candles for softness
- Add mirrors or metallic elements to amplify the light
- Consider a mix of pillar candles and hanging votives for dimension
Position your arch where it’ll be photographed repeatedly – entrance shots, grand exit, or even as a ceremony backdrop that transitions to reception décor.
Also Read: 10 Sophisticated Luxury Wedding Decor Ideas for Luxe Weddings
Illuminated Dance Floor Design
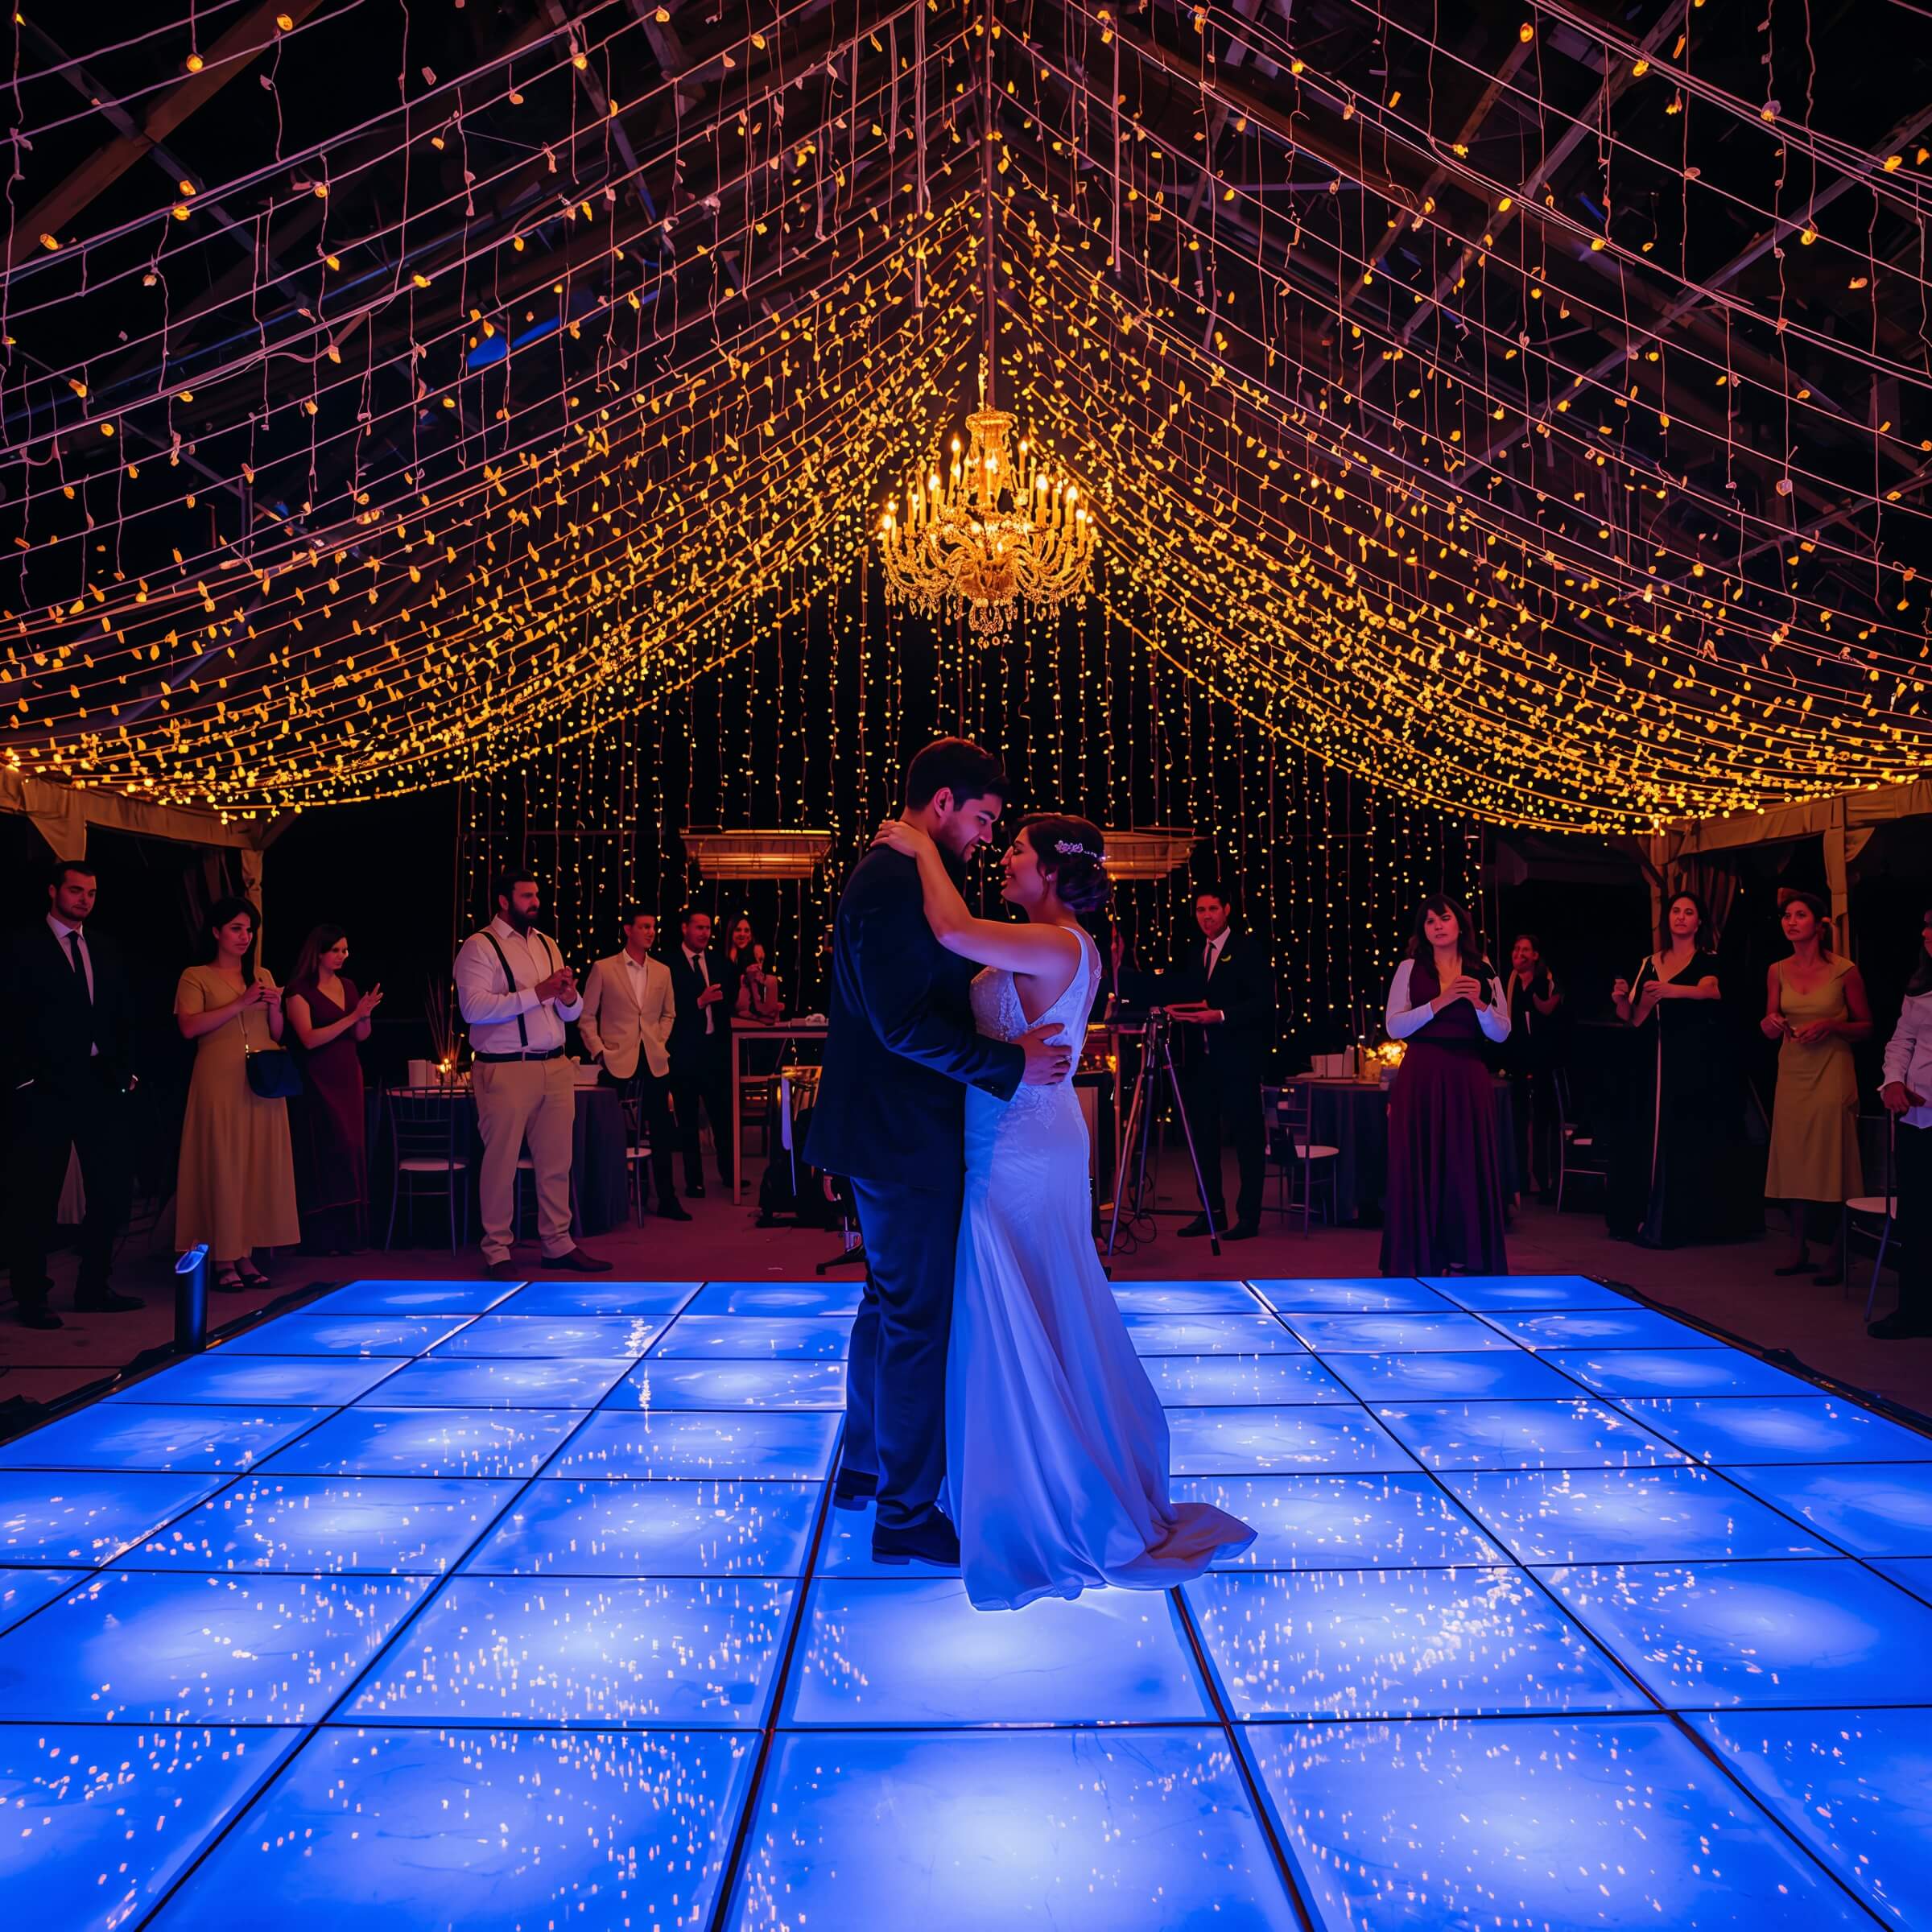
Last but absolutely not least – the illuminated dance floor. This is where the party happens, where the best candid shots emerge, and where you want lighting that makes everyone look like they’re having the time of their lives.
Modern LED dance floors can do everything from displaying your monogram to creating interactive light shows that respond to movement. But even if you’re working with a regular floor, strategic lighting can transform it into something spectacular.
Dance Floor Lighting Magic
The secret to a photogenic dance floor? Multiple light sources at different angles. Overhead lighting alone creates harsh shadows. Side lighting alone leaves the center dark. You need that perfect combination that makes everyone look good while they’re getting down.
Here’s my tried-and-true setup:
- Uplighting around the perimeter in your wedding colors
- String lights or chandeliers overhead for ambient glow
- Spotlights on key areas like where you’ll have your first dance
- LED furniture or glow elements for added visual interest
Don’t forget about the disco ball effect! Even in 2024, nothing creates party atmosphere in photos quite like those spinning light reflections. Modern versions use LED technology for more control and better photo results.
Bringing It All Together
Here’s the thing about night wedding lighting – it’s not about using every single idea. It’s about choosing the elements that tell YOUR story and create the atmosphere YOU want. I’ve seen weddings with just fairy lights and candles that photographed more beautifully than productions with every bell and whistle.
The magic happens when you layer different lighting types strategically. Start with your must-have element (maybe that fairy light canopy you’ve been dreaming about), then build around it. Each additional element should complement, not compete.
Remember, your photographer is your best friend in this process. Share your lighting plans early and often. They might have insights about how certain setups will photograph or suggest small tweaks that make a huge difference in the final images.
Most importantly? Don’t get so caught up in creating perfect photo opportunities that you forget to enjoy your actual wedding. The best photos happen when you’re genuinely having a blast, surrounded by beautiful lighting that enhances – not overshadows – your celebration. The glow in your eyes? That’s the light that matters most. :/
Test everything beforehand, trust your vendors, and then let the magic happen. Your night wedding photos will be absolutely spectacular – I guarantee it. After all, when you combine love, laughter, and the right lighting? That’s when the real magic happens.


