How to White Wash Brick Fireplace: Definitive Guide


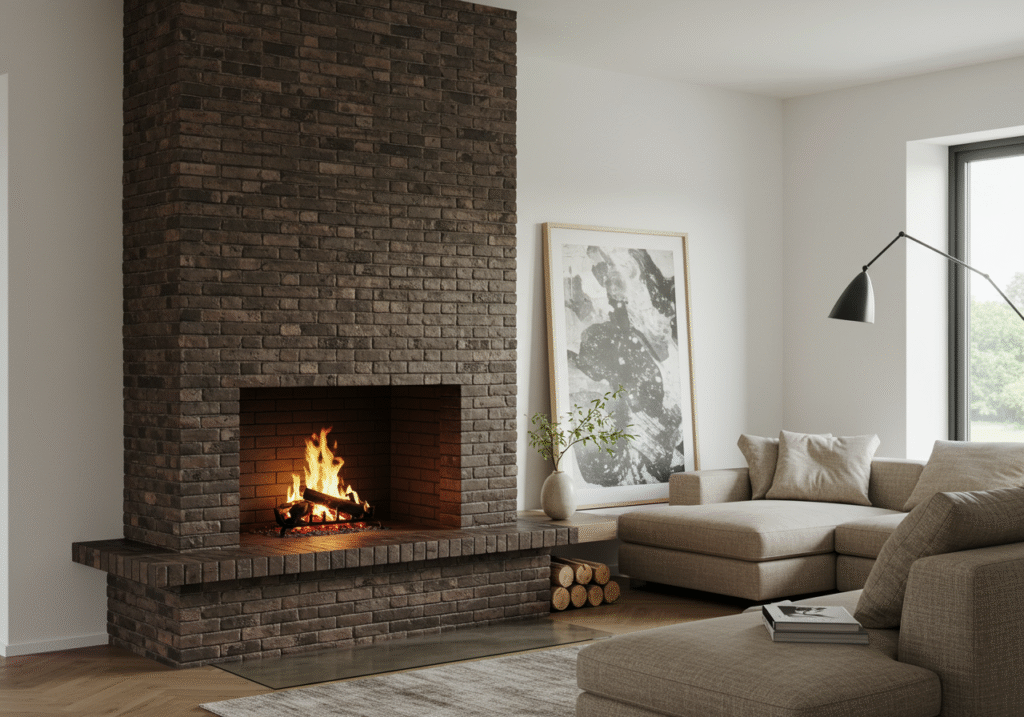
The fireplace serves as the heart of the home—a natural gathering place that radiates warmth and comfort. However, a dark or dated brick fireplace can make a room feel heavy and stuck in the past. If you’re looking for a transformative yet budget-friendly solution, learning how to white wash brick fireplace is the perfect project. This technique brightens your space while allowing the beautiful, textured character of the brick to shine through, creating a fresh, modern focal point.
Unlike solid paint, which can create a flat, sealed surface, whitewashing is a semi-transparent finish that lets the brick’s natural variations and texture remain visible . It’s a versatile look that suits a variety of styles, from farmhouse to coastal to contemporary .
This comprehensive guide will walk you through the entire process, from preparation and choosing the right materials to application techniques and long-term maintenance. By the end, you’ll have all the knowledge needed to confidently give your fireplace a stunning, light-filled update.
Section 1: Understanding Whitewashing – Why It’s the Ideal Choice
Whitewashing is a specific finishing technique that offers a unique set of advantages for updating brick. Understanding what it is and how it differs from other methods will help you achieve the result you want.
What is Whitewashing?
Whitewashing involves applying a thin, diluted mixture of paint and water to a brick surface . The porous brick absorbs the mixture, resulting in a soft, semi-transparent coating that tints the brick while allowing its natural color and texture to show through . The final effect is a cloudy, weathered look that feels both fresh and timeless.
Whitewash vs. Paint: Key Differences
While both change the appearance of your fireplace, whitewashing and painting have distinct outcomes .
Whitewash vs. Limewash
These terms are often used interchangeably, but they are different products. Whitewash is typically made with latex paint and water, making it easy for DIYers to mix and apply . Limewash, on the other hand, is made from slaked lime and water. It creates a chalky, mineral-rich finish that penetrates the brick and ages with a distinctive patina over time . Limewash is often preferred for historic homes due to its breathability, but whitewashing with latex paint is a more accessible and controllable method for most interior fireplace projects .
Section 2: Pre-Whitewashing Preparation – The Foundation for Success
Proper preparation is the most critical step in ensuring a beautiful, long-lasting finish. Rushing this stage can lead to uneven absorption, poor adhesion, and a flawed final look.
Assessing Your Fireplace’s Condition
Before you begin, carefully inspect your brick fireplace .
- Check for Damage: Look for crumbling mortar, loose bricks, or significant cracks. These should be repaired before you start whitewashing .
- Identify Previous Treatments: If your brick has already been painted or sealed, traditional whitewashing may not work, as the non-porous surface won’t absorb the mixture properly . You may need to remove the existing coating or choose a different technique.
- Look for Stains: Identify areas with heavy soot or smoke stains, which may require extra cleaning effort .
Deep Cleaning the Brick
A clean surface is essential for even absorption of the whitewash. Dirt, grease, and soot will prevent the mixture from adhering correctly .
- Remove Loose Debris: Start by vacuuming the brick and mortar joints to remove dust and cobwebs .
- Scrub the Surface: For general cleaning, use a stiff-bristled brush (natural bristles are recommended to avoid damaging the brick) and a solution of warm water and dish soap or a mild detergent . Scrub in a circular motion.
- Tackle Tough Stains: For stubborn soot or grime, use a stronger cleaner like trisodium phosphate (TSP) . Always follow the product instructions, wear gloves and eye protection, and ensure the room is well-ventilated .
- Rinse and Dry Thoroughly: After scrubbing, rinse the brick thoroughly with clean water to remove any soap or chemical residue . It is crucial to let the brick dry completely, which can take up to 24 hours. Painting on damp brick will trap moisture and cause the whitewash to fail .
Gathering Your Tools and Materials
Having everything on hand will make the process smooth and efficient.
Basic Supplies:
- Drop cloths or plastic sheeting
- Painter’s tape (such as FrogTape® Multi-Surface) to protect walls, the mantel, and the hearth
- A bucket and a stir stick for mixing
- Clean cotton rags, sponges, or microfiber cloths
- Rubber gloves (optional)
Whitewashing Materials:
- White Latex Paint: Choose a flat or matte sheen for the most authentic look; avoid high-gloss paint . Any brand of white latex paint will work.
- Water: For diluting the paint.
- Paint Brushes: A 2-inch angled brush is ideal for getting into mortar lines and applying the wash . You may also want a larger brush for big, flat brick surfaces.
Mixing Your Whitewash
The standard mixture is a 1:1 ratio of paint to water . Combine them in your bucket and stir until fully blended. The consistency should be thin and watery, similar to milk .
- For a more transparent look: Add more water (e.g., a 1:3 paint-to-water ratio) .
- For more coverage: Use less water (e.g., a 2:1 paint-to-water ratio) .
Pro Tip: Always test your mixture on a small, inconspicuous area of the fireplace or a spare brick. This allows you to see how the color looks when dry and adjust the ratio to your preference before committing to the entire project .
Section 3: Step-by-Step Application Techniques
This is where the transformation happens. The application method you choose will influence the final texture and depth of your whitewash.
Basic Application: Brush and Wipe
This is the most common and controlled technique, perfect for beginners.
- Protect the Area: Ensure your drop cloths are in place and painter’s tape is securely applied to all surrounding surfaces .
- Work in Small Sections: Start at the top of the fireplace and work your way down to avoid drips on finished areas . Work on a section about 3 feet wide at a time .
- Apply the Whitewash: Using your brush, apply the whitewash mixture to the brick. It can be helpful to start by brushing it onto the mortar lines first .
- Wipe Back: Immediately after applying the wash to a small area, use a damp rag or sponge to wipe off the excess. Wipe in a circular or blotting motion to blend the finish and control how much paint settles into the brick’s pores . The more you wipe, the more translucent the finish will be.
- Blend as You Go: Step back periodically to check your work. The beauty of whitewash lies in its subtle variations, but you want to avoid obvious lines between sections .
Advanced Technique: Using a Glaze for Extra Workability
For even more control and a unique effect, some DIYers add a clear mixing glaze to the paint instead of water . Glaze slows down the drying time significantly, giving you more time to manipulate the finish and wipe it back without it setting too quickly. Mix the paint with a product like Amy Howard At Home Glazed Over Clear Glaze according to the manufacturer’s directions .
Achieving the Desired Look
- For a Light, Airy Feel: Use a more diluted mixture and wipe back aggressively, leaving only a hint of white on the surface of the bricks.
- For a “German Schmear” Effect: Use a less diluted mixture and wipe back less, allowing more white to collect in the mortar joints and on the faces of the bricks for a heavier, more rustic look .
- Dealing with Dark Bricks: Dark red or orange bricks may require a second coat for more coverage. Always let the first coat dry completely (2-4 hours) before evaluating and applying a second coat .
Section 4: Finishing Touches and Long-Term Maintenance
Once the whitewash is applied and dry, a few final steps will ensure your fireplace looks beautiful for years to come.
Sealing (Optional)
Sealing is not always necessary for an interior fireplace, especially if it is decorative. However, if your fireplace is functional or in a high-humidity area, a sealant can protect the finish from soot and moisture, making it easier to clean .
- Choose the Right Sealer: Use a breathable, low-sheen masonry sealer . This type allows moisture to escape from the brick while protecting the surface.
- Apply Thin Coats: Use a brush to apply a thin, even coat of sealer. Follow the manufacturer’s instructions for drying time and recoating.
Cleaning and Touch-Ups
- Routine Cleaning: Dust your whitewashed brick regularly with a soft-bristled brush. For deeper cleaning, use a mixture of warm water and mild dish soap, applied with a cloth or sponge. Avoid harsh chemicals or abrasive scrubbers .
- Touch-Ups: The nature of whitewash means it may fade or wear slightly over time. Save a small amount of your original whitewash mixture for easy touch-ups. Simply clean the area, apply the mixture, and wipe it back to blend with the existing finish .
Conclusion: Enjoy Your Transformed Space
Learning how to white wash brick fireplace is a rewarding DIY project that can dramatically brighten and modernize your living space without the cost and permanence of a full remodel. This technique celebrates the character of your brick while softening its impact, resulting in a cozy, inviting focal point.
By following the steps outlined in this guide—thorough cleaning, careful preparation, and patient application—you can achieve a professional-looking result that you’ll be proud of for years to come. Embrace the process, and soon you’ll be enjoying the fresh, airy ambiance of your newly transformed fireplace.