10 Stunning Basement Ceiling Ideas to Brighten Rooms
- Basement Decor
 Ben
Ben- 0
- 38 minutes read

You know that feeling when you walk into your basement and immediately feel like you’ve entered a cave? Yeah, I’ve been there. Last year, I stood in my own basement, staring up at those exposed joists and pipes, wondering if I’d ever have a space that didn’t scream “unfinished dungeon.”
Here’s the thing: your basement ceiling holds more potential than you probably realize. I spent months researching, testing, and yes, making some hilarious mistakes along the way to transform my basement from forgotten storage space to the room everyone wants to hang out in. And guess what? The ceiling made all the difference.
So grab a coffee (or whatever keeps you going), and let’s chat about 10 basement ceiling ideas that’ll actually brighten your space without breaking the bank or your sanity. Trust me, if I can pull these off, you definitely can too.
Exposed Beam Basement Ceiling Ideas
Let me start with my personal favorite – the exposed beam look. Who says you need to hide everything above your head? Sometimes, embracing what you’ve got creates the most stunning results.
I remember when my contractor first suggested leaving the beams exposed. My initial reaction? “Are you kidding me?” But here’s what changed my mind: exposed beams add instant character and height to any basement. You’re literally gaining inches of headroom by not installing a traditional ceiling.
Making Exposed Beams Work
The key to nailing this look lies in the finish. You can’t just leave dusty, splintery wood up there and call it rustic (learned that one the hard way). Here’s what actually works:
- Sand and stain the beams in rich, dark tones for a sophisticated vibe
- Paint them white or light gray to maximize light reflection
- Add strategic lighting between the beams to eliminate shadows
- Install cable management systems to hide unsightly wires
What really sold me on this approach? The cost savings. We’re talking about saving thousands of dollars compared to installing a full ceiling. Plus, you maintain easy access to plumbing and electrical systems. Ever had a pipe leak behind drywall? Yeah, not fun.
Design Tips That Actually Matter
Here’s something nobody tells you: the spacing between your beams matters more than the beams themselves. Too far apart, and the ceiling looks unfinished. Too close, and you lose that airy feeling.
I found that painting the subfloor above (what becomes your “ceiling”) in a dark matte color makes the beams pop beautifully. Black works surprisingly well – it makes everything else disappear while the beams become the star of the show. Who would’ve thought?
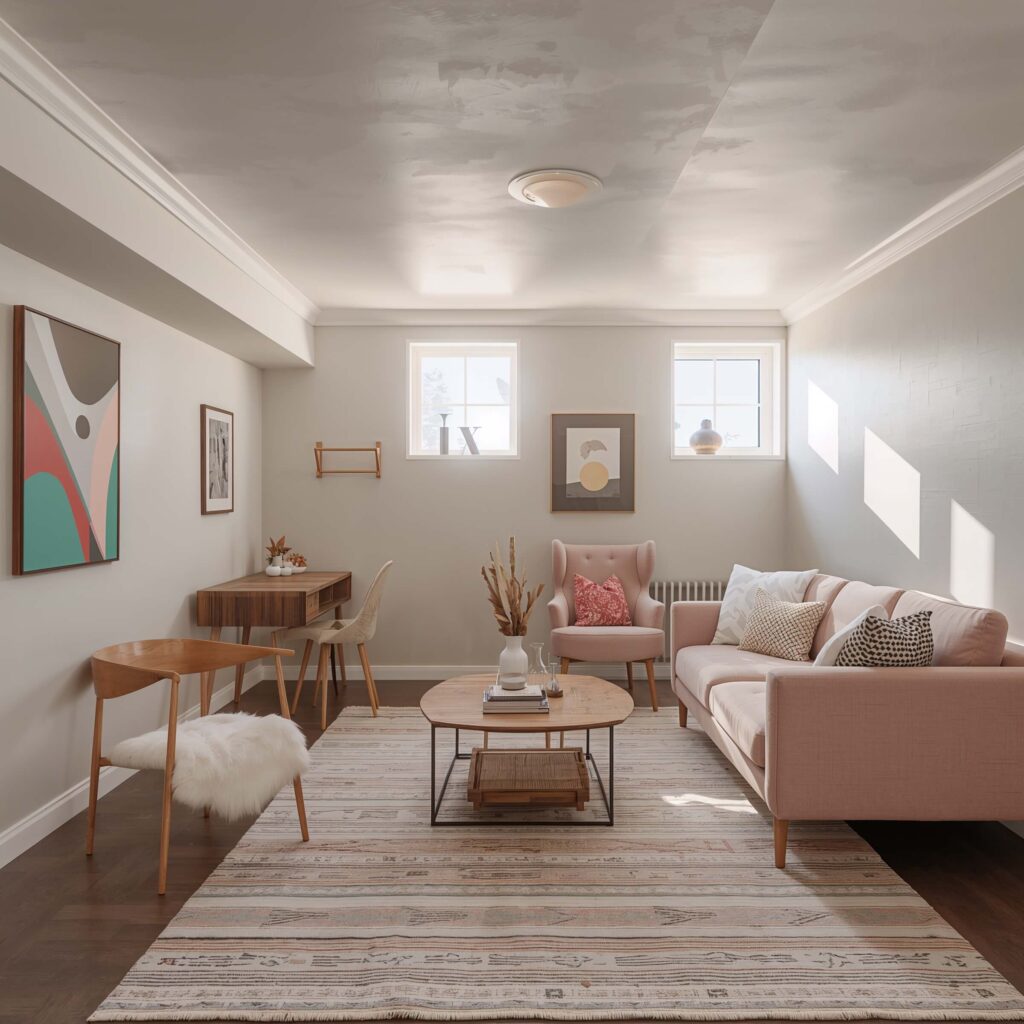
Modern Wood Plank Basement Ceilings
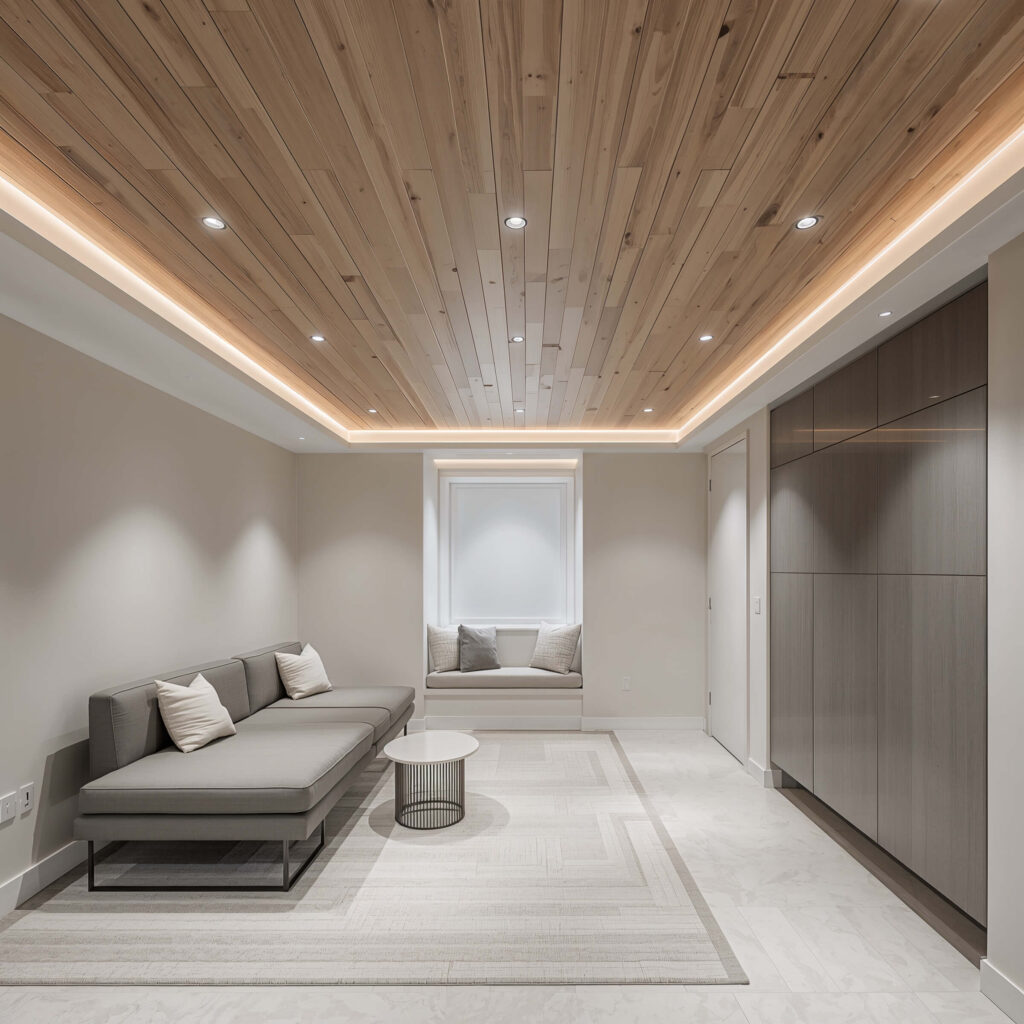
Now, if exposed beams feel too industrial for your taste, let’s talk about wood plank ceilings. This option transformed my friend Sarah’s basement from boring to magazine-worthy in just one weekend.
Wood planks bring warmth that drywall simply can’t match. You walk into a room with a wood plank ceiling, and it immediately feels cozier, more intentional. Plus, the installation process? Way easier than you’d think.
Choosing Your Wood Wisely
Not all wood planks are created equal, FYI. Here’s what I’ve learned through trial and error:
Pine planks offer the best bang for your buck. They’re lightweight, easy to work with, and take stain beautifully. I’ve seen people create stunning ceilings for under $500 using basic pine boards from their local hardware store.
Engineered wood provides consistency and stability. No warping, no gaps developing over time. Sure, it costs a bit more, but the peace of mind? Totally worth it in my book.
Installation Tricks That Save Time
Want to know a secret? You don’t need to be a carpenter to pull this off. The trick lies in using a nail gun and having a friend help hold the boards. Start from one wall and work your way across. Keep your lines straight by snapping a chalk line every few rows.
The biggest mistake people make? Not accounting for the room’s lighting. Light-colored wood planks reflect light beautifully, making your basement feel larger and brighter. Dark planks create drama but can make low ceilings feel even lower.
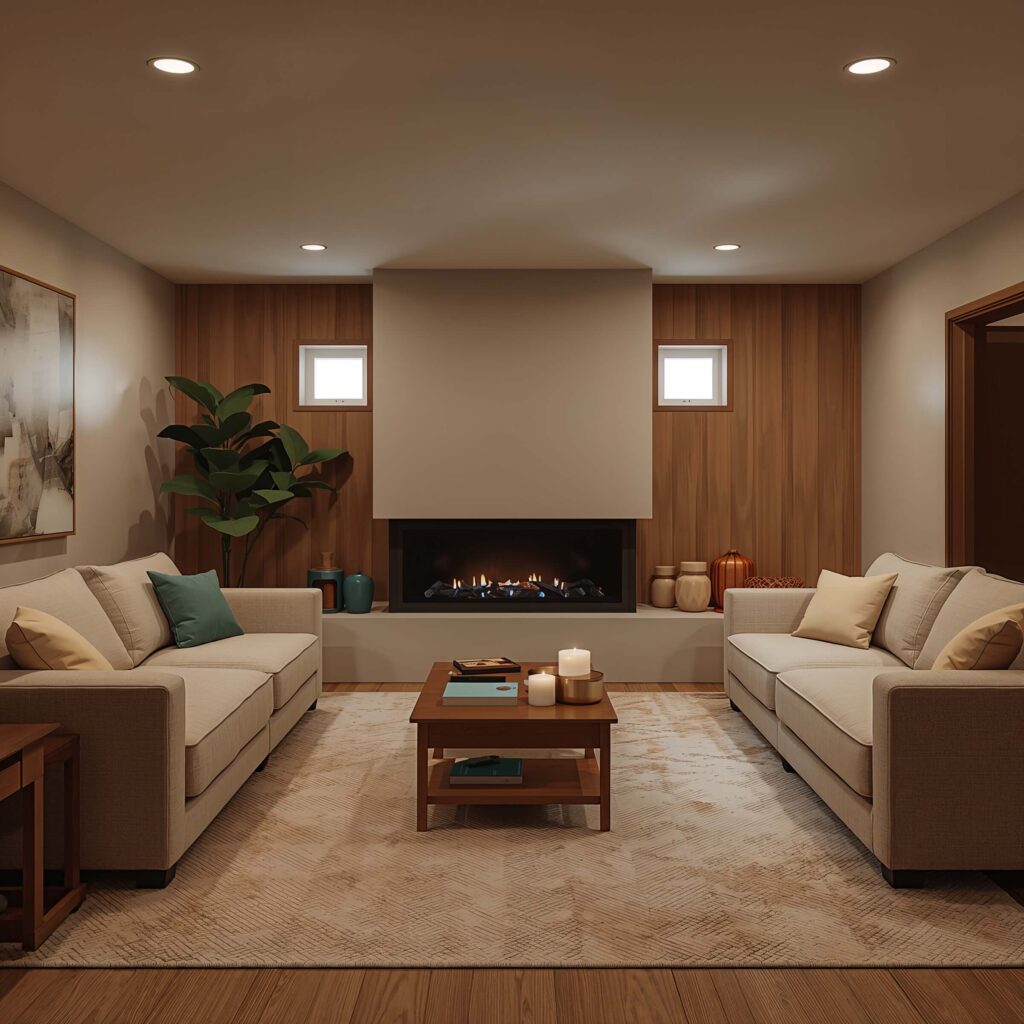
Painted Basement Ceiling Inspiration
Sometimes the simplest solution hits different. Painting your basement ceiling might sound basic, but hear me out – this approach can be absolutely transformative when done right.
I’ll admit, I was skeptical at first. How much difference could paint really make? Turns out, quite a lot. The right paint color and technique can add visual height, hide imperfections, and completely change the room’s atmosphere.
Color Psychology That Works
Black ceilings are having a moment, and for good reason. Paint your basement ceiling black, and suddenly all those pipes, ducts, and wires? They disappear. It’s like magic. The ceiling recedes, making the room feel taller. Weird but true.
White remains the classic choice for maximum brightness. But here’s a pro tip: don’t go pure white. Choose a white with warm undertones to avoid that stark, clinical feeling. I learned this after repainting my first attempt – pure white made my basement feel like a hospital corridor.
The Spray vs. Brush Debate
Let me save you some time here: rent a paint sprayer. Seriously. I tried brushing and rolling my first basement ceiling. Three days later, with a sore neck and paint in my hair, I finally gave up and got a sprayer. What took days by hand took hours with the sprayer.
Here’s what you need to know about spraying:
- Cover everything (and I mean everything) with plastic
- Thin your paint according to the sprayer instructions
- Keep the sprayer moving to avoid drips
- Plan for two coats minimum for even coverage
Also Read: 10 Bright Basement Family Room Ideas to Maximize Space
Drop Ceiling Alternatives for Basements

Drop ceilings get a bad rap, and honestly? They deserve some of it. Nothing screams “office building circa 1985” quite like those acoustic tiles. But modern alternatives to traditional drop ceilings can actually look pretty amazing.
I explored these options when dealing with a basement that had pipes running everywhere. Hiding them was non-negotiable, but I refused to install those dated ceiling tiles my contractor kept pushing.
Modern Grid Systems
Today’s grid systems aren’t your grandmother’s drop ceiling. Sleek, minimal grids in black or white create a contemporary look that actually adds to your design instead of detracting from it.
The best part about modern grid systems? They still offer the accessibility that makes drop ceilings practical. Need to access plumbing? Pop out a panel. Want to add a light fixture? No problem. It’s the perfect blend of form and function.
Creative Panel Options
Forget acoustic tiles. Modern panels come in:
- Wood-look planks that snap into the grid
- Fabric-wrapped panels for sound absorption and style
- Translucent panels that work with backlighting for ambiance
- Metal panels with interesting textures and finishes
My neighbor installed wood-look panels in a white grid system, and I’m not gonna lie – I’m a little jealous. The warmth of wood with the practicality of a drop ceiling? Genius.
Coffered Ceiling Designs for Small Basements
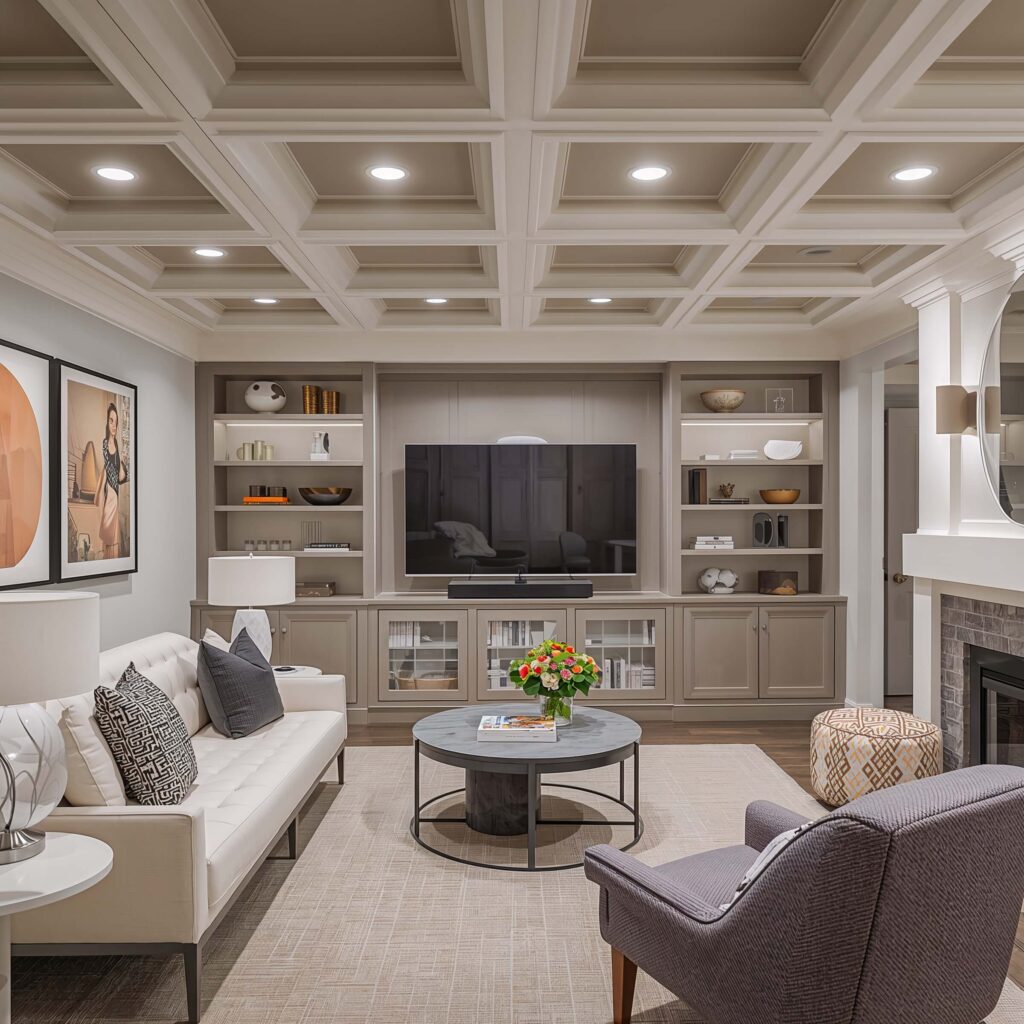
Here’s where things get fancy. Coffered ceilings in a basement? Sounds crazy, right? But when done correctly, coffered ceilings can make a small basement feel like a luxury retreat.
I helped my brother-in-law install a simplified coffered ceiling in his 400-square-foot basement. Everyone who sees it assumes he hired a high-end contractor. Nope – just two guys with a miter saw and a YouTube education 🙂
Scaling for Small Spaces
The trick with coffered ceilings in small basements? Keep the scale appropriate. Massive, deep coffers will overwhelm a small space and make your ceiling feel like it’s crushing down on you.
Here’s what works:
- Shallow coffers (3-4 inches deep maximum)
- Larger grid patterns (fewer, bigger squares rather than many small ones)
- Simple molding profiles (ornate details get lost in small spaces)
- Light colors inside the coffers to maintain brightness
DIY-Friendly Approach
You don’t need to be a finish carpenter to create a coffered look. Faux beam systems make this surprisingly achievable. These lightweight polyurethane beams look exactly like real wood but install with construction adhesive and screws.
I’ve seen people create stunning coffered ceilings using nothing but 1×4 boards and some creative painting. The shadow lines created by the coffers add depth and interest that flat ceilings simply can’t match.
Industrial Style Basement Ceiling Ideas

Industrial style isn’t just trendy – it’s practical for basements. Why? Because it celebrates the very elements most people try to hide. Exposed ducts, pipes, and concrete become design features instead of eyesores.
My buddy Tom went full industrial in his basement, and the transformation blew my mind. What started as an unfinished space with exposed everything became this cool, urban hangout that looks like it belongs in a converted loft.
Embracing the Raw Elements
The beauty of industrial style lies in its honesty. You’re not pretending your basement is something it’s not. Instead, you’re highlighting its authentic character.
Key elements that make industrial ceilings work:
- Exposed ductwork painted in matte black or metallic finishes
- Visible conduit and pipes arranged in geometric patterns
- Raw concrete or metal deck ceilings left unfinished but sealed
- Industrial light fixtures on tracks or suspended from pipes
Making It Livable
Here’s the thing about industrial style – it can feel cold if you’re not careful. The trick? Balance hard elements with warm touches. Add Edison bulb fixtures for warm lighting. Use area rugs and soft furniture to contrast the hard ceiling.
I learned this lesson when my first attempt at industrial style made my basement feel like an actual factory. Not the vibe I was going for. Adding warm wood elements and strategic lighting completely changed the feel while maintaining that industrial edge.
Also Read: 10 Modern Finished Basement Ideas for Small Spaces
Recessed Lighting Basement Ceiling Solutions
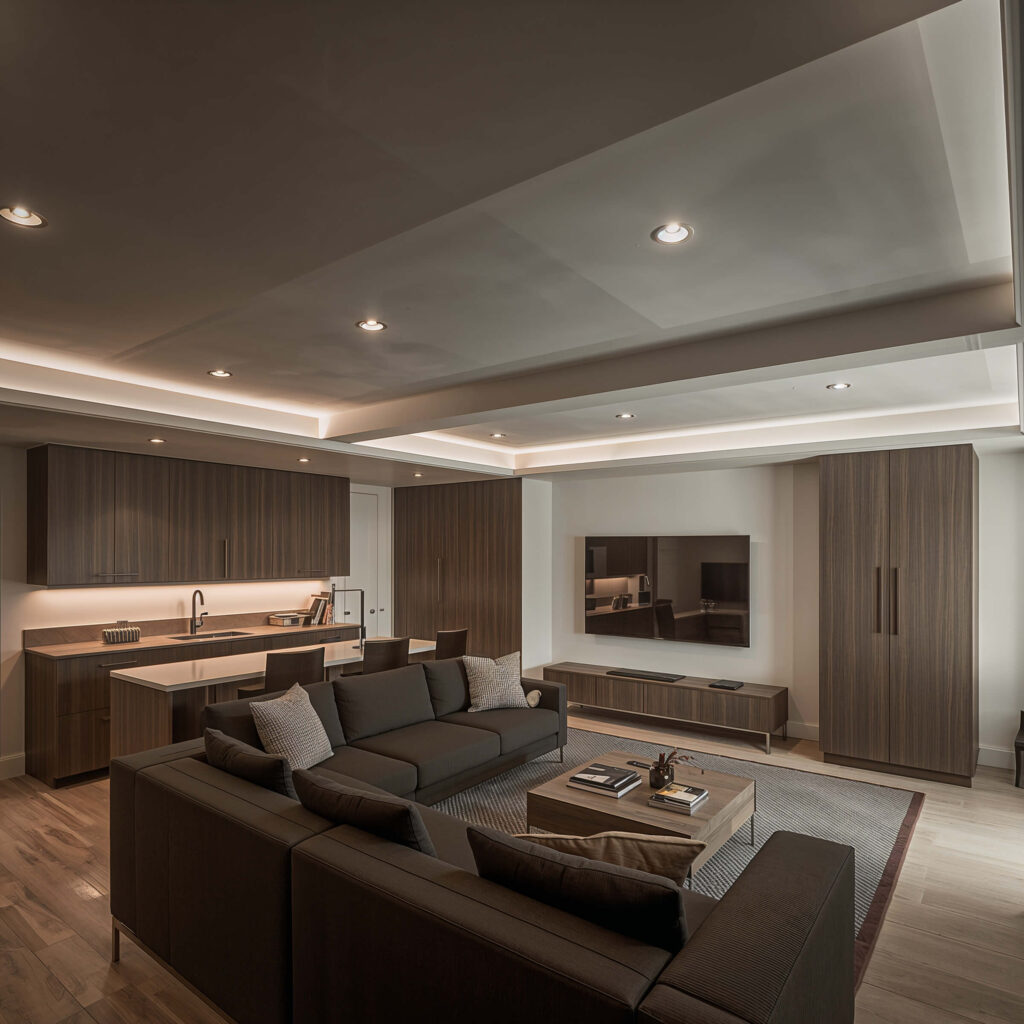
Let’s talk about the game-changer that nobody considers until it’s too late: lighting. Specifically, recessed lighting that doesn’t eat up your precious headroom.
In my basement, every inch of ceiling height matters. Traditional can lights that require 6+ inches of clearance? Not happening. But modern LED recessed lights changed everything.
Shallow Can Options
Ultra-thin LED panels require as little as 2 inches of clearance. I installed six of these in my basement, and the difference in brightness shocked me. We went from cave-like to actually pleasant.
What to look for in low-profile recessed lights:
- IC-rated fixtures (safe for insulation contact)
- Adjustable color temperature (warm for relaxing, cool for working)
- Dimming capability (trust me, you’ll want this)
- Energy Star certification (lower electric bills are always nice)
Strategic Placement Patterns
Here’s where most people mess up: random light placement. You can’t just throw lights wherever and hope for the best. Create a grid pattern based on your room’s dimensions, not your ceiling joists.
I use this simple formula: divide your ceiling into equal sections, placing lights at intersection points. For an 8-foot ceiling, space lights 4 feet apart. Higher ceiling? You can spread them out more.
Integration with Other Ceiling Types
Recessed lighting works with almost any ceiling type. Installing them in a painted ceiling? Cut clean holes with a hole saw. Working with a drop ceiling? Special brackets make installation a breeze. Even exposed beam ceilings can incorporate recessed lights between joists.
The best part? Modern smart bulbs let you control everything from your phone. IMO, being able to adjust lighting without getting off the couch is living in the future.
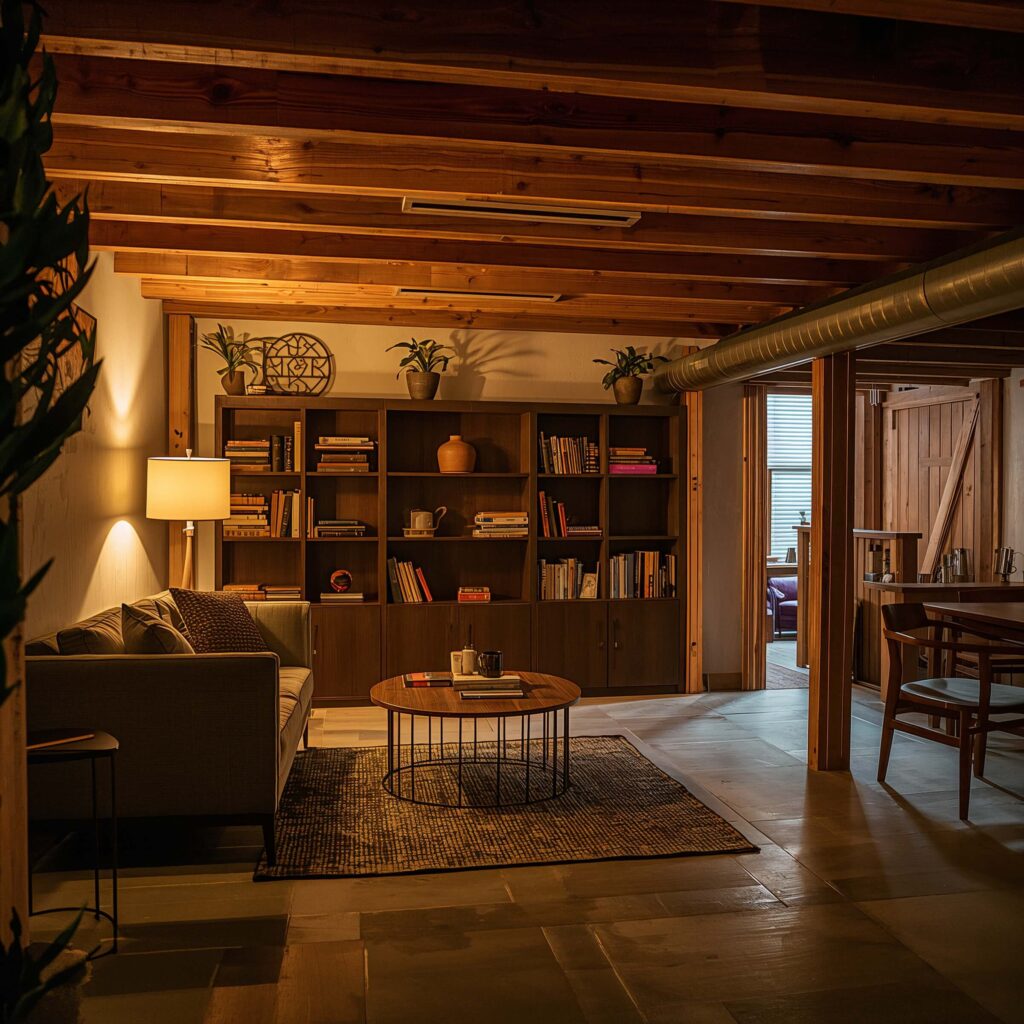
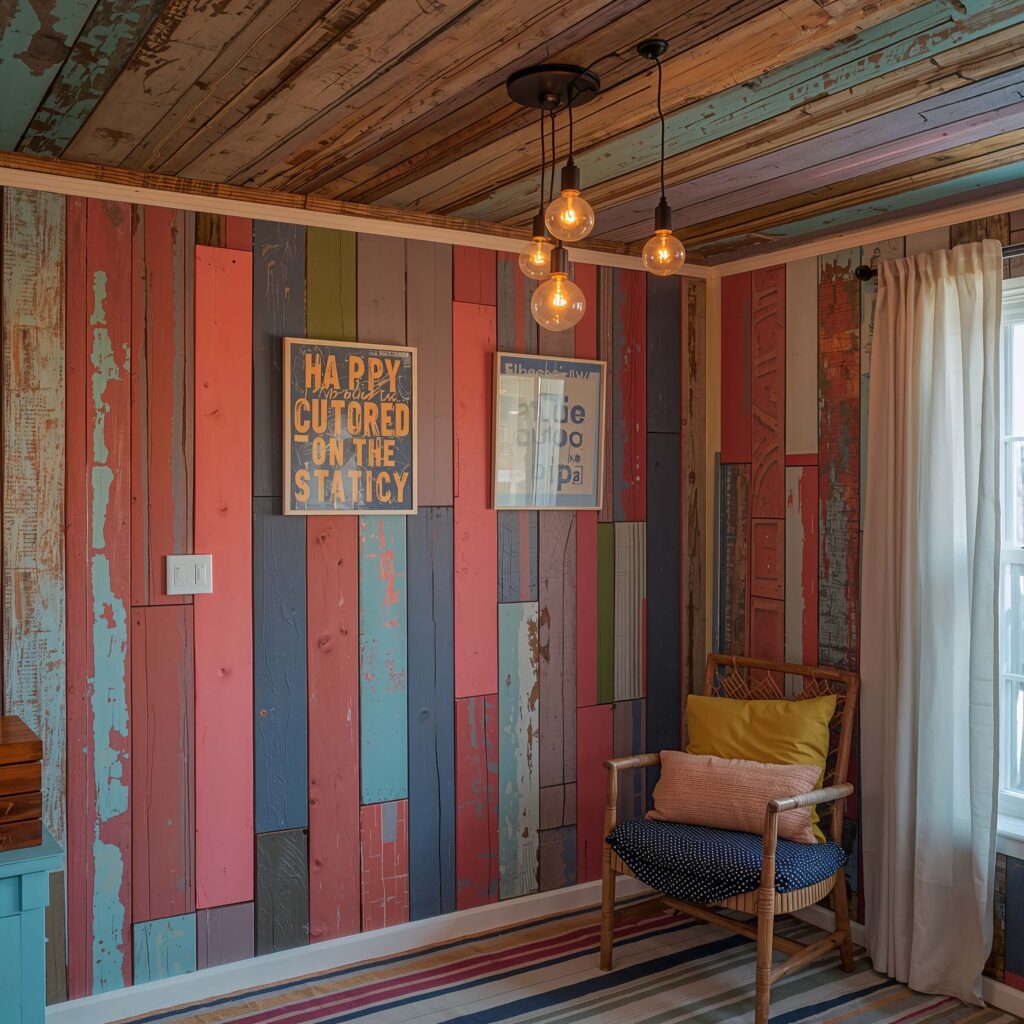
Rustic Basement Ceiling Makeovers

Sometimes you want your basement to feel like a cozy cabin retreat. Rustic ceiling treatments can transform a cold basement into the warmest, most inviting room in your house.
I helped my sister create a rustic basement ceiling using reclaimed barn wood, and now her kids prefer hanging out down there over their own bedrooms. That’s the power of getting the ceiling right.
Sourcing Authentic Materials
Real rustic charm comes from authentic materials. Reclaimed wood tells a story that new lumber simply can’t match. Check out:
- Local demolition sites (with permission, obviously)
- Architectural salvage yards
- Online marketplaces for barn wood
- Old fence boards from your own property
But here’s a secret: you don’t need genuinely old wood to get the rustic look. Distressing techniques can age new wood convincingly. Beat it with chains, sand edges randomly, use vinegar and steel wool solutions for authentic graying.
Balancing Rustic with Modern
The key to a successful rustic basement ceiling? Don’t go overboard. Too much distressed wood and suddenly you’re living in a theme park version of a cabin.
Mix rustic elements with modern touches:
- Combine rough wood with smooth drywall sections
- Add contemporary light fixtures against rustic beams
- Use modern furniture to contrast the aged ceiling
- Keep walls simple to let the ceiling be the star
DIY Basement Ceiling Panels
Real talk: not everyone has the budget for a contractor. That’s where DIY ceiling panels save the day. I’ve installed these myself, and while it took a weekend and some patience, the results rival professional installations.
The beauty of DIY panels lies in their forgiveness. Mess up a cut? It’s just one panel. Need to access something later? Pop out a panel. Your basement floods? Replace damaged panels without redoing everything.
Material Options That Don’t Break the Bank
Foam ceiling planks surprised me with their quality. They look like real wood shiplap but weigh nothing and install with adhesive. My entire ceiling cost less than $300.
Other budget-friendly options:
- Beadboard panels (classic look, easy installation)
- PVC planks (waterproof and lightweight)
- Corrugated metal sheets (industrial vibe, super affordable)
- Fabric panels (great for sound absorption)
Installation Without Professional Tools
You don’t need a workshop full of tools. Here’s your actual shopping list:
- Measuring tape and pencil
- Level (don’t skip this)
- Utility knife or circular saw
- Construction adhesive or nail gun
- Safety glasses (seriously, wear them)
The biggest rookie mistake? Not planning your layout first. Measure twice, cut once isn’t just a saying – it’ll save you money and frustration.
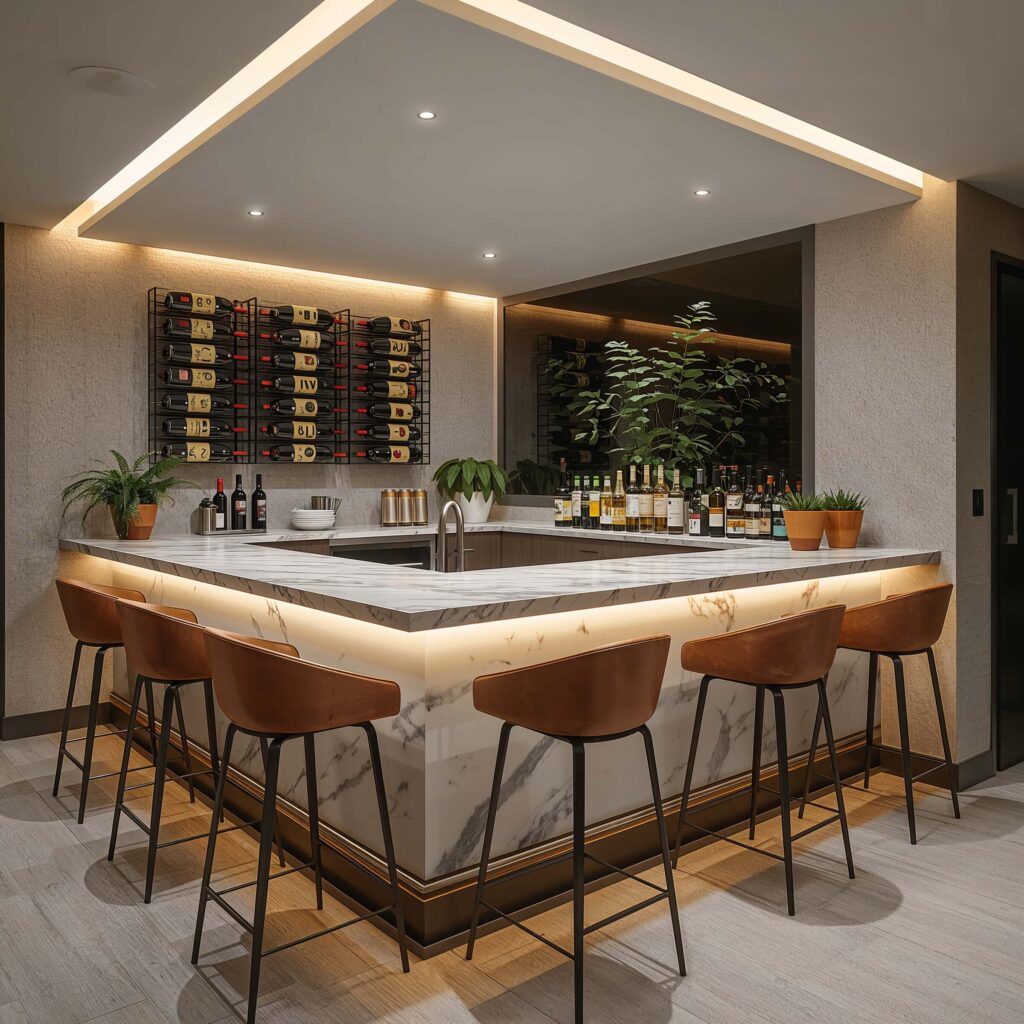
Also Read: 10 Luxury Basement Bar Ideas for Ultimate Relaxation
Decorative Tin and Metal Basement Ceilings
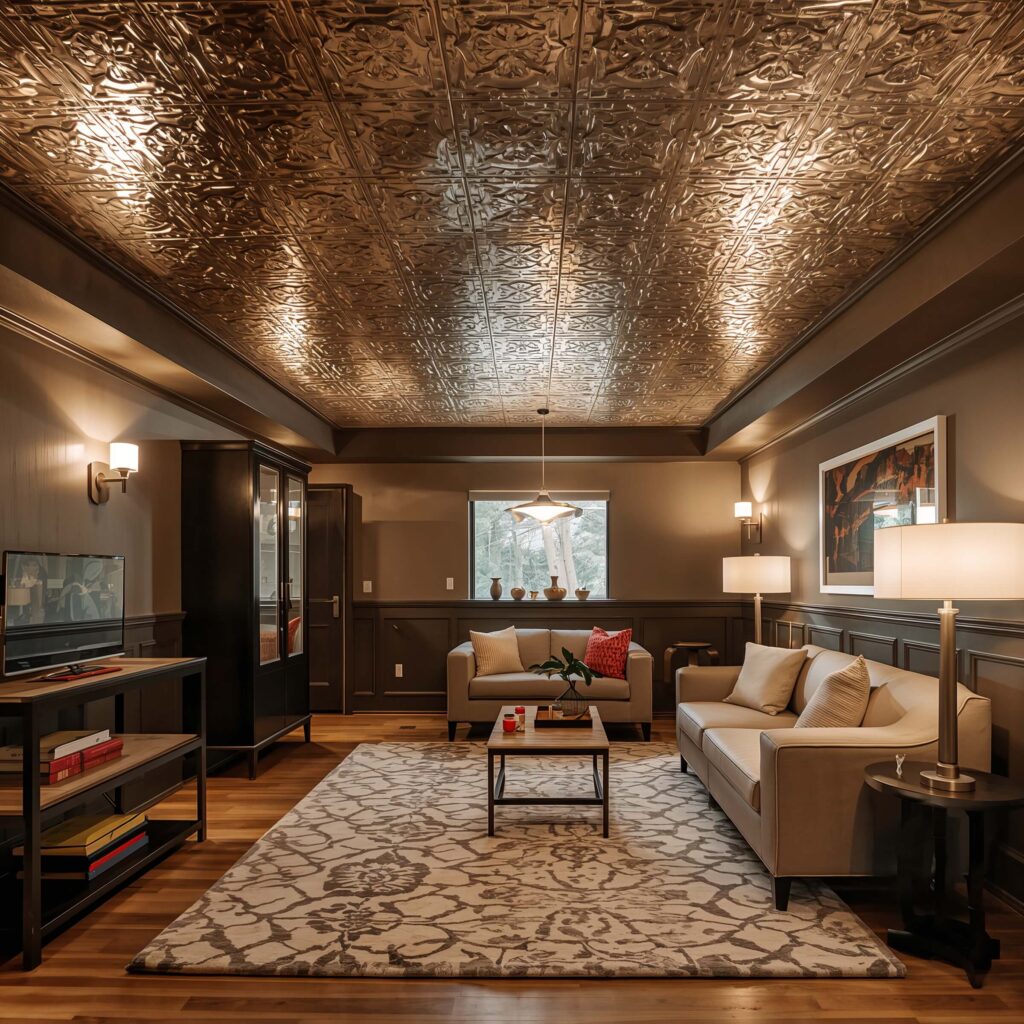
Last but definitely not least, let’s discuss the showstopper option: decorative tin and metal ceilings. These beauties bring vintage charm or modern edge, depending on your choice.
I installed tin ceiling tiles in my basement bar area, and every single person who visits comments on them. They add instant personality and elegance that makes the space feel intentional, not just finished.
Real Tin vs. Faux Options
Authentic tin tiles cost more but offer unmatched character. Each tile carries slight imperfections that create depth and interest. Plus, they’ll last literally forever with minimal maintenance.
Faux tin tiles made from:
- Aluminum (lighter, easier to cut)
- PVC (budget-friendly, moisture-resistant)
- Steel (magnetic, great for hanging decorations)
Honestly? Most people can’t tell the difference once they’re installed and painted. Choose based on your budget and installation comfort level.
Pattern Selection and Placement
The pattern you choose sets the entire mood. Victorian patterns create elegance, while geometric designs feel contemporary. Art deco patterns split the difference beautifully.
Here’s what I learned about pattern placement:
- Center your pattern in the room, not against one wall
- Use border tiles to create defined edges
- Mix patterns sparingly (one accent area maximum)
- Match the scale to your room size
Finishing Touches That Matter
Raw metal tiles need finishing. Paint them before installation – trust me on this one. Trying to paint installed tiles without getting paint on walls is a nightmare.
Popular finishes include:
- Copper patina for warmth
- Antique white for vintage charm
- Metallic silver for modern glamour
- Matte black for dramatic impact
Making Your Choice
So there you have it – ten ceiling ideas that can completely transform your basement. Which one speaks to you?
Remember, the best ceiling choice combines your style preferences with practical needs. Consider your budget, DIY skills, ceiling height, and how you’ll use the space. Don’t chase trends that don’t fit your lifestyle.
My basement journey taught me that the ceiling sets the tone for everything else. Get it right, and suddenly that forgotten space becomes everyone’s favorite room. Get it wrong, and no amount of fancy furniture will save it.
Whether you go industrial with exposed pipes or elegant with coffered details, commit to the vision and execute it well. Half-hearted attempts look worse than leaving things unfinished.
Your basement ceiling doesn’t have to be an afterthought. With these ideas and a bit of creativity, you can create a space that feels intentional, inviting, and uniquely yours. Now stop procrastinating and start planning – your dream basement ceiling awaits!