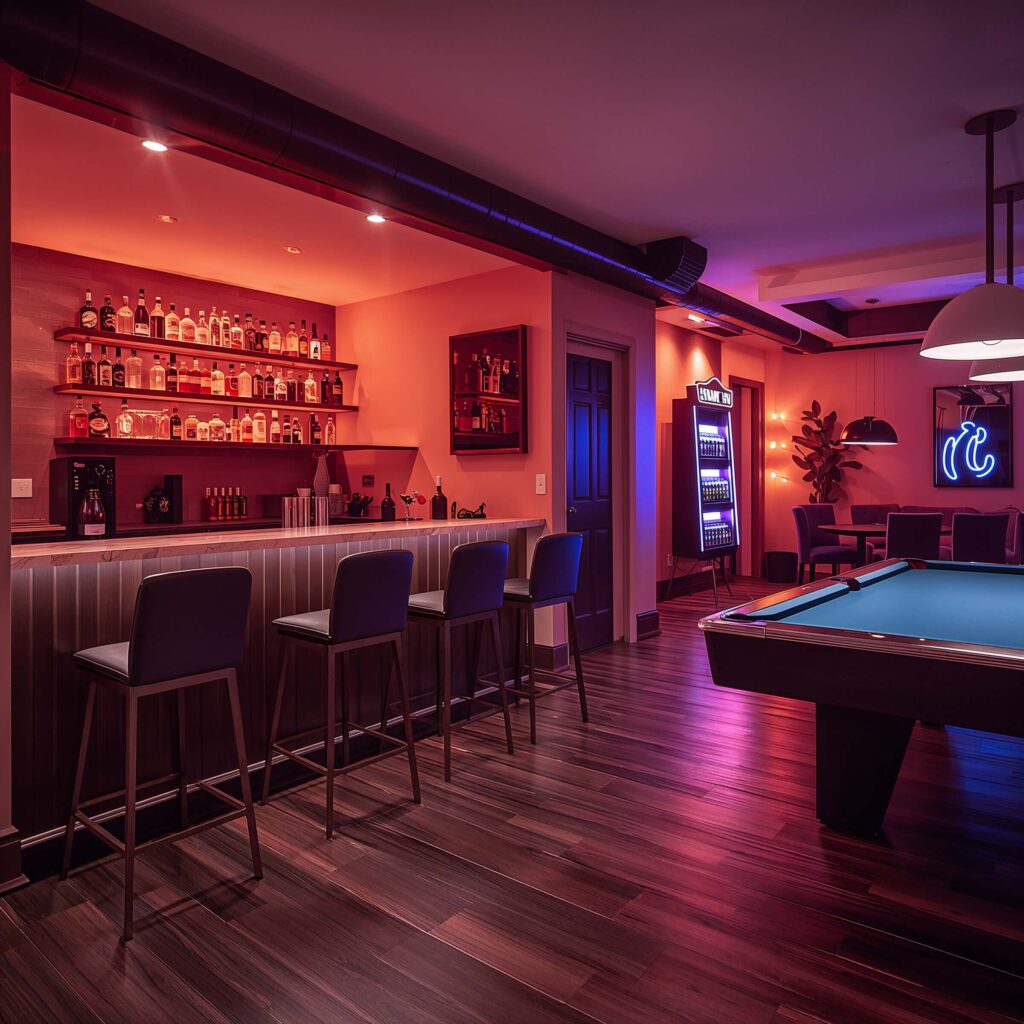
10 Genius Basement Storage Ideas to Save Space Instantly
- Basement Decor
 Ben
Ben- 0
- 28 minutes read
Look, we both know your basement probably looks like a tornado hit a garage sale right now. Mine did too until I finally cracked the code on basement organization. After helping three neighbors transform their dungeon-like basements into organized paradises (and accidentally becoming the neighborhood “storage guru”), I’ve discovered some game-changing solutions that actually work.
You’re about to learn the exact storage strategies that turned my 800-square-foot basement from a cluttered nightmare into a space so organized, my mother-in-law actually complimented it. And trust me, that woman finds fault in everything.
Hidden Under-Stair Storage Drawers
Remember that awkward space under your basement stairs that’s currently home to random holiday decorations and that exercise bike you swore you’d use? Yeah, that space. I turned mine into pull-out drawer heaven, and it changed everything.
Picture this: custom-fitted drawers that slide out smoothly, each one maximizing every inch of that triangular nightmare space. The tallest drawer near the bottom holds my camping gear, while the smaller ones up top store seasonal items I actually need to access. No more crawling on my hands and knees with a flashlight trying to find the Halloween decorations in October.
Why This Works So Well
The genius part? Each drawer pulls completely out, so you can see everything at once. I installed soft-close slides (about $30 per set at Home Depot), and honestly, watching them glide shut never gets old. Is that weird? Maybe, but when you’ve dealt with basement chaos as long as I have, you celebrate the small victories.
Here’s what makes under-stair drawers a total game-changer:
- Utilizes 100% of dead space that’s usually wasted
- Creates designated spots for specific categories
- Eliminates the dreaded “pile system” most of us default to
- Makes seasonal rotation actually manageable
- Adds surprising home value (real estate agents love this stuff)
Floating Wall Shelves with Baskets
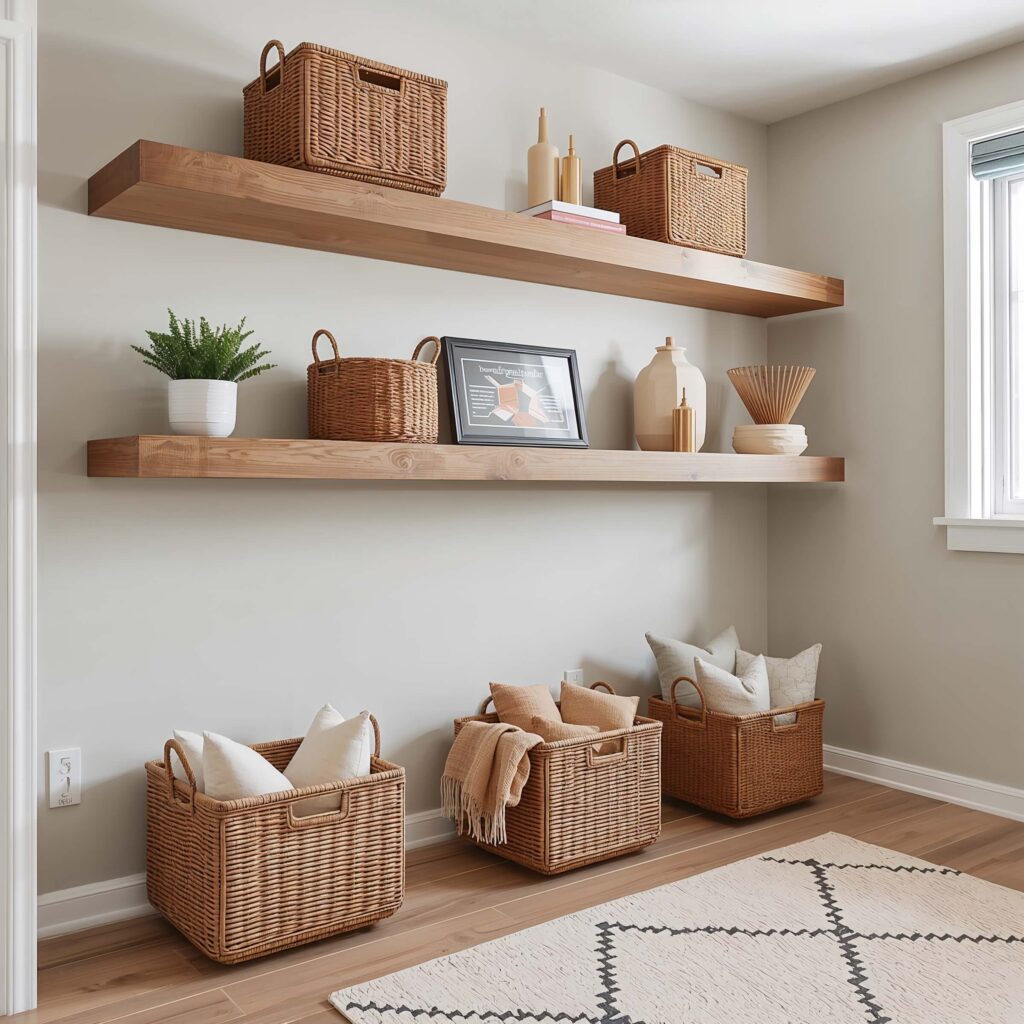
Who says basement storage has to be ugly? I installed floating shelves with woven baskets along one entire wall, and suddenly my basement looks like something out of a home magazine. Well, almost.
The shelves themselves cost me about $200 total for a 12-foot wall, but the transformation was worth every penny. Each basket has a specific purpose – one for sports equipment, another for crafts, one for tools that don’t deserve pegboard space. The best part? Everything looks intentional and organized even when it’s not perfectly neat inside the baskets.
Making It Work for Real Life
Here’s my pro tip: label the baskets from underneath. That way, you know what goes where, but guests don’t see a bunch of tacky labels ruining your aesthetic. Smart, right? I learned this trick after my kids kept throwing random stuff in random baskets, turning my system into organized chaos.
The key measurements you need to remember:
- Mount shelves at least 16 inches apart vertically
- Use wall studs or heavy-duty anchors (learned this the hard way)
- Choose baskets that are 2 inches shorter than shelf depth
- Leave 3-4 inches between baskets for easy grabbing
Ceiling-Mounted Bike and Gear Racks
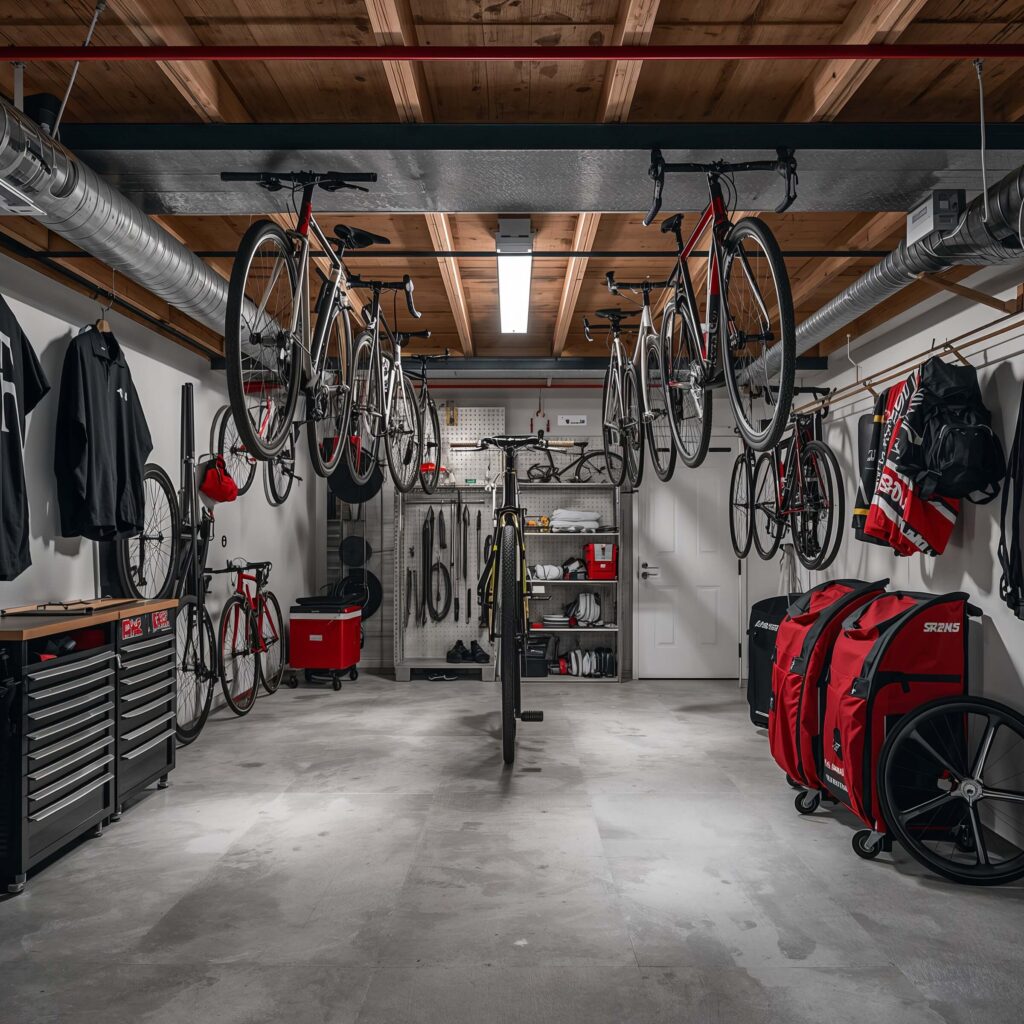
Ever tripped over a bike in your basement? Yeah, me too. Multiple times. That’s why ceiling-mounted storage became my new best friend. Those bikes that used to eat up 20 square feet of floor space? They’re now suspended overhead like some kind of sporting goods chandelier.
I use a pulley system for the kids’ bikes (because hauling them up and down keeps me from joining a gym), and simple hooks for adult bikes. The total cost was under $100, and I got back enough floor space to actually use my basement for, you know, basement things.
Installation Reality Check
Let me be real with you – installing ceiling storage isn’t exactly a breeze. You need to find the joists, drill pilot holes, and probably recruit a friend unless you’ve mastered the art of holding a bike overhead while operating a drill. But once it’s up? Pure organizational bliss.
What else works great on ceiling racks:
- Kayaks and paddleboards
- Seasonal decorations in mesh bags
- Camping gear in labeled bins
- Those giant plastic totes everyone seems to accumulate
- Ladders (why do these take up so much room?)
Also Read: 10 Charming Small Basement Ideas to Inspire Your Home
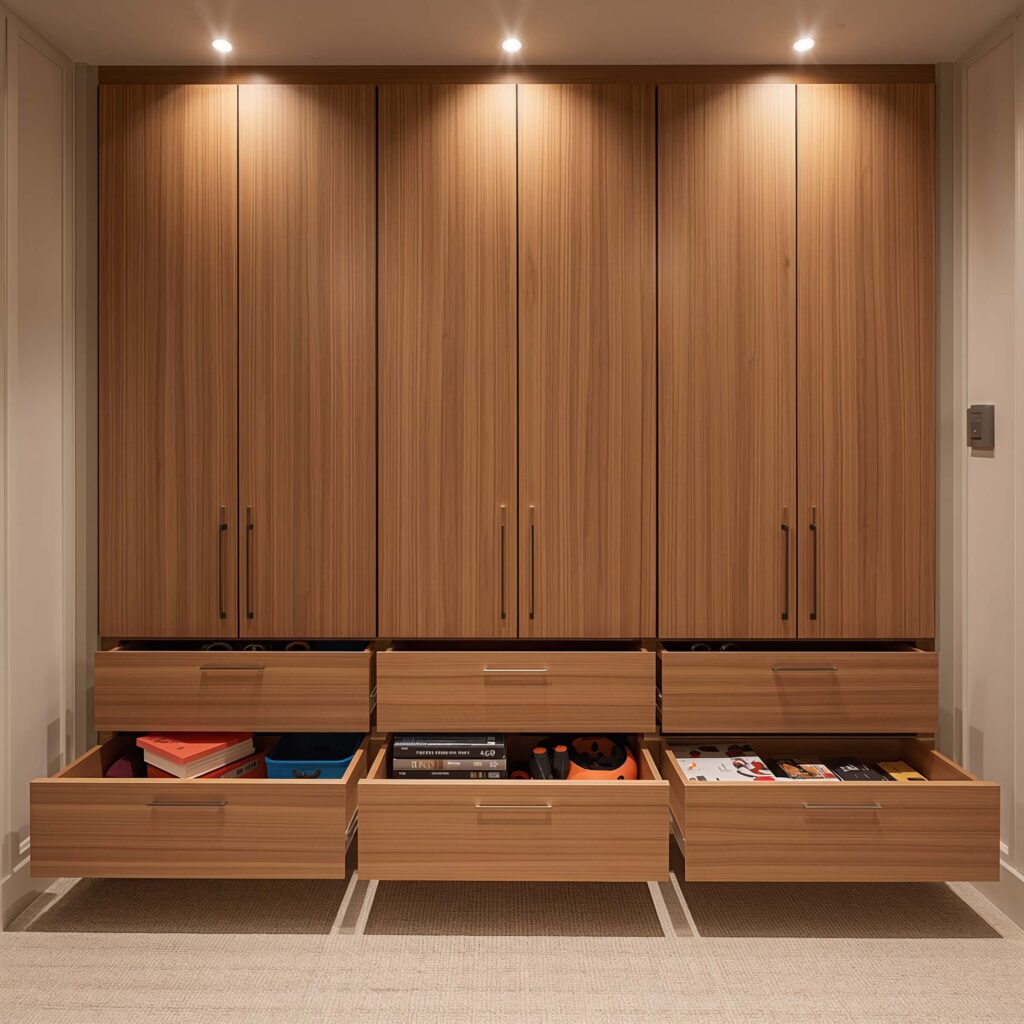
Custom Built-In Cabinetry Along Walls
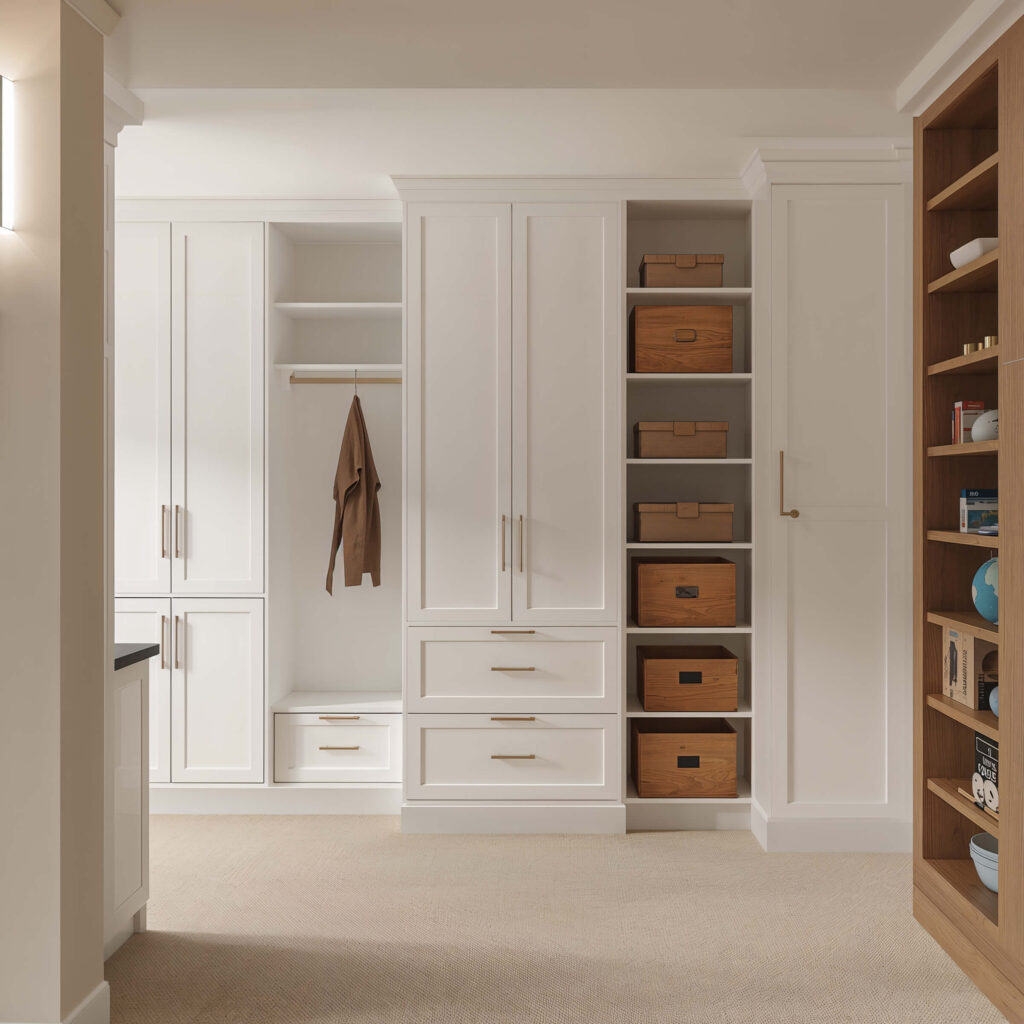
Okay, this one requires a bigger investment, but hear me out. I had a contractor build floor-to-ceiling cabinets along one wall, and it literally doubled my storage capacity. The bottom cabinets hide all the ugly stuff (paint cans, anyone?), while the upper sections with glass doors display things that don’t make me cringe.
Was it cheap? Nope. Did it transform my basement from scary dungeon to functional space? Absolutely. The cabinets run about 14 feet along one wall, providing roughly 200 cubic feet of storage. That’s like adding a whole closet to your basement.
Design Decisions That Matter
The smartest thing I did was make the center section a workspace with a countertop. Now I have a spot for gift wrapping, DIY projects, and hiding from my family when I need five minutes of peace. The counter height is 36 inches – perfect for standing work but low enough to use as a bench.
FYI, if you’re handy, you can DIY this with stock cabinets from IKEA or Home Depot for about 1/3 the cost of custom. Just saying.
Multi-Purpose Storage Benches
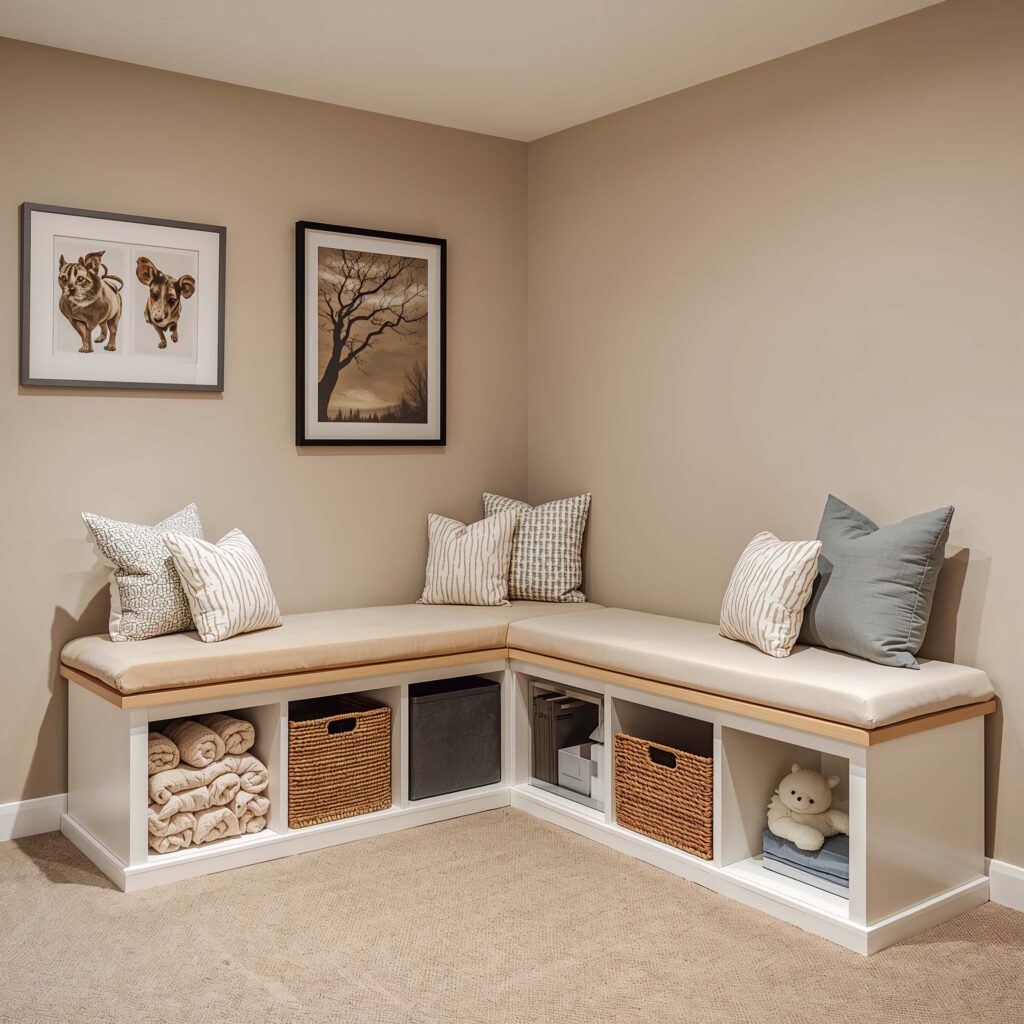
Want to know what piece of furniture does triple duty in my basement? Storage benches. They’re seating, storage, and a flat surface for sorting stuff all in one. I have three of them, and honestly, I might get a fourth.
The one by the stairs holds all our winter gear – mittens, hats, scarves – in separate compartments inside. The bench near my workspace stores craft supplies. And the one in the kids’ play area? That’s where all those tiny toy pieces go to die… I mean, get organized.
Choosing the Right Bench
Not all storage benches are created equal. Trust me, I bought a cheap one first, and the lid broke within a month. Now I look for these features:
- Soft-close hinges (protect little fingers and your sanity)
- Weight capacity of at least 300 pounds
- Interior dividers or the option to add them
- Water-resistant finish for basement moisture
- Cushioned top if you actually plan to sit on it
Clear Plastic Stackable Storage Bins
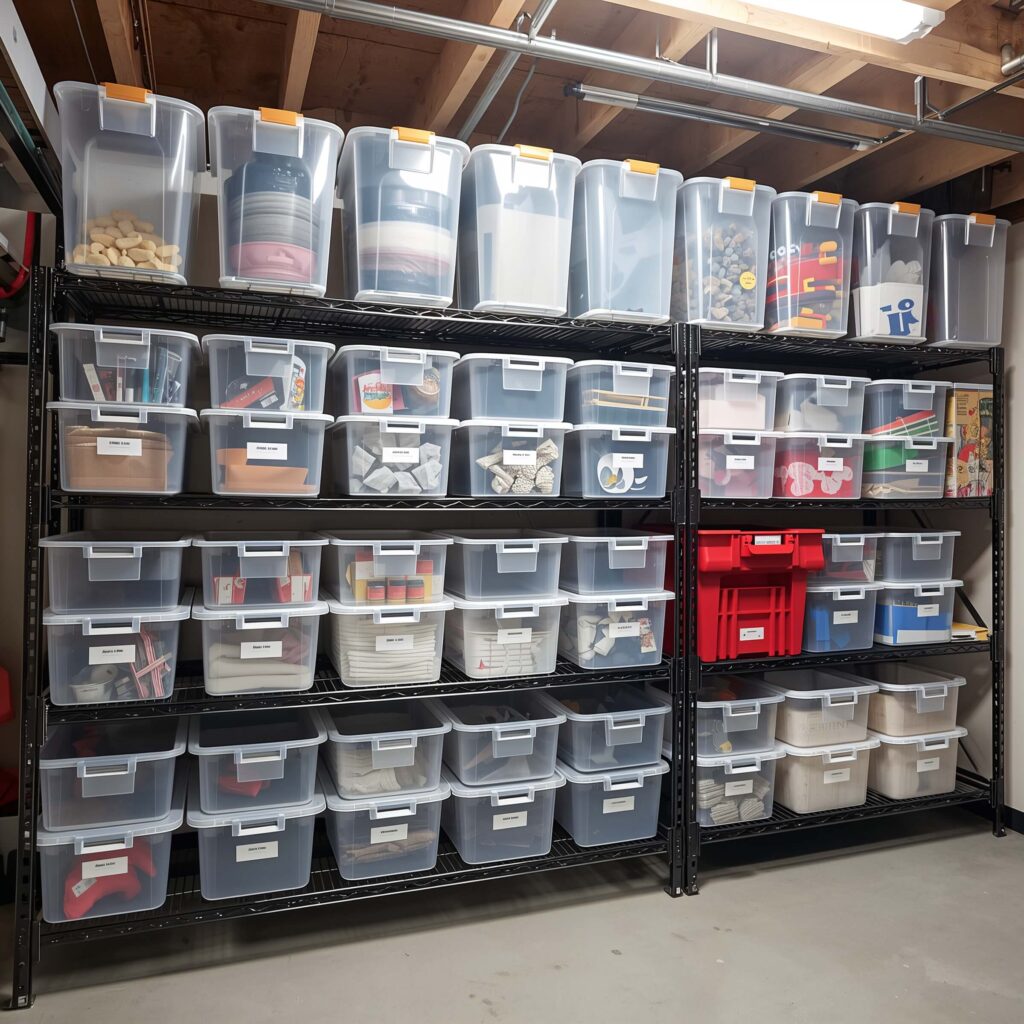
I know what you’re thinking – plastic bins are boring. But hear me out. Clear stackable bins are the unsung heroes of basement organization. Why clear? Because you can actually see what’s inside without playing the “mystery box” game every time you need something.
I use the same size bins throughout my basement (18-gallon capacity), which means they stack perfectly and look uniform. No more tower of mismatched containers threatening to topple over. Each bin gets a label on the front AND top, because I learned the hard way that you can’t read front labels when bins are stacked.
The System That Actually Works
Here’s my foolproof bin system that’ll save your sanity:
- Holiday decorations go in red-lid bins
- Kids’ outgrown clothes in blue-lid bins
- Sporting equipment in green-lid bins
- Craft supplies in clear-lid bins
- Random stuff (we all have it) in gray-lid bins
The color coding means even my kids can find and put away stuff correctly. Well, theoretically anyway 🙂
Also Read: 10 Trendy Cozy Basement Ideas and Stylish Room Makeovers
Pegboard Tool and Craft Organizer
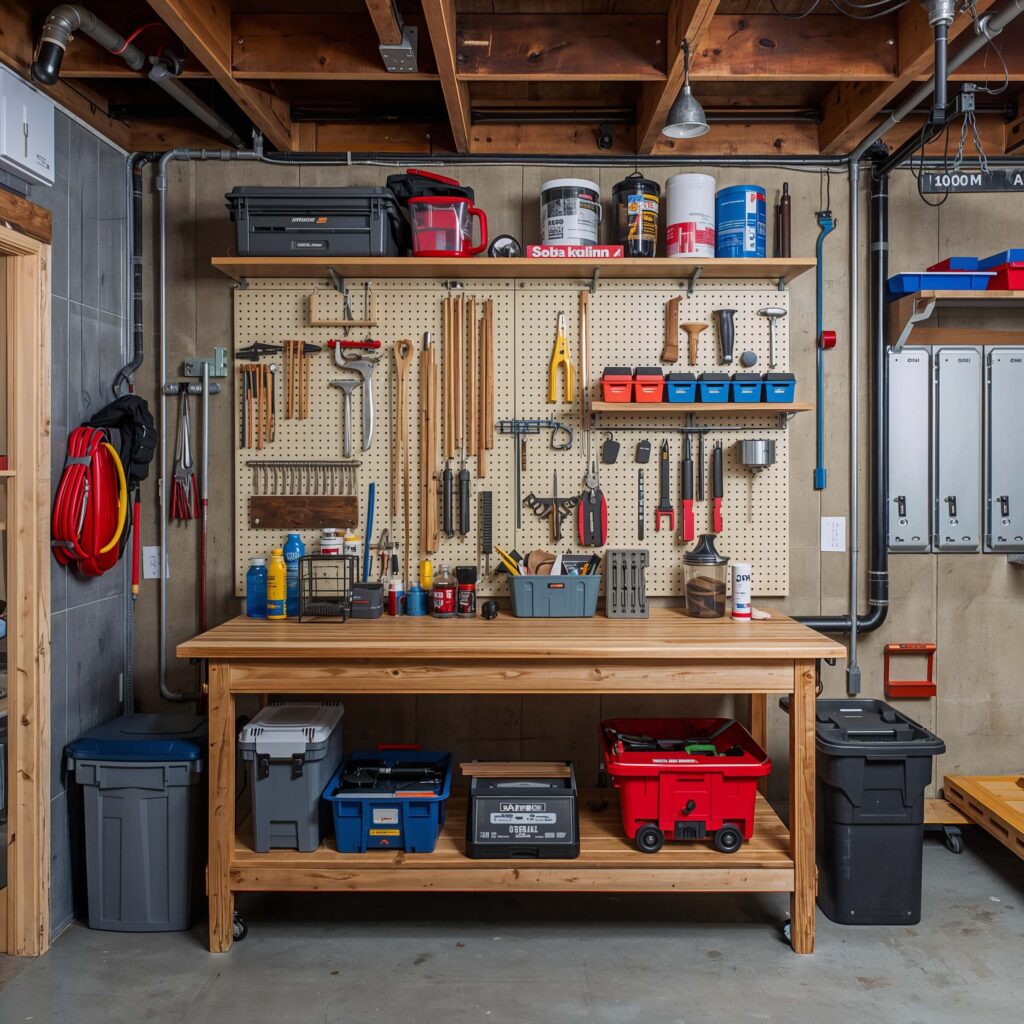
Let’s talk about the pegboard wall that made my husband actually excited about organizing. We installed a 4×8 foot pegboard, painted it black (because everything looks cooler in black), and suddenly our tools have a home that’s both functional and weirdly attractive.
But here’s where I got creative – I didn’t just use it for tools. Half the pegboard holds craft supplies using small baskets and hooks. Scissors, tape, ribbons, paint brushes – everything has its spot. The visual organization makes finding supplies instant, and cleanup takes seconds instead of the usual “shove everything in a drawer” method.
Pegboard Hacks Nobody Tells You
Want to know the secret to pegboard success? Use a variety of hook types. Those basic hooks that come in the kit? They’re just the beginning. I discovered angled hooks for hammers, basket attachments for small parts, and even shelf brackets that hold spray paint cans.
Must-have pegboard accessories:
- Lock-in hooks that won’t fall out when you grab tools
- Small parts bins that hook directly onto the board
- Magnetic strips for metal items
- Wire baskets for bulky items
- Tool holsters for drills and drivers
Sliding Rolling Pantry Shelves
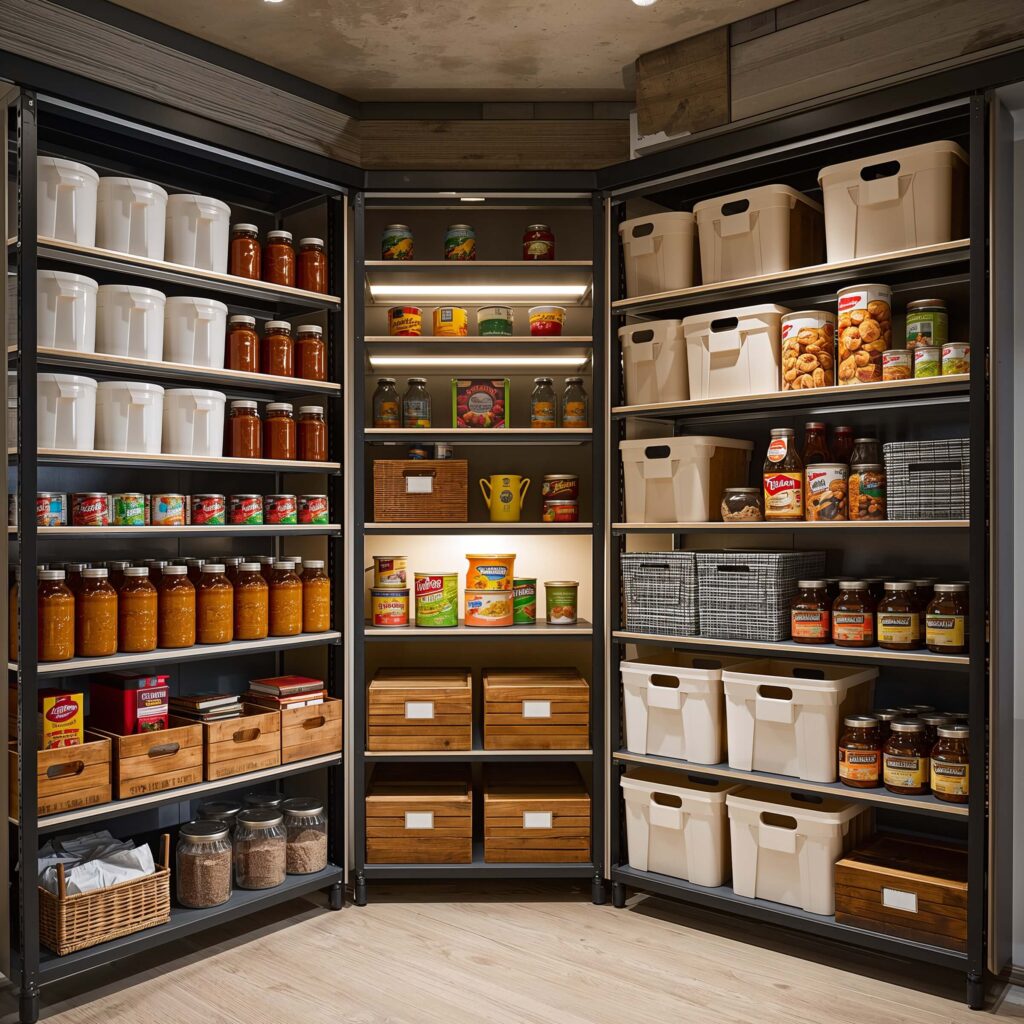
Who says pantry storage is just for kitchens? I installed rolling shelves in my basement storage closet, and now I can actually reach the stuff in the back. Revolutionary concept, right?
These shelves slide out completely on heavy-duty rails, supporting up to 100 pounds each. I use them for bulk grocery storage (hello, Costco runs), canned goods, and even paint cans organized by color. The best part? No more archaeological expeditions to find that one can of tomatoes hiding in the back.
Making Every Inch Count
The trick with rolling shelves is proper spacing. Too close together and you can’t fit tall items. Too far apart and you waste vertical space. My sweet spot is 12-14 inches between shelves for maximum flexibility.
IMO, the $300 I spent on four rolling shelves saved me from buying a second refrigerator for overflow groceries. Plus, being able to see everything at once means we actually use what we buy instead of discovering expired food two years later.
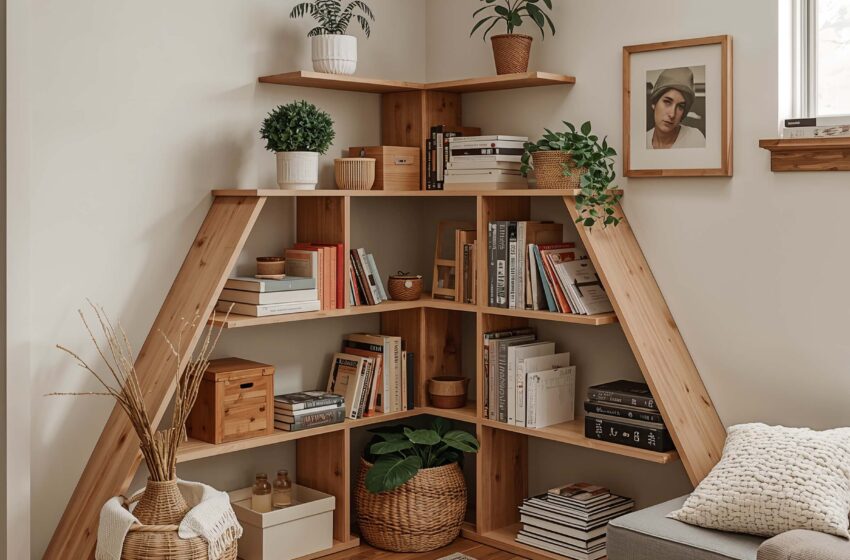
Corner Shelving Units for Odd Spaces
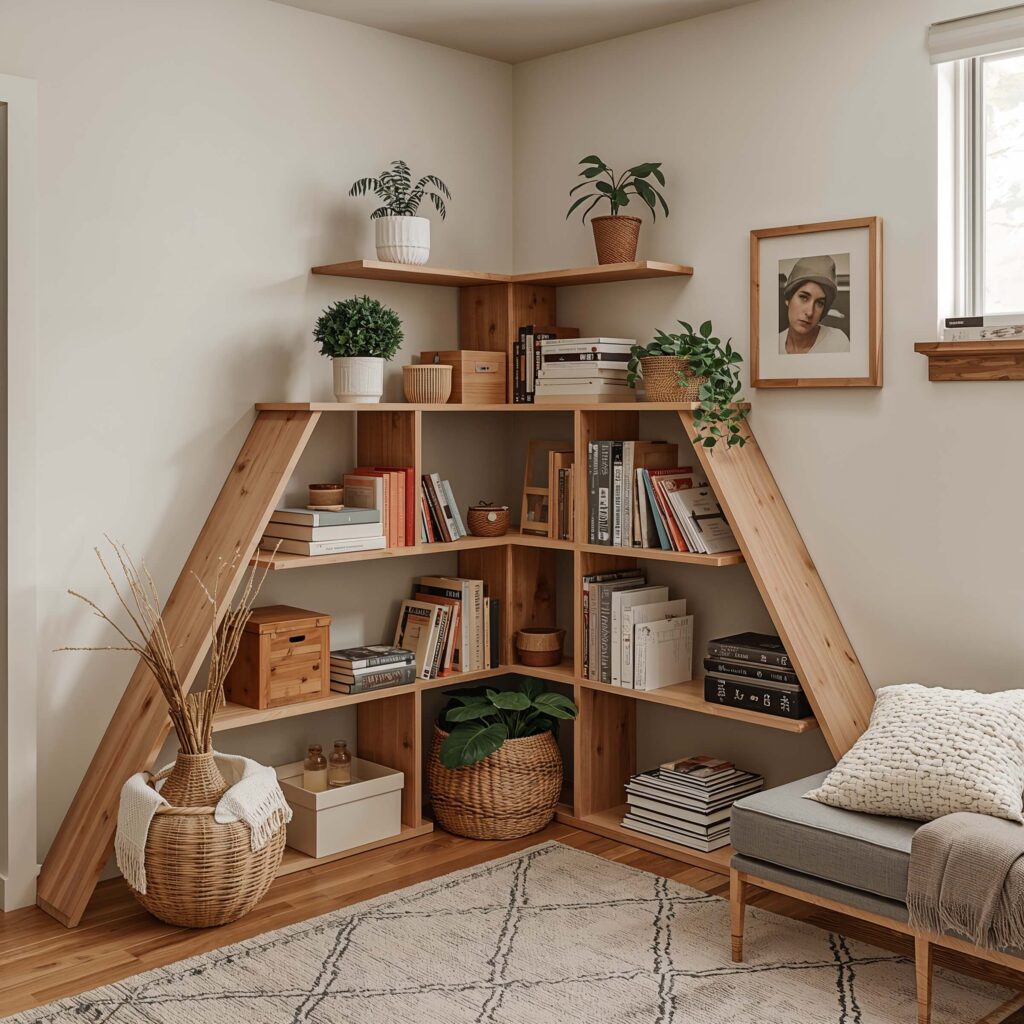
Basement corners are weird. They’re awkward, usually dark, and seem designed to collect cobwebs. But corner shelving units turned my dead corners into prime real estate. The L-shaped unit I installed holds everything from board games to photo albums.
The beauty of corner shelves? They make use of space that’s literally impossible to use any other way. Mine go from floor to ceiling – seven shelves total – providing about 35 square feet of storage in a space that was previously just collecting dust bunnies.
Custom vs. Store-Bought
You can buy pre-made corner units, but honestly? Building custom shelves to fit your exact corner dimensions makes a huge difference. My corners weren’t perfectly square (whose are?), so custom shelves meant no gaps and maximum storage.
If you go the DIY route, remember these measurements:
- Make shelves 24 inches deep on each side for standard storage
- Space shelves 12-16 inches apart
- Use brackets rated for at least 50 pounds per shelf
- Leave the bottom shelf 6 inches off the floor for cleaning
Also Read: 10 Epic Minecraft Basement Ideas and Secret Vaults
Modular Cube Storage Systems
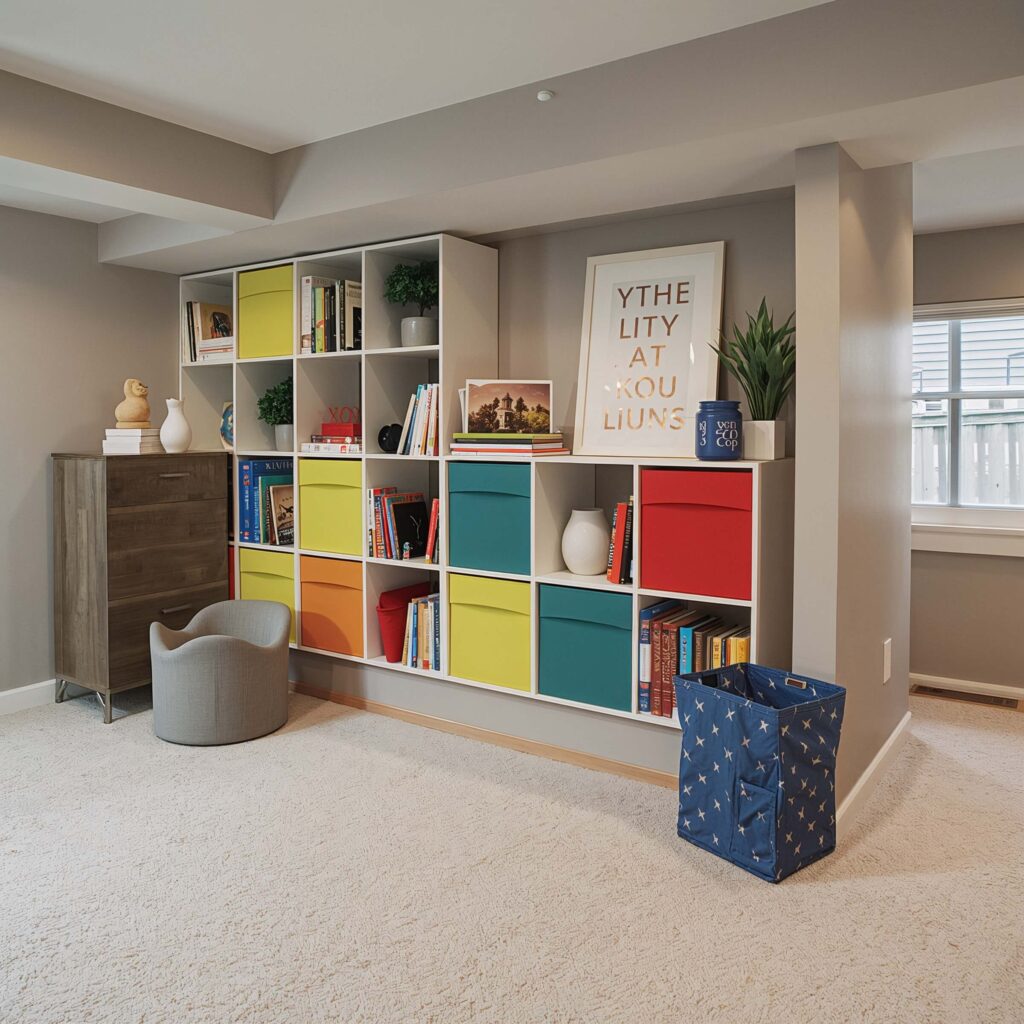
Last but definitely not least – modular cube storage. These bad boys are like adult LEGOs that solve storage problems. I started with a 4×4 cube organizer and kept adding units until I had a whole wall of perfectly sized compartments.
What makes cube storage genius? Flexibility. Some cubes hold fabric bins, others display books, and a few showcase those random decorative items that don’t belong anywhere else. When needs change, I just rearrange the cubes. Try doing that with built-in shelving.
The Cube Storage Strategy
Here’s how I maximize cube storage effectiveness:
- Use fabric bins in every other cube for hidden storage
- Leave some cubes empty for breathing room
- Mix horizontal and vertical arrangements
- Add doors to specific cubes for hiding ugly necessities
- Install LED strips inside display cubes for drama
The 16-cube unit along my basement wall cost about $150, plus another $80 for bins and baskets. For under $250, I created a storage solution that looks custom but took just an afternoon to assemble.
Making It All Work Together
So there you have it – ten storage solutions that actually work in real basements owned by real people with real clutter problems. The key isn’t picking just one solution; it’s combining several to create a system that works for your specific chaos… er, I mean, storage needs.
Remember, the best storage system is one you’ll actually use. Start with one area, get it working smoothly, then tackle the next. Before you know it, your basement will transform from that scary place where things go to die into an organized space that actually adds value to your home and your life.
And hey, if all else fails, at least you’ll have really nice-looking storage to hide your mess in. That’s still a win in my book.
Ready to tackle that basement? Trust me, future you will thank present you for finally getting organized. Plus, think of all the money you’ll save when you can actually find things instead of buying duplicates. My label maker and I are rooting for you!