10 Stylish Cardboard DIY Room Decor Ideas for Teens
- Bedroom Design
 Ben
Ben- 0
- 75 minutes read
Before you toss that Amazon box, read this. That cardboard you’re about to recycle is actually your ticket to having a room that looks like it cost thousands when it actually cost… well, nothing. Zero dollars. Zilch.
I stumbled into cardboard crafting completely by accident after a massive online shopping spree left me with enough boxes to build a small fortress. Instead of recycling them like a responsible adult, I got curious.
What started as “let me just try making one thing” turned into a full-blown obsession that transformed my room from “college dorm reject” to “wait, did you hire an interior designer?”
The best part? Nobody believes these pieces are cardboard until I tell them. I’ve had friends literally touch my wall shelves, examine my lamp closely, and ask where I bought my desk organizer—only to have their jaws drop when I reveal the truth. That reaction never gets old.
Whether you’re broke, bored, or just environmentally conscious, these 10 cardboard DIY room decor ideas will help you create custom pieces that look professionally made without spending a dime.
Let’s turn your trash into treasure that’ll make your Instagram followers seriously jealous.
1. Cardboard Geometric Wall Shelves

Let’s start with something that looks impossible but is surprisingly doable—geometric wall shelves that appear to defy gravity. These triangular and hexagonal beauties add storage and style simultaneously.
Why Geometric Shelves Hit Different
Angular shapes create visual interest that rectangular shelves simply can’t match. They’re modern, sculptural, and make even basic items look curated when displayed on them.
I made a set of three hexagonal shelves for my bedroom wall using Amazon boxes, and they’ve become my favorite room feature. Guests consistently ask where I bought them, and when I say “I made them from cardboard,” they literally don’t believe me until I show them the making-of photos on my phone.
Materials You’ll Actually Need
Gathering your supplies:
- Thick cardboard boxes (double-layered for strength)
- Box cutter with fresh blades
- Ruler and pencil
- Hot glue gun (your new best friend)
- Spray paint or acrylic paint
- Template (print or draw your shape)
- Strong mounting tape or brackets
Construction Basics
Building your geometric shelf:
- Print your shape template (hexagon, triangle, etc.)
- Trace onto cardboard multiple times
- Cut out identical pieces for front, back, sides
- Measure and cut side strips for depth
- Glue strips around one shape’s edge
- Attach second shape to close the box
- Reinforce all seams generously
- Let dry completely (patience!)
Making Them Weight-Bearing
Here’s the crucial part—ensuring they actually hold stuff:
- Use double or triple-layered cardboard
- Glue multiple strips for thick sides
- Add internal support beams
- Reinforce bottom shelf surface
- Test weight capacity before mounting
- Don’t overload (they’re cardboard, not steel)
Painting for Professional Finish
Getting that store-bought look:
- Prime first with gesso or spray primer
- Apply 3-4 thin coats of paint
- Let each coat dry completely
- Consider metallic spray paint for glam
- Matte finish hides imperfections better
- Seal with clear coat for durability
Mounting Safely
Installation options:
- Heavy-duty Command strips (check weight rating)
- Small L-brackets attached to wall studs
- Picture hanging wire system
- Multiple mounting points for stability
- Group in odd numbers for aesthetics
2. 3D Cardboard Wall Art Panels
Flat art is fine, but 3D panels? They catch light, create shadows, and add architectural interest that transforms blank walls into statement features.
The Dimension Advantage
Three-dimensional art creates drama that flat prints can’t achieve. The shadows shift throughout the day as light changes, making your art literally alive and dynamic.
My bedroom accent wall features a massive 3D geometric pattern made entirely from cardboard triangles, and it’s genuinely the first thing people comment on when they see my room. The whole project cost $0 and took one weekend. The impact? Absolutely priceless.
Design Patterns That Work
Popular 3D panel styles:
- Geometric triangles: Modern and clean
- Hexagonal honeycomb: Trendy and textured
- Abstract waves: Organic and flowing
- Mountain ranges: Minimalist and serene
- Starburst patterns: Dramatic and eye-catching
- Layered circles: Retro and dimensional
Creating Your Pattern
Step-by-step process:
- Sketch your design on graph paper
- Decide on panel size and quantity
- Cut cardboard into uniform shapes
- Fold or layer for dimension
- Arrange pattern before gluing
- Attach pieces to backing board
- Paint entire surface uniformly
- Mount backing to wall
Adding Dimension
Techniques for depth:
- Fold pieces at angles before gluing
- Layer multiple shapes on top of each other
- Add spacers between elements and backing
- Create graduated heights for drama
- Mix flat and raised elements
- Use shadows intentionally in design
Color Strategies
Making it pop:
- Monochrome looks sophisticated
- Ombre creates visual flow
- Metallic adds luxury
- Matte finishes appear more expensive
- Consider your wall color as part of design
3. Cardboard Photo Collage Frames
Custom multi-photo frames cost a fortune in stores, but cardboard versions work just as well and match your exact aesthetic because you design them yourself.
The Personal Touch Factor
Photo displays make rooms feel lived-in and loved, showcasing your actual life instead of generic stock images. Custom frames let you arrange photos exactly how you envision.
I created a massive collage frame that holds 20 photos in various sizes, and changing out the pictures regularly keeps my room feeling fresh. The frame itself looks professional enough that people assume it’s from a boutique shop.
Frame Design Options
Layout possibilities:
- Grid arrangement (uniform and clean)
- Scattered organic (casual and artistic)
- Single large frame with multiple openings
- Individual small frames grouped together
- Shaped overall frame (heart, circle, etc.)
- Asymmetrical modern layout
Building Multi-Opening Frames
Construction process:
- Plan your layout and photo sizes
- Cut cardboard base to overall size
- Cut window openings precisely
- Create depth with layered frames
- Build back piece slightly larger
- Create tab system or hinges for photo access
- Paint and assemble
Backing and Photo Attachment
Securing your pictures:
- Tape photos from behind
- Use small cardboard tabs
- Create pockets for easy swaps
- Add clear plastic over photos (optional)
- Build in standing easel or hanging system
Professional Finishing
Details that matter:
- Cut clean edges with sharp blade
- Sand any rough spots
- Multiple paint coats for coverage
- Consider matting effect with layered cardboard
- Add decorative elements before final assembly
FYI, making your frames modular means you can rearrange them whenever you want a room refresh without starting from scratch.
Also Read: 12 Stylish DIY Living Room Decor Ideas for Modern Homes
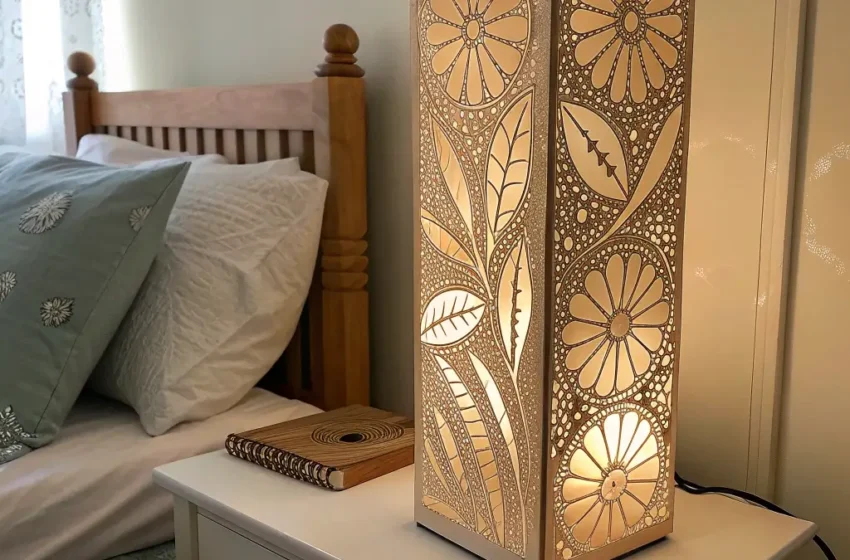
4. DIY Cardboard Lamp with Cut-Out Patterns

Lighting can make or break a room’s vibe, and a custom cardboard lampshade creates stunning light patterns while being completely free to make. Just remember: LED bulbs only for safety!
The Light and Shadow Magic
Cut-out patterns transform simple light into art, projecting beautiful designs onto your walls and ceiling. The right pattern creates ambiance that completely changes how your room feels.
My geometric lampshade casts the most incredible shadow patterns at night—it’s like having a light show every evening. Guests are always shocked when I tell them it’s cardboard, because the shadows it creates look so intentional and design-forward.
Safety First (Seriously!)
Critical safety rules:
- Use LED bulbs ONLY (they produce minimal heat)
- Keep cardboard 3+ inches from bulb
- Never exceed recommended wattage
- Check regularly for any heat damage
- Ensure adequate ventilation
- Replace immediately if damaged
Pattern Ideas
Design inspiration:
- Geometric shapes: Modern and clean
- Constellation patterns: Starry night effect
- Floral cutouts: Romantic and soft
- Abstract designs: Artistic and unique
- Moroccan-inspired: Intricate and exotic
- Simple circles: Classic and timeless
Construction Method
Building your lampshade:
- Measure your existing lamp base
- Design pattern on paper first
- Transfer to cardboard
- Cut carefully with craft knife
- Score fold lines if making angular shade
- Fold and glue into shape
- Reinforce seams thoroughly
- Prime and paint if desired
- Install with proper clearance from bulb
Shape Options
Different lamp styles:
- Cylindrical drum shade
- Geometric angular design
- Dome or globe shape
- Layered concentric circles
- Origami-inspired folds
- Abstract sculptural form
Adding Color and Texture
Finishing touches:
- Paint solid colors inside and out
- Leave natural cardboard for rustic look
- Add translucent paper for diffused light
- Create ombre effects
- Stencil additional patterns
5. Cardboard Desk Organizer & Stationery Holder
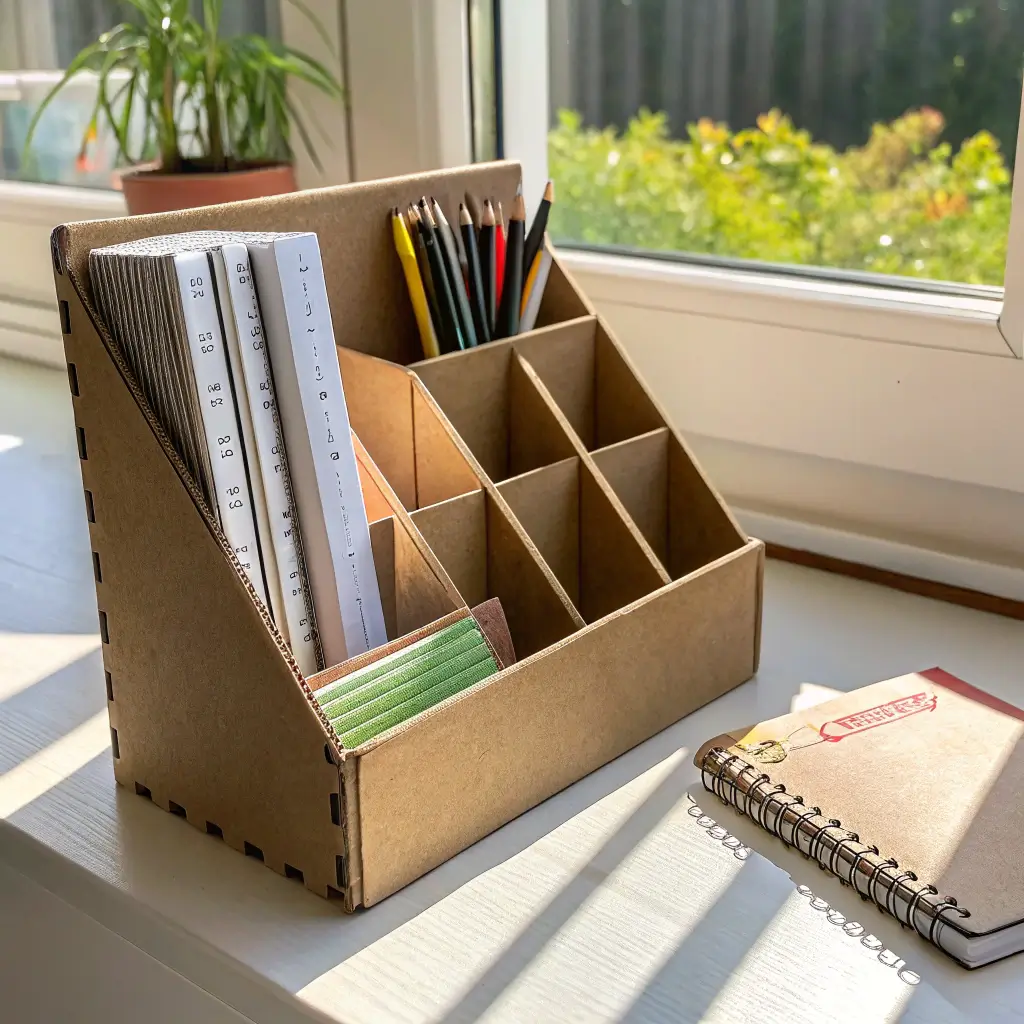
Every desk descends into chaos without proper organization, and custom cardboard organizers fit your exact needs better than anything you could buy.
The Custom Fit Advantage
Store-bought organizers never have the right combination of compartments, but when you make your own, you design exactly what you need for your specific stuff.
My desk organizer holds my laptop vertically, stores pens in graduated heights, includes a phone stand, and has a mail sorter—all made from cereal boxes covered in contact paper. Total cost: $0 for cardboard, $8 for covering material. Functionality: absolutely perfect for my needs.
Planning Your Organizer
Design considerations:
- What items need organizing?
- Desk space available?
- Horizontal or vertical orientation?
- Open compartments or drawers?
- Matching room aesthetic?
Building Multi-Compartment Organizers
Assembly process:
- Collect boxes of various sizes
- Cut to desired heights
- Arrange in functional layout
- Glue sections together securely
- Reinforce all joints
- Cover with decorative material
- Add labels if desired
Compartment Ideas
Functional sections:
- Pen/pencil cups
- Phone stand with viewing angle
- Sticky note holder
- Mail sorter sections
- Small drawer units
- Cable management channels
- Vertical laptop/tablet stand
Covering Materials
Making it pretty:
- Contact paper: Easy and durable
- Fabric: Soft and sophisticated
- Wrapping paper: Endless patterns
- Paint: Simple solid colors
- Wallpaper samples: Designer looks free
- Maps or sheet music: Unique character
Adding Functional Details
Extra features:
- Pen holder inserts
- Drawer pull handles
- Label holders
- Cork board section
- Magnetic strip for clips
- Built-in charging station cutout
6. Cardboard Hanging Wall Planters

Your plant babies deserve better than sitting on every flat surface, and hanging planters create vertical gardens that save space while looking incredible.
The Vertical Garden Vibe
Hanging planters maximize space while creating living art installations on your walls. They bring nature indoors without sacrificing valuable shelf or desk space.
I created a set of five hexagonal hanging planters for my wall, arranged in an asymmetrical cluster, and they’ve transformed my room into an urban jungle. The cardboard actually holds up surprisingly well when you use plastic liners properly.
Waterproofing is Critical
Protecting your cardboard:
- Always use plastic liner inside
- Never water directly in cardboard
- Apply waterproof sealant anyway
- Check regularly for moisture damage
- Use with succulents or faux plants for zero risk
- Consider removable plastic pots inside
Planter Designs
Shape options:
- Hexagonal geometric
- Cylindrical tubes
- Box-style cubes
- Triangular pyramids
- Tapered cone shapes
- Flat-backed half-rounds
Construction Steps
Making hanging planters:
- Cut cardboard to template shape
- Score fold lines carefully
- Fold into 3D shape
- Glue seams thoroughly
- Reinforce bottom especially
- Create drainage considerations
- Paint and seal completely
- Add hanging system
- Insert plastic liner before plants
Hanging Systems
Attachment methods:
- Rope or twine through punched holes
- Wire threaded through corners
- Leather straps for modern look
- Macrame-style hangers
- Mounted to wood backing first
- Command hooks for wall mounting
Plant Selection
Best choices for cardboard planters:
- Small succulents (low water needs)
- Air plants (no water in planter)
- Faux plants (zero risk option)
- Trailing pothos (if using plastic liner)
- Small herbs (with careful watering)
Also Read: 10 Inspiring Room Decor Bedroom DIY Ideas to Try Today
7. Foldable Cardboard Room Divider
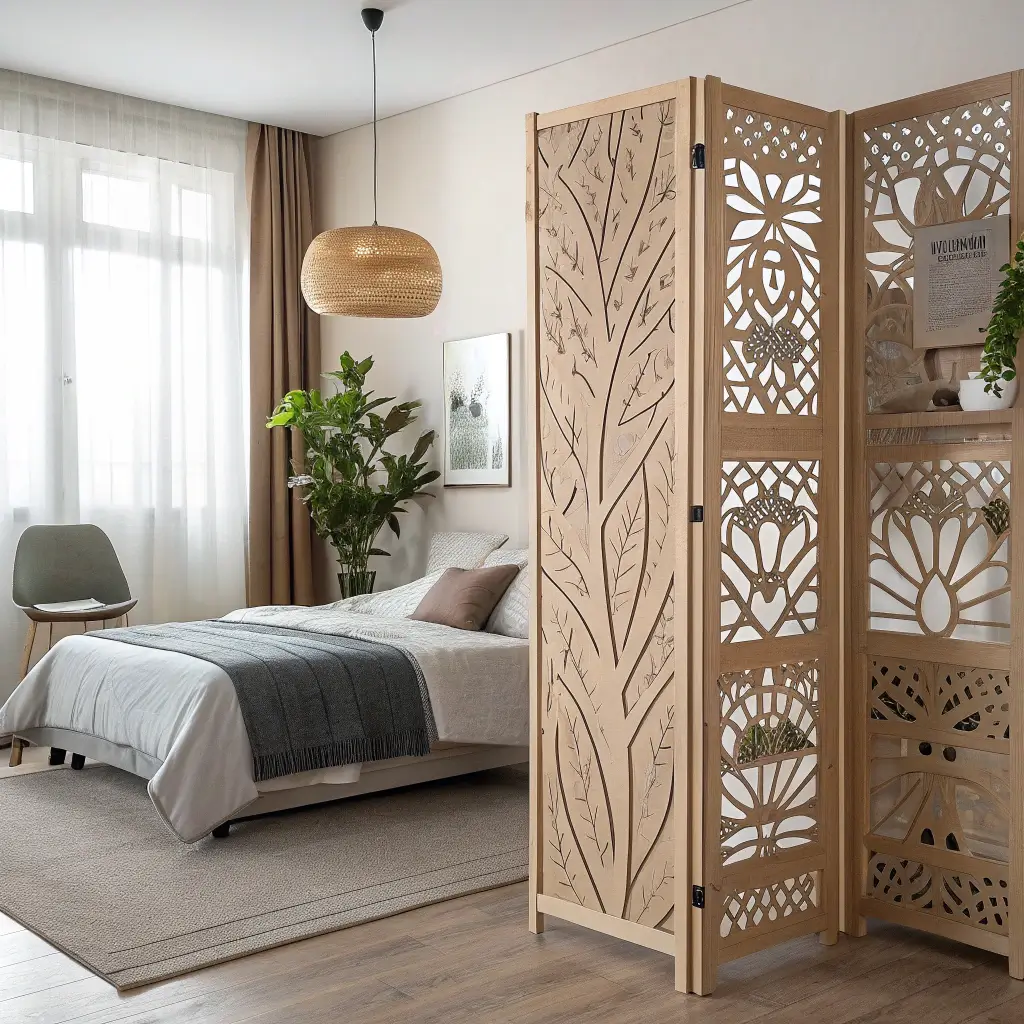
Need to section off space without permanent walls? A cardboard room divider provides privacy, defines areas, and adds decorative interest—all while being completely movable.
The Flexible Space Solution
Room dividers create distinct zones without construction or landlord permission. They’re perfect for studio apartments, shared rooms, or anyone wanting to define spaces differently.
I made a four-panel divider for my studio to separate sleeping and working areas, and it’s been a game-changer for my productivity. Being able to “leave work” by simply moving to the other side of the divider helps my mental boundaries immensely.
Divider Design Styles
Aesthetic options:
- Solid panels with cutouts: Privacy with airflow
- Lattice or geometric patterns: Decorative and light
- Full panels: Complete visual separation
- Mixed heights: Partial privacy
- Hinged accordion: Folds completely flat
- Standing panels: Stable without hinges
Building Foldable Panels
Construction process:
- Cut cardboard to panel size (height x width)
- Double or triple layer for stability
- Glue layers together thoroughly
- Create panels of equal size
- Connect with fabric hinges or actual hinges
- Add weight at bottom if needed
- Decorate before or after assembly
Hinge Options
Connecting panels:
- Duct tape hinges (surprisingly strong)
- Fabric strips glued on both sides
- Actual small hinges screwed in
- Rope or cord for looser connection
- Leather strips for decorative look
Decorating Your Divider
Making it beautiful:
- Paint solid colors both sides
- Decoupage with paper or fabric
- Create cut-out patterns for light
- Add photos or artwork
- Use washi tape for patterns
- Attach fabric for softness
Stability Features
Keeping it upright:
- Wide panel bases
- Weighted bottom edges
- Multiple panels for balance
- Rubber feet to prevent sliding
- Anchor to existing furniture if needed
IMO, room dividers are one of the most practical cardboard projects because they solve real space problems while looking intentional.
8. Cardboard Jewelry Display Stand
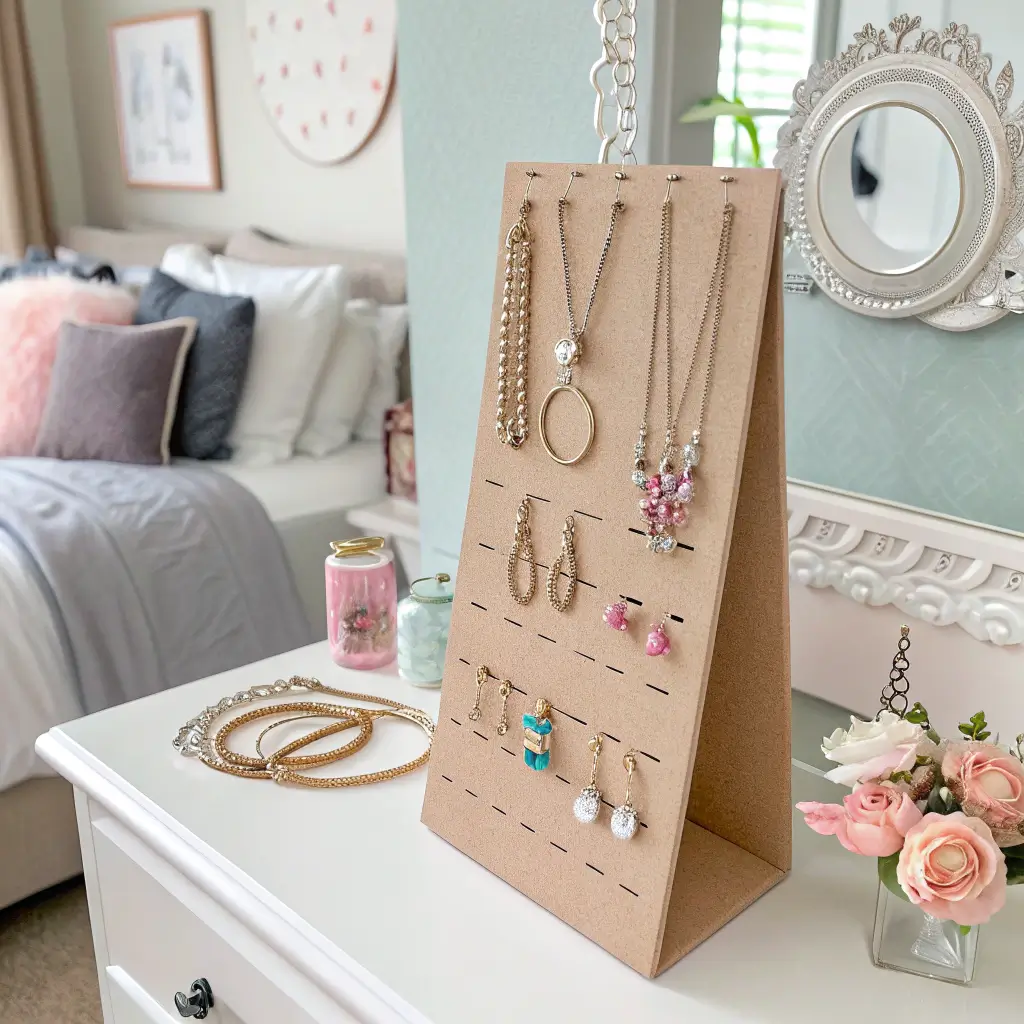
Tangled necklaces and lost earrings are the worst, but a custom jewelry stand keeps everything visible, accessible, and doubles as decorative art.
The Functional Display
Jewelry stands turn accessories into decor while solving storage problems. When your jewelry looks beautiful displayed, you’re more likely to actually wear it instead of forgetting you own it.
My cardboard jewelry tree holds all my necklaces without tangling, displays my earrings where I can actually see them, and has become a sculptural element on my dresser. It cost nothing to make and works better than any store-bought option I’ve tried.
Stand Design Options
Different structures:
- Tree branches: Organic and natural
- Geometric towers: Modern and angular
- Tiered platforms: Traditional display
- Hand sculpture: Artistic and unique
- Abstract forms: Sculptural and bold
- Themed shapes: Personalized fun
Building a Display Stand
Construction basics:
- Design your stand shape
- Create stable base (wide and weighted)
- Build vertical elements securely
- Add hooks, pegs, or notches for hanging
- Include small dishes for rings
- Reinforce all connections
- Paint and finish completely
Functional Elements
Adding useful features:
- Hooks for necklaces
- Small dishes for rings
- Earring holes or slits
- Bracelet bars
- Watch pillows
- Mirror element
- Compartments for small items
Finishing Touches
Professional appearance:
- Multiple paint coats for smooth finish
- Metallic spray paint for elegance
- Flocked coating for jewelry protection
- Decorative elements that match room
- Seal against makeup and perfume
Display Strategies
Organizing your jewelry:
- Group by color or type
- Most-worn pieces most accessible
- Rotate seasonally
- Keep sets together
- Display favorites as art
9. Cardboard Letter Wall Name/Quote
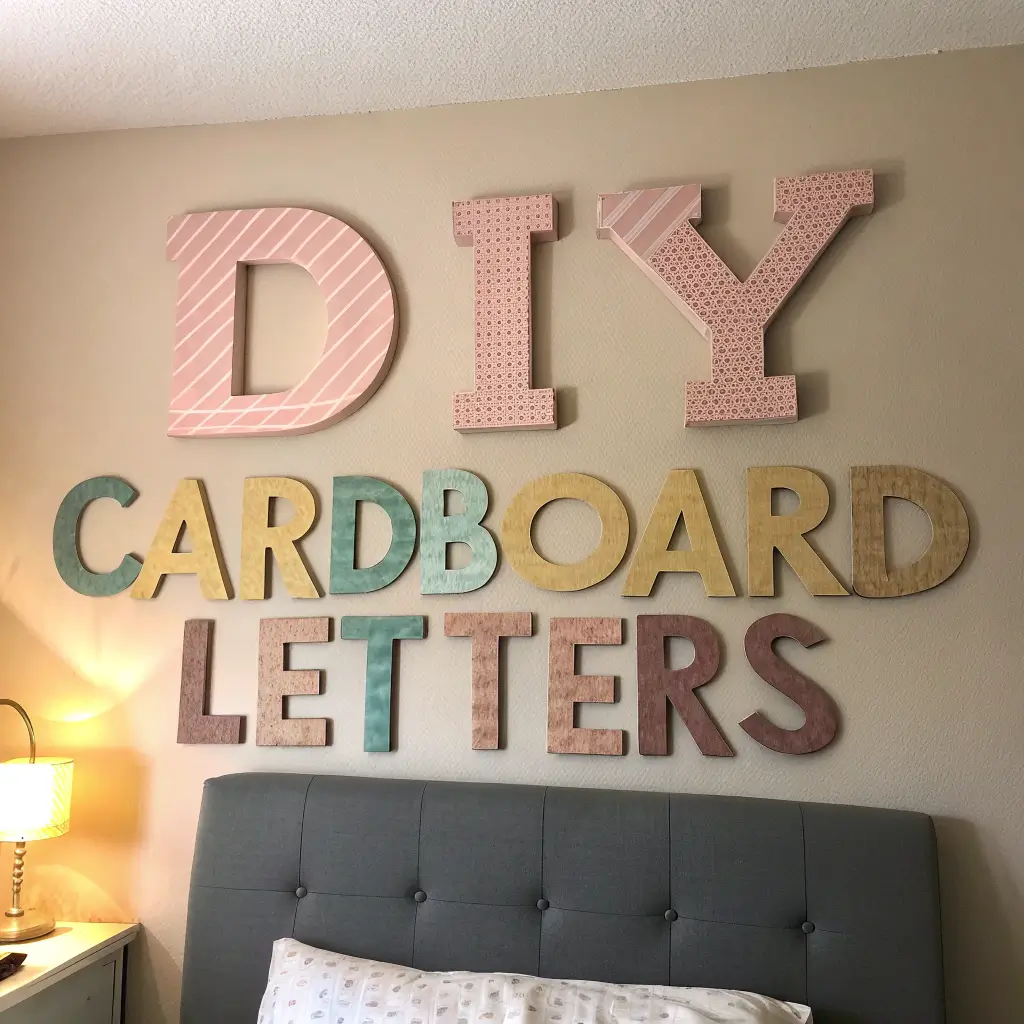
Giant letters spelling words, names, or quotes make bold statements that personalize your space completely. Making them from cardboard means custom sizes and colors at zero cost.
The Personalization Factor
Letter decor creates instant personality in any room. Whether it’s your name, favorite word, or inspiring quote, having it large-scale on your wall makes a serious design statement.
I made 12-inch tall letters spelling “CREATE” for my craft space, and they anchor the entire room’s vibe. Store-bought letters that size would’ve cost $50-100 minimum. Mine cost exactly nothing except time.
Planning Your Letters
Design decisions:
- Word or phrase to display
- Letter height and width
- Font style (block, script, serif)
- 2D or 3D construction
- Color and finish
- Mounting method
2D Letter Construction
Simple flat method:
- Print letter templates at desired size
- Trace onto thick cardboard
- Cut carefully with sharp blade
- Layer multiple pieces for thickness
- Glue layers together
- Sand edges smooth
- Prime and paint
- Add hanging hardware
3D Letter Construction
More dimensional approach:
- Cut two identical letter shapes
- Measure and cut side strips (letter depth)
- Glue strips around edge of one letter
- Attach second letter to opposite edge
- Reinforce all seams thoroughly
- Fill any gaps with cardboard or paper
- Sand and smooth entire surface
- Prime and paint all visible surfaces
Font Selection Tips
Choosing readable styles:
- Block letters easiest to construct
- Avoid thin fonts (structurally weak)
- Script looks elegant but challenging
- Consider readability from distance
- Bold fonts work best in 3D
Finishing Techniques
Professional results:
- Multiple thin paint coats
- Sand between coats
- Consider metallic finishes
- Add glitter or texture
- Seal for durability
- Attach decorative elements
Display Options
Mounting your letters:
- Command strips for damage-free hanging
- Picture wire on back
- Lean on shelves
- Hang from decorative ribbon
- Mount on painted board first
Also Read: 10 Creative DIY Aesthetic Room Decor Ideas for Cozy Vibes
10. Cardboard Floating Corner Shelf

Corner spaces are usually wasted, but floating corner shelves utilize that dead space while adding storage and display areas that look built-in.
The Corner Space Solution
Corners are goldmines of unused potential in most rooms. Custom corner shelves fit perfectly while creating interesting geometric shapes that standard rectangular shelves can’t achieve.
My bedroom corner now has three floating shelves at different heights, creating this cascading display area for plants and books. The triangular shape makes them look intentionally architectural, and nobody believes they’re cardboard until they pick them up.
Corner Shelf Shapes
Design options:
- Right-angle triangle (classic corner fit)
- Curved quadrant (softer look)
- Geometric multi-faceted
- Tiered wedding-cake style
- Simple floating platform
- Box-style with open front
Construction Method
Building corner shelves:
- Measure your corner angle (usually 90°)
- Design shelf shape on paper
- Cut cardboard in multiple layers
- Create side walls for depth
- Glue layers together thoroughly
- Reinforce bottom shelf surface
- Add triangular support brackets
- Paint and finish completely
Support and Installation
Making them sturdy:
- Use thick, multi-layered cardboard
- Add internal support struts
- Mount to wall studs if possible
- Use strong adhesive or brackets
- Test weight capacity before loading
- Don’t overload (they’re still cardboard)
Styling Corner Shelves
Display ideas:
- Small plants in matching pots
- Book collections stood upright
- Decorative objects grouped in threes
- Photos in frames
- Candles for ambiance
- Rotate displays seasonally
Creating a Corner Gallery
Multiple shelf arrangement:
- Stagger heights asymmetrically
- Vary shelf sizes
- Maintain consistent spacing
- Create visual balance
- Consider color coordination
Making Cardboard Decor Last
Here’s the real talk about cardboard projects: they’re not heirloom pieces, and that’s actually liberating. You can experiment freely, remake things when your style changes, and try bold ideas without financial risk.
Durability Enhancement
Making cardboard last longer:
- Seal everything with clear coat or Mod Podge
- Keep away from moisture and humidity
- Use multiple layers for strength
- Reinforce stress points thoroughly
- Handle gently during installation
- Store carefully if removing seasonally
When to Remake
Signs it’s time for a refresh:
- Visible wear or damage appears
- Your style preferences evolve
- You’ve learned better techniques
- Color scheme changes
- Structural integrity weakens
The Environmental Win
Feel-good crafting benefits:
- Diverts waste from landfills
- Reduces consumption of new materials
- Teaches resourcefulness and creativity
- Inspires sustainable thinking
- Costs literally nothing
- Can be recycled when done
Your Cardboard Crafting Journey Starts Now
The absolute best thing about room working with cardboard? Failure is free. That delivery box was heading to recycling anyway, so if your first attempt at a corner shelf looks wonky, just try again.
No wasted money, no guilt, no pressure—just learning and creating.
Start with whichever project excites you most. Maybe you’re drawn to the instant gratification of letter wall art, or maybe you want to tackle that geometric wall shelf.
Whatever calls to you, gather some boxes, grab your tools, and dive in.
Every piece you create is completely unique—literally one-of-a-kind decor that nobody else has. You’re not just decorating on a budget; you’re developing skills, problem-solving, and creating conversation pieces that have actual stories behind them.
Your room deserves to reflect your personality, and your wallet deserves a break. Cardboard DIY delivers both. Now stop hoarding those boxes “just in case” and start turning them into something amazing. Your room transformation starts with that next delivery. 🙂


