10 Easy Cute DIY Room Decor Ideas and Space-Saving Solutions
- Bedroom Design
 Ben
Ben- 0
- 66 minutes read

Your room is cute, but it could be cuter. Like, way cuter. And before you start thinking you need to raid your savings account or possess some magical crafting powers, let me stop you right there.
Creating an adorable space is more about creativity than cash, and I’m living proof that you can transform a boring room into something that makes you smile every morning.
I spent months scrolling through cute room decor accounts, saving approximately 623 images to a folder I optimistically called “Room Goals,” while my actual room looked like… well, let’s just say it wasn’t making anyone’s inspiration board.
Then I realized something: those adorable rooms weren’t created by professional decorators with unlimited budgets—they were made by regular people who just decided to try some simple DIY projects.
After transforming my own space from “meh” to “aww” using mostly craft store supplies and things I already had, I’ve learned that cute doesn’t have to be complicated or expensive.
These 10 cute DIY room decor ideas will help you create a space that’s equal parts functional and adorable, without requiring advanced crafting skills or a trust fund. Let’s make your room so cute it hurts.
1. Floating Bookshelf Display
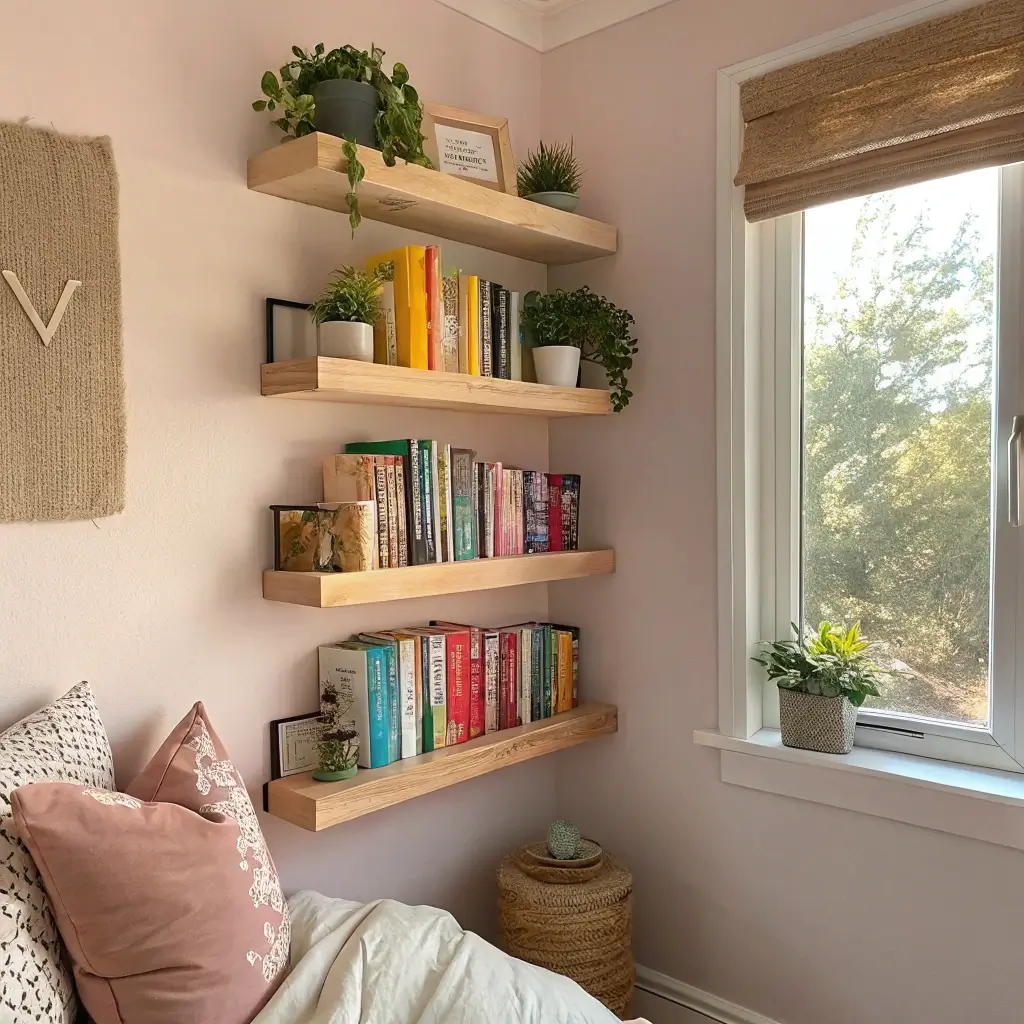
Floating bookshelves are like magic tricks for your wall—books appear to defy gravity while looking impossibly cute and organized. They’re perfect for displaying your favorite reads while adding that quirky, intellectual vibe to your space.
The Adorable Illusion
Floating bookshelves create visual intrigue by hiding the actual shelf mechanism, making your books look like they’re floating in mid-air. It’s the kind of cute detail that makes visitors do a double-take and ask “wait, how is that working?”
I installed my first floating bookshelf using a $15 kit from Amazon, and the number of times people have stopped to examine it is honestly embarrassing. My secret? I stack my prettiest book covers facing out and mix in small plants and cute trinkets. Suddenly my random collection of books looks curated and intentional.
Making Your Floating Display
Simple setup process:
- Purchase floating shelf brackets (they’re invisible once installed)
- Choose your anchor book (hardcover works best)
- Stack books artistically on top
- Add cute accents like mini plants or figurines
- Position at eye level for maximum impact
Styling Tips for Maximum Cuteness
Making it adorably photogenic:
- Choose books with pretty spines or covers
- Add small succulents in tiny pots
- Include a fairy light strand
- Mix books with small framed photos
- Use color-coordinated book covers
- Add seasonal decorations
Book Selection Strategy
What makes displays cute:
- Match books to your color scheme
- Include vintage finds for character
- Stack by size for visual balance
- Mix orientations (horizontal and vertical)
- Choose covers with pretty typography
- Don’t overcrowd (less is more)
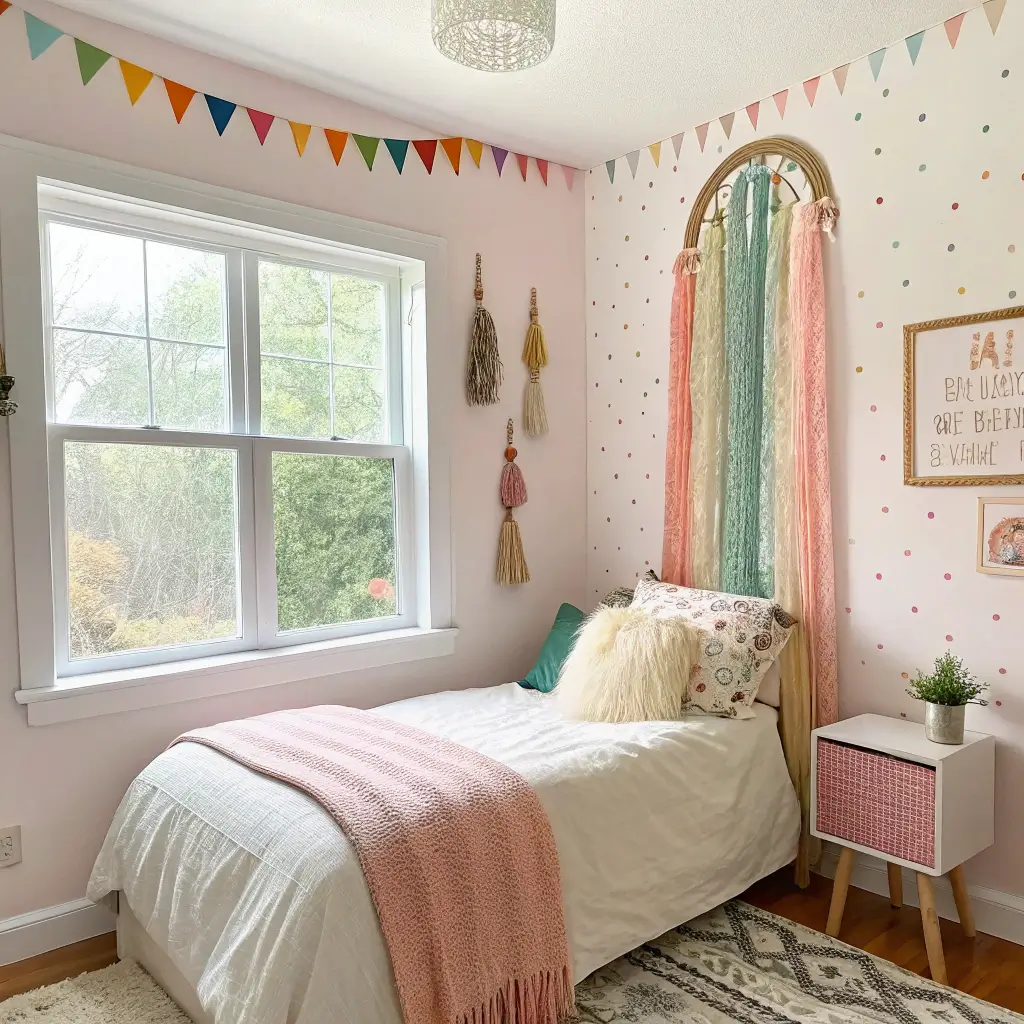
2. Macrame Wall Hanging Art
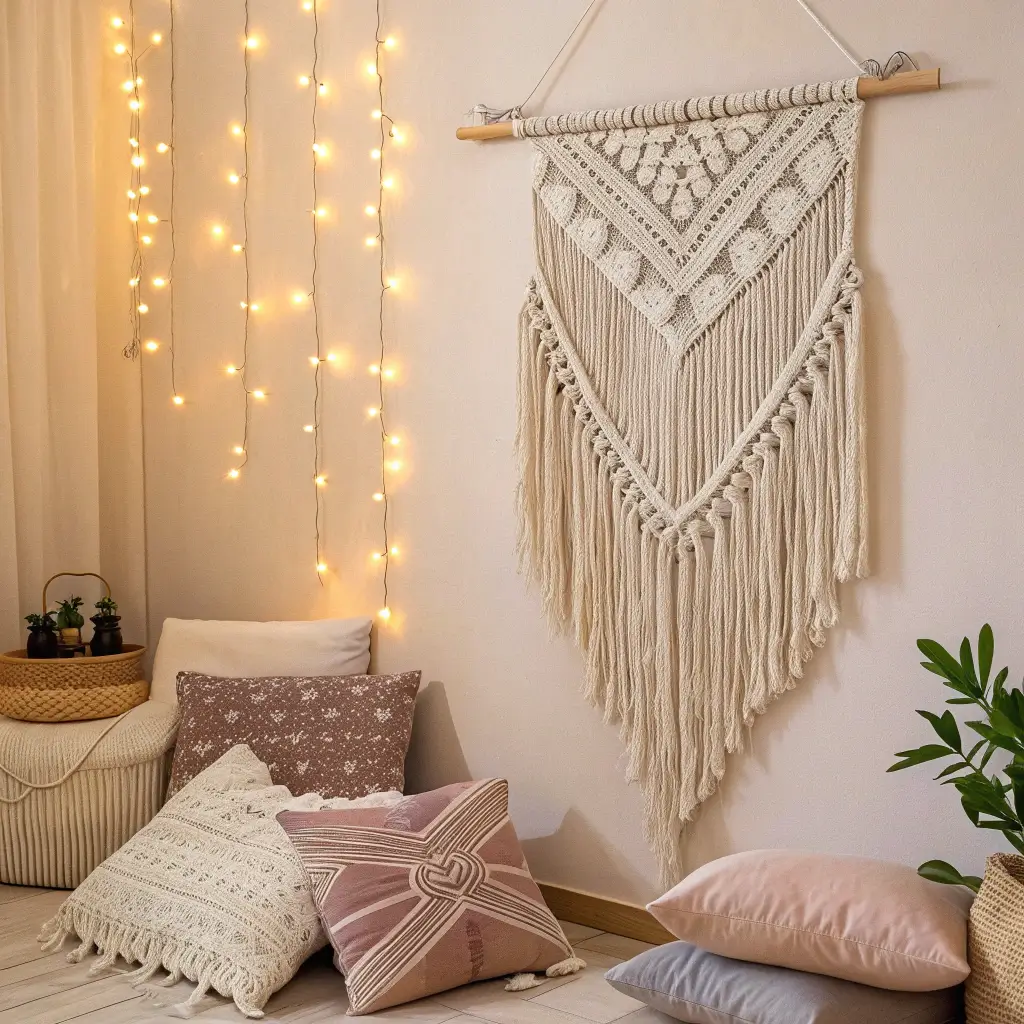
Macrame is having its cute moment, and I’m absolutely here for it. These knotted creations add that boho-chic, handmade charm that makes rooms feel cozy and personal. Plus, making them is surprisingly therapeutic.
Why Macrame Wins the Cute Contest
Macrame adds softness and texture to walls in a way that prints or paintings can’t. The natural cotton cords, flowing designs, and handmade imperfections create that perfectly imperfect cute aesthetic that’s so sought after.
My macrame journey started with a YouTube tutorial and a lot of tangled rope. But here’s the thing—even my wonky first attempts looked cute once I hung them up. There’s something about handmade items that just radiates charm, even when they’re not perfect.
Getting Started Without Stress
Essential supplies:
- Cotton macrame cord (3mm or 4mm for beginners)
- Wooden dowel (or a cute branch from outside)
- Scissors (sharp ones make life easier)
- Tape measure (or just estimate like I do)
- Basic knotting tutorial (YouTube is your bestie)
Beginner-Friendly Patterns
Start with cute and simple:
- Heart shape: Perfect for Valentine’s or year-round
- Simple wall hanging: Just fringe and basic knots
- Mini plant hanger: Holds small pots adorably
- Keychain practice: Learn knots on tiny scale
- Bookmark: Functional and cute
Adding Extra Cuteness
Customization ideas:
- Dye cord in pastel colors
- Add wooden beads throughout
- Incorporate dried flowers
- Mix in colorful yarn accents
- Attach small pom-poms
- Use ombre color schemes
Ever notice how macrame looks expensive but costs practically nothing to make? That’s the sweet spot of DIY—looking bougie on a budget.
3. Fairy Light Photo Wall
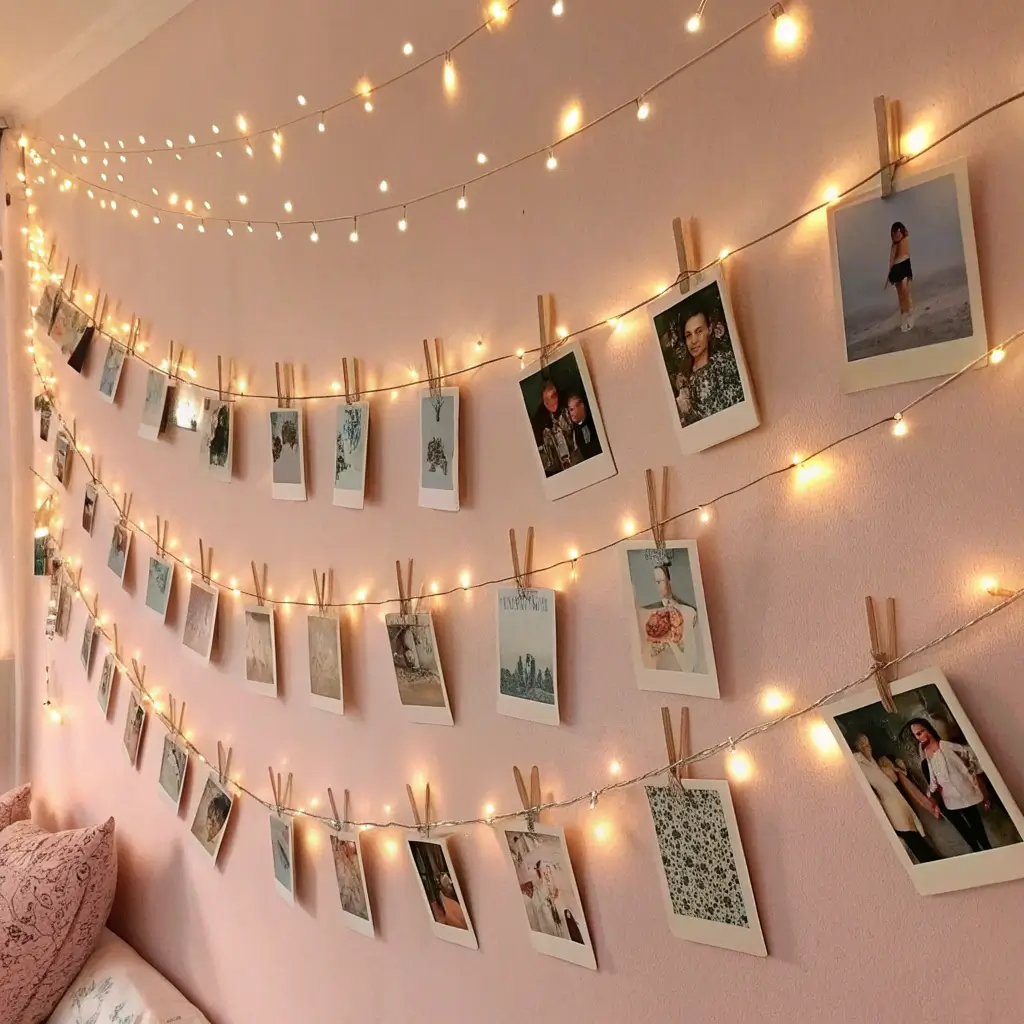
Combining fairy lights with photos creates that dreamy, twinkling effect that’s basically the definition of cute room decor. This project brings warmth, personality, and a soft glow to any wall.
The Glow-Up Your Memories Deserve
Fairy lights transform regular photo displays into magical focal points. The soft twinkle makes everything look more enchanting, and there’s something about backlit memories that just hits different emotionally.
I created my fairy light photo wall during a particularly homesick phase, and now it’s my favorite corner of my room. Fifty photos of friends, family, and adventures, all glowing softly at night—it’s like a hug on the wall. Cheesy? Maybe. Do I care? Not even a little.
Creating Your Glowing Display
You’ll need:
- String of fairy lights (warm white is cutest)
- Photos printed (any size works)
- Mini clothespins or clips (wooden ones are adorable)
- Command strips for damage-free hanging
- Optional: washi tape for extra cute factor
Layout Ideas That Work
Arrangement options:
- Heart shape: Classic cute configuration
- Grid pattern: Organized and aesthetic
- Cascading: Different lengths for dimension
- Zigzag: Dynamic and playful
- Circle: Unconventional and eye-catching
- Random scatter: Organic and casual
Making It Extra Adorable
Cute additions:
- Mix polaroids with standard prints
- Add fairy light bulbs to spell words
- Include small decorative cards
- Attach dried flowers between photos
- Use colored clothespins
- Create themed sections (friends, travel, pets)
Practical Photo Tips
Getting it right:
- Print photos on quality paper (not too thin)
- Leave space between clips for light visibility
- Change photos seasonally to keep fresh
- Balance busy and simple images
- Include some black and white for variety
- Use battery-operated lights for cord-free setup
FYI, this project is incredibly forgiving—there’s literally no wrong way to arrange photos and lights. If it makes you happy, it’s perfect.
Also Read: 12 Inspiring Aesthetic Room Decor DIY Ideas for Every Room
4. Painted Mason Jar Organizers
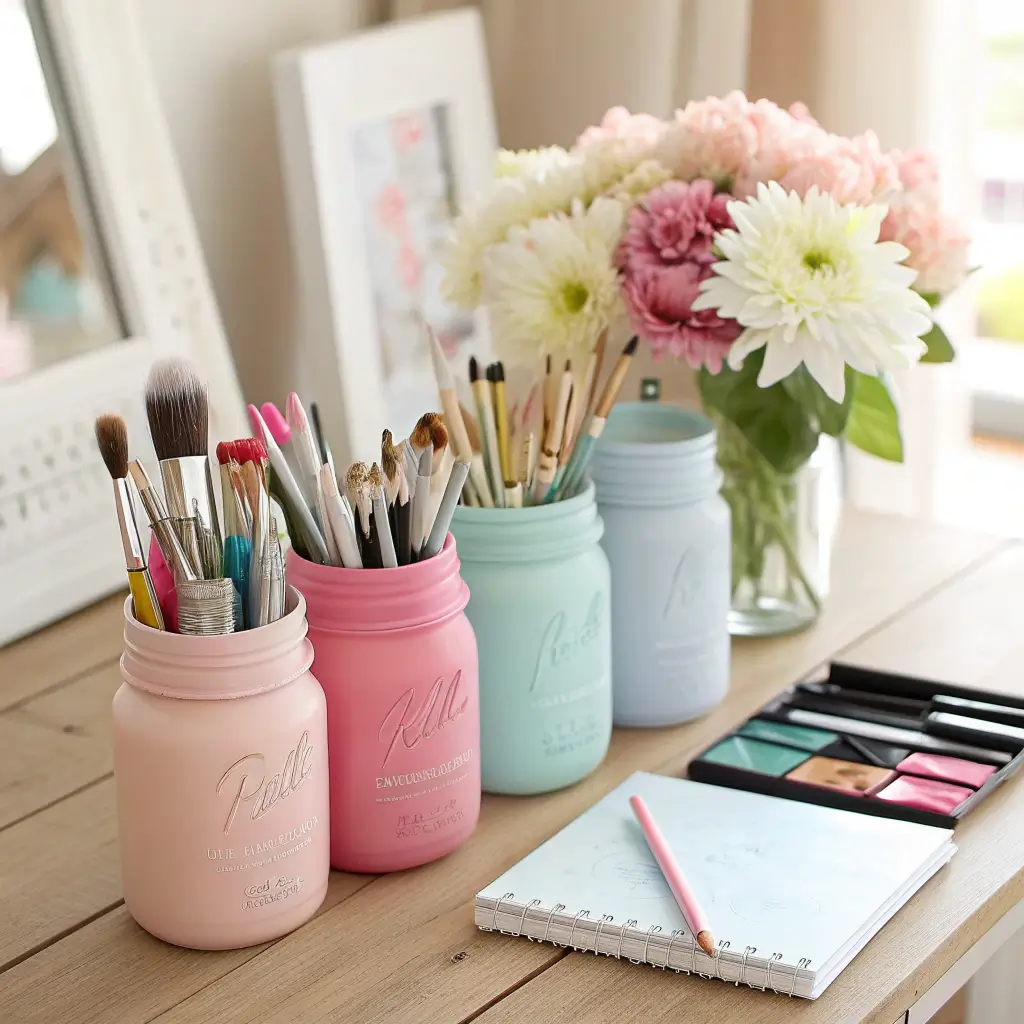
Mason jars are the chameleons of cute decor—paint them, and suddenly they’re customized organizers that match your room perfectly while keeping your stuff together. They’re functional cute at its finest.
The Charming Organizer
Painted mason jars turn clutter into cute storage. Pens, makeup brushes, flowers, fairy lights—basically anything looks more adorable when it’s in a prettily painted jar. It’s organizational magic.
I started painting jars during a rainy weekend and couldn’t stop. Now I have them holding everything from art supplies to cotton balls, all coordinated in soft pastels that make my room look way more put-together than I actually am. The secret? It’s just paint and jars, but people assume I shopped at some boutique.
Painting Your Jars
Simple process:
- Clean jars thoroughly (remove all labels)
- Choose paint type (acrylic or chalk paint)
- Apply primer if using glass jars
- Paint thin, even coats (2-3 layers usually)
- Let dry completely between coats
- Seal with clear coat for durability
Cute Paint Ideas
Color and pattern options:
- Pastel ombre: Gradient of soft colors
- Two-tone: Different colors on lid and jar
- Polka dots: Playful and sweet
- Stripes: Classic and clean
- Glitter accent: Sparkle on rim or lid
- Chalk paint: Write labels with chalk
Organizing With Style
What to store:
- Makeup brushes and tools
- Pens, pencils, and markers
- Cotton balls and swabs
- Jewelry and hair accessories
- Craft supplies
- Fresh or faux flowers
- Fairy lights (glowing jars!)
- Desk supplies
Display Strategies
Making them look intentional:
- Group jars in odd numbers (3 or 5)
- Vary heights with different jar sizes
- Stick to cohesive color palette
- Add cute labels or tags
- Place on matching tray
- Coordinate contents with jar colors
5. Washi Tape Wall Patterns
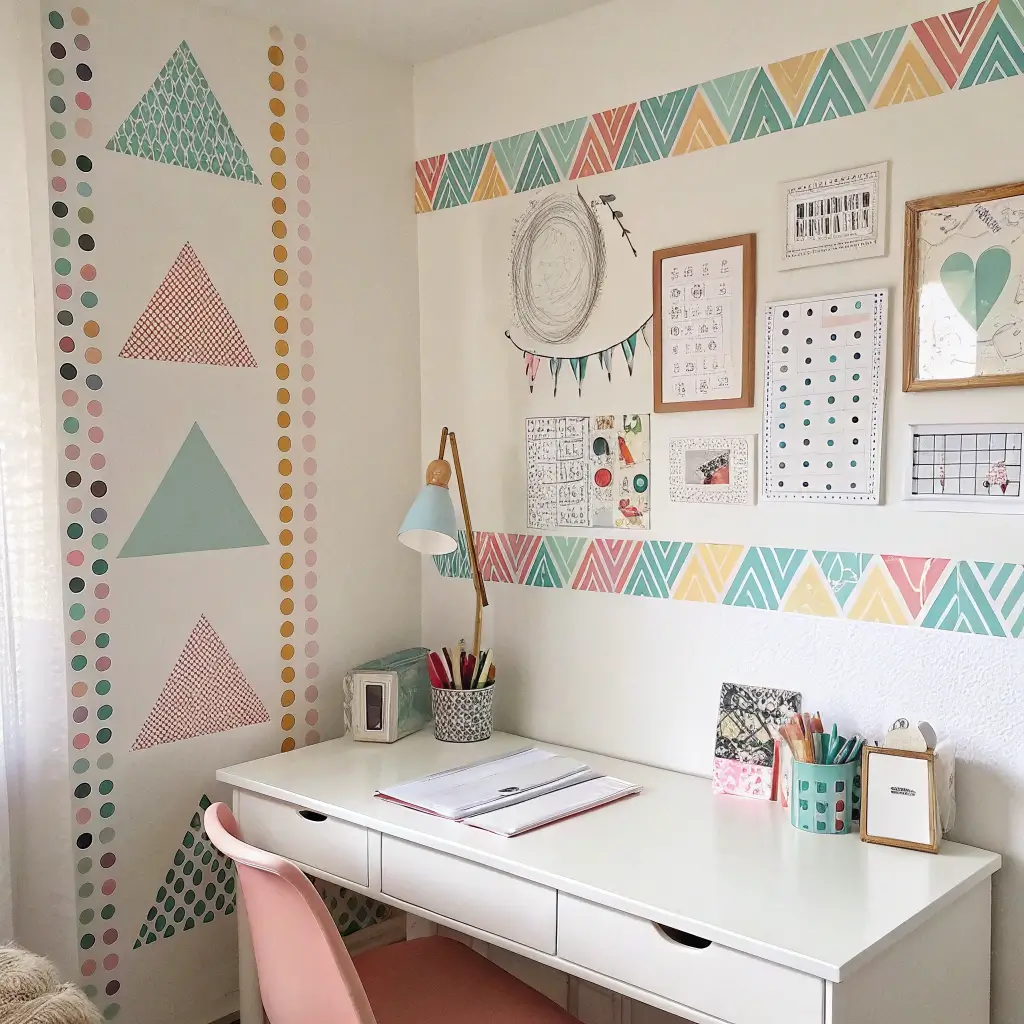
Washi tape is basically the perfect craft supply—it’s cute, comes in infinite patterns, costs almost nothing, and (best part) it’s completely removable. You can create entire wall designs without commitment or damage.
The Commitment-Free Cuteness
Washi tape lets you experiment boldly because if you hate it, you just peel it off. No holes, no paint, no regret. It’s the ideal solution for renters or anyone who changes their mind as frequently as I do (which is constantly).
My washi tape wall started as “I’ll just try one small design” and evolved into a full geometric installation. The whole thing cost less than $20 and took one afternoon. Now people ask if it’s wallpaper. Nope, just tape and determination.
Cute Design Ideas
Pattern possibilities:
- Heart outline: Above bed or on door
- Rainbow stripes: Cheerful and colorful
- Faux picture frames: Create frame shapes
- Quote displays: Spell out words
- Geometric patterns: Triangles or hexagons
- Border accents: Frame windows or mirrors
- Headboard alternative: Create bed backdrop
Application Tips
Getting clean results:
- Plan design lightly with pencil first
- Use level for straight lines (or embrace wonky)
- Press firmly as you apply
- Overlap corners neatly
- Start small if you’re nervous
- Mix patterns and colors for interest
Where to Apply Washi Magic
Beyond walls:
- Light switch plates
- Door frames
- Furniture edges
- Laptop or phone cases
- Picture frames
- Mirrors
- Notebooks and planners
- Desk accessories
Removal and Changes
The beauty of temporary:
- Peels off cleanly (test first)
- Remove slowly at angle
- Change designs seasonally
- Experiment without fear
- Try new patterns anytime
- No wall damage (usually)
6. DIY Pom-Pom Rug
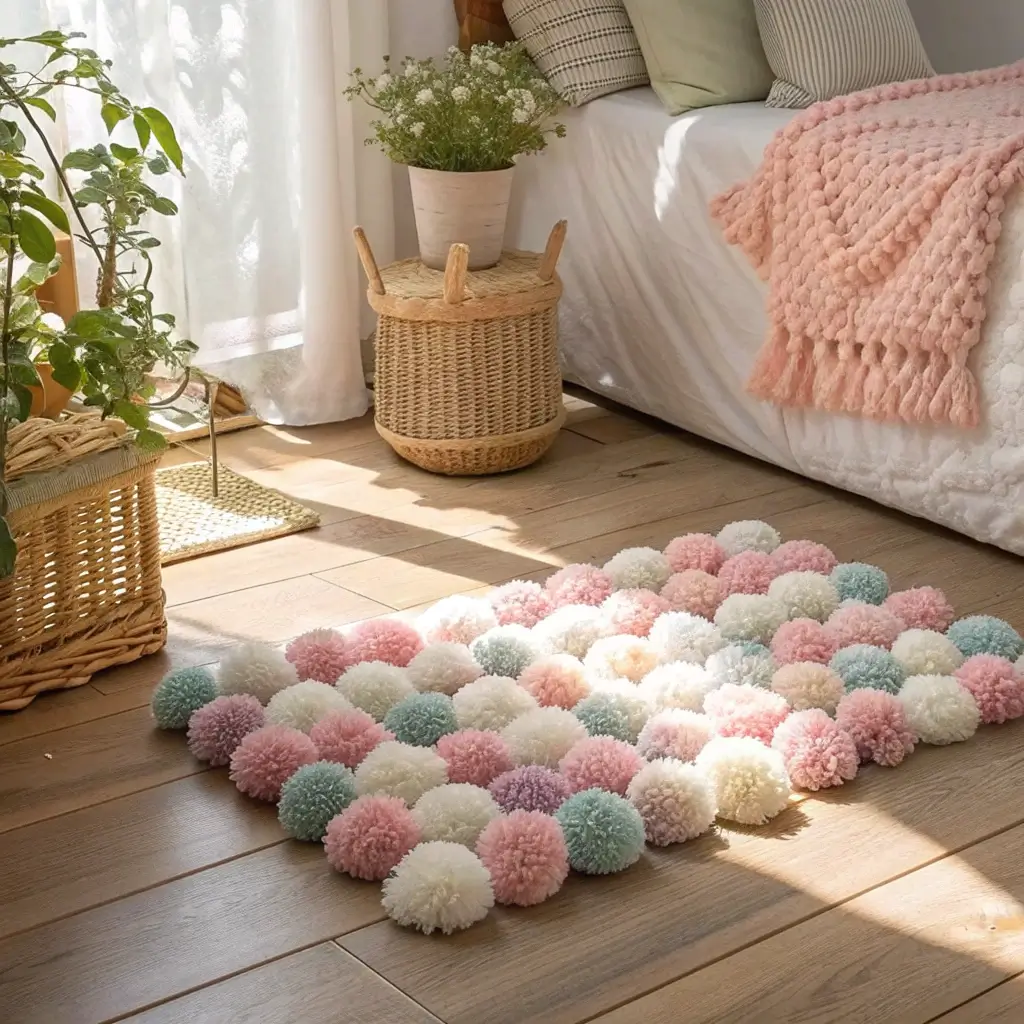
Nothing says cute quite like pom-poms, and a rug made entirely of fluffy pom-poms? That’s next-level adorable. Plus, it’s surprisingly easy to make and costs way less than buying a cute rug.
The Fluffy Cuteness Factor
Pom-pom rugs add softness and whimsy to any room. They’re like walking on clouds made of cute, and the texture is absolutely satisfying. Best of all, you can customize size, colors, and density to match your exact vision.
I made my first pom-pom rug for beside my bed because stepping on cold floor first thing in the morning is the worst. Now I have a fluffy pink cloud to land on, and it makes me genuinely happy every morning. Is that dramatic? Maybe. Do I care? Absolutely not.
Making Your Pom-Pom Rug
Supplies needed:
- Yarn in your chosen colors (lots of it)
- Non-slip rug mat as base
- Scissors for cutting yarn
- Pom-pom maker (optional, makes it easier)
- Patience (this takes time but it’s worth it)
The Pom-Pom Making Process
Step by step:
- Make dozens of pom-poms (seriously, lots)
- Tie pom-poms tightly to rug mat
- Work in rows for even coverage
- Pack them densely for fluffiness
- Trim poms to even height
- Shake out and fluff
- Place and enjoy your cloud
Color Scheme Ideas
Cute combinations:
- Pastel rainbow: Soft and dreamy
- Ombre: Gradient from light to dark
- Monochrome: All white or all one color
- Two-tone: Simple but impactful
- Color blocked: Different sections
- Seasonal: Match to your room’s palette
Size and Placement
Where they work best:
- Beside bed for soft morning landing
- In front of vanity or desk chair
- Bathroom (add waterproof backing)
- Reading nook accent
- Doorway welcome mat
- Under desk for cozy feet
IMO, the time investment is worth it for something this unique and adorable. Plus, it’s a great mindless activity while binge-watching shows.
Also Read: 10 Unique DIY Crafts Room Decor Ideas for a Trendy
7. Upcycled Crate Storage Shelves
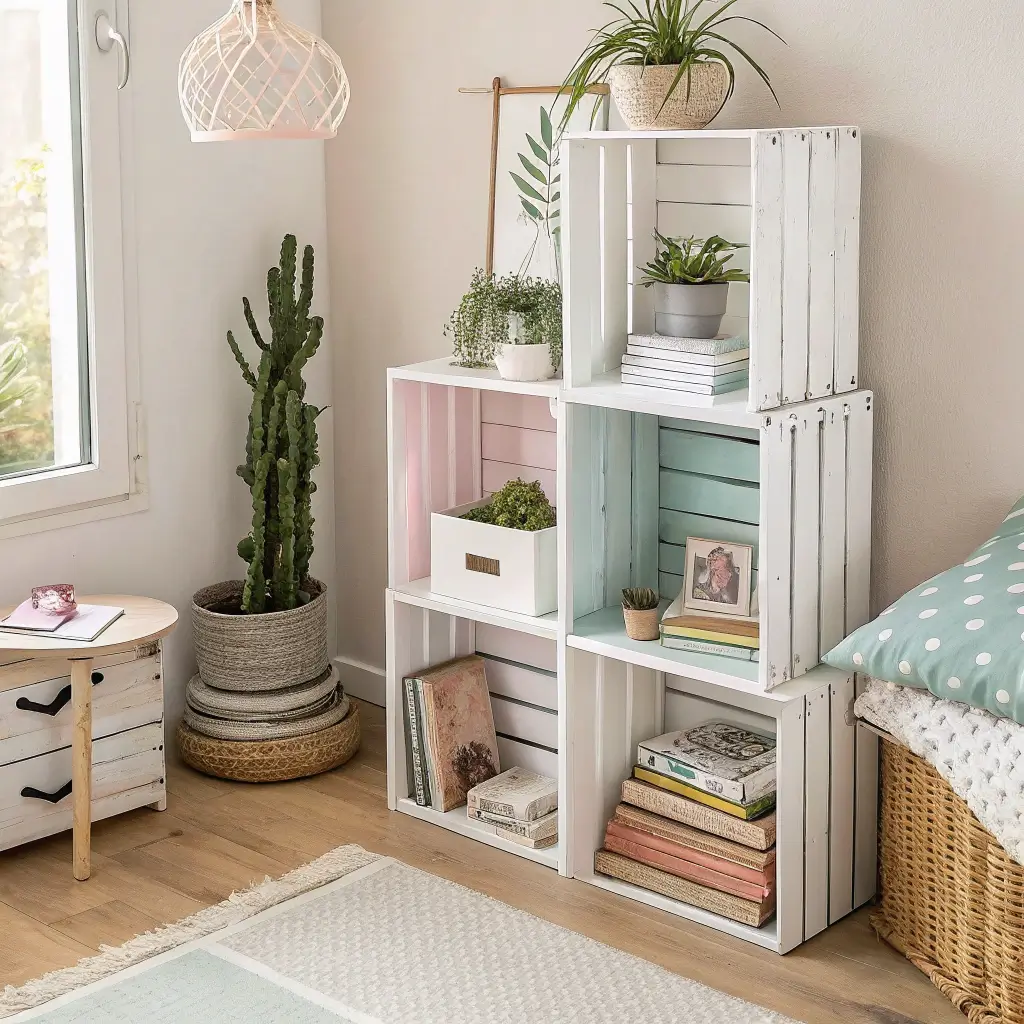
Wooden crates transform into the cutest storage shelves when you stack, paint, and style them right. They’re rustic, functional, and add that cozy farmhouse charm to any room.
The Charming Storage Solution
Crates become instant shelving that’s way cuter than basic shelves. They have character, provide storage, and look like you put thought into your decor even if you just stacked some boxes and called it a day.
My crate shelves started when I found wooden crates at a craft store on sale. I bought four, painted them white, stacked them in different configurations, and suddenly had a storage system that people genuinely compliment. The whole project cost under $40 and took one weekend.
Finding Your Crates
Where to source:
- Craft stores: New, uniform sizes
- Thrift stores: Character and cheap
- Facebook Marketplace: Often free
- Farmer’s markets: Authentic wooden crates
- Build your own: DIY from wood
- Online retailers: Delivery to door
Preparing and Painting
Making them cute:
- Sand rough edges smooth
- Clean thoroughly before painting
- Prime if needed
- Apply 2-3 coats of paint
- Consider distressing for vintage look
- Seal with clear coat for durability
Configuration Options
Stacking strategies:
- Horizontal rows: Traditional shelving
- Vertical columns: Tower of storage
- Mixed orientations: Some sideways, some not
- Offset stacking: Asymmetrical and interesting
- Wall-mounted: Attach to wall for security
- Free-standing: Easy to rearrange
Styling Your Crate Shelves
Making them adorable:
- Line with pretty fabric or paper
- Add fairy lights inside
- Display books and plants
- Include small baskets for organization
- Mix storage with decorative items
- Coordinate items by color
- Leave some intentional empty space
8. Hanging Terrarium Planters
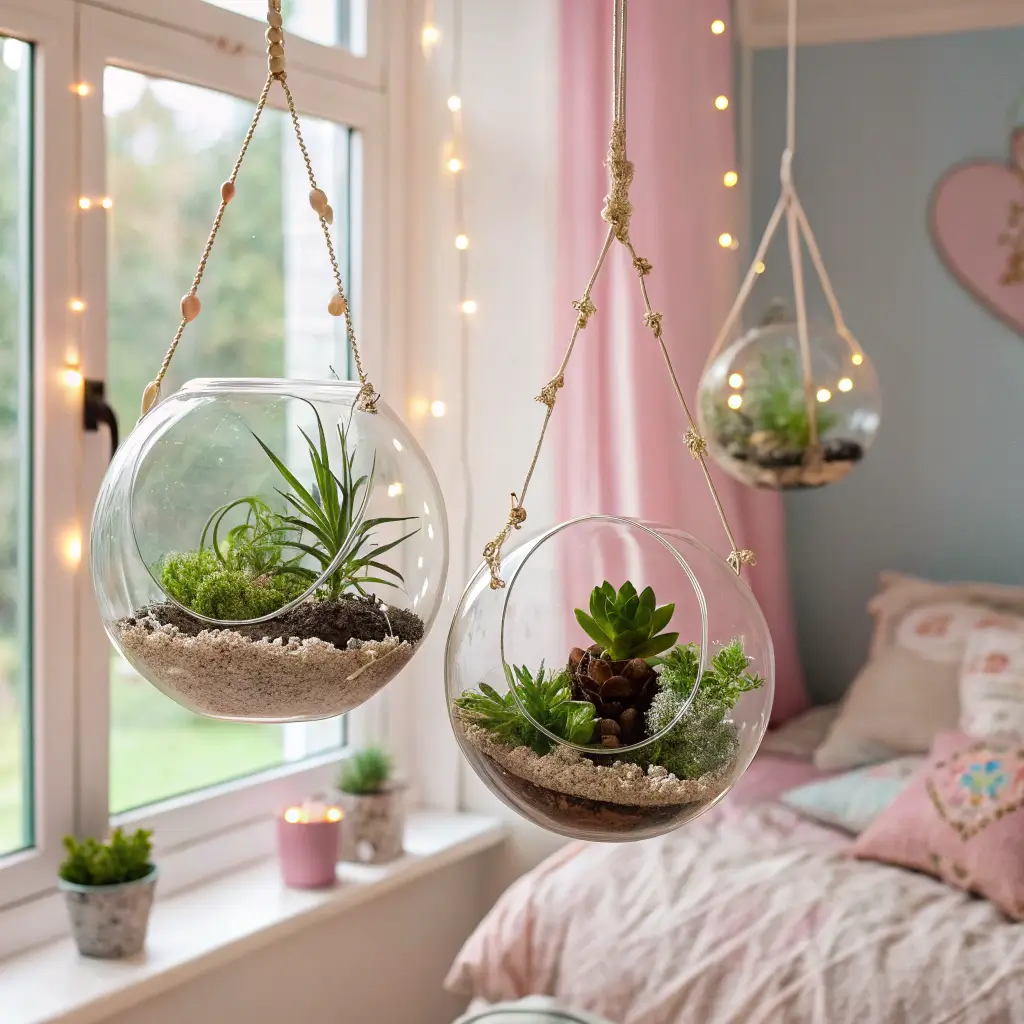
Hanging terrariums bring nature inside in the cutest way possible. They’re like tiny plant worlds suspended in glass, adding life and whimsy to your space.
The Living Decor
Terrariums combine plants with art in miniature ecosystems that require minimal care. They’re conversation starters, air purifiers, and honestly just really cute to look at.
I was intimidated by terrariums until I realized they’re basically just plants in glass containers—not rocket science. My first attempt is still thriving two years later, which gave me way too much confidence. Now I have five hanging at different heights, creating a little aerial garden.
Terrarium Basics
What you’ll need:
- Glass containers (open or closed)
- Small plants (succulents or air plants)
- Pebbles or rocks for drainage
- Activated charcoal (keeps it fresh)
- Potting soil (for plants that need it)
- Decorative elements (optional cute additions)
Choosing Terrarium Plants
Low-maintenance cuties:
- Air plants: No soil needed
- Succulents: Minimal water required
- Moss: Adds soft texture
- Small ferns: If keeping humid
- Baby tears: Delicate and cute
- Miniature ivy: Trailing beauty
Assembly Process
Building your mini world:
- Layer rocks at bottom
- Add charcoal layer
- Add soil (if using soil-plants)
- Arrange plants carefully
- Add decorative elements
- Mist lightly
- Hang and admire
Hanging Methods
Suspending your terrariums:
- Macrame plant hangers (double cute!)
- Simple rope or twine
- Metal hooks and chains
- Decorative ribbon
- Leather straps
- Wire hangers
Making Them Extra Cute
Adorable additions:
- Tiny figurines or animals
- Colored sand layers
- Small crystals or geodes
- Miniature furniture
- Seasonal decorations
- Fairy garden elements
9. Customized Canvas Wall Art

Blank canvases become personalized art when you add your own touch. This project lets you create exactly what your room needs while expressing your personality.
The Personal Touch
Custom canvas art means your walls show your style, not just whatever was on sale at HomeGoods. Whether you’re artistic or not, there are techniques that create cute results without requiring painting skills.
My canvas art journey involved zero traditional painting ability. Instead, I used techniques like tape resist, string art, and gluing on decorative elements. The result? Original pieces that look intentional and match my room perfectly.
No-Paint-Skills-Needed Techniques
Easy methods that work:
- Tape resist: Create patterns with painter’s tape
- String art: Nails and colorful string
- Decoupage: Glue on pretty paper or fabric
- Stamping: Use stamps and acrylic paint
- Stenciling: Templates make it foolproof
- Collage: Arrange and glue elements
- Quote art: Beautiful typography
Supply Shopping
Basic materials:
- Canvas (any size you want)
- Acrylic paints in your colors
- Painter’s tape for clean lines
- Brushes or foam applicators
- Decorative elements (as desired)
- Mod Podge for sealing
Cute Design Ideas
What looks adorable:
- Inspirational quotes in pretty fonts
- Abstract shapes in your color palette
- Geometric patterns with tape
- Floral designs using stamps
- Ombre effect with blended colors
- Polka dots (always cute)
- Heart or star shapes
Creating a Gallery Wall
Displaying multiple canvases:
- Keep sizes proportional
- Maintain consistent spacing
- Stick to cohesive color scheme
- Mix orientations (horizontal/vertical)
- Include some negative space
- Arrange before hanging
Also Read: 10 Stylish Easy DIY Room Decor Ideas for Modern Room
10. Ribbon and Tassel Curtain Decor
Transform plain curtains into something special with ribbons and tassels. This project adds softness, color, and that perfect finishing touch to window treatments.
The Decorative Detail
Ribbons and tassels elevate basic curtains from functional to fabulous. They add movement, texture, and that handmade charm that makes rooms feel curated and loved.
I added ribbon and tassel details to my plain white curtains, and they went from “came with the apartment” to “I definitely chose these.” The whole upgrade cost about $15 and took an hour. People assume I bought fancy curtains. Nope, just added cute details.
Gathering Supplies
What you’ll need:
- Ribbons in coordinating colors
- Tassels (make or buy)
- Curtain clips or sewing supplies
- Hot glue gun (if not sewing)
- Fabric scissors
- Measuring tape
Adding Ribbon Details
Cute attachment methods:
- Tie-on bows: Ribbon tied around curtain rod
- Sewn borders: Ribbon along curtain edges
- Vertical stripes: Ribbons down length
- Tiebacks: Ribbon instead of traditional holders
- Trim detail: Along top or bottom hem
- Random accents: Scattered ribbon bows
Tassel Placement
Where they look cutest:
- Along bottom hem (weighted nicely)
- Attached to tiebacks
- Hanging from curtain rod
- Corner accents on panels
- As decorative pulls
- Clustered at sides
Making Your Own Tassels
DIY tassel creation:
- Wrap yarn around cardboard
- Tie off at top
- Cut bottom loops
- Wrap “neck” section
- Trim ends evenly
- Attach to curtains
Color Coordination
Making it cohesive:
- Match tassel colors to room palette
- Use ombre or gradient effects
- Stick to 2-3 colors maximum
- Consider seasonal changes
- Mix textures (satin, cotton, yarn)
- Add metallic accents for glam
Bringing the Cute Home
Here’s what I’ve learned after making my room progressively cuter over the past year: the most adorable spaces aren’t the ones with the most stuff or the biggest budget.
They’re the ones with personal touches, handmade elements, and details that make you smile.
Start with one project that genuinely excites you instead of trying to tackle everything at once. I made that mistake initially and ended up with half-finished projects that just created clutter.
Pick your favorite idea, complete it, then move to the next. Your room will evolve into something cute organically.
The beauty of DIY cute decor is that it’s inherently personal and imperfect, which makes it even more charming. Store-bought perfection is fine, but there’s something special about handmade items that carry your energy and creativity.
Whether you’re team fairy lights or team pom-poms, remember that cute is subjective. Your room should make YOU happy first and Instagram-worthy second.
If something makes you smile every time you see it, it’s perfect—regardless of what anyone else thinks.
Now stop scrolling through cute room accounts and actually create something. Your space is ready for that personal touch, and those craft supplies aren’t going to use themselves.
Future you—the one living in an adorably decorated room that feels like a hug—is waiting. 🙂
Now excuse me while I go add more fairy lights to something that definitely doesn’t need them. It’s not a problem; it’s a lifestyle choice. :/


