10 Creative DIY Aesthetic Room Decor Ideas for Cozy Vibes
- Bedroom Design
 Ben
Ben- 0
- 63 minutes read

Your room is screaming for a makeover, and those generic posters from freshman year aren’t cutting it anymore.
Trust me, I’ve been there—staring at bland walls while scrolling through impossibly perfect room tours on TikTok at 2 AM, wondering how everyone else figured out this whole “aesthetic” thing while your space looks like a storage unit with a bed.
Here’s the tea: creating an aesthetic room doesn’t require a trust fund or a degree in interior design.
After transforming my own sad beige box into something I actually love showing off on Instagram stories, I’ve learned that the best aesthetic vibes come from DIY projects that cost less than your monthly coffee budget.
Whether you’re chasing that soft girl aesthetic, dark academia vibes, or minimalist zen, these 10 DIY aesthetic room decor ideas will help you create a space that looks like you hired a designer (but actually just watched some YouTube tutorials and got crafty).
Let’s turn that boring room into the aesthetic sanctuary you’ve been dreaming about.
1. Floating Shelves with Fairy Lights
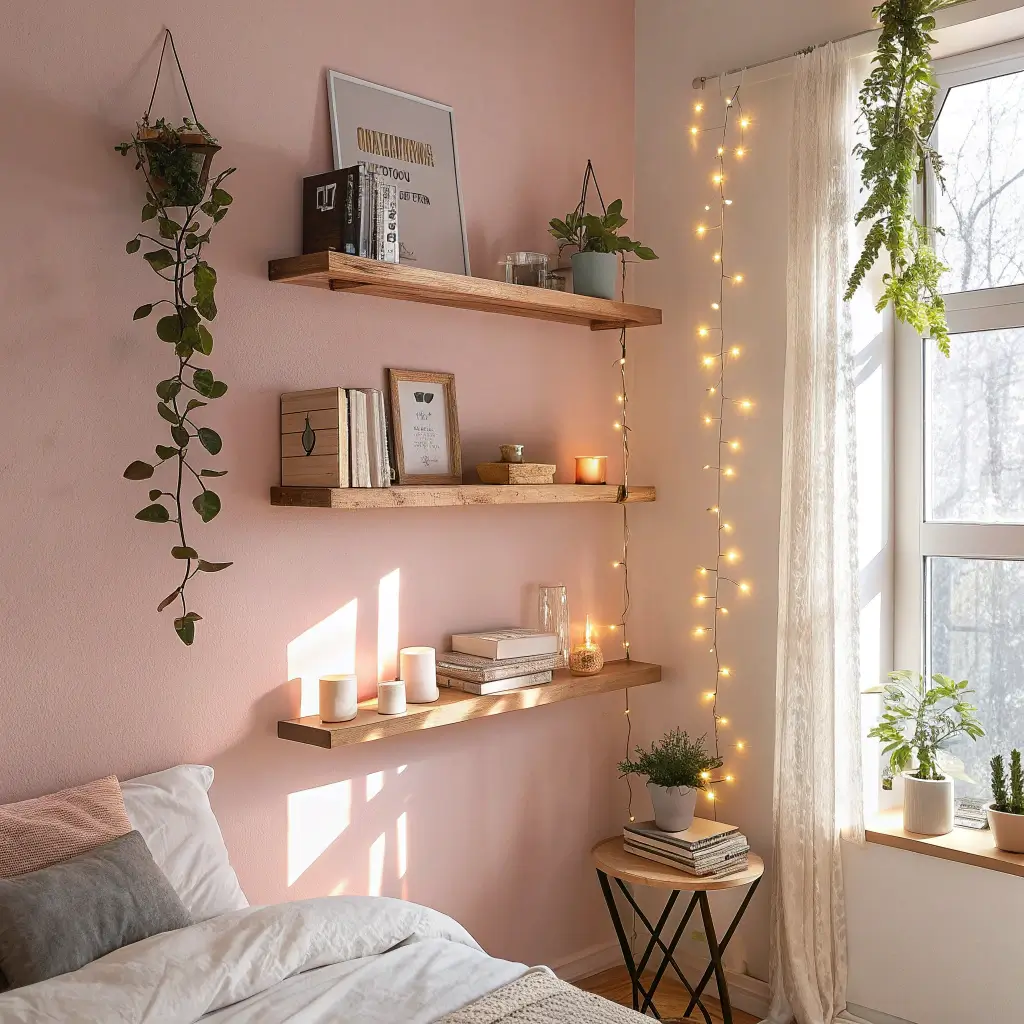
Floating shelves are cool. Floating shelves with fairy lights woven around them? That’s next-level aesthetic magic that makes your room look like it belongs in a Vogue living feature. This combo creates depth, warmth, and that dreamy glow everyone’s after.
Why This Combo Hits Different
Floating shelves with integrated lighting solve two problems at once—storage and ambiance. The shelves display your carefully curated items (books, plants, that vintage camera you never use), while the fairy lights add that soft, Instagram-worthy glow that overhead lighting could never achieve.
I installed this setup above my desk last year, and honestly? It changed the entire vibe of my room. The floating shelves cost me $25 from IKEA, the fairy lights were $15 on Amazon, and suddenly my workspace went from “depression corner” to “creative sanctuary.” Now I actually want to sit at my desk instead of working from bed.
Materials You’ll Need
Getting started is easier than you think:
- Floating shelf brackets (invisible mounting type)
- Wood boards (cut to desired length)
- LED fairy lights (warm white for cozy vibes)
- Wall anchors (don’t skip these!)
- Level (crooked shelves ruin the aesthetic)
- Command strips (for securing lights)
Installation Process
Making it happen:
- Mark your wall and ensure shelves are level
- Install brackets according to instructions
- Mount shelves securely
- Weave fairy lights along shelf edges
- Use small command strips to keep lights in place
- Hide the battery pack or cord behind objects
Styling Your Lit Shelves
Creating that curated look:
- Alternate books vertically and horizontally
- Add small plants (succulents are foolproof)
- Include personal items (vintage finds, crystals)
- Leave intentional empty space
- Vary object heights for visual interest
- Stick to a color palette
Light Placement Tips
Getting the glow right:
- Wrap lights loosely for organic look
- Hide battery packs behind books
- Consider timer-equipped lights
- Mix warm white with your decor colors
- Don’t overdo it—subtle is better
2. Macramé Wall Hangings
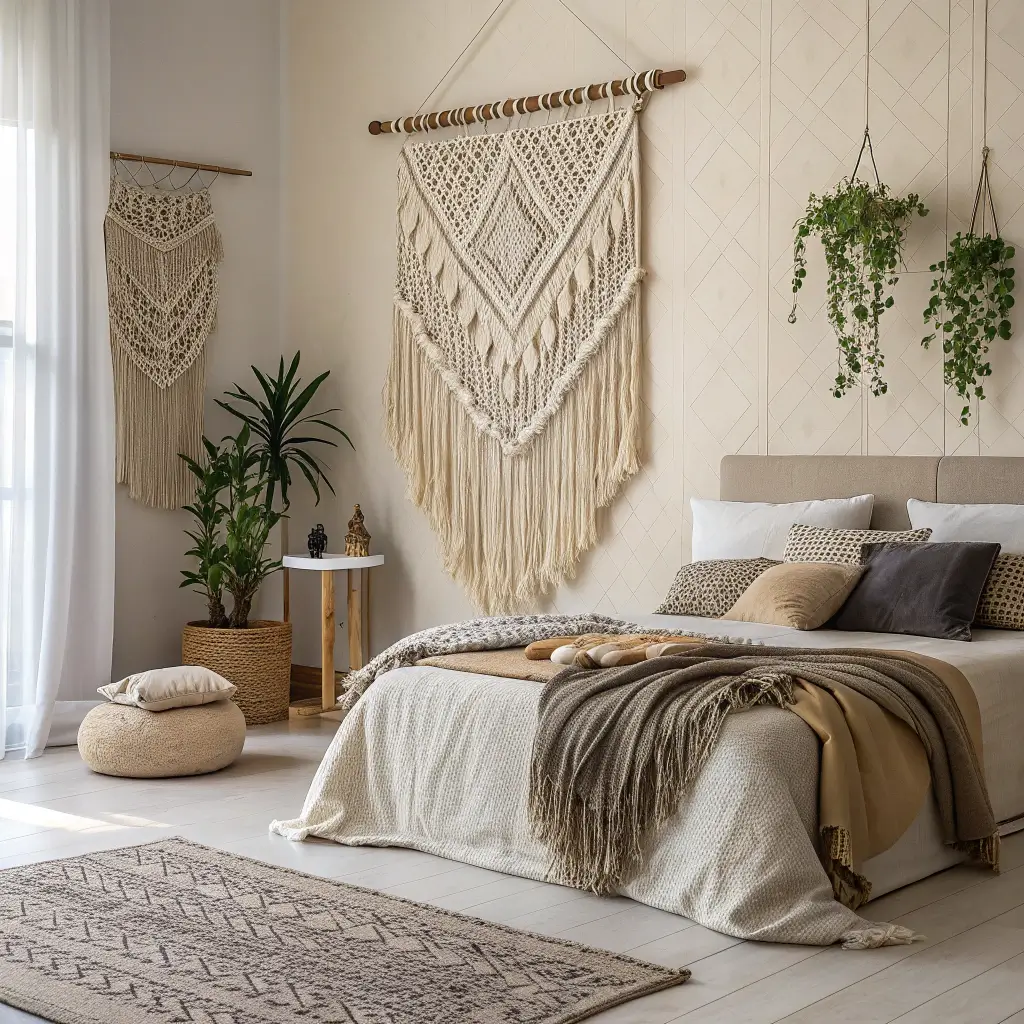
Macramé is having its moment, and honestly, it deserves it. These knotted beauties add texture, movement, and that boho-chic vibe that makes rooms feel lived-in and loved. Plus, making them is weirdly therapeutic once you get the hang of it.
The Texture Game Changer
Macramé brings softness to hard surfaces in a way that prints or paintings can’t. The organic shapes and natural materials create visual interest while adding that handmade touch that screams “I have my life together enough to craft things.”
My first macramé piece was a disaster—it looked like a rope had an anxiety attack. But here’s the secret: even wonky macramé looks intentional. After a few YouTube tutorials and some patience, I made a wall hanging that people genuinely think I bought from Urban Outfitters for $80. Actual cost? $15 in supplies.
Getting Started with Macramé
Basic supplies list:
- Cotton macramé cord (3mm or 5mm for beginners)
- Wooden dowel or branch (for hanging)
- Scissors (sharp ones save frustration)
- Measuring tape (or wing it like me)
- Comb (for fringe fluffing)
Simple Patterns for Beginners
Start with these:
- Basic wall hanging: Just knots and fringe
- Plant hanger: Functional and cute
- Small keychain: Practice project
- Dream catcher style: Mix techniques
- Geometric shapes: Modern twist
Essential Knots to Master
You only need three:
- Square knot: The foundation of everything
- Half square knot: Creates spiral effect
- Gathering knot: Finishes pieces cleanly
Making It Your Own
Customization ideas:
- Dye sections with natural dyes
- Add wooden beads throughout
- Incorporate dried flowers
- Mix cord thicknesses
- Create ombré effects
- Add metallic threads
Ever notice how macramé makes every room look more expensive? It’s that handmade factor—nothing beats the “I made this” energy.
3. Polaroid Photo Collage Wall
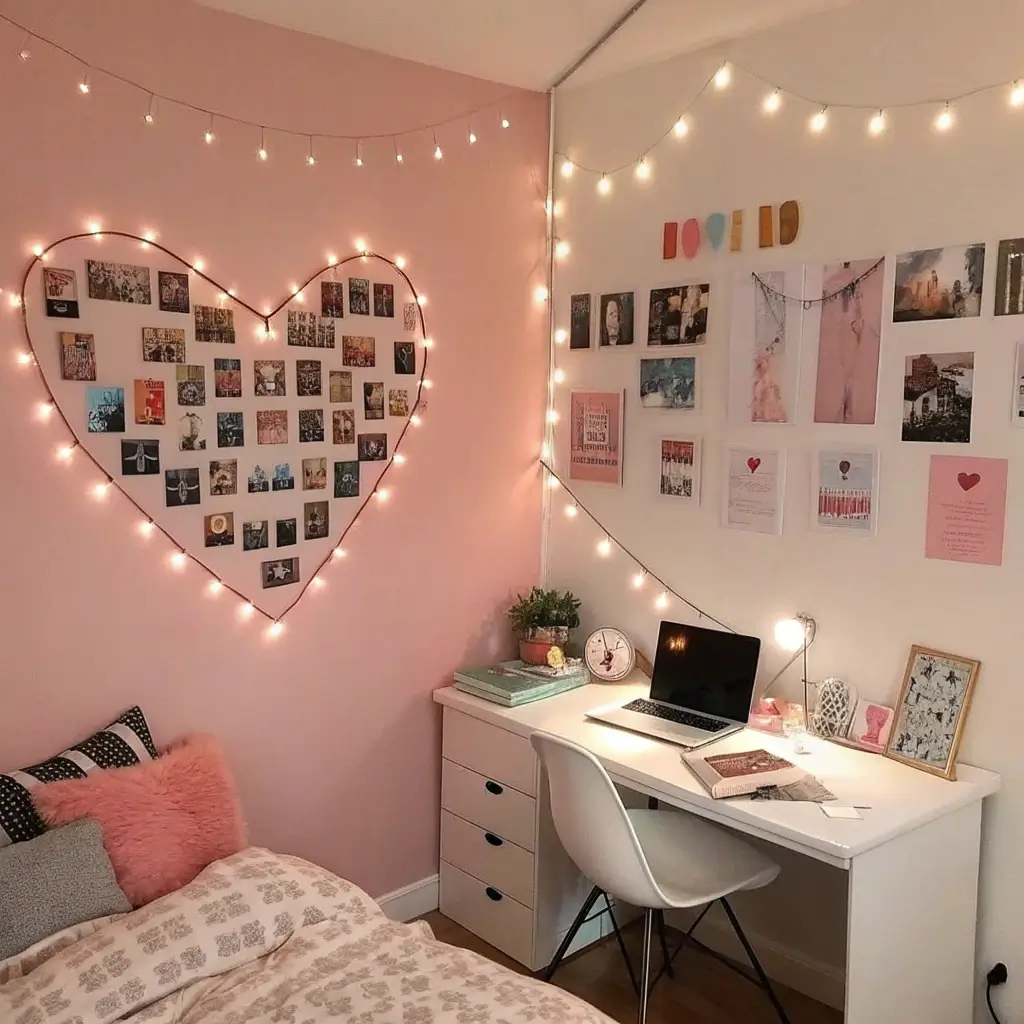
Photos trapped in your phone deserve better. A polaroid collage wall turns your memories into art while adding personality that generic wall decor could never match. It’s nostalgic, customizable, and constantly evolving with your life.
Why Polaroids Hit Different
Physical photos create emotional connections that digital galleries can’t replicate. There’s something about seeing your memories every day that makes a space feel genuinely yours, not just decorated.
I started my polaroid wall during quarantine when I was desperately missing my friends. Now it’s grown to over 100 photos covering an entire wall beside my bed. It’s become this living diary that I add to after every adventure. Visitors spend forever looking at it, and it’s always a conversation starter.
Creating Your Photo Wall
What you’ll need:
- Polaroid camera or printer (Instax is popular)
- Film or photo paper (budget accordingly)
- String and mini clothespins (classic display)
- Washi tape (damage-free option)
- Fairy lights (optional but recommended)
Layout Ideas That Work
Arrangement options:
- Heart shape: Romantic and recognizable
- Grid pattern: Clean and organized
- Scattered organic: Natural and casual
- Gradient: Organize by color
- Timeline: Chronological memories
- Themed sections: Friends, travels, etc.
Display Methods
How to hang them:
- String with clothespins for changeable display
- Washi tape for commitment-free mounting
- Cork board sections for easy rearranging
- Magnetic boards with small magnets
- Clip strings with battery lights
Keeping It Fresh
Maintenance tips:
- Rotate photos seasonally
- Leave space for new memories
- Mix polaroids with other small items
- Include ticket stubs or pressed flowers
- Add printed quotes between photos
FYI, you don’t need an actual polaroid camera—there are printers that make photos look like polaroids from your phone pics. Game changer for those of us who can’t afford $2 per photo.
Also Read: 12 Stylish DIY Room Decor for Teens Ideas and Cozy
4. Handmade Resin Coasters & Trays
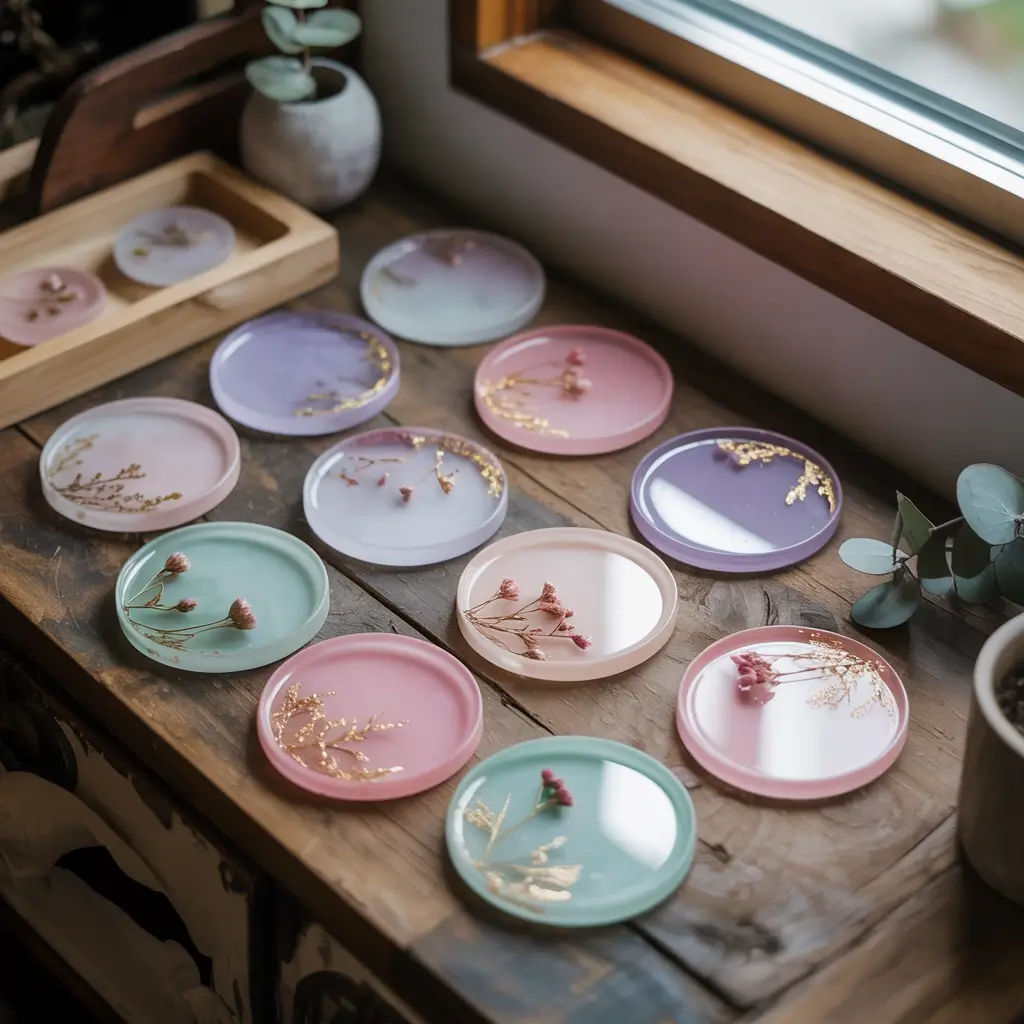
Resin crafts look intimidating, but they’re actually pretty forgiving once you understand the basics. Custom coasters and trays add that boutique touch to your room while actually being functional. Win-win.
The Functional Art Factor
Resin pieces combine beauty with purpose—they protect your surfaces while looking like expensive art pieces. Every time someone visits, they pick up my resin coasters and ask where I bought them. The satisfaction of saying “I made them” never gets old.
My resin journey started with one kit from Amazon and way too much confidence. First batch? Bubbles everywhere. Second batch? Forgot to add hardener (stayed liquid forever). Third batch? Finally got it right, and now I’m making sets for everyone I know.
Resin Basics for Beginners
Essential supplies:
- Epoxy resin kit (read ALL instructions)
- Silicone molds (coaster and tray shapes)
- Gloves and ventilation (safety first)
- Mixing cups and stir sticks
- Decorative elements (flowers, glitter, paint)
- Heat gun or torch (for bubbles)
Design Ideas That Pop
What to embed:
- Pressed flowers: Classic and elegant
- Glitter: Because sparkle
- Alcohol inks: Create marble effects
- Gold leaf: Luxe on a budget
- Photos: Personal touch
- Crystals: Mystical vibes
The Process Simplified
Basic steps:
- Prep workspace (protect everything)
- Mix resin according to ratios
- Add colors or elements
- Pour into molds carefully
- Pop bubbles with heat
- Let cure 24-48 hours
- Demold and admire
Pro Tips from My Failures
Learn from my mistakes:
- Measure resin parts exactly (chemistry matters)
- Work in ventilated area (headaches aren’t cute)
- Cover pieces while curing (dust is the enemy)
- Start small (coasters before trays)
- Accept imperfections (bubbles add character?)
5. DIY Neon Wall Signs
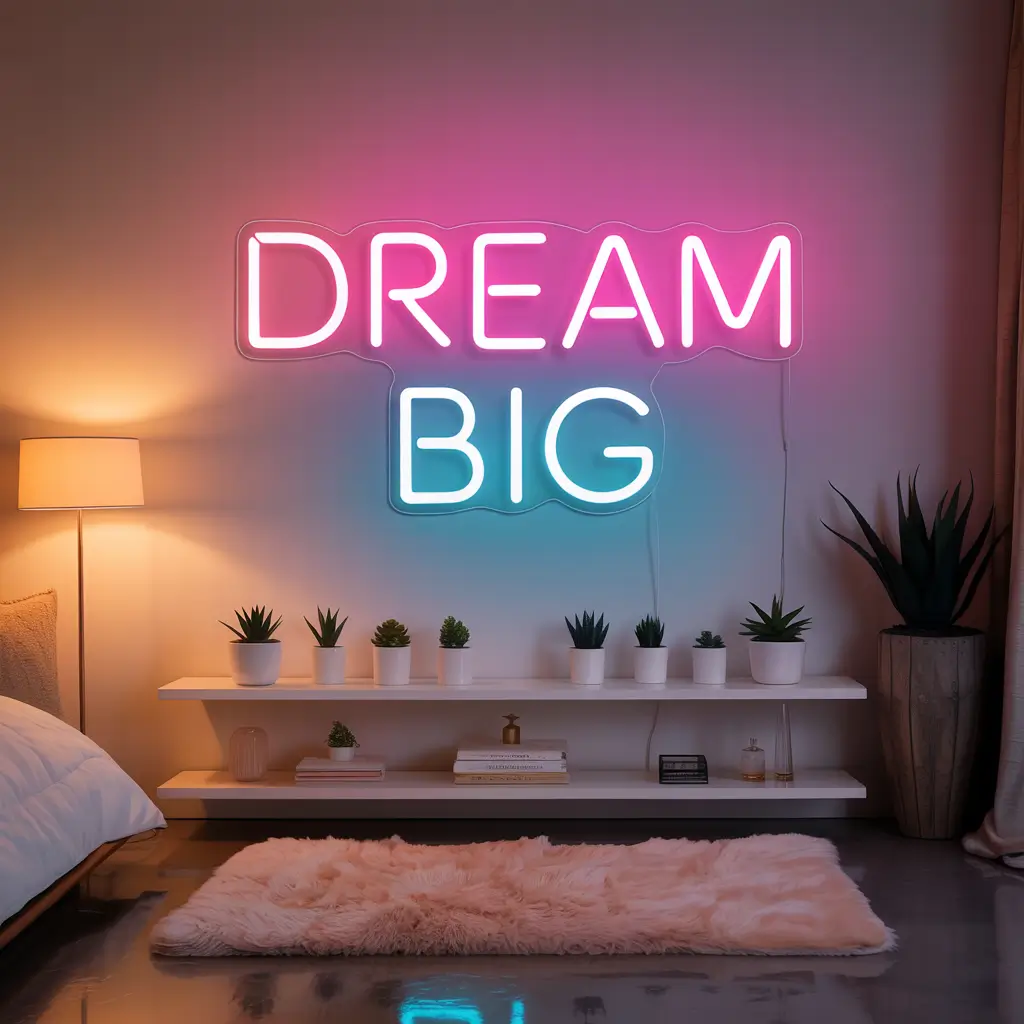
Real neon signs cost hundreds. DIY versions using LED neon flex? Under $50 and completely customizable. Nothing says “aesthetic room” quite like a glowing sign with your favorite quote or design.
The Glow Up Your Wall Needs
LED neon signs create ambiance and personality that regular lighting can’t touch. Whether it’s song lyrics, motivational quotes, or just a word that resonates, having it glow on your wall is peak aesthetic energy.
I made a “stay wild” sign for my room after seeing similar ones online for $300+. Mine cost $40 in materials and three hours of bending LED rope. It’s become the centerpiece of my room, and everyone assumes I splurged on it. The power of DIY, honestly.
Materials for Faux Neon
Shopping list:
- LED neon flex rope (pick your color)
- Clear acrylic sheet (for mounting)
- Wire or zip ties (for shaping)
- Drill with small bit (for mounting holes)
- Power adapter (usually included)
- Pencil (for design sketching)
Design Ideas That Work
Popular options:
- Short phrases (3-4 words max)
- Single words (“dream,” “create,” “chill”)
- Simple shapes (stars, hearts, moons)
- Music symbols
- Minimalist line art
- Your initials or name
Assembly Process
Making it happen:
- Sketch design on paper first
- Transfer to acrylic sheet
- Drill small holes along design path
- Thread wire through holes
- Attach LED rope to wire frame
- Secure with ties and test
- Mount and plug in
Making It Look Pro
The finishing touches:
- Keep designs simple (complex = difficult)
- Hide connections at back
- Use dimmers for mood lighting
- Position at eye level
- Consider colored acrylic backing
6. Painted Geometric Accent Wall
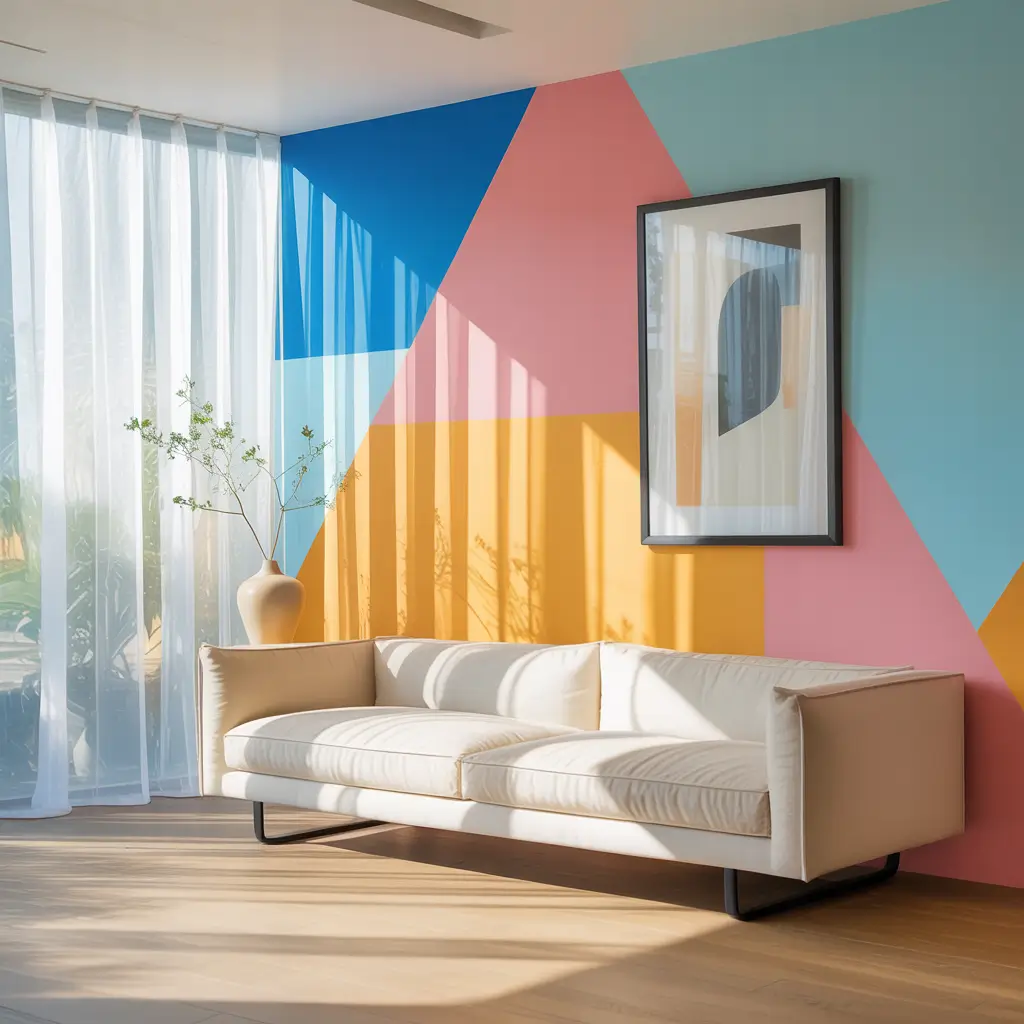
One painted wall can completely transform your room’s vibe. Geometric patterns take it from basic to boutique, and you don’t need artistic skills—just tape and patience.
The Statement Wall Effect
Geometric walls create visual interest without overwhelming the space. They’re bold enough to define your room’s aesthetic but versatile enough to work with changing decor.
I procrastinated on my geometric wall for months, intimidated by the process. Finally did it over a weekend, and honestly? It was easier than expected. My triangle mountain design gets more compliments than any other room feature, and it cost less than $50 in paint and tape.
Planning Your Design
Before you paint:
- Sketch ideas on paper first
- Measure your wall accurately
- Choose 2-3 colors maximum
- Buy quality painter’s tape (this matters!)
- Test paint colors on poster board
Popular Geometric Patterns
Tried and tested:
- Triangle mountains: Modern and calming
- Hexagon honeycomb: Complex but stunning
- Color blocks: Bold and simple
- Diagonal stripes: Dynamic energy
- Diamond patterns: Classic yet fresh
- Abstract shapes: Organic modern
The Painting Process
Step by step:
- Clean and prep wall
- Apply base coat if needed
- Measure and mark design lightly
- Apply tape carefully (press edges!)
- Paint in thin coats
- Remove tape while slightly wet
- Touch up any bleeds
Tape Tricks for Clean Lines
Getting crisp edges:
- Press tape edges with credit card
- Paint base color over tape first (seals edges)
- Use quality tape (FrogTape is worth it)
- Remove at 45-degree angle
- Pull slowly and steadily
IMO, the slight imperfections in DIY geometric walls add character. Perfect is boring anyway.
Also Read: 10 Easy Cute DIY Room Decor Ideas and Space-Saving Solutions
7. Upcycled Vintage Mirror Decor
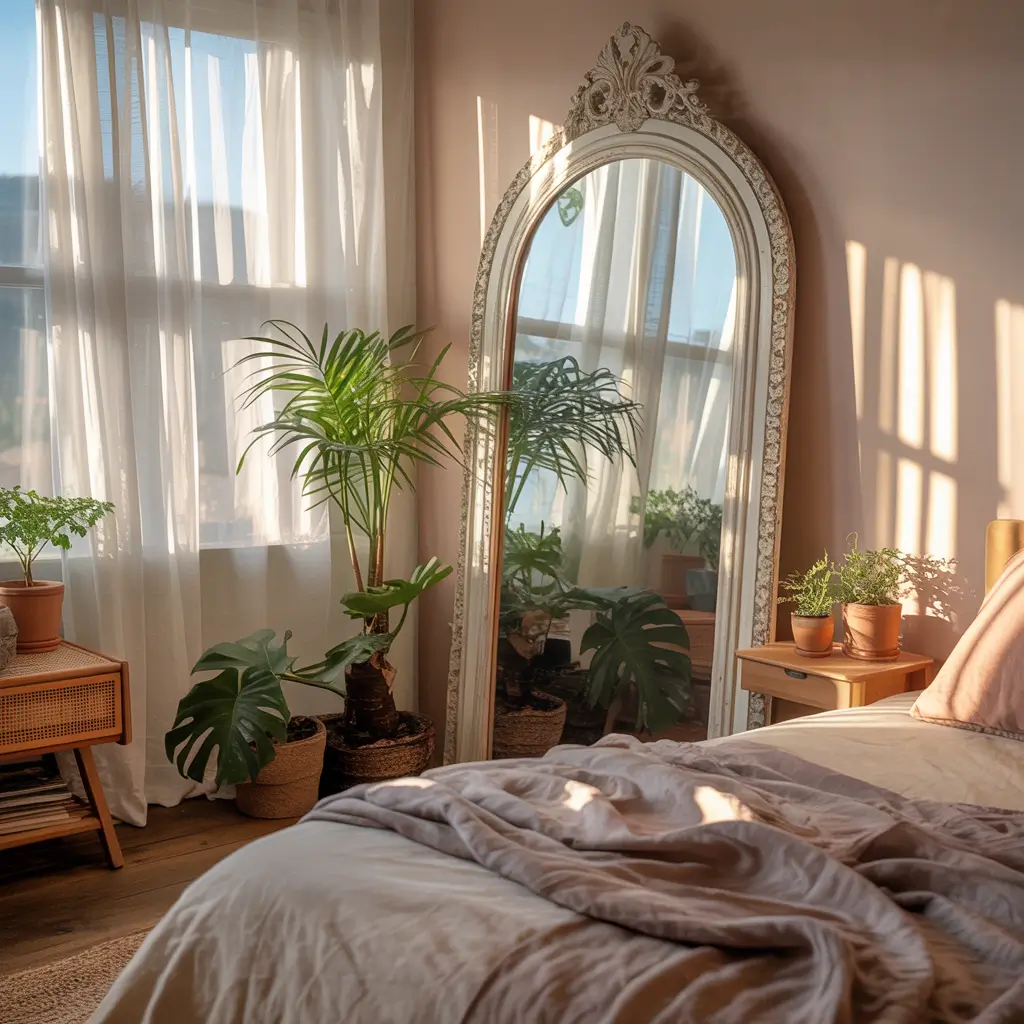
Thrift store mirrors are goldmines waiting for transformation. With some paint and creativity, that dated mirror becomes a statement piece that adds light, dimension, and serious aesthetic appeal.
The Reflection Revolution
Mirrors do double duty as decor and function—they make rooms look bigger, brighter, and more expensive while actually being useful. Vintage mirrors have character that new ones lack, and upcycling them adds your personal touch.
I found a hideous gold mirror at Goodwill for $8. One can of matte black spray paint later, it looked like something from CB2. Now it’s the focal point above my dresser, making my room feel twice as big and way more sophisticated.
Finding Mirrors to Transform
Where to hunt:
- Thrift stores: Best prices, unique finds
- Estate sales: Quality vintage pieces
- Facebook Marketplace: Local deals
- Garage sales: Hidden gems
- Family attics: Free and nostalgic
Transformation Techniques
Ways to upgrade:
- Spray paint frames (metallics or bold colors)
- Add decorative elements (flowers, beads)
- Distress for vintage look (sandpaper magic)
- Create mosaic borders (broken tile or glass)
- Wrap with rope or twine (boho vibes)
- Apply metallic leaf (instant luxury)
Styling Your Mirror Collection
Display ideas:
- Gallery wall of mixed sizes
- One large statement mirror
- Cluster of small round mirrors
- Lean against wall for casual look
- Layer mirrors for depth
Safety First
Working with old mirrors:
- Check for damage before buying
- Clean gently (old silver backing is delicate)
- Use proper hanging hardware
- Consider weight for wall type
- Secure properly (falling mirrors = bad luck literally)
8. Minimalist Hanging Planters
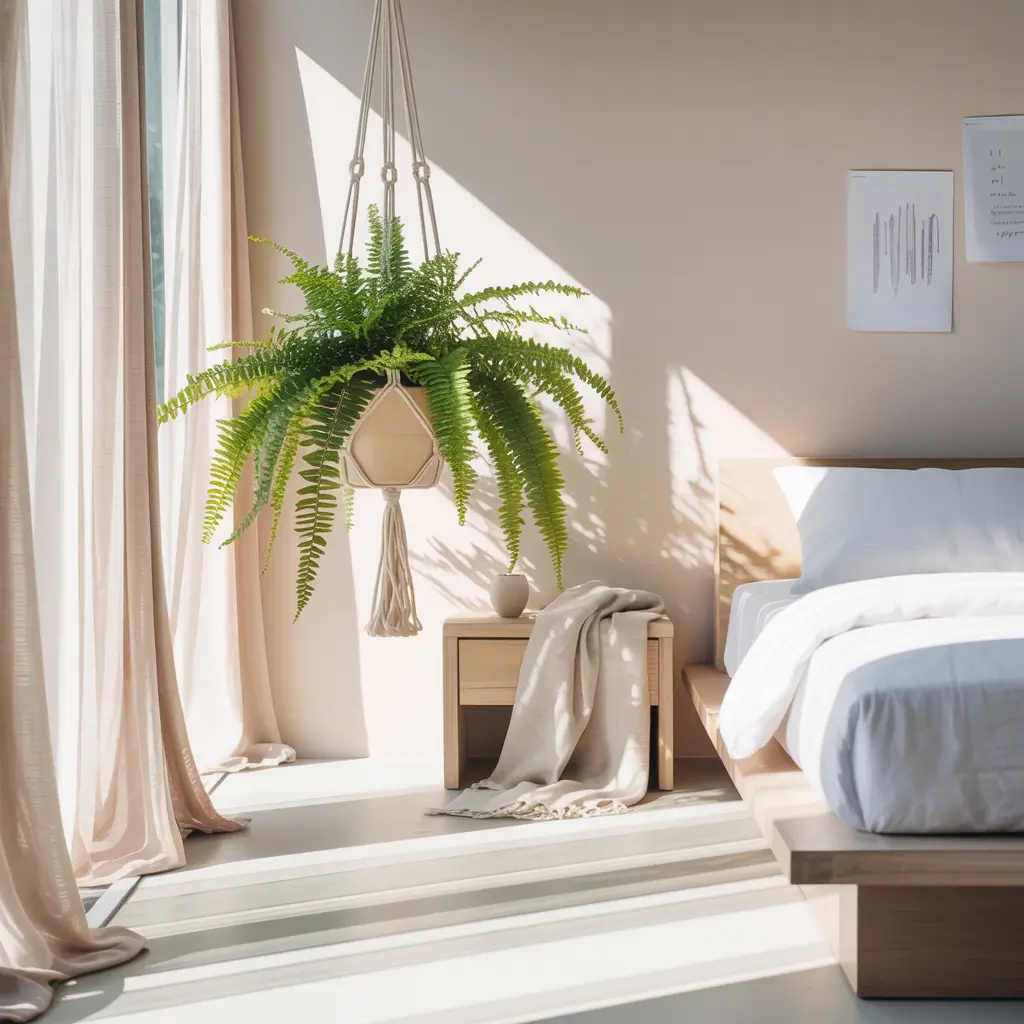
Plants make everything better, and hanging planters save precious surface space while adding vertical interest. Minimalist designs keep the focus on the plants while complementing any aesthetic.
The Living Decor Element
Hanging plants add life and movement that static decor can’t match. They purify air, boost mood, and create that organic feel that makes spaces feel alive rather than staged.
My hanging planter collection started with one pothos in a simple white ceramic planter. Now I have seven at varying heights, creating this cascading green corner that everyone comments on. It’s become my favorite spot to read, surrounded by my little hanging garden.
DIY Planter Options
Simple designs:
- Macramé hangers: Classic and customizable
- Minimalist rope: Single cord simplicity
- Geometric metal: Modern industrial
- Ceramic with leather straps: Scandi chic
- Glass orbs: Delicate and airy
- Concrete planters: Brutal beauty
Best Plants for Hanging
Low-maintenance winners:
- Pothos: Impossible to kill
- Spider plants: Make babies!
- String of hearts: Romantic trailing
- Air plants: No soil needed
- Philodendron: Fast growing
- Small succulents: If you have light
Creating Hanging Displays
Arrangement tips:
- Vary heights for visual interest
- Group in odd numbers
- Consider light requirements
- Mix trailing and upright plants
- Coordinate planter styles
- Leave room for growth
Installation Without Damage
Renter-friendly hanging:
- Ceiling hooks in existing holes
- Tension rods between walls
- Over-door hooks
- Command hooks (check weight limits)
- Curtain rods extended outward
9. Custom Fabric Wall Art Panels
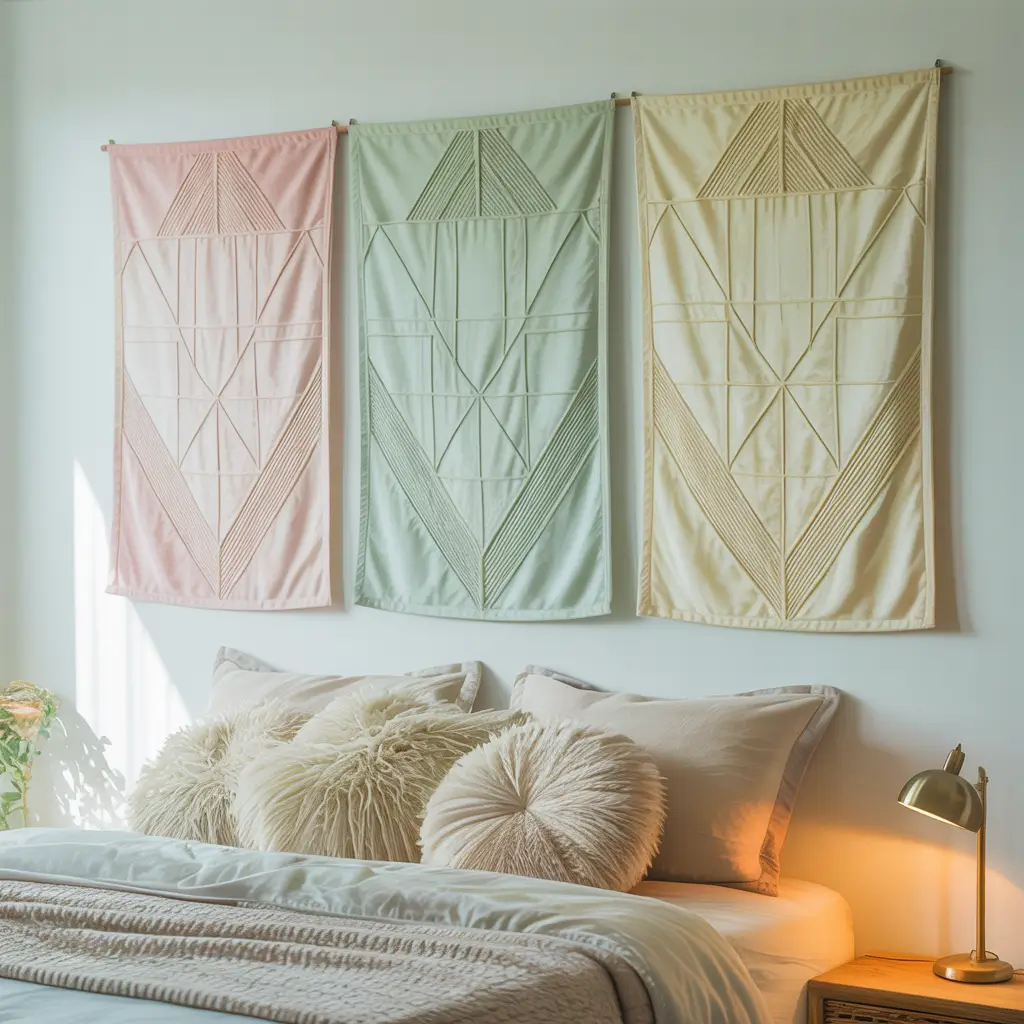
Fabric panels are like paintings you can change whenever you want. They add color, pattern, and softness to walls while being budget-friendly and completely customizable.
The Soft Art Solution
Fabric art panels warm up spaces in ways that traditional art can’t. They absorb sound, add texture, and can be swapped out seasonally or when your aesthetic evolves (which, let’s be real, happens every few months).
I created my first fabric panel set using clearance fabric from IKEA and canvas frames from the dollar store. Total cost: under $20. Impact: looks like custom textile art that would cost hundreds. The satisfaction of fooling people into thinking you’re fancier than you are? Priceless.
Creating Fabric Panels
What you’ll need:
- Canvas frames or embroidery hoops
- Fabric (any pattern you love)
- Staple gun or hot glue
- Scissors
- Iron (wrinkles ruin the vibe)
Fabric Selection Strategy
Choosing wisely:
- Consider your room’s color palette
- Mix patterns with solids
- Think about scale (big patterns for large frames)
- Quality matters less than you think
- Vintage scarves make unique panels
- Shower curtains work too (seriously)
Assembly Process
Making it happen:
- Iron fabric to remove wrinkles
- Lay fabric face down
- Center frame on fabric
- Pull tight and staple one side
- Opposite side next, then remaining
- Fold corners neatly
- Trim excess fabric
Display Arrangements
Hanging options:
- Grid of same-size panels
- Asymmetric gallery wall
- One large statement piece
- Vertical column
- Above bed as headboard alternative
Also Read: 12 Inspiring Aesthetic Room Decor DIY Ideas for Every Room
10. LED Strip Light Room Accents
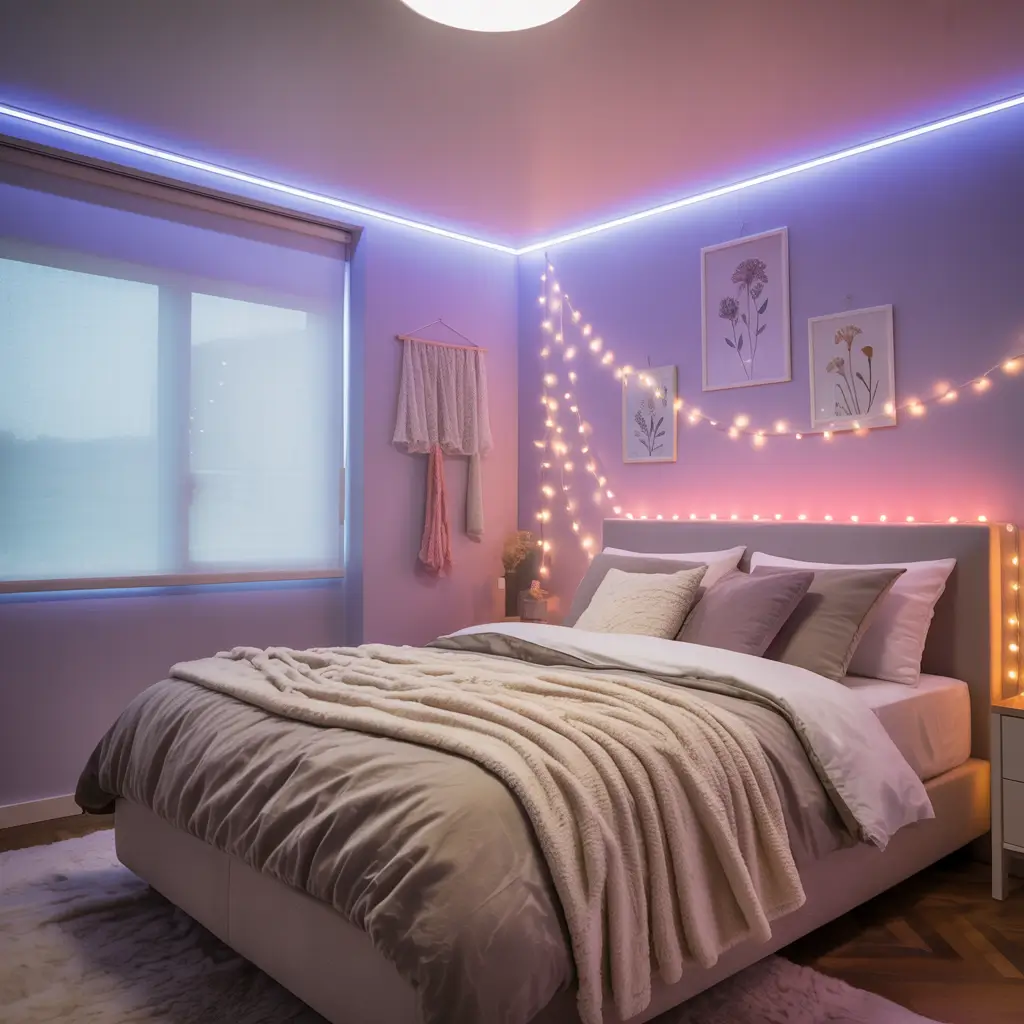
LED strips are the secret weapon of aesthetic rooms. They’re affordable, versatile, and instantly create that ambient glow that makes everything look more expensive and intentional.
The Ambient Game Changer
LED strips transform harsh spaces into moody sanctuaries. Hidden behind furniture or along architectural features, they create depth and atmosphere that overhead lighting could never achieve.
I was skeptical about LED strips (seemed too “gamer room” for my taste) until I installed them behind my floating shelves and under my bed. Now my room has this gorgeous ambient glow that makes it feel like a high-end hotel. Best $30 I’ve spent on room decor, hands down.
Strategic Placement Ideas
Where to install:
- Behind headboard: Soft reading light
- Under bed frame: Floating effect
- Along ceiling perimeter: Cove lighting
- Behind mirrors: Glamorous glow
- Inside closets: Functional and pretty
- Along baseboards: Futuristic feel
Installation Tips
Making it work:
- Clean surfaces before applying
- Plan your route (measure twice!)
- Hide connectors behind furniture
- Use corner connectors for turns
- Test before final installation
- Consider smart strips for phone control
Color Considerations
Choosing your vibe:
- Warm white for cozy feels
- Cool white for modern minimal
- RGB for mood flexibility
- Single colors for specific aesthetics
- Avoid rainbow unless that’s your thing
Creating Lighting Scenes
Maximize the effect:
- Layer with other light sources
- Use dimmers for versatility
- Create zones with different strips
- Sync with music for parties
- Timer settings for routine
Bringing Your Aesthetic Vision to Life
Here’s what I’ve learned after transforming my space from “generic college dorm energy” to “actually love being here”: aesthetic room decor isn’t about perfection or massive budgets.
It’s about creating a space that reflects who you are right now, knowing it can evolve as you do.
Start with one or two projects that genuinely excite you. Don’t try to recreate someone else’s entire room—take inspiration but make it yours.
Maybe you’re more geometric walls than macramé. Maybe fairy lights aren’t your thing but neon signs speak to your soul. That’s the beauty of DIY—infinite customization.
The best aesthetic rooms tell a story. They’re layered with personality, filled with handmade touches, and constantly evolving.
They’re spaces where you want to spend time, not just sleep. Most importantly, they make you happy every time you walk in.
So grab some supplies, pick a project, and start creating. Your future self—the one living in a space that actually feels like home—will thank you. And remember, if something doesn’t turn out perfect, that’s what makes it authentically yours. Perfect is overrated anyway. 🙂
Now excuse me while I go rearrange my fairy lights for the fifteenth time this week. It’s called “optimizing the aesthetic,” and yes, it’s a totally valid use of time. :/


