10 Cute DIY Baby Room Decor Ideas for Dreamy Spaces
- Bedroom Design
 Ben
Ben- 0
- 43 minutes read

Preparing for a baby is exciting, overwhelming, and weirdly expensive all at once. One minute you’re browsing adorable nursery photos online, the next you’re having heart palpitations over the price of a single mobile.
But here’s what nobody tells you until you’re knee-deep in baby registry hell: you can create a gorgeous nursery without selling a kidney.
I’ve been through the nursery decorating journey twice now, and I’m convinced that DIY is not just the budget-friendly option—it’s actually the better option.
There’s something incredibly special about creating pieces for your baby’s first space with your own hands. Plus, you can customize everything to match your exact vision instead of settling for whatever the big box stores are pushing this season.
So grab your crafting supplies, put on some good music, and let’s create a nursery that’ll make other parents seriously jealous.
These ten projects range from quick afternoon activities to weekend endeavors, but I promise they’re all totally doable even if you think you’re not “crafty.” If I can do them while pregnant and exhausted, trust me, you can too.
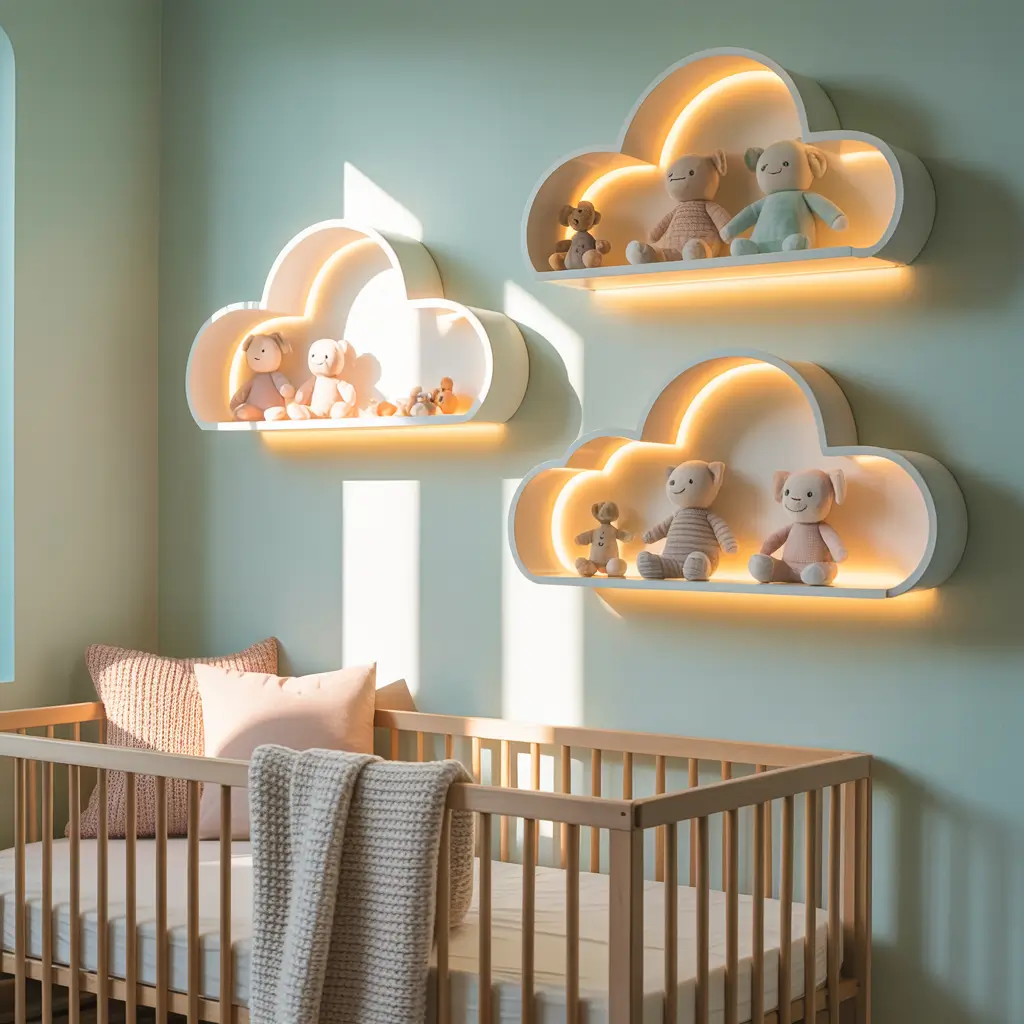
1. Floating Cloud Shelves with Soft Lighting

Why Clouds Belong in Every Nursery
Clouds are basically the universal symbol of sweet baby dreams, right? Creating floating cloud shelves takes that dreamy vibe and makes it functional. These aren’t just decorative—they actually hold your baby essentials while looking absolutely adorable. Win-win situation if you ask me.
I made three of these for my daughter’s nursery, and they became my favorite feature in the entire room. They’re whimsical without being over-the-top cutesy, and the integrated lighting creates this magical soft glow that’s perfect for those middle-of-the-night diaper changes when you need just enough light to see but not enough to fully wake everyone up.
Building Your Cloud Shelves
You need plywood or thick craft wood—nothing fancy, just sturdy enough to hold a few lightweight items. Draw a simple cloud shape on your wood. Keep it organic and fluffy-looking with rounded bumps, but don’t stress about making it perfect because clouds in nature aren’t uniform anyway.
Cut out your cloud shape with a jigsaw (or ask the hardware store to cut it for you if power tools aren’t your thing). Sand all the edges until they’re smooth and baby-safe. Paint your cloud white or a soft pastel like pale blue, blush pink, or mint green. I recommend at least two coats for nice even coverage.
Here’s where it gets fun: adding the lighting. Grab a battery-operated LED strip light—the kind that comes with adhesive backing. Attach the light strip along the underside edge of your cloud shelf. This creates a soft backlight effect that makes the cloud appear to glow. Some LED strips even come with dimmer switches, which is clutch for nighttime use.
Mounting and Styling
Attach L-brackets to the back of your cloud for mounting. Secure these brackets into wall studs using screws—safety first when you’re putting anything above baby’s space. Position your cloud shelves at varying heights to create visual interest and a floating effect.
Style them with small nursery items like board books, tiny stuffed animals, or small decorative pieces. I keep a soft nightlight toy and a few favorite books on ours. Just remember not to overload them—these are decorative shelves, not heavy-duty storage. The soft lighting makes whatever you display feel extra magical, especially during bedtime routines.
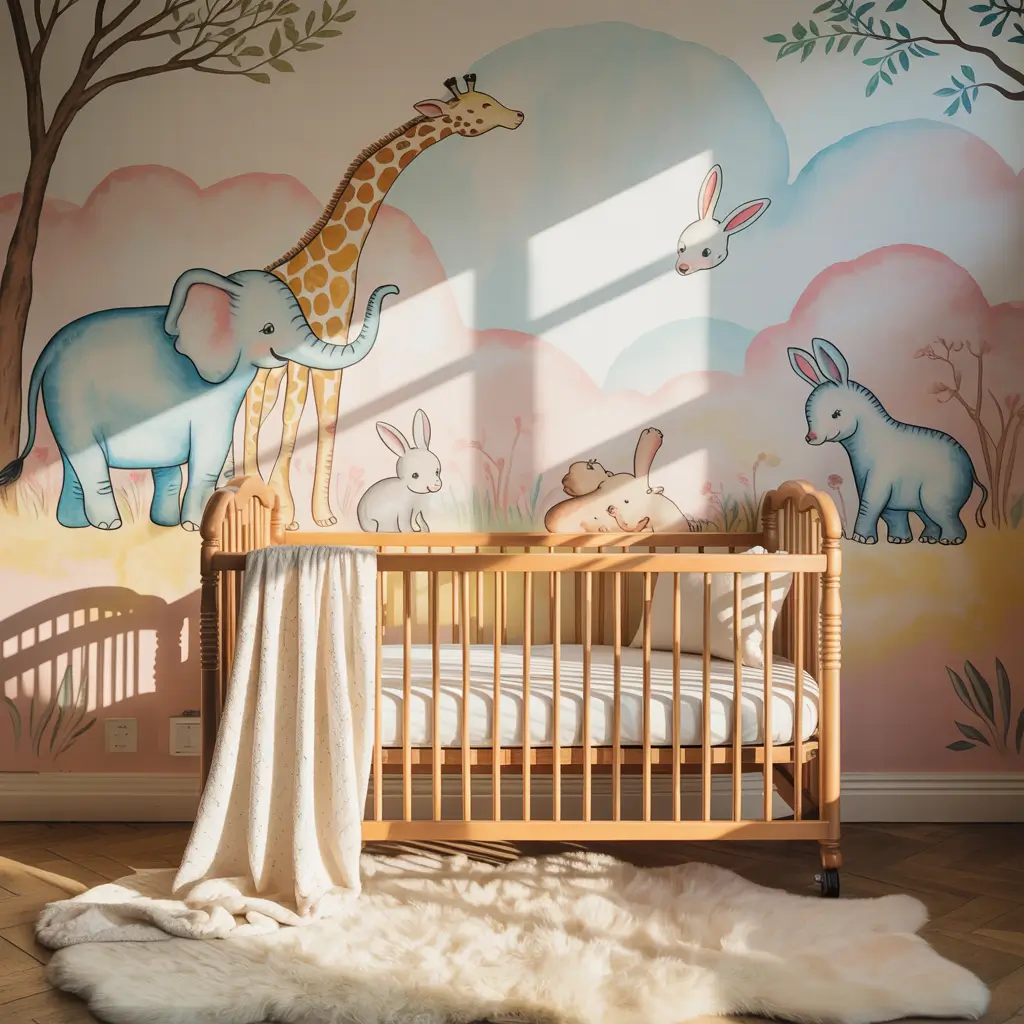
2. Pastel Wall Mural with Cute Animals

Your Artistic Side Doesn’t Need a Degree
Creating a custom wall mural sounds intimidating, but it’s honestly way easier than you think. You don’t need to be Michelangelo to paint some adorable animals on your nursery wall. Simple shapes and soft colors create the most impact anyway, and the personal touch beats any store-bought wall decal.
I was terrified to paint directly on our walls at first, but then I remembered paint is literally designed to cover other paint. Worst case scenario, you paint over it. That realization freed me up to just go for it, and I’m so glad I did.
Planning Your Mural
Choose 3-5 simple animals that match your nursery theme. Woodland creatures (deer, foxes, bears) are classic for a reason, but safari animals, ocean life, or farm animals work just as well. The key is keeping the designs simple—think silhouettes or cartoonish rather than realistic.
Sketch your design on paper first to plan the layout. I used a projector to trace animal outlines onto the wall, but you can also use a grid method or just freehand it if you’re feeling confident. Use pencil to lightly outline your animals on the wall before you commit with paint.
Painting Process
Grab acrylic paints in soft pastels—think dusty rose, sage green, pale yellow, soft grey, and cream. These colors work together beautifully and create that trendy modern nursery vibe. Paint your animal shapes in blocks of color first, keeping everything simple and graphic.
Add minimal details like closed eyes (little curved lines), simple noses, and maybe some spots or stripes depending on the animal. The beauty is in the simplicity—you don’t need individual fur strands or complex shading. Flat colors with basic features create that sweet, dreamy aesthetic that works perfectly in a nursery.
I painted a sleeping fox, a bunny, a bear, and some simple trees on one accent wall behind the crib. The whole project took one weekend (including drying time between coats), and the compliments I get on it are endless. People assume we hired someone, which makes me feel incredibly smug 🙂
Background Elements
Add some simple background elements to fill space and tie everything together. Clouds, stars, simple mountain silhouettes, or scattered leaves work great. Use a slightly lighter shade than your main wall color for these elements so they’re subtle but add visual interest. A few metallic gold or silver accents (like stars or small dots) catch the light beautifully and add just a touch of magic without overwhelming the space.
3. DIY Crib Mobile with Felt Shapes
The Focal Point Baby Actually Looks At
Crib mobiles are one of those baby items that seem insanely overpriced for what they are—some shapes dangling from strings. Making your own lets you customize the colors, shapes, and theme exactly how you want it, plus it’s way more budget-friendly than those designer mobiles that cost as much as the crib itself.
My first baby got a store-bought mobile that he honestly barely looked at. For baby number two, I made a custom felt mobile with shapes I chose specifically, and she was mesmerized by it. Could be coincidence, or could be that custom design really does make a difference.
Choosing Your Theme and Shapes
Decide on your mobile theme—celestial (moons and stars), woodland (animals and trees), clouds and raindrops, or simple geometric shapes. Whatever matches your nursery vibe. Cut your shapes from felt in coordinating colors. Felt is perfect for this because it’s soft, doesn’t fray, and comes in every color imaginable.
Cut two identical shapes for each piece and hot glue or hand-stitch them together with a bit of cotton stuffing inside. This makes them three-dimensional and more interesting to look at. I made stars, moons, and clouds for a celestial mobile, stuffing each shape lightly so they had body but weren’t heavy.
Assembly and Hanging
You need an embroidery hoop or mobile ring as your base—wooden embroidery hoops from the craft store work perfectly and cost maybe three dollars. You can leave it natural wood or paint it to match your nursery colors. Attach fishing line or embroidery thread to each felt shape at varying lengths.
Tie your shapes to the hoop, spacing them evenly around the circle. I did five shapes on mine—any more felt too crowded, any fewer looked sparse. Vary the hanging lengths so the shapes float at different heights when you hang the mobile. This creates visual depth and makes it more interesting for baby to look at.
Create a hanging mechanism by tying four equal-length strings to four points on your hoop, bringing them together at the center top and knotting them. Attach this to a ceiling hook directly above the crib (but following safe sleep guidelines—the mobile should be high enough that baby can’t reach it). Some people add a small battery-operated music box to the center for extra functionality, though honestly, the visual interest alone is enough.
Also Read: 12 Bright DIY Kids Room Decor Ideas for Cheerful Bedroom
4. Hand-Painted Name Sign for Nursery
Because Their Name Deserves to Shine
There’s something special about seeing your baby’s name displayed in their room—it makes the space feel truly theirs from day one. Hand-painted name signs add that personal touch that generic decor just can’t match, and you can make one that perfectly fits your style and color scheme.
I made name signs for both my kids before they were born, and even though I didn’t know 100% what we’d name them until they arrived, I had the signs ready to go. Changed my daughter’s at the last minute when we picked a different name, but hey, that’s what paint is for.
Creating Your Sign Base
You need a piece of wood for your sign base—pine boards from the hardware store work great. The size depends on the name length, but I’d go with at least 24 inches long to make an impact. Sand it smooth, then paint or stain it in your chosen background color. White, natural wood, or soft pastels all work beautifully depending on your nursery palette.
For the name itself, you have options. If you’ve got steady hands, sketch the letters lightly in pencil first, then paint them with a small brush. For those of us whose handwriting looks like a caffeinated spider, use letter stencils or print out letters in a font you love, trace them onto the wood, and then paint inside the lines.
Design Details
This is where you make it special. Add decorative elements around the name—little flowers, stars, animals, hearts, whatever matches your theme. I painted small woodland creatures (fox, deer, bunny) around my daughter’s name, and tiny stars around my son’s. These details transform it from just text into actual art.
Consider adding the birth details too—either on the same sign or on a coordinating smaller piece. Birth date, time, weight, length, that whole deal. You can paint these in smaller text below the name. Some people skip this until baby arrives and add it after, which gives you one more project to work on during those early weeks when you’re home bonding anyway.
Finishing Touches
Seal your painted sign with a clear coat of polyurethane or Mod Podge to protect it. This is especially important if you’ve added glitter or other embellishments that might fall off otherwise. Add picture hanging hardware to the back, or lean it on a shelf if you prefer. I hung ours above the changing table where I’d see it approximately eight million times a day during diaper changes.
5. Upcycled Wooden Toy Storage Bins

Function Meets Adorable
Babies accumulate stuff at an alarming rate—stuffed animals, blankets, toys, books, random things well-meaning relatives gift you that you have no idea what to do with. Storage is non-negotiable, but those plastic bins from big box stores are soul-crushingly ugly. Creating your own wooden storage bins solves the problem while adding to your decor instead of detracting from it.
I made four of these bins for under the window in our nursery, and they’ve been workhorses. Cute workhorses, but workhorses nonetheless. Function and form, people. That’s the dream.
Building Your Bins
You can build simple wooden crates from scratch if you’re handy with power tools, or buy unfinished wooden crates from craft stores and customize them. The craft store route is way faster and requires zero woodworking skills—major plus when you’re in nesting mode and just want results.
Sand your crates smooth if needed, then paint them in colors that coordinate with your nursery. I did two in white, one in soft grey, and one in pale yellow to match our color scheme. You could also do a rainbow gradient, all one color, or natural wood with stained edges. Whatever speaks to you.
Personalization Options
Here’s where you make them special. Use stencils to add labels—”Books,” “Toys,” “Blankets,” or even just cute icons that indicate what goes inside. You could also add the baby’s name or initial to each bin. I hand-painted little animal faces on the front of each bin so they looked friendly and inviting, which sounds cheesy but actually looks adorable.
Add rope handles for easy carrying if your crates don’t already have them. Drill holes on opposite sides, thread through some thick rope or fabric, and knot the ends. These handles make it easy to pull bins out, grab what you need, and slide them back. FYI, this becomes especially useful when you’re holding a fussy baby in one arm and trying to grab something with the other.
Organization Tips
Line your bins with fabric if you’re storing smaller items that might fall through crate slats. I used coordinating cotton fabric, cutting it to size and securing it inside with a staple gun. Place your bins on shelves, under cribs, in closets, or lined up against a wall. They’re storage that actually looks good, which is basically the holy grail of nursery organization.
6. Soft Fabric Wall Bunting Garland

Texture That Makes Everything Cozy
Fabric bunting garland adds softness and texture to nursery walls in a way that paint alone can’t achieve. It’s that finishing touch that makes a room feel complete and cozy, plus it’s ridiculously easy to make. Even people who claim they “can’t sew” can handle this one because the sewing is minimal and forgiving.
I draped fabric bunting across one wall in my son’s nursery, and it created this focal point that tied all the other colors in the room together. Such a small addition, such a big impact.
Gathering Materials
Hit up the fabric store and grab fat quarters (pre-cut 18×22 inch pieces of fabric) in 5-7 coordinating patterns and colors. Mixing patterns—stripes, dots, florals, and solids—creates visual interest. Choose colors that complement your nursery palette. I went with navy, white, grey, and soft yellow for a modern but warm feel.
You also need bias tape or ribbon for the top band that everything hangs from. I used white bias tape because it disappears against my walls, but colored ribbon can add another design element if you want.
Cutting and Assembly
Cut your fabric into triangle pennant shapes—I did mine about 7 inches wide at the top and 9 inches tall, but you can adjust based on your preference. You need two triangle pieces for each pennant (front and back) so they’re double-sided and look finished from any angle.
Place two triangles right sides together and sew along the two diagonal edges, leaving the top open. Turn them right side out and press flat with an iron. Boom, you’ve got a finished pennant. Repeat until you have enough pennants to span your desired length—I made about 15 for a 10-foot garland.
Creating Your Garland
Fold your pennants over your bias tape or ribbon, spacing them evenly, and sew or hot glue them in place. Leave extra length on each end of your ribbon for hanging. I spaced mine about 2-3 inches apart, which created a full look without being too crowded.
Hang your garland using small nails, command hooks, or even washi tape depending on your wall situation. Drape it in a gentle swag across a wall, over a window, or above the crib (though always following safe sleep guidelines—nothing should hang where baby could reach). The fabric adds dimension and softness that makes the whole room feel more finished and intentional.
Also Read: 10 Cool DIY Grunge Room Decor Ideas with Vintage Vibes
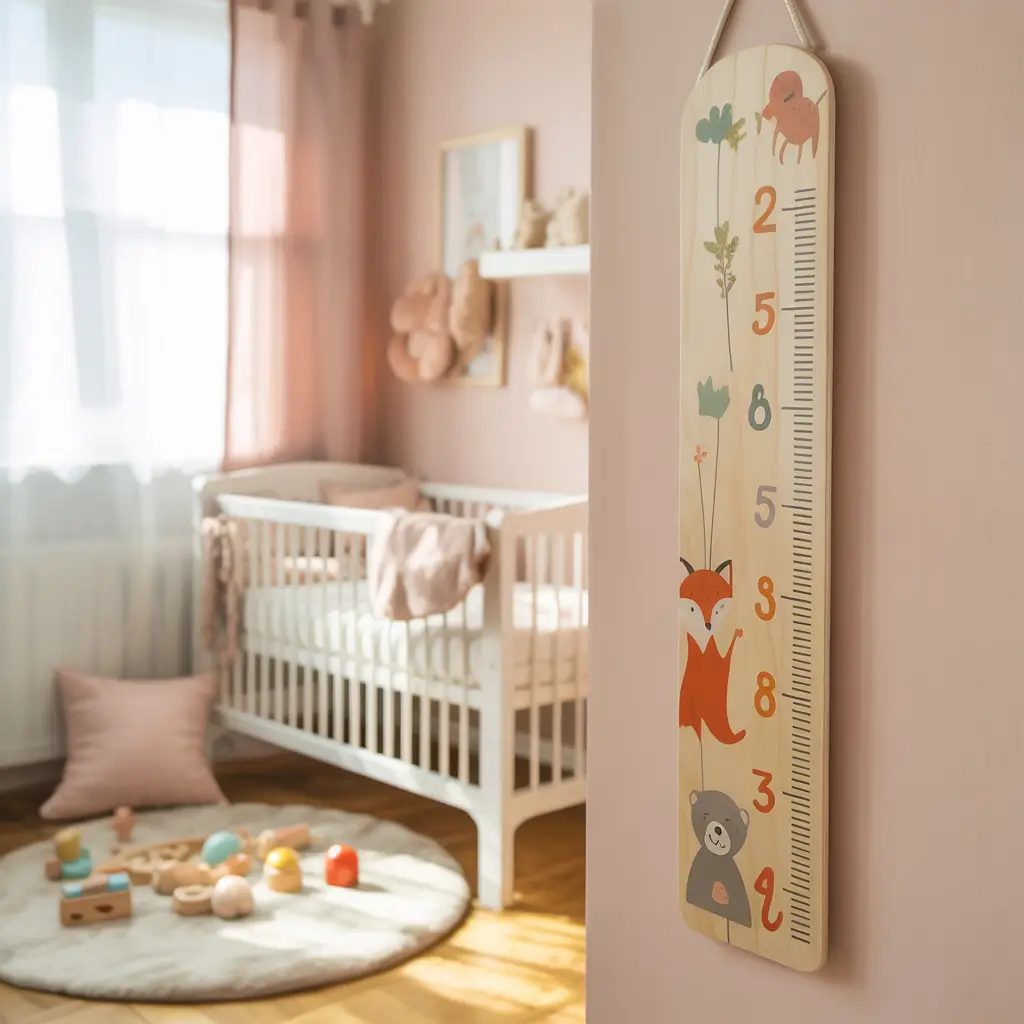
7. DIY Growth Chart on a Wooden Ruler
Measuring Precious Moments
Babies grow so fast it’s actually kind of shocking. One day you’ve got this tiny newborn, next thing you know they’re walking and talking and demanding snacks. A growth chart ruler becomes both functional decor and a precious keepsake that tracks those fleeting early years.
I made our growth chart ruler before my first baby even arrived, optimistically planning for all the measurements to come. Now it’s covered in pencil marks tracking both kids’ growth, and I legitimately get emotional looking at it sometimes.
Creating Your Ruler Base
Get a 1×6 board cut to 6 feet long from the hardware store. Sand it thoroughly until it’s smooth as butter—you don’t want splinters anywhere near baby. Paint or stain it in a color that matches your nursery. White with black numbers is classic and clean, natural wood with painted numbers is warm and rustic, or go with pastels for something softer.
Using a measuring tape and pencil, mark inches starting from the bottom edge. You don’t need to mark every single inch (that’s tedious and unnecessary)—I marked every 6 inches with a longer line and number, then added shorter tick marks for each inch in between. This gives you accuracy without making yourself crazy with tiny measurements.
Decorative Elements
Paint your measurement lines in a contrasting color so they’re easy to read. Add decorative elements that match your nursery theme—I painted small stars scattered around the numbers, but flowers, animals, clouds, or simple geometric shapes all work beautifully.
Add a title at the top like “Watch Me Grow,” baby’s name, or even just leave it simple and let the measurements speak for themselves. You can hand-paint letters or use letter stickers if your handwriting is questionable (no judgment—mine definitely is).
Installation and Use
Mount your ruler securely to the wall using screws into studs. This needs to stay put for years, so make sure it’s solid. The absolute bottom of your ruler should sit exactly at floor level for accurate measurements.
Use pencil to mark baby’s height along with the date. Start from birth if you want—we did a horizontal line at birth length just to have that reference point. Then track monthly for the first year (they change so much!), and maybe every few months or yearly after that. These pencil marks become a visual timeline of growth that you’ll treasure forever, trust me.
8. Fairy Light Canopy over Crib

Magical Without Being Dangerous
Canopies create that dreamy, magical vibe that makes nurseries feel extra special. Adding fairy lights takes it to the next level by creating soft, twinkling illumination that’s perfect for nighttime comfort. Just make sure you do this safely—the canopy and lights need to be completely out of baby’s reach.
I was hesitant about this project initially because safety is obviously paramount, but once I figured out how to install it properly (high and secure), it became my favorite feature in the nursery. The soft glow is genuinely soothing for both baby and exhausted parents.
Choosing Your Materials
Grab sheer fabric—tulle, organza, or lightweight cotton in white, soft pink, grey, or whatever color coordinates with your nursery. You need several yards depending on how full you want the canopy. I used about 5 yards for a nice, flowing effect. You also need battery-operated fairy lights (never plug-in lights near baby) in warm white or soft colors.
Get a sturdy embroidery hoop or metal ring that’s at least 18-24 inches in diameter. This becomes your canopy crown that everything drapes from. Paint or wrap it in ribbon to make it decorative rather than just functional.
Assembly Process
Drape your sheer fabric over the hoop, bunching it at the top and letting it cascade down the sides. You can drape it loosely for a flowing look or gather it more tightly for a structured effect. Secure the fabric to the hoop with hot glue, small zip ties, or by sewing it in place.
Weave your battery-operated fairy lights through the gathered fabric at the top of the hoop and throughout the draping fabric. Secure the light strand with small zip ties or thread so it doesn’t slip. Make sure the battery pack is accessible so you can turn lights on/off and change batteries without taking down the whole canopy.
Safe Installation
This is crucial: mount your canopy to the ceiling using a heavy-duty ceiling hook screwed into a stud or ceiling joist. It needs to be completely secure. Position it directly above the center of the crib but high enough that even when your growing baby stands in the crib, they cannot reach the fabric or lights. I positioned mine about 7 feet high to be extra safe.
The canopy fabric should drape down along the wall behind the crib, not hanging over the sleep space where baby actually lies. This creates the magical effect while following safe sleep guidelines. IMO, this is one of those rare projects that delivers maximum visual impact while still being completely safe when installed correctly.
9. Customized Baby Blanket with Embroidery

Soft Skills Required: Minimal
A customized baby blanket becomes an heirloom piece—something your child will keep for years and maybe even pass down someday. Adding simple embroidery personalizes it and makes it special, and before you panic, I’m not talking about complex embroidery skills. We’re keeping this simple and doable.
I made personalized blankets for both my babies, and they’re still their most treasured comfort items. There’s something about that personal touch that makes them extra special and loved.
Choosing Your Blanket Base
Start with a pre-made soft blanket as your base—fleece, minky, or cotton flannel all work great. You can buy these blank at craft stores or online. Choose a color that works with your nursery but also consider what might be a favorite color as baby grows. Neutrals are always safe, but don’t be afraid of color either.
Alternatively, make your own blanket by cutting two squares of soft fabric (about 36×36 inches), placing them wrong sides together, and sewing around the edges with a blanket stitch or zigzag stitch. Add a backing in a coordinating color or pattern for extra dimension.
Embroidery Design
Choose what you want to embroider—baby’s name, initials, birth date, a simple design like a star or heart, or even a sweet phrase like “Sweet Dreams” or “Love You to the Moon.” Keep it simple because we’re not professional embroiderers here, just parents with good intentions and some thread.
Use an embroidery hoop to hold your fabric taut while you work. Trace your design lightly onto the blanket with a water-soluble fabric pen. These marks disappear with water, so don’t stress about perfection in the tracing stage.
Simple Embroidery Techniques
You only need to know one or two basic embroidery stitches for this project. Backstitch works great for lettering and outlines—it creates a solid line that looks neat and intentional. For filling in shapes, use a simple satin stitch (basically parallel straight stitches placed close together).
Use embroidery floss in colors that contrast with your blanket for visibility. I used white floss on a grey blanket for my daughter’s name and navy floss on a cream blanket for my son’s. Take your time—embroidery is forgiving and actually kind of meditative once you get into it. If you mess up, you can always pull out stitches and try again.
Honestly, the slightly imperfect handmade look is part of the charm. This blanket becomes more precious because you made it, not less precious because it’s not machine-perfect.
Also Read: 10 Stylish Cardboard DIY Room Decor Ideas for Teens
10. Themed Corner Reading Nook with Cushions

Never Too Early for Story Time
Reading to your baby is one of those magical bonding experiences, so why not create a special space dedicated to it? A cozy corner reading nook gives you a designated spot for story time, and it grows with your child—what starts as a space for baby board books becomes a reading corner for early chapter books and beyond.
I set up a reading nook in both my kids’ nurseries, and it became our favorite daily ritual spot. Something about having a special place for books made story time feel more intentional and special.
Choosing Your Corner
Pick an underutilized corner of the nursery—maybe by a window if you have one for natural light, or just any corner that needs some love. You don’t need much space, maybe 3×3 feet or so. This becomes your dedicated book zone.
Paint the corner walls in an accent color or add a simple mural if you’re feeling ambitious. I painted one corner wall in soft sage green and added hand-painted clouds and birds to create a sky theme. Super simple but it defined the space visually and made it feel special.
Creating Comfort
Throw down a soft, plush rug or cushioned mat to define the space and make it cozy. Layer floor cushions, poufs, or a small bean bag chair—whatever makes sitting and reading comfortable. I used three large floor pillows in coordinating colors that I made by sewing together fabric squares and stuffing them with polyfill. Total cost: maybe fifteen bucks for materials.
Add a bookshelf or book bin within easy reach. Those wall-mounted book shelves that display covers facing out work great because babies and toddlers choose books by their covers. I DIY’d simple book ledges using narrow shelves and small trim pieces as lips to hold books in place.
Finishing Touches
String some fairy lights around the corner at ceiling height for ambient lighting—perfect for evening story time. Add a small reading lamp if you have space and access to an outlet. Hang a fabric canopy from the ceiling in the corner to create that cozy nook feeling (install it high and secure, following the same safety guidelines as the crib canopy).
Keep a basket of favorite books rotated regularly to maintain interest. Toss in a soft throw blanket for snuggling. I added a small star projector nightlight that we turn on during nighttime stories, and my kids are obsessed with it. This corner becomes a sanctuary for calm, connection, and story time—pretty much everything you want in a nursery.
Bringing Your Nursery Vision to Life
Creating a DIY nursery room isn’t about perfectly executing Pinterest-worthy projects—it’s about crafting a space filled with love and intention for your little one.
These ten projects prove that you don’t need a massive budget or professional design skills to create something beautiful and meaningful.
The best part about DIY nursery decor? You can adapt and change as baby grows and their personality emerges. That cloud shelf holds board books now, but in a few years, it’ll display their favorite toys or achievements.
The reading nook evolves from a place you read to them to a place they escape into their own story worlds.
Every handmade piece in your nursery tells a story—the weekend you spent painting that mural, the late pregnancy nesting period when you sewed that bunting, the excited anticipation while making that name sign.
Years from now, when your baby is somehow not a baby anymore :/), you’ll look back at photos of their nursery and remember not just how it looked, but how it felt to create that space for them.
So don’t stress about perfection. Embrace the handmade, slightly imperfect, totally personal vibe that DIY brings.
Your baby won’t care if your embroidery stitches are uneven or your mural isn’t Instagram-perfect. They’ll just know they’re in a room made with love, and honestly, that’s what matters most.
Now stop overthinking and start creating—your baby’s cozy haven is waiting, and it doesn’t require a designer price tag, just some creativity and heart 🙂


