10 Inspiring DIY Bookshelf Ideas and Cozy Home Decor
- Bookshelf Styling
 Ben
Ben- 0
- 39 minutes read
Your current bookshelf probably looks a bit sad, doesn’t it? I know that feeling because I spent years cramming every book I owned into a wobbly IKEA shelf until it started to bow in the middle like a sad, overloaded banana.
It looked less like a curated library and more like a book graveyard. Once I finally committed to building my own, my entire living room transformed from “college dorm” to “sophisticated adult.”
Creating your own bookshelf isn’t just about saving money—it’s about building a piece of furniture that perfectly fits your space and your personality. You don’t need a massive workshop or a degree in woodworking to pull this off.
You just need a bit of strategy, a few basic tools, and these 10 DIY bookshelf ideas. Let’s explore some projects that will turn your cluttered book collection into a high-end design feature.
1. Floating Wall Bookshelf
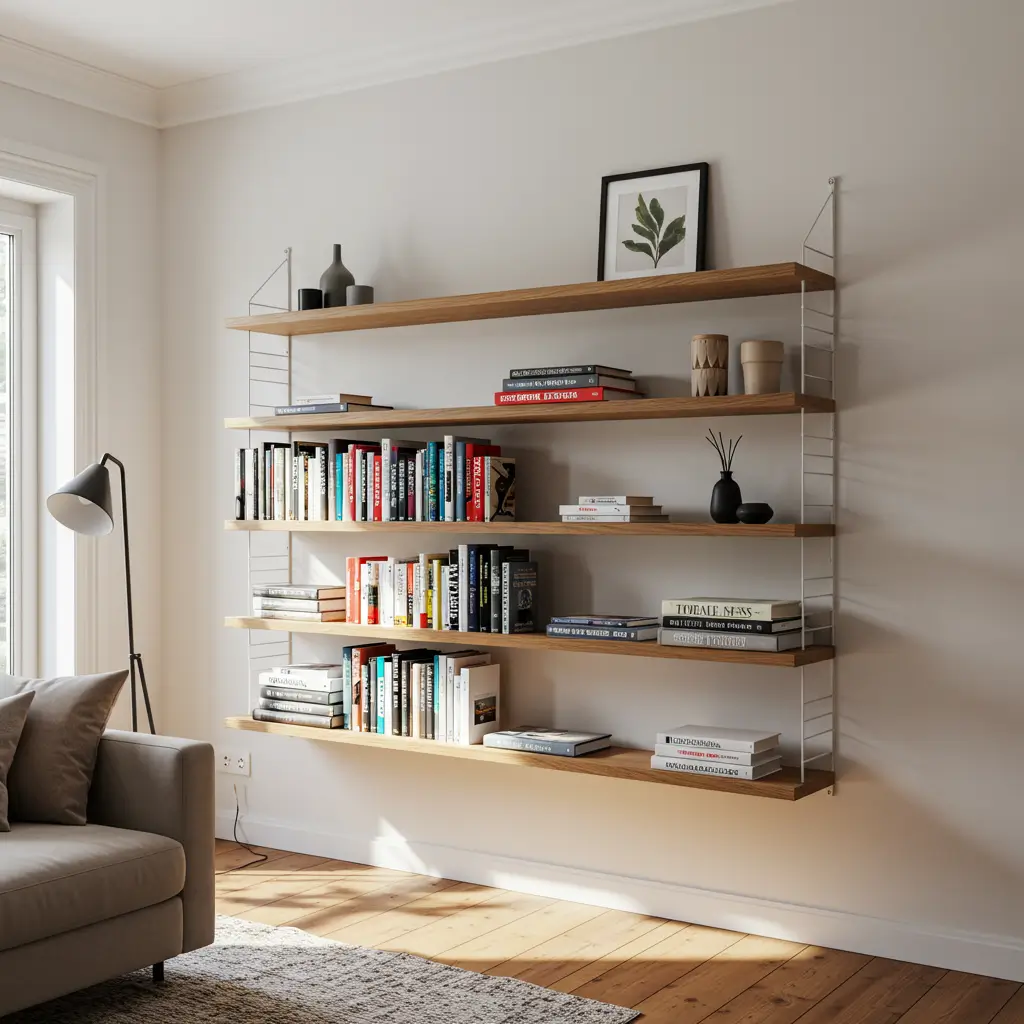
I firmly believe that the floor is lava when you inhabit a small room. Every inch of floor space you occupy with heavy furniture makes the room feel like it’s closing in on you. That is why I absolutely swear by the DIY floating wall bookshelf. When you remove the bulky frame of a traditional bookcase, you open up the “visual floor,” which tricks your brain into thinking the room is much larger than it actually is.
Why You Should Ditch the Frame
A floating shelf mounts directly to your wall studs. I installed three reclaimed wood shelves in my living room last summer. This single move freed up about 40% of my floor space. Now, my book collection looks like it’s magically suspended in mid-air. It feels much lighter and more modern than a heavy oak bookcase.
Essential Materials for Your Floating Library
- Sturdy wood planks: I recommend 2x10s for a substantial look.
- Heavy-duty floating shelf brackets: Don’t cheap out on these!
- A stud finder: This is non-negotiable. Books are heavy.
- A level: A crooked bookshelf will haunt your dreams.
- Wood stain or paint: Customize the look to match your room.
Does your current bookshelf feel like a magnet for random junk? A floating shelf forces you to stay organized because it lacks deep “junk drawers.” You only keep what you need, and that, my friend, is the secret to a clear mind.
The “Invisible” Bookshelf Trick
For a truly magical look, try the “invisible” bookshelf. These are small, L-shaped metal shelves that you screw into the wall. You place the bottom book over the shelf, and it looks like your books are literally floating without any support. It’s a great conversation starter and perfect for a small, curated collection.
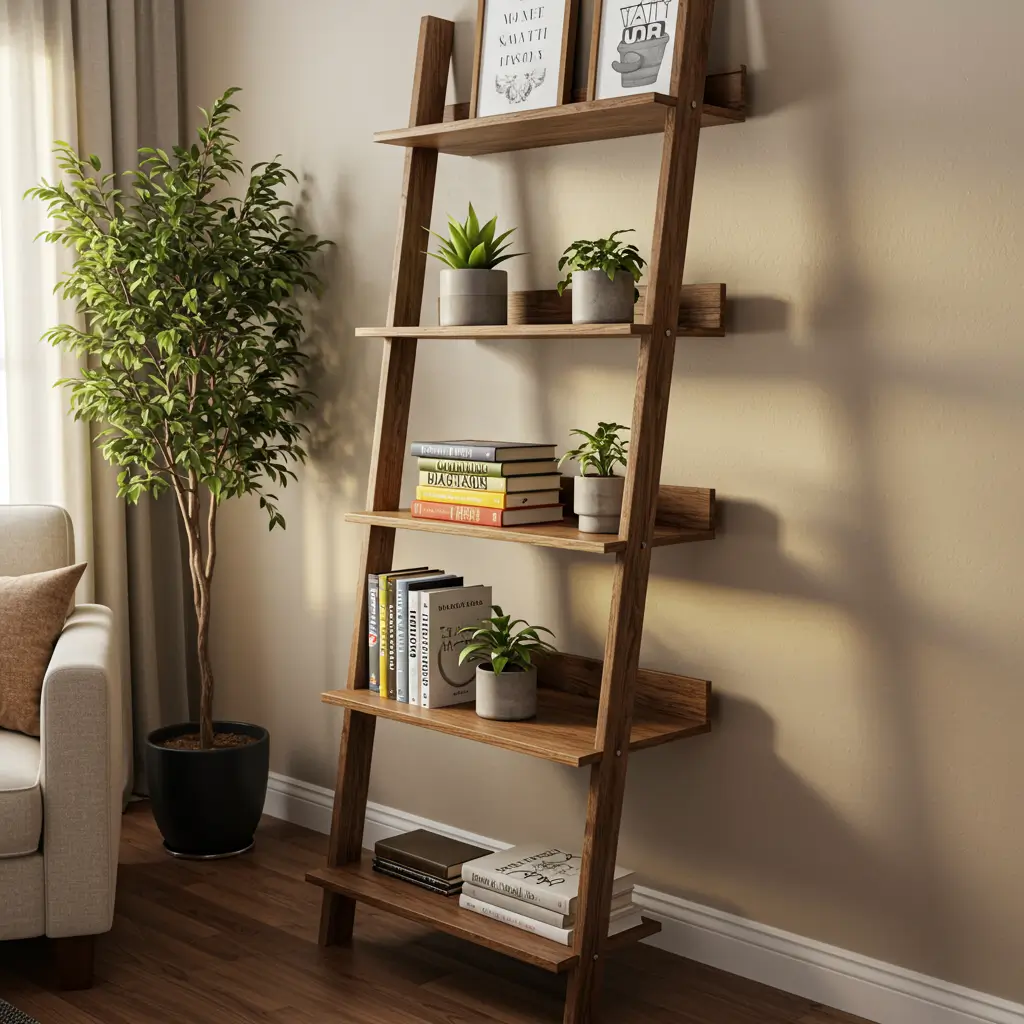
2. Ladder-Style Bookshelf
A ladder-style bookshelf is the perfect solution for people who hate the “boxy” look of a traditional bookcase. These shelves lean against the wall and have a tapered design, with the shelves getting narrower as they go up. This creates an open, airy feel that works beautifully in small spaces.
The “Leaning Tower” Advantage
I love a ladder shelf because it has a very small footprint but provides a surprising amount of storage. It draws the eye upward, making your ceilings feel taller. I built one for my bathroom to hold towels and toiletries, but they work just as well for books.
How to Build Your Own
- Cut two long pieces of wood for the side supports at a slight angle.
- Cut your shelves in decreasing lengths (e.g., 24″, 20″, 16″, 12″).
- Use a Kreg jig to create pocket holes for a clean, professional look.
- Assemble the shelves with wood glue and screws.
- Sand and finish with a paint or stain of your choice.
Ever wondered why this works so well? The angled design creates a sense of movement that a standard vertical bookcase lacks. It feels more dynamic and less “stuck” in place. Ladder shelves are a great compromise between open floating shelves and a traditional bookcase. I recommend you always secure the top of the shelf to the wall with a small bracket to prevent tipping, especially if you have kids or pets.
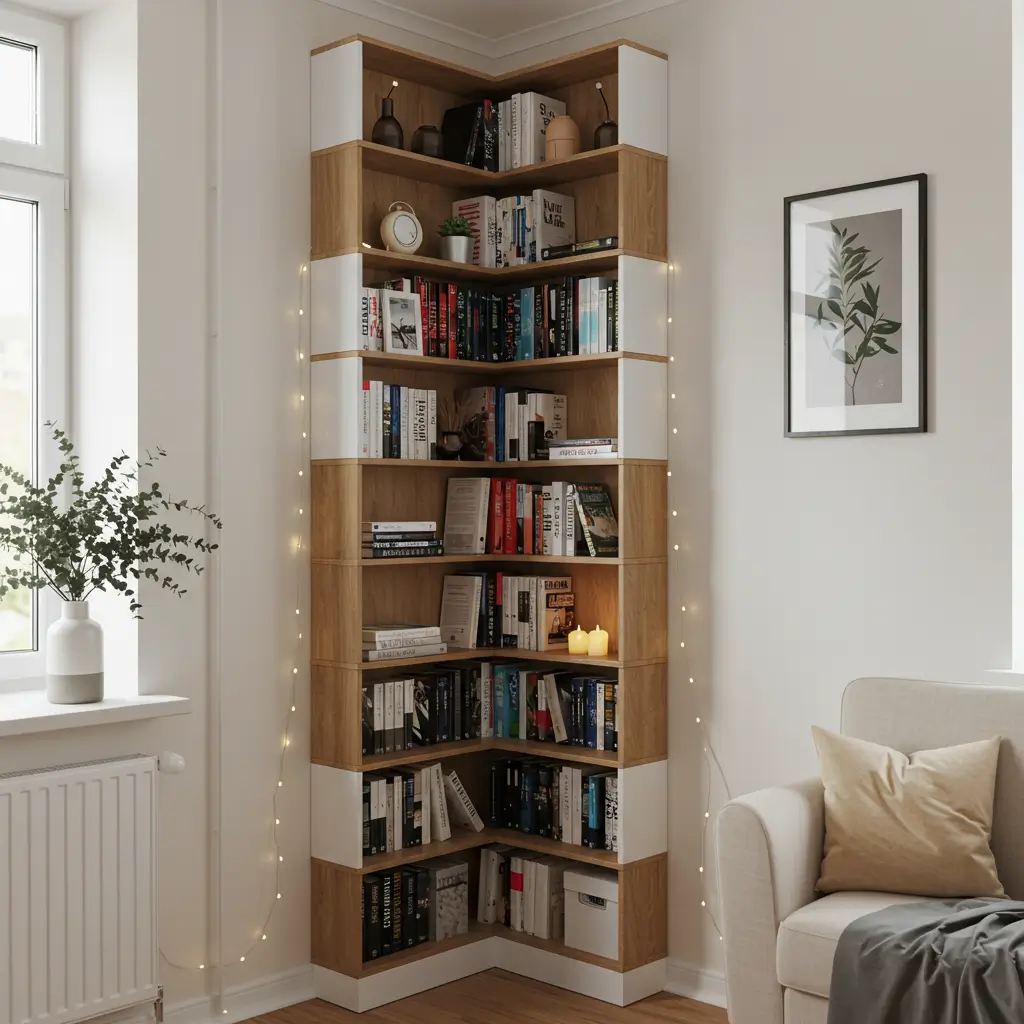
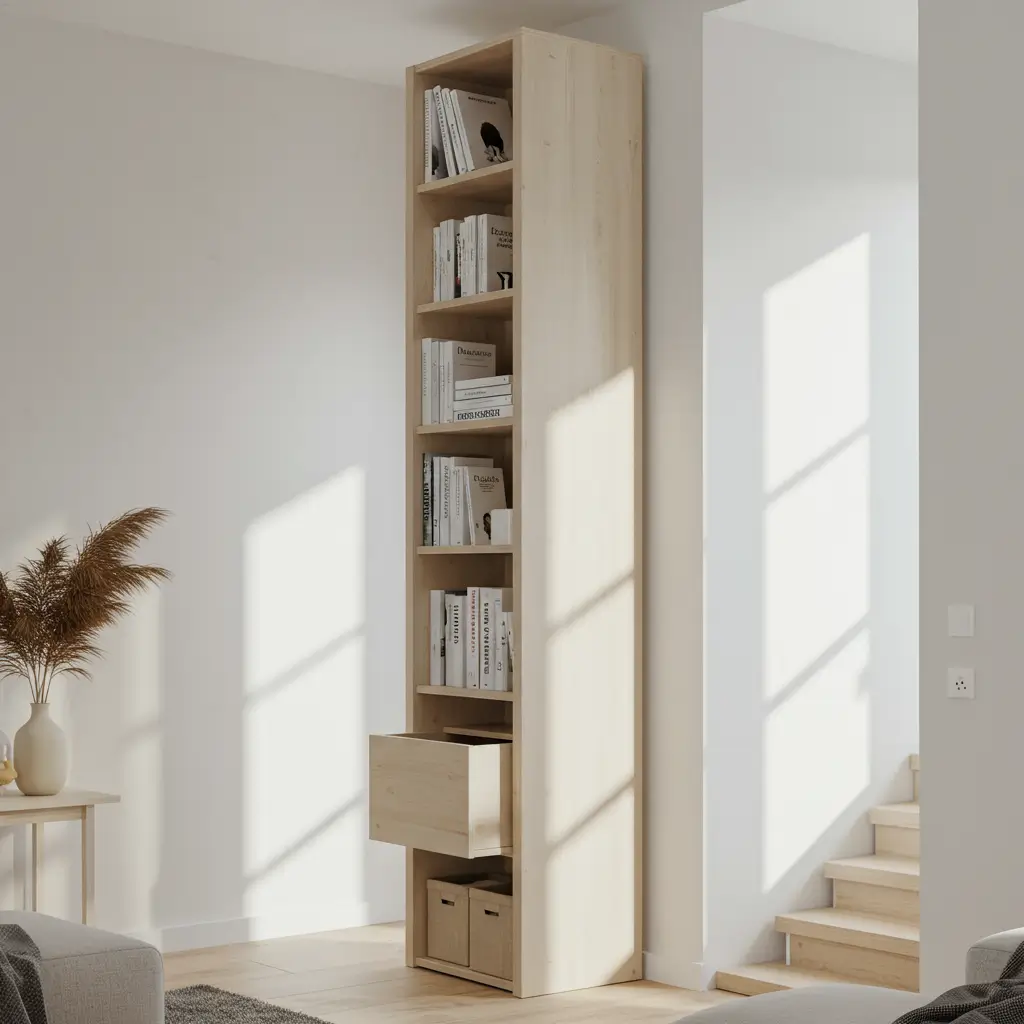
3. Corner Nook Bookshelf
Ever looked at that weird corner behind your door or next to the window and thought, “What a waste of space”? Most people ignore corners, but in a small room, corners represent prime real estate. A DIY corner nook bookshelf allows you to tuck your library away from the main traffic flow of your home.
The Zig-Zag Corner Shelf
I love this design because it’s so simple. You just cut a few square pieces of wood in half diagonally to create triangles. You then mount these triangles into the corner, alternating which wall you attach the long edge to. This creates a “zig-zag” or “floating spine” effect that looks incredibly modern.
Materials You’ll Need
- A square piece of plywood or MDF (you can get multiple shelves from one piece).
- Small L-brackets to mount the shelves to the wall.
- A saw to cut the squares into triangles.
- A level to ensure your shelves are perfectly horizontal.
IMO, the corner bookshelf is the ultimate “introvert’s dream.” It feels like a little literary hideaway. Just make sure you don’t pile too many things in the corner, or it will start to feel like a cave rather than a nook. 🙂
The Quarter-Circle Shelf
For a softer look, you can cut quarter-circles instead of triangles. This creates a curved, wrap-around shelf that feels very elegant. I once built a floor-to-ceiling corner shelf using this method, and it became the most interesting architectural feature in the room.
Also Read: 10 Gorgeous Bookshelf Decor Ideas to Transform Your Space
4. Crate Stack Bookshelf
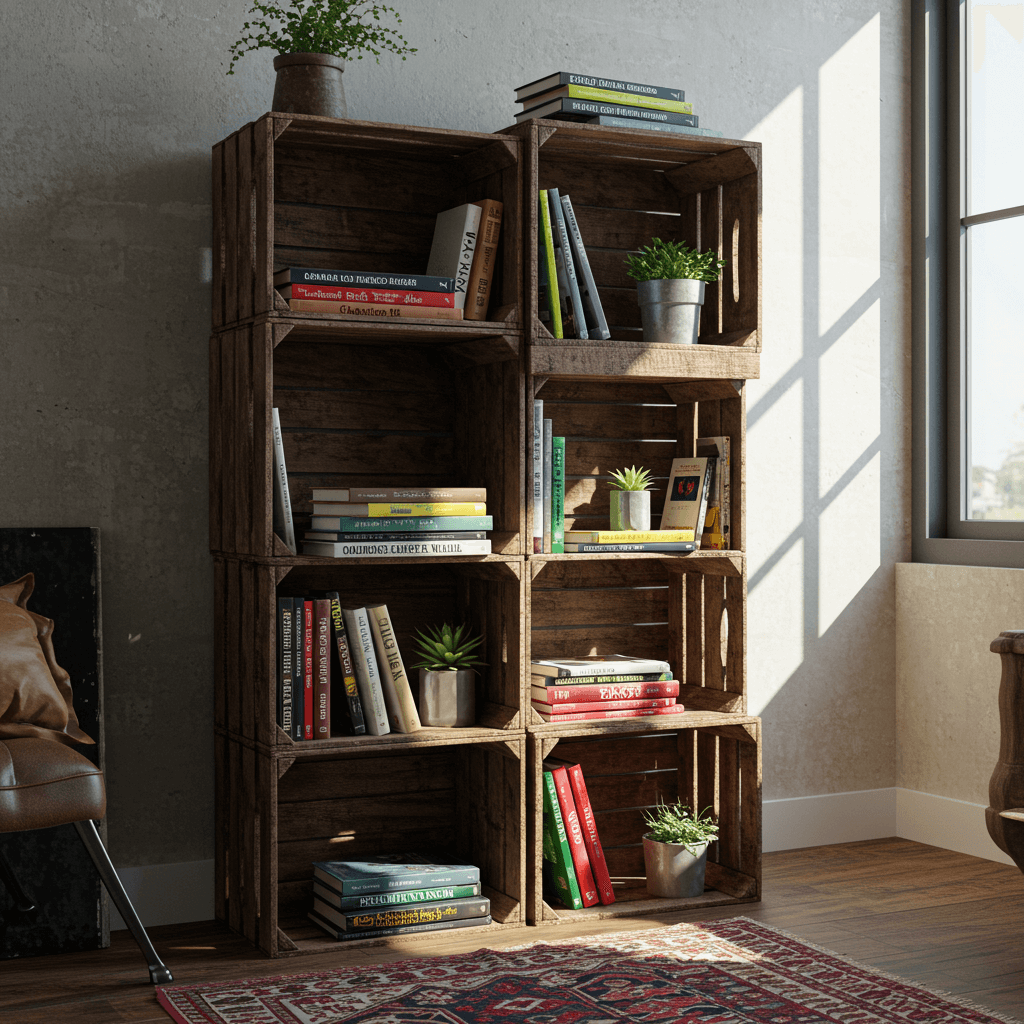
If you crave the warmth of a cozy cabin or an old-world library, DIY crate stack bookshelves are your answer. This project allows you to create a custom piece with more character than anything you can buy in a store. Plus, it’s incredibly budget-friendly.
The “Crate and Barrel” Look on a Budget
I recommend sourcing old wooden wine or apple crates from flea markets or antique stores. You can stack them in various configurations to create a modular, rustic shelving unit. I once built a 6-foot-tall bookshelf using six old crates, and it cost me a grand total of $30.
How to Build Your Crate Masterpiece
- Sand the crates thoroughly to remove splinters and rough edges.
- Apply a dark wood stain to bring out the grain and give them a uniform look.
- Arrange the crates in an interesting pattern—some vertical, some horizontal.
- Secure the crates to each other with small screws or wood glue for stability.
- Mount the entire unit to the wall with L-brackets to prevent it from tipping over.
Styling Your Crate Shelves
I love the “shadow box” effect that crates provide. You can place your most beautiful books or objects in their own little “frame.” I suggest painting the inside of one or two crates a contrasting color for a pop of visual interest. Rustic wooden crate shelves celebrate imperfection and a “found object” aesthetic.
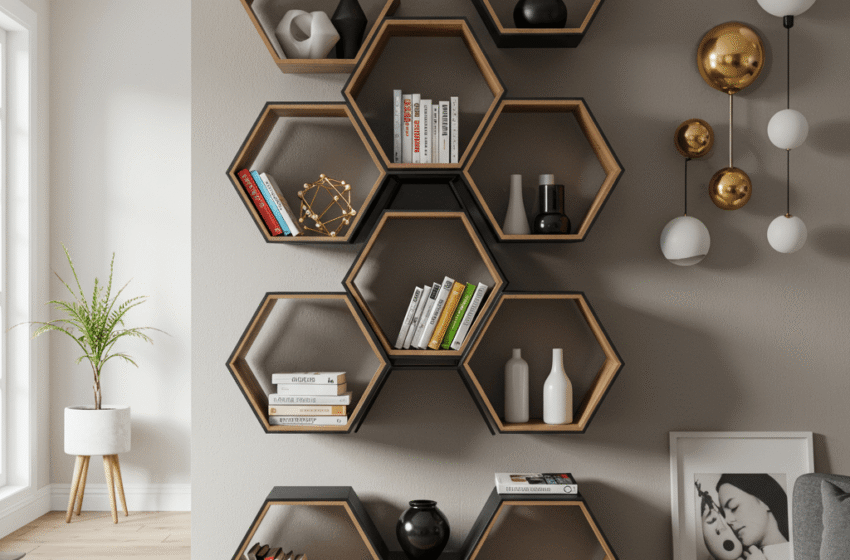
5. Geometric Shape Bookshelf
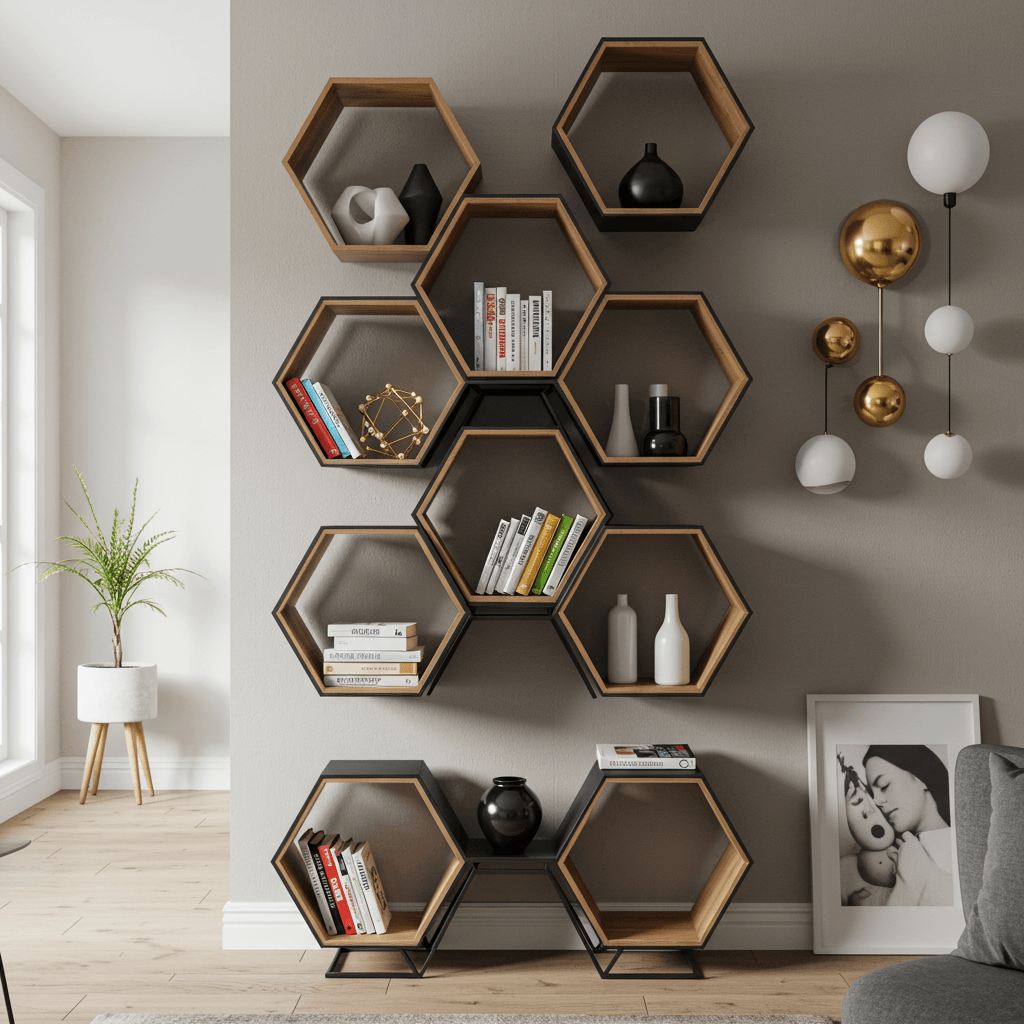
If you love clean lines and a high-end, architectural look, a DIY geometric shape bookshelf is for you. This approach uses bold shapes to turn your bookshelf into a piece of modern art.
The Honeycomb Shelf
I recommend building a series of hexagonal boxes that you can arrange on your wall in a honeycomb pattern. This looks incredibly complex, but it’s actually just six pieces of wood cut at a 30-degree angle and joined together.
How to Build Your Hexagons
- Cut six identical pieces of wood with a 30-degree miter cut on each end.
- Use wood glue and a brad nailer to join the pieces into a hexagon.
- Sand and finish with a light wood stain or a bold paint color.
- Arrange the hexagons on the wall in a pattern that pleases you.
- Secure them to the wall and to each other for stability.
Rhetorical question: Why settle for a boring rectangle when you can have a beehive of books? I love this feature because it’s modular. You can start with three hexagons and add more as your book collection grows.
The Triangle Mountain Shelf
For a simpler project, you can build a large triangle shape that looks like a mountain peak. It’s a great way to display a small, curated collection of books and objects. Geometric bookshelves value form over function, so they are best for displaying your most beautiful items rather than your entire library.
6. Reclaimed Wood Bookshelf
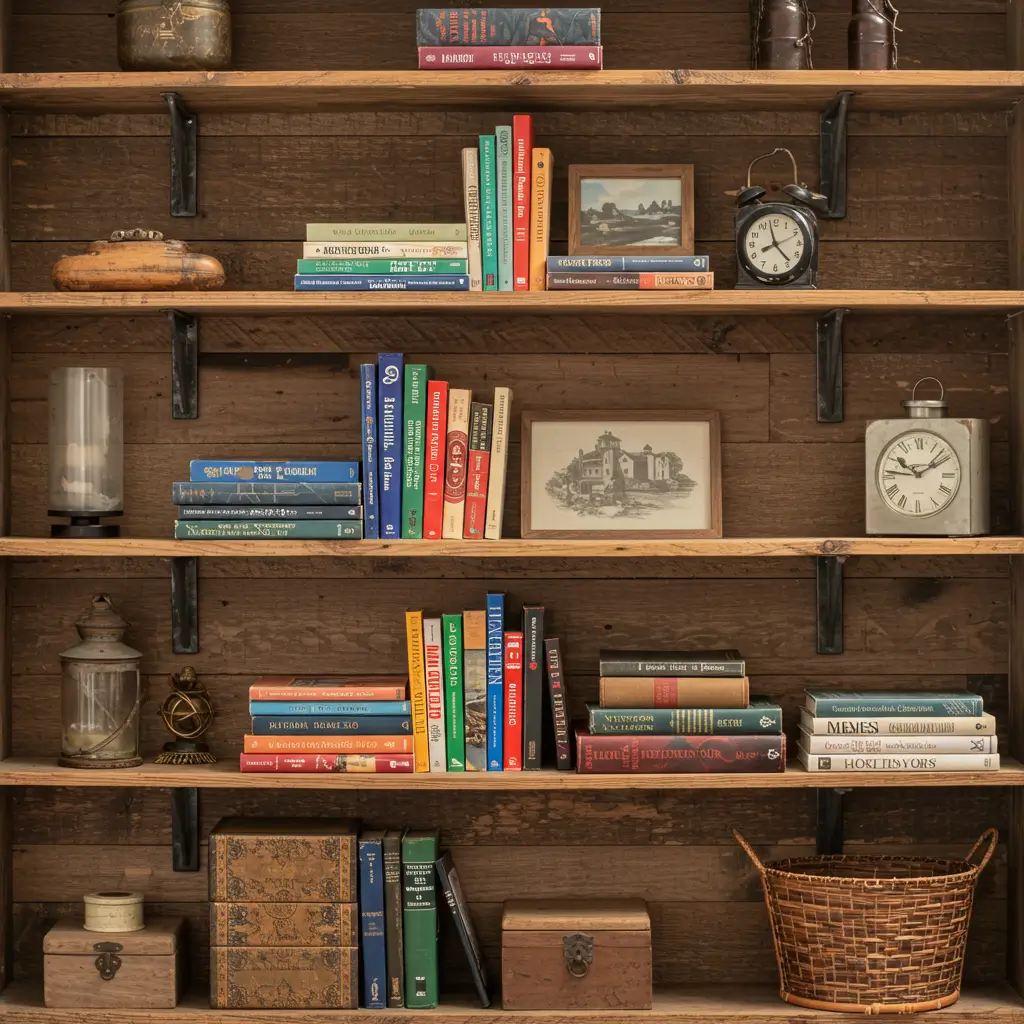
There’s something about reclaimed wood that brings a sense of history and soul to a room. A DIY reclaimed wood bookshelf uses timber salvaged from old barns, factories, or pallets to create a piece with a story.
Finding Your “Gold”
I recommend looking for reclaimed wood at:
- Architectural salvage yards.
- Local sawmills.
- Online marketplaces (be careful with shipping costs).
- Pallets from local businesses (always ask first!).
The “Live-Edge” Look
If you can find a slab of wood with a “live edge”—the natural, uncut edge of the tree—you have the makings of a stunning floating shelf. Just sand it, seal it, and mount it with heavy-duty brackets. The organic shape provides a beautiful contrast to the straight lines of books.
Preserving the Character
When you work with reclaimed wood, you want to preserve its imperfections. Don’t sand away all the old nail holes or saw marks. These are the details that make the piece unique. I suggest a clear, matte sealant to protect the wood without making it look glossy and new.
FYI, always check reclaimed wood for insects before you bring it into your home. A good cleaning and a thorough inspection can save you a lot of headaches later.
Also Read: 12 Minimalist Bookshelf Design Ideas and Clean Decor Styles
7. Hidden Compartment Bookshelf
Let’s be honest: not all of our stuff is beautiful. We all have ugly textbooks, messy files, and random electronics that we need but don’t want to look at. A DIY hidden compartment bookshelf is the perfect solution. It’s like a mullet for your furniture: business in the back, party on the top.
The Faux Book Spine Box
I love this trick. You can buy pre-made boxes that look like a stack of vintage books. You can also make your own by gluing the spines of old, worthless books onto the front of a simple wooden box. This gives you a secret spot to hide your router, your spare keys, or your chocolate stash.
The Sliding Panel
For a more advanced project, you can build a bookshelf with a sliding panel or a hinged section. I once built a bookshelf where one of the vertical dividers was actually a hidden door that opened to reveal a small compartment. It’s the perfect place to store valuables or just surprise your guests.
Building a Hollow Shelf
This is a simpler version of the hidden compartment. You can build your floating shelves as hollow boxes rather than solid planks. This gives you a space to tuck away charging cables, backup hard drives, or other “ugly” tech essentials. A hidden compartment bookshelf allows you to maintain a curated look while still having access to your real-life clutter.
8. Hanging Rope Bookshelf
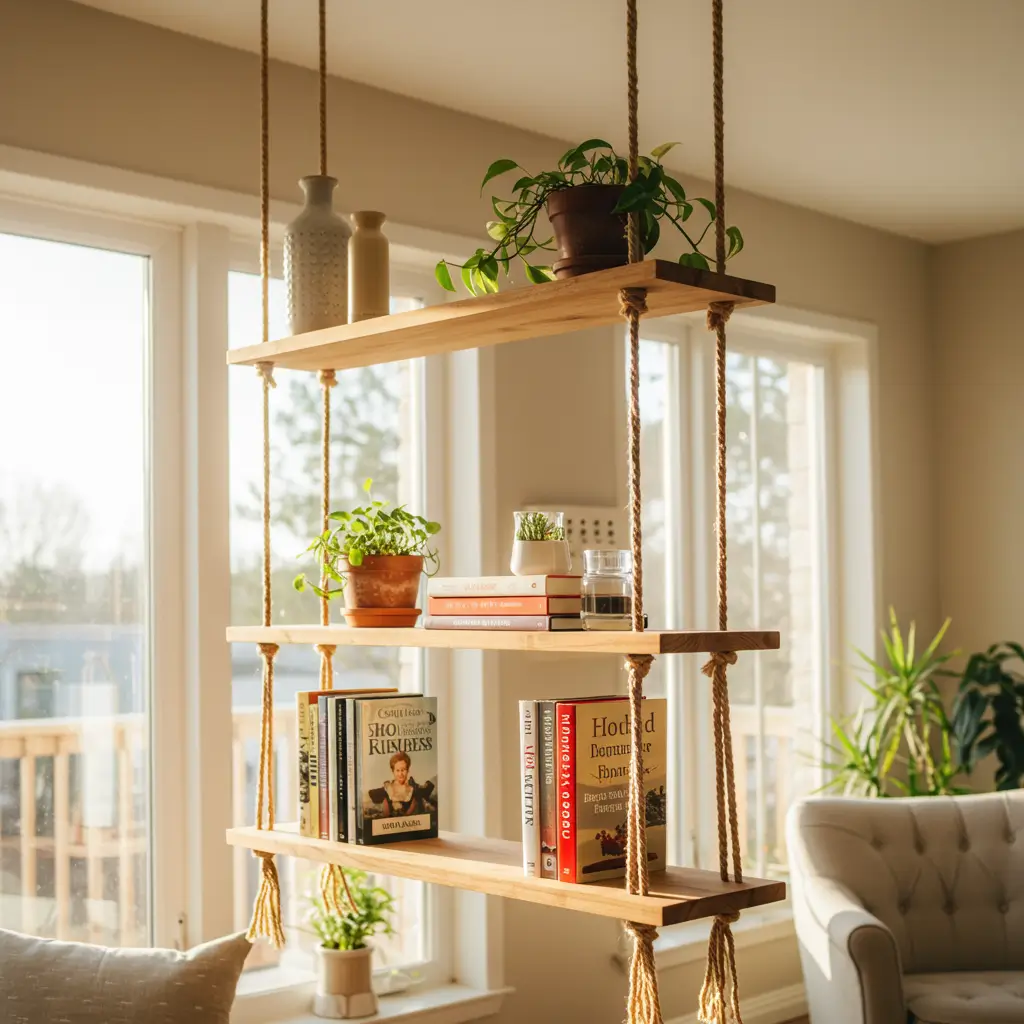
For the Boho-chic enthusiast, a DIY hanging rope bookshelf brings a soft, artistic, and handcrafted vibe to your book display. This project involves using macrame techniques or simple knots to create a hanger that supports one or two small wooden shelves.
The “Floating” Aesthetic
This project involves drilling holes into wooden planks and threading thick cotton or jute rope through them. You then hang the entire assembly from two sturdy ceiling hooks. It looks incredibly artistic and adds a “handcrafted” vibe to the room. Natural textures lower your stress levels during intense study sessions.
Construction Tips
- Choose a thick, sturdy rope like 1/2 inch cotton or manila.
- Tie uniform knots under each shelf to keep them level.
- Sand the edges of your wood to prevent splinters.
- Mount the top hook into a ceiling joist. Books are heavy, and you don’t want it to fail!
- Keep the weight balanced. This style is best for a few special books, not your entire collection.
I once built one of these for my bedroom, and it became the most-commented-on piece in my house. It’s perfect for showing off your plant collection or your favorite poetry books. Hanging rope shelves add vertical interest without “eating” the room’s visual space.
9. Modular Cube Bookshelf
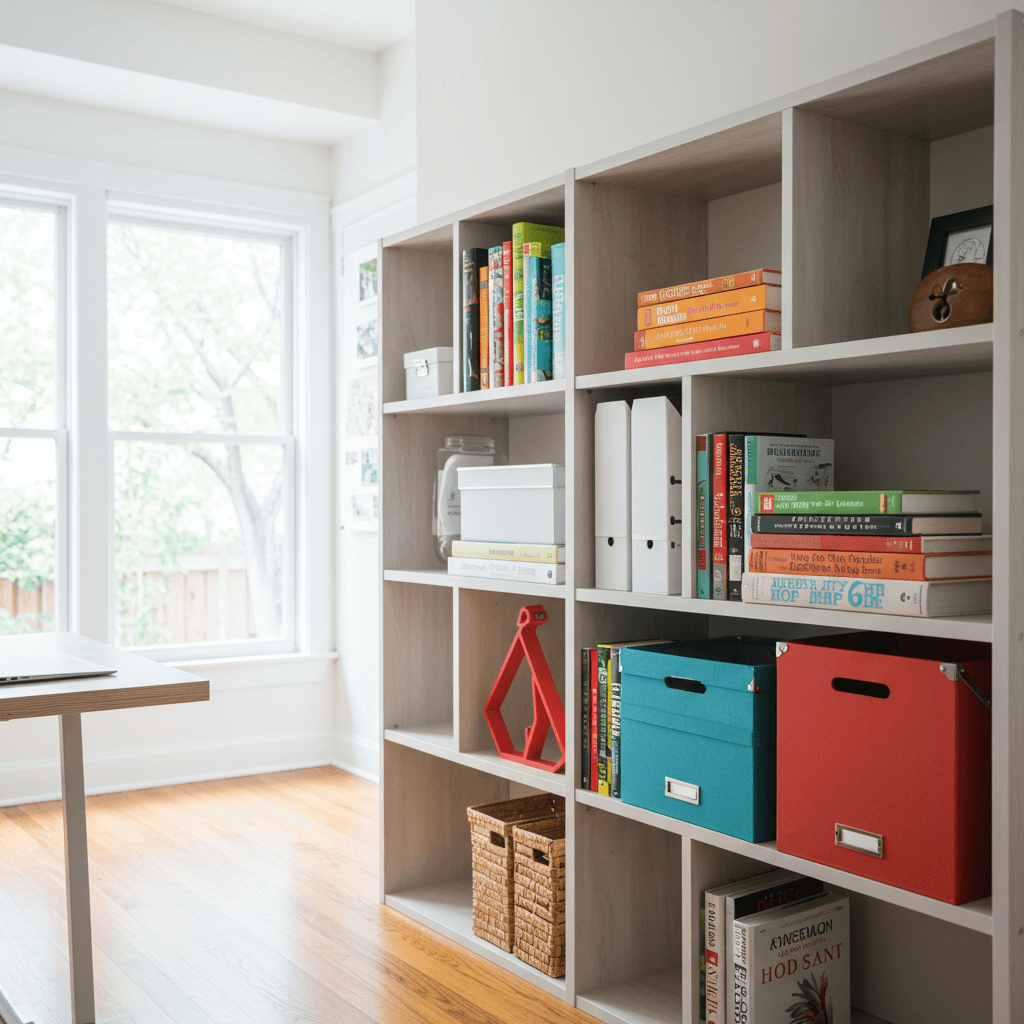
If your needs are constantly changing, a DIY modular cube bookshelf offers the ultimate flexibility. This project involves building a series of simple wooden or plywood cubes that you can stack and rearrange in endless configurations.
The Building Blocks of Design
I recommend building your cubes in a standard size, like 12×12 or 15×15 inches. This allows them to fit standard fabric bins and ensures they stack neatly. You can leave some cubes open for books and add doors or backing to others for hidden storage.
The Power of Customization
- Paint each cube a different color for a playful, eclectic look.
- Add caster wheels to the bottom cubes to create a mobile unit.
- Arrange them in a pyramid shape or a staggered, asymmetrical layout.
- Use them as a room divider in a studio apartment.
- Build a desk surface that rests on two stacks of cubes.
I love this feature because it grows with you. You can start with six cubes in a small apartment and then build more as your collection and your space expand. Modular design is the ultimate commitment-free furniture.
Also Read: 12 Inspiring Bookshelf Ideas and Modern Display Tricks
10. Staircase-Inspired Bookshelf
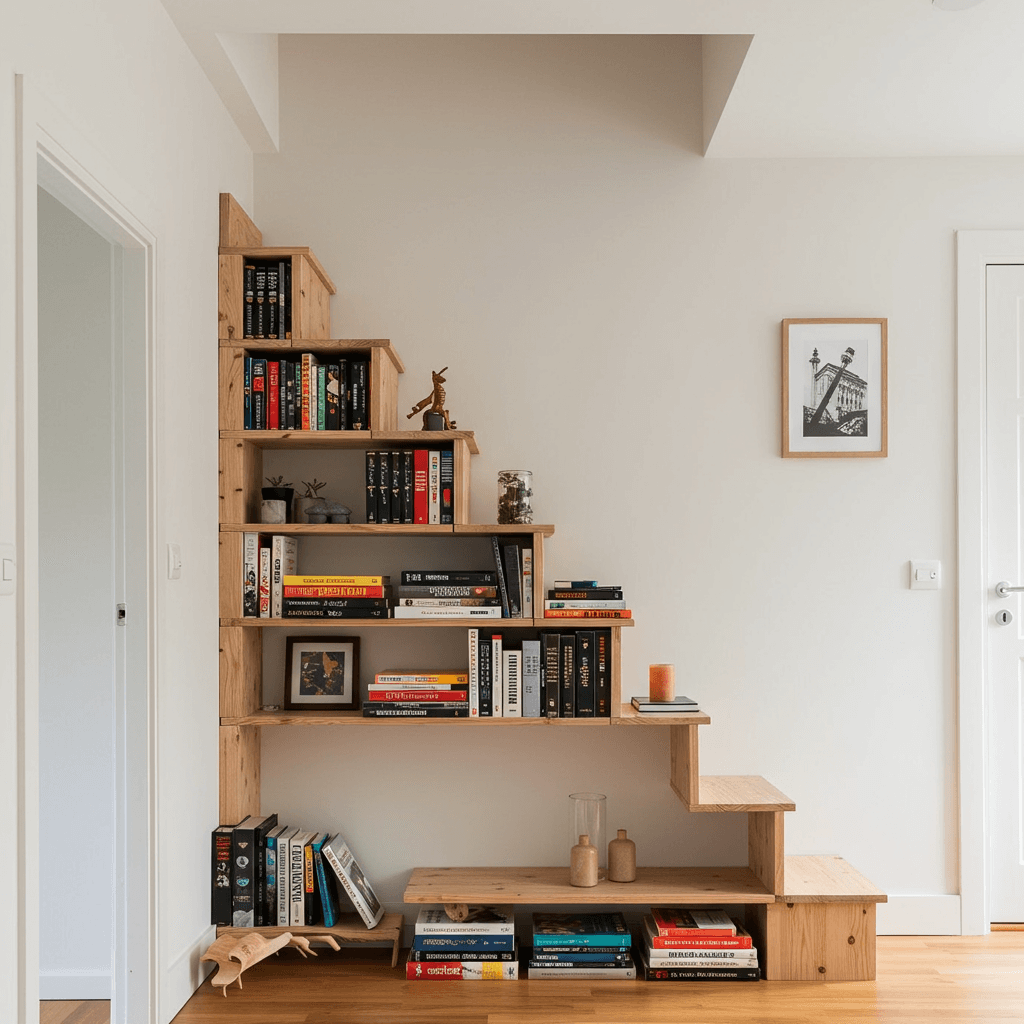
A staircase-inspired bookshelf is a more sophisticated version of the ladder shelf. It features a series of boxes or shelves that ascend like a set of stairs. It’s a dynamic, architectural design that makes a major statement.
The “Step-Up” Design
You can build this by creating a series of cubes of different heights and arranging them in ascending order. Alternatively, you can build a single unit with staggered, step-like shelves. I once saw a design where the “steps” were actually hollow and served as hidden storage drawers. Genius.
Why This Design Works
- Creates a sense of movement and energy.
- Draws the eye upward, making the room feel taller.
- Provides display surfaces of various sizes for different objects.
- Acts as a sculptural piece in its own right.
Combining with a Real Staircase
If you have a staircase in your home, you can build a bookshelf directly into the wall underneath it. This turns a typically wasted triangular space into a beautiful and functional library. IMO, this is one of the smartest and most impressive DIY projects you can tackle.
Technical Details: The “Boring” Stuff That Matters
Before you start cutting wood, you need to consider the “boring” technical specs. These details ensure that your DIY bookshelf is actually safe and functional, not just pretty.
Weight Loads
Books are incredibly heavy. A standard shelf full of hardcovers can easily weigh 50-75 pounds. Always use sturdy materials (at least 3/4 inch thick wood) and heavy-duty hardware. When in doubt, add an extra bracket.
Wall Mounting Safety
I cannot stress this enough: always mount your bookshelf to the wall. A freestanding, top-heavy bookshelf is a major tipping hazard, especially if you have children or pets. Use L-brackets or furniture straps to secure it to the wall studs.
Finishing for Durability
Don’t skip the final sealing step. I recommend at least two coats of polyurethane or a similar topcoat. This protects the wood from water rings, scratches, and dust. A matte or satin finish looks more modern than a high-gloss one.
Frequently Asked Questions
What is the cheapest way to build a DIY bookshelf?
I recommend the Rustic Wooden Crate or the Industrial Pipe & Wood designs. You can often find crates and pipes for very cheap or even free.
What tools do I absolutely need to get started?
At a minimum, you’ll need a saw, a drill, a level, a measuring tape, and sandpaper. A Kreg jig for pocket holes is a great investment if you plan on doing more projects.
How do I make my DIY bookshelf look professional?
The secret is in the finishing. Sand everything meticulously, use wood filler to hide your screw holes, apply multiple thin coats of paint or stain, and always use a level.
My Personal DIY Journey
I want to leave you with a quick story. Three years ago, I couldn’t find a bookshelf that fit the awkward, narrow wall in my living room. Everything was either too wide or too shallow. I was so frustrated.
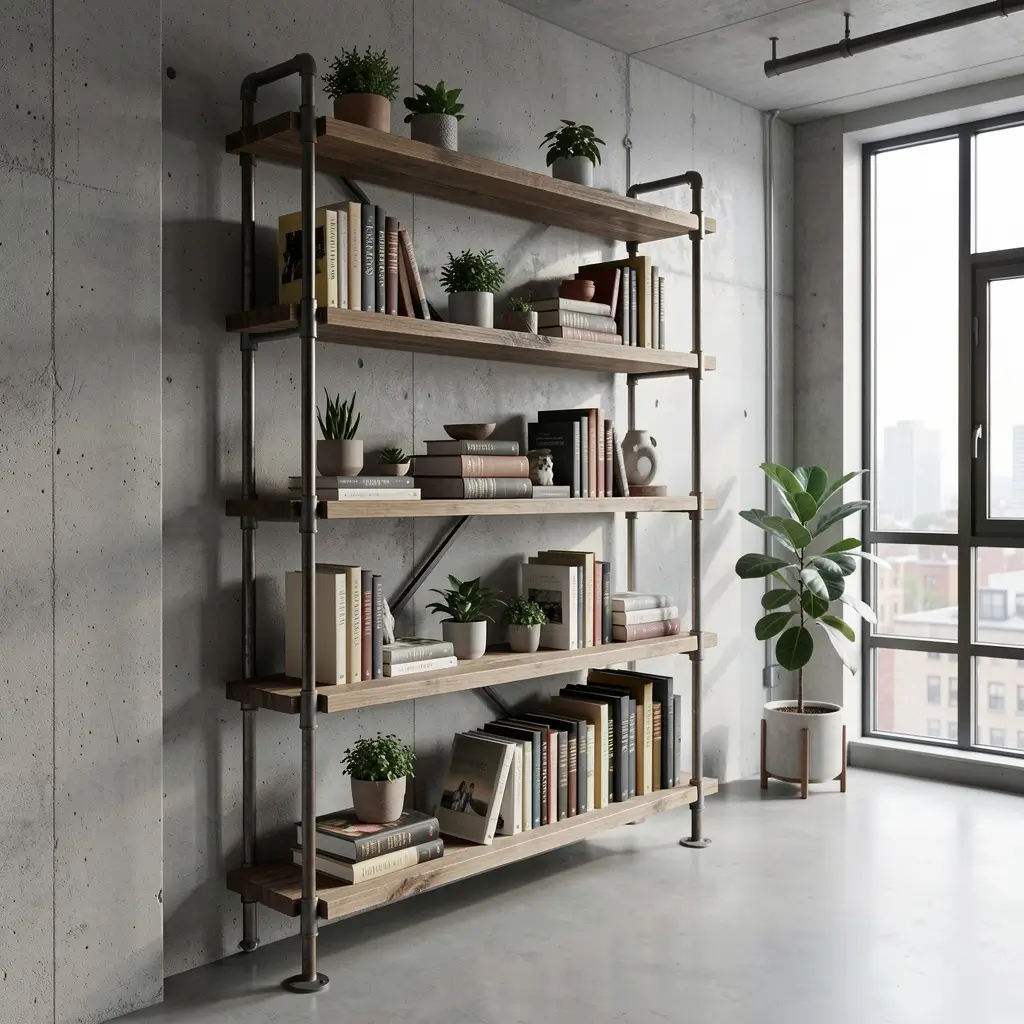
I finally decided to build my own Industrial Pipe & Wood shelf. I had never worked with pipes before, and I made about a million mistakes. My first attempt was crooked, and I had to take it all apart. But I kept at it. When I finally mounted the finished piece, I felt an incredible sense of pride. It fit the space perfectly, it held all my books, and I made it. That experience is why I’m so passionate about these 10 DIY bookshelf ideas. Building your own furniture connects you to your home in a way that shopping never can.
Final Thoughts: Build Your Story
You don’t need a massive workshop or years of experience to create a beautiful, functional bookshelf.
The key to these 10 DIY bookshelf ideas involves starting with a clear plan, taking your time, and embracing the small imperfections that make handmade pieces unique.
Start small. Maybe build a simple floating shelf or assemble a few crates. You will be amazed at how much your confidence grows with each successful project.
Remember, your bookshelf should serve you, not the other way around. It should be a source of inspiration, a tool for organization, and a reflection of your unique personality.
Pick the idea that resonates most with your lifestyle and your skill level, and start creating your own personal library.
You deserve a space that makes you feel smart, creative, and inspired. Now, go grab a tape measure and start planning! Your dream bookshelf is only a few saw cuts away.
And seriously, measure twice—you’ll thank me later. :