10 Fun DIY Closet Organization Ideas and Affordable Home Projects
- Closet Organization
 Ben
Ben- 0
- 31 minutes read
My closet used to look like a discount store exploded in it. Clothes piled on the floor, shoes playing hide-and-seek, and that one belt that somehow ended up wrapped around three hangers like a confused snake.
Then my landlord announced a surprise inspection, and I had exactly 48 hours to make my closet look like an actual adult lived here.
That panic-driven weekend changed everything. I discovered that organizing a closet doesn’t require a trust fund or a degree in interior design – just some creativity, basic supplies from the dollar store, and maybe a hot glue gun you’re not afraid to use.
These ten DIY solutions cost me less than $100 total and transformed my disaster zone into something I’m actually proud to show off.
The best part? You probably have half the materials already lying around your house. Let’s turn that chaotic closet into an organized space without selling a kidney to pay for fancy organizing systems.
Budget-Friendly Hanging Shelf Dividers
You know those wire shelf dividers that cost $30+ at organizing stores? I made better ones for $3 using cardboard and contact paper. These DIY dividers turned my sweater avalanche into neat, accessible stacks that actually stay put when I grab something from the middle.
Here’s my secret: I used sturdy cardboard from Amazon boxes (we all have those, right?), covered them with marble-pattern contact paper from the dollar store, and created slots that slide right onto my closet shelves. They look intentional and expensive, but cost basically nothing. The whole project took maybe an hour while binge-watching Netflix.
The cardboard is surprisingly durable when you use the corrugated kind. I made mine 12 inches tall and 10 inches deep, perfect for separating sweaters, jeans, and T-shirts. Six months later, they’re still going strong and haven’t sagged once.
Making Your Own Shelf Dividers
Materials you’ll need:
- Thick cardboard (appliance boxes work great)
- Contact paper or wrapping paper
- Ruler and pencil for measuring
- Box cutter or scissors
- Hot glue for reinforcement
Cut a slot halfway up from the bottom, about an inch wide, to fit over your shelf. Make sure the slot is slightly wider than your shelf thickness. I learned this the hard way when my first attempt got stuck and ripped the contact paper.
Repurposed Shoe Boxes for Drawer Organization
Those shoe boxes you’re hoarding “just in case”? Time to put them to work. I transformed twelve shoe boxes into a complete drawer organization system that rivals those expensive acrylic organizers everyone’s obsessed with.
I covered each box with the same wrapping paper (leftover from last Christmas) to create a cohesive look. The uniform appearance tricks your brain into thinking it’s a planned system rather than repurposed trash. Smaller boxes hold socks and underwear, medium ones store belts and ties, and boot boxes became perfect homes for scarves.
The genius move was cutting some boxes down to different heights. This created a tiered effect in my drawers where I can see everything at once. No more digging through layers to find that one specific pair of socks.
Shoe Box Transformation Tips
Steps for success:
- Sort boxes by size before starting
- Cut boxes to varying heights (2-4 inches works best)
- Use double-sided tape instead of glue (less mess)
- Label the front edge if you’re feeling extra organized
Pro tip: Reinforce the corners with clear tape before covering with paper. This prevents the boxes from falling apart when you’re yanking out socks at 6 AM.
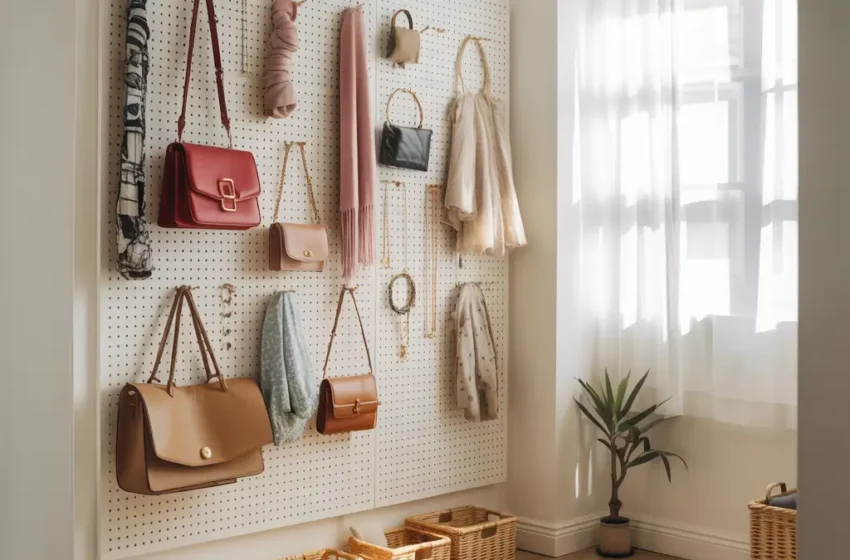
DIY Pegboard Closet Storage System
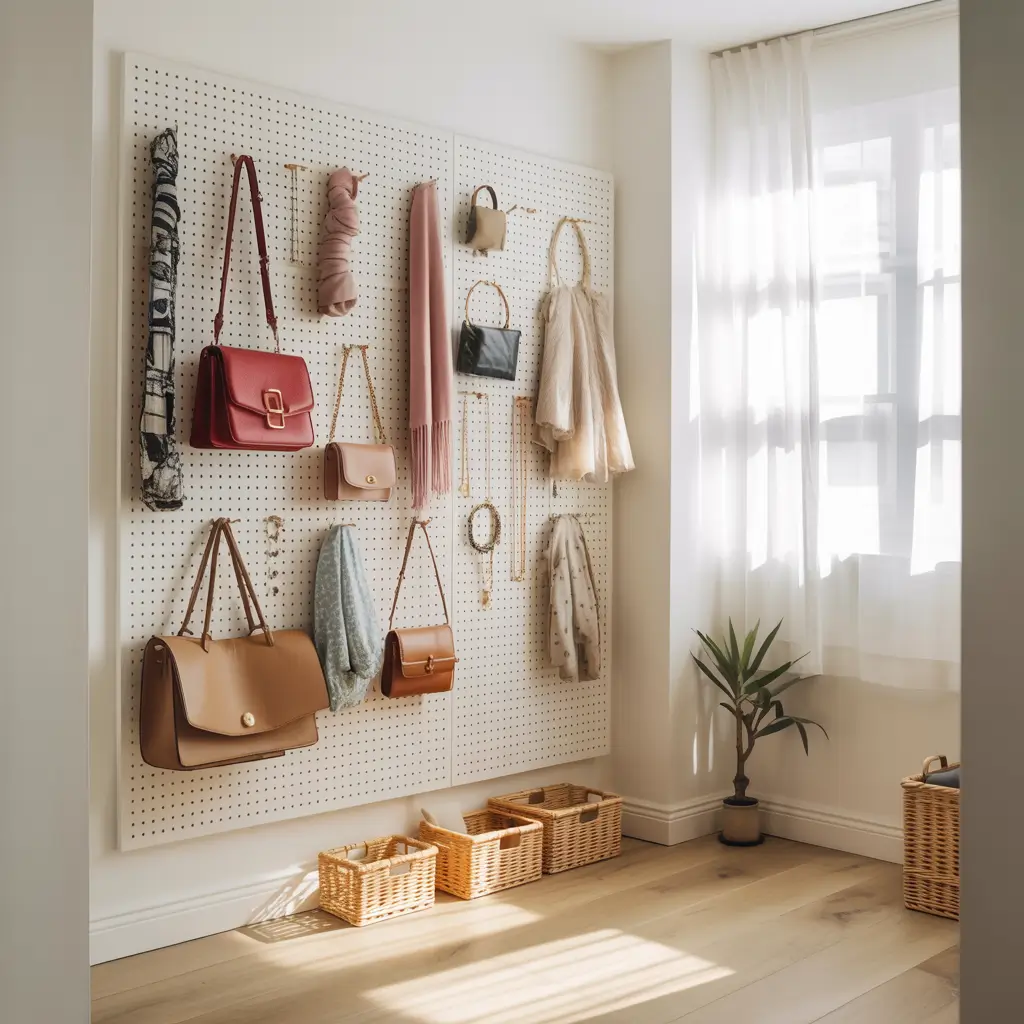
Pegboard isn’t just for garages anymore. I installed a 2×4 foot pegboard on my closet wall for under $20, and it became command central for accessories, bags, and random stuff that never had a proper home.
The hardware store cut the pegboard to size for free (always ask!). I painted it white to match my walls, though honestly, the natural brown looked pretty cool too. Installation required just four screws and some wall anchors – even I managed it without calling my dad for help.
What makes pegboard amazing for closets? The infinite customization. I rearrange hooks monthly based on what I’m wearing most. Summer means more hooks for sun hats and beach bags. Winter brings out the scarf hooks and beanie storage. The flexibility beats any fixed system.
Pegboard Installation Secrets
Essential pegboard knowledge:
- Leave 1-inch gap between board and wall (hooks need clearance)
- Use furring strips as spacers
- Start with variety pack hooks to experiment
- Add small baskets for tiny items
My favorite hack? I spray-painted some hooks gold for a fancy touch. Suddenly my $20 pegboard looks like something from a boutique.
Also Read: 12 Creative Utility Closet Organization Ideas and Storage Solutions
Tension Rod Accessories Organizer
Tension rods are the Swiss Army knife of closet organization. I use five of them throughout my closet, and they’ve solved problems I didn’t even know I had. Total cost? About $15 for all five rods.
The game-changer was installing a tension rod vertically in the corner for belts and scarves. They hang on shower curtain rings (12 for $1 at the dollar store), making each item visible and accessible. Another rod runs horizontally under a shelf, creating instant storage for tank tops and camisoles.
My favorite setup uses two parallel rods about 6 inches apart. I hang pants on one and coordinate the matching tops directly behind on the second rod. Outfit planning became ridiculously easy when everything’s already paired up.
Creative Tension Rod Uses
Unexpected places for tension rods:
- Between walls for additional hanging space
- Under shelves for lightweight items
- Across corners to create diagonal storage
- Multiple rods stacked for tiered storage
FYI, not all tension rods are created equal. The cheap ones bow under weight. Spend the extra $2 for ones with rubber ends – they grip better and won’t scratch your walls.
Upcycled Crate Shelving Units
Remember when wooden crates were trendy? I jumped on that bandwagon late but discovered they’re actually practical. Three wine crates from a local liquor store became floating shelves that hold everything from purses to folded jeans.
I sanded them lightly (splinters are not the vibe), stained two and painted one white for contrast. Mounting them was simple – two screws per crate into wall studs. The rustic look adds character, and people always ask where I bought them. The answer “literally from the dumpster behind the wine shop” usually gets interesting reactions.
The crates work especially well for items you want to display. My nice handbags finally have a home where I can see them instead of stuffed in a bin. The open sides mean everything stays ventilated too – no more musty smell!
Crate Shelving Success
Tips for crate organization:
- Sand all surfaces to prevent snags
- Seal the wood to prevent staining
- Mount at varying heights for visual interest
- Use crate dividers for smaller items
Mix orientations – some horizontal, some vertical – to create different storage options. I have one vertical crate divided into sections for clutches and wallets.
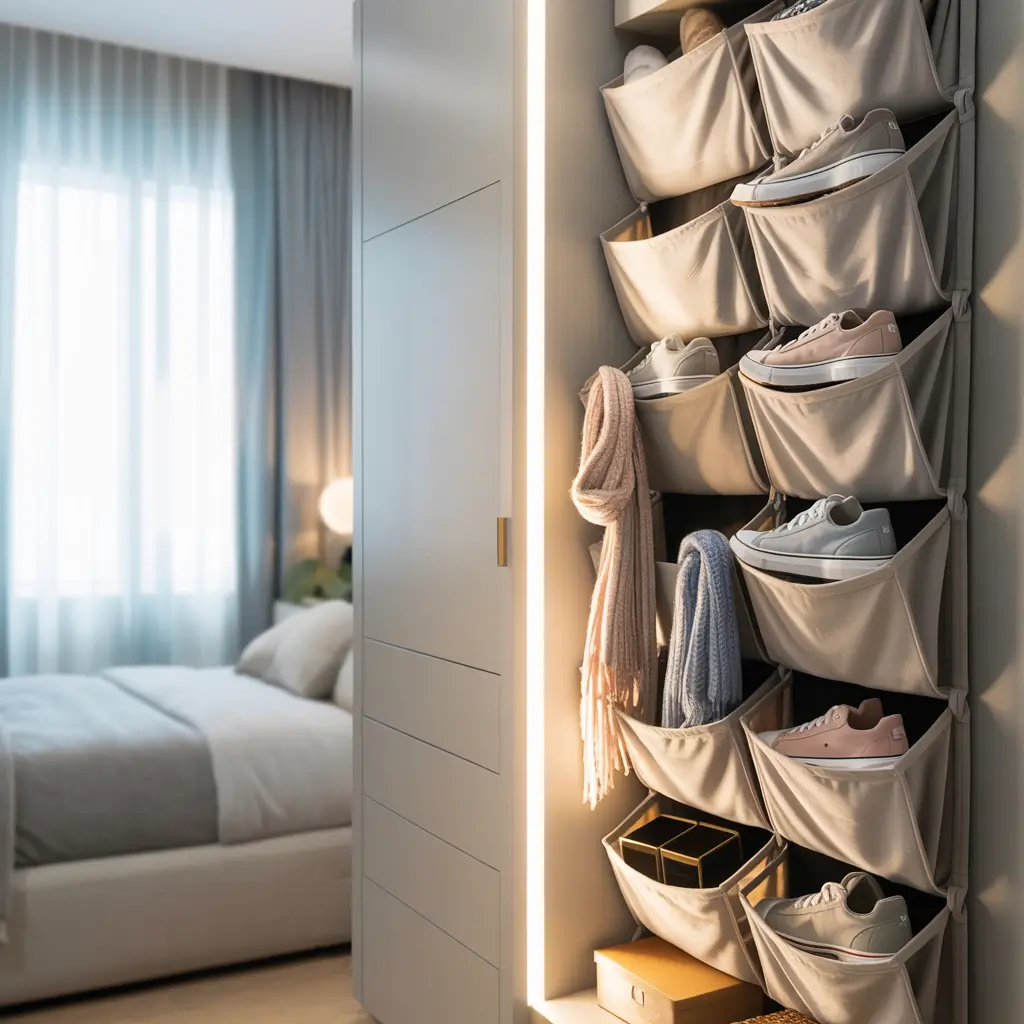
Hanging Basket Storage for Small Closets
When floor and shelf space run out, look up. I hung three wire baskets from my closet rod, and they became the perfect solution for accessories, workout clothes, and those awkward items that don’t fold or hang well.
The baskets cost $3 each at the thrift store. I spray-painted them matte black for a cohesive look, added S-hooks, and hung them at different heights. The tiered arrangement means I can access all three without removing any. Genius? Maybe not. Effective? Absolutely.
What really sells this system is using baskets with different depths. Shallow basket for accessories, medium for workout gear, deep one for bulky sweaters. Everything stays visible but contained, which is basically organization nirvana.
Hanging Basket Optimization
Making baskets work harder:
- Line with fabric to prevent small items falling through
- Label the front for quick identification
- Vary heights by 6-8 inches for easy access
- Choose coated wire to prevent rust
My unexpected discovery? These baskets work great for dirty laundry too. One basket = one load, so I know exactly when it’s time to do laundry. :/
Also Read: 10 Elegant Closet Organization Ideas Aesthetic Ideas That Wow
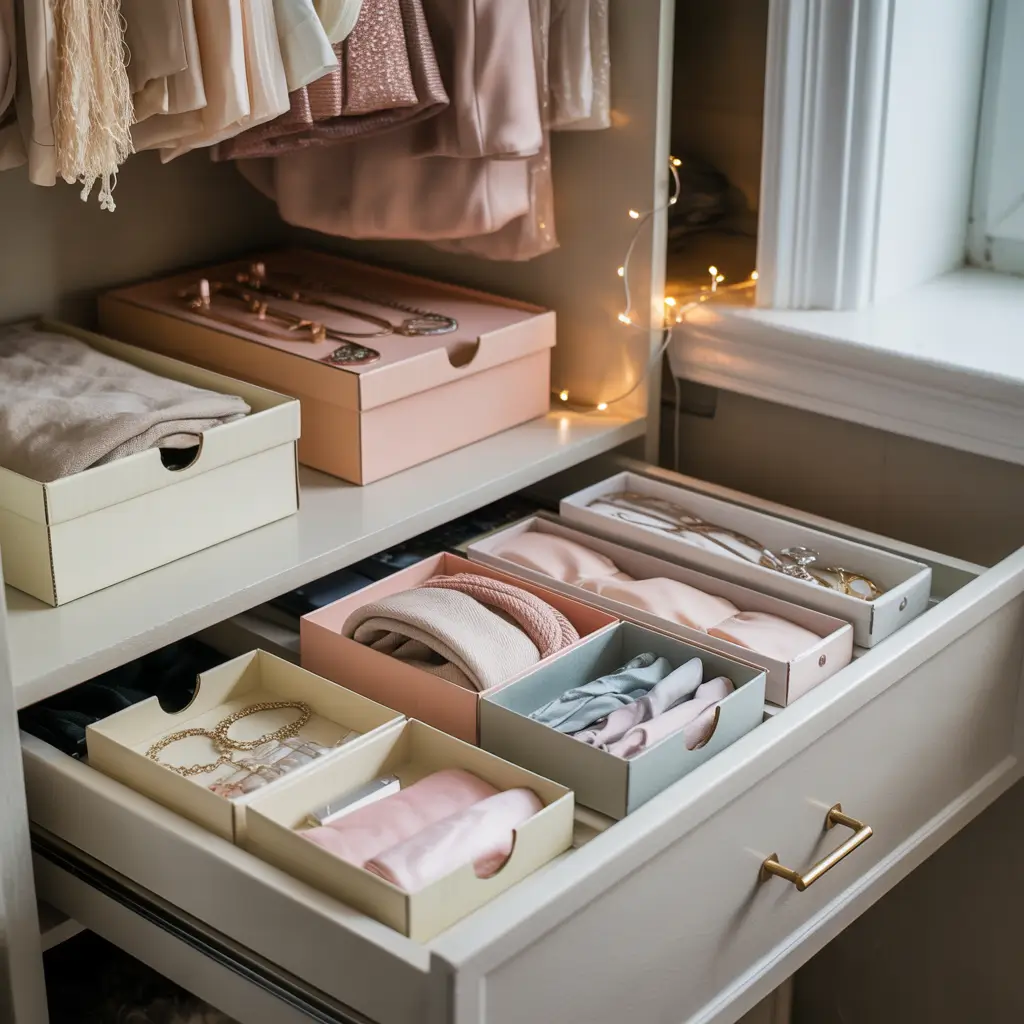
Affordable Clear Bin Labeling System
Clear bins are great, but you know what makes them amazing? A labeling system that actually makes sense. I created mine using a label maker I borrowed (okay, “permanently borrowed”) from work and some creative categorization.
Instead of boring labels like “winter clothes,” I use specific, actionable labels: “Cozy Saturday Sweaters,” “Interview Outfit Components,” “Clothes That Spark Joy But Never Fit Right.” The specificity helps me actually maintain the system because I know exactly what belongs where.
The bins themselves came from the dollar store – $1 for small, $3 for large. I have eight total, stacked on the top shelf. The clear sides mean I can verify contents without pulling everything down, and the silly labels make me smile every time I see them.
Label System Psychology
Why specific labels work better:
- Eliminates decision fatigue when putting things away
- Creates emotional connection to the organization
- Makes you actually think about what you’re keeping
- Adds personality to boring storage
IMO, funny labels are the secret to maintaining any system. “Jeans That Lie About Being Comfortable” is way more memorable than “Denim.”
Over-the-Door Multi-Pocket Organizer
That over-the-door shoe organizer gathering dust? It’s about to become your new favorite closet hack. Mine holds exactly zero shoes but organizes approximately one million other things perfectly.
I use clear pockets for accessories – each pocket holds a different category. Sunglasses in top row, watches and bracelets in the second, hair accessories in the third. The bottom rows store things like lint rollers, fashion tape, and those weird shoulder strap things that come with dresses.
The $10 organizer cleared an entire drawer and made getting ready faster. Everything’s visible immediately – no more dumping out boxes looking for that one specific bracelet. Plus, the clear pockets mean I actually remember what I own.
Alternative Pocket Storage Ideas
Creative pocket organizer uses:
- Makeup and toiletries overflow
- Craft supplies for DIY projects
- Tech accessories like chargers and cables
- Seasonal items like gloves and scarves
The key is keeping like with like. Mixed categories in pockets create visual chaos that defeats the purpose.
DIY Pull-Out Jewelry and Accessories Tray
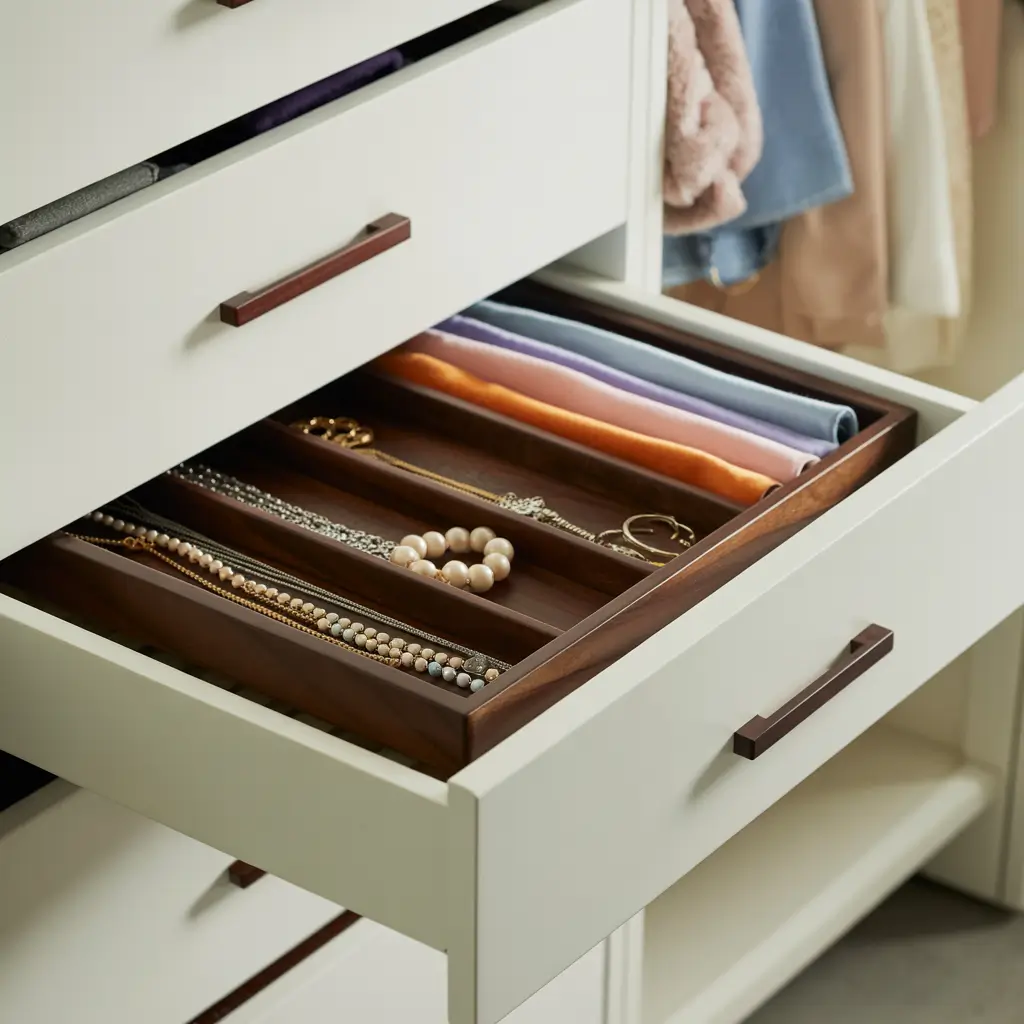
You don’t need custom closet drawers for pull-out storage. I created a sliding jewelry tray using a cookie sheet, drawer slides, and ice cube trays. Total cost: $12. Total time: 45 minutes.
The cookie sheet (dollar store) became the base. I attached drawer slides (hardware store, $8) to the sides and mounted them under a shelf. Ice cube trays and small boxes create compartments for different jewelry types. Everything pulls out smoothly, displays beautifully, and pushes back hidden when not in use.
The best part? I can lift the entire tray out for deep cleaning or rearranging. Try doing that with built-in drawers! The ice cube trays are perfect for earrings – each pair gets its own cube, no more tangled masses of hooks.
Pull-Out Tray Construction
Building your jewelry tray:
- Use a rimmed tray to prevent items sliding off
- Choose ball-bearing slides for smooth operation
- Mix compartment sizes for different jewelry
- Add felt lining to prevent scratches
Line everything with felt or velvet for that luxury jewelry box feel. I used adhesive felt sheets from the craft store – $3 for enough to line three trays.
Also Read: 10 Inspiring Linen Closet Organization Ideas for Every Closet
Minimalist Rolling Cart Closet Solution
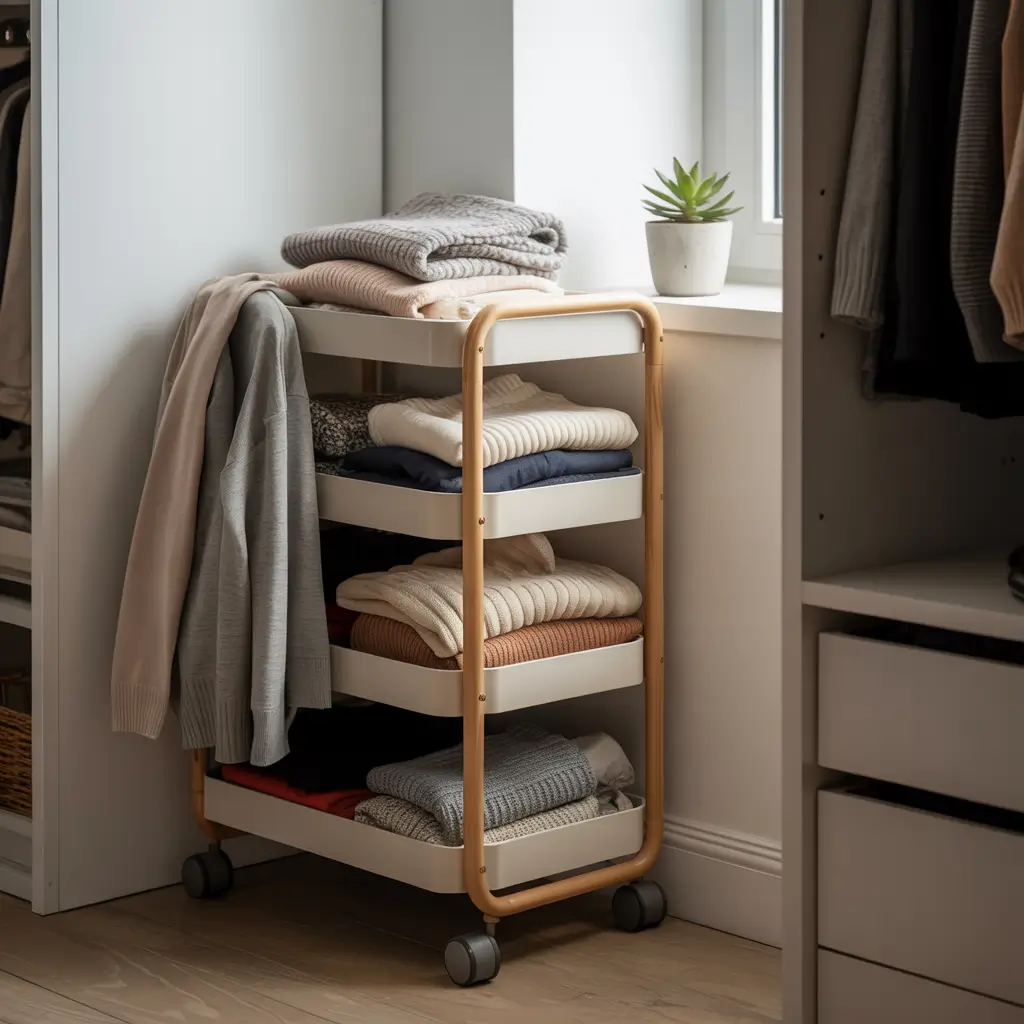
That IKEA rolling cart everyone uses for craft supplies? It’s a closet organization powerhouse. I wheel mine in and out as needed, and it’s become mobile storage for everything from shoes to gym gear.
The three-tier cart fits perfectly in the dead space beside my hanging clothes. Top tier holds everyday shoes, middle stores gym stuff, bottom contains bags and purses. The wheels mean I can pull it out completely for cleaning or rearranging. No more forgotten items in dark corners!
I spray-painted mine gold because why not? It cost $30 originally, but I’ve seen similar ones at discount stores for $20. The mobility factor alone makes it worth every penny. 🙂
Rolling Cart Optimization
Maximizing cart potential:
- Add adhesive hooks on sides for belts
- Use basket inserts for small items
- Install a wooden top for extra surface space
- Label each tier for designated purposes
The cart also works as temporary storage when reorganizing. Dump everything on it, clean the closet, then put things back properly. Game-changer for deep cleaning days.
The Real Talk About DIY Organization
Here’s what nobody tells you about DIY closet organization: the first attempt might look terrible. My initial shelf dividers were crooked disasters.
The first pegboard fell off the wall (turns out, you really do need those spacers). But each failure taught me something.
The beauty of DIY is you can adjust, improve, or completely start over without major investment. That expensive custom closet system? You’re stuck with it even if it doesn’t work.
My cardboard dividers? I can remake them in an afternoon if needed.
These ten ideas transformed my closet from embarrassment to efficiency for less than $100 total. Some projects took minutes, others a few hours, but none required special skills or tools.
If I can do this with my limited patience and even more limited budget, you absolutely can too.
Your closet doesn’t need to look like a Pinterest board or Instagram post. It needs to work for your life, your stuff, and your habits.
These DIY solutions do exactly that while saving money for things that actually matter – like clothes to fill that newly organized closet.
Start with one idea this weekend, and watch how quickly organization becomes addictive when it doesn’t break the bank.