12 Stylish DIY Living Room Decor Ideas for Modern Homes
- Bedroom Design
 Ben
Ben- 0
- 68 minutes read
Your living room is basically the face of your home, and right now, yours might be giving “I gave up in 2018” energy.
Don’t worry—we’ve all been there, staring at blank walls and mismatched furniture, wondering why our space looks nothing like those Pinterest boards we’ve been saving for years.
Here’s the reality check: you don’t need an interior designer or a massive budget to create a living room that actually impresses people.
After transforming my own sad, generic living space into something I’m genuinely proud to show off, I’ve learned that the best home decor comes from getting your hands dirty and embracing the DIY spirit.
Whether you’re dealing with rental restrictions, a tight budget, or just a burning desire to make your space uniquely yours, these 12 DIY living room decor ideas will help you create a room that looks expensive without the expensive price tag.
Grab your craft supplies, put on some good music, and let’s turn that boring living room into something spectacular.
1. Floating Wooden Shelves with Plants
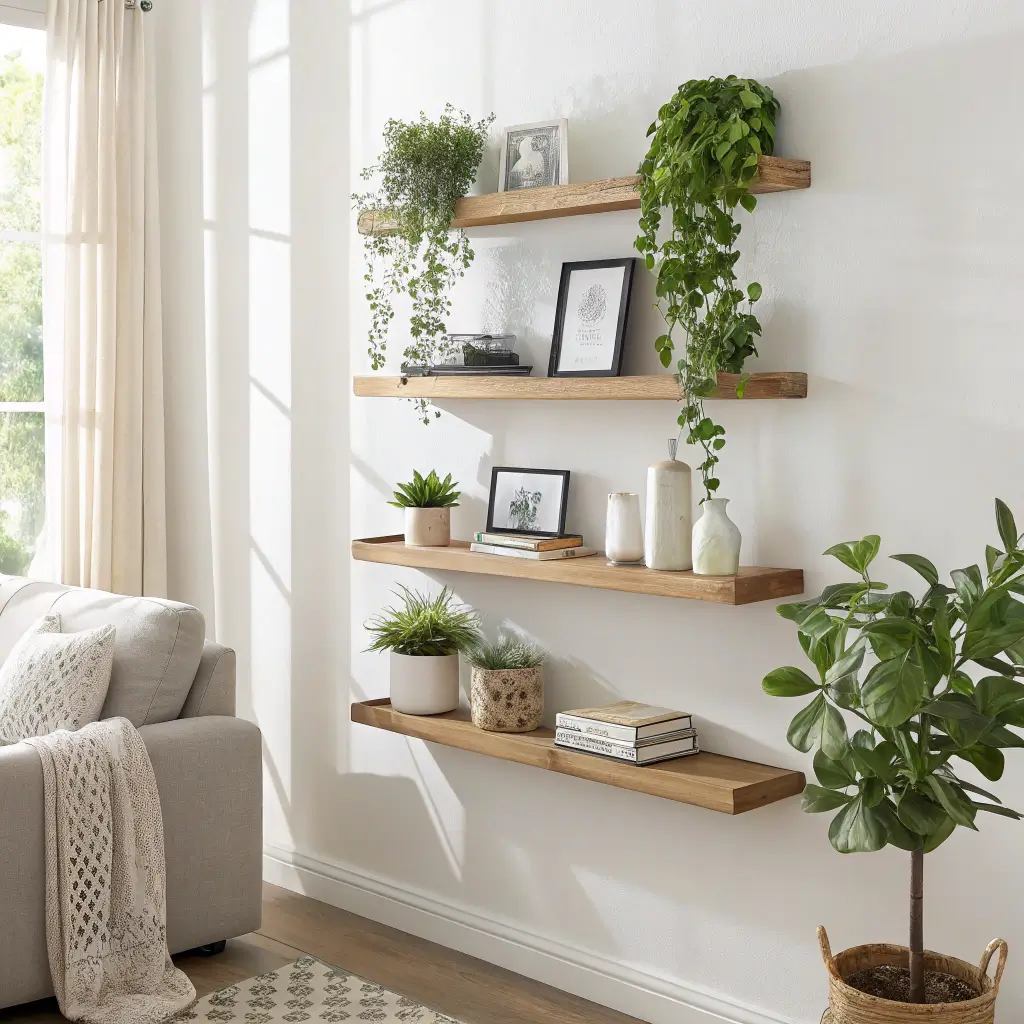
Let’s kick things off with a project that solves two problems at once: bare walls and the need for more plant babies. Floating shelves with plants create that effortless “I’m an adult who has things figured out” vibe that we’re all chasing.
Why This Combo Works Magic
Floating shelves add dimension to flat walls while giving your plants the perfect home to thrive. The combination of warm wood and green foliage creates a natural, organic feel that softens any living room and makes it feel more alive.
I installed a set of three floating shelves on my living room wall last spring, and honestly, it’s become the focal point everyone comments on. The plants cascading down create this living art installation that changes as they grow. Total investment: about $60. Compliments received: countless.
Choosing Your Shelf Material
Options that look great:
- Live-edge wood: Raw, natural aesthetic
- Stained pine: Budget-friendly and customizable
- Reclaimed wood: Eco-friendly with character
- Walnut: Rich, sophisticated finish
- White oak: Light and modern
Plant Selection for Indoor Shelves
Low-light winners for shelves:
- Pothos (the impossible-to-kill champion)
- Spider plants (produce cute babies)
- Philodendrons (heart-shaped leaves!)
- Snake plants (tolerate neglect like pros)
- Trailing ivy (drama without the diva)
Installation Tips
Getting it right:
- Use a level (seriously, crooked shelves ruin everything)
- Find studs or use proper wall anchors
- Leave enough space between shelves for plant growth
- Consider weight capacity when loading up
- Stagger heights for visual interest
2. Handmade Macrame Wall Hanging
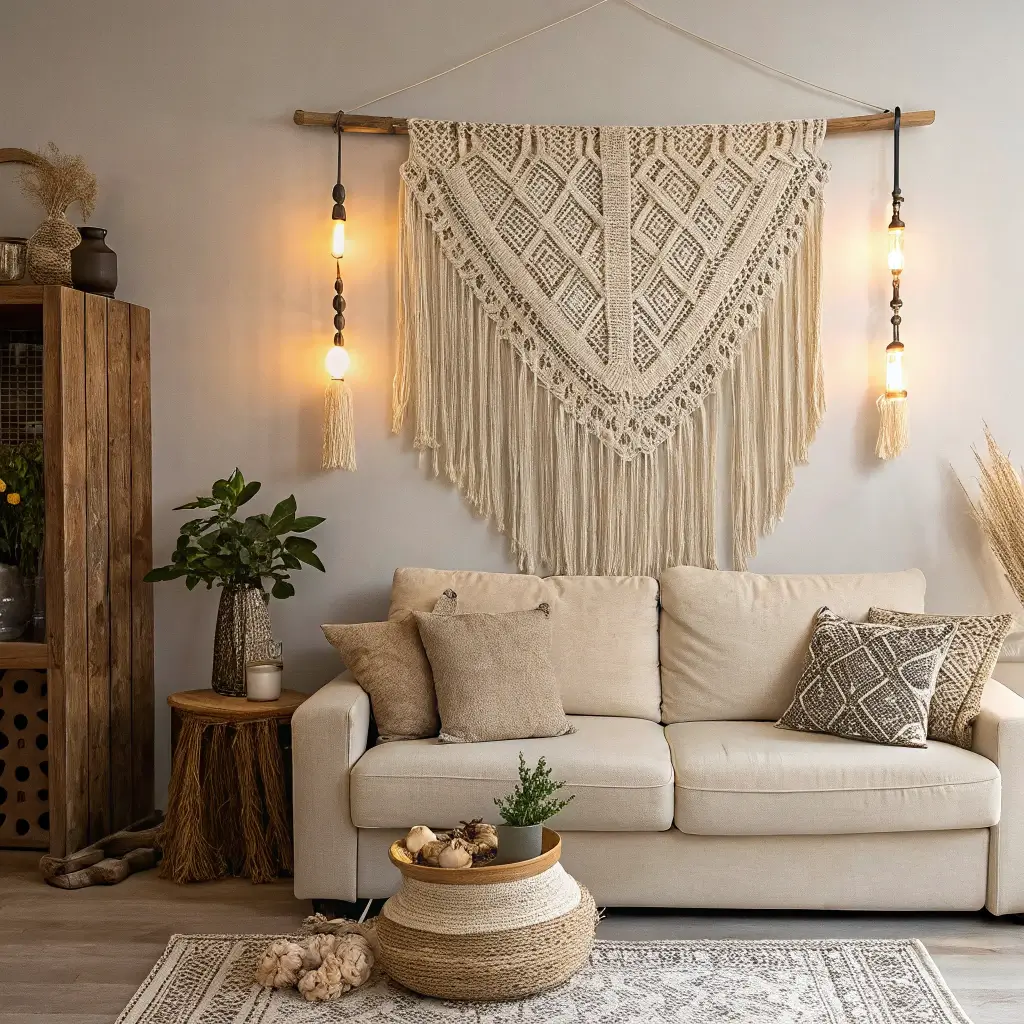
Macrame is having its well-deserved moment, and creating your own wall hanging adds that handmade touch that store-bought decor just can’t replicate. Plus, there’s something therapeutic about knotting rope while binge-watching your favorite show.
The Texture Factor
Macrame brings softness and texture to living rooms that often feel too hard-edged with all that furniture and technology. The natural fibers warm up the space and add that boho-chic element everyone loves.
My first macrame attempt looked like a tangled mess that a cat attacked. But here’s the secret: even “imperfect” macrame looks intentionally artistic. After a few YouTube tutorials, I created a wall hanging that people genuinely think I bought from an expensive boutique. The learning curve is real but worth it.
Getting Started
Essential supplies:
- Cotton macrame cord (3mm or 5mm for beginners)
- Wooden dowel or branch for hanging
- Sharp scissors for clean cuts
- Tape measure for consistency
- Workspace with good lighting
Basic Knots to Master
You only need three to start:
- Square knot: Foundation of most patterns
- Half hitch: Creates beautiful diagonal lines
- Gathering knot: Cleanly finishes sections
Design Ideas for Living Rooms
Scale matters:
- Large statement piece above sofa
- Medium-sized grouping for gallery wall
- Small accent pieces for shelves
- Plant hangers that double as art
- Geometric designs for modern spaces
Personalizing Your Piece
Make it unique:
- Dip-dye the bottom for ombre effect
- Add wooden beads throughout
- Incorporate dried flowers or feathers
- Mix cord colors for patterns
- Create asymmetrical designs
3. Upcycled Coffee Table from Crates
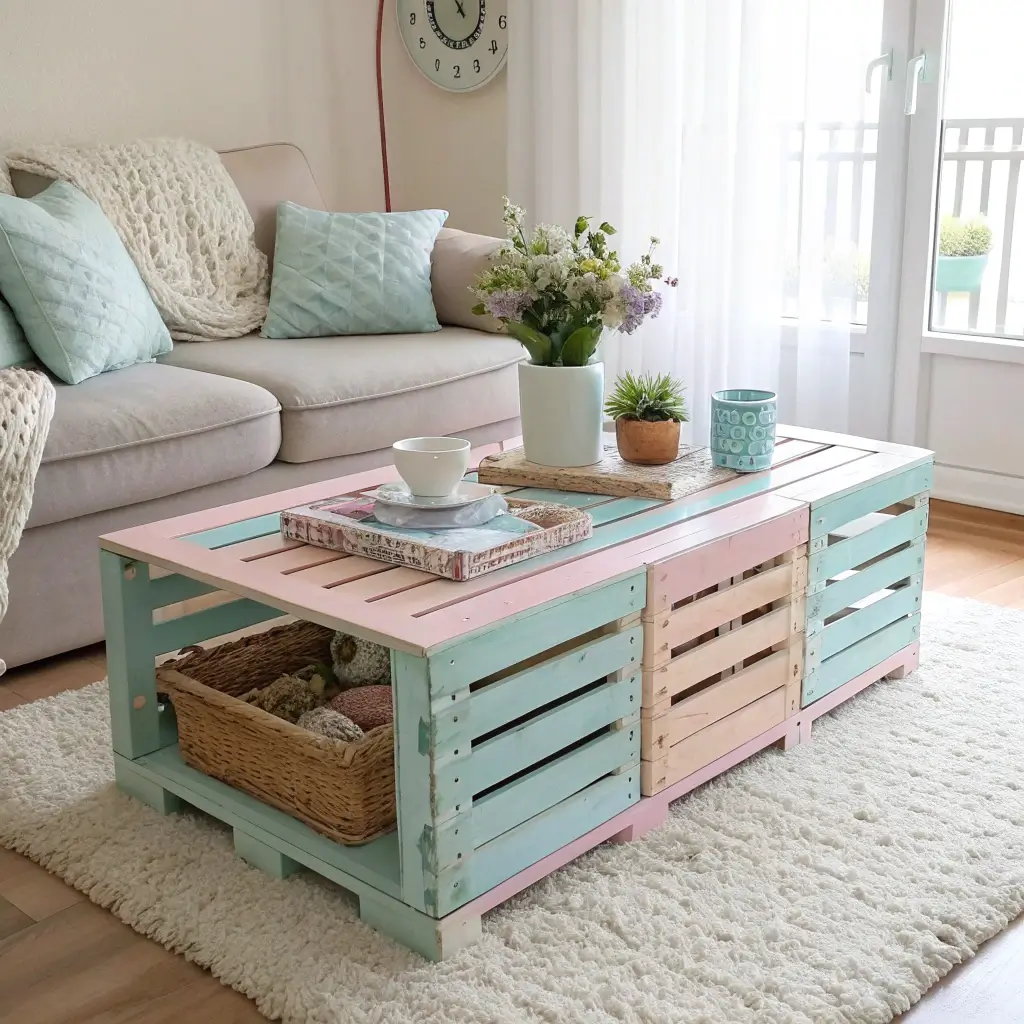
That sad coffee table you’ve had since college? Time to retire it. Wooden crates transform into the most unique, functional coffee tables that cost practically nothing and look like they belong in a design magazine.
The Upcycle Revolution
Creating furniture from crates saves money and the planet while giving you a completely custom piece. Plus, the built-in storage is a game-changer for living rooms that double as everything rooms.
I found four matching crates at a craft store for $8 each, spent a weekend sanding and staining them, and now I have a coffee table that looks like it cost $300. The center cavity holds remotes, books, and all the random stuff that used to clutter my space. Best $32 I’ve ever spent.
Sourcing Your Crates
Where to find them:
- Craft stores: Uniform sizes, clean wood
- Thrift stores: Authentic vintage finds
- Wine shops: Often give away wooden wine crates
- Online marketplaces: Bulk deals available
- Grocery stores: Fruit crates are free sometimes
Building Your Table
Step-by-step:
- Sand all surfaces smooth
- Stain or paint in your chosen color
- Let dry completely (patience!)
- Arrange crates in square formation
- Secure together with wood screws or brackets
- Add casters if desired for mobility
- Optional: Add glass or wood top
Finishing Options
Style it your way:
- Natural wood stain for rustic look
- White paint for farmhouse vibes
- Dark stain for sophisticated feel
- Two-tone for visual interest
- Distressed finish for vintage appeal
Styling Your Crate Table
Making it look intentional:
- Use center cavity for decorative storage
- Add books and candles on top
- Include small plants in the openings
- Keep some sections organized, some curated
- Add a tray for coralling items
Also Read: 10 Inspiring Room Decor Bedroom DIY Ideas to Try Today
4. DIY Geometric Wall Art
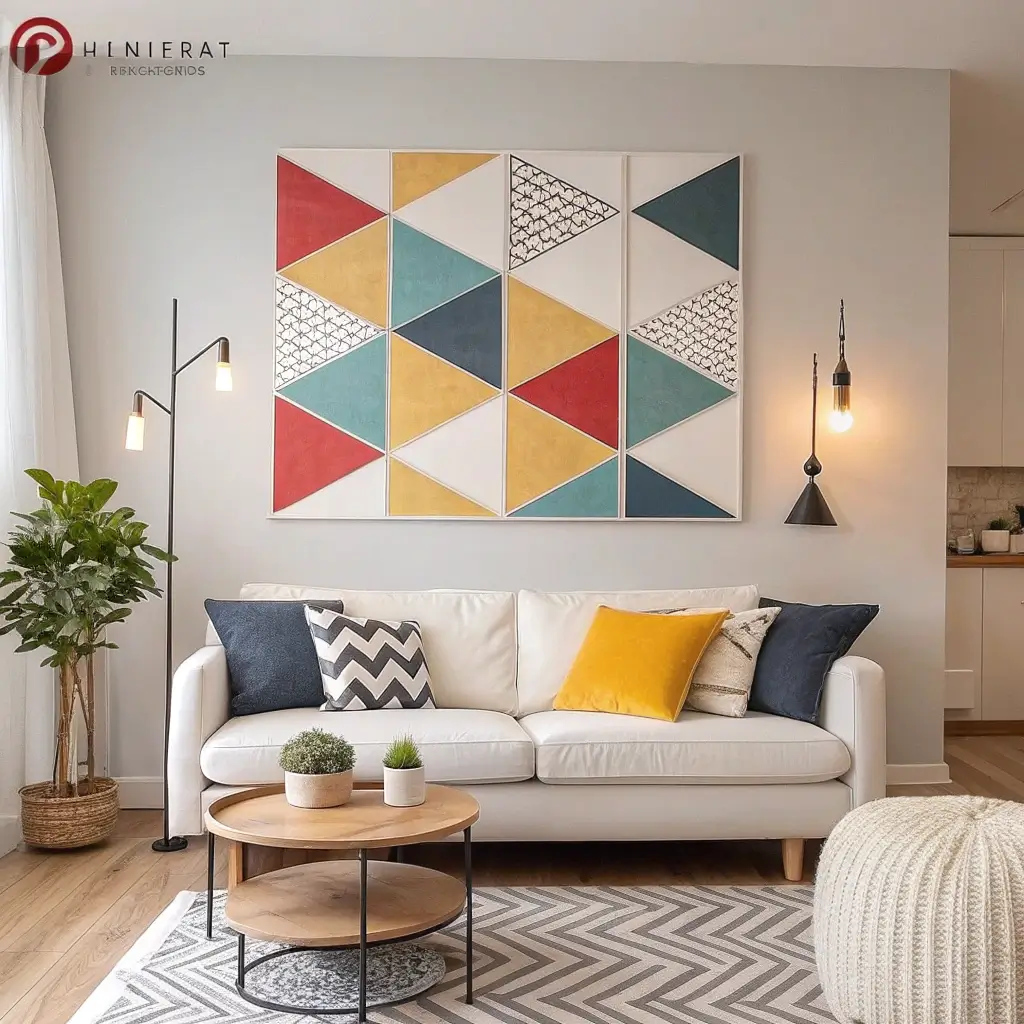
Geometric art is everywhere because it works—it’s bold, modern, and surprisingly easy to create yourself. Custom geometric pieces let you match your exact color palette and size requirements.
The Modern Art Approach
Geometric designs add contemporary flair without the pretentious gallery price tag. They’re the kind of art that makes people think you have sophisticated taste, even if you’re secretly just really good with painter’s tape.
I created a set of three geometric canvases after being quoted $400 for similar pieces at an art fair. Armed with canvas, tape, and craft paint, I made my own for under $40. They look identical to the expensive originals, and I have serious bragging rights.
Supplies You’ll Need
Shopping list:
- Canvas or wood panels (various sizes)
- Painter’s tape (quality matters here)
- Acrylic paint in your color scheme
- Foam rollers or brushes
- Pencil and ruler for planning
- Level for precise lines
Design Techniques
Creating professional results:
- Tape resist method: Apply tape, paint, peel
- Color blocking: Bold sections of solid color
- Gradient effects: Blend colors within shapes
- Metallic accents: Add gold or silver details
- Negative space: Let canvas show through
Pattern Inspiration
Popular geometric designs:
- Triangle mountain ranges
- Hexagon honeycomb patterns
- Abstract overlapping circles
- Diamond and chevron patterns
- Minimalist line compositions
Creating Cohesive Sets
Gallery grouping tips:
- Use consistent color palette
- Vary sizes but maintain balance
- Mix complex and simple designs
- Keep spacing uniform
- Plan layout before hanging
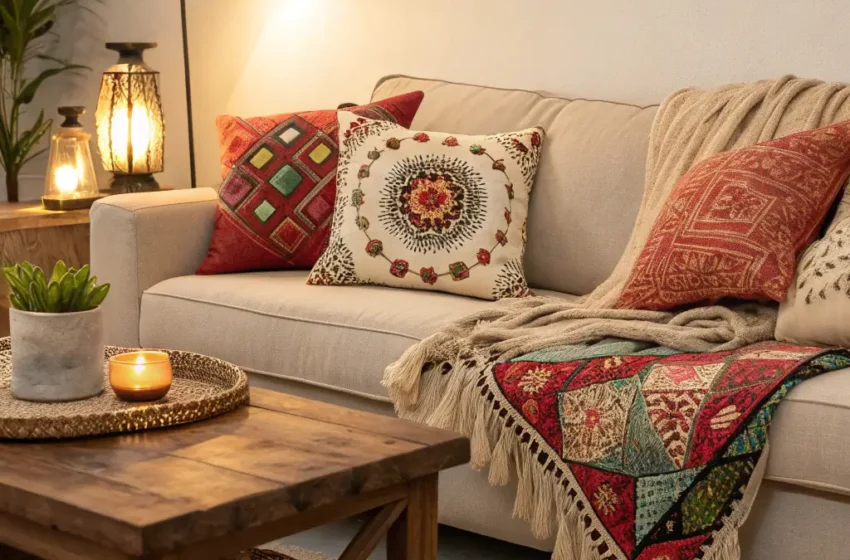
5. Fabric-Covered Accent Pillows
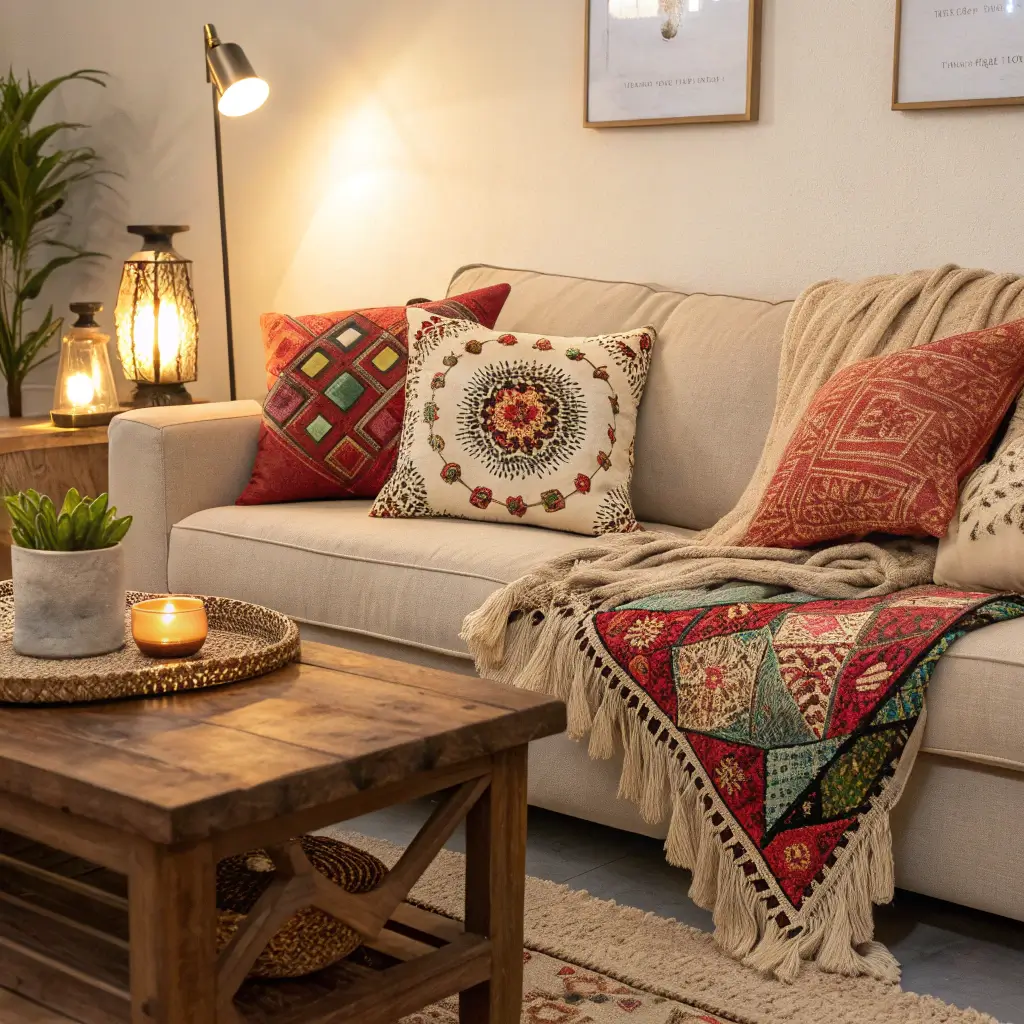
New pillows transform sofas instantly, but buying them gets expensive fast. Making your own covers lets you change your living room’s look seasonally without spending a fortune.
The Instant Update
Pillow covers are the quickest room refresh available. They take existing pillows from tired to fresh in minutes, and making your own means unlimited fabric options.
I sewed my first pillow covers during quarantine (basic skills, lots of determination), and the satisfaction of changing my living room’s entire vibe for $20 in fabric was addictive. Now I have seasonal sets I rotate throughout the year.
Sewing vs. No-Sew Options
Choose your skill level:
- Envelope closure: Easiest sewing method
- Zipper closure: Cleaner, more permanent
- Hot glue method: No sewing required
- Fabric tape: Even easier no-sew
- Tie closure: Decorative and simple
Fabric Selection
Choosing wisely:
- Upholstery fabric for durability
- Cotton for easy washing
- Velvet for luxury feel
- Linen for casual texture
- Outdoor fabric for high-traffic homes
Pattern Mixing Tips
Creating visual harmony:
- Mix patterns within same color family
- Vary scale (large, medium, small patterns)
- Include solid coordinates
- Limit to 3 patterns maximum
- Use odd numbers of pillows
Seasonal Swaps
Rotate for freshness:
- Bright florals for spring
- Nautical themes for summer
- Warm plaids for fall
- Rich velvets for winter
FYI, pillow inserts are super cheap, and having extras means you can mix and match covers whenever the mood strikes. 🙂
6. Personalized Gallery Wall
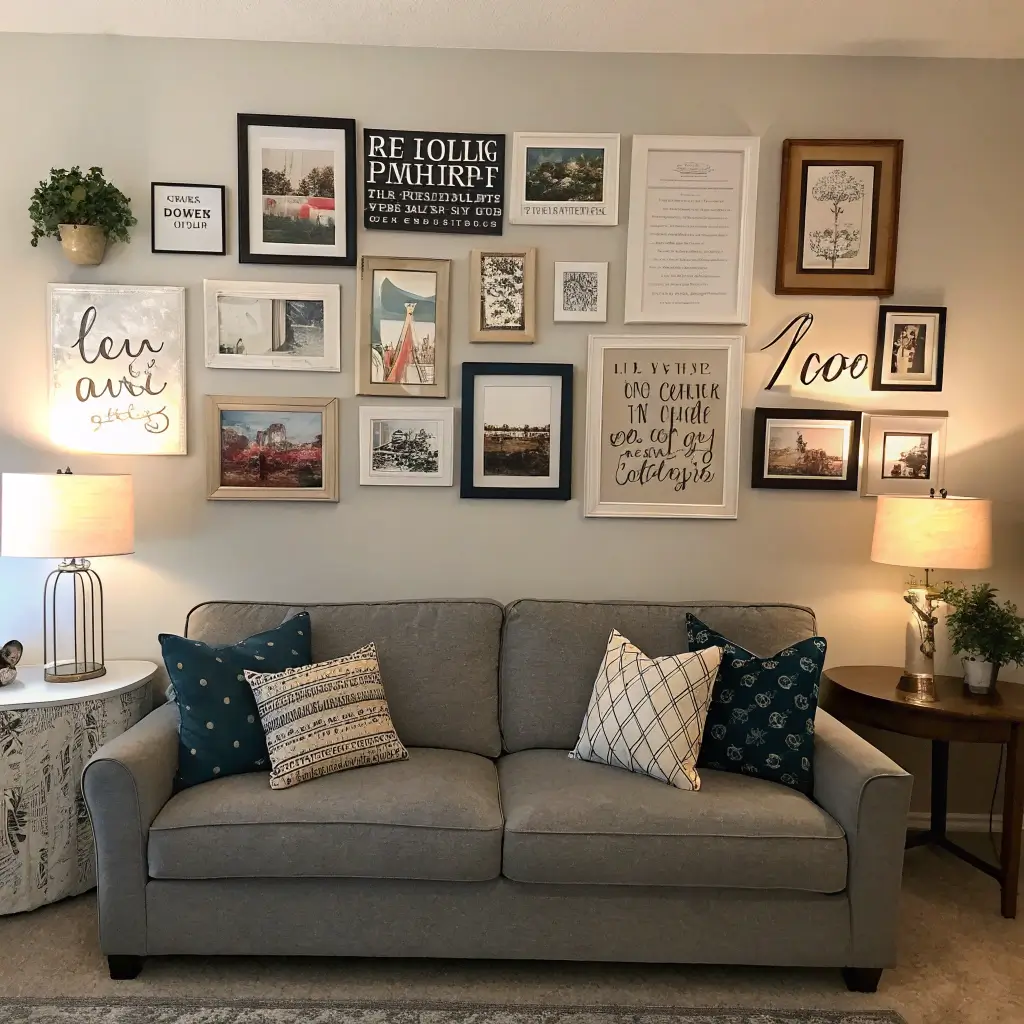
A gallery wall turns blank walls into personal art exhibitions that tell your story. The best part? You don’t need expensive art—just meaningful pieces and a good plan.
The Storytelling Wall
Gallery walls showcase your personality in ways that single art pieces can’t. They’re collections of memories, tastes, and experiences that make your living room uniquely yours.
My gallery wall took three attempts to get right (first two looked like a Pinterest fail), but once I nailed the layout, it became the conversation starter of my living room. Friends spend time examining each piece, asking about stories behind the items.
Planning Your Layout
Before hammering nails:
- Gather all pieces first
- Lay out arrangement on floor
- Trace on craft paper and tape to wall
- Test different configurations
- Consider visual weight and balance
Mix of Elements
What to include:
- Personal photographs
- Vintage or thrift finds
- Original artwork
- Mirrors for depth
- Typography prints
- Three-dimensional objects
- Memorabilia and souvenirs
Hanging Hardware
Getting it level:
- Use Command strips for renters
- Picture hanging wire for heavy pieces
- Saw-tooth hangers for frames
- French cleats for very heavy items
- Adhesive strips for light objects
Frame Coordination
Creating cohesion:
- Match frame colors (black, white, or wood)
- Mix frame styles intentionally
- Keep mat colors consistent
- Vary sizes within the same family
- Include some frameless pieces
Also Read: 10 Creative DIY Aesthetic Room Decor Ideas for Cozy Vibes
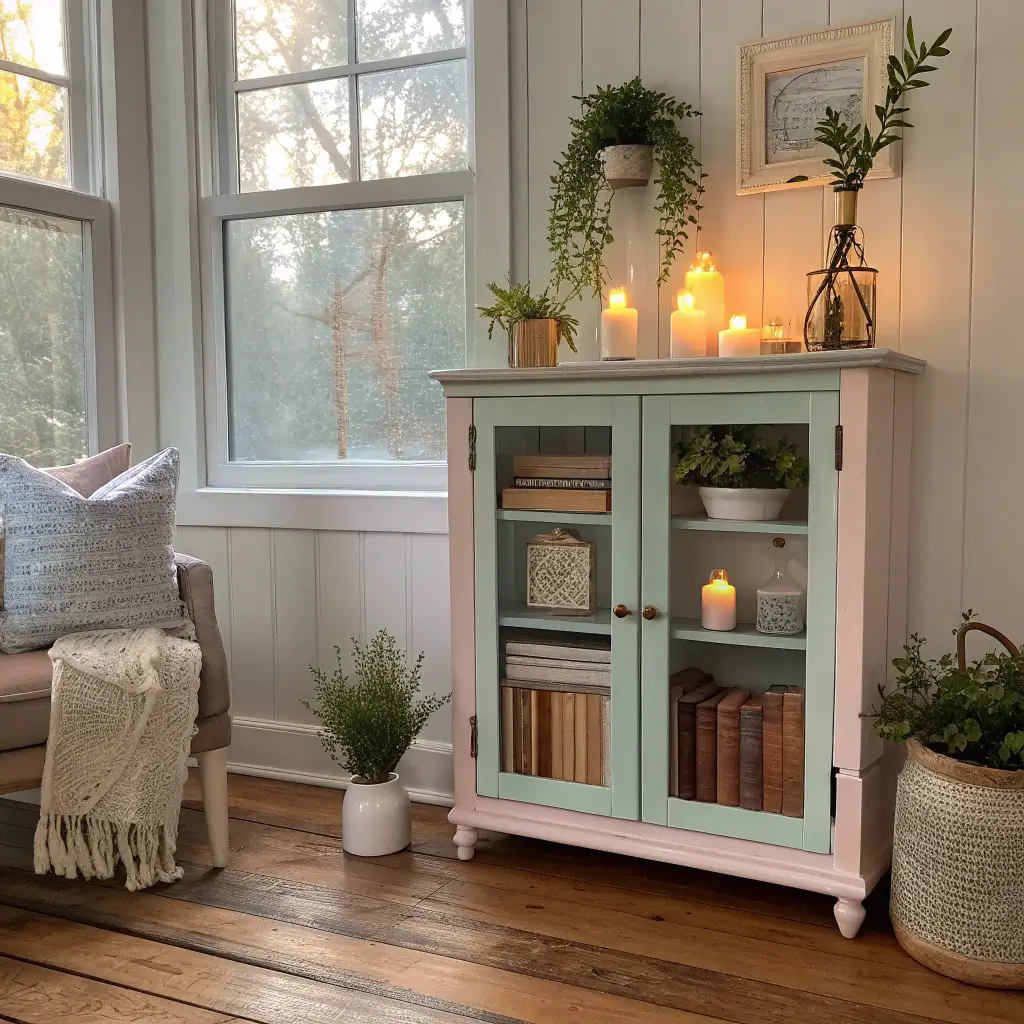
7. Repainted Vintage Cabinets
That dated cabinet at the thrift store? It’s actually treasure waiting for a transformation. Repainting vintage pieces gives you unique storage that looks custom-designed for your space.
The Vintage Advantage
Old furniture has better bones than most new flat-pack options. The solid construction and unique details just need fresh paint to become statement pieces.
I rescued a hideous 1970s cabinet from the curb, painted it deep navy blue, and added brass hardware. Now it holds my books and plants while looking like something from West Elm. Total cost: $40 in supplies plus some elbow grease.
Finding Pieces Worth Saving
What to look for:
- Solid wood construction
- Interesting shapes or details
- Stable structure (no major repairs needed)
- Good proportions for your space
- Drawers and doors that function
Prep Work That Matters
Steps you can’t skip:
- Clean thoroughly with degreaser
- Sand lightly for paint adhesion
- Fill any holes or dents
- Prime (especially for dark-to-light changes)
- Remove hardware before painting
Paint Options
Choosing your finish:
- Chalk paint: No prep, matte finish
- Milk paint: Authentic vintage look
- Spray paint: Smooth, even coverage
- Cabinet paint: Durable and washable
- High-gloss: Modern and dramatic
Hardware Updates
The finishing touch:
- Replace dated pulls with modern options
- Mix metals for eclectic look
- Add leather or rope pulls for unique style
- Consider oversized hardware for statement
- Paint existing hardware if budget is tight
8. DIY String Light Canopy

String lights aren’t just for bedrooms—a canopy effect in your living room creates ambiance that overhead lighting could never match. It’s like permanent good lighting for every movie night.
The Ambiance Factor
String lights transform evening vibes completely. They create warmth and intimacy that makes your living room feel like a cozy retreat rather than just another room.
I installed string light canopy in my living room’s reading corner, and now I never use the overhead light in the evenings. The soft glow makes everything look better—including my mediocre furniture. It’s basically like putting a filter on your actual room.
Creating the Canopy Effect
Installation approaches:
- Drape from center to walls
- Create parallel lines across ceiling
- Outline architectural features
- Focus on seating area only
- Combine with sheer fabric
Light Selection
Choosing the right strings:
- LED for energy efficiency and safety
- Warm white for cozy atmosphere
- Globe bulbs for statement lighting
- Fairy lights for subtle shimmer
- Smart lights for color-changing options
Installation Methods
Renter-friendly options:
- Command hooks (my go-to)
- Ceiling clips that screw in
- Tension wire systems
- Removable adhesive strips
- Hanging planters as anchors
Safety Considerations
Keep it safe:
- Use LED only (no heat risk)
- Don’t overload electrical outlets
- Keep connections accessible
- Use outdoor-rated for safety
- Never leave unattended when not LED
9. Cork Board Decorative Wall
Cork boards aren’t just for offices anymore. A decorative cork wall creates an ever-changing display that’s functional and artistic, perfect for living rooms that double as creative spaces.
The Flexible Canvas
Cork walls let your decor evolve constantly without leaving holes everywhere. Pin up inspiration, swap out photos, and keep your living room feeling fresh and personal.
I covered one small wall section with cork tiles, and it’s become my inspiration zone. Concert tickets, postcards, fabric swatches, and random pretty things I find all get pinned there. It’s like a living mood board that visitors love exploring.
Cork Options
Choosing your material:
- Cork tiles: Easy to install, uniform look
- Roll cork: Seamless coverage
- Cork boards: Framed and finished
- Cork hexagons: Trendy geometric pattern
- Cork strips: Accent rather than full coverage
Installation Approaches
Different methods:
- Full wall coverage for maximum function
- Grid of framed cork boards
- Single statement panel
- Geometric arrangement of tiles
- Border or wainscoting style
What to Display
Curating your cork:
- Inspiration images and quotes
- Fabric and color swatches
- Postcards and ticket stubs
- Small artwork and prints
- Dried flowers and natural elements
- Notes and reminders (the practical stuff)
Styling Tips
Making it look intentional:
- Organize by color or theme
- Leave some cork visible
- Use decorative pushpins
- Frame the cork section
- Update regularly to keep fresh
Also Read: 12 Stylish DIY Room Decor for Teens Ideas and Cozy
10. Painted Ombre Vases
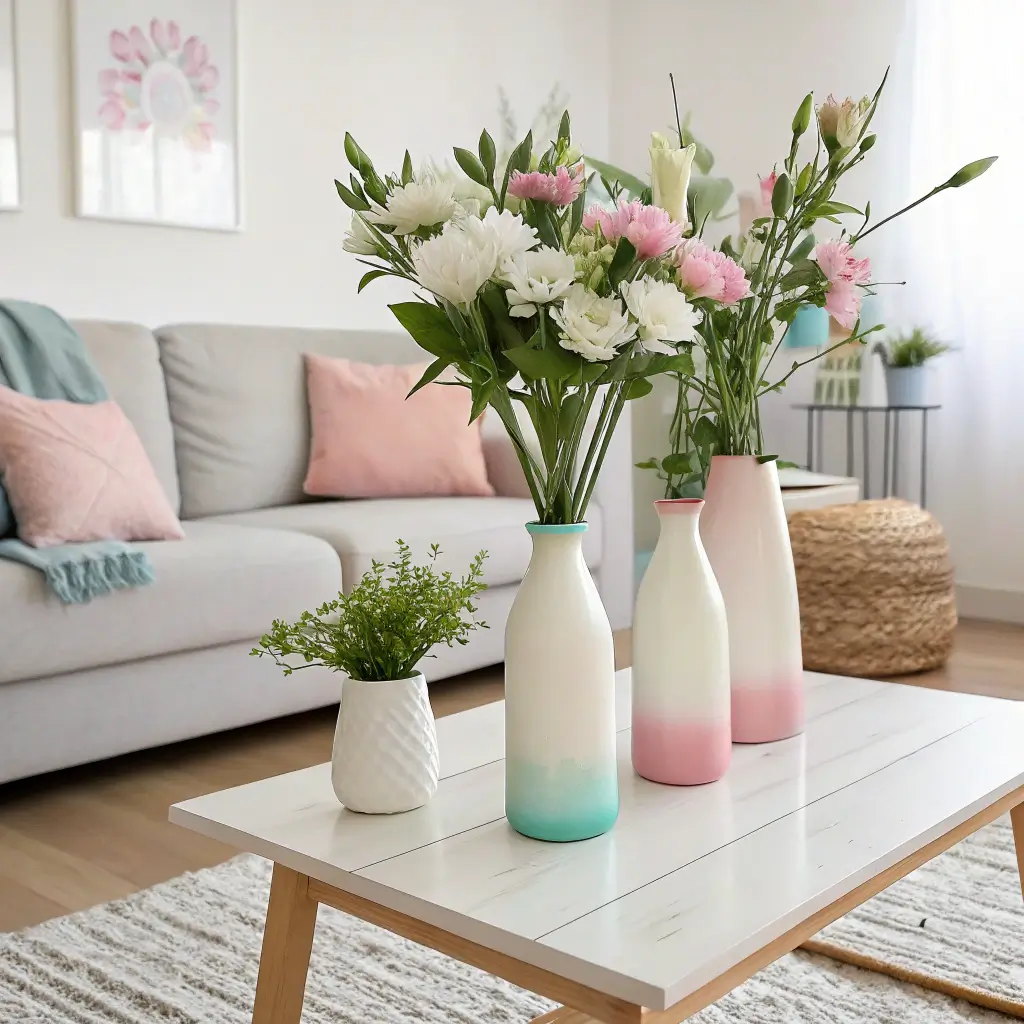
Plain glass vases from the dollar store become designer-looking pieces with simple ombre painting techniques. They’re perfect for adding coordinated color throughout your living room.
The Custom Color Effect
Ombre vases tie your color scheme together in subtle ways. They’re affordable, customizable, and look way more expensive than they actually cost.
I painted six vases in various shades of terracotta for my mantel, spending maybe $15 total on supplies. Guests always assume they’re expensive ceramics, and I just smile and accept the compliment without correction.
Materials Needed
Simple supply list:
- Glass vases (thrift stores are goldmines)
- Spray paint in 2-3 shades
- Painter’s tape
- Drop cloth or cardboard
- Clear sealant (optional)
The Ombre Technique
Creating the gradient:
- Clean vases thoroughly
- Apply lightest color as base coat
- Let dry completely
- Tape off sections if needed
- Apply medium shade overlapping
- Finish with darkest at bottom
- Blend while wet or layer when dry
Color Schemes That Work
Tested combinations:
- Blue to teal to white
- Coral to pink to white
- Sage to forest green
- Terracotta to rust to cream
- Gray ombre for neutral spaces
Displaying Your Collection
Styling suggestions:
- Group in odd numbers
- Vary heights and widths
- Mix empty and filled vases
- Include dried flowers or branches
- Place on tray for cohesion
11. Pallet Sofa or Lounge Chair
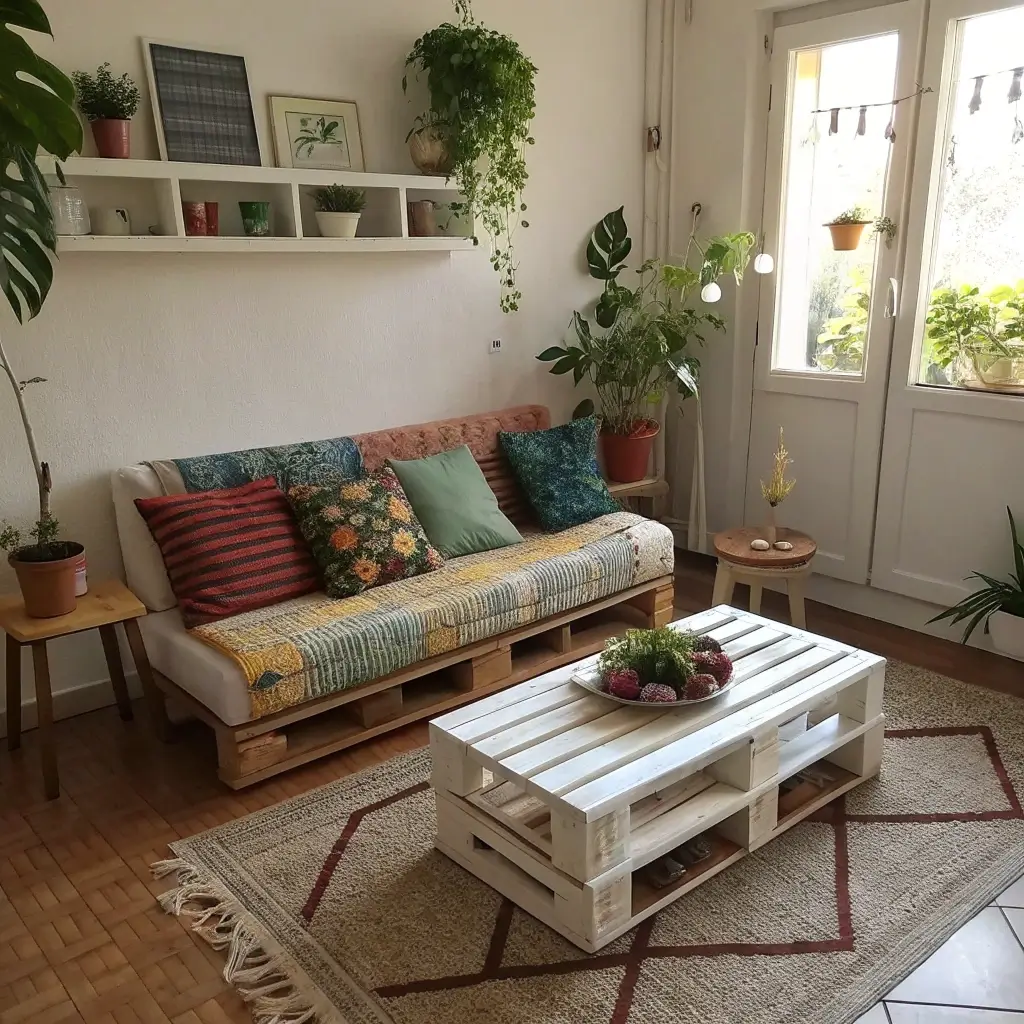
For the ambitious DIYer, pallet furniture creates serious statement pieces that cost practically nothing. These projects take more effort but result in completely unique furniture.
The Ultimate Upcycle
Pallet furniture is eco-friendly and budget-friendly while giving you bragging rights for years. Yes, it’s more work than buying something, but the satisfaction is unmatched.
I built my outdoor patio sofa from pallets, and the skills transferred when I made an indoor lounge chair. Both projects cost under $50 in materials (mainly cushions), and both look like custom furniture pieces.
Finding Safe Pallets
Source carefully:
- Look for “HT” stamp (heat-treated, safe)
- Avoid “MB” pallets (chemical-treated)
- Check for damage and splinters
- Clean thoroughly before bringing inside
- Ask local businesses for discards
Building Basics
What you’ll need:
- Pallets (quantity depends on design)
- Sandpaper or electric sander (crucial)
- Screws and drill
- Wood stain or paint
- Cushions for comfort
Simple Designs
Beginner-friendly projects:
- Stacked pallet coffee table
- Basic bench/daybed
- Floor seating with back support
- Lounge chair with angled back
- Side table from single pallet
Finishing Touches
Making it comfortable:
- Sand, sand, sand (no splinters!)
- Seal wood for durability
- Add quality cushions (don’t skimp)
- Include throw pillows
- Consider casters for mobility
IMO, pallet furniture is best for casual spaces—it’s not going to look like Restoration Hardware, but it has character you can’t buy.
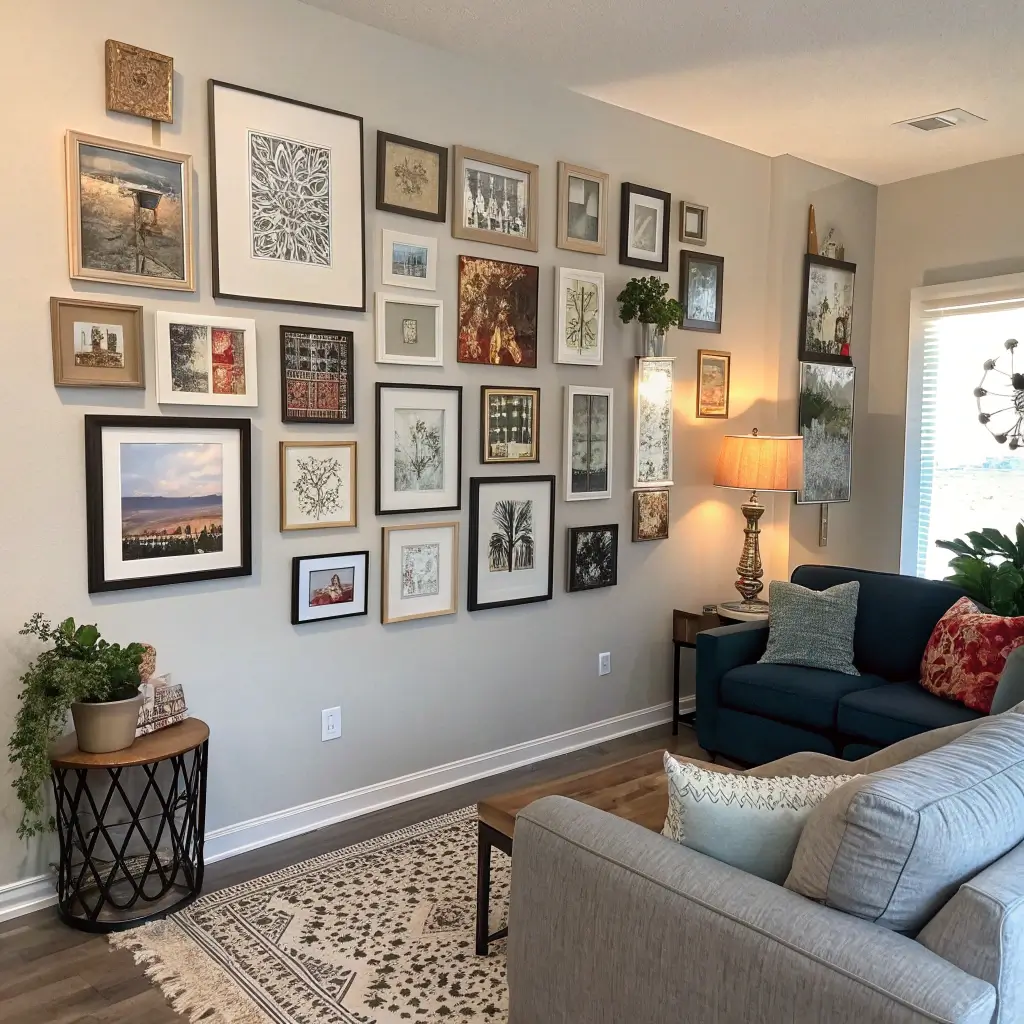
12. Customized Photo Collage Wall
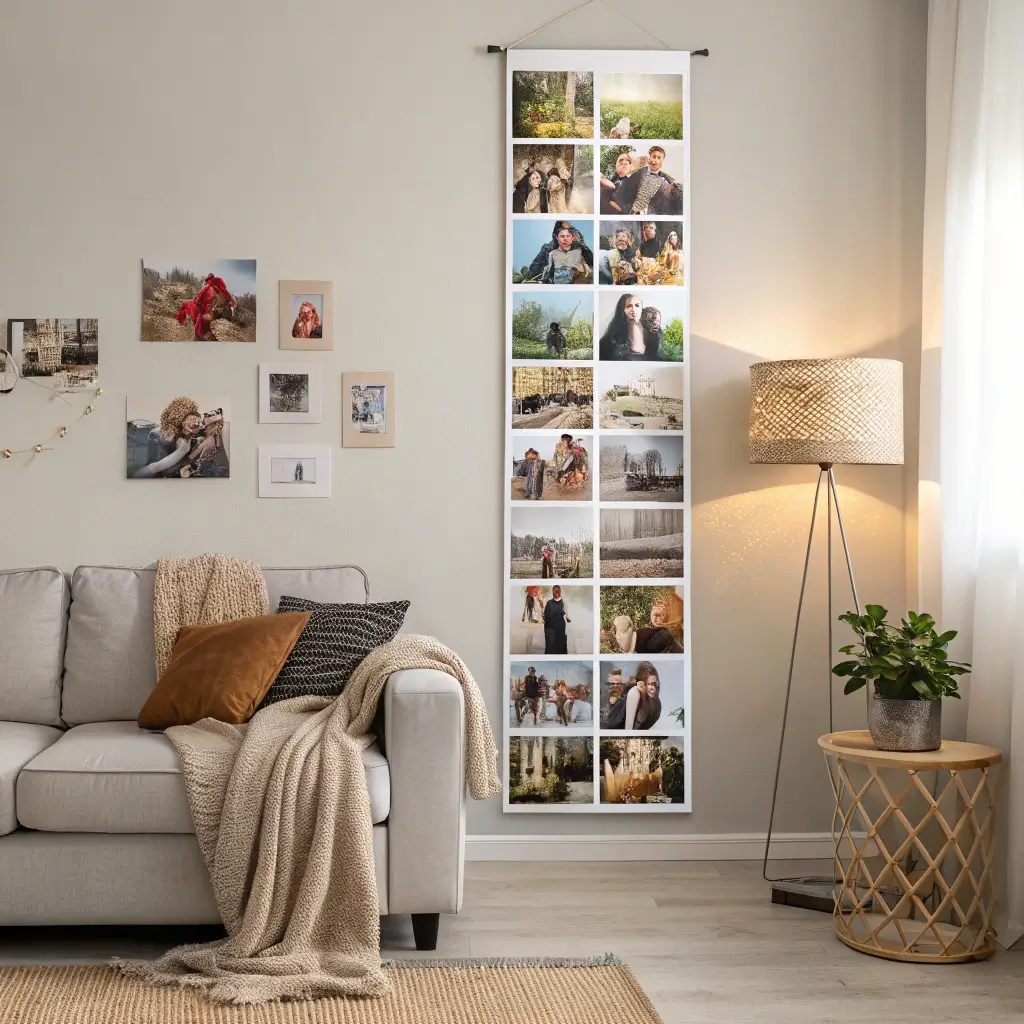
Similar to a gallery wall but focused specifically on photographs, a photo collage wall creates a personal museum of your life’s best moments.
The Memory Gallery
Photo walls transform spaces emotionally, making living rooms feel warm and lived-in rather than staged. They remind you of good times and give visitors insight into your life.
My living room photo wall started with 20 prints and has grown to over 50. It’s become this evolving display that I add to after every vacation or major life event. Friends love looking through it, and it always sparks conversations.
Display Methods
Different approaches:
- String and clothespin display
- Uniform framed grid
- Mixed frame gallery style
- Floating photo ledges
- Direct wall prints (no frames)
- Photo wire systems
Photo Selection
Curating your collection:
- Choose high-quality images
- Mix candid and posed shots
- Include different eras
- Balance people and places
- Add some black and white
- Include meaningful moments
Printing Tips
Getting good results:
- Edit for consistency before printing
- Use quality photo paper
- Consider canvas prints for variety
- Explore different sizes
- Look for printing deals online
Layout Strategies
Creating visual harmony:
- Mix horizontal and vertical
- Vary frame sizes intentionally
- Leave consistent spacing
- Center around focal point
- Consider adding text or quotes
Keeping It Updated
Maintaining freshness:
- Use easy-swap systems
- Rotate seasonally
- Add new photos regularly
- Remove outdated images
- Archive old photos rather than discarding
Bringing Your Living Room to Life
Here’s what I’ve discovered after years of DIY decorating: the best living rooms aren’t the ones with the most expensive furniture or trendiest decor.
They’re the ones that feel lived-in, loved, and personal. Every project on this list creates something that can’t be bought at a store—pieces with your story, your energy, your creativity woven in.
Start with one project that excites you most. Maybe it’s the instant gratification of painted vases, or maybe you’re ready to tackle that pallet sofa. Whatever calls to you, just start.
The first project leads to the second, which leads to the third, and before you know it, you’ve created a living room that feels uniquely, authentically yours.
The skills you develop on these projects transfer to other rooms and future homes. That confidence you gain from completing something with your own hands? It’s addictive in the best way.
And the money you save compared to buying everything new? That’s vacation money, friend.


