12 Stylish DIY Room Decor for Teens Ideas and Cozy Corners
- Bedroom Design
 Ben
Ben- 0
- 78 minutes read

Your room is basically your whole world right now, and those beige walls are killing your vibe.
I get it—scrolling through Pinterest at midnight, saving “room inspo” that requires a budget you don’t have and skills that seem impossible to learn. Been there, screenshot that, never actually made it.
Here’s the reality check: you don’t need your parents’ credit card or some magical ability to transform your space into something that actually reflects who you are.
After helping my younger sister upgrade her room from “elementary school leftovers” to something she’s genuinely proud to show her friends, I’ve learned that the best teen room decor comes from creativity, not cash.
Whether you’re into dark academia aesthetics, cottagecore vibes, or that clean minimalist look everyone’s obsessed with, these 12 DIY room decor ideas for teens will help you create a space that’s uniquely yours.
No complicated tools, no expensive materials, and definitely no asking “can we afford this?” before every project.
Let’s make your room the kind of place where you actually want to hang out instead of just scrolling TikTok while lying on your bed.
1. Fairy Light Wall Display
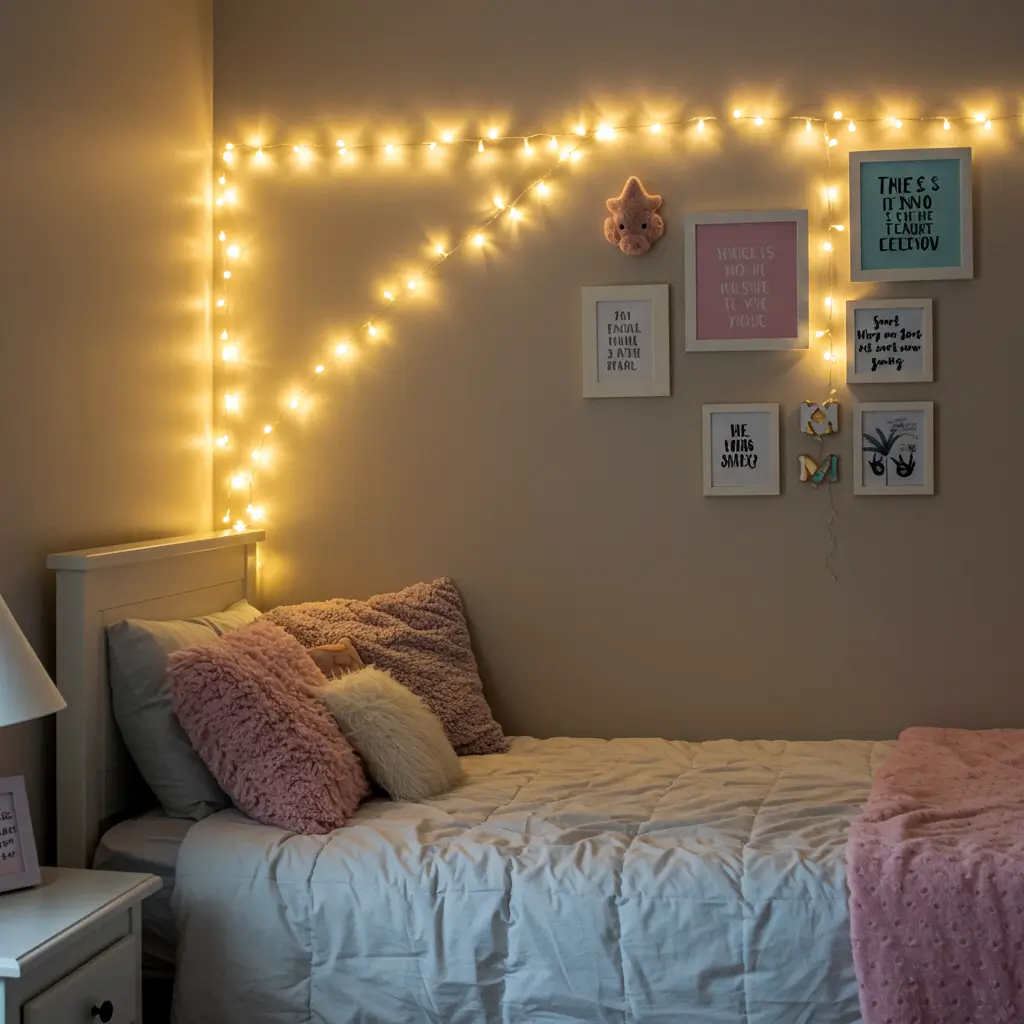
Fairy lights aren’t just for holidays anymore—they’re the secret weapon for transforming any teen room from basic to magical. String them up right, and suddenly your room has that cozy, aesthetic vibe everyone’s chasing.
Why Fairy Lights Hit Different
Fairy lights create instant atmosphere without permanent changes or your parents freaking out about holes in the wall. They’re renter-friendly, teen-budget-friendly, and honestly just make everything look better. Plus, that soft glow is way easier on your eyes than harsh overhead lighting when you’re up late studying (or, let’s be real, watching YouTube).
I watched my sister arrange and rearrange her fairy lights about seventeen times before settling on a design. The final setup—lights draped in a canopy above her bed—cost $12 and took 20 minutes. Now her room looks like something from an aesthetic mood board, and she uses those lights more than her actual bedroom light.
Creative Hanging Ideas
Ways to display that go beyond basic:
- Canopy style: Drape above bed for dreamy vibes
- Photo clipper: Use mini clips to hang photos along the string
- Headboard alternative: Outline your bed frame
- Wall words: Spell out words or create shapes
- Shelf accent: Wind along bookshelf edges
- Window frame: Outline windows for cozy glow
- Ceiling cascade: Hang from center, spread outward
Making Them Look Intentional
Avoiding the “I just threw these up” look:
- Choose one color temperature (warm white is usually best)
- Hide cords behind furniture or use cable clips
- Use command hooks for damage-free hanging
- Mix with other decor instead of relying solely on lights
- Create patterns or designs rather than random draping
Power Solutions
Dealing with outlets:
- Battery-operated options eliminate cord chaos
- Invest in a timer for automatic on/off
- Use power strips if you have multiple strands
- Consider solar-powered for window placement
- Remote-controlled sets make life easier
2. Personalized Photo Collage Board
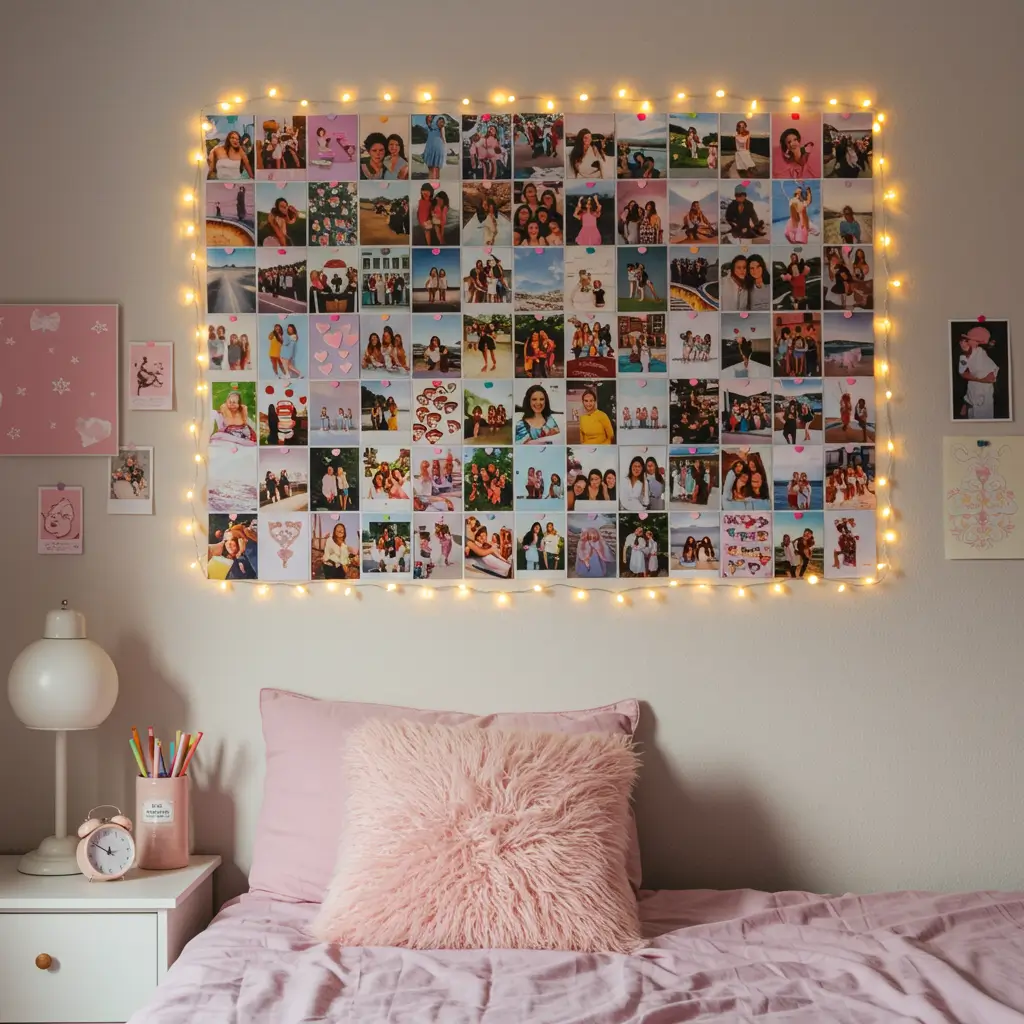
Social media is great, but there’s something about having physical photos on your wall that hits different. A personalized photo collage board lets you curate your favorite memories while creating a statement piece.
The Memory Wall Effect
Photo collages make your space uniquely yours in a way that store-bought posters can’t. Every image tells a story, and arranging them creates a visual diary of your life right now—friends, concerts, random adventures, embarrassing moments you’ll somehow treasure later.
My sister’s photo wall started with like 20 photos and has grown to over 60. She changes them out seasonally, adding new memories and rotating older ones. The wall has become this living, evolving thing that actually represents her life, which is way cooler than generic room decor.
Creating Your Board
What you’ll need:
- Large cork board or foam board (any size works)
- Photos printed (Shutterfly, drugstore, or home printer)
- Push pins, washi tape, or clothespins for attaching
- String or fairy lights (optional extra)
- Decorative elements like stickers or small prints
Layout Strategies
Making it look curated, not chaotic:
- Grid layout: Organized and aesthetic
- Heart shape: Classic and recognizable
- Random scatter: Organic and casual
- Timeline: Chronological memory display
- Theme sections: Friends, family, adventures
- Color coordinated: Black and white with color pops
Printing on a Budget
Affordable photo solutions:
- Print at home on photo paper (cheaper per print)
- Use drugstore apps for deals and coupons
- Go smaller (4×6 is way cheaper than 8×10)
- Print in batches when there are sales
- Consider phone printers for instant prints
- Split orders with friends for bulk savings
Keeping It Fresh
Making it low-maintenance:
- Use removable methods so you can swap photos
- Update seasonally or after major events
- Include some blank space for future additions
- Mix photos with printed memes or quotes
- Add small LED lights for nighttime glow
3. Hanging Macrame Plant Holders
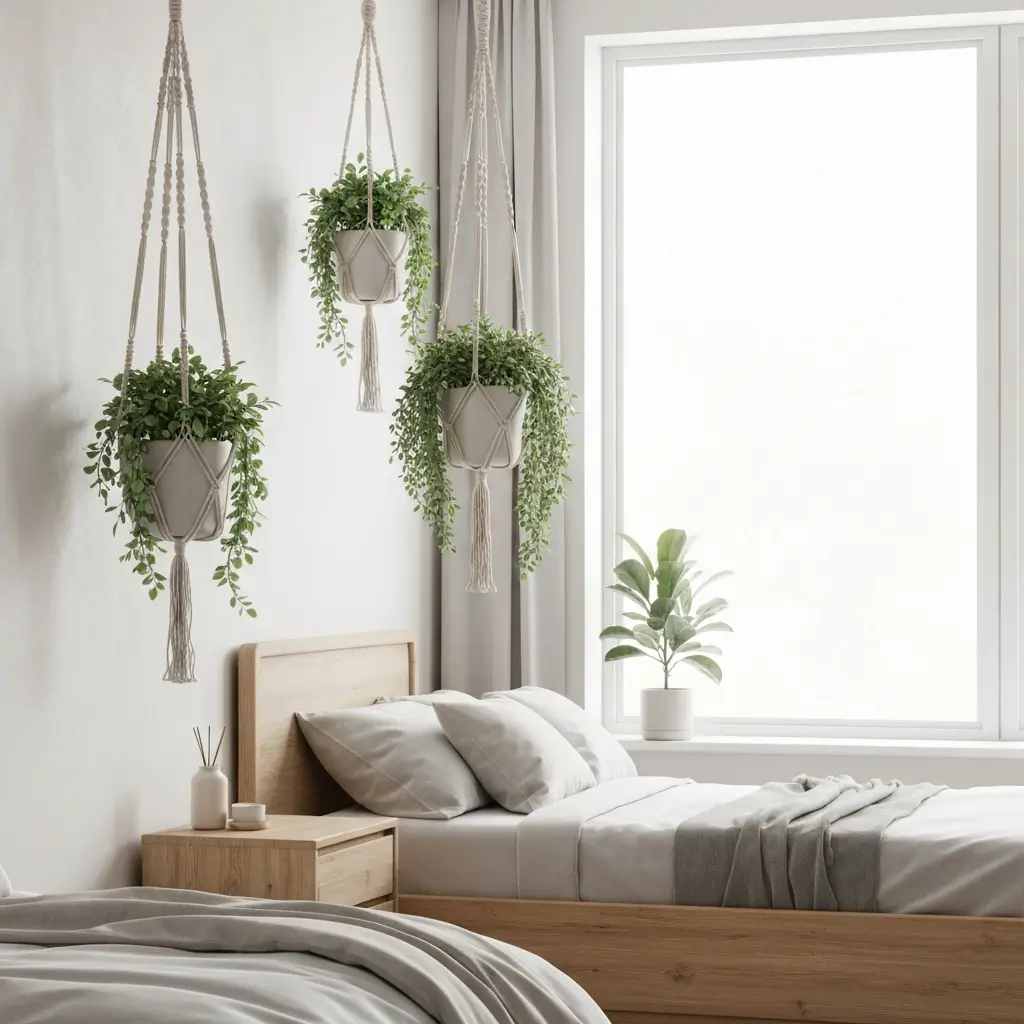
Plants are trendy, and macrame is having its moment—combine them and you get the perfect teen room decor that’s both Instagram-worthy and actually useful. Plus, caring for plants gives you something living to nurture (practice for future responsibilities without the commitment of, like, a pet).
The Boho Plant Vibe
Macrame plant hangers add texture and life to your room while saving precious desk and shelf space. They create that effortless boho aesthetic that’s been everywhere lately, and making them yourself means custom colors and sizes that actually fit your space.
I’ll be honest—my first macrame attempt looked like tangled spaghetti had a bad day. But macrame is surprisingly forgiving, and even wonky handmade pieces have charm. After watching a few YouTube tutorials, I made three plant hangers in one afternoon, and they genuinely look like something from Urban Outfitters.
Basic Macrame Supplies
What you actually need:
- Cotton macrame cord (3mm or 5mm for beginners)
- Metal or wooden ring for top
- Scissors (nothing fancy)
- Tape measure (or eyeball it)
- YouTube tutorial (seriously, your best friend)
- Patience (can’t buy this one)
Beginner-Friendly Patterns
Start simple:
- Basic spiral: Just one knot repeated
- Square knot hanger: Classic and sturdy
- Simple sling: Minimal knotting needed
- Twisted design: Looks complex, isn’t
- Beaded variation: Add wooden beads for flair
Best Plants for Teens
Low-maintenance green friends:
- Pothos: Literally cannot kill it
- Snake plant: Survives neglect beautifully
- Spider plant: Makes babies (cute!)
- Succulents: If you have window light
- Air plants: No soil, minimal care
- Fake plants: No judgment here
Hanging Without Damage
Protecting your deposit (or parents’ patience):
- Use heavy-duty command hooks
- Ceiling hooks in existing holes
- Over-door hooks work great
- Tension rods between close walls
- Adhesive hooks rated for weight
FYI, even if you think you’re bad at plants, try once. A living thing in your room changes the energy more than you’d expect.
Also Read: 10 Easy Cute DIY Room Decor Ideas and Space-Saving Solutions
4. DIY Neon Sign
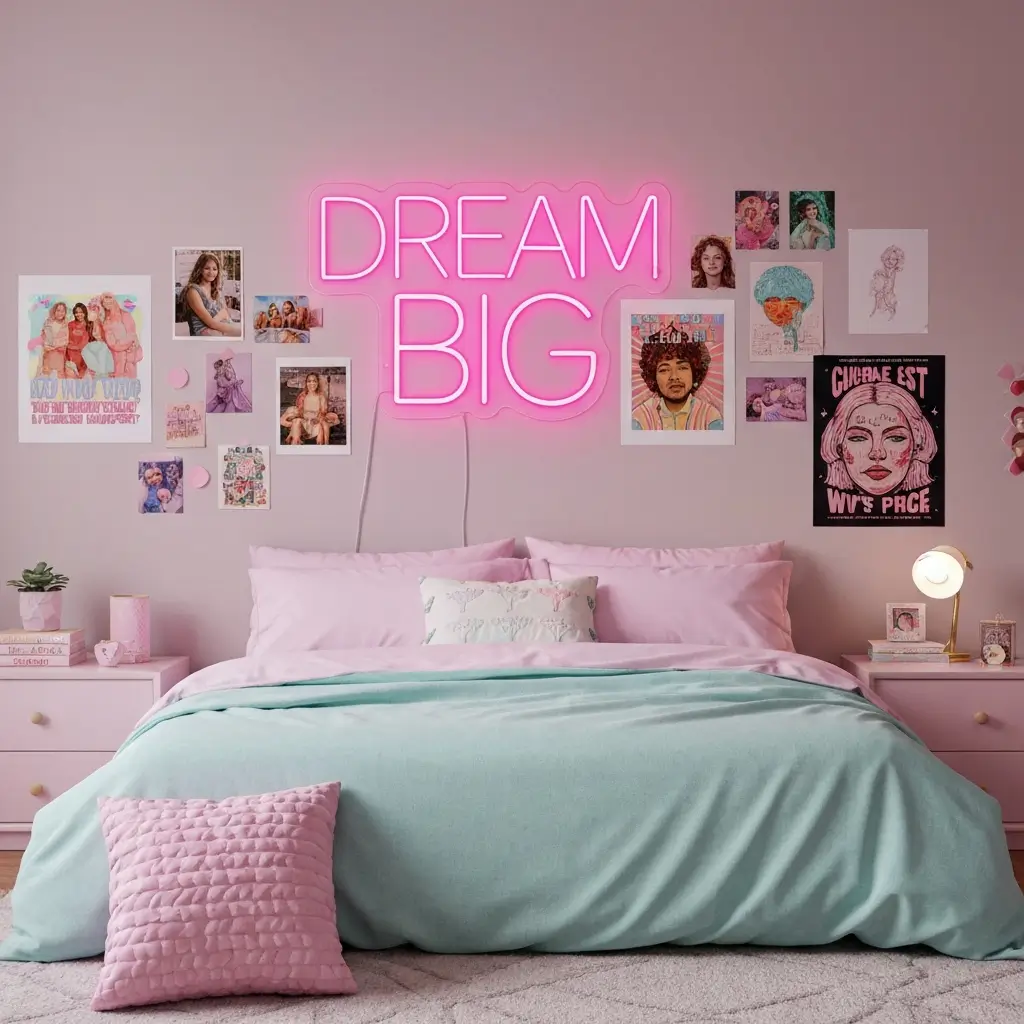
Real neon signs cost hundreds of dollars. DIY versions using LED neon rope? Under $50 and you get to customize exactly what it says. Nothing makes a room feel more personalized than a glowing message or design that speaks to your vibe.
The Custom Glow Factor
LED neon signs create ambiance and personality that regular lights can’t match. Whether it’s your favorite lyric, motivational quote, or just a word that resonates, having it glow on your wall is peak aesthetic energy.
My sister made a “good vibes” sign for her room, and the number of times her friends have asked where she bought it is honestly hilarious. Total cost: $35. Time invested: maybe three hours including design and installation. Looking like you spent way more: priceless.
Materials You’ll Need
Shopping list:
- LED neon rope light in your color choice
- Clear acrylic board for mounting
- Wire or small zip ties for securing
- Power adapter (usually included with lights)
- Pencil for sketching your design
- Strong adhesive or small clips
Design Ideas That Work
Popular teen room options:
- Favorite song lyrics (one line max)
- Motivational words (“breathe,” “create,” “dream”)
- Your name or initials
- Simple shapes (heart, star, moon)
- Music symbols or headphones
- Lightning bolts or clouds
- Zodiac symbols
Assembly Process
Making it happen:
- Sketch your design on the acrylic board
- Carefully bend the LED rope to match
- Secure at regular intervals with ties
- Hide connection points strategically
- Test the light before final mounting
- Hang and bask in the glow
Making It Look Professional
The finishing touches:
- Keep designs simple (complex = harder)
- Use consistent spacing when securing rope
- Hide the power cord behind furniture
- Consider a dimmer switch for mood control
- Mount at eye level for maximum impact
5. Washi Tape Wall Art
Washi tape is basically magic—it’s removable, comes in every pattern imaginable, costs almost nothing, and lets you create entire wall installations without your parents freaking out about damage. It’s the perfect teen room solution.
The No-Commitment Wall Art
Washi tape transforms blank walls into personalized art pieces without paint, nails, or permanent changes. Perfect for renters, teens with strict parents, or anyone who changes their mind about aesthetics every three months (same, honestly).
I’ve used washi tape to create geometric patterns, outline fake windows, make inspirational quote displays, and even a faux headboard. The best part? When I got bored with one design, I just peeled it off and tried something new. Zero commitment, infinite possibilities.
Creative Design Ideas
What you can create:
- Geometric patterns: Triangles, hexagons, diamonds
- Faux frames: Create picture frame outlines
- Quote displays: Spell out favorite words
- Rainbow stripes: Colorful and cheerful
- Mountain ranges: Minimalist and trendy
- Headboard alternative: Frame your bed
- Border accents: Define spaces
Application Tips
Getting clean results:
- Plan your design with pencil marks first
- Use a level for straight lines (or embrace imperfection)
- Press firmly as you apply each strip
- Overlap corners neatly for professional look
- Start with smaller designs to build confidence
Pattern and Color Strategy
Making it cohesive:
- Stick to 2-3 colors maximum
- Mix patterns with solid colors
- Match tape colors to your room palette
- Consider metallic gold or silver for accents
- Use gradient effects from light to dark
Beyond Walls
Other washi tape uses:
- Decorate light switches
- Frame mirrors or existing art
- Add patterns to furniture edges
- Customize phone cases or laptops
- Organize notebooks and planners
- Label storage boxes
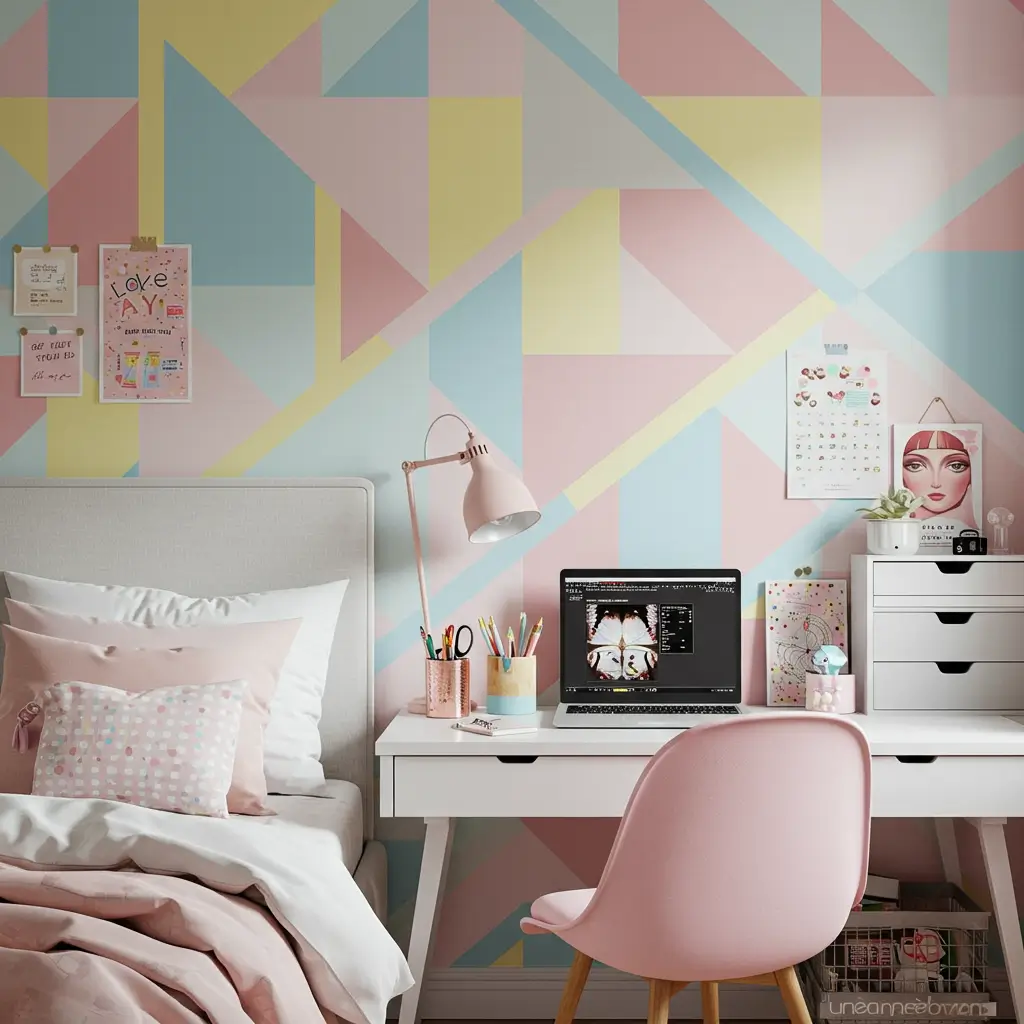
6. Custom Painted Accent Wall
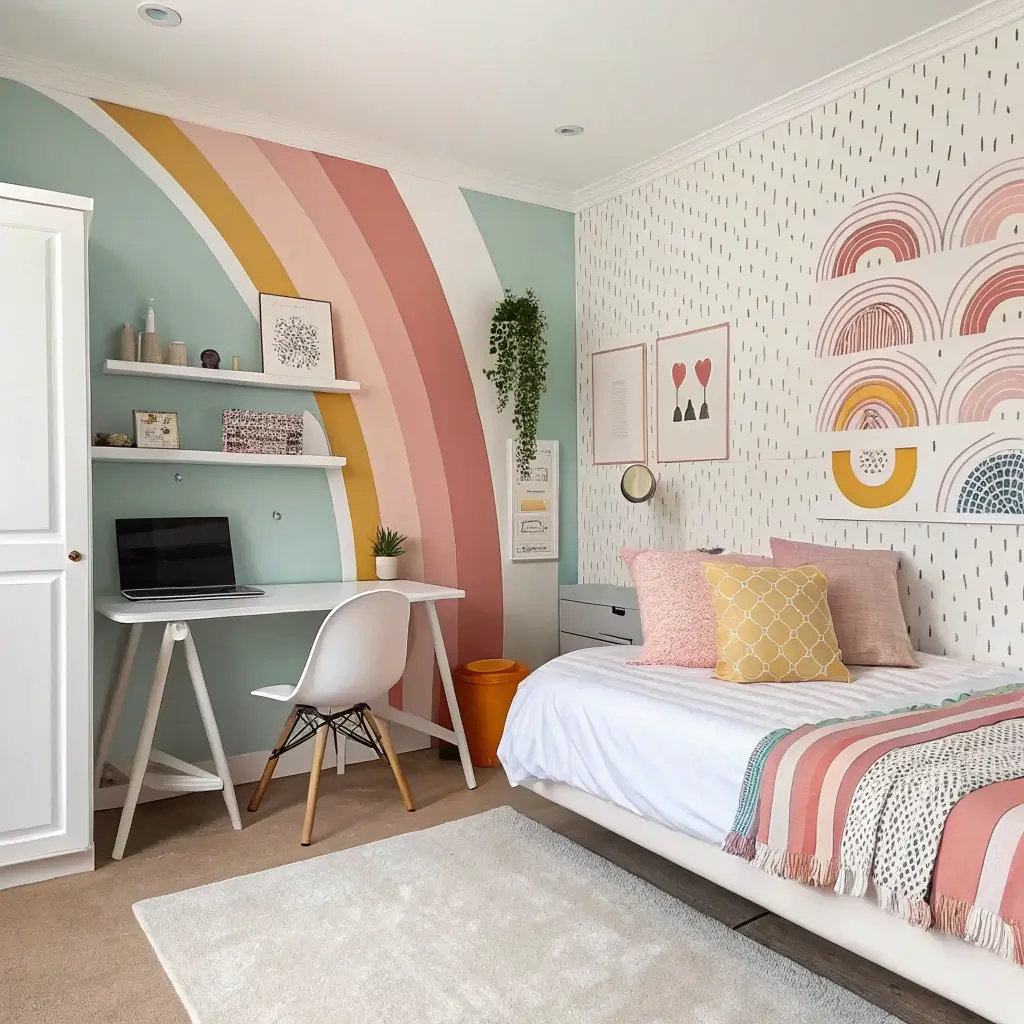
An accent wall completely transforms a room, and painting one yourself (with parental permission, obviously) gives you total control over your space. It’s the most dramatic change on this list, but also potentially the most rewarding.
The Statement Wall Impact
One painted wall changes everything about how your room feels. It creates a focal point, adds personality, and makes your space feel intentionally designed instead of just default bedroom.
When my sister painted her accent wall dark blue (after weeks of begging), her entire room’s vibe shifted. What was once a generic space became moody, sophisticated, and totally her. The wall anchored all her other decor choices and made everything else look more intentional.
Getting Parental Approval
Convincing the adults:
- Show inspiration photos of how it’ll look
- Offer to do it yourself (less money)
- Promise to repaint if you move/redecorate
- Start with one wall, not the whole room
- Choose a color that’s not terrifying
- Explain how it’ll make you love your space
Color Selection Strategy
Choosing wisely:
- Dark colors: Moody, cozy, dramatic (navy, forest green, charcoal)
- Pastels: Soft, calming, trendy (sage, blush, lavender)
- Bold colors: Energizing, personality-filled (terracotta, mustard, teal)
- Neutrals: Sophisticated, versatile (warm beige, soft gray)
Design Beyond Solid Color
Getting creative:
- Ombre effect: Gradient from light to dark
- Geometric shapes: Tape off triangles or mountains
- Stripes: Horizontal or vertical
- Color blocking: Two colors, split horizontally
- Textured paint: Adds dimension
DIY Painting Process
Making it happen:
- Get permission and paint approval
- Prep the wall (clean, tape edges)
- Prime if going dark over light
- Paint 2-3 thin coats
- Remove tape while slightly wet
- Touch up any mistakes
- Let cure before moving furniture back
Also Read: 12 Inspiring Aesthetic Room Decor DIY Ideas for Every Room
7. Upcycled Mason Jar Storage
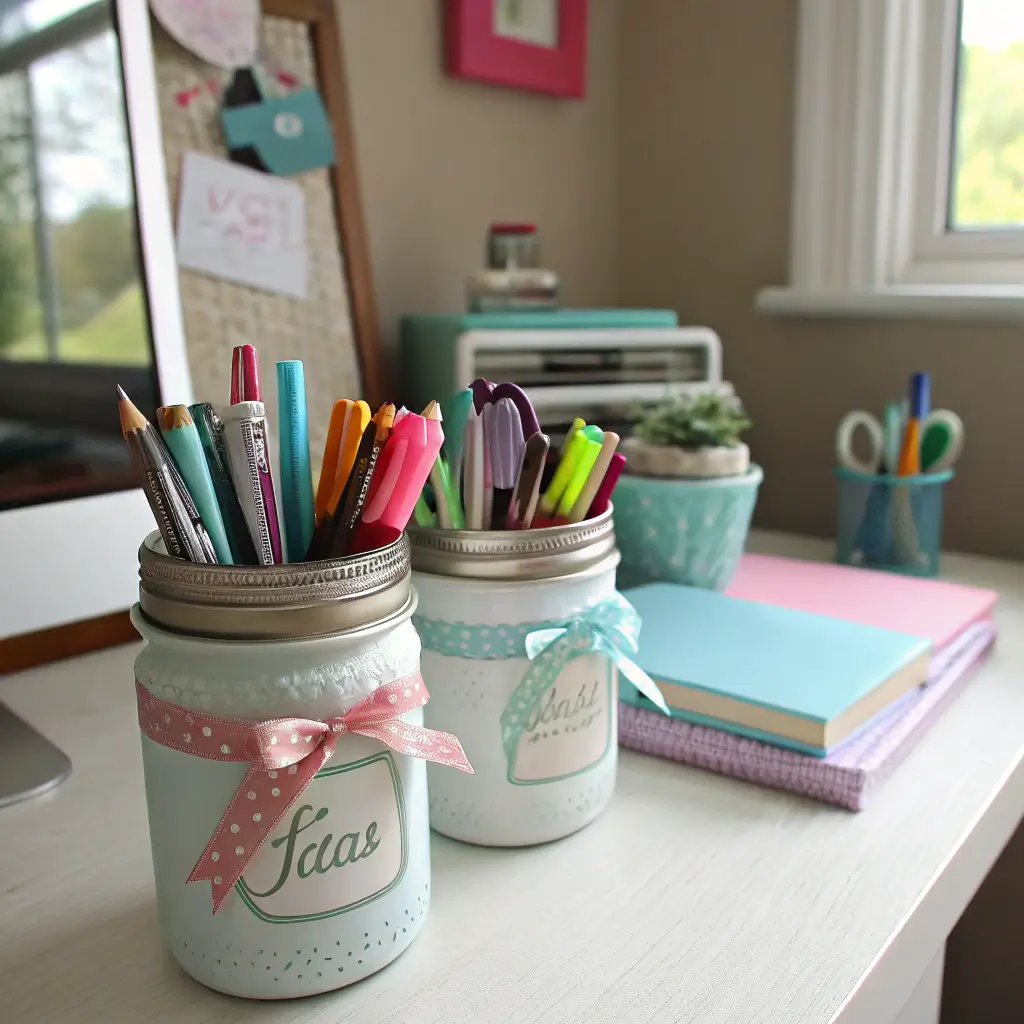
Mason jars are the Swiss Army knife of teen room organization—they’re cheap (or free if you save them), versatile, and look way cuter than plastic containers. Paint them, and suddenly you have custom storage that matches your aesthetic.
The Organized Aesthetic
Mason jar storage keeps your stuff together while looking intentional instead of messy. From makeup brushes to pens to random trinkets, jars make everything look more curated and less chaotic.
I started collecting mason jars after noticing I was buying expensive organizers that honestly weren’t that cute. Now I have painted jars holding everything from art supplies to hair ties, all coordinated in my room’s color scheme. Total investment: maybe $20 in paint. The organized, aesthetic vibe: totally worth it.
Painting Your Jars
The process:
- Clean jars thoroughly (remove labels completely)
- Choose acrylic or chalk paint
- Apply 2-3 thin coats (let dry between)
- Seal with clear coat for durability
- Optional: paint lids too
Cute Customization Ideas
Making them unique:
- Pastel ombre: Gradient of soft colors
- Glitter coating: Sparkle on everything
- Two-tone: Different colors on jar and lid
- Polka dots: Hand-painted or stickers
- Chalkboard paint: Write contents with chalk
- Metallic spray paint: Gold or rose gold
What to Store
Organization ideas:
- Makeup brushes and beauty tools
- Pens, pencils, and markers
- Hair accessories and jewelry
- Craft supplies
- Desk essentials
- Cotton balls and swabs
- Charging cables (finally organized!)
- Random small items that usually clutter
Display Strategies
Making it look intentional:
- Group jars in odd numbers (3 or 5)
- Vary jar sizes for visual interest
- Place on matching tray for cohesion
- Stick to your room’s color palette
- Add cute labels or tags
- Include one with fairy lights (glowing jar!)
8. Boho Dreamcatcher Decor
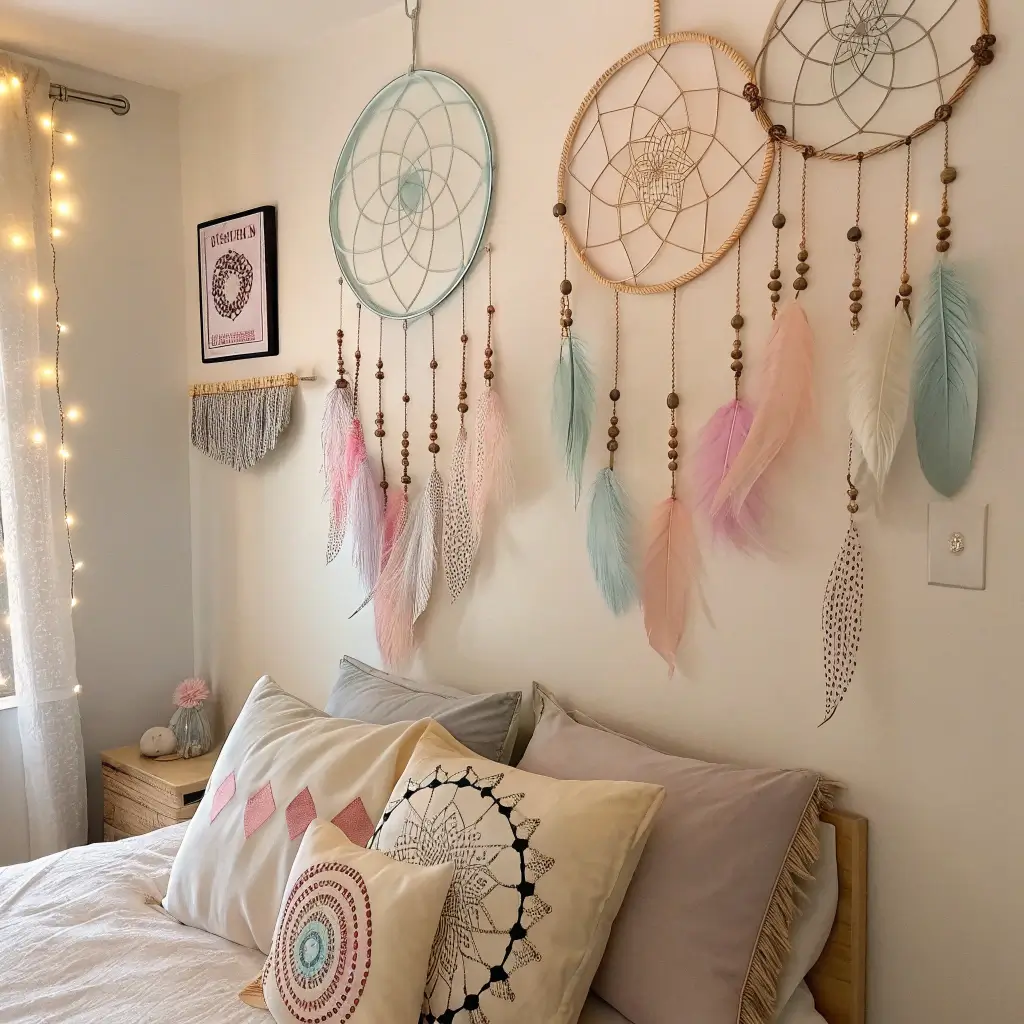
Dreamcatchers add that boho, free-spirited vibe that’s perfect for teen rooms. Making your own means custom colors, sizes, and styles that actually match your aesthetic instead of settling for whatever Target has.
The Boho Touch
Dreamcatchers add softness and movement to walls in a way that prints or posters can’t. They catch light, create interesting shadows, and bring that relaxed, creative energy that makes rooms feel lived-in and loved.
My first dreamcatcher was definitely lopsided and the “webbing” looked drunk, but honestly? It still looked cute hanging on my wall. The imperfect, handmade quality is actually part of the charm. Now I can make them in like an hour, and they’re great gifts too.
Basic Supplies
What you need:
- Metal or wooden hoop (any size)
- Yarn or embroidery floss for webbing
- Feathers (craft store or collected)
- Beads (optional but cute)
- Scissors and possibly needle
- Glue for securing ends
Making the Dreamcatcher
Simple process:
- Wrap hoop with yarn (or leave bare)
- Create web pattern inside hoop
- Add beads while weaving if desired
- Attach hanging string at top
- Add feathers and beads at bottom
- Customize with extras
Customization Ideas
Making it yours:
- Color themes: Match your room palette
- Add dried flowers: Romantic touch
- Include photos: Personal memories
- LED lights: Modern twist
- Multiple hoops: Layered design
- Ribbon instead of feathers: Different vibe
Placement Ideas
Where they look best:
- Above bed as focal point
- On wall near window
- Grouped in odd numbers
- Hanging from curtain rod
- Over desk or vanity
IMO, the wonky handmade ones have more character than perfect store-bought versions. Embrace the imperfection.
9. Floating Bookshelf Display
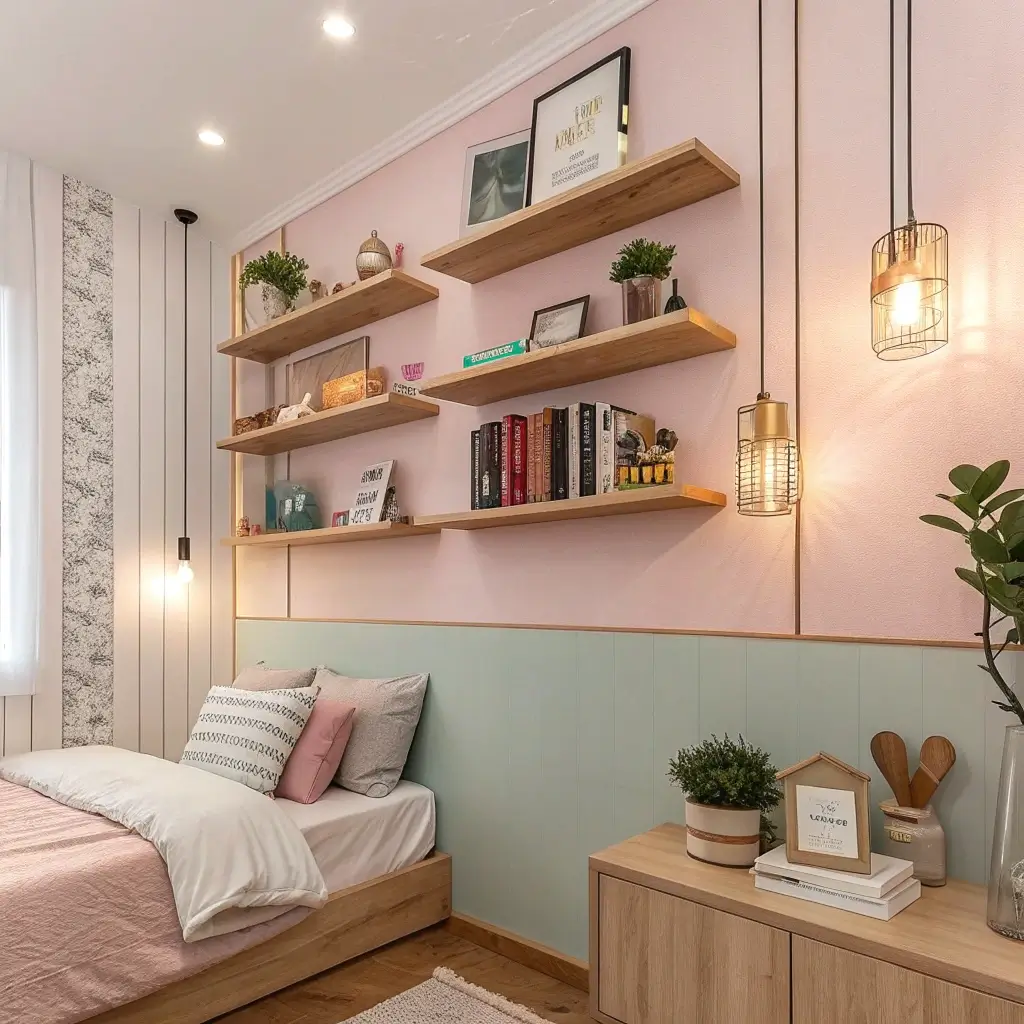
Floating bookshelves are like magic tricks for your wall—books appear to defy gravity while creating that intellectual, curated vibe. They’re conversation starters and practical storage in one cute package.
The Illusion of Floating
Floating shelves hide their brackets to make your books look suspended in mid-air. It’s the kind of detail that makes people stop and ask “wait, how does that work?” while you just smile mysteriously.
My sister installed three floating book shelves at different heights, creating this cascading effect up her wall. She displays her favorite books with the prettiest covers facing out, plus small plants and polaroids. The whole setup cost under $30 and looks like intentional design instead of just storage.
Installation Basics
Making it work:
- Purchase floating shelf kits (brackets hide inside)
- Choose anchor book (hardcover works best)
- Stack books on top
- Add decorations between books
- Mount at varied heights for visual interest
Styling Your Floating Books
Making it aesthetic:
- Choose books with pretty spines or covers
- Add small succulents or air plants
- Include framed photos
- Mix horizontal and vertical stacking
- Coordinate book colors if possible
- Leave some intentional space
What Else to Display
Beyond books:
- Small plant in cute pot
- Polaroid photos
- Vintage camera or trinkets
- Inspirational quotes in frames
- String lights wound around
- Small decorative objects
Safety and Placement
Doing it right:
- Use proper wall anchors (drywall needs special ones)
- Ensure books are secure (test before fully styling)
- Mount at safe height (not over bed where things could fall)
- Follow weight limits for brackets
- Consider earthquake safety if relevant
Also Read: 10 Unique DIY Crafts Room Decor Ideas for a Trendy
10. Glitter Resin Trinket Dishes
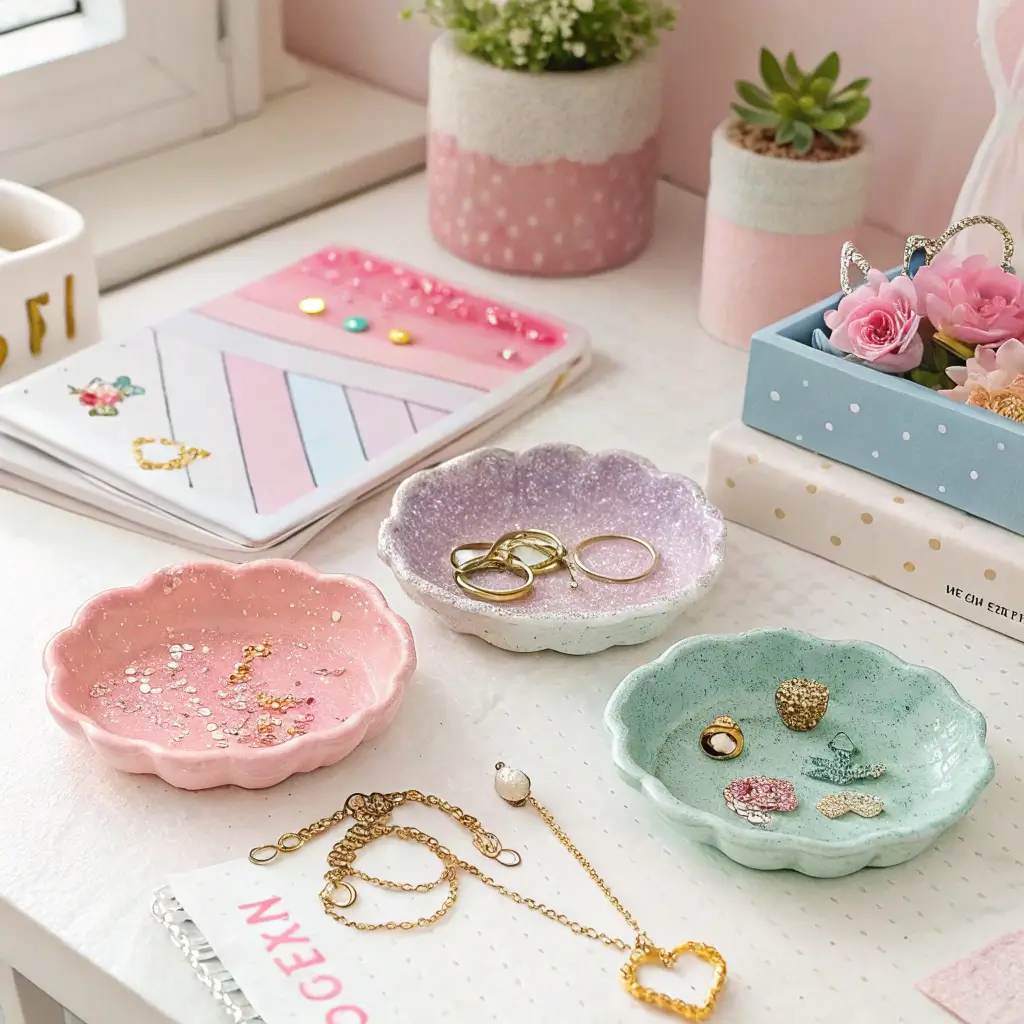
Resin crafts look intimidating, but small trinket dishes are actually perfect beginner projects. You create custom catch-all dishes for jewelry, hair ties, or random small things while learning a new craft skill.
The Sparkly Organization
Resin dishes combine function with art—they hold your stuff while looking like something from an expensive boutique. The glitter adds that extra touch of personality and sparkle that makes them uniquely yours.
I made resin dishes during winter break when I was bored, and they turned out way better than expected. Now I have them on my desk, dresser, and bathroom counter. Friends keep asking where I bought them, and telling them “I made them” feels unexpectedly satisfying.
Resin Basics
What you’ll need:
- Epoxy resin kit (follow instructions carefully)
- Silicone molds (small dish shapes)
- Glitter in your choice of colors
- Mixing cups and stir sticks
- Protective gloves (resin is sticky)
- Well-ventilated space (open windows!)
Color Combinations
Pretty glitter options:
- Monochrome: All one color in different shades
- Ombre: Gradient effect
- Galaxy: Blues, purples, and silver
- Rose gold: Trending forever apparently
- Rainbow: All the colors
- Holographic: Iridescent sparkle
The Resin Process
Step by step:
- Mix resin according to package directions
- Add glitter to mixed resin
- Pour into silicone mold
- Pop any bubbles with toothpick
- Let cure 24-72 hours (be patient!)
- Demold and use
Safety First
Important stuff:
- Work in ventilated area (outside if possible)
- Wear gloves (resin sticks to everything)
- Protect work surface
- Follow mixing ratios exactly
- Keep away from pets and kids
- Don’t rush the curing process
Uses for Trinket Dishes
What to store:
- Jewelry (rings, earrings, bracelets)
- Hair ties and bobby pins
- Desk supplies (paper clips, rubber bands)
- Keys and change
- Small crystals or rocks
- Random tiny items that usually get lost
11. Handmade Fabric Wall Banners
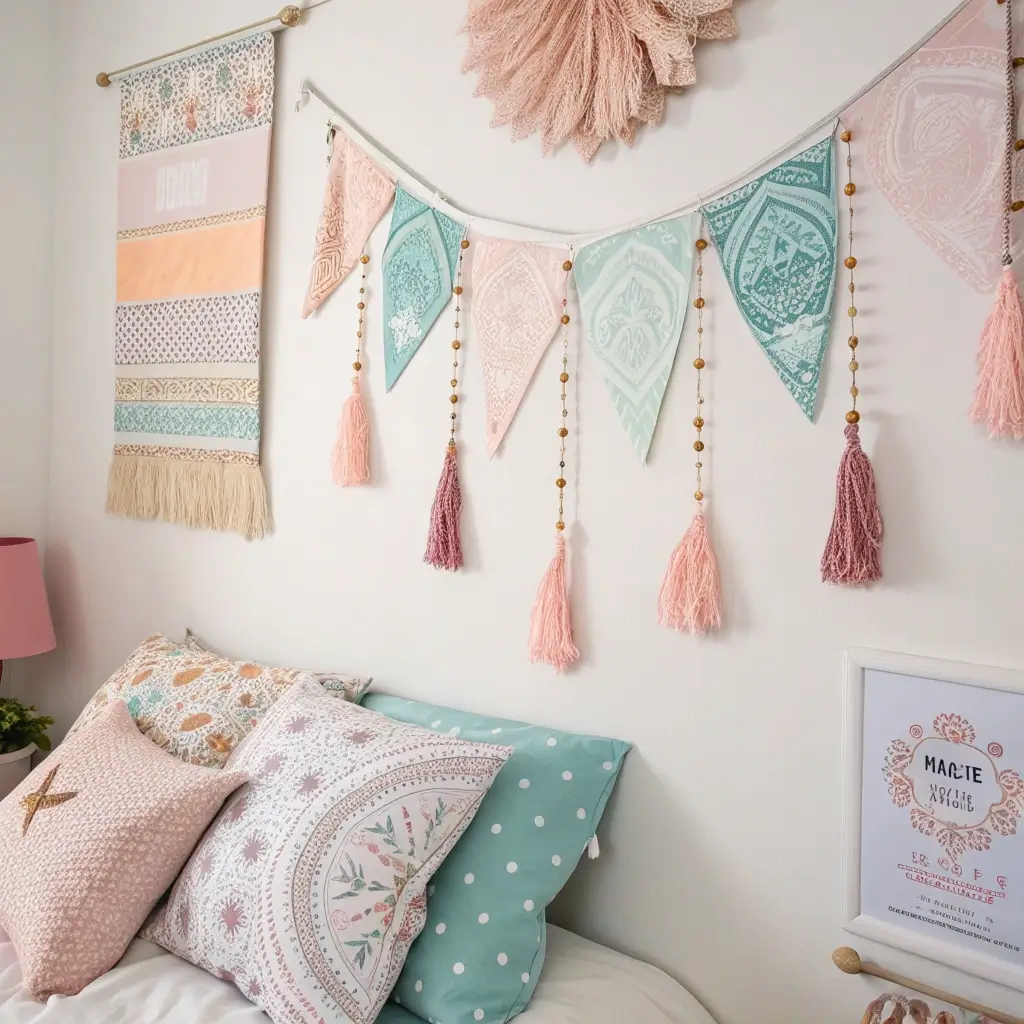
Fabric banners add color, texture, and personality to walls while being super easy to make. They’re like flags for your personal space, declaring your vibe to anyone who enters.
The Textile Statement
Fabric banners bring softness to walls in a way that posters or prints can’t. They add movement, texture, and that handmade touch that makes rooms feel curated and personal instead of just decorated.
I made my first banner using fabric scraps from old clothes I was getting rid of anyway. Cut them into triangles, strung them on twine, and boom—instant wall art that cost literally nothing. Now I make new ones seasonally to match my changing aesthetic.
Creating Your Banner
Simple process:
- Choose fabrics (coordinate colors/patterns)
- Cut triangle shapes (or other shapes)
- Attach to string or ribbon with glue or sewing
- Space evenly along the string
- Hang with command hooks
Fabric Selection
What works:
- Old t-shirts: Free and nostalgic
- Fabric scraps: From other projects
- Bandanas: Pre-hemmed and cute
- Felt: Doesn’t fray, easy to work with
- Burlap: Rustic vibe
- Patterned quilting fabric: Coordinated colors
Design Variations
Getting creative:
- Triangle pennants: Classic banner style
- Square flags: Different look
- Layered shapes: Dimension and interest
- Mixed sizes: Varied visual weight
- Add tassels: Between fabric pieces
- Include letters: Spell words or name
Placement Ideas
Where they look great:
- Above bed as headboard alternative
- Across window frame
- Along one wall as border
- Over doorway as entrance decor
- Diagonal across corner
- Multiple banners at different heights
No-Sew Options
If you can’t/won’t sew:
- Use fabric glue
- Hot glue gun works
- Fold fabric over string and glue
- Use iron-on hem tape
- Clothespins to attach (can swap fabrics easily)
12. Cork Board Inspiration Wall
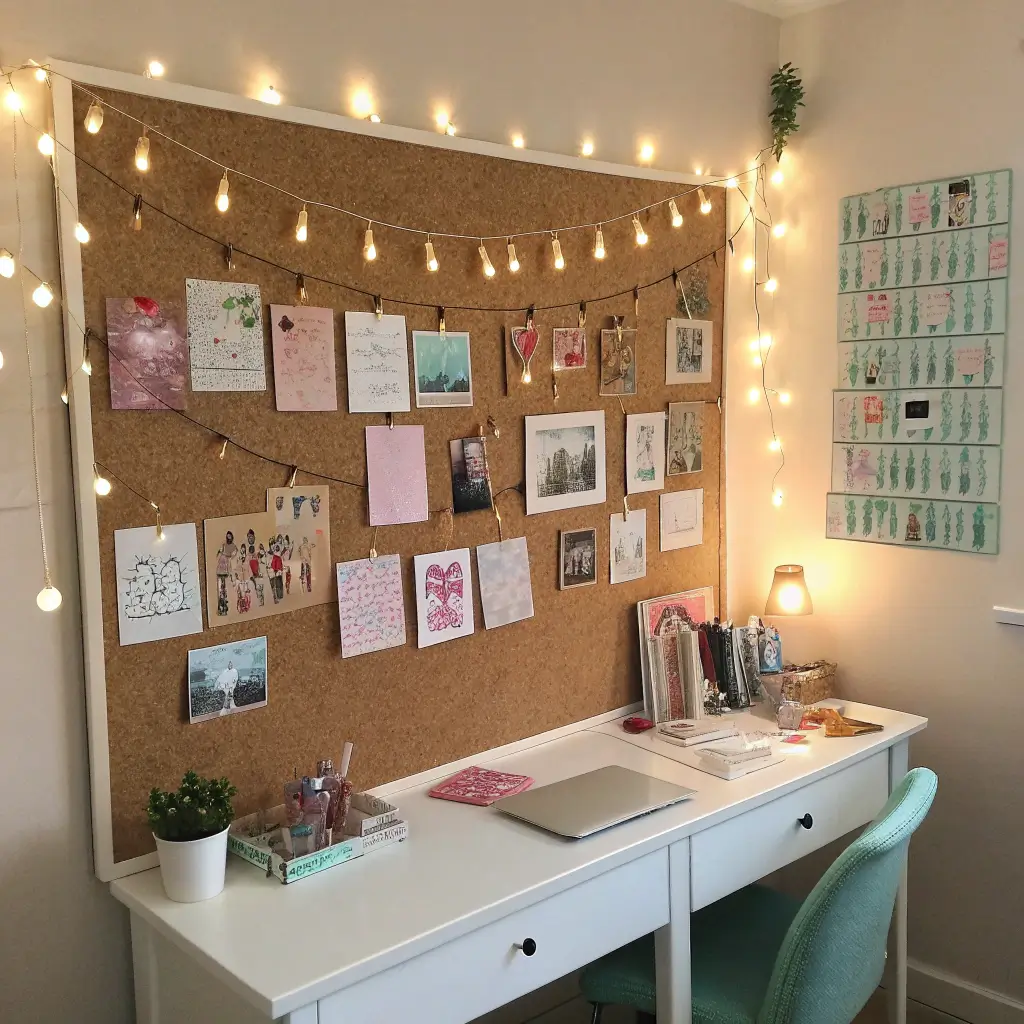
Cork boards aren’t just boring office supplies anymore. When you customize them and style them right, they become functional art pieces that hold your life together while looking intentional.
The Organized Inspiration
Cork boards combine pretty and practical better than almost any other decor. They hold your photos, notes, tickets, and random important papers while looking like a curated inspiration board instead of a chaotic mess.
My cork board transformation involved fabric, decorative pins, and actual organization. Now it displays concert tickets, polaroids, motivational quotes, and my schedule without looking cluttered. It’s functional art that actually helps me keep my life together.
Customizing Your Board
Making it cute:
- Cover with fabric: Wrap and staple behind board
- Paint the frame: Bold color or metallic
- Add decorative trim: Ribbon or ric-rac
- Create sections: Use washi tape to divide
- Upgrade pins: Pretty pushpins or mini clothespins
What to Display
Inspiration and function:
- Photos and polaroids
- Concert or movie tickets
- Inspirational quotes
- Monthly calendar
- Important reminders
- Art or magazine clippings
- Postcards from friends
- Small mementos
Organization Strategy
Keeping it functional:
- Create zones (tasks, memories, inspiration)
- Update regularly (remove old stuff)
- Use different colored pins for categories
- Leave some open cork visible
- Balance busy and calm areas
Alternative Cork Ideas
Beyond basic rectangle:
- Hexagon shapes: Modern and geometric
- Circle boards: Soft and unexpected
- Multiple small boards: Grid of mini boards
- Letters or numbers: Spell your name
- Map background: Covered in map before cork
Making Your Room Truly Yours
Here’s what nobody tells you about DIY teen room decor: it doesn’t have to be perfect to be perfect.
After watching countless room transformations and attempting way too many Pinterest fails, I’ve learned that the best rooms are the ones that evolve with you and actually reflect your personality.
Start with one or two projects that genuinely excite you instead of trying to copy someone else’s entire aesthetic. Your room should tell your story, not someone else’s.
Maybe you’re into maximalist colorful chaos, or maybe you prefer clean minimalist vibes. Both are valid, and both can look amazing.
The beauty of DIY is that you’re not locked into anything. Made a banner you hate? Take it down. Painted jars that don’t match anymore?
Repaint them. Your room can evolve as you do, and that’s actually the point. Teen years are all about figuring out who you are, and your room is the perfect low-stakes place to experiment.
Whether you’re team fairy lights or team painted walls, remember that your space should make you happy first and camera-ready second.
If something brings you joy but wouldn’t photograph well, keep it anyway. Your room, your rules, your self-expression.
Now stop scrolling through aesthetic room accounts and actually make something. Pick one project from this list, gather your supplies, and create something that’s uniquely yours.
Future you—the one living in a room that actually feels like home—will thank you for starting today. 🙂
Now excuse me while I go rearrange my fairy lights for the hundredth time this month. It’s not procrastination; it’s “refining the aesthetic.” Totally different. :/


