Do It Yourself Outdoor Fireplace: The Ultimate Build Guide

The crackle of a warm fire, the soft glow illuminating a gathering of friends and family, the cozy ambiance that transforms a simple backyard into a personal retreat—this is the magic of an outdoor fireplace. Undertaking a do it yourself outdoor fireplace project is one of the most rewarding endeavors a homeowner can pursue, offering not just a source of warmth but a stunning architectural centerpiece that increases property value and enhances outdoor living.
While the prospect may seem daunting, with meticulous planning, the right materials, and a methodical approach, building a durable and beautiful fireplace is an achievable goal for a dedicated DIYer.
This exhaustive guide will walk you through every single step of the process, from the initial spark of an idea to the final celebratory lighting of your first fire. We will demystify the critical planning phases, including navigating local building codes and selecting the optimal fuel type for your needs. You will receive a detailed breakdown of all necessary materials and tools, followed by a comprehensive, step-by-step construction manual that covers everything from pouring a structurally sound foundation to building the firebox and chimney.
Furthermore, we will equip you with essential knowledge on long-term maintenance, safety protocols, and troubleshooting common issues. By committing to this process, you can create a lasting legacy in your backyard, a focal point for countless memories for years to come.
Section 1: Laying the Groundwork – Planning and Design
The success of any significant DIY project hinges on thorough preparation. Rushing the planning stage is the most common cause of errors, cost overruns, and safety hazards. A well-conceived plan is your blueprint for success.
Establishing Your Budget and Scope
Before falling in love with a specific design, it’s crucial to establish a realistic budget. The cost of a do it yourself outdoor fireplace can vary dramatically based on size, materials, and complexity. A simple, small fireplace built with a pre-fabricated kit might cost around $1,300 in materials, as one DIY project demonstrated . A larger, custom-built stone fireplace can easily run into the thousands. When budgeting, account for all material categories: foundation (concrete, gravel, rebar), structural components (cinder blocks, firebrick), the fireplace insert (if used), veneer or finishing materials (stone, stucco), and various supplies like mortar, adhesive, and tools you may need to purchase or rent.
Simultaneously, define the project’s scope. Consider the primary purpose: is it for intimate family gatherings or large-scale entertaining? This will determine the size. Assess your available space, ensuring the fireplace will be proportionate to your yard and comply with required clearance distances from structures, property lines, and overhanging trees .
Choosing Your Fireplace’s Fuel Type
The choice of fuel is a fundamental decision that affects construction complexity, ongoing cost, and user experience. The three main options are wood-burning, gas, and electric.
- Wood-Burning Fireplaces: This is the classic choice, offering the authentic crackling sounds, smoky aroma, and vibrant flames that many desire.
- Pros: Authentic ambiance, no utility connection needed, can be used during power outages.
- Cons: Requires a chimney and smoke chamber, necessitates regular cleaning of ash and creosote, produces more smoke and sparks, requires a steady supply of dry, seasoned firewood .
- Construction Note: Requires the most complex build, with a properly sized firebox and chimney to ensure a good draft.
- Gas Fireplaces (Natural Gas or Propane): These offer incredible convenience and control at the flip of a switch.
- Pros: Clean-burning (no ash or soot), instant on/off control, adjustable flame height, no smoke or sparks.
- Cons: Requires a professional to run a gas line, lacks the authentic wood-burning ambiance, usually has a higher initial cost due to the insert and gas line installation.
- Operating Cost: Generally cheaper to run. A 5,100 BTU gas fireplace costs about $0.05 per hour to operate, compared to $0.18 per hour for an equivalent electric unit .
- Electric Fireplaces: The simplest option to install, as they require no venting.
Selecting a Design and Checking Codes

With a budget and fuel type in mind, explore design ideas. Popular styles include rustic stone, modern linear, traditional brick, or simplified kits using stackable concrete blocks . Platforms like Pinterest offer a wealth of visual inspiration .
Crucially, before finalizing your design, you must check local building codes and HOA regulations. This is a non-negotiable step for safety and legality. Codes will dictate critical requirements such as:
- Minimum clearance from structures and property lines.
- Whether a permit is required.
- Chimney height specifications.
- The need for a spark arrestor .
Contact your local municipal building department to understand the specific rules in your area. Ignoring this step could result in being forced to dismantle your finished fireplace or facing liability issues.
Section 2: Materials and Tools – The DIY Fireplace Builder’s Checklist
Gathering all materials and tools before starting will make the construction process smoother and more efficient. The following is a comprehensive list, though quantities will vary based on your specific design.
Comprehensive Materials List
- Foundation Materials: Gravel (for a stable base), concrete mix, concrete wire mesh, and rebar for reinforcement .
- Structural Materials: Cinder blocks (standard and cap blocks) for the base and core structure. For the firebox, you will need firebrick and refractory mortar, which are designed to withstand extreme heat. A pre-cast concrete lintel is required to span the top of the firebox opening .
- Fireplace Insert (Optional but Recommended for Gas): A pre-fabricated steel fireplace insert simplifies construction immensely, especially for gas units .
- Chimney Components: Chimney flue pipes (typically stainless steel for durability) and a chimney cap or spark arrestor .
- Veneer/Finishing Materials: This is the visible exterior. Choices include natural stone veneer, brick, or stucco. You will need the appropriate mortar or adhesive for your chosen material.
- Fasteners and Supplies: Concrete wedge anchors to secure the wooden frame (if building a surround), masonry screws, and a high-temperature sealant for the chimney flashing .
Essential Tools for the Job
Having the right tools is paramount for a professional-looking result.
- Excavation and Site Prep: Shovel, wheelbarrow, tamper.
- Foundation Work: Wooden stakes and 2×6 boards for concrete forms, a concrete mixing tub or rental cement mixer, a magnesium float for finishing the concrete, and a hammer drill with a masonry bit for installing anchors .
- Masonry Work: Mason’s trowel, mortar hawk, a 4-foot level (critical for ensuring everything is plumb and level), a torpedo level, a “Big Ass Square” or large framing square to keep corners perfect, and a dead blow hammer for adjusting blocks without chipping them .
- General Tools: Tape measure, chalk line, safety glasses, work gloves, and multiple ladders for building the chimney .
Table: DIY Outdoor Fireplace Fuel Type Comparison
Section 3: The Step-by-Step Construction Guide
This section provides a detailed, sequential guide to building your outdoor fireplace. Work methodically and check your level and square at every stage.
Step 1: Site Preparation and Foundation Pour
The foundation is the most critical part of the structure; a failure here will compromise the entire fireplace.
- Mark and Excavate: Mark the outline of your foundation using stakes and string. The foundation should be larger than the fireplace’s footprint. Dig down at least 6-8 inches, ensuring the soil is level and compacted .
- Build the Form: Construct a wooden form using 2×6 boards to contain the concrete. Use a level to ensure the top of the form is even.
- Add Base and Reinforcement: Pour 1.5-2 inches of gravel into the excavation and tamp it down. Then, place wire mesh supported by mesh stands for reinforcement. For added strength, especially in colder climates, add rebar in a grid pattern .
- Mix and Pour Concrete: Following the manufacturer’s instructions, mix and pour the concrete into the form. Use a screed (a long, straight board) to level the concrete by dragging it across the top of the form. Use a magnesium float to smooth the surface. Let the concrete cure for the recommended time, typically 24-48 hours, before proceeding .
Step 2: Building the Cinder Block Base and Heat Shield
The base elevates the firebox and provides a stable platform.
- Lay the First Course: Mix mortar according to package directions. Lay the first course of cinder blocks on the cured foundation, ensuring they are level and square. Fill the hollow cores of the blocks with mortar or concrete for added stability .
- Lay the Cap Blocks: Lay a second course of solid cap blocks, orienting them perpendicular to the first course to tie the structure together and create a solid surface for the firebox .
- Construct the Heat Shield: For open-fireplace designs, you may need to build a heat shield with additional cinder blocks to protect the surrounding structure from radiant heat. Dry-lay the blocks around the planned fireplace insert location to ensure a perfect fit before mortaring them in place .
Step 3: Installing the Firebox and Building the Smoke Chamber
This is the heart of your fireplace.
- Install the Insert or Build the Firebox: If using a pre-fabricated insert, carefully set it in place on the base, following the manufacturer’s instructions . If building a traditional masonry firebox, use firebrick and refractory mortar to construct the walls and floor of the box. The back wall should be vertical, while the side walls are often angled inward to form a smoke chamber that directs smoke toward the chimney.
- Install the Lintel: Place a pre-cast concrete lintel across the top of the firebox opening to support the masonry above it. This is a critical structural component .
Step 4: Constructing the Chimney
The chimney creates the draft that pulls smoke up and out of the firebox.
- Build the Smoke Chamber: Above the lintel, continue building upward with your blocks or bricks, gradually stepping them inward (a process called “racking”) to create a smooth, tapered transition from the wide firebox to the narrower chimney flue. This area is called the smoke chamber and is crucial for proper draft .
- Stack the Chimney: Continue stacking blocks to form the chimney. It is vital to keep the chimney perfectly plumb (vertical). Use a level on all sides with every new course. The chimney should extend to a height that ensures a good draft, typically at least 2 feet above any roof line or obstacle within 10 feet .
- Install the Flue and Cap: Place the metal flue liner inside the chimney structure. Top the chimney with a rain cap and a spark arrestor to prevent embers from escaping and water from entering .
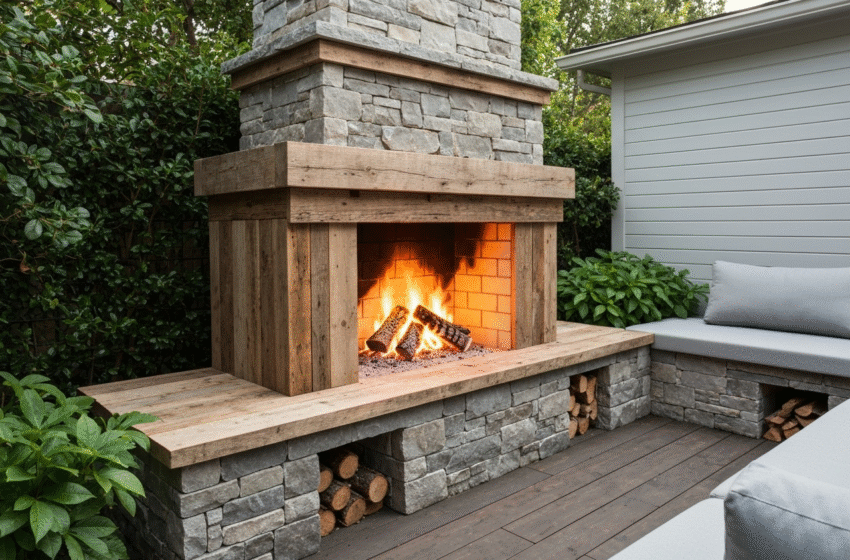
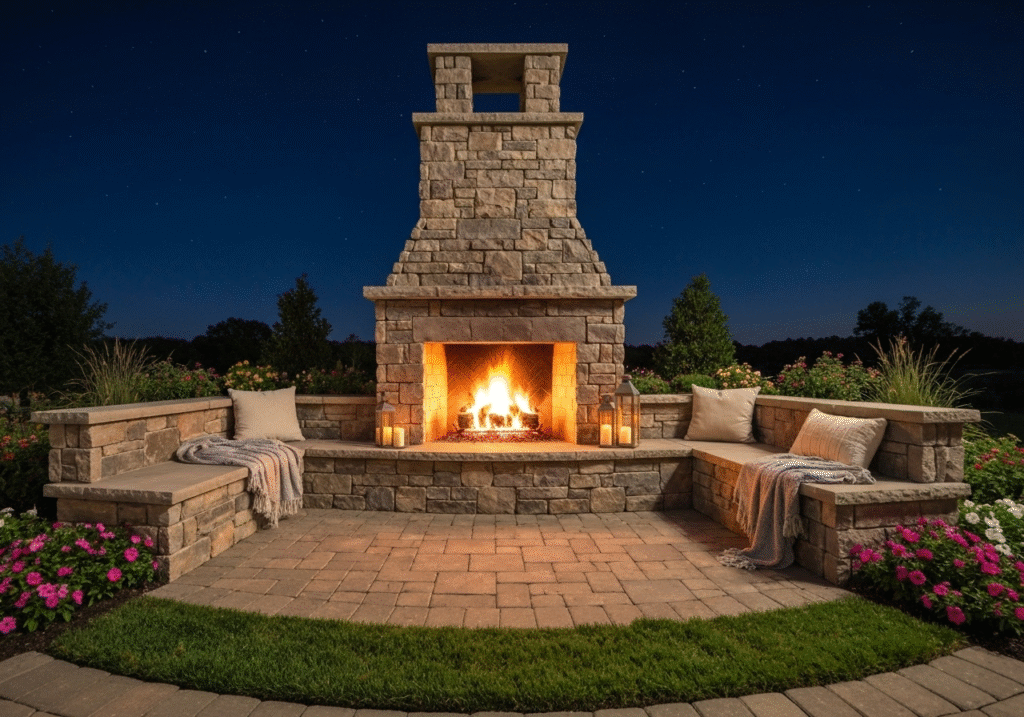
Step 5: Applying the Finishing Veneer
This step transforms the structural block core into the beautiful finished product.
- Prepare the Surface: Ensure the cinder block surface is clean and free of dust.
- Apply the Veneer: Using the appropriate mortar or adhesive, apply your chosen finishing material—stone, brick, or stucco. Work in small sections. For stone or brick, butter the back of each piece with mortar and press it firmly into place. Use a trowel to clean up excess mortar from the joints.
- Point the Joints: Once the mortar in the joints has started to set but is still pliable, use a jointing tool to smooth and compress the mortar, creating a clean, finished look.
Step 6: Curing and First Fire
Your fireplace is not ready for a roaring blaze immediately. Masonry and mortar contain moisture that must be driven out slowly to prevent cracking.
- Curing Period: Allow the entire structure, especially the firebox and mortar, to cure for at least 72 hours or as recommended by your mortar manufacturer.
- The First Fire: Start with a very small fire, using only kindling or a few small logs. Let this burn for an hour or two. The goal is to gently warm the masonry. Over the next several fires, gradually increase the size and duration of the fire. This slow curing process, called “seasoning,” will ensure the longevity of your fireplace.
Section 4: Maintenance, Safety, and Troubleshooting

A well-built fireplace, when properly maintained, will provide decades of enjoyment. Consistent upkeep is simple but essential.
Ongoing Maintenance Schedule
- After Every Use: For wood-burning units, allow ashes to cool completely, then remove them with a shovel and metal bucket. A thin layer of ash can be left to insulate the next fire, but excessive buildup should be avoided .
- Seasonally: Inspect the masonry for cracks or deteriorating mortar and repair them promptly with refractory mortar to prevent water damage . Trim back any foliage or tree branches that have grown within 10 feet of the chimney .
- Annually: Have a professional chimney sweep inspect and clean the chimney, especially for wood-burning fireplaces. Creosote buildup thicker than 1/8 inch is a serious fire hazard . Apply a waterproofing sealant to the exterior masonry (but not the firebox) to protect it from the elements .
Essential Safety Practices
Safety must always be the top priority.
- Clearance: Keep all flammable materials, including furniture, cushions, and decorations, at least three feet away from the fireplace .
- Fire Extinguisher: Always have a fire extinguisher or a garden hose readily accessible whenever the fireplace is in use .
- Supervision: Never leave a fire unattended. Ensure the fire is completely extinguished before leaving the area.
- Proper Fuel: Only burn dry, seasoned hardwoods. Never burn trash, treated wood, or plastics, as they release toxic fumes .
Troubleshooting Common Issues
- Smoke Blows Back into the Sitting Area: This is typically a draft issue caused by a chimney that is too short or obstructions like nearby trees or a poorly designed smoke chamber. Ensure your chimney height meets code and clears nearby obstacles .
- Water Pooling in the Firebox: Check that the chimney cap is securely in place and not clogged. Ensure the hearth slopes slightly away from the firebox opening to shed water.
- Cracks in the Masonry: Small hairline cracks can be filled with refractory mortar. Larger cracks may indicate a foundational issue and should be assessed by a professional.
Conclusion
Building a do it yourself outdoor fireplace is a substantial project that demands careful planning, physical effort, and attention to detail. However, the reward—a permanent, value-adding feature that becomes the heart of your outdoor living space—is immeasurable. By methodically following the steps outlined in this guide—from securing permits and pouring a solid foundation to carefully laying each course and applying the final veneer—you can achieve a professional-quality result. This fireplace will stand not only as a testament to your skill and dedication but as a warm, welcoming gathering place for friends and family for many years to come. Remember, patience is your greatest ally; take your time, respect the process, and soon you will be enjoying the unparalleled satisfaction of relaxing by a fire you built with your own hands.


