How to Attach Garland to Fireplace Mantel Easily


The fireplace mantel serves as the heart of the home, especially during the holiday season. Adorning it with a lush, beautiful garland instantly creates a warm and festive focal point. However, the process of how to attach garland to fireplace mantel can seem daunting, balancing the desire for a stunning display with concerns about damaging your mantel’s surface. Whether you have a classic wood mantel, a rustic barn beam, or a modern stone finish, there is a secure and appropriate method for your home.
This comprehensive guide will walk you through every step of the process. We will explore the various techniques—from completely damage-free solutions using adhesive hooks to more permanent methods for heavy garlands. You will learn how to calculate the perfect garland length, choose the right hanging style for your aesthetic, and add those professional-looking finishing touches. By the end of this article, you will be equipped with the knowledge and confidence to create a mantel display that is both secure and spectacular, setting the stage for a cozy and memorable season.
Section 1: Laying the Groundwork – Planning Your Mantel Display
Before you attach a single hook, successful garland installation begins with careful planning. Taking the time to measure, choose your style, and select the right materials will ensure a seamless and beautiful result.
Determining the Right Garland Length
One of the most common mistakes is using a garland that is too short, which can make the display look skimpy and unbalanced. The correct length depends on your desired style:
- For a simple lay-flat look: The garland should be at least as long as the width of your mantel.
- For ends draped over the sides: Add approximately four extra feet (two feet on each side) to the mantel’s width.
- For a dramatic floor-length drape: A more complex calculation is needed. Measure the height of your mantel and multiply it by two. Then, add this number to the width of your mantel. For example, a 54-inch wide and 54-inch high mantel would require a garland of about 13.5 feet to drape to the floor on both sides.
- For a swagged look: The garland needs to be at least 1.5 times the width of your mantel, plus extra length for any draping on the ends.
Choosing Your Hanging Style
The way you arrange the garland defines the overall visual impact. The three primary styles are:
- Lay-Flat: The garland rests flat across the top of the mantel. This is the simplest style and works well on deep mantels where there’s still room for other decor items like candles or vases.
- Swagged (Scalloped): A classic and popular style where the garland swoops down over the front of the mantel in one or more curves. This creates a larger visual impact and is ideal for making a statement.
- Asymmetrical: A modern, trendy approach where the garland is draped to cascade dramatically down one side of the mantel only. This creates a dynamic and artistic look.
Selecting Garland and Materials
- Real vs. Faux: Real garland offers an authentic scent and look but can shed needles and has a limited lifespan. Faux garland is reusable, low-maintenance, and often easier to manipulate and secure.
- Tools and Supplies: Gather your materials beforehand. Depending on your chosen method, this may include:
- Garland: Consider doubling up thinner garlands for a fuller, more luxurious appearance.
- Adhesive Hooks: Such as Command hooks, for damage-free installation.
- Floral Wire or Twist Ties: For securing garland to hooks and connecting multiple garland strands together.
- Scissors/Wire Cutters: For trimming wire and adjusting garland.
*Table: Garland Length Guide for a Standard 54-Inch Wide Mantel*
| Hanging Style | Drape Length | Recommended Garland Length | Visual Impact |
|---|---|---|---|
| Lay-Flat | No drape | 5 feet | Simple, minimalist |
| Lay-Flat | 2 feet per side | 8.5 feet | Traditional, balanced |
| Lay-Flat | To the floor | 13.5 feet | Dramatic, formal |
| Swagged | 2 feet per side | 11 feet | Classic, festive |
| Asymmetrical | To the floor on one side | Varies | Modern, artistic |
Section 2: Attachment Methods – Choosing the Right Technique for Your Mantel

The best method for attaching garland depends on your mantel’s material, the weight of your garland, and whether you are willing to make permanent modifications.
Damage-Free Methods
For most homeowners, avoiding nails or screws is a top priority. Fortunately, there are several effective damage-free options.
- Command Hooks: These are the go-to solution for smooth, paintable surfaces like wood, stone, or marble.
- Types: Clear mini-hooks work for lightweight garlands, while larger hooks or Command Cord Bundlers are designed to hold heavier weights and can “bundle” multiple garland strands securely.
- Application Tip: For the strongest bond, clean the mantel surface with rubbing alcohol before applying the adhesive strip, rather than a household cleaner that can leave a slippery residue.
- Placement: For a swagged look, place hooks at each corner and at each point where the garland will swoop back up to the mantel. Position them about an inch back from the front edge to help hide them.
- Decorative Weights: This is a purely passive method ideal for lightweight garlands on wide mantels. Simply lay the garland across the top and use heavy decorative objects like candleholders, books, or vases placed strategically on top of the garland to hold it in place. This method offers zero security if the garland is bumped but requires no installation.
Semi-Permanent and Permanent Methods
For very heavy garlands, rough-hewn mantels where adhesive won’t stick, or for those who prefer a more secure installation, these methods are effective.
- Floral Wire: This is an excellent way to supplement other methods or to attach garland to existing features. If your mantel has any protruding elements, you can discreetly wrap green floral wire around the garland and these features to anchor it. The green wire blends in seamlessly with the greenery.
- Cup Hooks or Nails: For a more permanent solution, especially on painted wood mantels that can be easily patched, small screw-in cup hooks or nails can be used.
- Installation: Pre-drill a small pilot hole for the hook to prevent splintering, then screw it in so the opening faces the wall, creating a hidden anchor point.
- Patchability: When removed, the small hole can be filled with a dab of white wood filler, making it nearly invisible, especially on white mantels.
- Brick Clips: For brick or stone fireplaces where drilling into the mortar is not desired, brick clips can be a sturdy solution. These metal clips grip the protruding edge of a brick without causing damage. It is crucial to ensure your brick protrudes from the mortar and that the clip size matches your brick’s dimensions.
Section 3: Step-by-Step Installation Guide
Follow these steps for a professional-looking garland installation that stays secure throughout the season.
Step 1: Preparation is Key
- Clean the Mantel: Thoroughly dust and wipe down the entire mantel surface. If using adhesive hooks, follow up with a wipe of isopropyl rubbing alcohol to ensure optimal adhesion.
- Fluff the Garland: Especially if using faux garland that has been in storage, take time to separate the branches, needles, and leaves. Bend and shape them to create a full, natural look.
Step 2: Install Your Hooks or Anchors
- Based on your chosen method and style, install your hooks or anchors.
- For a swagged look, place a hook at each end of the mantel and additional hooks where you want the lowest points of the swags to be.
- For an asymmetrical look, concentrate hooks on the side where the garland will be weighted.
- Allow adhesive hooks to cure for the time recommended on the packaging before hanging any weight on them.
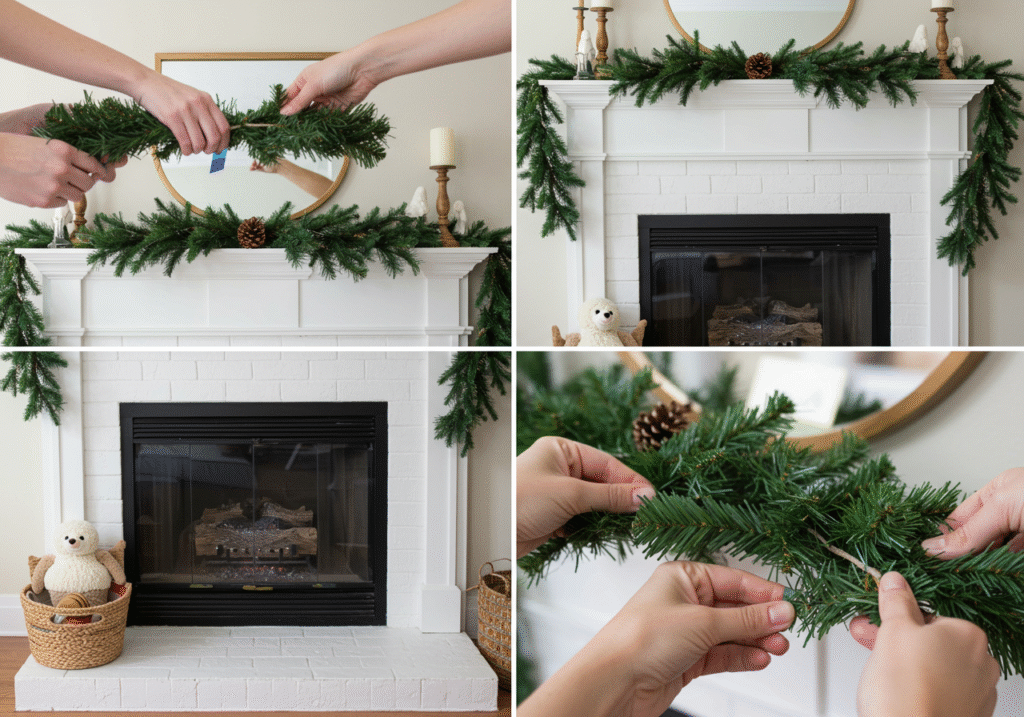
Step 3: Attach the Garland
- For Command Hooks: Gently hook a sturdy branch or the central wire of the garland onto the hook. For a more secure hold, use a short piece of floral wire to create a loop on the garland and hang that loop on the hook.
- For Multiple Garlands: If you are layering garlands for fullness, arrange them on the hooks first. Then, use green twist ties or floral wire to bind the garlands together at several points along their length to create one unified piece.
Step 4: Final Adjustments and Fluffing
- Once the garland is secured, step back and assess the arrangement. Adjust the drape and swoops as needed.
- Go back in and do a final fluff, rearranging branches to cover any hooks, wires, or bare spots. This is the time to make it look perfectly natural and abundant.
Section 4: Pro Tips for a Professional Finish
Elevate your mantel from simple to stunning with these expert tips.
- Hide the Mechanics: Always position hooks an inch or two back from the front edge of the mantel and use the greenery to camouflage them completely.
- Add Dimension: Weave in a few individual branches of a different greenery type (e.g., eucalyptus in a pine garland) to add texture and depth.
- Incorporate Lights: If your garland isn’t pre-lit, add battery-operated fairy lights. Weave them through the garland before hanging for a magical glow.
- Accessorize: Add decorative elements like ribbons, bows, pinecones, or even holiday ornaments clustered and wired into the garland for a personalized touch.
Section 5: Troubleshooting Common Issues
- Problem: Garland is too heavy for Command Hooks.
- Problem: Garland sags in the middle.
- Problem: Gaps are visible in the garland.
Conclusion
Knowing how to attach garland to fireplace mantel is a simple yet transformative skill that can define your holiday decor. By selecting the right method for your mantel, carefully planning the arrangement, and securing it properly, you can create a breathtaking centerpiece for your home. Whether you achieve a full, traditional swag with the help of Command hooks or a modern asymmetrical drape secured with floral wire, the result will be a warm and welcoming atmosphere that celebrates the season. So gather your supplies, embrace the process, and get ready to enjoy the festive glow of your beautifully decorated fireplace.


