10 Gorgeous Kitchen Floating Shelves Ideas and Space Savers
- Floating Shelves
 Ben
Ben- 0
- 33 minutes read
Your kitchen cabinets are probably hiding half your dishes, and let’s be honest – you can’t even reach that top shelf without climbing on the counter like a mountain goat.
I made the switch to floating shelves in my kitchen two years ago, and suddenly cooking became less of a treasure hunt and more of an actual enjoyable experience.
Kitchen floating shelves aren’t just trendy Instagram fodder (though they do look amazing in photos). They’re practical, accessible, and can make your kitchen feel twice as big.
After helping three friends install floating shelves in their kitchens and living with my own for years, I’ve learned what works, what doesn’t, and what makes people say “wow” when they walk into your kitchen.
Whether you’re dealing with a tiny galley kitchen or just tired of playing hide-and-seek with your dinnerware, these 10 floating shelf ideas will transform your kitchen from cluttered cave to organized oasis.
And the best part? You’ll actually be able to find that one specific mug you love without moving twelve others first.
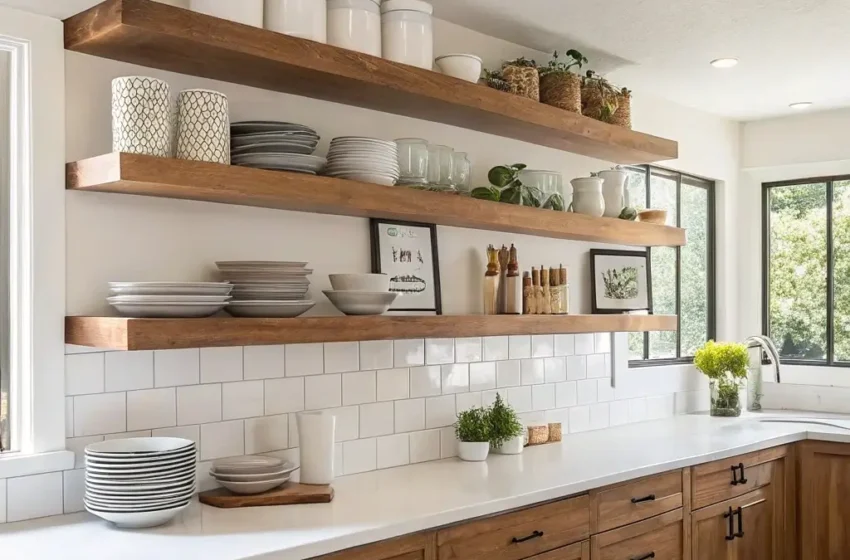
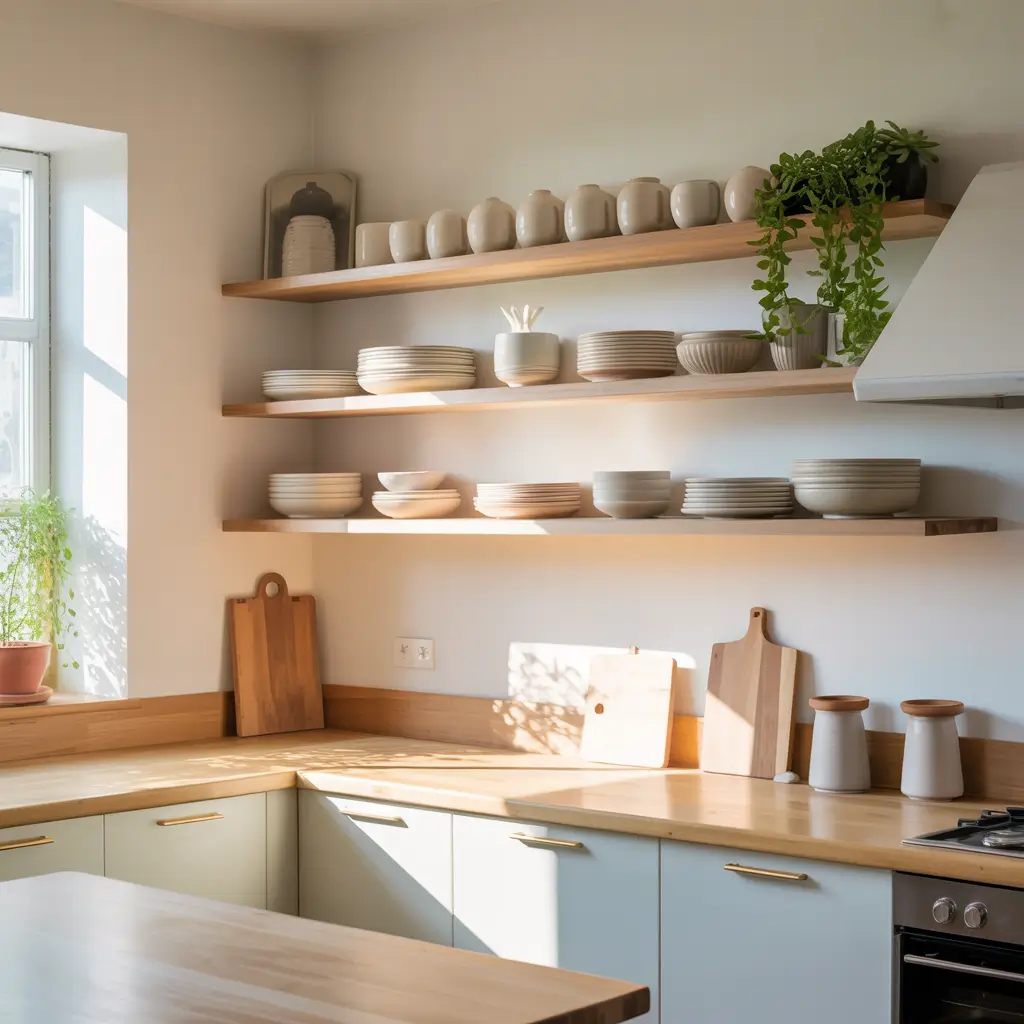
1. Minimalist Floating Shelves for Small Kitchens
Small kitchens and bulky upper cabinets go together like oil and water – they just don’t mix. I learned this living in a 500-square-foot apartment where my upper cabinets made the kitchen feel like a narrow hallway. Switching to minimalist floating shelves opened up the space so much that visitors thought I’d knocked down a wall.
Minimalist shelves work magic in small kitchens because they provide storage without visual weight. You get the function without the bulk, which is basically the holy grail of small kitchen design.
Choosing the Right Minimalist Shelves
Stick with thin profiles – we’re talking 1.5 inches thick maximum. Anything chunkier starts eating into your precious visual space. I started with 3-inch thick shelves and quickly swapped them out when I realized they looked like diving boards sticking out from my wall.
White or light wood works best for maintaining that airy feel. My white oak shelves practically disappear against my white walls, creating storage that doesn’t scream “look at me!” Dark shelves in a small kitchen can feel oppressive – save those for larger spaces.
Keep the brackets minimal too. Hidden brackets or slim metal supports maintain clean lines. Those ornate Victorian-style brackets might look cute on Pinterest, but they’ll make your small kitchen feel cluttered.
What to Display on Minimalist Shelves
Less is definitely more when you’re going minimalist. I keep only my everyday dishes on display – six plates, six bowls, and my favorite mugs. Everything else lives in lower cabinets or has been donated because, honestly, when did I last use that avocado slicer?
Stick to a cohesive color palette. All my displayed dishes are white or cream, which creates a calm, unified look. That mismatched collection of promotional mugs from various 5Ks? They’re enjoying retirement in the donation bin.
Leave breathing room between items. Cramming stuff onto shelves defeats the minimalist purpose. I follow the 70/30 rule – 70% stuff, 30% empty space.
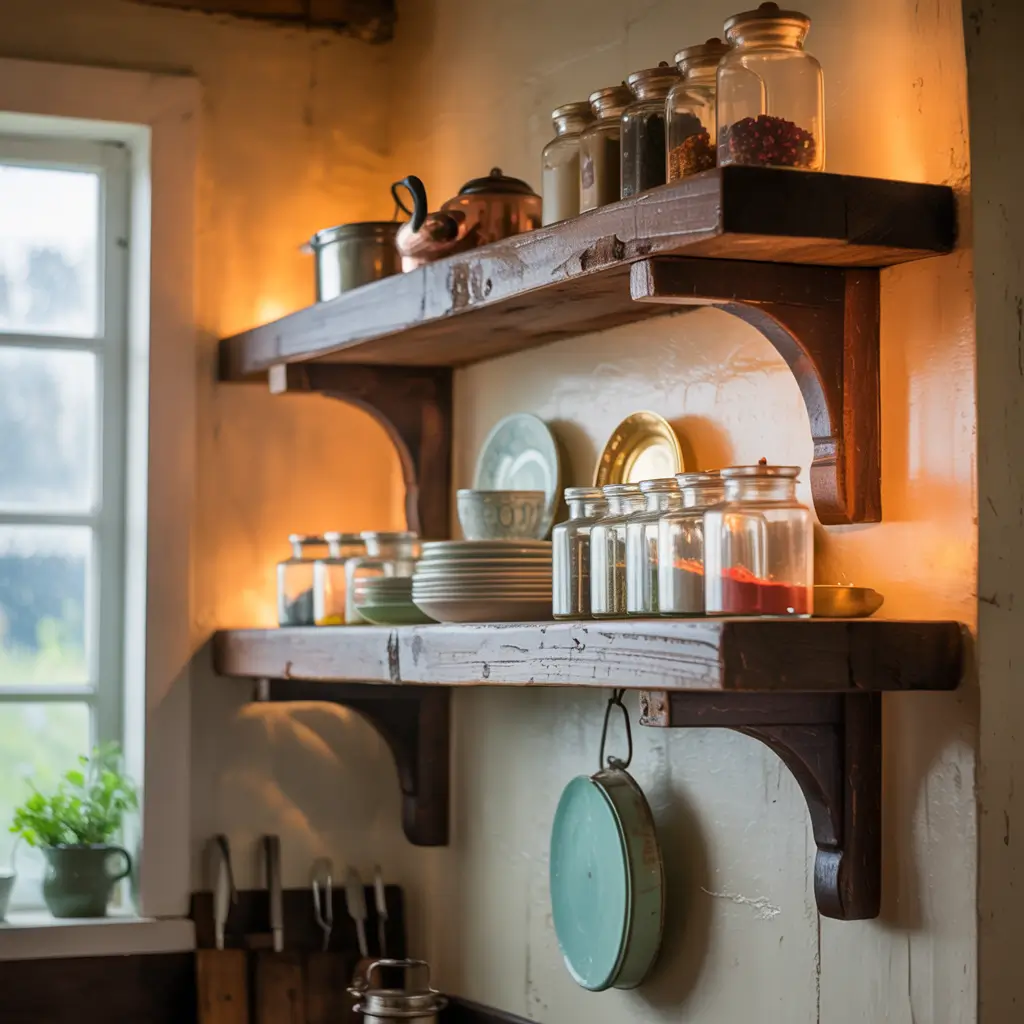
2. Rustic Wooden Shelves with Open Storage
There’s something about rustic wood shelves that makes a kitchen feel instantly warmer and more inviting. I installed reclaimed barn wood shelves in my current kitchen, and now everyone congregates here during parties instead of the living room.
Rustic shelves bring character that you just can’t get from perfectly finished surfaces. Every knot, grain pattern, and imperfection tells a story and adds authenticity to your space.
Finding the Perfect Rustic Wood
Reclaimed wood isn’t just trendy – it’s genuinely beautiful and has that lived-in quality you can’t fake. My shelves came from an old barn in Vermont, complete with nail holes that I left visible. They’re conversation starters every single time someone new visits.
Consider the wood’s weight and your wall’s capability. Rustic wood tends to be heavier than manufactured shelves. I learned this when my first attempt at DIY installation resulted in a very expensive crash at 2 AM. Now I use heavy-duty brackets rated for twice the weight I need.
Seal the wood properly for kitchen use. Raw wood and kitchen moisture don’t play nice together. I use a food-safe sealant that protects the wood while maintaining its natural look.
Styling Rustic Open Storage
Mix practical and decorative items. My rustic shelves hold everyday dishes on lower shelves and decorative pieces like vintage scales and mason jars up top. The combination feels intentional rather than just utilitarian.
Embrace the farmhouse vibe without going full Pioneer Woman. A few mason jars are charming; twenty mason jars is a craft store explosion. I keep it balanced with modern elements mixed in.
Use the natural wood as part of your color scheme. The warm browns of my barn wood shelves tie together my whole kitchen color palette. They’re not just storage; they’re part of the design.
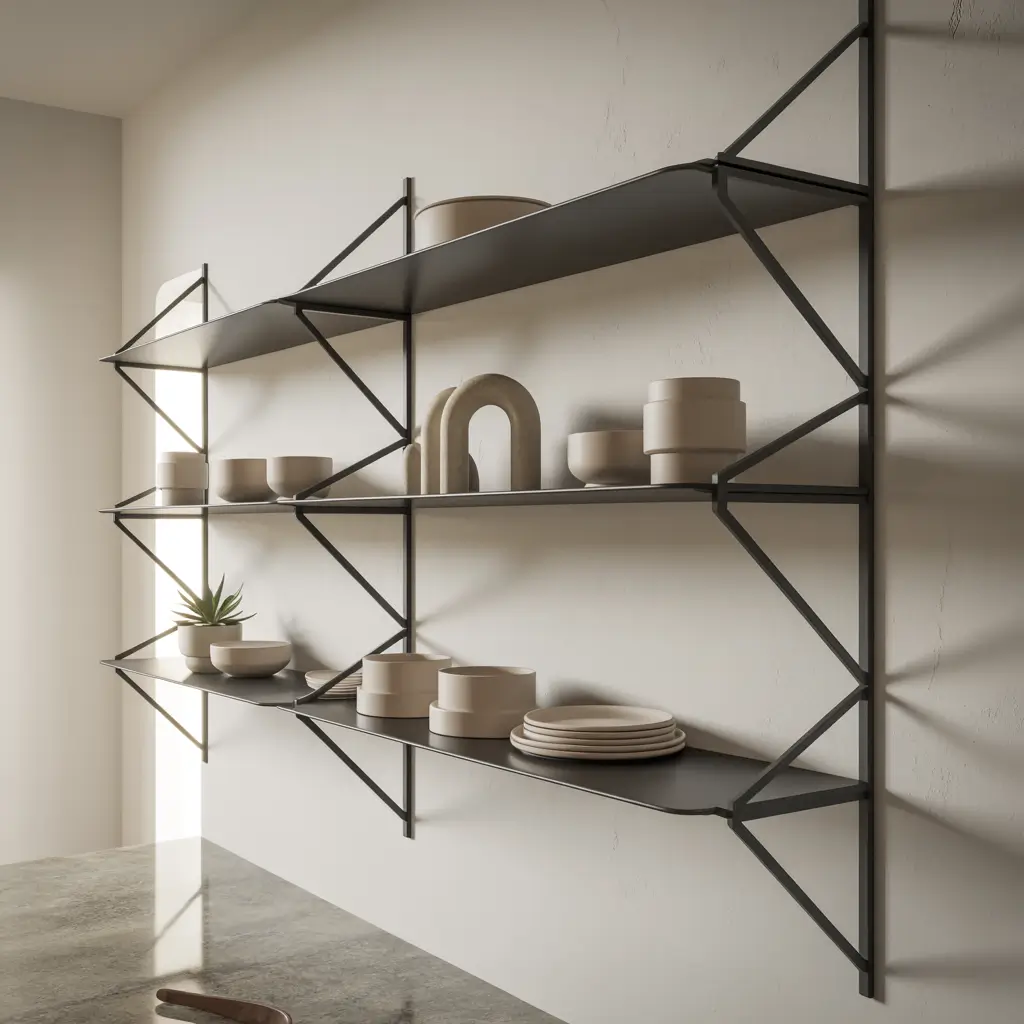
3. Modern Black Metal Floating Shelf Display
Black metal floating shelves are having their moment, and I’m here for it. I installed matte black shelves in my friend’s all-white kitchen, and the contrast is absolutely stunning – like adding the perfect bold accessory to a simple outfit.
These shelves make a statement without overwhelming the space. They’re sophisticated, modern, and surprisingly versatile.
Making Black Metal Work
The key is contrast – black shelves need a light backdrop to really pop. Against white or light gray walls, they create graphic lines that look intentional and designed. Against dark walls? They disappear, which defeats the purpose.
Choose matte over glossy finishes. Glossy black shows every fingerprint and water spot (trust me, I learned this the hard way). Matte black stays looking clean and sophisticated even when it’s not actually clean.
Keep the styling simple. Black shelves are already making a statement, so your items don’t need to shout. I stick to white dishes and clear glass on black shelves – the contrast is all the drama you need.
What Works on Black Metal Shelves
White dishes look incredible against black shelves. The contrast is crisp and modern, plus it makes your dishes look more expensive than they probably are. My $30 dish set from Target looks like designer dinnerware on black shelves.
Add metallic accents sparingly. A copper pot or brass utensils can add warmth, but too much metal-on-metal gets busy. I limit myself to one or two metallic pieces per shelf.
Plants pop beautifully against black. The green creates a nice bridge between the stark black and white. My pothos trailing down from a black shelf is probably the most photographed thing in my kitchen.
Also Read: 10 Beautiful Floating Shelves Bedroom Ideas and Space Hacks
4. Corner Floating Shelves for Space-Saving
Kitchen corners are the Bermuda Triangle of storage – stuff goes in and never comes back out. Corner floating shelves changed that completely in my kitchen, turning dead space into my favorite storage spot.
Corner shelves maximize every inch of kitchen real estate without requiring you to play Tetris with your dishes every time you need something.
Installing Corner Shelves Right
Measure your corner angle carefully. Not all corners are perfect 90-degree angles, especially in older homes. My 1920s house has corners that are more “suggestions” than right angles. Custom-cut shelves or adjustable brackets are your friends here.
Consider the workflow around corner shelves. You don’t want to bonk your head every time you reach for the coffee maker. I positioned mine high enough to clear my tallest appliance with room to spare.
Use corner-specific brackets for stability. Regular brackets won’t cut it for corner installations. I tried to MacGyver it with standard brackets and ended up with a pile of broken dishes. Learn from my expensive mistake.
Making Corner Shelves Functional
Store items you use together in corners. My coffee corner has mugs, coffee, filters, and sugar all in one spot. No more morning scavenger hunts for caffeine supplies.
Use turntables on corner shelves for easy access. Nothing gets lost in the back when everything spins to the front. My spice turntable on a corner shelf is a game-changer.
Keep corner shelves less crowded than wall shelves. The viewing angle means clutter is more noticeable. I stick to attractive, frequently-used items only.
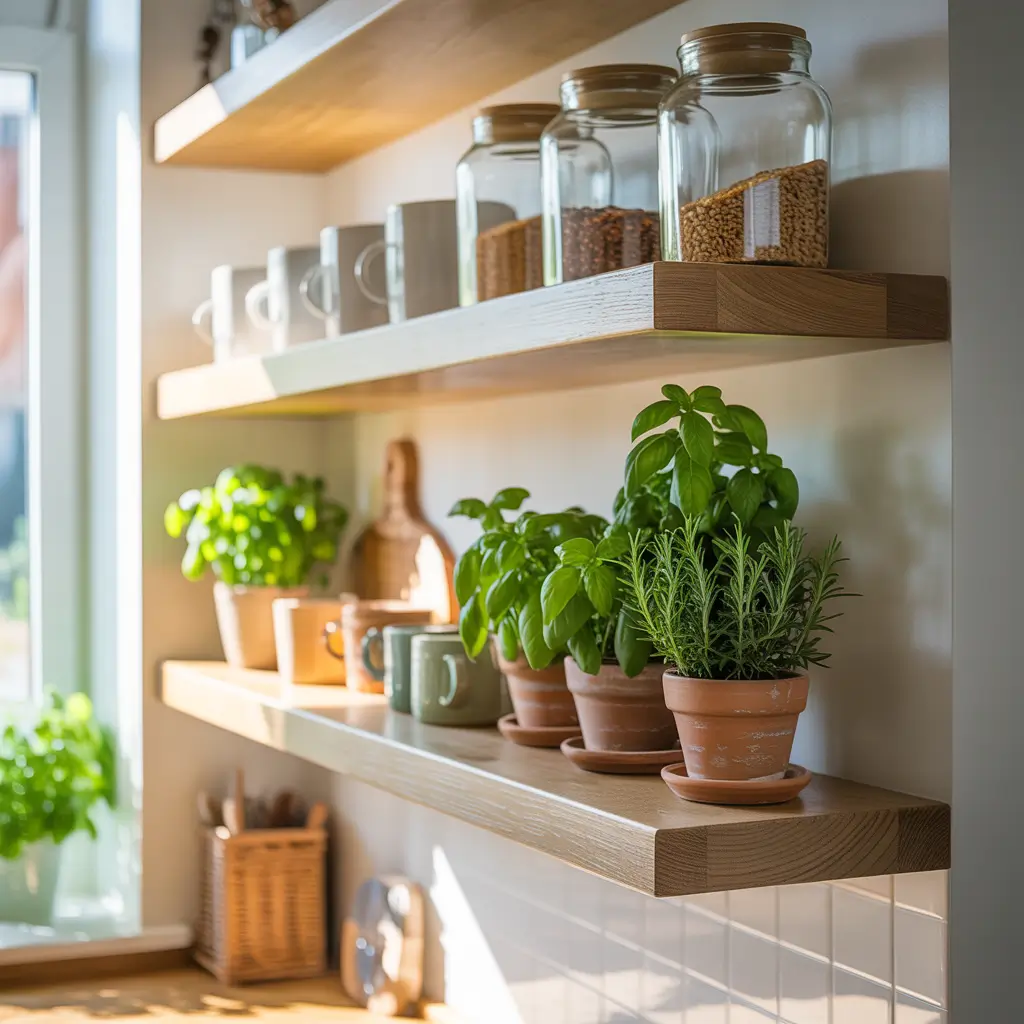
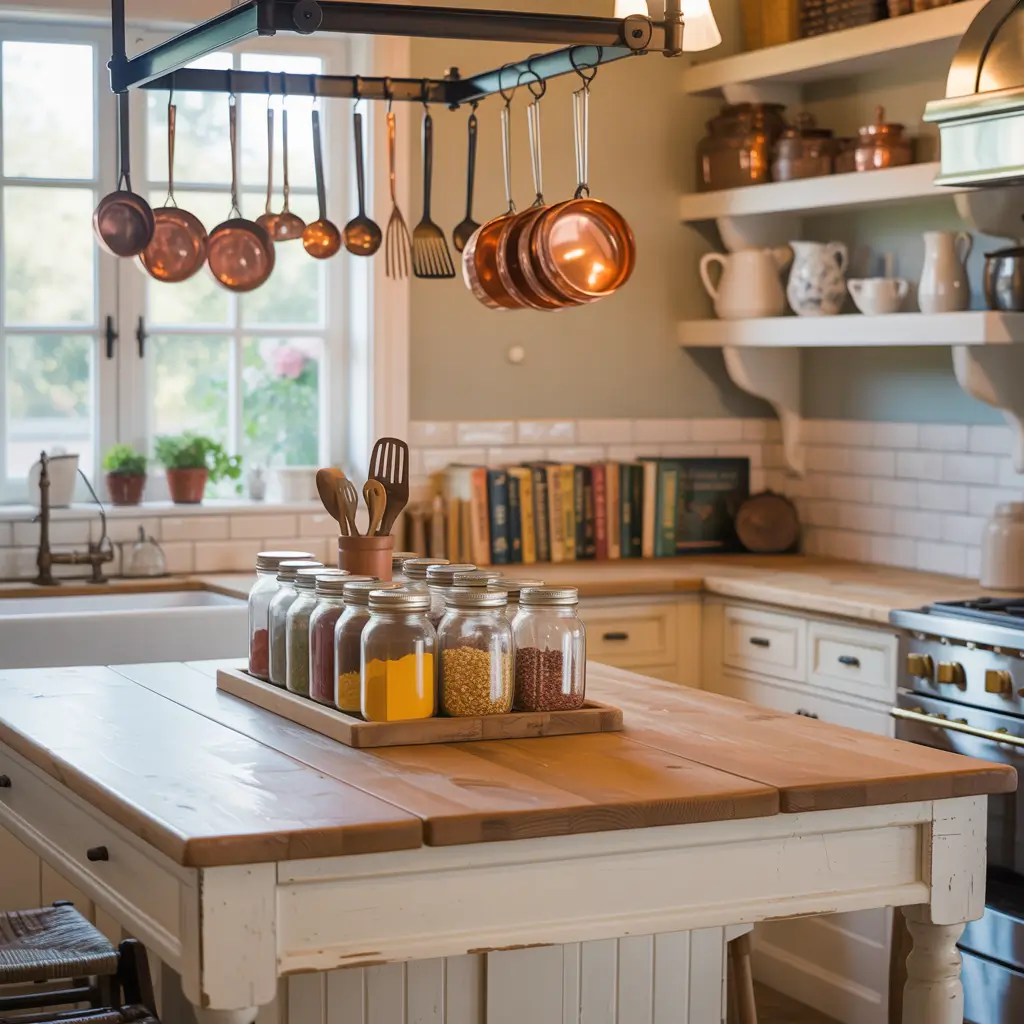
5. Farmhouse Kitchen Shelves with Mason Jar Storage
Farmhouse style and mason jars go together like biscuits and gravy. I resisted this trend for years, thinking it was too cutesy, but then I realized mason jars are actually brilliant storage solutions that happen to look adorable.
The farmhouse shelf aesthetic brings warmth and functionality together in a way that makes kitchens feel homey rather than sterile.
Creating Authentic Farmhouse Shelves
Choose wood with visible grain and character. Smooth, perfect wood looks out of place in farmhouse style. My shelves have knots, color variations, and a slightly distressed finish that adds authenticity.
Install shelves at varying heights for visual interest. My farmhouse shelves aren’t evenly spaced – some are closer together for glasses, others farther apart for tall mason jars. The irregularity feels more organic and less manufactured.
Add corbels or decorative brackets for extra farmhouse flair. Simple hidden brackets work, but decorative supports add to the farmhouse charm. Mine look like old barn brackets, and they’re functional art pieces.
Mason Jar Organization Magic
Use mason jars for dry goods storage. I store everything from pasta to coffee beans in mason jars, and I can see exactly what I have at a glance. No more buying duplicate items because I couldn’t see them in the back of the cabinet.
Label jars stylishly. Chalkboard labels or kraft tags with twine keep the farmhouse vibe while helping you find things quickly. My handwritten labels add personality that printed labels can’t match.
Mix jar sizes for visual interest. All same-sized jars look commercial. I use quart jars for flour and sugar, pint jars for spices, and half-pint jars for specialty salts.
6. Floating Shelves with Built-in Spice Racks

Built-in spice racks on floating shelves are the organizational hack I wish I’d discovered years ago. No more knocking over five spice jars to reach the oregano in the back!
These specialized shelves keep spices visible, accessible, and organized while looking like intentional design elements rather than afterthoughts.
Designing Spice Rack Shelves
Include a lip or rail on shelf edges. This tiny addition prevents spice jars from taking suicide dives off your shelves. My first shelves didn’t have this, and I lost many good soldiers to gravity.
Size shelves for your specific spice containers. Standard spice jars need about 4 inches of depth. I made my shelves 5 inches deep to accommodate different brands comfortably.
Position spice shelves at eye level or below. Reaching above your head for spices while cooking is a recipe for disaster (pun intended). Mine sit right at eye level beside my stove.
Organizing Your Spice Display
Alphabetize or group by cuisine type. I tried alphabetizing but found grouping by use more practical. My Italian spices live together, Asian spices hang out as a group, and baking spices have their own section.
Invest in matching spice jars for a cohesive look. Yes, it’s extra work to transfer spices, but the visual payoff is worth it. My matching jars make my kitchen look like a magazine spread instead of a garage sale.
Keep everyday spices front and center. That star anise you used once three years ago? It can live in the back. Salt, pepper, garlic powder – these MVPs get prime real estate.
Also Read:12 Chic Floating Shelves Living Room Ideas for Modern Interiors
7. Floating Shelves with Hidden Hooks for Utensils
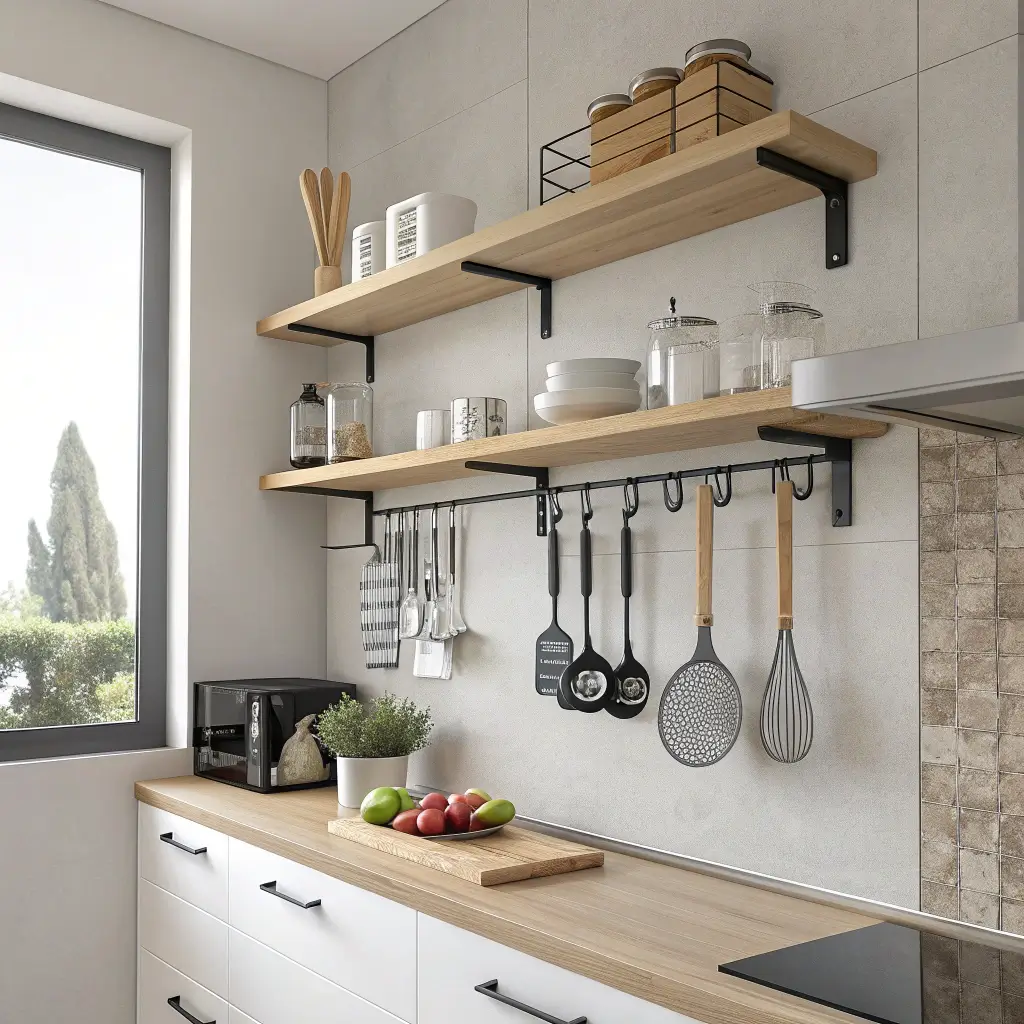
Hidden hooks under floating shelves are the secret weapon of organized kitchens. I discovered this trick accidentally when I needed somewhere to hang my measuring cups, and now I can’t imagine shelves without them.
This combo gives you display space up top and functional storage below without cluttering your visual space.
Installing Hidden Hook Systems
Add hooks to the underside of shelves before mounting. It’s nearly impossible to add them after installation unless you enjoy working upside down. I learned this doing kitchen yoga trying to retrofit hooks.
Use removable adhesive hooks for renters. Not everyone can drill holes, but command strips work great for lightweight utensils. My rental kitchen uses these exclusively, and nothing has fallen yet.
Space hooks based on your utensil collection. Measure your largest items first, then plan spacing. My ladle needs more swing room than my measuring spoons.
What to Hang Where
Keep cooking utensils near the stove. Spatulas, spoons, and tongs should be within arm’s reach of where you cook. I have a shelf with hidden hooks right beside my range, and it’s perfect.
Hang items you use daily. That melon baller and egg separator? They don’t need prime hanging space. My everyday tools hang while specialty items live in drawers.
Use S-hooks for flexibility. Fixed hooks are limiting, but S-hooks let you adjust and rearrange as needed. Plus, they’re easier to clean around.
8. Colorful Floating Shelves to Brighten Kitchens
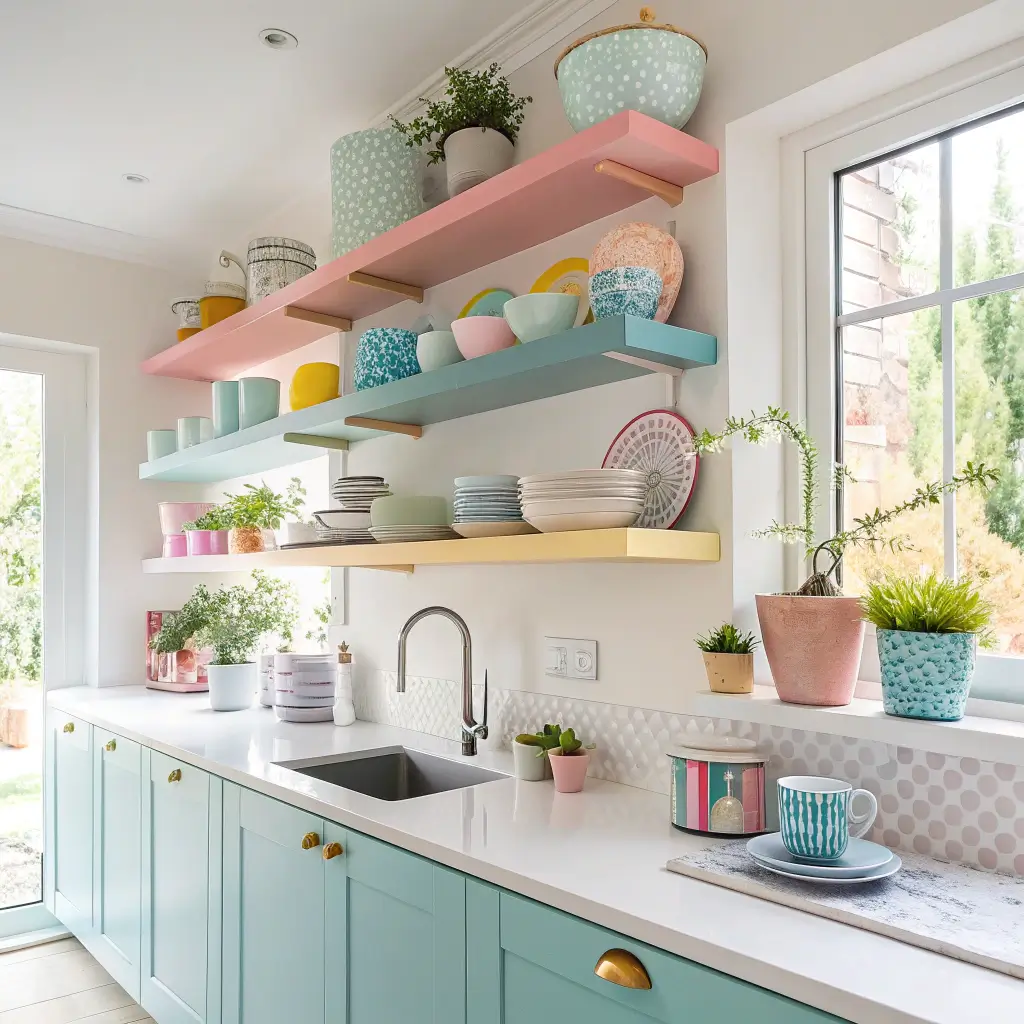
Who says kitchen shelves have to be brown or white? I painted my floating shelves bright turquoise, and they inject so much personality into my kitchen that they’ve become the room’s focal point.
Colorful shelves are an easy way to add personality without committing to painting cabinets or walls.
Choosing Your Pop of Color
Pick a color that complements your existing palette. My turquoise plays well with my white cabinets and brass hardware. Clashing colors create chaos, not character.
Consider the commitment level. Shelves are easier to repaint than cabinets if you get tired of the color. I’ve had mine for two years and still smile every time I see them.
Test paint colors first. What looks amazing on a paint chip might be overwhelming on multiple shelves. I painted a sample board first and lived with it for a week before committing.
Styling Colorful Shelves
Keep displayed items simple when shelves are bold. My turquoise shelves hold white dishes and clear glass. Adding more color would create visual overload.
Use the shelf color as an accent throughout the kitchen. I have turquoise dish towels and a matching utensil crock that tie everything together.
Don’t go overboard. One or two colorful shelves make a statement. All colorful shelves make a migraine. I limited myself to two shelves and kept the rest neutral.
9. Floating Shelves Above the Countertop for Easy Access

The space between your counter and upper cabinets is prime real estate that most kitchens waste. I installed floating shelves in this zone, and it revolutionized my cooking efficiency.
These shelves put everything at the perfect height – no reaching up or bending down. It’s ergonomic gold.
Planning Counter-Height Shelves
Maintain 18-20 inches between counter and shelf. This gives you workspace while keeping items accessible. I started with 15 inches and felt claustrophobic. Now at 19 inches, it’s perfect.
Consider what lives below the shelves. My coffee maker sits under one section, so that shelf is higher. The prep area shelves are lower since nothing tall lives there.
Install good lighting. This space can get shadowy. I added LED strips under my shelves, and now I can actually see what I’m chopping.
What Works at Counter Height
Store daily-use items here. Coffee mugs, everyday dishes, and frequently used ingredients deserve this prime spot. My olive oil, salt, and favorite spices live right where I need them.
Use attractive containers for ingredients. Since these shelves are so visible, ugly packaging stands out. I transfer everything to nice containers, and it looks like a styled cooking show set.
Keep it clean and organized. These shelves are at eye level for anyone in your kitchen. Messy shelves here make your whole kitchen look chaotic.
Also Read: 10 Creative Floating Shelves Ideas for Blank Walls
10. Glass Floating Shelves for a Sleek, Modern Look

Glass floating shelves make kitchens feel larger and more sophisticated. I installed them in a friend’s small, dark kitchen, and the transformation was incredible – suddenly there was light and airiness where there had been shadows.
Glass shelves provide storage without visual weight, making them perfect for modern kitchens or spaces that need to feel more open.
Installing Glass Shelves Safely
Use tempered glass only. Regular glass in kitchens is asking for disaster. Tempered glass is stronger and safer if it does break. My installer wouldn’t even consider regular glass, and I’m grateful for his wisdom.
Choose appropriate thickness based on use. Light items like glassware need ½ inch glass. Heavier items like plates need ¾ inch. I went with ¾ inch for everything because I didn’t trust myself to remember weight limits.
Install proper supports. Glass needs more support points than wood. My shelves have brackets every 16 inches, and they’re rock solid.
Styling Glass Shelves
Embrace transparency. Glass shelves look best with glass and crystal items. My friend displays her grandmother’s crystal on glass shelves, and it looks like the glasses are floating.
Keep it minimal. Cluttered glass shelves lose their airy appeal. I convinced my friend to display only her prettiest items, and the restraint pays off.
Add lighting for drama. Glass shelves with lighting create incredible effects. LED strips above make glassware sparkle like jewelry.
Making Floating Shelves Work in Your Kitchen
After installing floating shelves in multiple kitchens, here’s what I know: they’re not just trendy, they’re genuinely transformative. The key is choosing the right style for your space and needs.
Start small if you’re nervous about open storage. Replace one upper cabinet with floating shelves first. See how you like living with them before committing to a full kitchen transformation. I started with one wall and now have them throughout my kitchen.
Be realistic about your organizational habits. If you’re not naturally neat, open shelving will expose that. But here’s the secret: having everything visible actually made me neater. When mess has nowhere to hide, you tend to keep things tidier. 🙂
Remember that floating shelves aren’t just about storage – they’re about creating a kitchen you love being in. Mine make cooking feel less like a chore and more like a pleasure. Everything I need is visible and accessible, and the open feel makes the space inviting rather than closed off.
BTW, don’t let anyone tell you floating shelves are impractical or just for show. Mine hold everything my upper cabinets used to, but now I can actually find things.
The “dust issue” everyone warns about? It’s overblown. Dishes you use daily don’t collect dust, and a quick wipe during regular cleaning handles the rest.
Your kitchen should work for your life, not some magazine’s idea of perfection. Whether you go rustic, modern, colorful, or classic, make sure your floating shelves serve you, not the other way around.
Happy cooking, and may you never lose another spice jar in the cabinet abyss!


