10 Modern DIY Bathroom Vanity Ideas and Sleek Designs
- Bathroom Design
 Ben
Ben- 0
- 33 minutes read
So you just got a quote for a new bathroom vanity and nearly choked on your coffee. Five thousand dollars? For a cabinet with a sink? That’s when I decided to grab my drill and show that overpriced furniture who’s boss.
Three years and four DIY vanities later (don’t ask about the first one), I’ve learned what actually works versus what just looks good in those perfectly staged YouTube tutorials.
Here’s the thing about DIY bathroom vanities – they’re actually way more doable than you think.
Sure, you might cry a little during the plumbing part, and yes, you’ll definitely make seventeen trips to the hardware store, but that moment when you’re brushing your teeth at a vanity you built with your own hands? Priceless.
Plus, you’ll save enough money to actually afford that fancy faucet you’ve been eyeing.
These ten DIY vanity projects range from weekend-easy to “maybe call a friend who actually knows what they’re doing.”
Each one solves different problems and creates different vibes, but they all share one thing: they’ll cost way less than buying retail and give you serious bragging rights.
Rustic Wooden Pallet Vanity
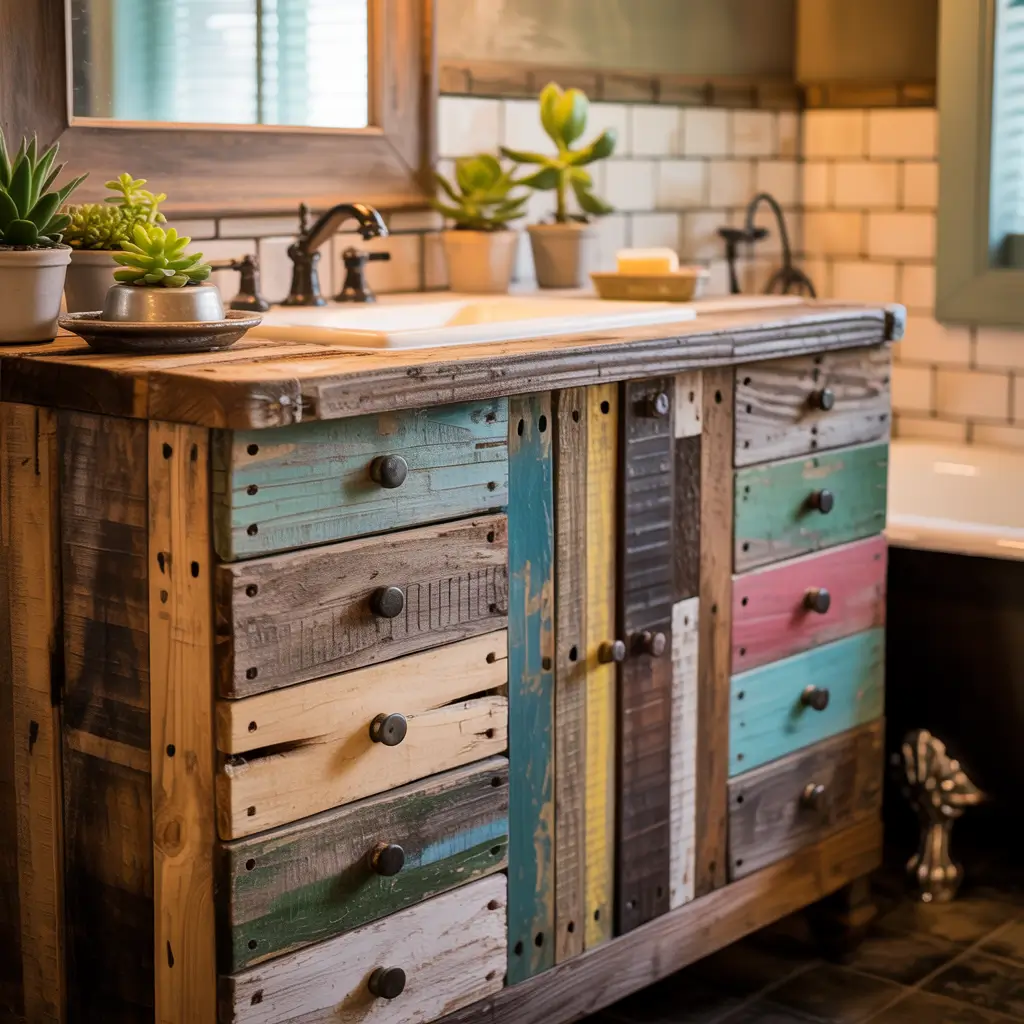
Who knew those shipping pallets businesses literally throw away could become the star of your bathroom? The rustic wooden pallet vanity takes free (or dirt cheap) materials and transforms them into something that looks like it came from a high-end farmhouse boutique.
I built my first pallet vanity after seeing one at a restaurant bathroom that probably cost them thousands. Grabbed three pallets from behind a warehouse (with permission!), spent a weekend sanding and assembling, and created something that guests always compliment. The weathered wood texture gives instant character that you can’t fake with stain.
The process involves dismantling pallets, sanding everything smooth (splinters in the bathroom = bad), and assembling into a frame. Add a vessel sink on top, run plumbing through the back, and boom – rustic elegance for under $200. The hardest part is finding pallets that aren’t chemically treated.
Making Pallet Wood Bathroom-Ready
Essential steps for pallet vanity success:
- Check the stamps – HT (heat treated) is safe, MB (methyl bromide) is toxic
- Sand thoroughly – I mean really thoroughly, like three times
- Seal everything – bathrooms are humid, unsealed wood warps
- Reinforce joints – pallets weren’t meant for daily use
- Plan for plumbing – measure pipe locations before assembly
The rustic look means imperfections are features, not flaws. That uneven board? Adds character. Slight color variations? That’s the beauty of reclaimed wood. This project embraces the perfectly imperfect aesthetic.
Floating Modern Minimalist Vanity
Want your bathroom to look like it belongs in a Swedish design magazine? The floating minimalist vanity delivers clean lines and the illusion of more space without the designer price tag. Plus, mounting it at your perfect height means no more back pain from brushing teeth.
Built my floating vanity from a single sheet of plywood and some edge banding. Total cost: $150. The secret is quality finishing – that plywood needs to look intentional, not cheap. I used white oak veneer plywood, applied edge banding carefully, and finished with three coats of polyurethane.
The floating aspect requires serious wall mounting. We’re talking heavy-duty brackets anchored into studs, not those dinky drywall anchors. Remember, this thing needs to hold a sink full of water plus someone leaning on it. Don’t cheap out on the mounting hardware.
Floating Vanity Installation Tips
Critical factors for successful floating vanities:
- Find the studs – use a real stud finder, not the knocking method
- Level obsessively – nothing worse than watching water roll to one side
- Hide the brackets – mount from inside the vanity when possible
- Pre-drill everything – splitting wood at this stage is heartbreaking
- Consider the weight – calculate sink + counter + water weight
The minimalist aesthetic means every flaw shows. Take your time with finishing, use quality materials, and remember that simple doesn’t mean easy. This style requires precision.
Vintage Repurposed Dresser Vanity
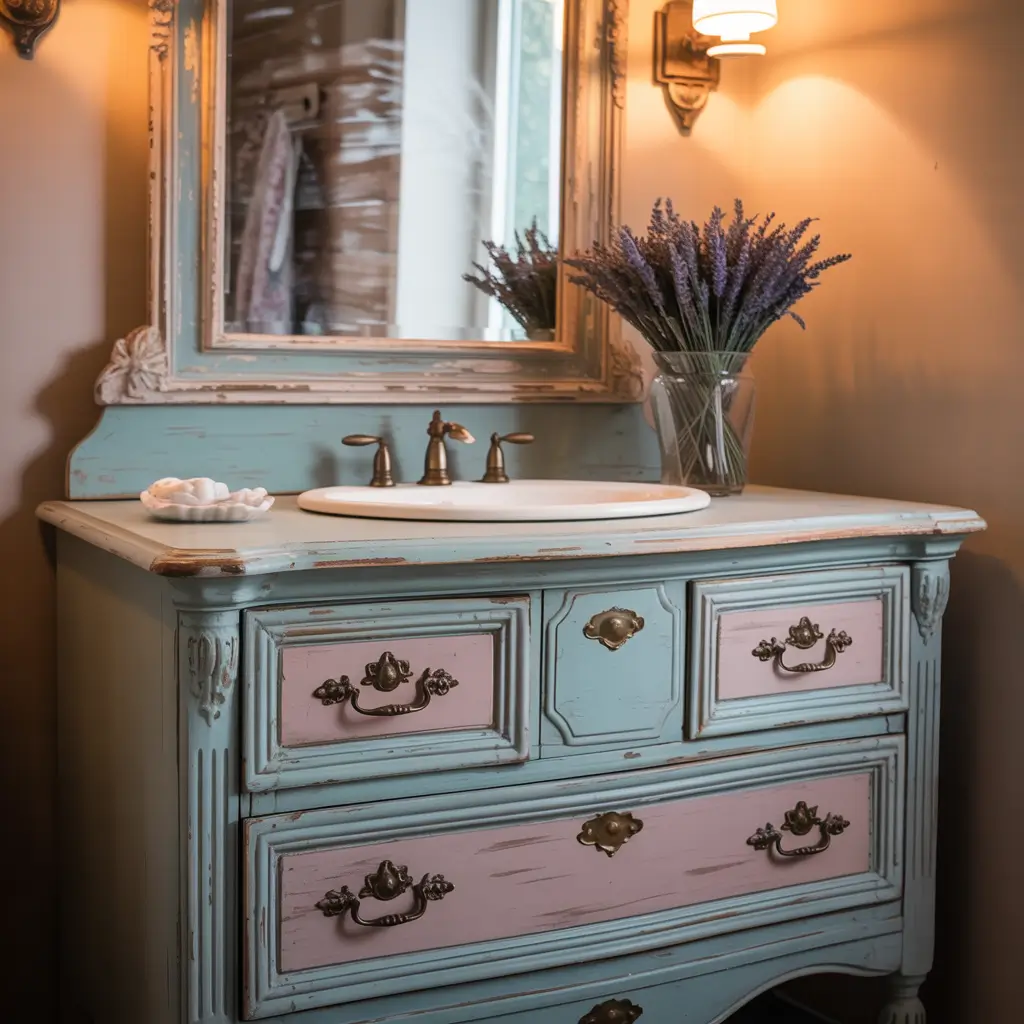
That old dresser gathering dust in your garage? It’s actually a bathroom vanity waiting to happen. Repurposing vintage dressers creates unique vanities with built-in storage and character you can’t buy new.
I converted my grandmother’s 1950s dresser into our guest bathroom vanity, and it’s become the room’s showpiece. The process involved reinforcing the top, cutting holes for plumbing, and adding a marble remnant I scored from a countertop shop. The original hardware and worn patina give it soul that modern vanities lack.
The trickiest part is retrofitting for plumbing. You’ll need to cut through the top for the sink, through the back for pipes, and possibly remove or modify drawers. But keeping functional drawers around the plumbing creates storage that custom vanities charge extra for.
Dresser Conversion Essentials
Key steps for dresser-to-vanity transformation:
- Check structural integrity – old doesn’t mean falling apart
- Reinforce the top – it needs to support sink weight
- Protect the wood – seal everything against moisture
- Modify drawers carefully – you might salvage more than you think
- Choose appropriate sink style – vessel sinks work best
FYI, not every dresser works for this. You need solid wood construction (not particle board), appropriate height (30-36 inches), and depth that accommodates plumbing. But when you find the right piece? Magic happens.
Also Read: 10 Amazing Double Sink Bathroom Vanity Layouts and Decor Tips
Concrete Industrial Vanity
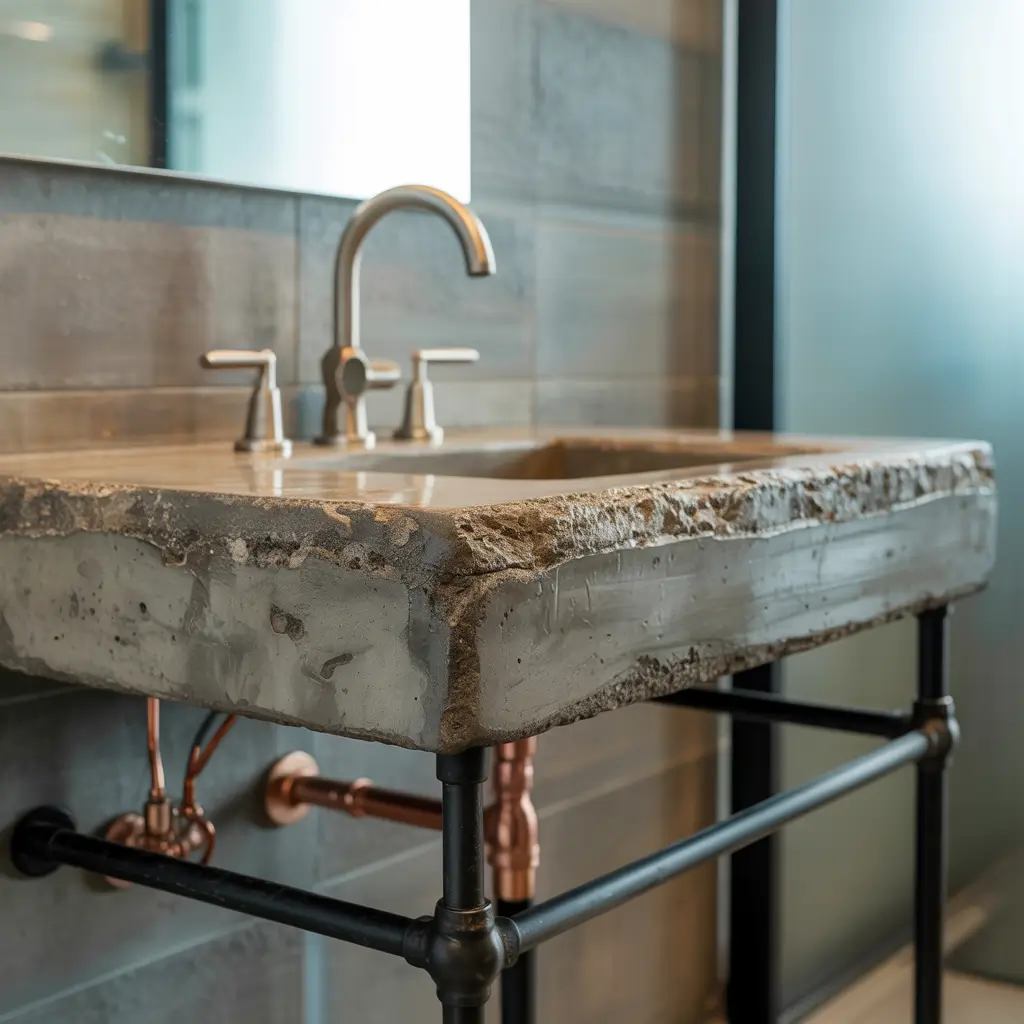
Concrete countertops scream industrial chic, and making your own is surprisingly doable. The concrete vanity brings that raw, urban edge to your bathroom while being practically indestructible. Plus, you can customize everything from color to texture.
My concrete vanity project started as a disaster and ended as my favorite DIY ever. First pour? Complete failure – looked like the surface of the moon. Second attempt with proper research? Restaurant-quality smooth finish that everyone assumes cost thousands. Total actual cost: $300 including the base cabinet.
The process requires concrete mix, melamine forms, and patience. Lots of patience. You’re essentially creating a custom countertop that happens to have sink holes. The finishing process – sanding, sealing, polishing – takes days but determines whether it looks professional or homemade.
Concrete Countertop Success Secrets
Crucial tips for concrete vanity tops:
- Use countertop mix – regular concrete is too coarse
- Vibrate thoroughly – removes air bubbles that create holes
- Cure slowly – rushing creates cracks
- Seal properly – concrete stains without sealer
- Consider weight – concrete is HEAVY, reinforce accordingly
The industrial aesthetic means some imperfections work – small air holes, slight color variations. But cracks or major flaws? Those just look bad. Take your time, follow mixing instructions exactly, and maybe practice on a small piece first.
Farmhouse Shiplap Vanity
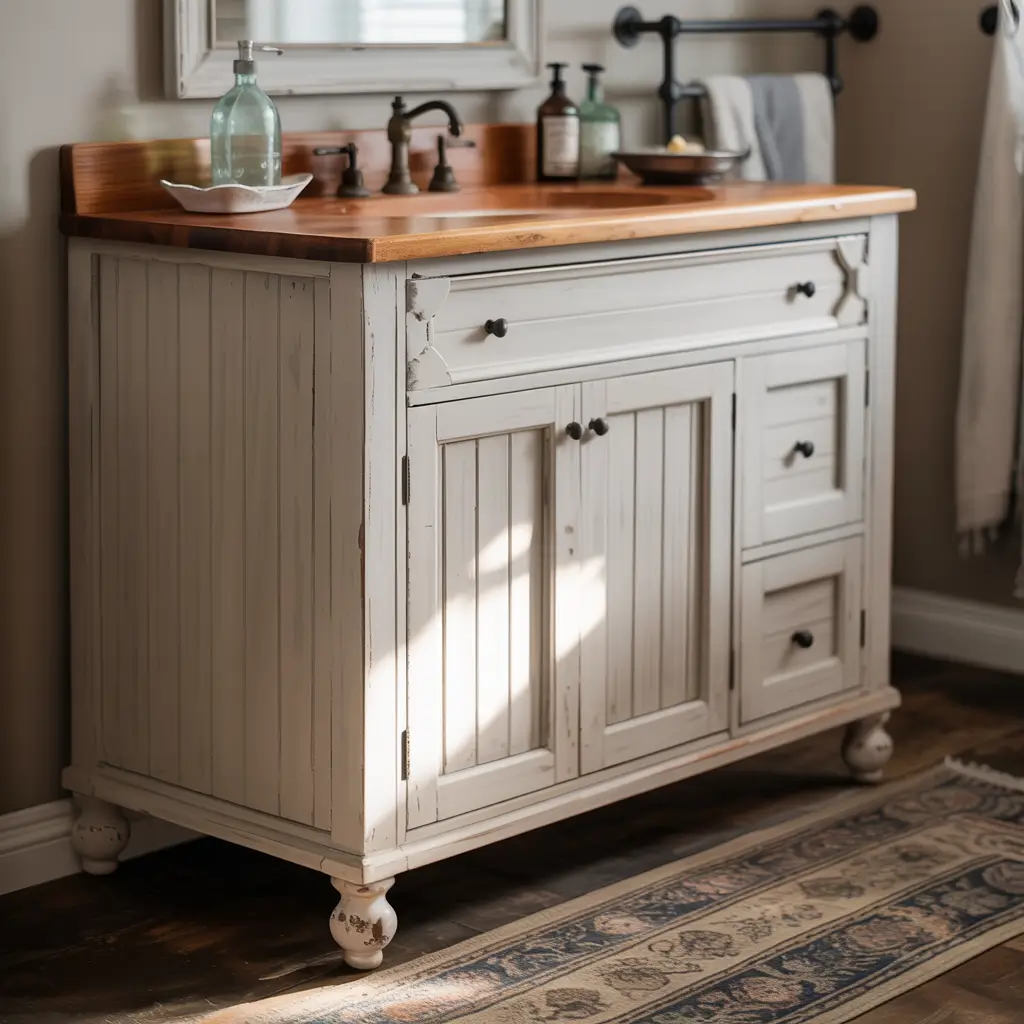
Shiplap isn’t just for walls anymore. The farmhouse shiplap vanity brings that Joanna Gaines charm to your bathroom without the Magnolia price tag. This project combines the shiplap trend with functional storage for peak farmhouse aesthetic.
I built a shiplap vanity for my daughter’s bathroom using pre-primed shiplap boards and basic 2×4 framing. The vertical shiplap on the sides and horizontal on the doors creates visual interest. White paint with light distressing gives it that perfect lived-in farmhouse feel without looking artificially aged.
The beauty of this project is its forgiving nature. Shiplap naturally has gaps and lines, so minor imperfections blend right in. Plus, the texture hides any amateur mistakes in your construction. This is a great first major DIY project.
Shiplap Vanity Construction Tips
Building a farmhouse vanity that actually looks farmhouse:
- Use real wood shiplap – MDF versions look fake in bathrooms
- Prime everything – bathrooms need serious moisture protection
- Don’t overdo distressing – subtle is better than shabby
- Add modern hardware – keeps it fresh, not dated
- Include open shelving – baskets complete the farmhouse look
The key is balance. Too much farmhouse and your bathroom looks like a barn. Just enough and it’s cozy perfection. Mix in modern elements like sleek faucets to keep it current.
Mid-Century Modern Vanity Makeover
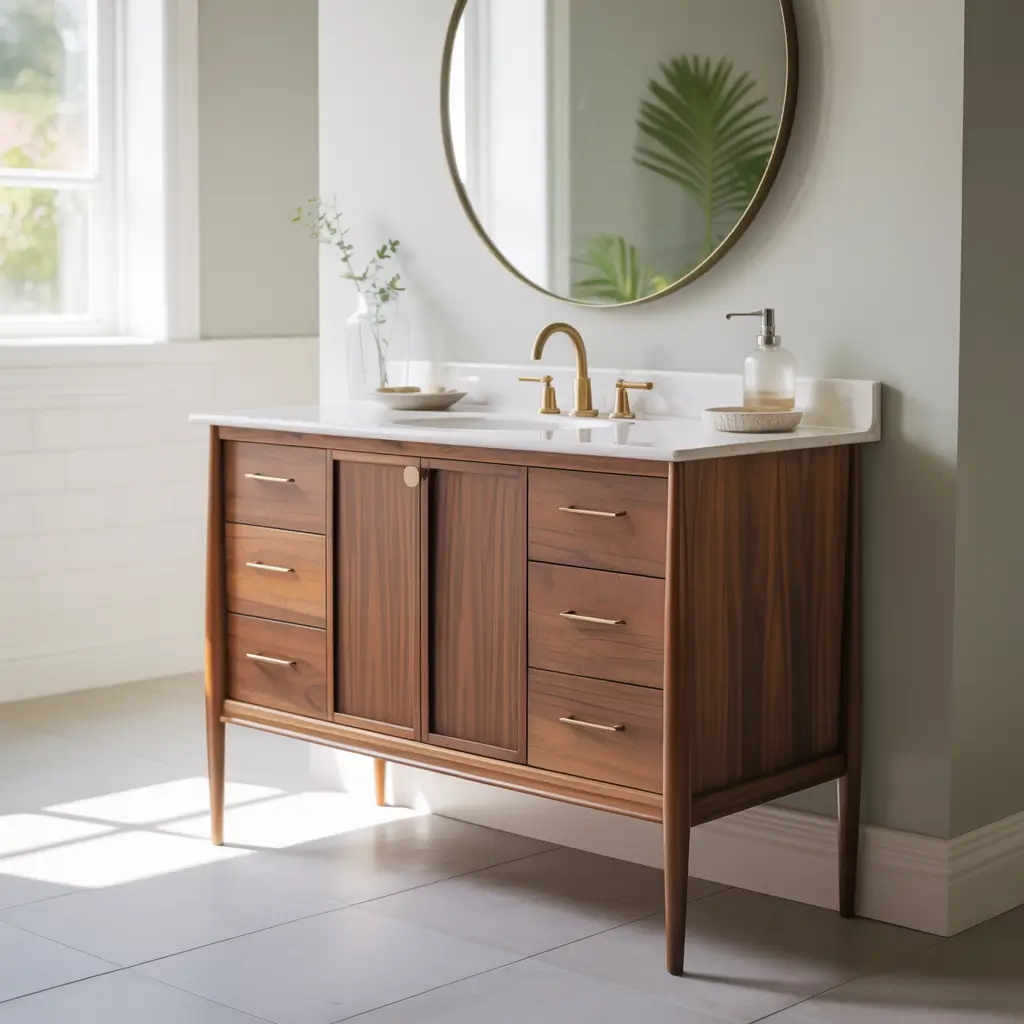
Got an ugly but structurally sound vanity? Transform it into a mid-century modern masterpiece with some hairpin legs and walnut stain. This makeover takes boring builder-grade vanities and gives them that Mad Men swagger.
I transformed a basic oak vanity from the 90s into something that looks like it came from West Elm. Removed the doors, added hairpin legs to raise it up, stained everything in rich walnut, and added leather drawer pulls. The clean lines and warm wood completely changed the bathroom’s vibe. Cost? Under $150.
The mid-century aesthetic requires specific proportions and details. Think tapered legs, warm wood tones, and minimal ornamentation. The beauty is that many dated vanities already have the bones – they just need the right modifications.
Mid-Century Makeover Must-Dos
Nailing the mid-century modern transformation:
- Raise it on legs – that floating look is essential
- Choose warm stains – walnut, teak, or mahogany
- Update hardware – brass or leather pulls work perfectly
- Keep lines clean – remove unnecessary trim or details
- Add geometric elements – hexagon tiles or angular mirrors
This makeover works best on solid wood vanities. Particle board or MDF vanities can work but require more prep and careful handling. The transformation potential makes hunting for the right base vanity actually fun.
Also Read: 12 Chic Bathroom Vanity Lighting Ideas for Small Bathrooms
Compact Small Bathroom Vanity

Small bathrooms need big creativity. The compact DIY vanity maximizes every inch while proving that tiny doesn’t mean boring. These projects focus on vertical storage, wall mounting, and multi-functional elements.
Built a 24-inch vanity for my powder room using a floating shelf, vessel sink, and wall-mounted storage cubes. The entire thing sticks out only 16 inches from the wall but provides everything needed. The vertical arrangement draws eyes up, making the room feel larger.
Small vanity projects require precise planning. Every inch counts, so measure seventeen times. Consider corner sinks, wall-mounted faucets, and sliding mirrors to maximize space. The goal is function without claustrophobia.
Small Space, Big Impact Strategies
Making compact vanities work:
- Go vertical – use wall space for storage
- Float everything – visible floor space feels bigger
- Choose shallow sinks – every inch of depth matters
- Skip cabinet doors – open shelving feels less bulky
- Use mirrors strategically – double the visual space
IMO, small bathroom vanities are harder than large ones because there’s no room for error. But nail it, and you’ll have the most efficient bathroom on the block 🙂
Colorful Painted Cabinet Vanity
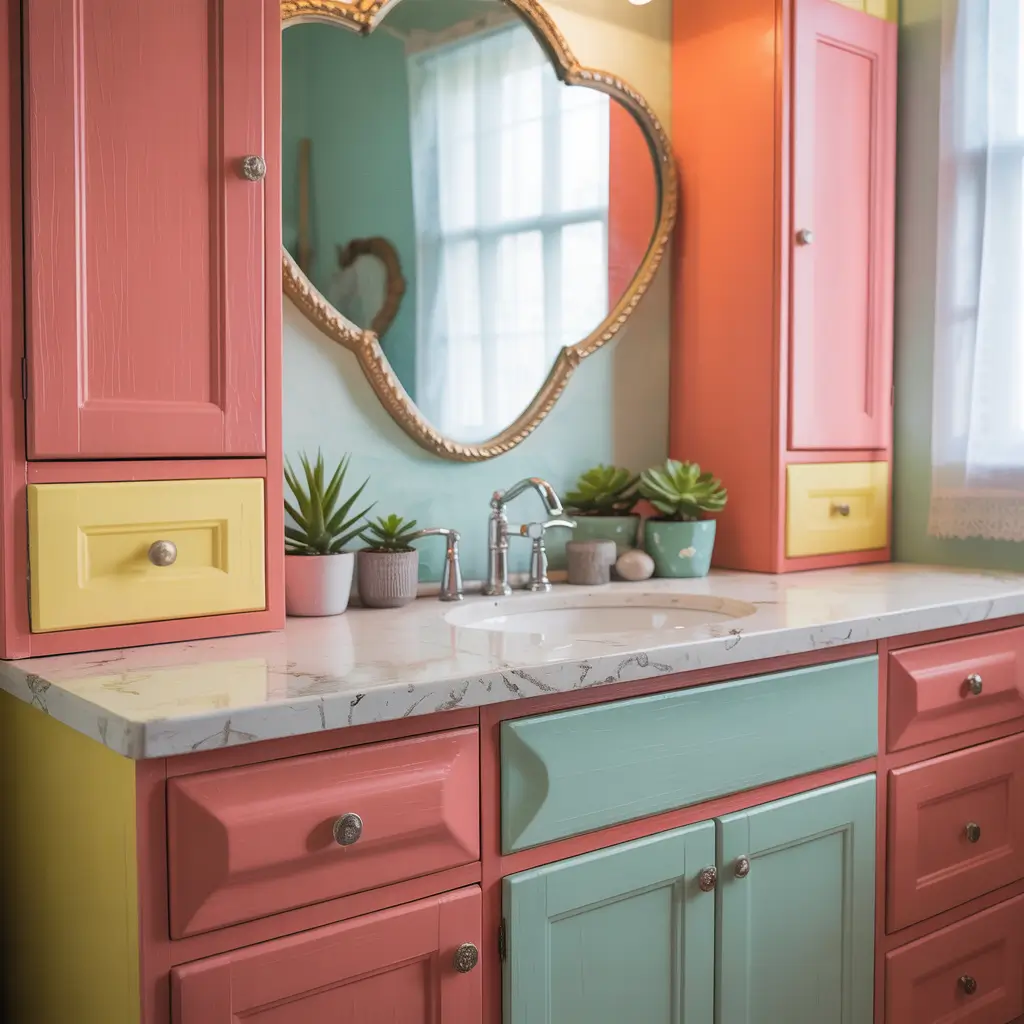
Why stick with boring white when you can have a bold, colorful vanity that makes you smile every morning? This project takes any basic vanity and transforms it with paint, turning the ordinary into extraordinary.
Painted my main bathroom vanity emerald green after three glasses of wine and a Pinterest binge. Best drunk decision ever. The rich jewel tone against white subway tiles creates a focal point that everyone notices. The color hides water spots better than white ever did.
The key to painted vanities is proper preparation and quality paint. We’re talking sanding, priming, and using bathroom-specific paint that handles humidity. Skip these steps and you’ll watch your beautiful color peel off in sheets.
Paint Project Perfection
Steps for a painted vanity that lasts:
- Clean and sand thoroughly – paint won’t stick to grime or gloss
- Use quality primer – this is not where you save money
- Choose bathroom paint – needs mold and moisture resistance
- Apply thin coats – thick paint drips and looks amateur
- Seal properly – topcoat protects your work
Bold colors make small bathrooms feel designed rather than forgotten. Just remember you’re looking at this color every day, so choose something you genuinely love, not just what’s trending.
Open Shelf Vanity with Basket Storage
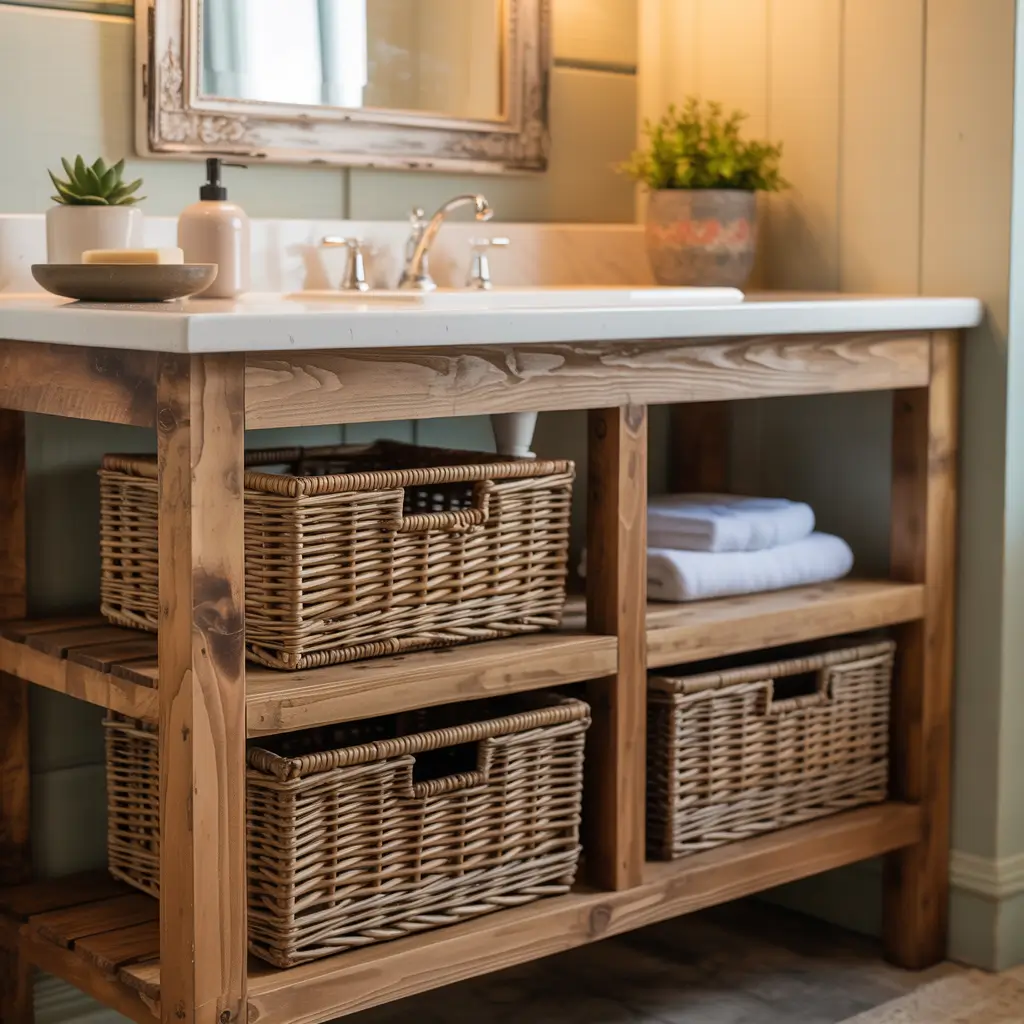
The open shelf vanity embraces the “everything on display” trend while using baskets to hide the not-so-pretty necessities. This project costs less because you’re building a frame, not complicated cabinets.
My open shelf vanity uses industrial pipes for the frame and reclaimed wood for shelves. Matching baskets create uniform storage that looks intentional. The open design makes the bathroom feel larger and forces me to keep things organized (blessing and curse).
Building an open vanity requires strong frame construction since there’s no cabinet box for support. The combination of hard materials and soft baskets creates textural interest while maintaining functionality.
Open Shelving Success
Making open vanities work in real life:
- Invest in quality baskets – they’re doing heavy visual lifting
- Build sturdy frames – no cabinet means frame carries all weight
- Plan basket sizes – measure before building shelves
- Include some closed storage – medicine needs hiding
- Maintain organization – messy open shelves look terrible
This style works best for neat people or those willing to become neat. If you’re naturally messy, consider a hybrid with some open and some closed storage.
Also Read: 12 Chic Bathroom Vanity Designs Ideas to Upgrade Your Decor
Marble Top DIY Vanity

Want marble elegance without marble prices? The DIY marble top vanity uses remnants, contact paper, or marble-look techniques to achieve that luxury look affordably. Yes, you can actually create convincing marble finishes yourself.
I scored a marble remnant from a fabricator for $50 – enough for my powder room vanity top. Had it cut to size, polished the edges myself (YouTube University strikes again), and created something that looks like it cost thousands. The natural veining and cool touch make every hand wash feel fancy.
For those without remnant access, marble contact paper or epoxy techniques create surprisingly realistic results. The key is choosing quality materials and taking time with installation. Bubbles or visible seams ruin the illusion.
Marble Options and Techniques
Achieving marble looks on a budget:
- Check fabricators for remnants – often sold cheap
- Try marble contact paper – new versions look amazingly real
- Consider epoxy techniques – creates depth and veining
- Use marble-look porcelain – thin tiles work for countertops
- Paint techniques – requires skill but costs least
Real marble needs sealing and careful maintenance. Faux options might lack the cool touch but require zero maintenance. Choose based on your patience for upkeep.
Making Your DIY Vanity Dreams Reality
After building multiple DIY vanities and helping friends with theirs, here’s what I know: the hardest part is starting. That perfect vanity in your head won’t build itself, and waiting for the “perfect” time means waiting forever.
Start with honest skill assessment. Never used a drill? Maybe skip the concrete countertop. Comfortable with basic woodworking? That pallet vanity is calling your name.
The beauty of DIY is customizing everything – size, style, storage – exactly how you want it.
Budget for mistakes because they’ll happen. Buy extra materials, especially for finishes. And please, measure everything multiple times. Nothing worse than cutting your carefully chosen wood only to discover it’s an inch too short.
Trust me, I’ve been there. But when you’re standing in front of your completed DIY vanity, knowing you built it with your own hands and saved thousands?
That feeling beats any store-bought vanity every time. Now stop scrolling through Pinterest and go build something amazing. Your bathroom (and wallet) will thank you.