10 Cool DIY Grunge Room Decor Ideas with Vintage Vibes
- Bedroom Design
 Ben
Ben- 0
- 37 minutes read
Look, I’m not gonna sugarcoat it—grunge decor is having a serious moment right now, and honestly? It never really left for some of us.
If you’ve been scrolling through Pinterest at 2 AM (no judgment, we’ve all been there), you’ve probably noticed that whole angsty-90s-meets-underground-aesthetic vibe everywhere. And the best part? You don’t need to drop your entire paycheck at Urban Outfitters to get the look.
I’ve been experimenting with grunge room decor for years now, and lemme tell you, the DIY route is where it’s at.
Not only does it save you cash, but there’s something ridiculously satisfying about creating that perfectly chaotic, lived-in vibe with your own hands. Plus, you can customize everything to match your exact flavor of angst 🙂
So grab your black spray paint,Channel your inner Kurt Cobain, and let’s turn your room into the grunge paradise you’ve been dreaming about.
Trust me, these ideas are easier than they look, and you probably already have half the materials lying around your house.
1. Ripped Poster Collage Wall
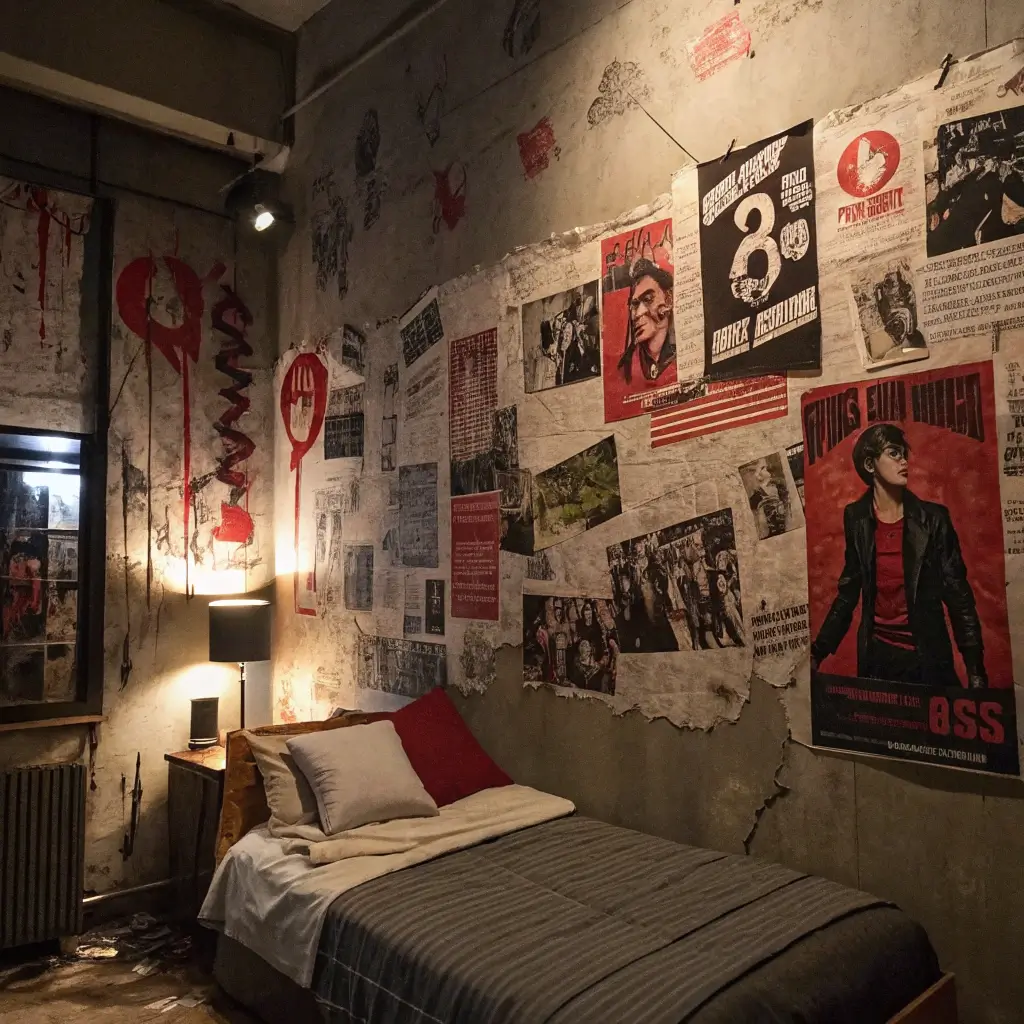
Why This Works
Ever walked past a concert venue or an old warehouse and seen those layered, half-torn posters creating this incredible chaotic pattern? That’s exactly what we’re recreating here. This technique is literally the backbone of grunge aesthetic—it’s messy, it’s rebellious, and it tells a story without being too precious about it.
I stumbled onto this idea after moving apartments and realizing I had a stack of old band posters I couldn’t bear to throw away. Instead of hanging them neatly (boring), I started ripping and layering them, and honestly? Best decorating decision ever.
How to Pull It Off
Start collecting posters—concert flyers, album covers, magazine pages, old newspapers, whatever speaks to you. The beauty here is imperfection, so don’t stress about finding pristine materials. Hit up thrift stores, raid your recycling bin, or print stuff off the internet (seriously, there are tons of free vintage poster PDFs out there).
Here’s where it gets fun. Rip the edges of your posters—don’t cut them with scissors because that defeats the whole purpose. We want jagged, uneven edges that look like they’ve survived a mosh pit. Layer them on your wall using poster putty or washi tape (FYI, washi tape is your best friend for renter-friendly decorating). Overlap them randomly, let some corners peel away, and don’t be afraid to tear pieces in half.
Pro Tips from Experience
The key is building depth. I usually start with larger posters as a base layer and then add smaller ripped pieces on top. Black and white prints mixed with some color pops work incredibly well—think black-and-white band photos with splashes of red or green from vintage ads.
Also, rotate and replace pieces whenever you feel like it. This isn’t meant to be permanent or perfect. I probably change out sections of my collage wall every couple of months just to keep things fresh.
2. Distressed Cardboard Wall Art

The Unexpected Material Hero
Okay, hear me out on this one because I know cardboard sounds weird. But distressed, painted cardboard creates this insanely cool industrial texture that screams grunge without screaming “I’m trying too hard.” Plus, it’s literally free if you’ve ordered anything online recently.
I discovered this technique completely by accident when I was spray-painting something else and accidentally got black paint all over a cardboard box. Instead of tossing it, I leaned into the mess, and now I have people asking where I bought my “industrial art pieces.” The irony is beautiful.
Creating Your Cardboard Masterpiece
Cut your cardboard into whatever shapes you want—rectangles, squares, irregular geometric shapes, whatever vibes with you. Don’t worry about clean edges; in fact, rough and torn edges add to the aesthetic.
Now here’s where you get creative with texture. Crumple the cardboard slightly to create natural creases (this adds dimension), then spray paint it black, dark grey, or even a rust-orange color. Don’t do even coats—we want splotchy, uneven coverage. Let some of the brown cardboard show through because that contrast is chef’s kiss.
Once it’s dry, you can add layers. Splatter some white or silver paint over it, write lyrics or quotes with a paint marker, or even use sandpaper to distress certain areas. Mount these pieces on your wall using command strips, and boom—you’ve got instant industrial-grunge art.
Why It Actually Looks Expensive
The texture of distressed cardboard mimics that weathered metal or concrete look without the weight or cost. I’ve grouped five or six pieces together in an asymmetrical arrangement above my desk, and it creates this focal point that somehow ties the whole room together. People legitimately don’t believe me when I tell them it’s cardboard.
3. DIY Chain Hanging Decor
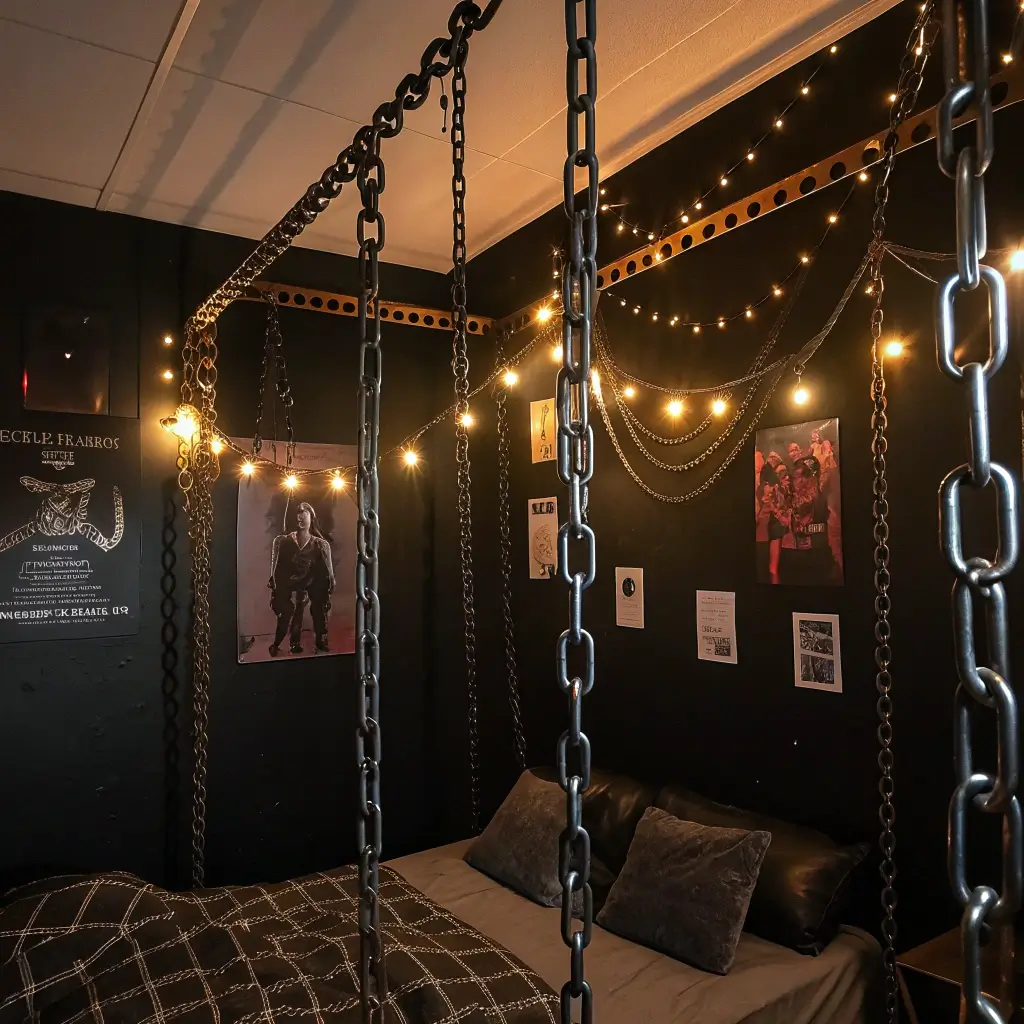
Hardware Store Meets Bedroom Goals
Chains. Metal chains. Hanging from your ceiling or draped across your walls. If that doesn’t scream grunge, I don’t know what does. This is one of those decor ideas that looks complicated but is actually ridiculously simple, and the visual impact? Unmatched.
I started with this idea after seeing an old industrial loft conversion and thinking, “How do I get that vibe without, you know, living in an actual warehouse?” Turns out, a quick trip to the hardware store and twenty bucks later, you’re basically there.
Installation and Styling
Head to your local hardware store and grab some metal chains—you can choose chunky chains for a heavier industrial look or thinner chains for something slightly more delicate (though let’s be real, nothing about grunge is delicate). They usually sell them by the foot, so measure your space first.
For hanging them from the ceiling, you’ll need ceiling hooks that can support the weight. Install these in corners or above your bed—anywhere that could use some visual interest. Then simply attach your chains and let them drape down. You can leave them plain or hang small items from them: Polaroids, small plants in glass containers, fairy lights, or even more chains at different lengths.
I’ve also draped chains across my walls in swag patterns, securing them with small nails or command hooks at intervals. Layer different types of chains—mix silver with brass, chunky with delicate—to create depth and texture.
Safety Real Talk
Just make sure whatever you’re hanging from is secure, especially if you’re attaching to the ceiling. Test the weight before you commit, and if you’re renting, use heavy-duty command hooks rated for the weight rather than putting holes in the ceiling. Your security deposit will thank you later :/
Also Read: 10 Stylish Cardboard DIY Room Decor Ideas for Teens
4. Grunge Lyrics Quote Canvas
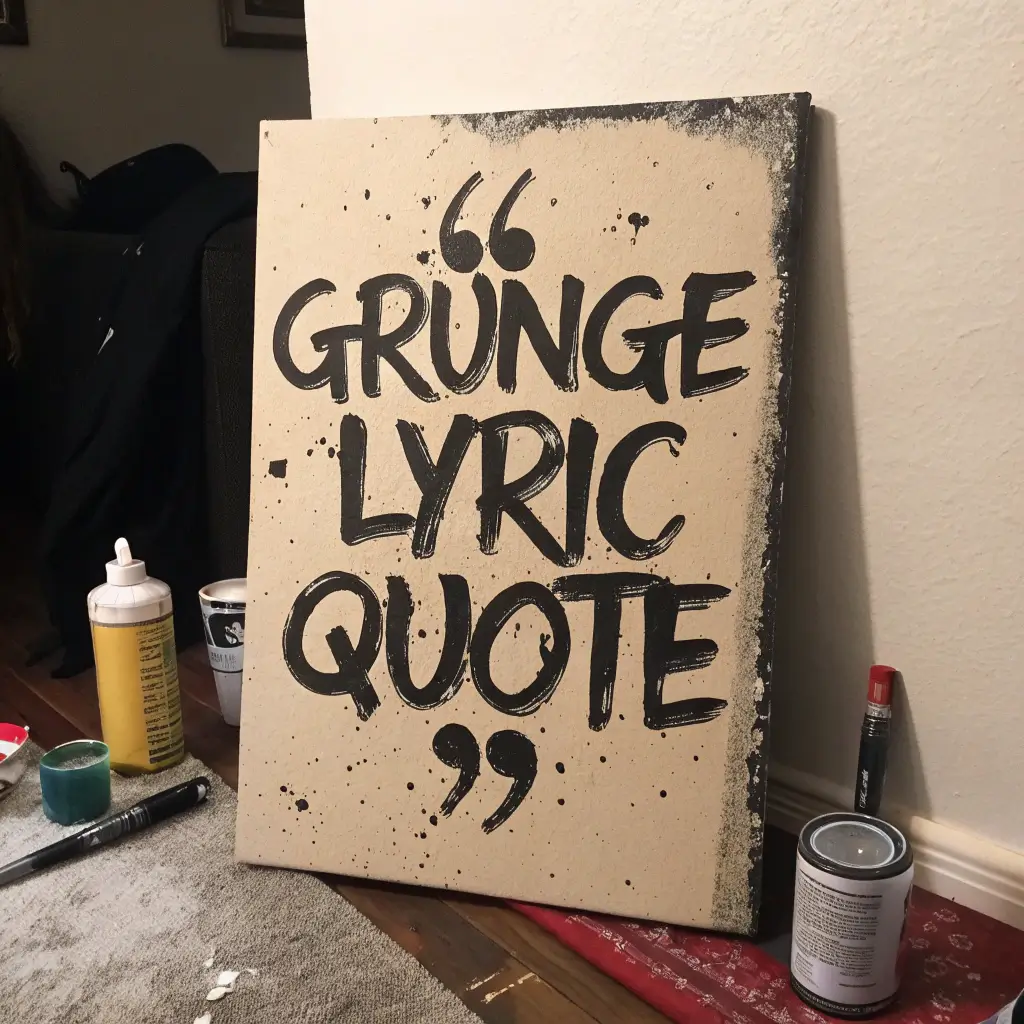
Words That Hit Different
There’s something about seeing your favorite angsty lyrics staring back at you from your wall, right? Grunge music is all about raw emotion and brutal honesty, so why not plaster those words everywhere? This project combines art with personal meaning, and you can make it as chaotic or as minimalist as you want.
I have a canvas above my bed with lyrics from Nirvana’s “Lithium,” and I’m not gonna lie—every time I look at it, it just feels right. It’s personal, it’s moody, and it cost me maybe eight dollars to make.
Creating Your Lyric Canvas
Grab a canvas from any craft store (or honestly, a thick piece of cardboard works too if you’re on a budget). Choose your favorite grunge lyrics—we’re talking Nirvana, Soundgarden, Pearl Jam, Alice in Chains, whatever speaks to your soul.
Paint the background first. Black is classic, but I’ve also seen dark grey, deep burgundy, or even a distressed white background look incredible. Don’t stress about perfect coverage—splotchy and uneven adds character.
For the text, you have options. If you’ve got decent handwriting, paint the lyrics directly onto the canvas with white or silver paint markers. If you’re like me and your handwriting looks like a toddler’s, print out the lyrics in a cool font, cut them into strips, and use Mod Podge to attach them to the canvas. You can even rip the paper edges before attaching for extra grunge points.
Layering and Distressing
Here’s where you take it from “nice art project” to “actual grunge aesthetic.” Splatter some black or grey paint over the finished piece. Use sandpaper to rough up certain areas. Add drips by loading your brush with watery paint and letting it run down the canvas. Some people even burn the edges slightly (safely, outside, with supervision—don’t burn your house down for the aesthetic, please).
IMO, the beauty is in making it look like it’s been through something, like it has history and wear. Perfection is the enemy of grunge, so embrace the mess.
5. Painted Vinyl Record Wall Decor
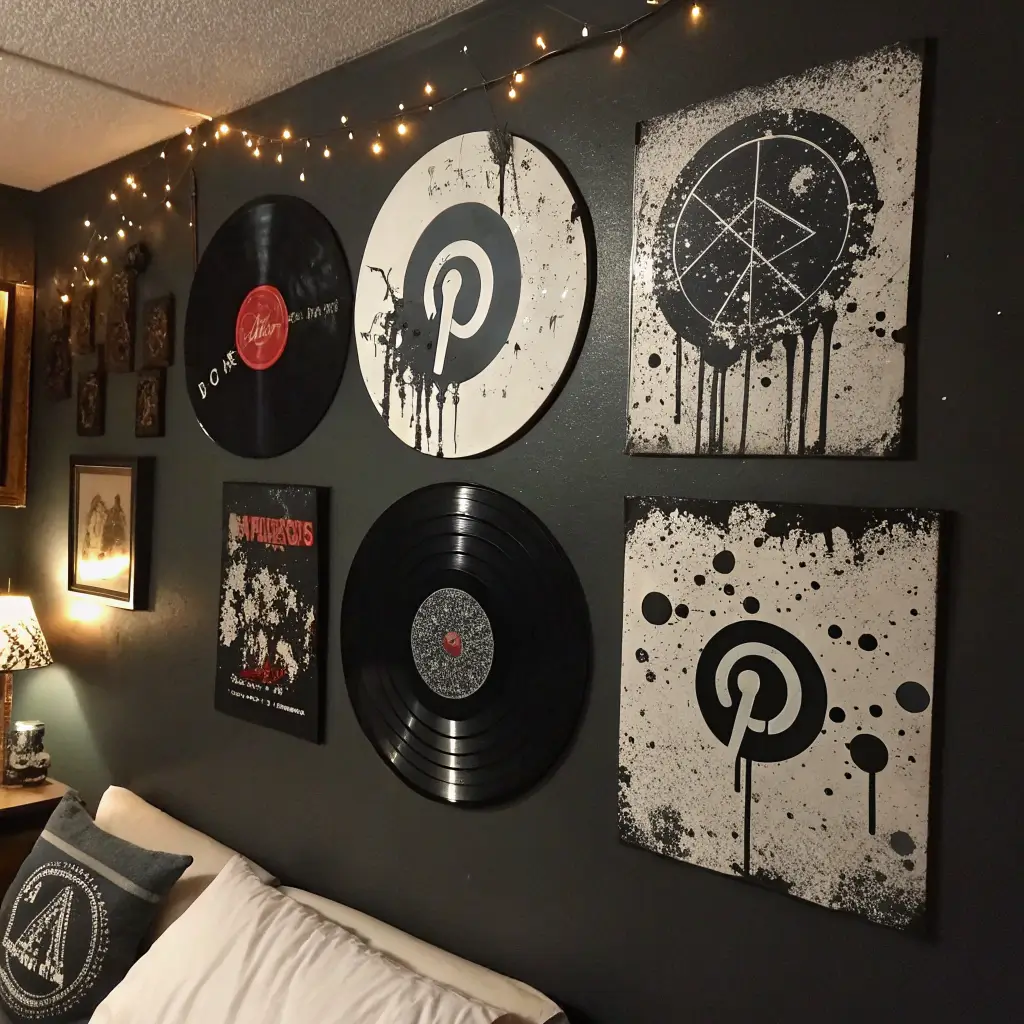
Vintage Meets Vandalism (But Make It Art)
Vinyl records are already pretty grunge on their own—they’re vintage, they’re musical, they’re circular pieces of nostalgia. But painted vinyl records? Now we’re talking. This is one of my favorite projects because you’re essentially taking something old and giving it new life through creative destruction.
Before you come at me—yes, I know some people think painting vinyl is sacrilege. But hear me out: I’m talking about using scratched, damaged records from thrift store dollar bins that would never play again anyway. We’re upcycling here, not destroying mint-condition Beatles albums.
Paint Techniques That Actually Look Good
Thrift stores are gold mines for old vinyl records. Grab a handful of damaged ones for like fifty cents each. Clean them off, then start experimenting with paint.
My go-to technique is the splatter method—lay the record flat, load up a brush with acrylic paint (black, white, silver, burgundy all work great), and flick it across the record surface. The paint will create these cool random patterns that look intentionally artistic. You can also do drip painting by holding the record vertically and letting paint run down from the top.
Another technique I love is the half-paint approach—cover half the record in solid black or white paint and leave the other half showing the original label and grooves. The contrast is so visually interesting.
Once dry, you can add more details—write song lyrics around the edges with paint markers, add metallic accents, or leave them simple. Hang them on your wall using plate hangers or command strips arranged in a cluster.
Display Ideas
I’ve got seven vinyl records arranged asymmetrically on one wall, all painted differently but using the same color palette. Some people create a grid pattern, others do a scattered constellation-style arrangement. There’s no wrong way to do this—just eyeball it until it looks right to you.
6. Torn Fabric Wall Tapestry
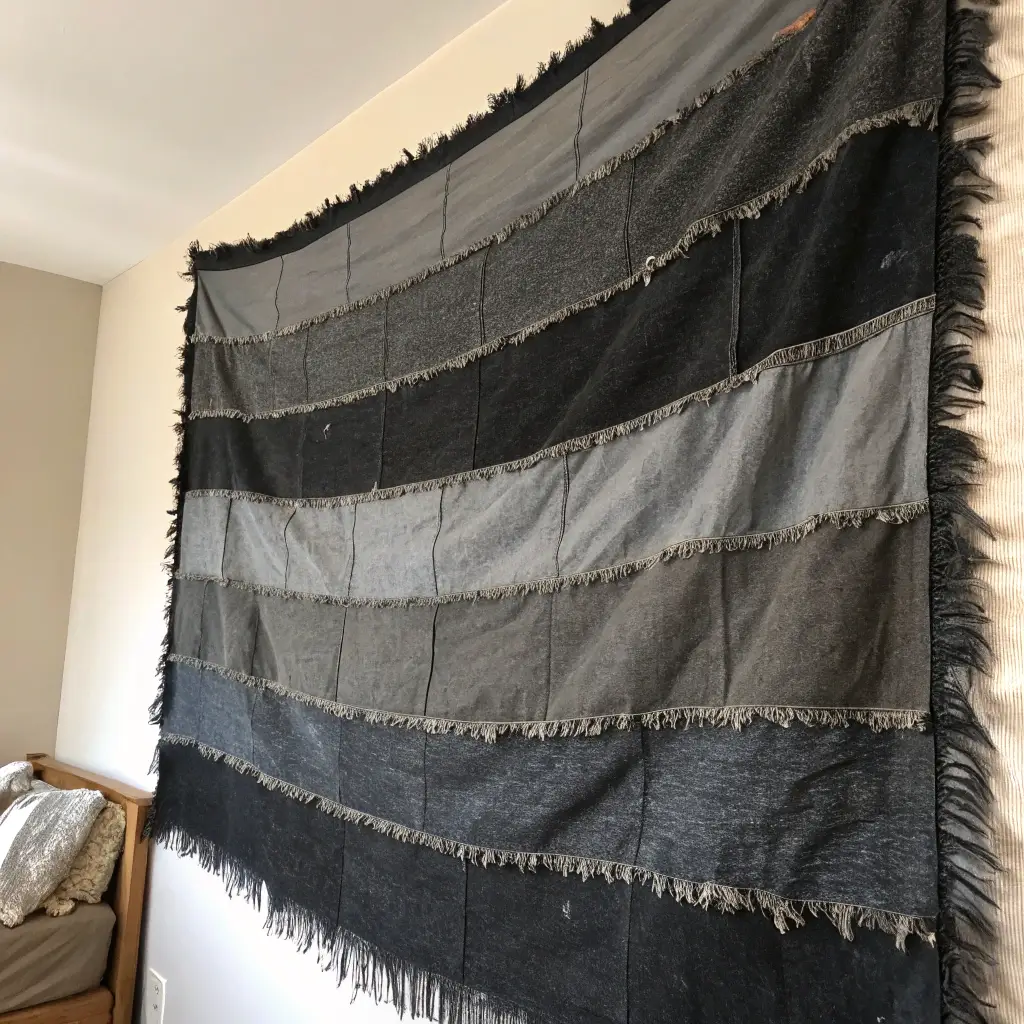
Textile Destruction As Decor
Okay, this one might sound counterintuitive—deliberately destroying fabric to hang on your wall—but trust me, the torn fabric aesthetic is incredibly grunge. We’re going for that abandoned building vibe where tattered curtains are still hanging, that weathered beauty that only comes from intentional imperfection.
I created my first torn fabric tapestry after thrifting this massive piece of black muslin that had a tiny hole in it. Instead of trying to hide the flaw, I made it worse (on purpose), and somehow that felt perfectly appropriate for grunge decor.
Choosing Your Fabric
Hit up thrift stores for large pieces of fabric—old sheets, curtains, tablecloths, whatever. Stick with darker colors or black and white patterns for maximum grunge impact. Lightweight fabrics like muslin, cotton, or even gauze work best because they’re easier to rip and drape.
Here’s the fun part: rip it up. Tear holes in random places, pull threads to create frayed edges, cut slits that start at the bottom and work up. You want it to look weathered and worn. Some areas should barely be held together, while others remain mostly intact. The irregularity is what makes it interesting.
Hanging and Styling
I hang mine using a tension rod at the top (super renter-friendly) and let the torn fabric drape naturally. The weight of the fabric creates these organic folds and shadows that change throughout the day as the light shifts.
You can layer multiple pieces of torn fabric in different colors or textures for even more depth. I’ve also seen people add safety pins randomly across the fabric, string lights through the holes, or attach Polaroids and small chains to create a mixed-media wall hanging.
The beauty here is impermanence—you can rearrange, add more tears, or completely change it up whenever the mood strikes. Nothing is precious, everything is temporary, and that’s kind of the point.
Also Read: 12 Stylish DIY Living Room Decor Ideas for Modern Homes
7. Black Spray Drip Mirror Frame
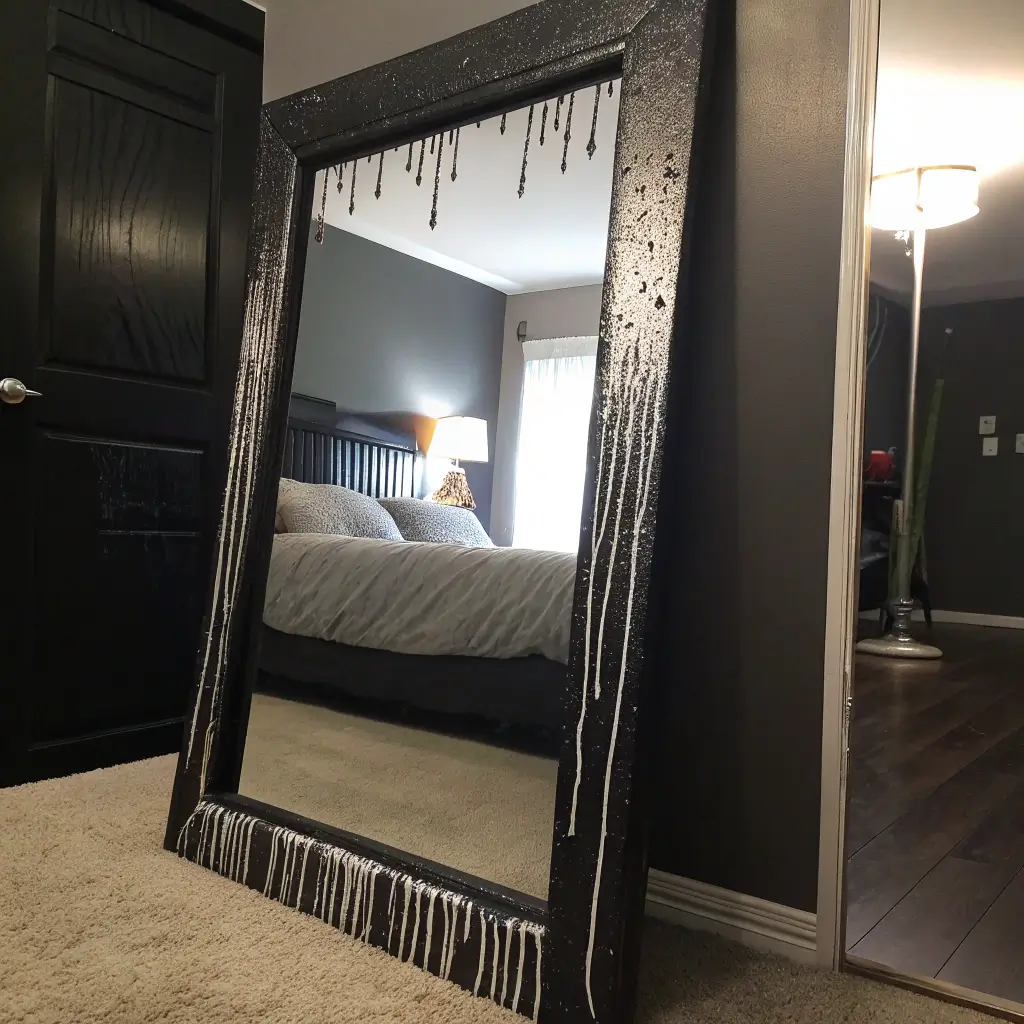
Reflection With Edge
Mirrors are functional, sure, but a plain mirror is basically a missed opportunity for grunge expression. Adding a black spray-drip effect to your mirror frame (or creating a frame if it doesn’t have one) transforms it from basic necessity to statement piece.
I did this to my full-length mirror last year, and I’m not exaggerating when I say it completely changed the vibe of my room. Every time I check my outfit, I’m reminded that perfection is overrated and controlled chaos is beautiful.
The Drip Effect Technique
If your mirror already has a frame, great—you can work with that. If not, you can create a makeshift frame by taping cardboard strips around the mirror edges (protect the actual mirror glass with painter’s tape and newspaper).
Take your mirror outside or to a very well-ventilated area. Position it upright. Now, with black spray paint, start at the top of the frame and do short bursts of spray, letting gravity pull the paint down in drips. Don’t try to control it too much—irregular drips are what we want. Some drips should be thick and run far, others should be short. Let some paint pool at the top before dripping.
You can layer this with other colors too. I added some silver and dark grey drips among the black ones for more dimension. Let each color dry slightly before adding the next so they don’t all blend into one muddy mess.
Protecting the Process
This is crucial: make absolutely sure your mirror glass is completely covered and protected. Spray paint on glass is a pain to remove (trust me, I learned this the hard way). Use painter’s tape right at the edge where frame meets glass, and cover the entire mirror surface with newspaper or plastic.
Once everything is dry—and I mean completely dry, give it 24 hours—carefully remove all the protective coverings. You’ll be left with this sick drip effect that makes your mirror look like it belongs in an underground art gallery.
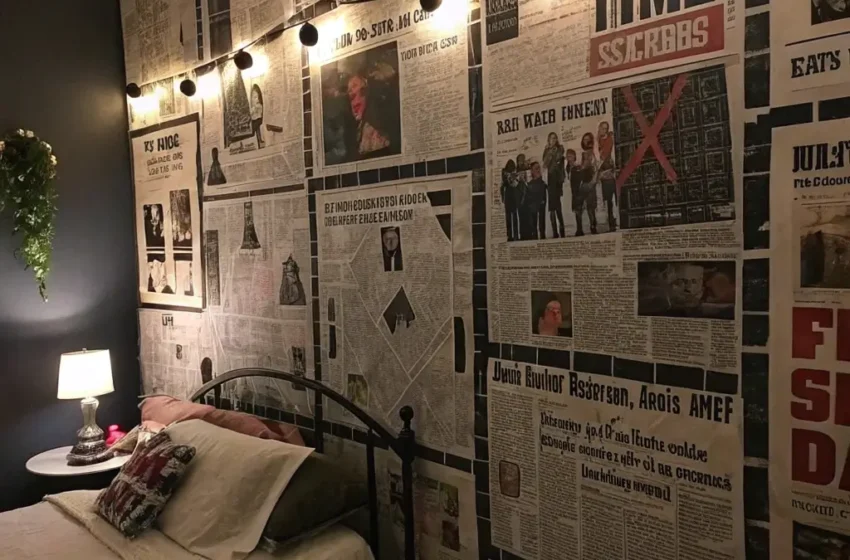
8. DIY Newspaper Mood Wall
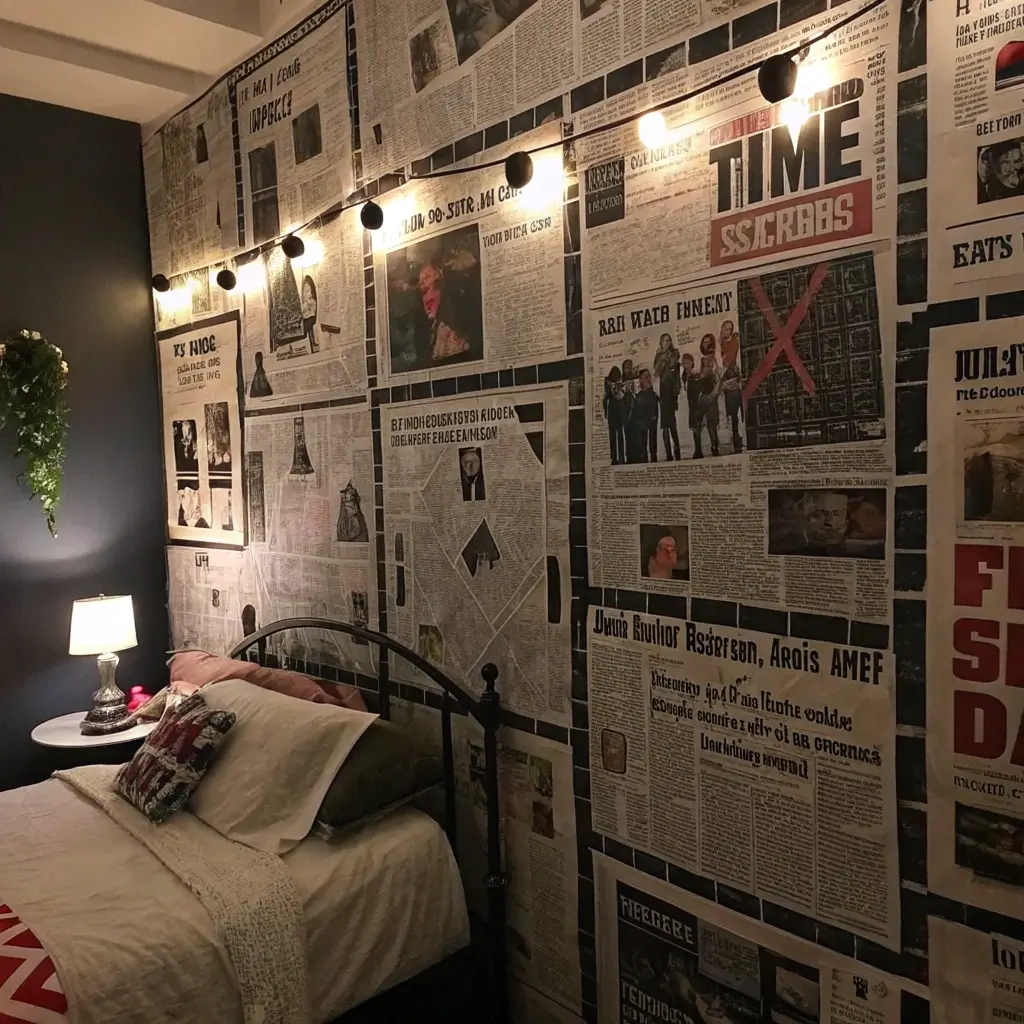
Print Media Meets Grunge Aesthetic
There’s something inherently grunge about old newspapers—maybe it’s the black-and-white aesthetic, maybe it’s the raw text, or maybe it’s that connection to analog media in our digital world. Whatever it is, creating a newspaper mood wall is easier than you think and looks absolutely killer.
This project happened for me kind of by accident. I was using newspaper to protect my floor during another project and realized the text and photos actually looked really cool as decor. Sometimes the best ideas come from happy accidents, you know?
Sourcing and Selecting Content
You need newspapers, obviously. Check your recycling bin, ask neighbors, or pick up free community papers. Look for interesting headlines, dramatic photos, or even just sections with heavy text density. The content doesn’t even have to be in English—sometimes foreign language newspapers look even cooler because you’re responding purely to the visual aesthetic.
I also mix in magazine pages—specifically black-and-white photos from fashion magazines or grungy concert photos. The combination of newsprint texture with higher-quality magazine paper creates visual variety.
Application and Arrangement
This is basically a collage, but instead of colorful posters, we’re going monochromatic with text and news imagery. Use Mod Podge or even just a flour-water paste (seriously, old-school technique that works great) to adhere the paper directly to your wall. Overlap pieces randomly, let some areas be text-heavy while others feature photos, and don’t stress about wrinkles—they add texture.
I covered an entire accent wall with this technique, and it became this incredible conversation starter. The randomness of the content means every time you look at it, you notice something new. Plus, it’s ridiculously budget-friendly—we’re talking maybe five dollars for a large coverage area.
FYI, if you’re renting, apply the paper to large pieces of cardboard first, then mount those panels to your wall with command strips. Same effect, zero commitment to the wall itself.
9. Rust-Style Bottle Vase Decor
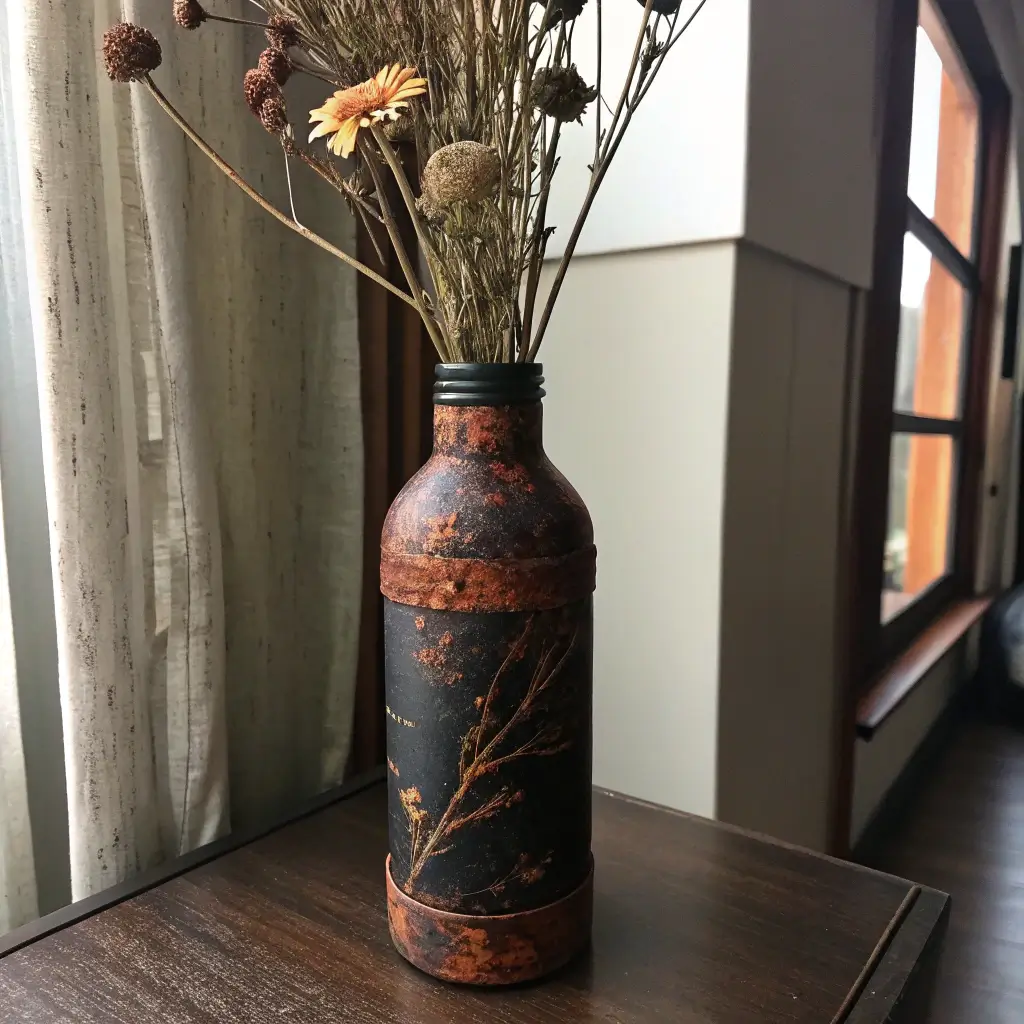
Industrial Decay As Decoration
Rust represents decay, age, and industrial abandonment—basically the holy trinity of grunge aesthetics. While actual rust requires metal and time (and isn’t super safe indoors), we can fake that rust effect on glass bottles to create these moody, industrial-looking vases that are perfect for dried flowers or even just standing alone as sculptural pieces.
I started experimenting with this after seeing expensive “distressed” vases at boutique stores going for like forty dollars each. Figured there had to be a way to DIY it, and spoiler alert: there absolutely is, and it costs practically nothing.
Creating the Rust Effect
Start collecting glass bottles—wine bottles, beer bottles, even old pasta sauce jars work great. Remove all labels and clean thoroughly. The glass needs to be completely clean and dry for paint to adhere properly.
Here’s the magic formula for fake rust: mix burnt sienna and burnt umber acrylic paint with a tiny bit of water to thin it slightly. Apply this with a sponge in splotchy, uneven layers. While it’s still wet, sprinkle on some actual rust (you can scrape this off old metal objects) or just use orange and brown paint in powdered form if you can find it.
Layer different shades—start with darker browns at the bottom, add some orange-red tones in the middle, and maybe some dark grey at the neck of the bottle. Use a dry brush technique to drag colors and create that weathered, peeling effect that real rust has.
Styling Your Rust Bottles
Once dry, these bottles look legitimately aged. I group three or five together (odd numbers always look better, that’s just a design rule) on shelves or windowsills. Add dried flowers—stuff like pampas grass, eucalyptus, or even dried wheat looks incredible. Or leave them empty because honestly, the bottles themselves are the statement.
The best part? Every bottle will look different based on how you apply the paint, so you’ll end up with a cohesive set that still has individuality. Very grunge, very intentional-but-not-trying-too-hard.
Also Read: 10 Inspiring Room Decor Bedroom DIY Ideas to Try Today
10. Flickering LED Grunge Corner Setup
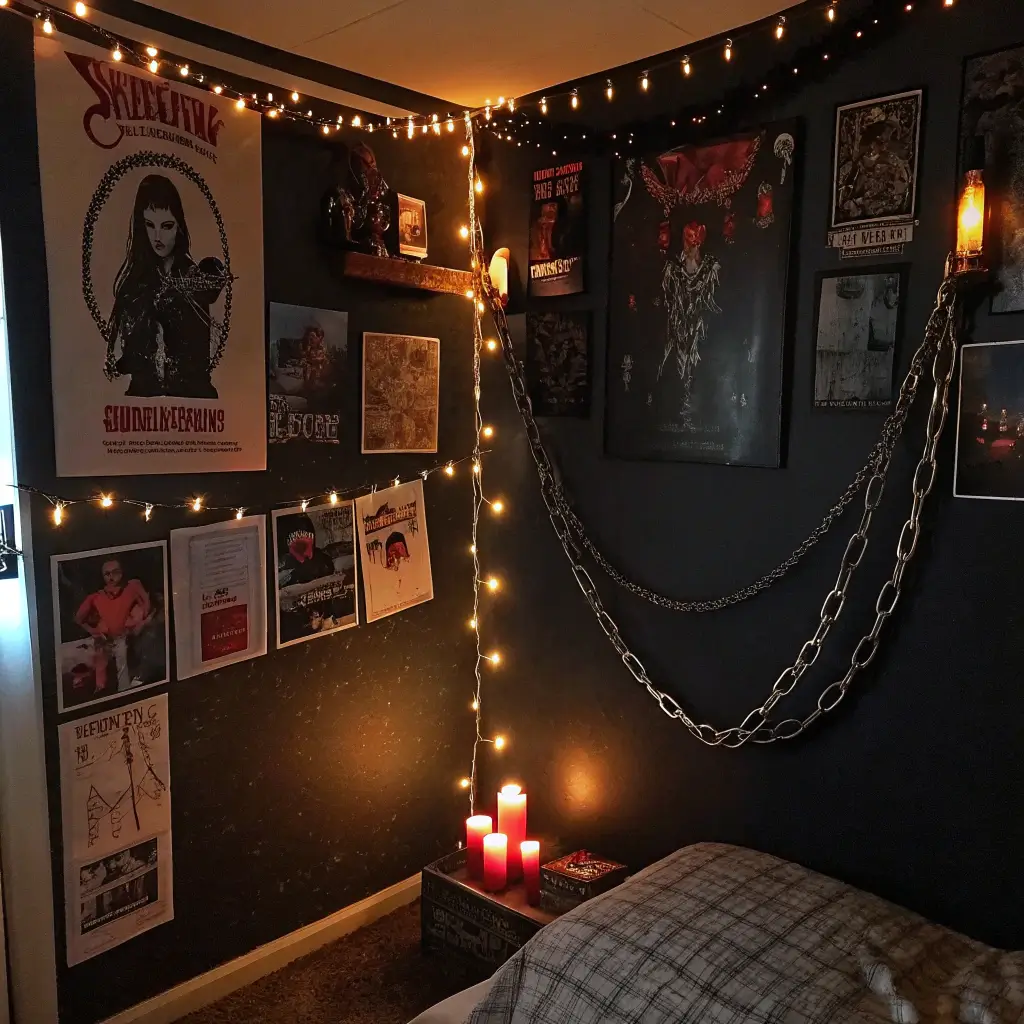
Moody Lighting For Maximum Atmosphere
Let’s talk about lighting because honestly, you can have all the grunge decor in the world, but if your room is lit up like a dental office, the vibe is lost. This final idea is about creating a dedicated grunge corner with strategic lighting that sets the entire mood.
Lighting was actually the last piece of my own grunge room puzzle, and once I got it right, everything else suddenly made sense. The right lighting doesn’t just illuminate—it transforms the entire atmosphere.
Building Your Grunge Corner
Choose a corner of your room that’s already a bit shadowy or underutilized. This will be your statement area. Start with a base—maybe stack some old wooden crates, use a distressed side table, or even just clear some floor space.
Layer in some of your other DIY projects here—prop up some painted vinyl records, drape a torn fabric piece, hang some chains from above. The corner should feel dense with texture and objects, not minimal or sparse.
The Lighting Magic
Here’s where it gets atmospheric. Grab some Edison bulb string lights (the ones with exposed filaments) and drape them around the corner space. These bulbs have that warm, vintage glow that’s perfect for grunge.
Add a Himalayan salt lamp or two—I know they’re kind of cliché now, but that orange-pink glow is unmatched for moody ambiance. Position them at different heights within your corner setup.
The real game-changer? LED candles with flickering flames. Real candles are obviously a fire hazard (and most dorms don’t allow them anyway), but the LED versions create that same shadowy, dancing light effect. Place several around your corner setup at various heights. The flickering effect makes everything feel more alive and less static.
Final Touches
I added a small mirror in my grunge corner to reflect and multiply the light sources—creates this infinite depth thing that’s really trippy. You can also incorporate some blacklight elements if you’re feeling extra. Certain posters and fabrics glow under blacklight, which adds another dimension when you switch it on.
The goal is to create a space where you can kill the overhead lights and just vibe with your layered, flickering grunge corner lighting. Perfect for late-night playlist sessions or just sitting and contemplating the void, as one does 🙂
Bringing It All Together
Look, grunge decor room isn’t about following rules or achieving some Pinterest-perfect aesthetic.
It’s about embracing imperfection, celebrating the weathered and worn, and creating a space that feels authentically you—mess and all.
The beauty of these DIY projects is that they’re forgiving. Messed up your spray paint drips? That’s fine, adds character. Ripped your fabric too much? Even better.
The whole point is that nothing is too precious, nothing is permanent, and your room should reflect the beautiful chaos of real life, not some sterile magazine spread.
I’ve been building my grunge room for years now, and honestly, it’s never “done.” I’m constantly swapping out elements, adding new layers, destroying and rebuilding things.
That evolution is part of the aesthetic itself—grunge represents authenticity and raw emotion, and both of those things change over time.
So grab whatever materials you have lying around, crank up some Soundgarden or Hole, and start creating.
The worst that can happen is you create something you don’t like, and then you just… destroy it and start over. Very grunge, when you think about it.
The best that can happen is you create a space that finally feels like it actually represents who you are, and honestly? That’s worth more than any expensive decor you could buy.
Now go forth and embrace the beautiful mess. Your grunge room paradise is waiting.