10 Unique Garage Shoe Storage Ideas and Stylish Solutions
- Garage Decor
 Ben
Ben- 0
- 40 minutes read
Look, I get it. You walk into your garage, and the first thing you see is a mountain of sneakers, boots, flip-flops, and that one pair of dress shoes you wore to a wedding three years ago. It’s chaos. It’s frustrating. And honestly? It’s a little embarrassing when the neighbor pops over to borrow your drill.
I’ve been there — tripping over running shoes at 6 a.m. while trying to grab my coffee mug from the garage fridge. That was my rock bottom. So I spent an unreasonable amount of time researching, testing, and obsessing over garage shoe storage ideas that actually work and don’t look like a clearance aisle at a discount store. The result? These ten solutions changed my garage from a shoe graveyard into an organized, genuinely stylish space.
Whether you’ve got a massive three-car garage or a tight single-car setup, there’s something here for you. Let’s get your shoes off the floor and your sanity back on track.
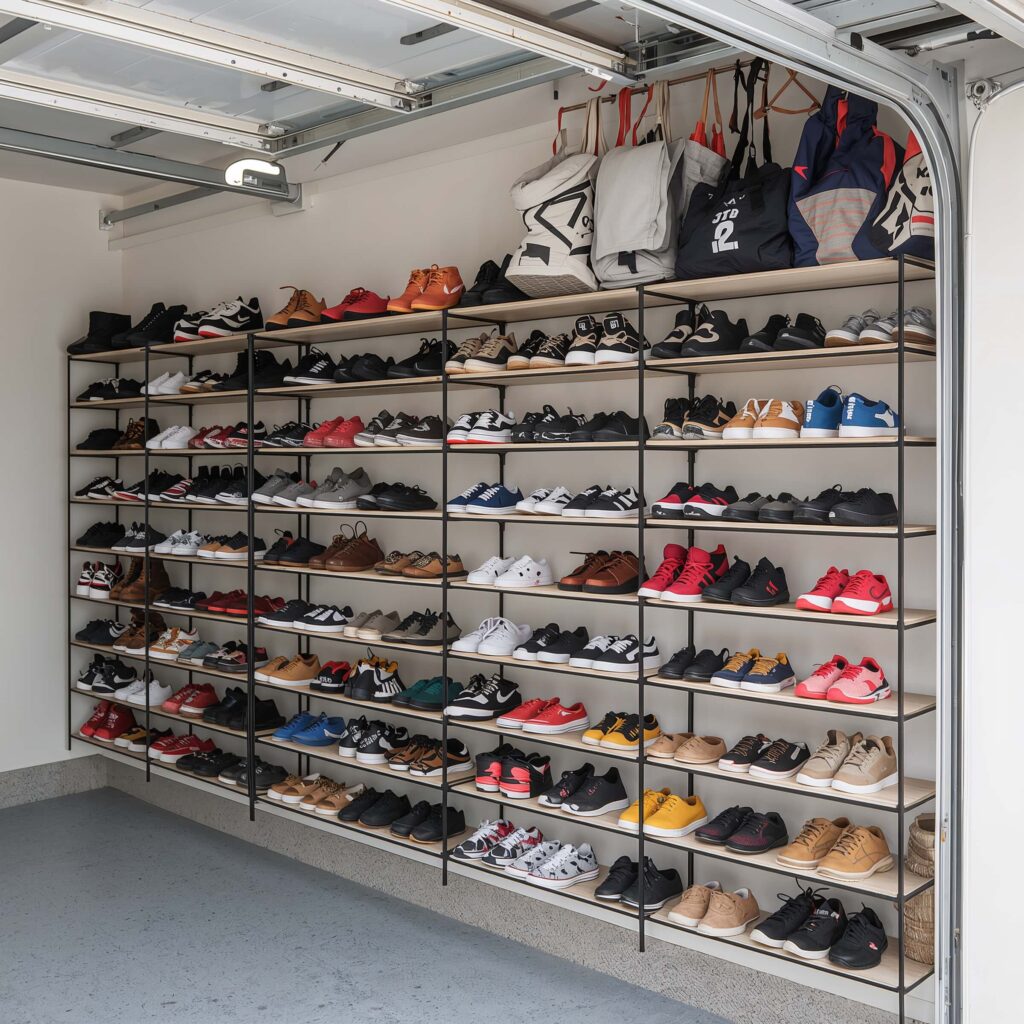
1. Floating Wall Shoe Racks
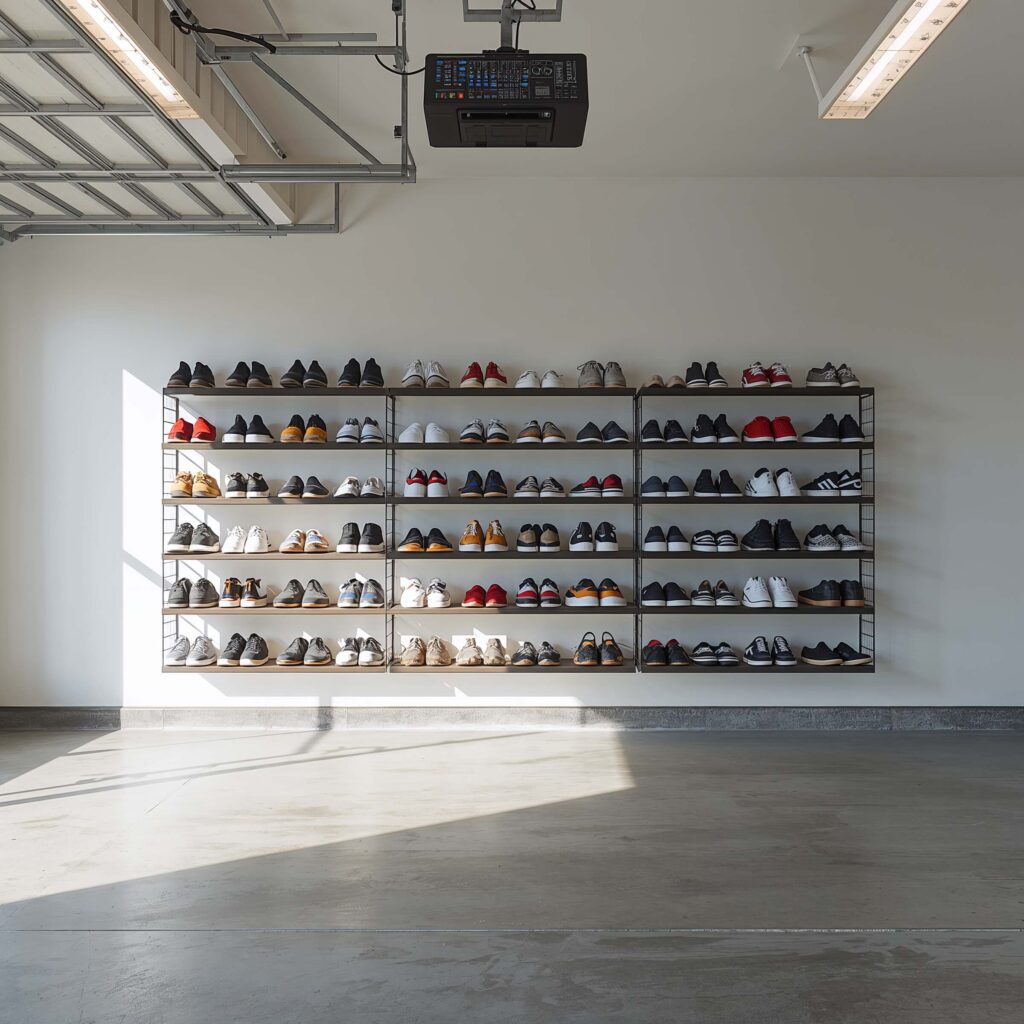
If floor space in your garage feels like prime real estate, floating wall shoe racks are your best friend. These sleek shelves mount directly to your garage wall, keeping every pair visible and off the ground. I installed a set of these last spring, and honestly, I felt like I’d unlocked a secret level in the game of home organization.
Why They Work So Well
Floating shelves exploit vertical wall space that most people completely ignore. Think about it — how much empty wall do you have between your workbench and the ceiling? Probably a lot. These racks turn that dead zone into functional storage without eating into your parking or workspace.
Here’s what makes floating wall shoe racks a standout choice:
- Easy installation — most sets require just a few screws and a level
- Adjustable spacing — you control the gap between shelves to fit boots, heels, or chunky sneakers
- Clean, minimalist look — they add a modern vibe to an otherwise utilitarian space
- Affordable — basic floating shelves cost anywhere from $15 to $50 per set
Best Practices for Installation
Mount them near your garage entry door so you can kick off your shoes the moment you walk in. I placed mine right beside the door that connects to my house, and it created a natural “shoe drop zone.” No more dragging mud through the kitchen.
Space your shelves about 8 to 10 inches apart for regular shoes and bump that up to 14 inches for tall boots. Use a stud finder — seriously, don’t skip this step unless you want your shelf and twelve pairs of shoes crashing down at 2 a.m.
2. Overhead Ceiling Shoe Storage
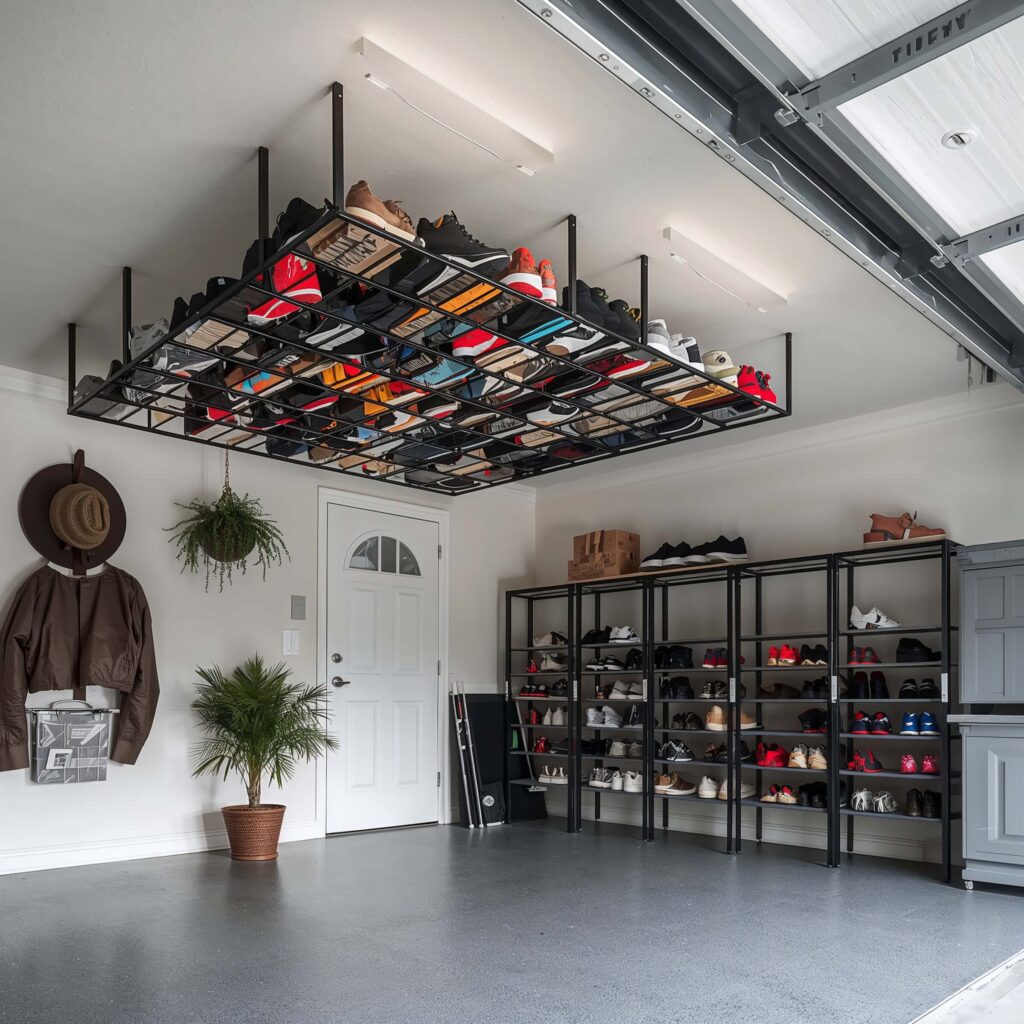
Ever looked up at your garage ceiling and thought, “That’s a whole lot of nothing up there”? Overhead ceiling shoe storage takes advantage of that completely wasted space above your head. This solution works incredibly well for seasonal shoes you don’t need daily access to.
How It Works
You install a platform or hanging rack system from your ceiling joists, then stash shoes in bins or directly on the rack. Most overhead systems use a pulley or lift mechanism, so you can lower them when you need something and hoist them back up when you don’t.
Key benefits include:
- Maximum floor and wall space preservation — nothing touches the ground or walls
- Perfect for seasonal rotation — store winter boots in summer and sandals in winter
- High weight capacity — many systems hold 200 to 600 pounds
- Out of sight, out of mind — keeps the garage looking clean and uncluttered
A Word of Caution
Make sure you anchor into ceiling joists, not just drywall. I cannot stress this enough. A friend of mine skipped this step, loaded up his overhead rack with boots and work shoes, and the whole thing came down onto his car hood. Not a fun insurance call.
Also, measure your garage door clearance before installing. You need enough room for the door to open and close without clipping your storage system. It sounds obvious, but you’d be surprised how many people forget this.
3. Industrial Pipe Shoe Shelves
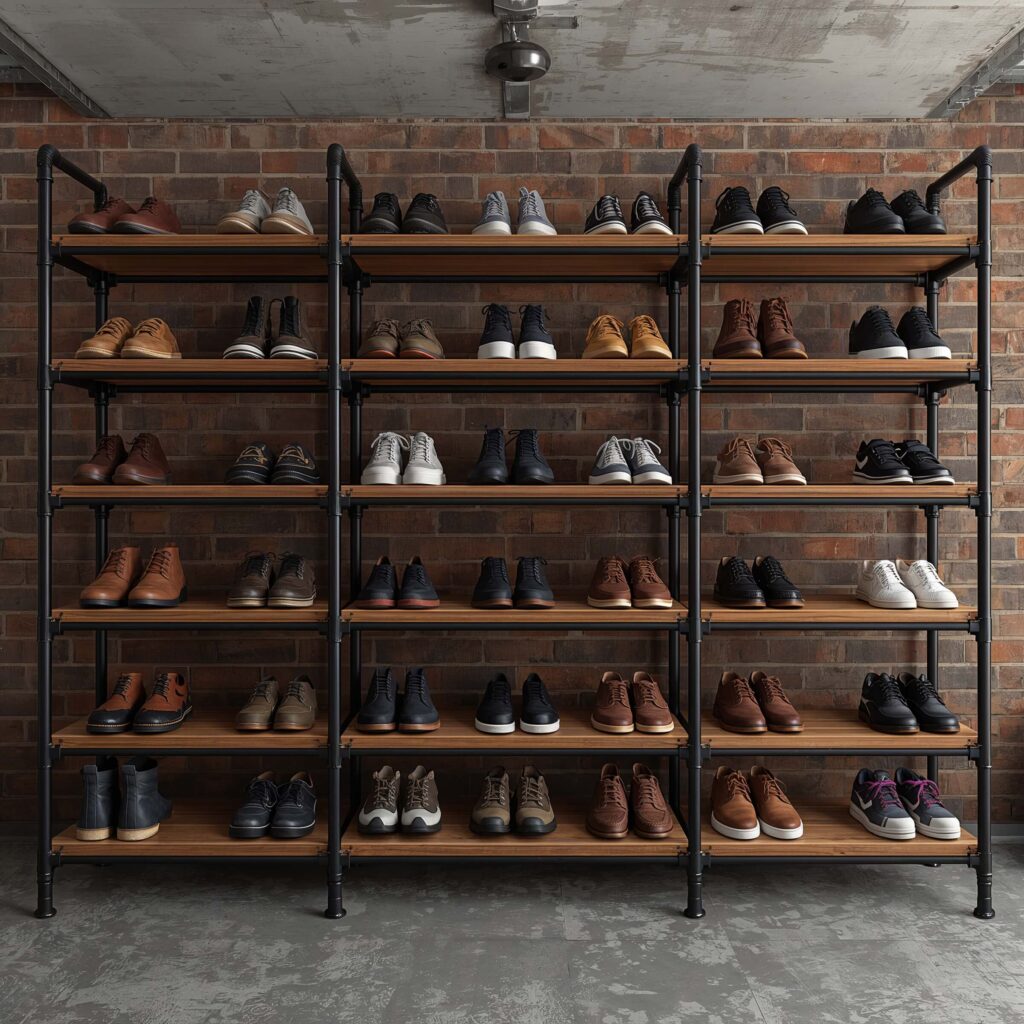
Want your garage to look like a trendy Brooklyn loft instead of a suburban storage unit? Industrial pipe shoe shelves bring that raw, rugged aesthetic while being ridiculously sturdy. These shelves use iron or steel pipes as the frame and wooden planks as the shelf surfaces.
The Aesthetic Appeal
There’s something deeply satisfying about the contrast of dark metal pipes against warm wood. It gives your garage character — like your shoes deserve their own boutique display. I built a set using black iron pipes from the hardware store and reclaimed wood planks, and every single person who walks into my garage comments on them.
Building Your Own
Here’s the fun part — you can totally DIY this project over a weekend. Here’s what you’ll need:
- Black iron pipes and fittings (flanges, elbows, tees)
- Wooden planks — pine works great, but reclaimed barn wood adds extra charm
- Screws and wall anchors
- Sandpaper and wood stain or sealant
The total cost usually runs between $50 and $120, depending on how many tiers you build. Compare that to a pre-made industrial shelf from a furniture store that’ll set you back $200 or more. IMO, the DIY route wins every time — both on price and on the satisfaction of saying, “Yeah, I built that.”
Durability Factor
These shelves can handle serious weight. Iron pipes don’t bend or sag like cheap particleboard shelving. If you’ve got heavy work boots, steel-toed shoes, or a collection of chunky sneakers, industrial pipe shelves won’t even flinch.
Also Read: 10 Brilliant DIY Garage Storage Ideas and Space-Saving Hacks
4. Rolling Shoe Cart for Garage

Flexibility matters, especially in a garage that serves multiple purposes. A rolling shoe cart gives you portable storage you can wheel wherever you need it — or tuck away when you need the space for a project.
Why Mobility Matters
Maybe you park your car in the garage during the week but use the space as a workshop on weekends. A rolling cart lets you move your shoe storage out of the way in seconds. No dismounting shelves, no rearranging — just roll and go.
Features to look for in a quality rolling shoe cart:
- Locking casters — so it stays put when you want it to
- Multiple tiers — three to four shelves maximize vertical storage
- Open design — allows airflow to keep shoes from getting musty
- Rust-resistant frame — garages can get humid, so metal carts should have a powder-coated or stainless finish
My Experience
I grabbed a three-tier rolling cart from a restaurant supply store for about $40. It wasn’t even marketed for shoes — it was a kitchen utility cart. But the shelf spacing fit sneakers and boots perfectly, and the industrial-grade casters roll smoothly on concrete. Sometimes the best garage shoe storage ideas come from thinking outside the box.
5. Rustic Wooden Crate Storage
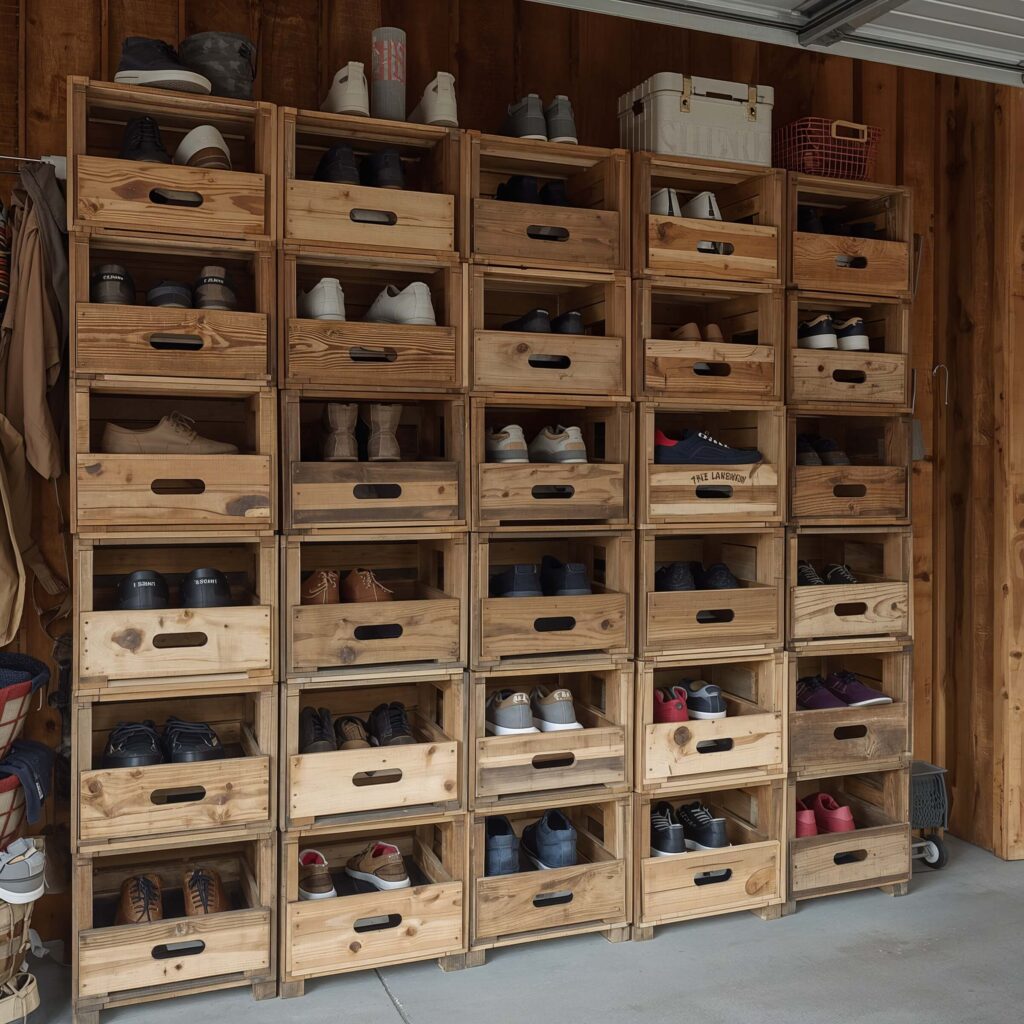
If you love that farmhouse or rustic vibe, wooden crate shoe storage delivers warmth and charm without costing a fortune. Old wooden crates — the kind you find at flea markets, antique shops, or even behind grocery stores — stack beautifully and hold shoes like they were designed for it.
Stacking and Arranging
The beauty of crate storage lies in its modularity. You can stack crates vertically, arrange them horizontally, or create a staggered pattern on the wall. Each crate holds two to three pairs of shoes comfortably, and you can label them for even faster access.
Here’s how to set up a crate storage wall:
- Sand each crate to remove splinters and rough edges
- Stain or paint to match your garage aesthetic (or leave them raw for a more authentic look)
- Secure crates to the wall using L-brackets for stability
- Arrange in a grid or creative pattern — asymmetrical layouts look surprisingly stylish
Cost and Sourcing
You can find wooden crates for $5 to $15 each at thrift stores and flea markets. Some craft stores sell new ones for around $10 to $20. For a ten-crate setup, you’re looking at roughly $50 to $150 total — a steal for storage that doubles as wall art.
The rustic look also hides scuffs and wear incredibly well. Your garage isn’t a pristine showroom, so storage that embraces a little imperfection fits right in.
6. Pegboard Shoe Organizer
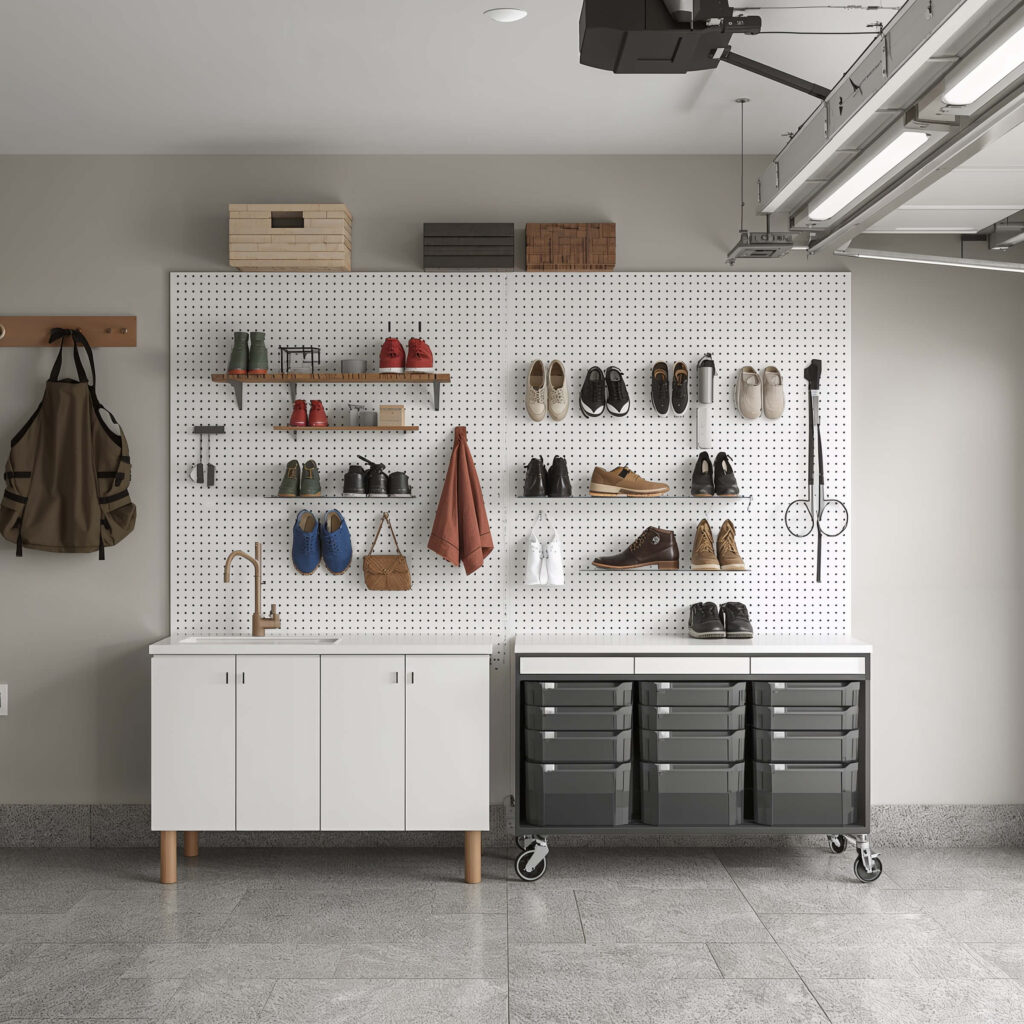
Pegboards aren’t just for hanging tools anymore. A pegboard shoe organizer turns an entire wall section into a customizable, rearrangeable shoe display. And the best part? You can change the layout whenever you want without drilling new holes.
Customization Is King
With pegboard, you control every single inch of your storage layout. Use hooks, baskets, and shelf attachments to create a system that fits your exact shoe collection. Got wide boots? Space the hooks further apart. Switching to summer sandals? Rearrange in five minutes.
Advantages of pegboard shoe storage:
- Infinitely adjustable — rearrange without any tools
- Accommodates accessories — hang shoe horns, brushes, or spray bottles alongside your shoes
- Budget-friendly — a 4×8 pegboard panel costs about $15 to $30
- Highly visible — you see every pair at a glance, so no more digging through piles
Installation Tips
Mount the pegboard with spacers behind it so hooks and attachments can clip in properly. Without that gap, nothing fits. I learned this the hard way — hung a gorgeous pegboard, tried to insert a hook, and realized I’d mounted it flat against the wall like a poster. Had to redo the whole thing. Learn from my mistakes 🙂
Paint your pegboard a bold color to make it pop against your garage wall. A bright white or charcoal gray pegboard against a neutral wall creates a clean, intentional look that screams “I have my life together” — even if the rest of your garage says otherwise.
Also Read: 10 Practical Garage Shelving Ideas and Smart Space Layouts
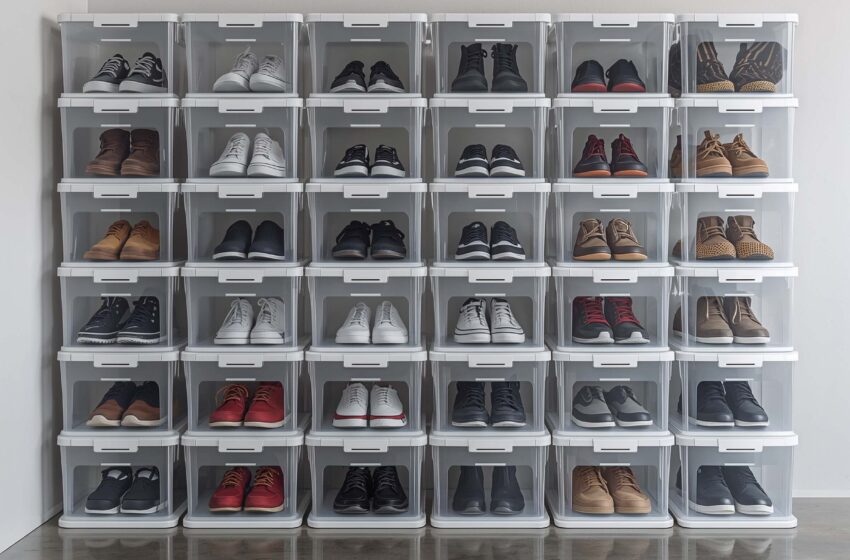
7. Stackable Clear Shoe Boxes
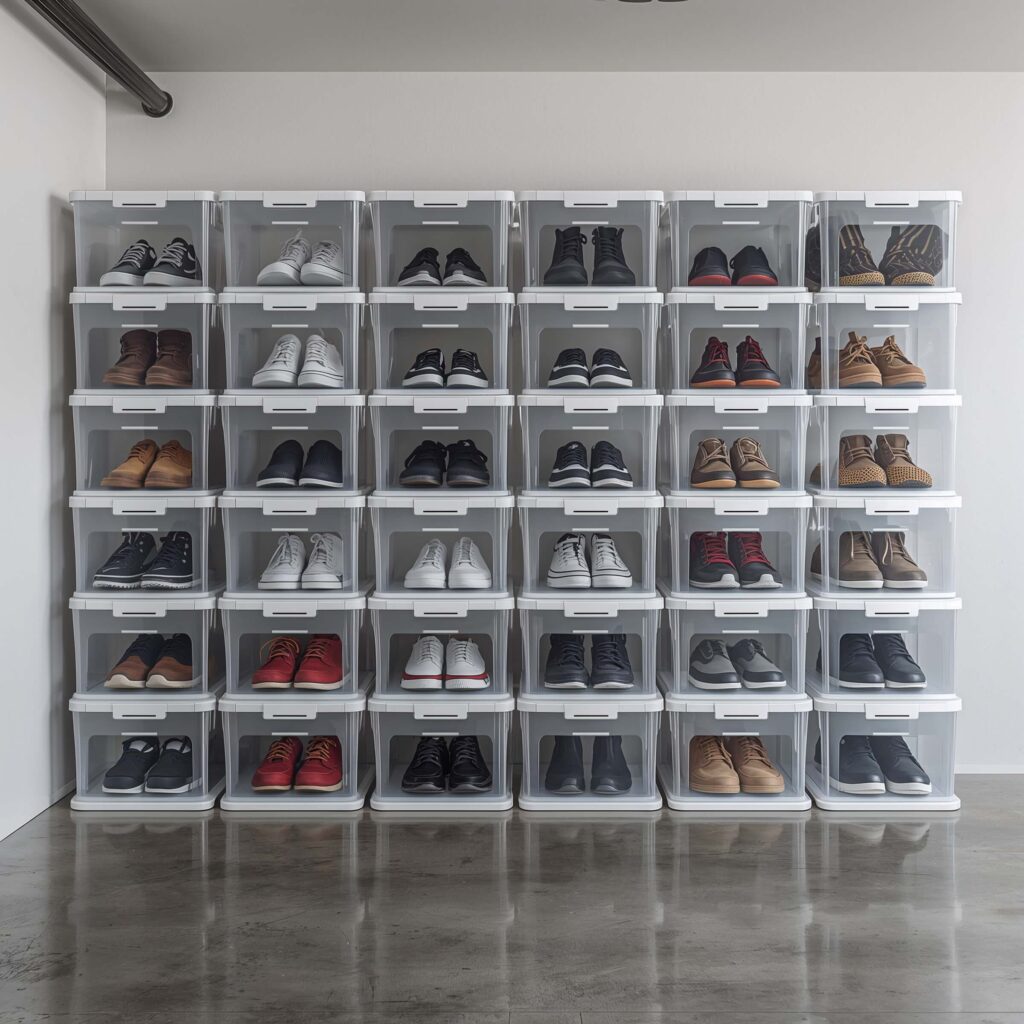
Let’s talk about the storage solution that took social media by storm — stackable clear shoe boxes. These transparent containers let you see exactly what’s inside without opening a single lid. For sneakerheads and shoe collectors, these are basically non-negotiable.
Visibility and Protection
Clear shoe boxes solve two problems at once. First, you instantly identify every pair without rummaging. Second, they protect your shoes from dust, moisture, and garage grime. If you’re storing expensive sneakers or leather dress shoes in the garage, that protection matters a lot.
What to look for in quality clear shoe boxes:
- Drop-front opening — so you can grab shoes without unstacking the whole tower
- UV-resistant plastic — prevents yellowing over time
- Sturdy construction — cheap boxes crack and collapse under weight
- Uniform sizing — ensures clean, satisfying stacking
Organizing Like a Pro
I color-code my stackable boxes with small labels on the front — one color for athletic shoes, another for casual, and a third for work boots. It sounds excessive, but when you’re rushing out the door and need specific shoes, that five-second identification saves real frustration.
Stack these boxes against a garage wall or on a shelving unit for a clean, almost retail-display look. A tower of clear boxes with neatly arranged shoes inside genuinely transforms the feel of a garage. Visitors will think you’ve lost your mind or found enlightenment — possibly both.
8. Garage Door Mounted Racks
Here’s a storage idea most people never even consider — mounting racks directly to the inside of your garage door. That massive, flat surface swings up and out of the way every time you open the door, and when it’s closed, your shoes hang right there, easy to access.
Maximizing Hidden Space
The inside panel of your garage door represents square footage that almost nobody uses. Slim-profile racks or wire baskets attached to the door panels can hold lightweight shoes like sandals, slip-ons, and sneakers without adding significant weight to the door mechanism.
Benefits of garage door mounted racks:
- Uses completely overlooked space — no wall, floor, or ceiling impact
- Shoes stay accessible when the door is closed
- Easy to install with basic hardware
- Keeps shoes near the exit — perfect for grab-and-go situations
Important Considerations
Weight is critical here. Your garage door opener has a weight limit, and overloading the door can strain the motor, springs, or tracks. Stick to lightweight shoes and use slim, low-profile racks — heavy work boots belong elsewhere.
Also, consider the vibration factor. Every time the door opens and closes, anything mounted to it shakes. Use racks with lips or edges that prevent shoes from sliding off. Bungee cords or elastic straps across the front of each shelf add extra security.
FYI, check your garage door warranty before drilling into the panels. Some manufacturers void warranties if you modify the door. A quick phone call can save you a headache later.
9. DIY Pallet Shoe Shelf
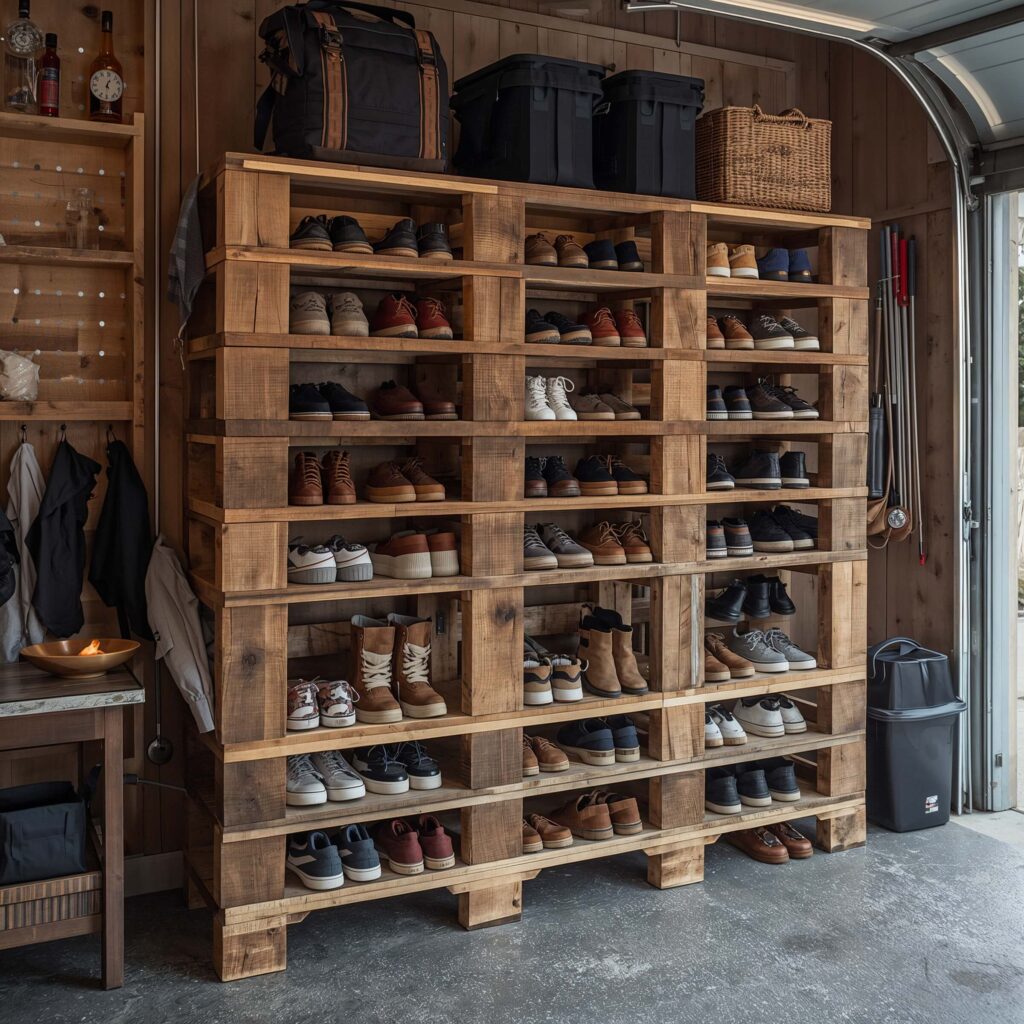
Wooden pallets are the darling of the DIY world, and for good reason. A DIY pallet shoe shelf costs practically nothing, looks fantastic with a little effort, and gives your garage that handmade, personal touch no store-bought product can replicate.
Sourcing Pallets
Finding free pallets is shockingly easy. Check behind warehouses, hardware stores, and shipping centers — many businesses give them away because disposing of them costs money. Just make sure you grab pallets stamped with “HT” (heat-treated) rather than “MB” (methyl bromide treated). The HT ones are safe for indoor and garage use.
Building the Shelf
You can build a functional pallet shoe shelf in under two hours with minimal tools. Here’s the basic process:
- Clean and sand the pallet thoroughly
- Cut to your desired size — a half-pallet works great for a compact shelf
- Stain, paint, or seal the wood for protection against garage humidity
- Mount vertically on the wall — the gaps between slats become perfect shoe slots
- Add a bottom shelf if needed for taller boots
The vertical mounting trick is a game-changer. When you stand a pallet upright, the spaces between the planks create natural cubbies that hold shoes in place. Heels slip right through the gaps, and the horizontal planks act as shelves for flat shoes.
Why I Love This Option
My first pallet shelf cost me exactly $0 in materials — I grabbed a free pallet, used leftover stain from another project, and mounted it with screws I already had. The whole project took about 90 minutes, and it holds eight pairs of shoes comfortably. For a garage storage solution, you really can’t beat free.
The slightly rough, imperfect look of pallet wood also hides dirt and scuffs brilliantly. Your garage floor kicks up dust and grit constantly, so pristine white shelving gets grimy fast. Pallet wood? It just looks more “authentically rustic” with age. That’s a win in my book.
Also Read: 10 Brilliant Garage Mudroom Ideas and Space-Saving Tricks
10. Multi-Tier Shoe Bench
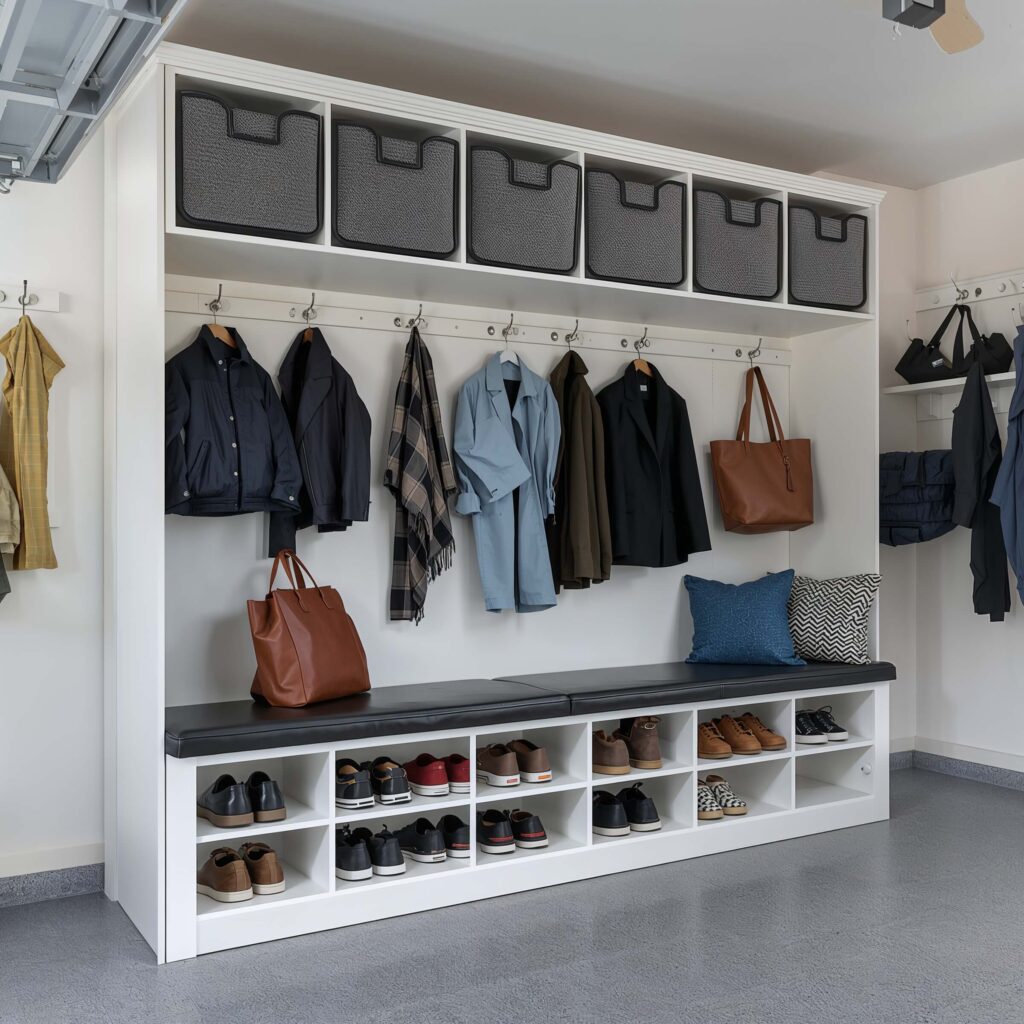
Last but absolutely not least — the multi-tier shoe bench. This solution combines seating with storage, giving you a spot to sit down and lace up your shoes while keeping multiple pairs organized underneath.
Function Meets Comfort
How many times have you balanced on one foot in the garage, trying to pull on a boot while hopping around like a flamingo? A shoe bench eliminates that awkward dance entirely. You sit down, grab your shoes from the shelf below, and put them on like a civilized human being.
What makes a great multi-tier shoe bench:
- Sturdy top surface — strong enough to sit on comfortably (aim for benches rated at 250+ pounds)
- Two to three lower tiers — enough shelving for 6 to 12 pairs
- Weather-resistant materials — metal frames with wood or composite tops handle garage conditions best
- Appropriate width — 36 to 48 inches fits most garage entryways without blocking traffic
Choosing the Right Style
Shoe benches come in everything from sleek modern metal to warm rustic wood to heavy-duty industrial. Match yours to the overall feel of your garage. If you’ve already got industrial pipe shelves (see idea #3), a matching metal-and-wood bench ties the whole space together.
I went with a bamboo-topped bench with a steel frame, and it handles the temperature swings in my garage without warping or rusting. Bamboo resists moisture better than most hardwoods, and steel powder-coated in matte black looks sharp without trying too hard.
Placement Strategy
Position your shoe bench right beside your garage entry point. This creates a natural transition zone — you walk in, sit down, swap your outdoor shoes for indoor ones, and keep the mess contained. Add a small mat underneath to catch dirt and water drips, and you’ve built yourself a fully functional mudroom alternative without renovating a single room in your house.
Bonus Tips for Keeping Your Garage Shoe Storage Fresh
No matter which solution you choose, a few universal habits keep everything looking and smelling great:
- Air out shoes before storing — toss them on the bench or rack for an hour before boxing them up
- Use cedar shoe inserts or charcoal bags — they absorb moisture and odor naturally
- Rotate seasonally — move off-season shoes to overhead or high storage and keep current-season pairs at eye level
- Wipe down shelves monthly — garage dust builds up fast, and a quick wipe prevents grime from transferring to your shoes
- Label everything — especially if you use closed boxes or overhead bins
These small steps take five minutes a month and keep your storage system working as well on day 365 as it did on day one.
Wrapping It All Up
Garage shoe storage doesn’t have to mean a plastic bin shoved in the corner or a sad pile of mismatched sneakers by the door. Every idea on this list — from floating wall racks to multi-tier shoe benches — solves real problems while making your garage look like you actually planned the space on purpose.
My personal favorites? The industrial pipe shelves for sheer style points and the DIY pallet shoe shelf for unbeatable value. But honestly, the best solution depends on your garage size, shoe collection, budget, and how much effort you want to put in. Some of these take an afternoon to build; others you can order online and install in thirty minutes.
The key takeaway is simple: get your shoes off the garage floor. It protects them, frees up space, and eliminates that low-grade anxiety you feel every time you open the garage door and see the mess. Pick one idea, start this weekend, and I guarantee you’ll wonder why you didn’t do it sooner.
Now go organize those shoes — your garage (and your sanity) will thank you.