10 Ultimate Garage Workshop Layout Ideas for Tool Storage
- Garage Decor
 Ben
Ben- 0
- 38 minutes read

You’ve got tools scattered across every flat surface, a workbench buried under “organized chaos,” and that one drawer you’re genuinely afraid to open. Sound familiar? Yeah, me too. About two years ago, my garage workshop looked like a hardware store had exploded inside it. I could never find my 10mm socket (classic), my drill bits lived in three different locations, and I spent more time searching for tools than actually using them.
That frustration pushed me to completely rethink my garage workshop layout. I tried different configurations, moved things around a dozen times, and learned some hard lessons about what actually works for tool storage. The ten layout ideas I’m sharing here come from that experience — plus a healthy amount of research and conversations with fellow garage tinkerers who’ve cracked the code.
Whether you’re working with a cramped single-car garage or a spacious three-car setup, one of these layouts will transform your workshop from a frustrating mess into a space that actually helps you get things done.
1. Small Space Garage Workshop Layout

Let’s start with the elephant in the room — or rather, the elephant crammed into a very small room. If your garage barely fits your car plus a human being, you need a small space garage workshop layout that squeezes maximum function out of minimum square footage.
Making Every Inch Count
Small garages demand ruthless prioritization. You can’t have everything, so you focus on what you use most. The trick? Think vertically and think slim. Floor space becomes sacred territory you protect at all costs.
Here’s how to structure a small space workshop layout:
- Push your primary workbench against the shortest wall — this keeps the center clear for your car or larger projects
- Use wall-mounted storage exclusively — nothing touches the floor except your workbench legs
- Install a slim shelf system above your workbench, no deeper than 8 inches — deep enough for tool boxes, shallow enough to avoid head-bumping
- Keep a clear path at least 36 inches wide for moving materials and walking comfortably
My Small Garage Experience
I spent my first two years as a homeowner working in a single-car garage. The biggest lesson I learned? Stop buying freestanding storage units. Every cabinet or rolling chest I added ate another chunk of precious floor space. The moment I switched to wall-mounted everything, the garage felt twice as big. It wasn’t — but it functioned like it.
If you’re in a tight space, accept that your workshop area might only occupy one wall. That’s perfectly fine. A well-organized single wall beats a cluttered full garage every single time.
2. Wall Mounted Tool Storage Workshop Layout

Speaking of walls — a wall mounted tool storage workshop layout centers your entire organization strategy on vertical surfaces. This approach works beautifully in any size garage, but it absolutely shines when you want to keep your floor completely open.
Why Walls Are Your Best Asset
Most garage owners treat their walls like background decoration. Maybe a few nails with a hammer hanging here and there. But your walls represent dozens of square feet of untapped storage potential. When you commit to a wall-mounted layout, you free up the floor for vehicles, large equipment, and actual workspace.
Key components of a wall-mounted tool storage system:
- French cleat systems — interlocking wooden strips that let you hang and rearrange tool holders, shelves, and bins with zero extra hardware
- Wall-mounted cabinets — enclosed storage for items you want to protect from dust
- Magnetic tool strips — perfect for metal hand tools, drill bits, and screwdrivers
- Track rail systems — brands like Gladiator and Rubbermaid offer modular tracks with interchangeable hooks and baskets
French Cleat vs. Track Systems
Here’s an honest comparison. French cleat systems cost less and offer unlimited customization because you build each holder yourself. However, they require woodworking skills and time. Track rail systems cost more upfront but install faster and look cleaner right out of the box.
I use a combination of both in my garage. French cleats hold my custom-built tool holders for chisels and hand saws, while a Gladiator track handles the heavier items like my circular saw and power drill. Best of both worlds.
3. Corner Workbench Garage Workshop Layout

Got an awkward corner in your garage that collects cobwebs and forgotten paint cans? Turn it into the anchor of your entire workshop with a corner workbench layout. This L-shaped or triangular setup tucks your primary work surface into a corner, creating a surprisingly efficient workspace.
The Ergonomic Advantage
A corner workbench wraps around you, putting tools and supplies within arm’s reach on two sides instead of just one. You pivot rather than walk, which saves time and energy during longer projects. It’s the same reason professional kitchens use L-shaped and U-shaped counter layouts — efficiency through proximity.
Benefits of a corner workbench setup:
- Maximizes dead corner space that usually goes wasted
- Creates a natural “cockpit” feel where everything surrounds you
- Leaves the rest of the garage wide open for parking or large projects
- Accommodates both a vise and a work surface on separate legs of the L
Building Tips
When I built my corner workbench, I made one leg 24 inches deep for general work and the other leg 18 inches deep for tool staging. The deeper section handles the actual projects, while the shallower section keeps my most-used tools, fastener bins, and measuring equipment right next to me.
Use sturdy legs or wall-mounted brackets at the corner joint. That junction point bears the most stress, and a wobbly corner workbench will drive you absolutely crazy. Trust me on this — I rebuilt my corner joint three times before I got it right. Overkill the support and thank yourself later.
Also Read: 10 Unique Garage Shoe Storage Ideas and Stylish Solutions
4. Pegboard Tool Wall Workshop Layout
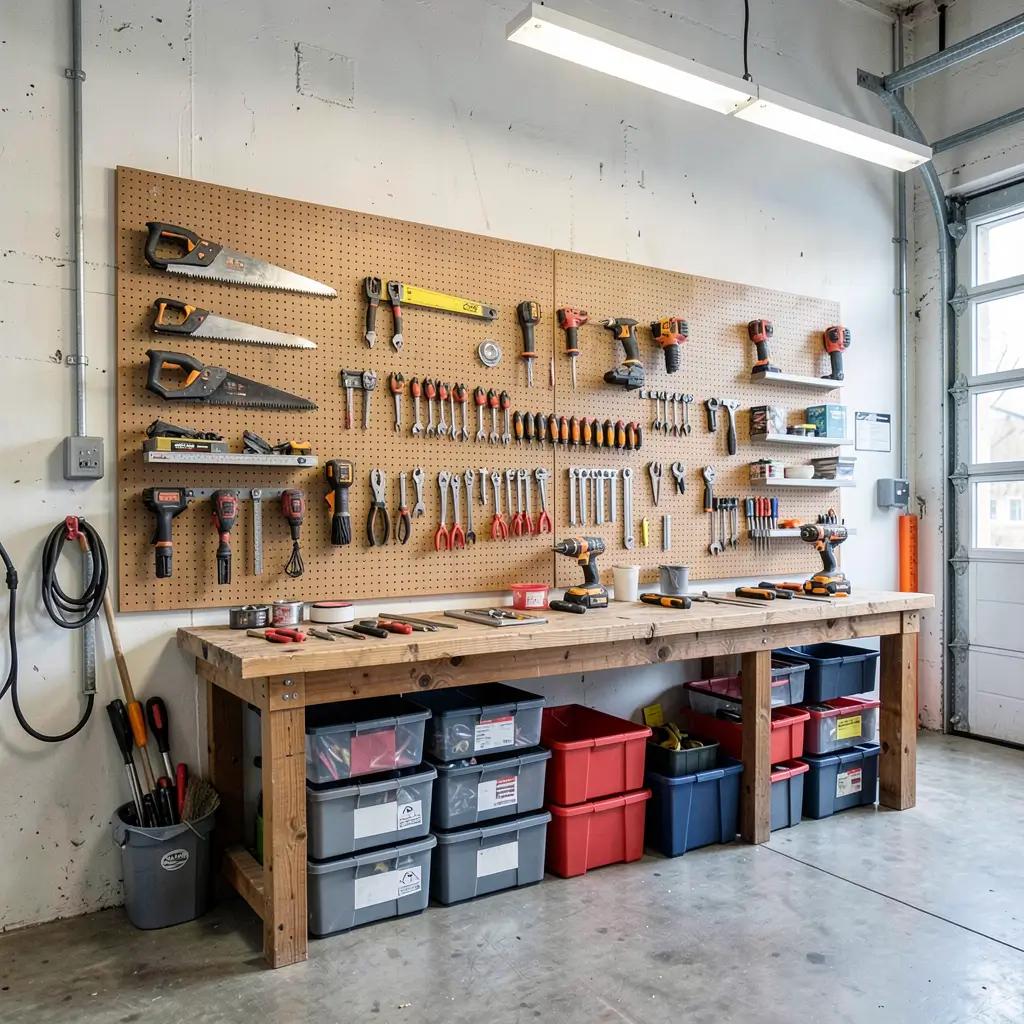
The classic. The legend. The pegboard tool wall has organized workshops for decades, and it persists because it genuinely works. A full pegboard wall gives you a visual, accessible, and endlessly customizable tool storage system that costs next to nothing.
Why Pegboard Still Dominates
Ever walked into a professional shop and seen every tool outlined on the wall? That’s pegboard magic. You see every tool at a glance, you grab what you need instantly, and — here’s the killer feature — you immediately notice when something’s missing. No more losing tools in drawers or bins.
What makes pegboard ideal for garage workshops:
- Incredibly affordable — a 4×8 sheet runs about $15 to $30
- Endlessly rearrangeable — move hooks and accessories without any new holes
- Supports accessories — bins, shelves, hooks, and specialty holders all snap right in
- Visual organization — trace tool outlines with a marker for a “shadow board” effect
Pegboard Installation Mistakes to Avoid
The number one mistake? Mounting pegboard flat against the wall. You need a gap — typically ¾ inch — behind the board so hooks can insert properly. Use furring strips or spacers behind the panel. Skip this step, and none of your hooks will fit. I made this exact error on my first attempt and had to unmount the entire panel to add spacers. Learn from my pain 🙂
Also, don’t cheap out on hooks. Those flimsy wire hooks that come in bulk packs bend and fall out constantly. Invest in locking-style hooks that click into place and stay put. The price difference is maybe $5 to $10 more per pack, but the frustration savings are priceless.
5. Foldable Workbench Garage Workshop Layout

Not everyone can dedicate permanent space to a workbench. If your garage needs to serve double duty — parking spot by day, workshop by night — a foldable workbench garage workshop layout gives you the best of both worlds.
The Disappearing Workspace
A foldable workbench mounts to your wall and drops down when you need it. When you’re done working, you fold it up flat against the wall, and your garage returns to its regular duties. It’s like a Murphy bed for your tools.
Features to look for in a foldable workbench:
- Heavy-duty hinges rated for at least 200 pounds
- Folding leg supports or drop-down brackets that lock securely
- A solid work surface — plywood or butcher block, at least ¾ inch thick
- Wall-mounted tool storage above — so your tools stay accessible even when the bench folds up
Real-World Application
My neighbor runs this exact setup. He parks his truck in the garage during the week and folds down his workbench on Saturday mornings for woodworking projects. The bench itself measures 60 inches wide by 24 inches deep, and it folds completely flat — only about 4 inches of depth when stowed.
He paired it with a pegboard mounted above the bench so his tools remain on the wall regardless of whether the bench is up or down. Smart, right? The whole system cost him roughly $150 in materials and a Saturday afternoon of building.
6. Rolling Tool Cart Workshop Layout

Flexibility is underrated in workshop design. A rolling tool cart workshop layout builds your entire tool storage strategy around mobile carts that you can position wherever the work happens. This approach works especially well for people who tackle projects in different spots around the garage — or even outside.
Mobility Equals Versatility
Why walk to your tools when your tools can come to you? Rolling tool carts eliminate the back-and-forth between your workbench and a stationary tool chest. You load up your cart with what you need, roll it to the project, and everything stays within reach.
Advantages of a rolling cart layout:
- Repositionable — move your entire tool set in seconds
- Works for indoor and outdoor projects — roll the cart into the driveway for larger builds
- Stackable options — many brands offer carts that lock together vertically
- Easy to clean around — just roll carts aside and sweep underneath
Choosing the Right Cart
Not all rolling tool carts deserve your money. IMO, the sweet spot sits between $80 and $200 for a quality three-to-five-drawer cart with solid casters. Anything cheaper tends to have flimsy drawers and wobbly wheels. Anything more expensive enters professional mechanic territory — great quality, but overkill for most home workshops.
Look for carts with ball-bearing drawer slides rather than friction slides. The difference in smoothness is night and day. Ball-bearing slides let you open and close drawers with one finger, even when they’re loaded with heavy wrenches and sockets. Friction slides stick, jam, and make you question every life decision that led you to that moment.
Also Read: 10 Practical Garage Shelving Ideas and Smart Space Layouts
7. U-Shaped Garage Workshop Layout
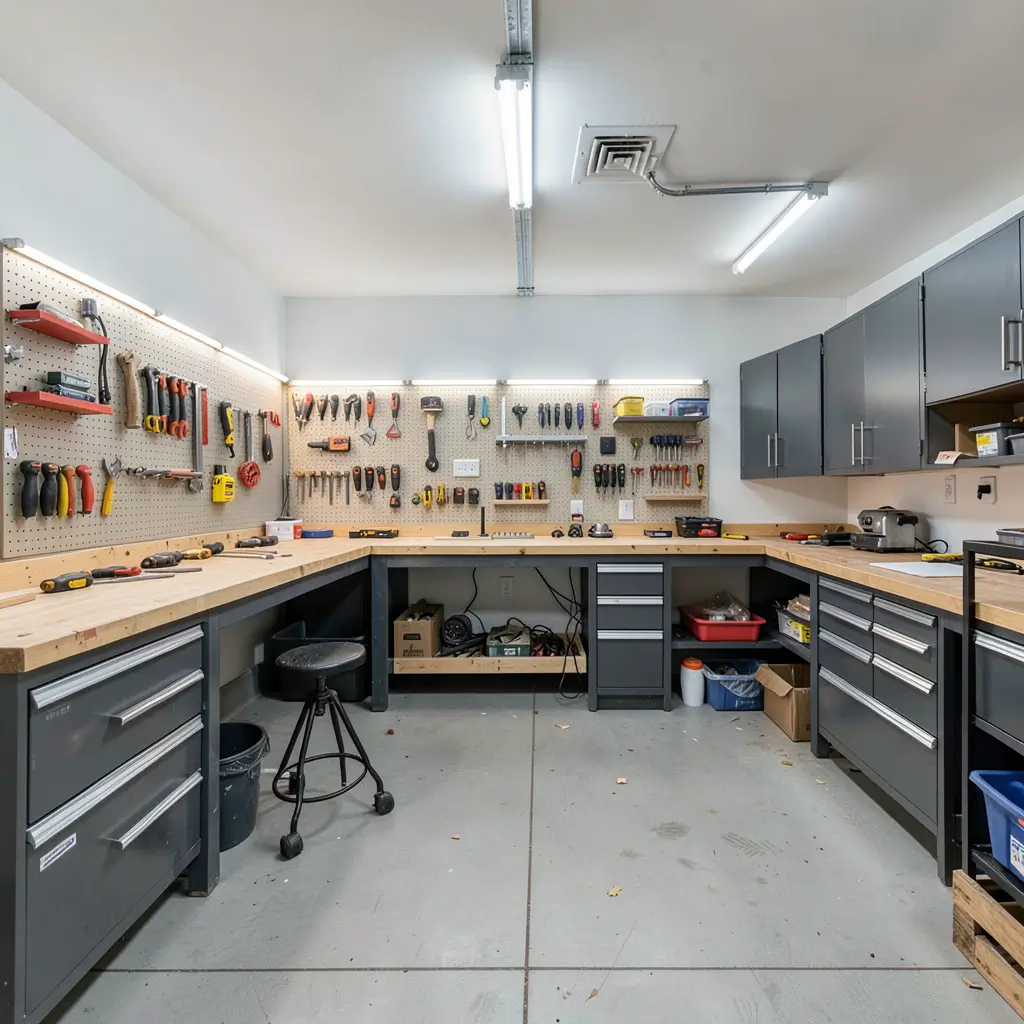
If you have the space, a U-shaped garage workshop layout creates the ultimate dedicated work environment. Three walls of bench space, storage, and equipment surround you, putting virtually everything within a step or two.
The Workshop Powerhouse
A U-shaped layout dedicates three full walls to your workshop, leaving the fourth wall (usually the garage door side) open for vehicle access or large material handling. This configuration gives you the most storage and workspace of any layout on this list.
Ideal components of a U-shaped workshop:
- Primary workbench on the back wall — your main project surface with overhead lighting
- Tool storage wall on the left — pegboard, cabinets, or French cleats for hand tools and power tools
- Assembly and finishing station on the right — secondary bench for gluing, sanding, or painting
- Central floor space — kept open for standing projects, sawhorses, or equipment
Who Should Use This Layout
This layout works best if you can dedicate at least half your garage permanently to the workshop. If you still need to park a car inside, a full U-shape probably won’t fit. But if your vehicles live in the driveway and the garage belongs to your projects, this configuration maximizes every wall.
I dream about a U-shaped layout. My current two-car garage only allows me an L-shape because — you know — my wife’s car needs a spot too. Apparently. But if you have the luxury of a dedicated workshop garage, the U-shape is the gold standard for garage workshop layouts for tool storage.
8. Overhead Storage Garage Workshop Layout
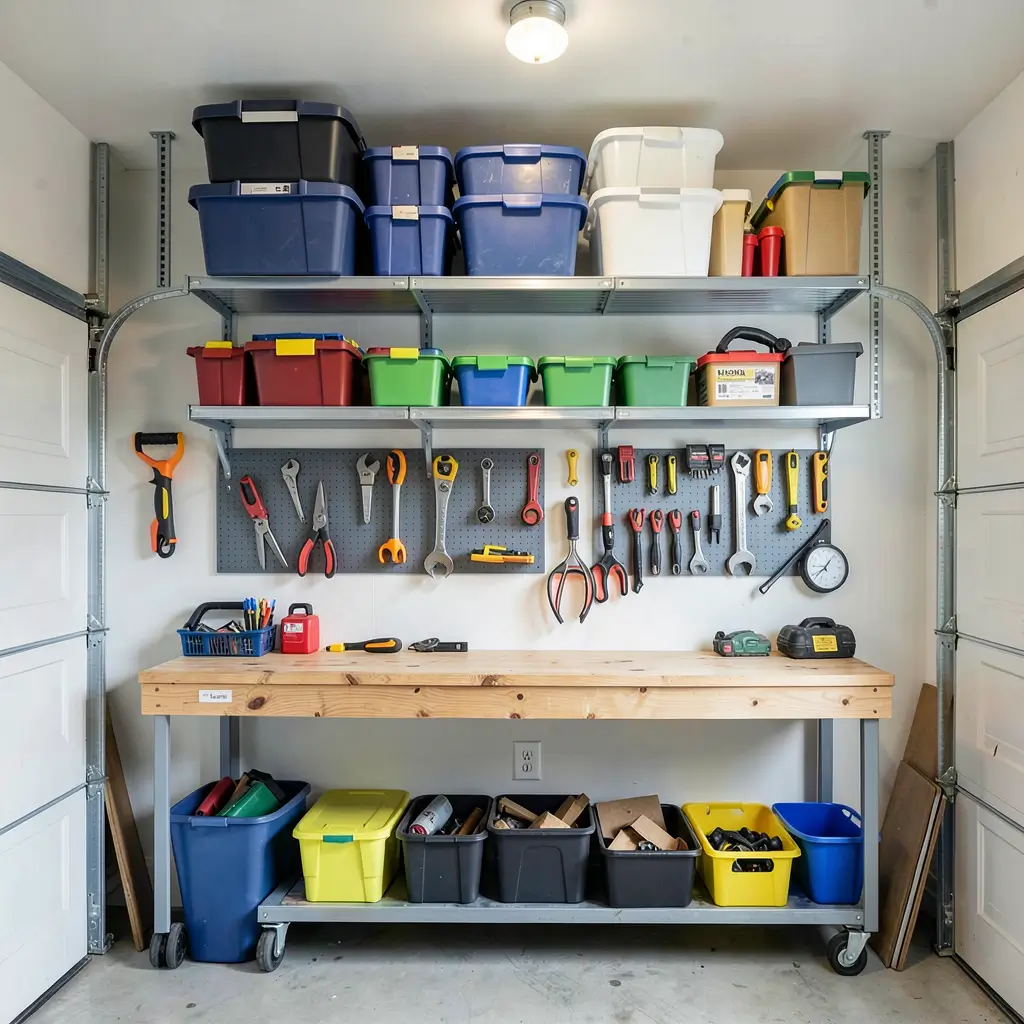
Your ceiling holds potential you’re probably ignoring. An overhead storage garage workshop layout lifts seasonal items, bulk supplies, and seldom-used tools above your head, freeing up walls and floors for the stuff you actually use daily.
Looking Up for Solutions
Overhead storage systems mount to your ceiling joists and create a platform for bins, boxes, and bulky items. These work phenomenally for things like holiday decorations, camping gear, and backup tool sets that you don’t need regular access to.
Key overhead storage options:
- Ceiling-mounted shelf platforms — fixed shelves bolted to joists, holding 200 to 600 pounds
- Pulley-operated lift systems — raise and lower bins using a hand crank or motorized winch
- Ceiling track systems — sliding bins that move along overhead rails
- Simple hooks and hangers — for extension cords, ladders, and long-handled tools
Safety First
I’ll be blunt — improperly installed overhead storage can be dangerous. You must anchor into ceiling joists, not just drywall. Use lag bolts, not wood screws. And never exceed the weight rating of your system. A 300-pound platform crashing down onto your workbench or your car isn’t just expensive — it’s terrifying.
Measure your garage door clearance before installing anything overhead. Your garage door needs room to open and travel along its tracks. Most systems recommend installing platforms at least 4 inches above the highest point of the door’s travel path. Check this twice. Install once.
9. Multi-Zone Garage Workshop Layout

Here’s where strategic thinking really pays off. A multi-zone garage workshop layout divides your garage into distinct functional areas, each dedicated to a specific type of work. Instead of one cluttered multipurpose space, you create several organized, purpose-built zones.
Defining Your Zones
The number and type of zones depend on your hobbies and needs. A typical multi-zone setup includes:
- Woodworking zone — workbench, saw horses, clamps, and wood storage
- Mechanical zone — rolling tool chest, floor jack, creeper, and automotive tools
- Finishing zone — sanding station, painting supplies, and ventilation
- Storage zone — cabinets, shelving, and overhead bins for supplies and materials
- Clean zone — near the house entry, kept tidy for shoes, coats, and daily items
How Zones Improve Workflow
When everything has a designated area, your brain stops wasting energy on “where did I put that?” questions. You know your drill press lives in the woodworking zone. You know your socket set sits in the mechanical zone. This mental clarity speeds up every single project.
FYI, you don’t need physical barriers between zones. Floor tape, different colored mats, or simply different wall treatments can define boundaries visually. I use blue painter’s tape lines on my garage floor to mark zone edges, and it works surprisingly well as a mental organizer.
Balancing Zone Sizes
Allocate space based on how much time you spend in each zone, not how much equipment each zone contains. If you do 70% woodworking and 30% auto maintenance, your woodworking zone should get the lion’s share of space. Seems obvious, but many people allocate equally and end up with cramped primary workspaces and roomy zones they rarely use.
10. Minimalist Garage Workshop Layout
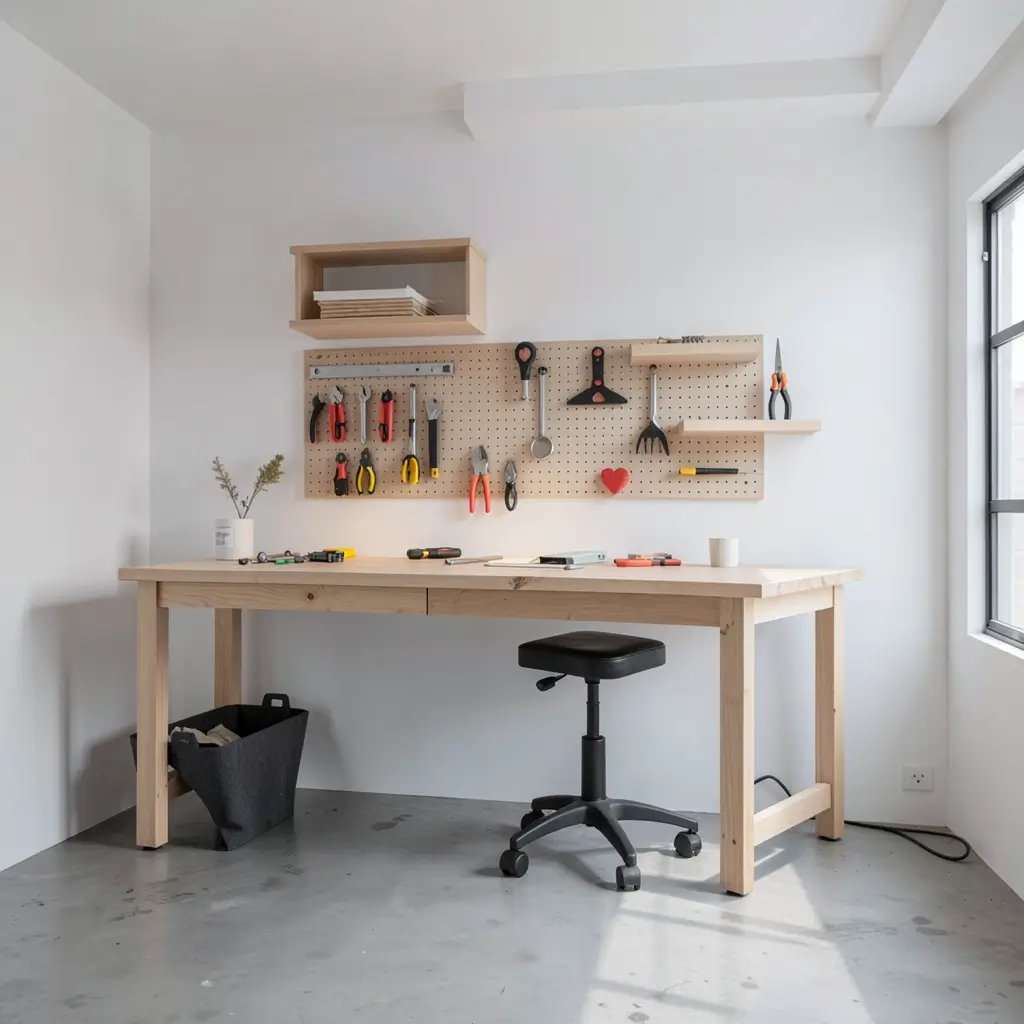
Sometimes less really is more. A minimalist garage workshop layout strips everything down to essentials — one workbench, one tool storage area, and nothing else. This approach appeals to people who want a clean, distraction-free environment or who simply don’t own a massive tool collection.
The Power of Restraint
A minimalist workshop forces you to keep only what you actually use. That random specialty wrench you bought for one project in 2019? Gone. The three duplicate screwdriver sets? Consolidated to one. This editing process hurts a little, but the resulting clarity feels incredible.
Core elements of a minimalist workshop layout:
- One solid workbench — quality over quantity, invest in a sturdy surface
- One wall-mounted tool panel — pegboard or magnetic strips holding your essential hand tools
- One tool box or small cabinet — for power tools, fasteners, and supplies
- Open floor space — the defining feature of minimalism, room to breathe and work comfortably
Who Benefits Most
Minimalist layouts work best for casual DIYers and light hobbyists who tackle occasional home repairs and small projects. If you’re building furniture every weekend or restoring engines, you’ll probably need more storage than this layout provides. But if your tool needs are modest, a minimalist setup keeps your garage clean, open, and stress-free.
I keep a minimalist secondary workspace in the corner of my garage opposite my main workshop wall. It holds a small folding table, a basic toolbox, and a pegboard strip with screwdrivers, pliers, and a tape measure. That’s it. I use it for quick fixes — tightening a loose cabinet hinge, fixing a toy for my kid — and it handles those tasks perfectly without pulling out the full workshop arsenal.
Quick Comparison: Which Layout Fits You Best
Choosing the right garage workshop layout for tool storage depends on your space, habits, and ambitions. Here’s a fast breakdown:
- Tiny garage, big dreams? → Small Space or Foldable Workbench Layout
- Want everything visible? → Pegboard Tool Wall or Wall Mounted Layout
- Dedicated workshop space? → U-Shaped or Multi-Zone Layout
- Need flexibility? → Rolling Tool Cart or Foldable Workbench Layout
- Hate clutter? → Minimalist Layout
- Awkward garage shape? → Corner Workbench Layout
- Too much stuff? → Overhead Storage Layout
Final Thoughts
Your garage workshop should work for you, not against you. Every minute you spend hunting for a lost tool or tripping over clutter is a minute stolen from the projects you actually enjoy. The right layout eliminates that friction and makes your workshop a place you genuinely want to spend time in.
Start by honestly assessing your space and your needs. Pick the layout that matches both. You don’t need to build everything in one weekend — I spent about three months gradually building out my current setup, and the incremental progress kept me motivated without overwhelming my budget or my weekends.
The ten garage workshop layout ideas here cover practically every scenario, from tiny one-wall setups to sprawling multi-zone dream shops. No matter where you land, the goal stays the same: a place for every tool and every tool in its place.
Now stop reading about workshop layouts and go build one. Your tools — and your sanity — are counting on you.