10 Gorgeous Garden Layout Ideas for Relaxing Green Corners
- Garden Design
 Ben
Ben- 0
- 37 minutes read
Look, I get it. You step outside, stare at your yard, and think, “This could be so much better.” Maybe you’ve got a sad patch of grass that screams “help me,” or perhaps you’re blessed with actual space but have zero clue what to do with it. Either way, you’re here because you want a garden that makes you actually want to hang out in it—not just mow it and forget it exists.
I’ve spent way too many weekends experimenting with garden layouts (some disasters, some wins), and honestly? The layout is where the magic happens. You can have the prettiest plants in the world, but if you throw them together like a toddler arranging toys, it’ll never look quite right. So let me walk you through 10 garden layout ideas that’ll transform your outdoor space into a genuine relaxing retreat. No fancy degree required—just a willingness to get your hands dirty and have some fun with it.
Modern Symmetrical Garden Layout

Ever notice how satisfying it is when things line up perfectly? That’s the whole vibe of a modern symmetrical garden. I’m talking clean lines, mirrored plantings on both sides of a central path or focal point, and an overall sense of “I totally have my life together” (even if you don’t).
This layout works beautifully if you’ve got a contemporary home or just love that minimalist aesthetic. Picture boxwood hedges trimmed into identical shapes flanking a central water feature, or matching raised beds on either side of a sleek paved walkway. The key here is repetition and balance—what you plant on the left, you mirror on the right.
Why I Love This One
It looks sophisticated without being stuffy. Plus, symmetrical gardens are surprisingly forgiving when it comes to maintenance. You only need to remember one side’s planting scheme because the other side is literally a copy-paste situation. Genius, right?
The downside? You’ve got to keep up with the trimming and tidiness. A symmetrical garden that’s gone wild loses its charm fast. If you’re the “set it and forget it” type, this might drive you nuts. But if you find pruning therapeutic (weird flex, but okay), you’ll love this layout.
Pro tips for nailing the modern symmetrical look:
- Use geometric planters and hardscaping materials like concrete or steel
- Stick to a limited color palette—greens, whites, and maybe one accent color
- Choose architectural plants like ornamental grasses, agaves, or sculptural evergreens
- Keep pathways wide and uncluttered
- Add subtle lighting to highlight the symmetry at night
Small Space L-Shaped Garden Design
Got a tiny backyard that wraps around the corner of your house? Welcome to the L-shaped garden club. This layout is perfect for maximizing those awkward corner spaces that most people just ignore or fill with random junk they don’t know where else to put (I see you, old barbecue nobody uses).
The beauty of an L-shaped design is that you can create distinct zones within a small footprint. Maybe one leg of the L becomes your dining area with a small bistro set, while the other transforms into a lush planting bed or even a mini vegetable patch. The corner itself? That’s prime real estate for a statement piece—a bench, a fountain, or a gorgeous container garden.
Making the Most of That Corner
I once helped my neighbor redesign her sad L-shaped yard, and we turned the corner into a cozy reading nook with a curved bench and climbing jasmine on a trellis behind it. Now she practically lives out there with her morning coffee. The trick is to embrace the shape instead of fighting it.
Use the longer side for flow and movement—maybe a winding path or a series of staggered planters that draw the eye along. The shorter side can be more intimate and enclosed, creating a sense of privacy even in a small space.
L-shaped layout essentials:
- Define each “leg” with a different purpose (seating, planting, play area, etc.)
- Use vertical elements like trellises or tall plants to add height without eating up ground space
- Consider a diagonal path across the corner to create visual interest
- Layer plants from tall to short to maximize the illusion of depth
- Add a mirror or reflective surface in the corner to make the space feel larger
Japanese Zen Minimal Garden Layout
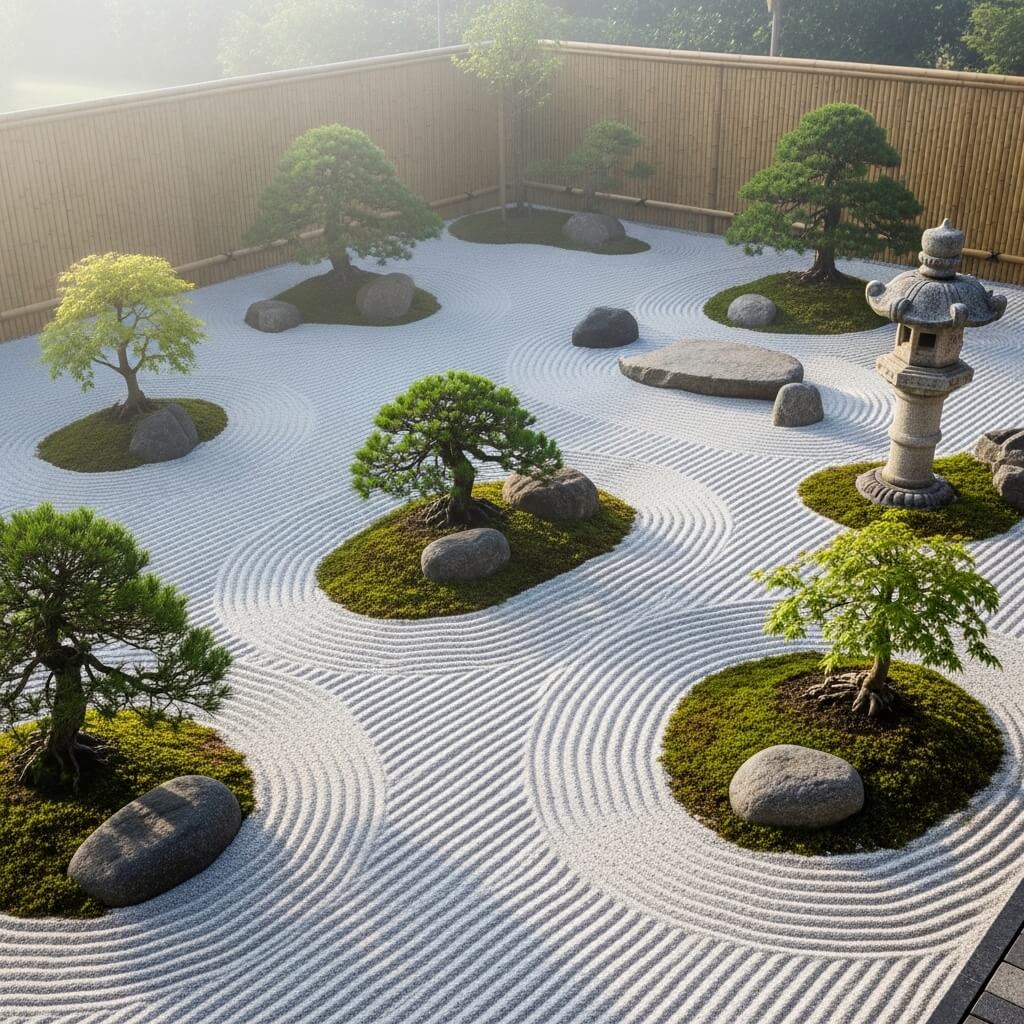
Nothing says “inner peace” quite like a Japanese Zen garden. I’m talking raked gravel, carefully placed rocks, minimal plantings, and an overall atmosphere that whispers “calm the heck down.” If your life feels chaotic (whose doesn’t?), this layout might be exactly what your soul needs.
The philosophy behind Zen gardens is all about simplicity and contemplation. You’re not trying to cram in every plant species known to humanity. Instead, you’re curating a space where every element has meaning and purpose. A moss-covered stone isn’t just decoration—it represents a mountain or an island. The raked gravel patterns symbolize water ripples.
Less Really Is More Here
I’ll be honest—my first attempt at a Zen garden was a hot mess. I thought “minimal” meant “boring,” so I kept adding stuff. Wrong move. The magic happens when you show restraint. Choose a beautiful Japanese maple as your main focal point, add some stepping stones, incorporate a small water feature or bamboo fountain, and call it a day.
This layout thrives in small spaces, which is great news if you’re working with limited square footage. You don’t need a massive yard to create that serene, meditative vibe. FYI, maintenance is pretty chill once you’ve set it up—just periodic raking of the gravel and keeping plants pruned and tidy.
Zen garden must-haves:
- Smooth pebbles or fine gravel for raking (white, gray, or tan work best)
- Carefully selected rocks in varying sizes—aim for interesting shapes and textures
- Limited plant palette: Japanese maples, bamboo, moss, ferns, maybe a single flowering shrub
- Water element (even a small fountain counts)
- Clean, simple borders—no fussy edges or bright colors
- Absolutely no clutter or lawn ornaments (sorry, no garden gnomes in the Zen zone)
Also Read: 10 Inspiring Tiny Garden Design Ideas for Modern Homes
Cottage Style Flowery Path Garden Design
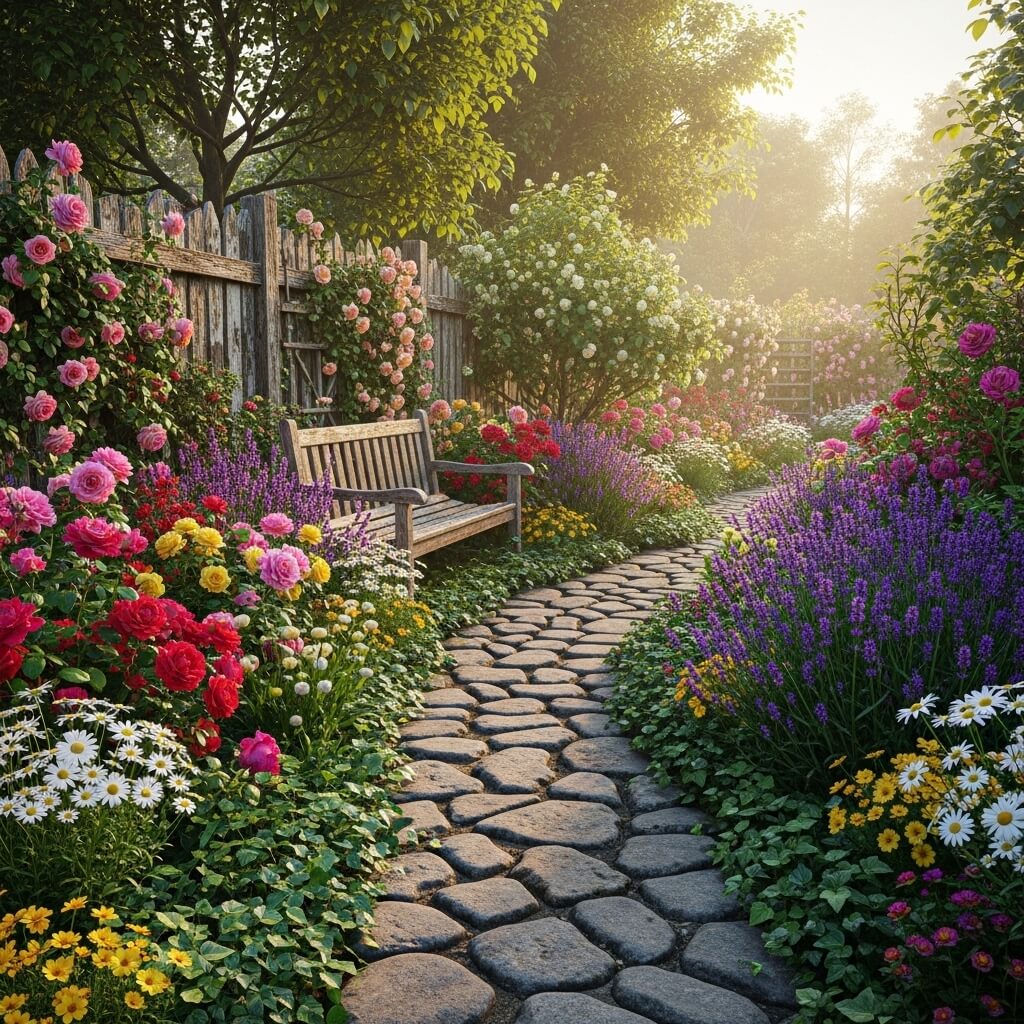
Okay, time to switch gears completely. If the Zen garden is all about restraint, the cottage garden is about joyful, beautiful chaos. Picture overflowing flower beds, climbing roses scrambling over arbors, and a meandering path that begs you to wander through and smell literally everything.
This is my personal favorite layout (can you tell I have commitment issues with garden styles?). There’s something ridiculously charming about a cottage garden that looks like it just happened—even though you know damn well it took planning and effort. The key is making it look effortlessly abundant.
Organized Chaos at Its Finest
The cottage garden layout typically features a central path—often made of brick, stone, or even just packed earth—with densely planted borders overflowing on both sides. You mix perennials, annuals, herbs, and even vegetables all together. Roses tangle with lavender. Hollyhocks tower over catmint. It’s controlled madness, and I’m here for it.
The trick is layering heights and textures so the eye has somewhere interesting to go. Tall delphiniums or foxgloves in the back, medium-height roses or geraniums in the middle, and low-growing alyssum or pansies spilling onto the path. The whole thing should feel like a cottage in the English countryside, even if you live in suburban anywhere.
Cottage garden essentials:
- Winding or straight central path (brick, gravel, or flagstone work beautifully)
- Mix of perennials and annuals for continuous blooms
- Climbing plants on arbors, trellises, or fences
- Fragrant plants—lavender, roses, sweet peas, honeysuckle
- Self-seeding annuals that fill in gaps (poppies, cosmos, nigella)
- Vintage or rustic garden accessories (old watering cans, weathered benches)
- Don’t stress about perfect edges—a little spillover adds to the charm
Raised Bed Vegetable Grid Layout
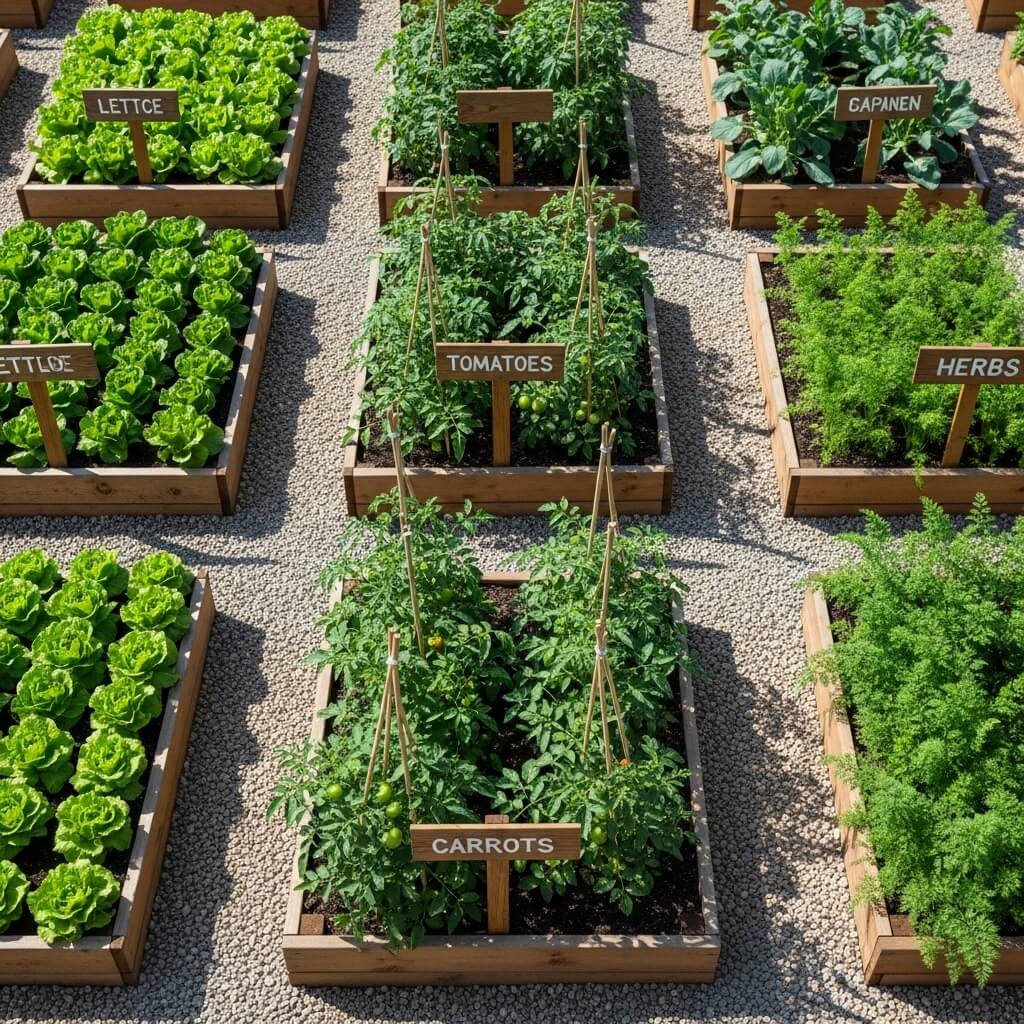
Alright, let’s talk practicality. If you want a garden that actually feeds you (not just your aesthetic soul), the raised bed vegetable grid layout is where it’s at. This is the go-to for anyone serious about growing food but who also appreciates organization and efficiency.
The concept is simple: you build raised beds (usually rectangular) and arrange them in a grid pattern with paths between them. Each bed can house different crops, making crop rotation and companion planting stupidly easy. Plus, you’re not bending over as much because the beds are elevated. Your back will thank you.
Why This Layout Changed My Gardening Game
I switched to this layout three years ago, and honestly, I can’t imagine going back to in-ground vegetable gardening. The raised beds warm up faster in spring, drain better, and you can control the soil quality perfectly. The grid layout means I can walk between beds without compacting the soil, and everything is accessible without doing weird yoga poses to reach plants.
You can make this as simple or as elaborate as you want. Basic 4×4 or 4×8 beds work great for most folks. Add drip irrigation if you’re fancy (or forgetful about watering, like me). The paths between beds can be mulch, gravel, grass, or pavers—whatever fits your vibe and budget.
Raised bed grid layout tips:
- Build beds at a comfortable height (6-12 inches minimum, but waist-high is even better for accessibility)
- Keep beds narrow enough that you can reach the center from either side (4 feet max width)
- Space paths wide enough for a wheelbarrow (at least 2-3 feet)
- Use untreated wood, cedar, or composite materials for bed frames
- Fill with quality soil mix—this is where you don’t skimp
- Label your beds or keep a garden journal to track what grows where
- Add trellises to some beds for vertical growing (beans, peas, cucumbers, tomatoes)
Courtyard Circular Centerpiece Garden Design
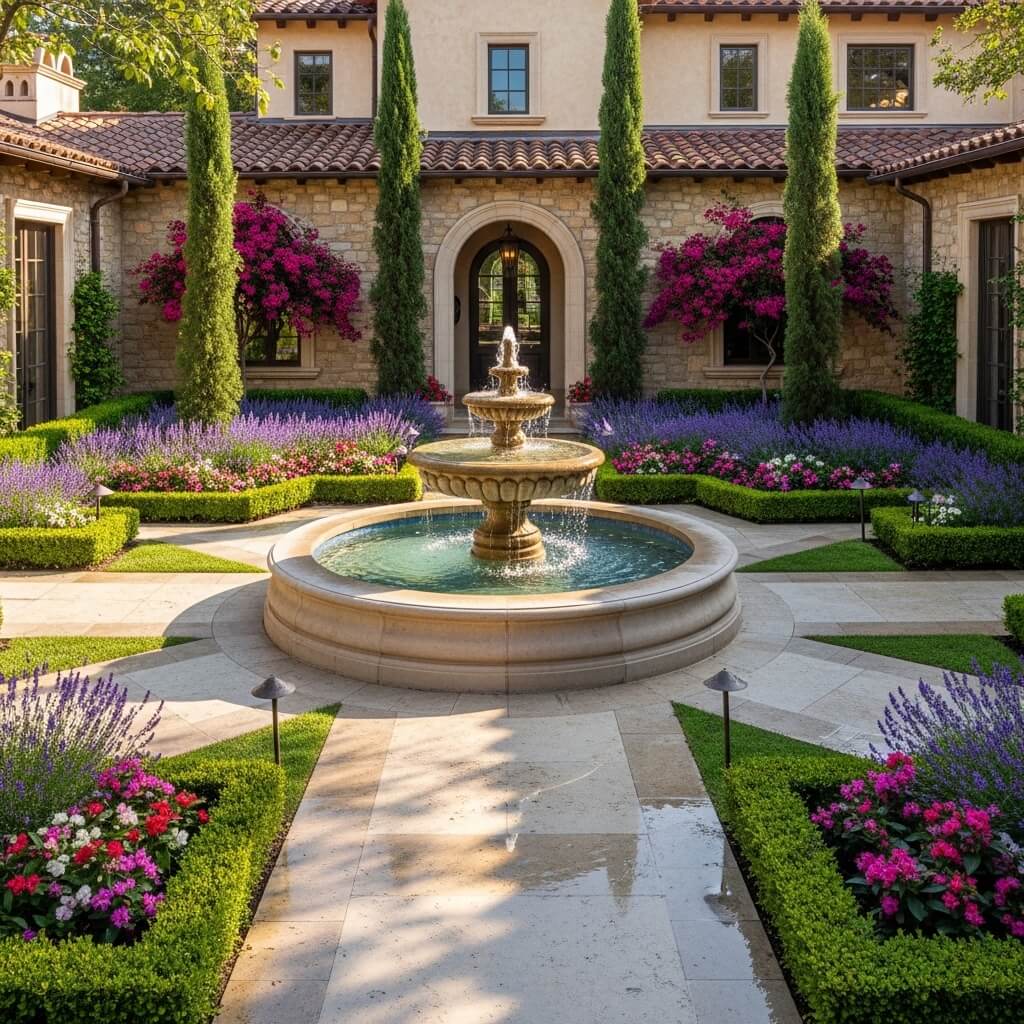
There’s something inherently inviting about a circular garden design, especially in a courtyard setting. The circular layout creates a natural gathering point and focal area that draws people in. I’ve always thought of it as the garden equivalent of sitting around a campfire—everyone naturally faces the center.
This layout works brilliantly in enclosed or semi-enclosed spaces like courtyards, small backyards, or even front yards if you’re feeling bold. You create a circular feature in the center—a fountain, a specimen tree, a circular flower bed, a fire pit, whatever speaks to you—and design everything else to radiate outward or encircle it.
Creating Flow in a Compact Space
I visited a friend’s courtyard garden with this layout, and it completely changed how I thought about small spaces. She had a circular stone patio in the center with a small table and chairs, surrounded by a ring of lavender, which was then bordered by a gravel path, and finally backed by taller shrubs and climbers on the courtyard walls. The layering created incredible depth in maybe 300 square feet total.
The circular design naturally slows you down and encourages you to pause and appreciate the space. It’s inherently relaxing because curves are easier on the eyes than harsh angles. Plus, it’s super flexible—you can adapt this layout to formal or informal styles depending on your plant choices and materials.
Circular courtyard design elements:
- Define the center with something meaningful—seating area, water feature, sculpture, or ornamental tree
- Create concentric circles using different materials or plantings
- Use curved paths or borders to emphasize the circular flow
- Layer plant heights from low at the edges to tall at the perimeter (or vice versa)
- Consider symmetrical plantings around the circle for formal look, or asymmetrical for casual vibe
- Add lighting to highlight the circular pattern at night
Also Read: 10 Stunning Succulent Garden Design Ideas for Small Spaces
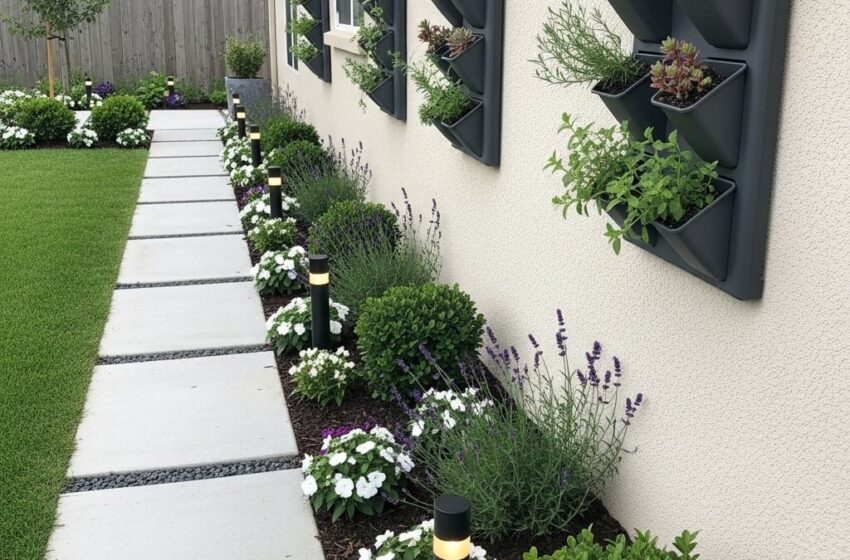
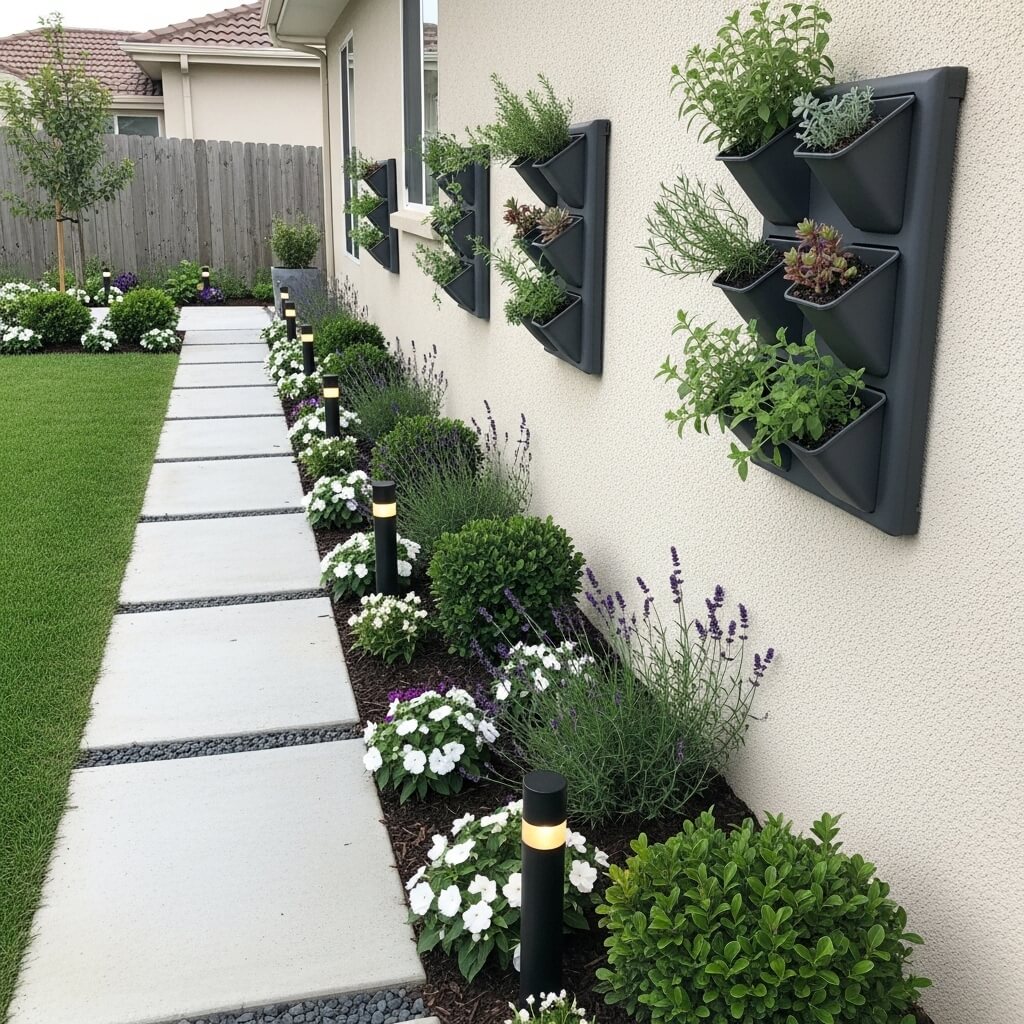
Vertical Wall + Ground Mixed Garden Layout
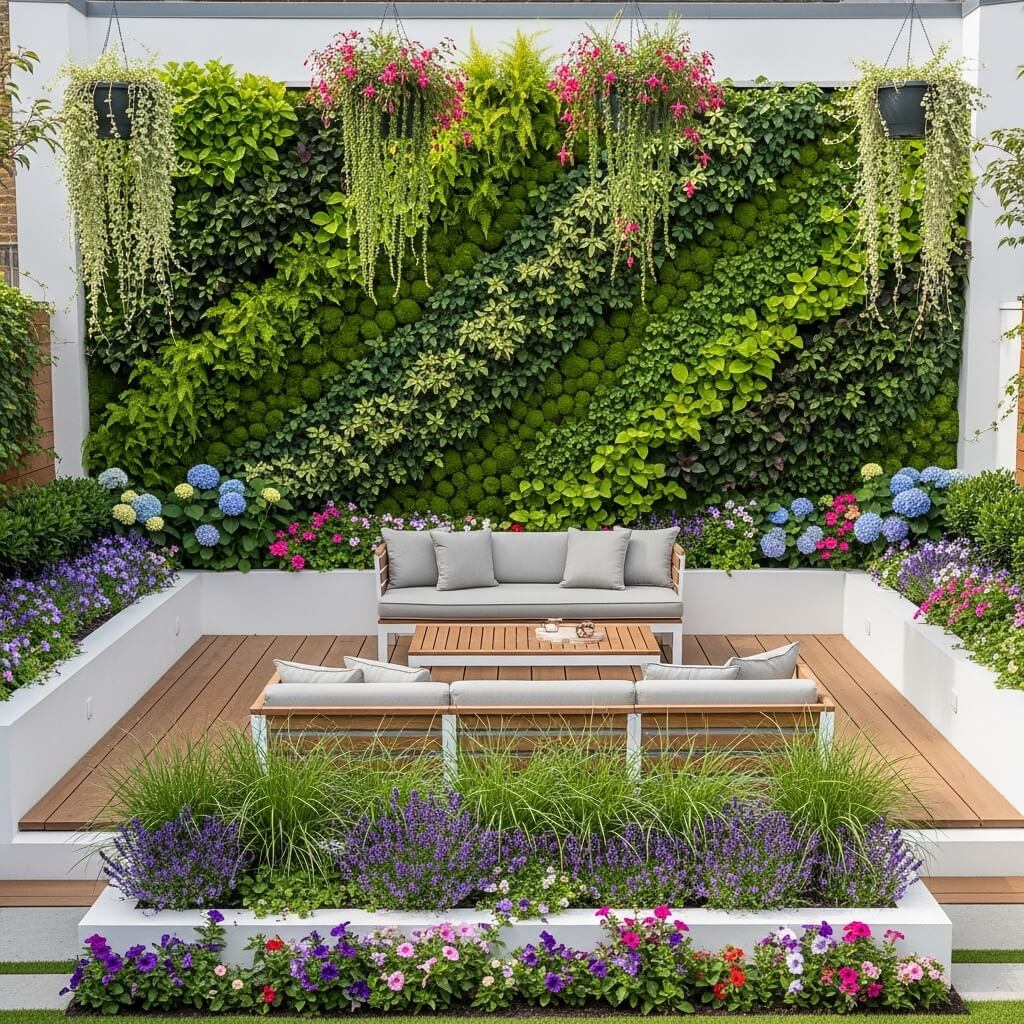
IMO, this is hands-down the most underrated garden layout. If you’re working with limited ground space (hello, urban dwellers), going vertical is a total game-changer. This layout combines traditional in-ground or container planting with vertical elements like living walls, trellises, hanging planters, and wall-mounted containers.
The result? You basically double or triple your planting area without expanding your actual footprint. Mind = blown, right? Plus, vertical gardens add this amazing architectural quality that makes even small spaces feel lush and designed.
My Tiny Balcony Transformation
I used to have a depressing balcony with room for maybe three pots. Then I discovered vertical gardening, and suddenly I had herbs, flowers, trailing plants, and even a few veggies all thriving in the same small space. I mounted a trellis on one wall for climbing beans and morning glories, added wall pockets for herbs and succulents, and hung baskets from the railing. Game. Changer.
The trick with this layout is balancing the vertical and horizontal elements so it doesn’t feel top-heavy or chaotic. You want your eye to travel up and around the space naturally, not get overwhelmed by too much going on in one area.
Vertical + ground layout strategies:
- Install sturdy support structures first—wall-mounted planters need proper anchoring
- Choose appropriate plants for vertical growing (climbers, trailing plants, compact varieties)
- Mix textures and colors both vertically and horizontally for visual interest
- Ensure vertical elements don’t block light from ground-level plants
- Consider irrigation carefully—watering vertical gardens can be tricky
- Use the “thriller, filler, spiller” approach in containers at multiple heights
- Incorporate shelving, ladder planters, or tiered stands for even more levels
Mediterranean Gravel Path Garden Design
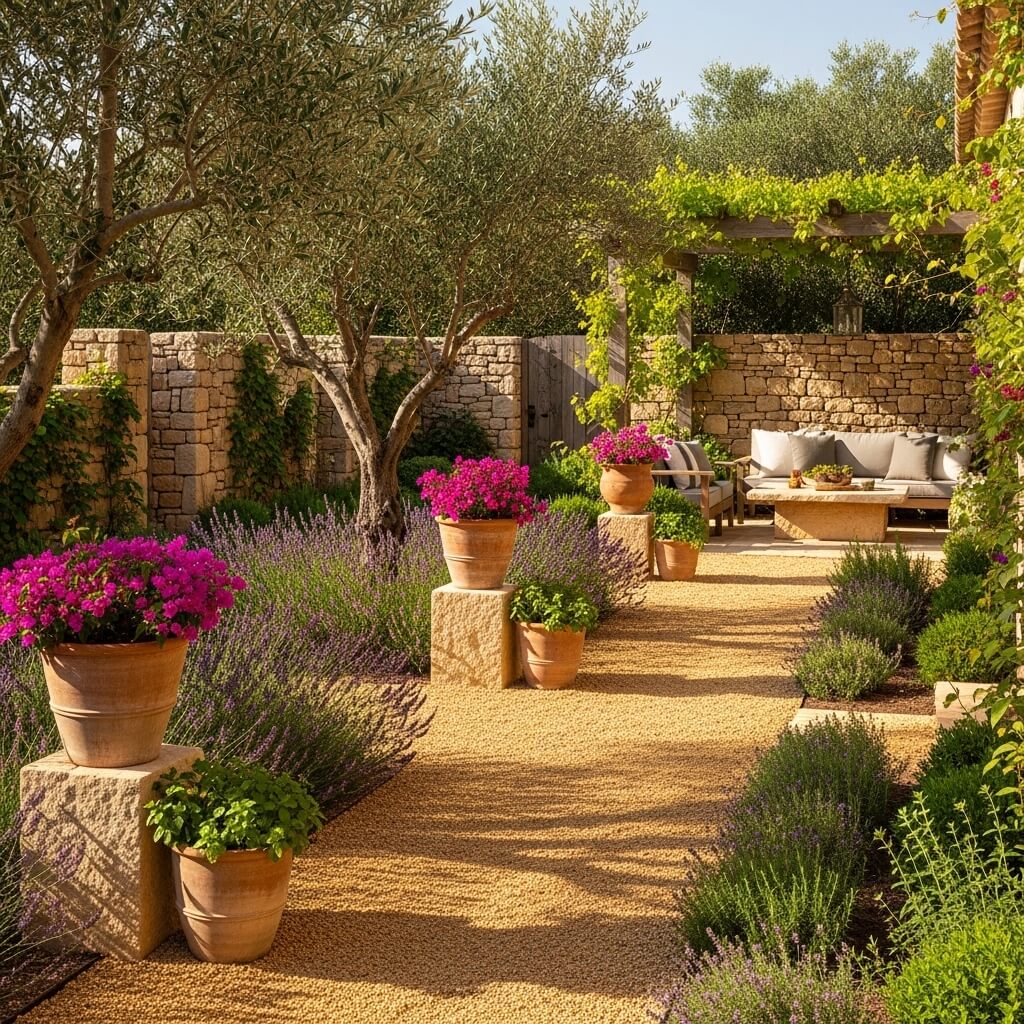
Transport yourself to the Italian countryside or Greek islands with a Mediterranean garden layout. This style is all about sun-baked elegance—think gravel paths, terracotta pots, drought-tolerant plants, and an overall vibe that says “I’m perpetually on vacation, even though I’m just in my backyard.”
The foundation of this layout is typically gravel or decomposed granite paths winding through planted areas. The plants themselves are chosen for their ability to handle heat and drought: lavender, rosemary, olive trees, cypress, ornamental grasses, and flowering perennials like salvia and santolina.
Why This Layout Makes Sense (Especially Now)
With water conservation becoming increasingly important, Mediterranean gardens are not just beautiful—they’re practical. I converted a section of my yard to this style two summers ago during a particularly brutal drought, and it was the only part of my garden that didn’t look like a crispy disaster.
The gravel paths are genius because they’re low-maintenance, allow for great drainage, and create that classic Mediterranean sound when you walk on them (you know the one). Pair that with strategically placed pots of herbs and flowers, maybe a simple fountain or birdbath, and some rustic seating, and you’ve got yourself a proper retreat.
Mediterranean garden must-haves:
- Gravel, pea stone, or decomposed granite for paths and ground cover
- Drought-tolerant, sun-loving plants (lavender, rosemary, sage, thyme, cistus, agapanthus)
- Terracotta, ceramic, or concrete planters (the more weathered-looking, the better)
- Structural evergreens like olive trees, Italian cypress, or rosemary topiaries
- Minimal lawn or no lawn at all
- Warm-toned hardscaping—buff stone, terracotta pavers, weathered wood
- Simple water feature—a wall fountain or shallow basin
- Outdoor seating with cushions in natural linen or faded blues
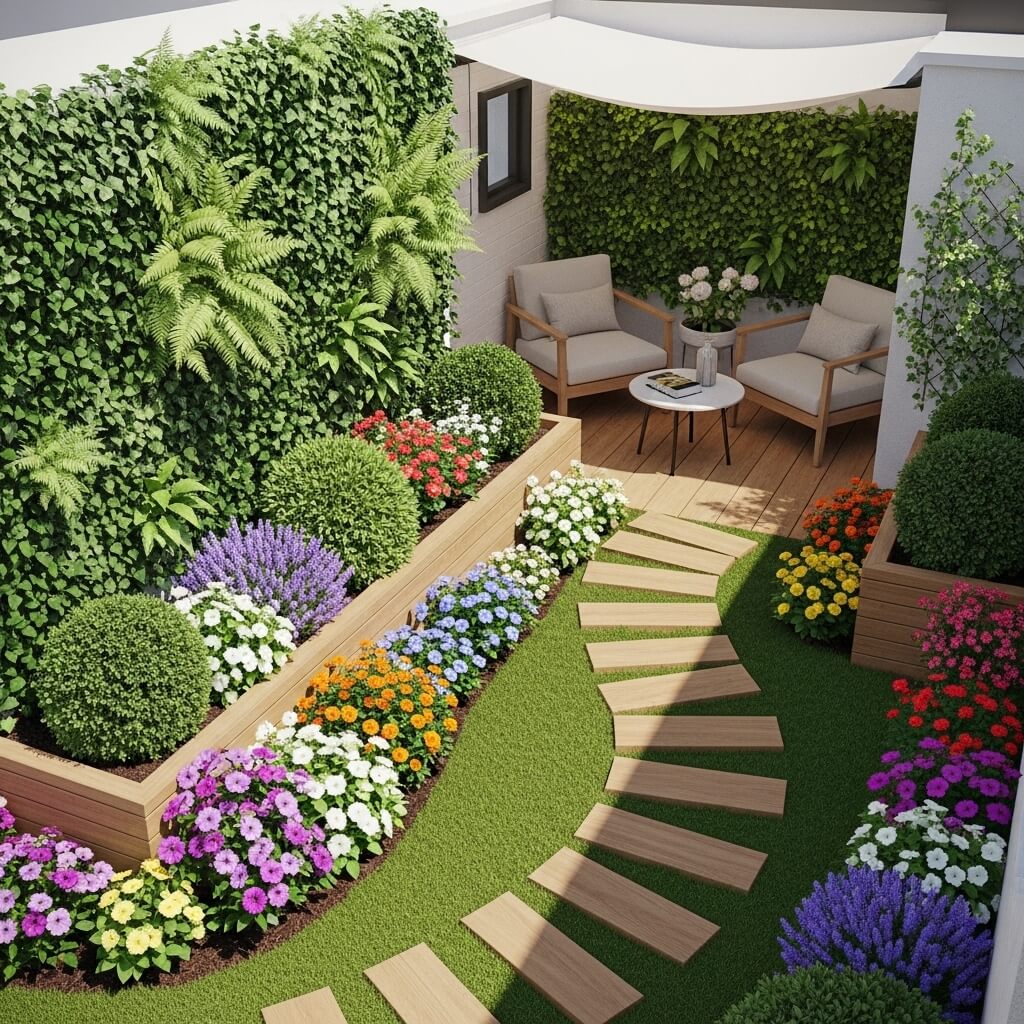
Tropical Layered Plant Jungle Layout

Ready to go full jungle mode? The tropical layered layout is maximalist gardening at its finest. Forget minimalism—we’re piling on the lush foliage, bold colors, huge leaves, and enough layers to make your garden feel like a secret rainforest hideaway.
This layout is all about creating density through layering. You’ve got your canopy layer (if you have space for small trees or large shrubs), your mid-layer of medium-sized plants, and your ground layer of low growers and ground covers. Fill every possible gap with plants that love humidity and warmth, and you’ll create a green cocoon that feels like a total escape.
Embracing the Controlled Chaos
I’ll admit, my tropical corner got a little out of hand last year. 🙂 Turns out when you plant things like elephant ears, bananas, cannas, and giant ferns together, they really, really want to take over. But honestly? It was glorious. The key is choosing plants with varying leaf sizes, shapes, and colors to create that layered jungle effect without it looking like a tangled mess (well, mostly).
Even if you don’t live in an actual tropical climate, you can fake it pretty convincingly during warm months using containers and tropical annuals. Then you either overwinter the tender stuff indoors or treat them as annuals and start fresh next year.
Tropical jungle layout essentials:
- Layer, layer, layer—plant in multiple height tiers for maximum lushness
- Choose plants with bold foliage (elephant ears, bananas, cannas, coleus, caladiums, large ferns)
- Mix leaf shapes and sizes—huge paddle leaves with delicate fronds with spiky palms
- Don’t be shy with color—tropical gardens embrace bold flowers and variegated foliage
- Mulch heavily to retain moisture (these plants are thirsty)
- Create winding paths that make you feel like you’re exploring
- Add tropical-feeling hardscape like bamboo fencing, tiki torches, or bright painted furniture
- Consider a water feature—even a small pond or fountain amps up the tropical vibe
Also Read: 10 Smart Garden Design Layout Ideas for Easy Planning
Linear Side Yard Narrow Garden Design
Ah, the side yard—that awkward strip of space most people use for trash cans and AC units. But hear me out: with a linear garden layout, you can transform that neglected passage into a genuinely delightful garden feature.
Linear designs work beautifully in narrow spaces because you’re working with the dimensions instead of against them. The key is creating visual interest along the length of the space while keeping pathways clear and functional. Think of it as designing a hallway but with plants and pretty stuff.
Turning “Blah” Into “Ooh!”
I worked with a narrow side yard that was literally just 3 feet wide and 40 feet long. Sounds limiting, right? Wrong. We created a stepping stone path down one side with a narrow planting bed along the fence. We chose plants that stayed relatively compact but offered different textures and heights—some upright ornamental grasses, trailing ground covers spilling over the stones, and a few accent plants like hostas and heuchera for interest.
The linear layout actually became one of the most charming parts of the whole property because it felt like a secret garden passage. Visitors loved walking through it, and it connected the front and back yards in a way that felt intentional and designed.
Linear narrow garden strategies:
- Keep paths at least 2-3 feet wide for comfortable walking
- Use vertical space—grow UP with climbers, wall-mounted planters, or espaliered plants
- Choose narrow or columnar plant varieties that won’t overwhelm the space
- Create a “view” at the end of the path—a piece of art, a nice container, a bench
- Light the pathway for evening use and ambiance
- Use repetition (same plants spaced evenly along the length) for cohesion
- Consider a single color scheme to make the space feel larger
- Add mirrors strategically to create the illusion of width (seriously, it works)
Wrapping It Up
So there you have it—10 completely different garden layouts to inspire your next outdoor project. Whether you’re working with a sprawling yard or a tiny balcony, there’s a layout here that’ll work for your space, your style, and your sanity level when it comes to maintenance.
The truth is, the “perfect” garden layout is the one that makes you actually want to spend time outside. Maybe that’s a pristine symmetrical modern garden where everything has its place. Maybe it’s a wild cottage garden that looks like organized chaos. Or maybe it’s a productive veggie garden that feeds your family. All of these are good answers.
Start with one idea that speaks to you, adapt it to your specific space and needs, and don’t stress about getting it perfect on the first try. Gardens evolve—that’s literally the whole point. You plant, you observe, you move things around, you try new stuff. Half the fun is in the experimenting.
Now get out there and start planning that garden layout you’ve been daydreaming about. Your future self (chilling in your gorgeous, relaxing green corner with a cold drink) will thank you. Trust me on this one.