10 Budget-Friendly DIY Balcony Decor Ideas for Home Glow
- Balcony Decor
 Ben
Ben- 0
- 56 minutes read
Look, I get it. You stare at your balcony and see… well, nothing much. Maybe a forgotten plant pot, some dust, and a whole lot of wasted potential. Your wallet’s giving you side-eye every time you browse those fancy outdoor furniture catalogs, and you’re stuck between wanting an Instagram-worthy space and, you know, actually paying rent this month.
Here’s the thing though – I’ve transformed my sad little concrete slab into something I actually want to hang out in, and I spent less than what most people drop on a weekend brunch spree. No kidding. Your balcony doesn’t need a designer’s touch or a trust fund. It just needs some creativity, elbow grease, and the willingness to get a little crafty.
I’m about to walk you through ten seriously doable balcony makeover ideas that won’t break the bank. These aren’t just pretty concepts I pulled from some fancy magazine – I’ve either done them myself or watched friends pull them off with budget finds and DIY magic. Ready to turn that neglected space into your favorite spot at home? Let’s get into it.
Cozy Boho Balcony Makeover on a Budget
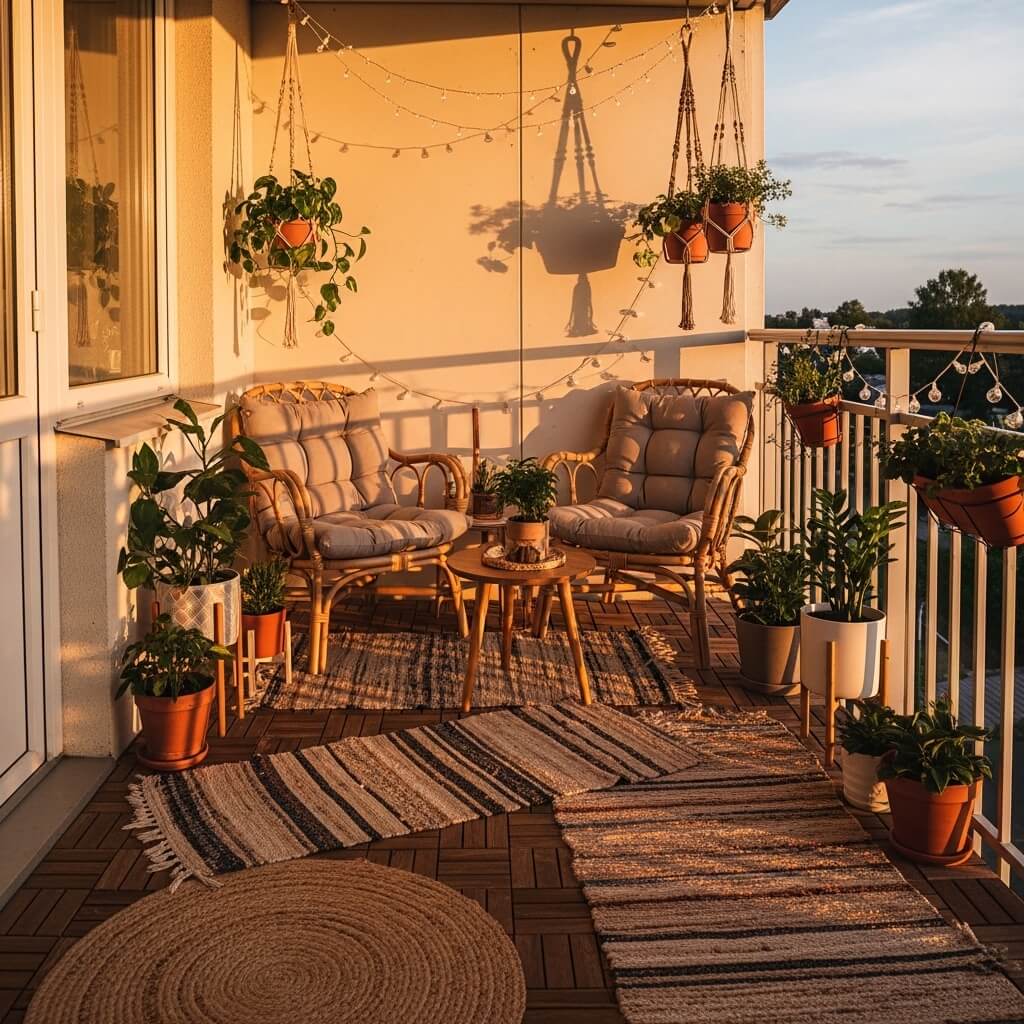
Ever scrolled through Pinterest and wondered how people create those dreamy boho spaces without selling a kidney? The secret’s out – boho style is actually the most forgiving and budget-friendly aesthetic you can choose.
I started my boho balcony transformation with floor cushions and throw pillows. Hit up your local thrift stores or those clearance sections everyone ignores. You want textures, patterns, and warm earthy tones. Mix and match shamelessly – boho thrives on that “collected over time” vibe anyway.
The Essential Boho Elements
Here’s what makes a balcony scream boho without making your bank account scream:
- Macramé everything: Wall hangings, plant hangers, even DIY macramé cushion covers (YouTube is your friend here)
- Layered textiles: Throw blankets, rugs, cushions in different patterns
- Natural materials: Jute, rattan, bamboo, wood
- Warm lighting: String lights or lanterns (more on fairy lights later)
- Greenery: Plants in mismatched pots
I picked up a massive outdoor rug remnant from a home improvement store for literally $15. Was it exactly what I wanted? Nope. Did I layer a smaller patterned rug on top that I found at a yard sale for $5? Absolutely. Looks intentional, costs nothing.
DIY Boho Projects That Actually Work
You don’t need to be crafty to pull this off. I made a macramé wall hanging after watching exactly one tutorial, and people think I bought it from some artisan shop. The cotton cord cost me $12, and I had enough left over for plant hangers.
Pro tip: Old wooden crates make perfect side tables. Stack them, leave them horizontal, paint them, or keep them natural. I found mine behind a grocery store (yes, I asked first, I’m not a crate thief). A quick sand and they looked rustic-chic.
The magic of boho is that “imperfect” is the goal. Your cushions don’t match perfectly? That’s the aesthetic. Your plants are in random containers? Even better. This style celebrates the eclectic, which means your budget constraints actually work in your favor.
Minimalist Green Plant Balcony Retreat
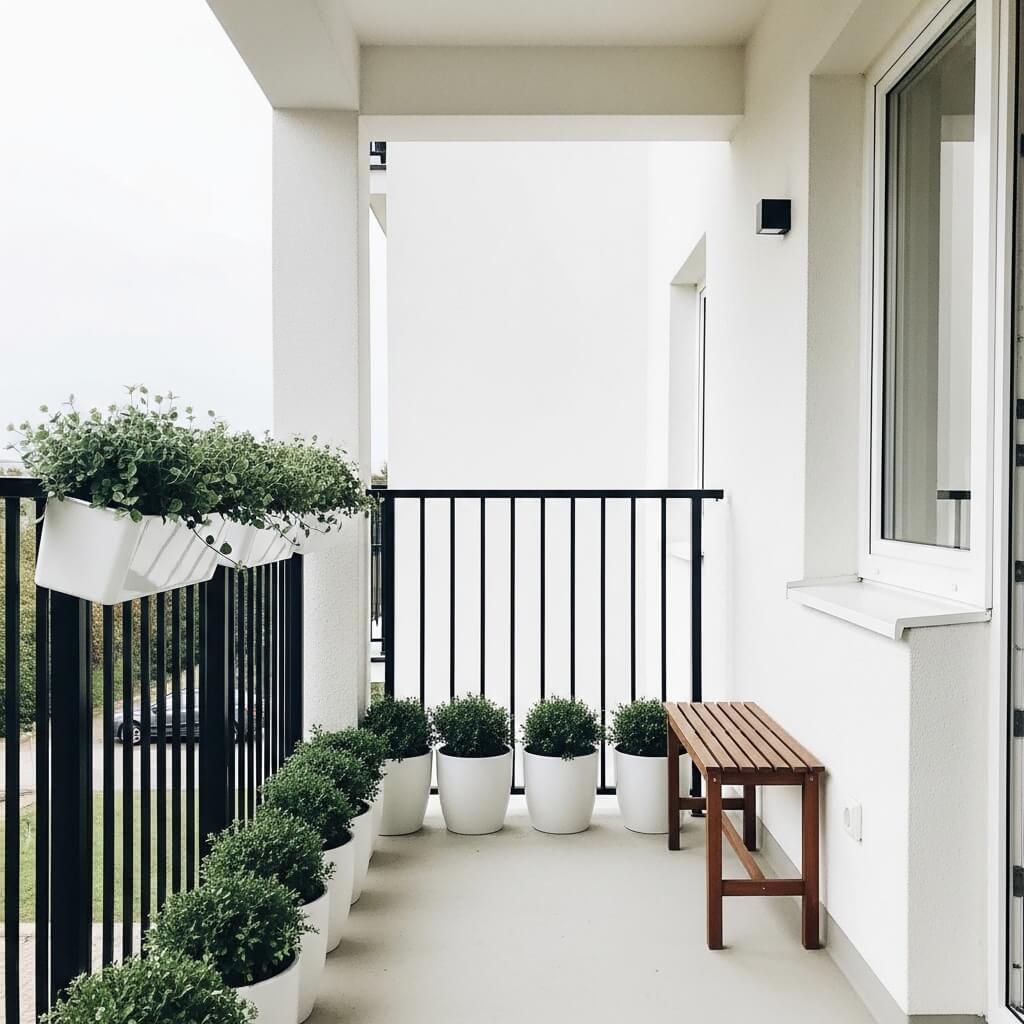
On the complete opposite end of the spectrum, let me introduce you to minimalist zen. If boho feels too busy for your brain, a plant-focused minimalist balcony might be your jam.
I learned this the hard way – more stuff doesn’t equal more style. Sometimes a few well-placed plants and clean lines create way more impact than cramming every inch with decorations. Your balcony becomes this breathing space where you actually want to, well, breathe.
Choosing Your Plant Squad
You don’t need rare expensive plants. Honestly, I’ve killed enough fiddle leaf figs to know that expensive doesn’t mean better. For balconies, I stick with these budget-friendly champions:
- Pothos: Practically indestructible, grows like crazy
- Snake plants: Survives neglect like a champ
- Spider plants: Babies for days (free plants!)
- Succulents: If you get decent sun
- Herbs: Functional AND pretty
Start with 3-5 plants max. I know that sounds sparse, but minimalism isn’t about having nothing – it’s about having just enough. Each plant gets to shine instead of competing for attention.
The Minimalist Setup
Keep your color palette tight. I went with white and natural wood tones for my containers and furniture. You can find simple white planters at dollar stores – yes, really. Group them in odd numbers (3 or 5 plants together) at different heights.
For seating, I use a simple wooden bench I snagged from a neighbor’s curb pile. Gave it a light sand and a coat of outdoor sealant. Cost? About $8 for the sealant. The bench? Free. Add one simple cushion in a neutral color.
The minimalist mantra: If it doesn’t serve a purpose or bring you joy, it doesn’t belong. Harsh? Maybe. Effective? Absolutely.
This approach saves you money because you’re literally buying less stuff. Weird how that works, right? 🙂 Focus on quality over quantity, and your balcony becomes this calm retreat instead of another cluttered space.
Fairy Light Romantic Balcony Setup
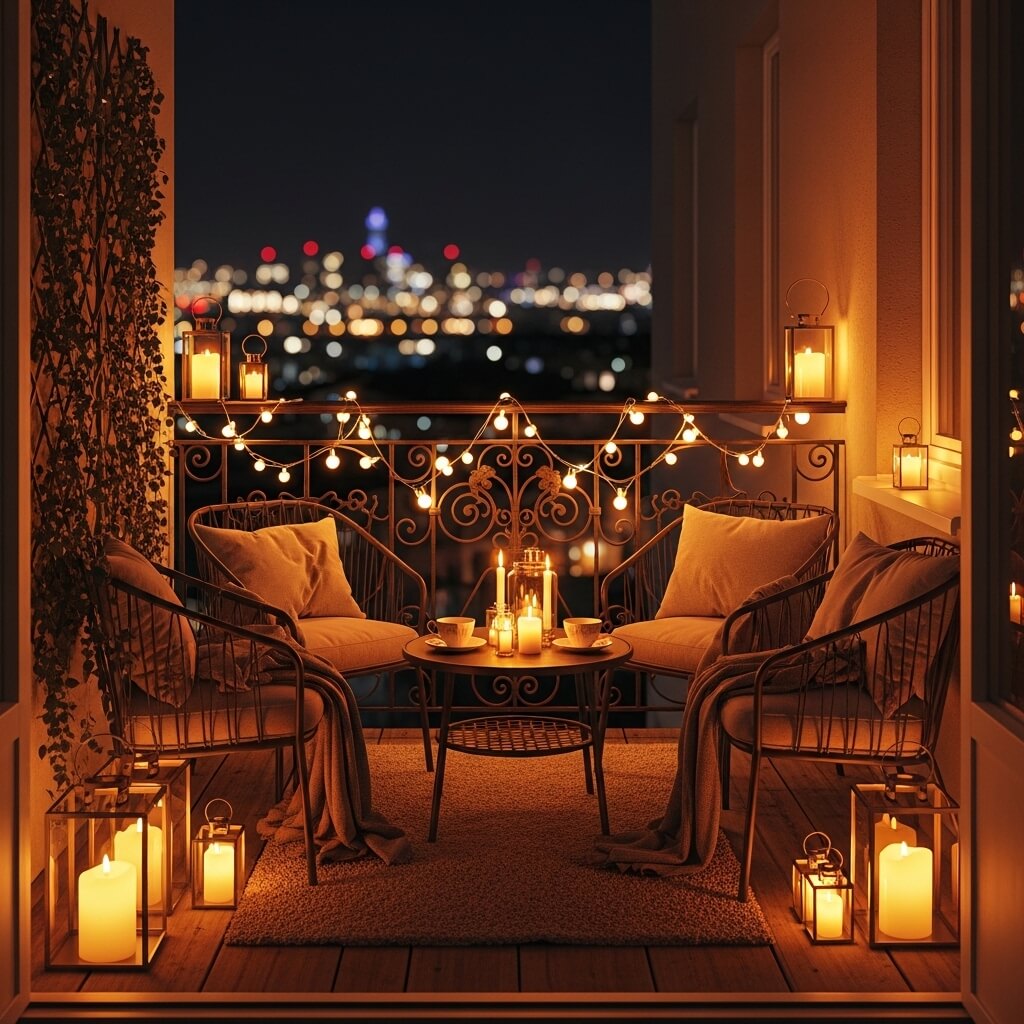
Okay, real talk – fairy lights are the MVP of balcony transformations. I don’t care if you think they’re overdone or basic. They transform ANY space from “meh” to “magical” the second the sun goes down.
I resisted fairy lights for way too long because I thought they were cliché. Then I actually hung some up, and suddenly I wanted to spend every evening outside. The vibe shift is unreal.
Choosing the Right Lights
Not all fairy lights are created equal, and this is where you don’t want to cheap out entirely. Here’s what I learned after buying (and returning) several sets:
- Solar-powered: Skip the extension cord hassle and save on electricity
- Warm white over cool white: Unless you want your balcony to look like a dentist’s office
- Dimmable options: Game changer for setting the mood
- Weather-resistant: Because rain happens
You can find decent solar string lights for $15-25. I’ve had mine for two years now, and they still work perfectly. Compare that to constantly replacing cheap ones that die after one summer.
Creative Hanging Ideas
Don’t just string them straight across like you’re marking a crime scene. Get creative with it. I created a canopy effect by draping lights from the corners to a central point. Used cup hooks (literally $2 for a pack) to create anchor points.
Other ideas that actually look good:
- Wrap them around railings
- Weave through plant hangers
- Create a curtain effect against one wall
- Outline your seating area
- Wrap around posts or beams
Add some sheer curtains from a thrift store behind your lights for extra romance points. The fabric diffuses the light and adds softness. I spent $6 on two panels that I cut to size. The wind catches them, the lights glow through them, and suddenly your balcony feels like a scene from a movie.
Combine fairy lights with candles (the battery-operated kind are safer and last forever), and you’ve created the perfect date night spot. Or just a perfect “me, wine, and a book” spot. No judgment.
Also Read: 10 Brilliant Tiny Balcony Decor Ideas for Budget Makeovers
Small Space Hanging Garden Balcony Design
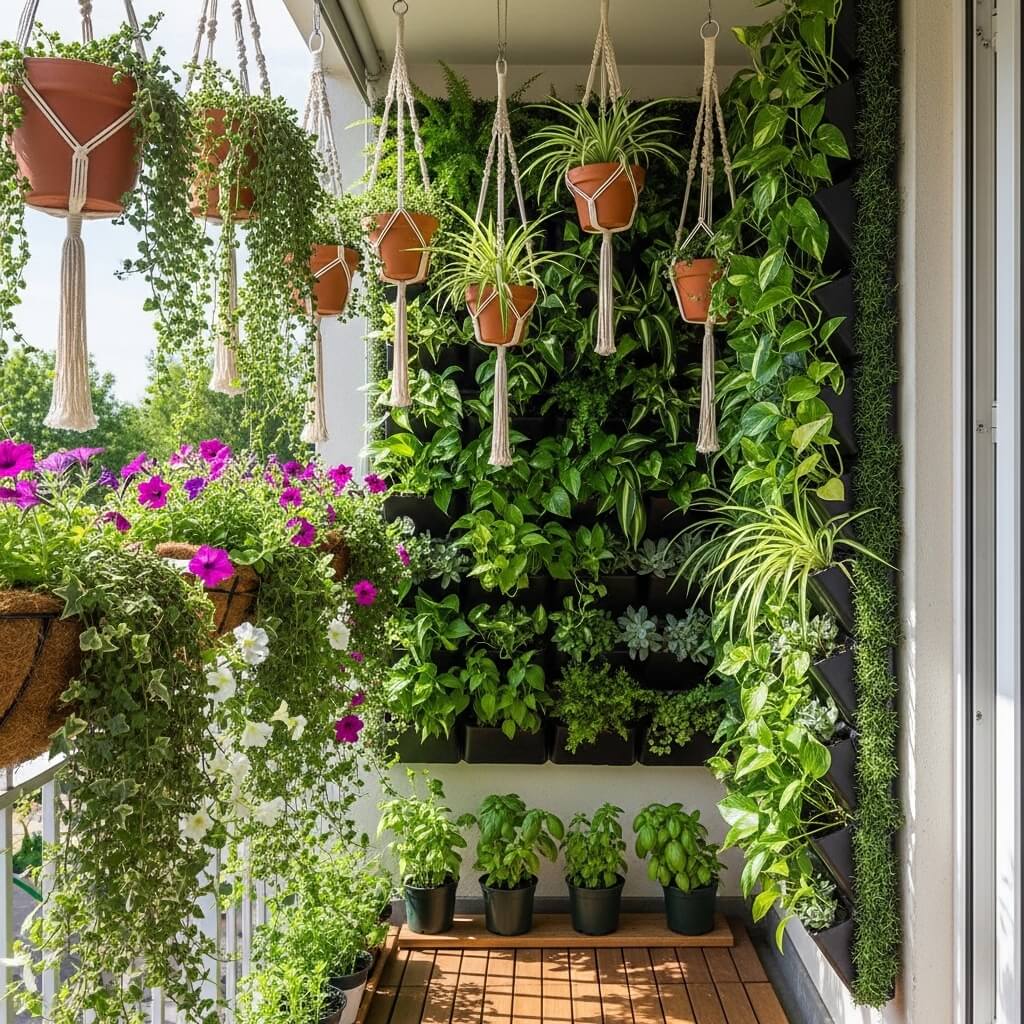
Got a balcony the size of a postage stamp? Yeah, me too. My first apartment balcony was so small that I could touch both walls with my arms spread. But vertical space? That was fair game.
Hanging gardens are perfect when you’re working with limited square footage. You get all the greenery without sacrificing precious floor space. Plus, it looks intentional and designed instead of cramped.
Vertical Growing Solutions
I started with basic hanging planters from the dollar store. Five bucks got me three plastic hanging pots. Spray painted them matte black, and they looked way more expensive than they were. Hung them at different heights along the railing.
But here’s where it gets fun – you can hang plants from basically anything:
- Tension rods: Between walls or in doorways
- Over-the-door shoe organizers: Perfect for herbs and small plants
- Wooden ladders: Lean one against the wall and hang pots from the rungs
- Pegboards: Mount to the wall and customize your layout
- Macramé hangers: DIY or thrifted
I found an old wooden ladder at a yard sale for $3. It was kind of gross and definitely needed work, but after a good cleaning and some outdoor wood stain, it became a plant ladder that people constantly ask about.
Plants That Thrive Hanging
Not every plant loves hanging out (pun intended). You want cascading varieties that show off when elevated:
- String of pearls: Instagram famous for a reason
- Trailing pothos: The overachiever that never stops growing
- Ivy: Classic cascading beauty
- Ferns: For that lush jungle vibe
- Cherry tomatoes: Because why not grow food?
FYI, I grew cherry tomatoes on my tiny balcony last summer, and it felt ridiculously satisfying to snack on something I actually grew. Plus, it saved me a few bucks at the grocery store.
The trick is balancing your hanging garden so it doesn’t look like a plant avalanche waiting to happen. Vary your heights, mix trailing and upright plants, and leave some breathing room. Your balcony should feel lush, not like you’re fighting through a jungle to reach your chair.
DIY Wooden Pallet Balcony Seating Area
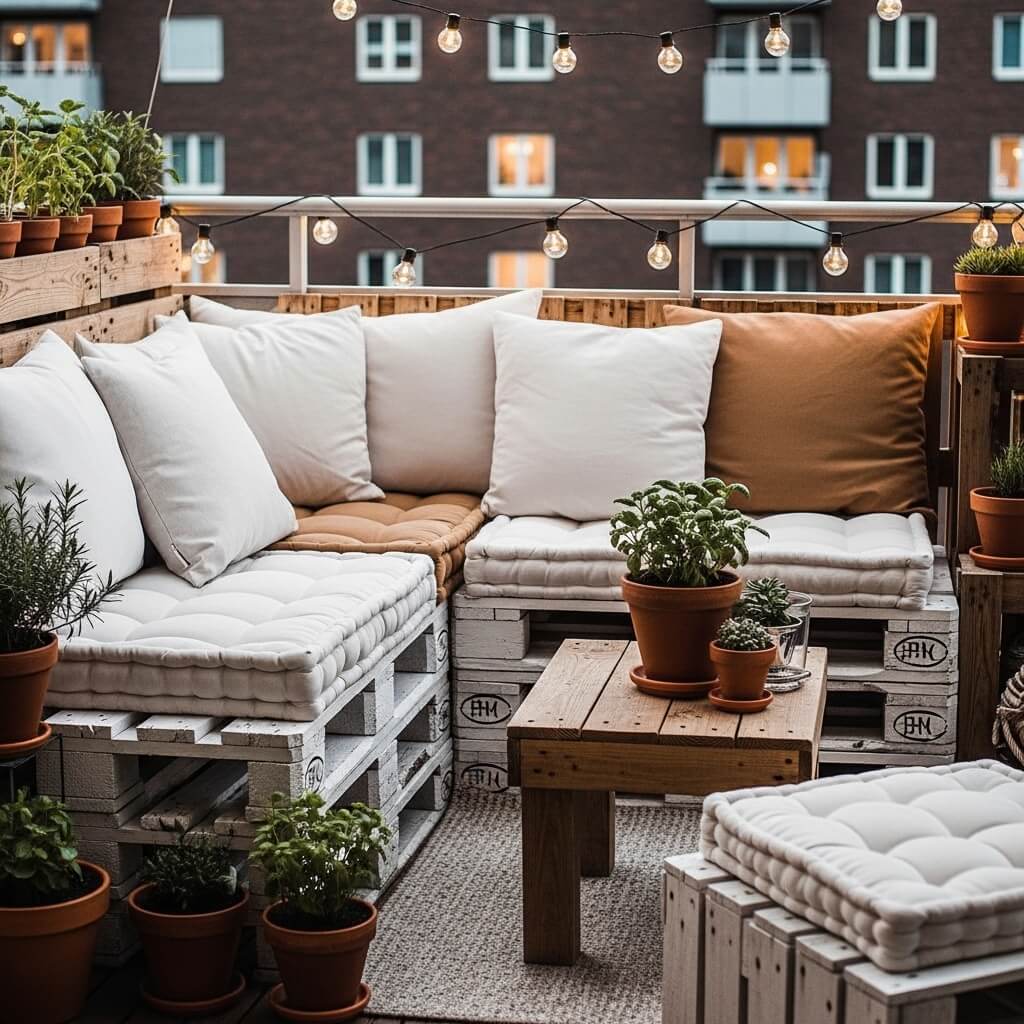
Let’s talk about wooden pallets – the ultimate budget DIY material. I know, I know, pallet projects are everywhere. But there’s a reason they’re popular: pallets are often free, endlessly customizable, and surprisingly sturdy.
I built my entire balcony seating area from pallets, and my total cost was around $30 (and that was mostly for cushions and stain). People assume I dropped hundreds on outdoor furniture. Nope, just some elbow grease and YouTube tutorials.
Finding and Preparing Pallets
First, you need pallets. Check behind grocery stores, home improvement stores, or small businesses. Always ask first – some places will happily give them away, others use them for returns. Look for pallets marked “HT” (heat-treated) rather than “MB” (methyl bromide treated) because chemicals and your butt don’t mix well.
Inspect them for damage, weird stains, or rot. You want solid wood that can handle weight and weather. I usually grab one or two extra pallets beyond what I need because some boards will be unusable.
Building Your Seating
Here’s the simplest pallet sofa I built:
- Base: Stack two pallets for height and comfort
- Back: Stand one pallet vertically and secure it to the base
- Sand everything: This step sucks but prevents splinters
- Stain or paint: Weather-proof that wood
- Add cushions: This is where you make it actually comfortable
You can build an entire L-shaped sectional for a corner balcony using 4-6 pallets. Secure them with wood screws or corner brackets (hardware store, super cheap). I reinforced mine with 2x4s underneath for extra stability.
Making It Comfortable
Raw pallet wood isn’t exactly cozy. You need cushions, and this is where you might spend the most money. But get creative:
- Foam from fabric stores: Cut to size and make your own covers
- Outdoor cushion clearance sales: End of season = big discounts
- Old couch cushions: If they fit, they sit (cover with outdoor fabric)
- Floor cushions: Cheaper than outdoor cushions, just bring them in when it rains
I made cushion covers from clearance outdoor fabric ($4/yard on sale) and stuffed them with cheap foam. Total cost: about $25 for seating that looks custom-made. Add some throw pillows, and you’ve got a legit lounge area.
Bonus pallet projects: Coffee tables, plant stands, vertical gardens, shelving. Once you start looking at pallets as free building blocks, the possibilities are honestly endless.
Urban Jungle Balcony with Vertical Planters
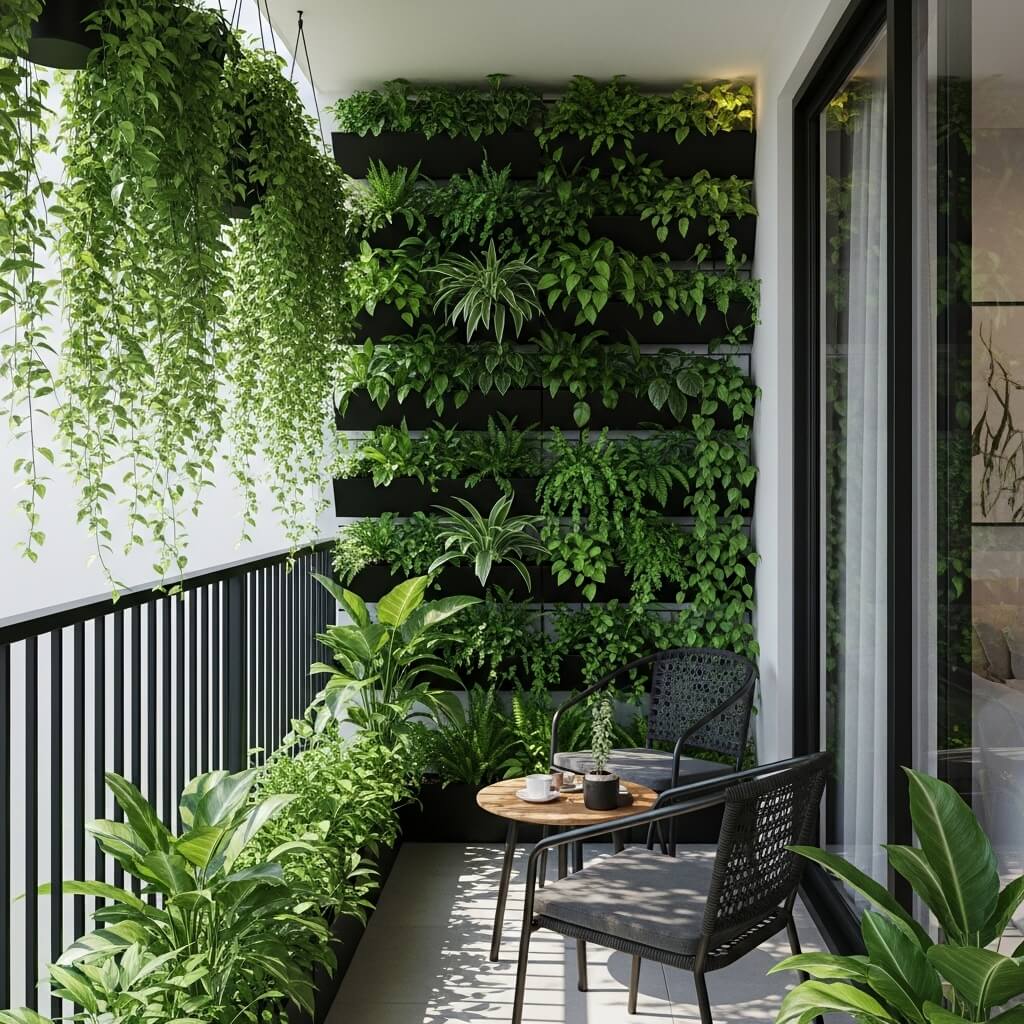
Want your balcony to feel like you’re vacationing in a tropical paradise? The urban jungle trend is all about maximum greenery with that lush, overgrown vibe. Think less “carefully curated” and more “nature is taking over.”
I went full jungle mode on my balcony last year, and I’m not exaggerating when I say it dropped the temperature by a few degrees and made the space feel completely different. Plus, all those plants improved the air quality and gave me a project during those months we don’t talk about.
Vertical Planter Options
When you’re going for jungle vibes, you need LOTS of plants. Floor space fills up fast, so vertical planters become essential. Here are the budget-friendly options I’ve used:
- Wall-mounted pocket planters: Fabric ones are cheap and easy to hang
- Gutter gardens: Old gutters mounted horizontally make perfect planters
- PVC pipe planters: Cut holes in large PVC pipes for vertical growing
- Wooden crate boxes: Mount to walls at different levels
- Hanging baskets: Cluster them at varying heights
I built a gutter garden for under $20. Bought two lengths of vinyl gutter, some end caps, and mounting brackets. Drilled drainage holes, mounted them to the balcony wall, and filled them with herbs and trailing plants. Looks intentional, cost almost nothing.
Creating Layers and Depth
The jungle look is all about layering. You want plants at every level – ground, mid-height, overhead, and cascading. This creates that dense, enclosed feeling that makes the space so cozy.
I arranged my balcony like this:
- Floor level: Large planters with bigger plants (even small trees if you can swing it)
- Railing level: Medium pots and hanging planters
- Wall level: Vertical gardens and mounted planters
- Overhead: Hanging plants and vines
Mix different types of foliage – big leaves, small leaves, variegated, solid green, different textures. The variety makes it feel more natural and less like a plant store display.
Budget Plant Shopping
Jungle vibes need volume, which could get expensive fast. Here’s how I filled my space without going broke:
- Propagate everything: One pothos can become ten with patience
- Plant swaps: Trade with friends or join local plant groups
- Seasonal sales: Grocery stores discount plants like crazy sometimes
- Divide larger plants: Many plants can be split into multiples
- Grow from seed: Takes longer but costs pennies
IMO, the urban jungle look is the most forgiving style for newbie plant parents because it’s supposed to look wild and overgrown. Your plant looks a little messy? Perfect. Something’s growing out of control? Even better. Brown leaf here and there? Just remove it and call it natural selection.
Also Read: 10 Aesthetic Balcony Christmas Decor Ideas for Night Vibes
Cozy Reading Nook Balcony Corner Idea
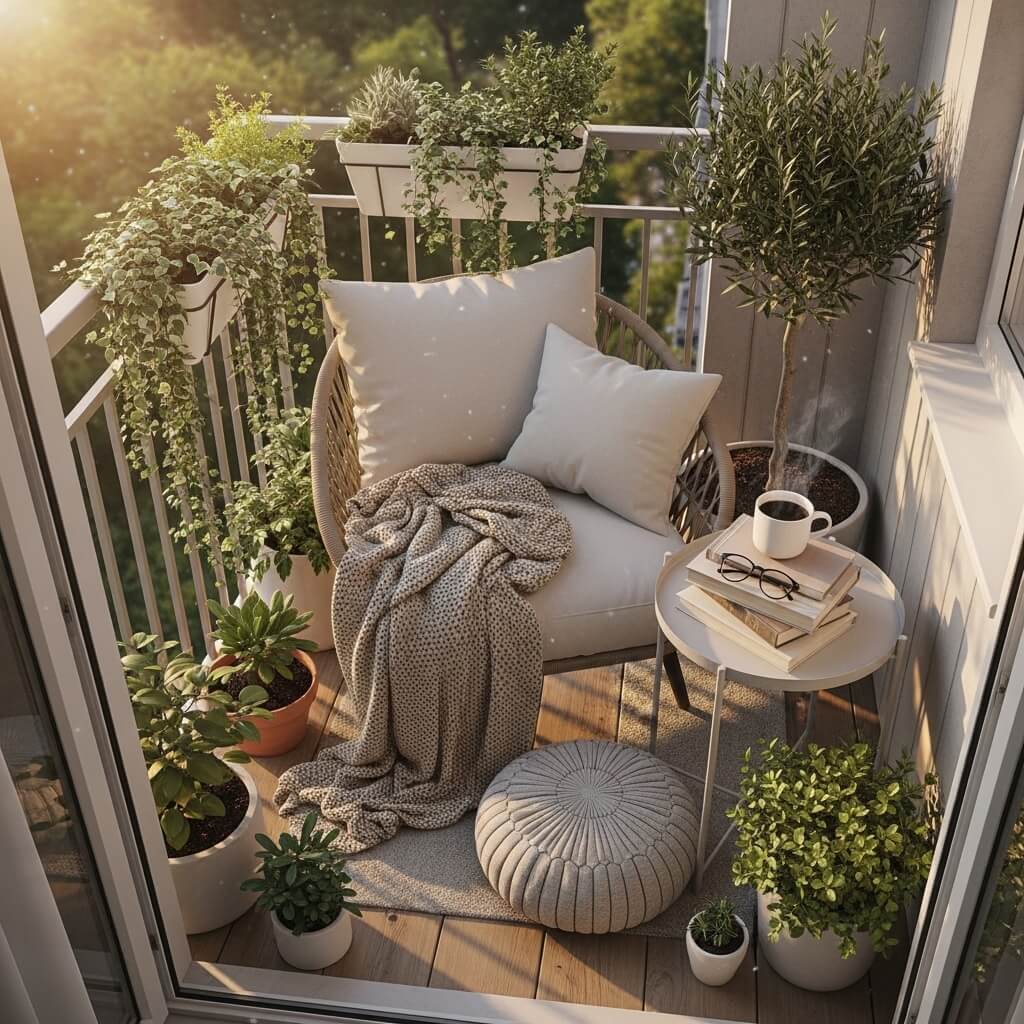
Ever wanted your own personal reading retreat but don’t have a spare room? Your balcony corner is literally just sitting there, doing nothing. Let’s fix that.
I created a reading nook in the corner of my balcony, and it became my favorite spot in my entire home. Something about being outside with a book and coffee just hits different. The setup is simple and cheap if you know where to look.
The Essential Elements
A good reading nook needs three things: comfortable seating, good lighting, and a surface for your drink. Everything else is just bonus. I found a papasan chair cushion at a thrift store for $8, threw it on a raised wooden platform I built from scrap wood, and boom – seating solved.
If you can’t find a papasan cushion (they’re gold for reading nooks), here are other options:
- Floor cushions: Stack a few for back support
- Hammock chair: Hanging options save floor space
- Bean bag: Outdoor ones exist and they’re surprisingly cheap
- Folding lounge chair: With lots of pillows and blankets
For lighting, you need something functional for when the sun goes down. I use a solar-powered clip-on reading light ($12) attached to a mounted shelf above my seat. No electrical needed, charges during the day, perfect light for reading at night.
Creating the Vibe
The magic is in the details that make you actually want to curl up there:
- Soft blanket: Even in summer, evenings get cool
- Small side table: For coffee, wine, or a plant (multitask!)
- Weather-proof book storage: A small crate or basket
- Privacy screen: If your neighbors are nosy (mine definitely are)
I made a privacy screen using a bamboo fence roll from the hardware store ($25) and zip-tied it to my balcony railing. Instant privacy, and it added to the cozy enclosed feeling. You could also use outdoor curtains, lattice panels, or tall plants.
The Coffee Table Situation
You need somewhere to set your stuff, but coffee tables can be expensive. I’ve used all of these as side tables in my reading nook:
- Upside-down wooden crate: Free or a few bucks
- Plant stand: Dual purpose furniture
- Tree stump: Foraged from a tree service company
- Stacked books: Ironic but functional
- Wire basket: Flipped upside down with a board on top
Currently, I use a slice of tree trunk (free from a neighbor who cut down a tree) sanded smooth and sealed. Cost me nothing, looks rustic and intentional, and it’s the perfect height next to my floor cushions.
Add a small plant, maybe a candle, and some fairy lights nearby, and you’ve created a space you’ll actually use. I read out there almost every evening when the weather’s decent. Best corner I’ve ever decorated, hands down.
Budget-Friendly Rattan Style Balcony Decor
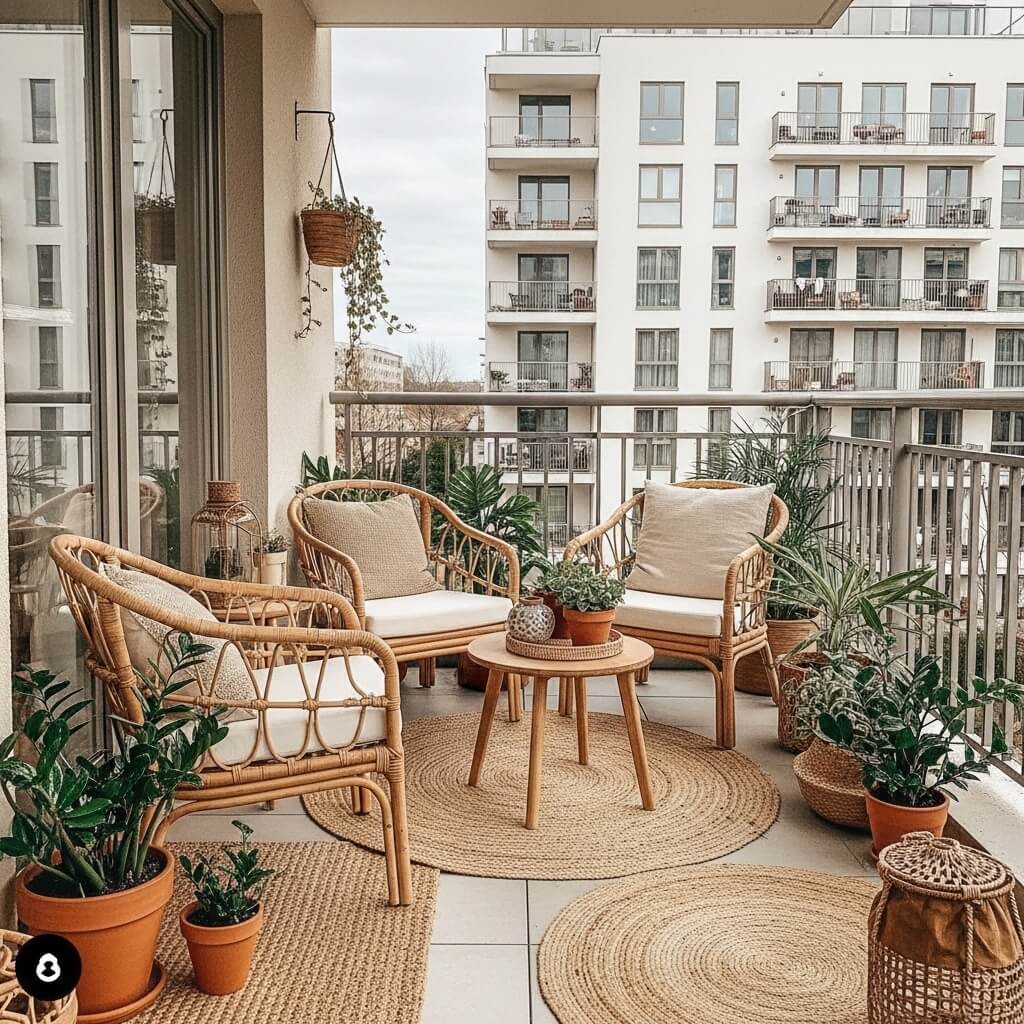
Real rattan furniture costs a fortune. Like, “I need to rethink my life choices” kind of money. But the LOOK of rattan? Totally achievable on a budget if you’re willing to get creative.
I wanted that coastal, breezy, resort-style balcony without the resort-style prices. Turns out, you can fake it pretty convincingly with some smart shopping and a little DIY spirit.
Faux Rattan Furniture Options
First, check these places before you assume rattan is out of reach:
- Thrift stores: People donate outdoor furniture all the time
- Facebook Marketplace: Search “wicker” or “rattan” and filter by price
- End-of-season sales: August/September at big box stores
- IKEA: Their faux rattan stuff is surprisingly affordable
- Import stores: Sometimes cheaper than you’d expect
I scored a rattan-style chair at a yard sale for $10 that just needed a good cleaning and new cushions. The person selling it thought it was trash. I thought it was treasure. We were both happy with the transaction.
DIY Rattan-Look Projects
Can’t find actual rattan? Create the aesthetic with:
Woven textures everywhere: Jute rugs, wicker baskets, bamboo blinds, seagrass planters. These materials give you that natural, textured look that defines rattan style.
Natural wood tones: Sand and stain regular furniture to match rattan’s warm honey color. I did this with basic wooden chairs, and paired with wicker cushions, they pass for the real thing.
Macramé and woven accents: These add texture and play into the natural material theme.
Styling Your Rattan-Inspired Space
The rattan look works best with a neutral, coastal color palette. Think whites, creams, soft blues, natural wood, and pops of green from plants. I kept my balcony mostly neutral and let plants and textures do the talking.
Add these elements to complete the vibe:
- Lots of plants (palms or ferns especially)
- Light, breezy curtains
- Natural fiber rugs
- White or cream cushions
- Woven baskets for storage
- Driftwood or beach-inspired accents
The whole point is creating that relaxed, vacation-y feel. Nothing should feel too precious or formal. I found that using varying shades of white and cream (instead of trying to match everything perfectly) actually made the space feel more collected and interesting.
Real talk: Most people can’t tell the difference between real rattan and good faux rattan, especially when it’s styled well. Save your money, get the look, and spend the difference on plants or wine. Your choice.
Colorful Moroccan Style Balcony Transformation
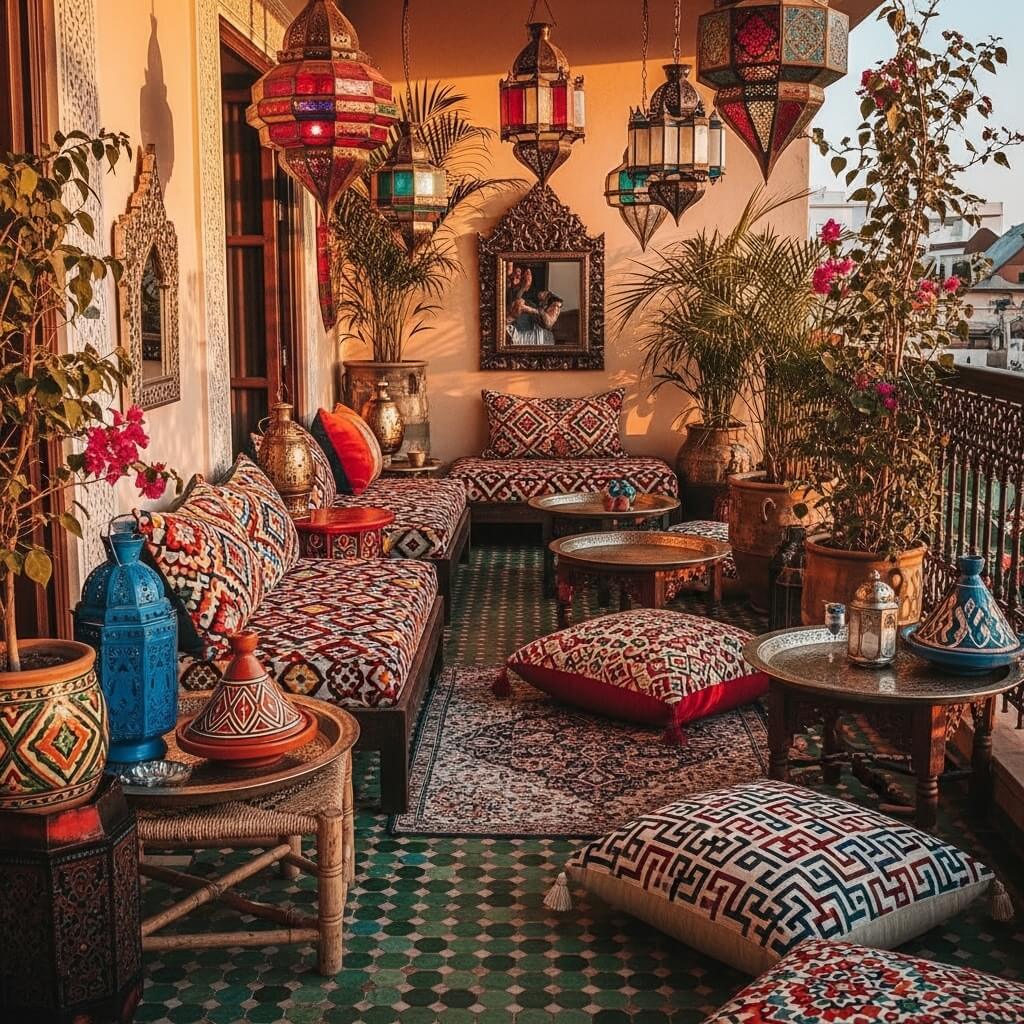
If neutrals bore you to tears and you want COLOR and PATTERN and LIFE, Moroccan style is calling your name. This look is bold, vibrant, and honestly so fun to put together.
I did a Moroccan-inspired corner on my balcony, and every time I look at it, it makes me happy. There’s something about all that color and pattern that just lifts your mood. Plus, this style is surprisingly budget-friendly because it celebrates mixing and mismatching.
The Moroccan Color Palette
Moroccan design embraces rich, saturated colors. We’re talking:
- Deep jewel tones: sapphire blue, emerald green, ruby red
- Warm sunset colors: orange, pink, gold
- Earthy accents: terracotta, mustard, rust
- Bright white for contrast
You don’t need to use ALL the colors (that way lies chaos), but pick 3-4 colors that make your heart happy and run with them. I went with cobalt blue, terracotta orange, gold accents, and lots of white to balance it out.
Essential Moroccan Elements
Here’s what creates that Moroccan vibe without breaking the bank:
Patterned textiles: Hit up discount home stores, international markets, or thrift shops for:
- Colorful floor cushions and poufs
- Patterned throw pillows
- Printed outdoor rugs or carpet remnants
- Lightweight patterned throws
I found an amazing patterned rug remnant at a discount store for $12. It became the foundation of my whole color scheme.
Metallic accents: Lanterns, trays, or pots in brass, copper, or gold. Dollar stores sell metal lanterns that you can spray paint gold or copper for that authentic Moroccan metallic shine.
Geometric patterns: Moroccan design loves geometry. Look for:
- Tile-printed pillows
- Geometric planters
- Patterned outdoor rugs
- Stenciled furniture (DIY this!)
I bought geometric tile stencils for $6 and painted a plain wooden side table. Suddenly it looked like something from a Marrakech marketplace instead of someone’s garage.
Creating Your Moroccan Oasis
Layer, layer, layer. Moroccan style is all about abundance – multiple patterns, lots of cushions, various textures. The “too much” line is pretty far away in this aesthetic.
I created a low seating area using floor cushions and poufs. Found them at discount stores and thrift shops, mixed patterns shamelessly, and it somehow all works together. The key is keeping a consistent color palette even when patterns vary.
Add hanging lanterns (battery-operated candles inside for safety) in different sizes and shapes. I have five lanterns of different sizes hung at varying heights, and when they’re all glowing, the space feels magical. Total cost: about $20 for all five (dollar store and thrift finds).
Plants in colorful pots: Paint terra cotta pots in your color scheme, or hunt for colorful ceramic planters at thrift stores. The pops of color from planters add to the vibrant feel.
This style proves you don’t need expensive taste to have great style. Moroccan design celebrates the handmade, the found, the collected – which means your budget constraints actually align perfectly with the aesthetic. Lucky you :/
Also Read: 10 Genius Balcony Wall Decor Ideas for Budget Friendly Looks
Tiny Balcony Coffee Corner DIY Setup
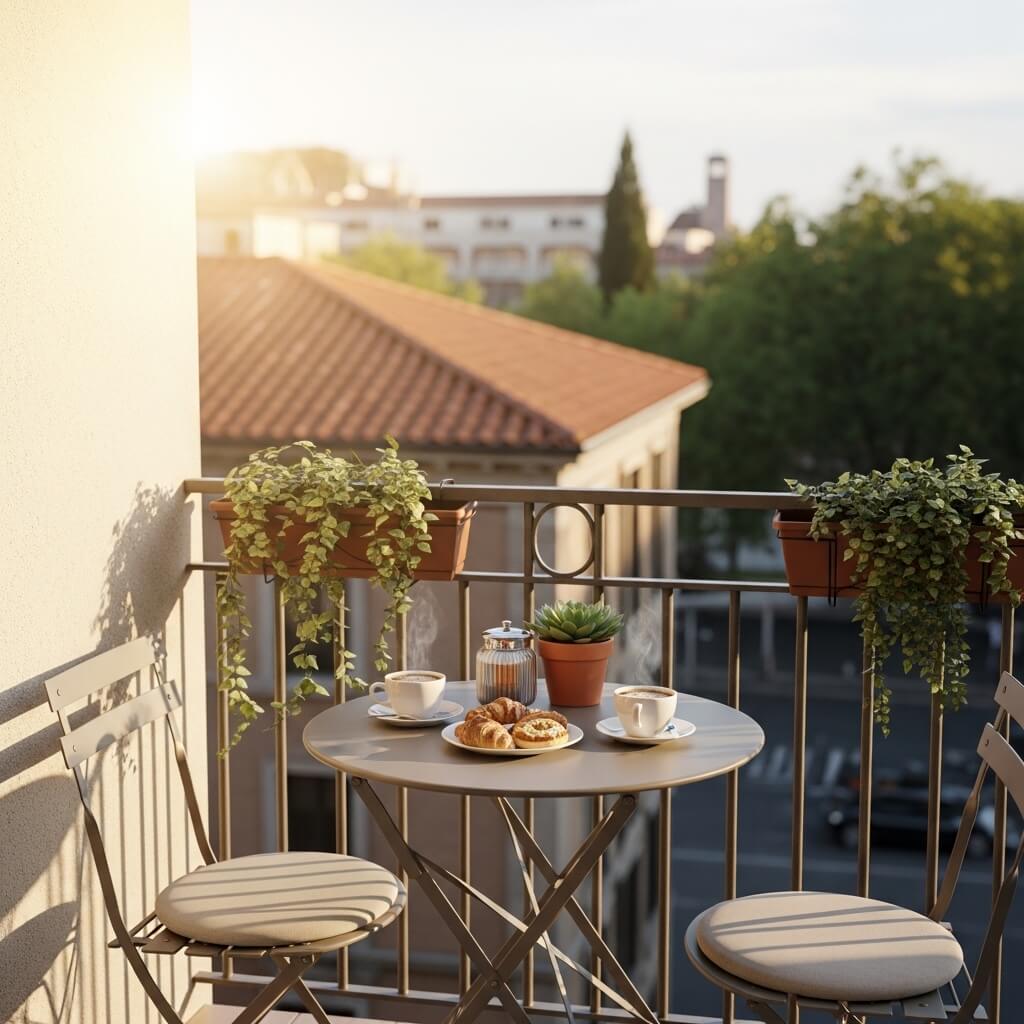
Last but definitely not least, let me introduce you to the concept that changed my mornings: the balcony coffee corner. If your balcony is tiny (and I mean TINY), you can still create a dedicated spot for your morning coffee ritual.
My balcony is seriously small – like, two people standing out there feels crowded. But I carved out the tiniest coffee corner, and now I start every day outside with my coffee instead of scrolling my phone in bed. Game changer.
The Minimal Setup
A coffee corner needs very little space. Here’s literally all you need:
- One chair or stool: Even a small folding chair works
- Small surface: For your coffee cup
- Optional plant or two: Because mornings are nicer with greenery
I use a folding bistro chair ($15 from a discount store) and a tiny folding table I found curbside (free, just needed cleaning). The whole setup folds flat against the wall when I’m not using it, which means it doesn’t eat up my already limited space.
Maximizing Tiny Spaces
When you’re working with truly minimal square footage, every inch counts. Here’s what I learned:
Go vertical: Hang plants above, mount a shelf for your coffee supplies, use wall hooks for your favorite mug. The walls are valuable real estate.
Folding everything: Folding furniture changes the game for tiny balconies. I can fold up my coffee corner when I need the space for other things, then set it back up in seconds.
Dual-purpose items: My “side table” is also a plant stand. My storage basket is also my seat cushion storage. Everything does double duty.
Creating the Morning Vibe
The magic is in making this space feel special enough that you’ll actually use it. I added:
- One good plant: A small potted herb (basil or mint) that I can literally pick and put in my water
- A small wall shelf: Holds my favorite mug when I’m not using it
- One string of fairy lights: Just a short strand wrapped around the railing
- A small outdoor rug: Defines the space (even if it’s only 2×3 feet)
Some mornings I literally stand at my balcony railing with my coffee because sitting takes up too much room when I’ve got laundry drying out there (glamorous, I know). But even standing outside with coffee and plants beats sitting inside staring at my phone.
The best part? This setup cost me less than $30 total (not counting the coffee itself, because that’s a necessary life expense). The chair was my only real purchase. Everything else was found, made, or repurposed.
Your balcony doesn’t need to be big to be useful. It just needs to be intentional. Even a tiny coffee corner gives you a reason to step outside, breathe actual outdoor air, and start your day with a moment of peace. Worth every penny of that $30 investment.
Wrapping It All Up
So there you have it – ten different ways to transform your balcony without requiring a second mortgage or a design degree. Whether you go full Moroccan color explosion, minimal green retreat, or somewhere in between, the point is making that space actually usable.
I’ve tried most of these styles (my balcony has had more makeovers than I’d like to admit), and here’s what I learned: the best balcony design is the one you’ll actually use. Doesn’t matter if it’s Instagram-perfect. What matters is whether it makes you want to spend time out there.
Start small. Pick one idea that speaks to you and run with it. You don’t need to transform the whole space at once. I built my current balcony setup over months, adding pieces as I found deals or got inspired by new ideas. That’s actually better than doing everything at once because you figure out what works for your space and lifestyle.
The budget-friendly approach means you can experiment without stress. Hate the boho vibe after trying it? You’re out maybe $30, not $300. Want to switch from minimalist to Moroccan? Go for it. The investment is low enough that changing your mind doesn’t hurt.
Remember, your balcony is YOURS. It doesn’t need to look like anyone else’s. Mix these ideas, adapt them, make them your own. Use the colors you love, the plants that make you happy, the seating that fits your body. The “rules” of design are really just suggestions, and breaking them often leads to the most interesting spaces.
Now stop reading about balcony makeovers and actually start making over your balcony. Future you (the one sipping coffee surrounded by plants and fairy lights) will thank you. Trust me on this one.
Your sad concrete slab is about to have the best glow-up of its life.