10 Creative Floating Shelves Ideas for Blank Walls
- Floating Shelves
 Ben
Ben- 0
- 32 minutes read
Your walls are basically just standing there doing nothing, aren’t they? Mine were too until I discovered the magic of floating shelves.
I used to think they were just trendy Instagram nonsense until I installed my first set and realized they’re actually genius space-savers disguised as home decor.
Let me tell you about my floating shelf journey. It started when I moved into a tiny apartment where floor space was more precious than parking spots in Manhattan.
I had books stacked on the floor, plants crowding my windowsills, and zero storage solutions that didn’t make my place look like a college dorm room.
Then my sister suggested floating shelves, and honestly, I thought she was just trying to get me to jump on another Pinterest bandwagon.
Fast forward two years, and I’ve installed floating shelves in every room of my house. They’ve solved storage problems I didn’t even know I had, turned blank walls into functional art, and made my small spaces feel way bigger.
Whether you’re dealing with a cramped apartment or just want to add some style to your walls, these 10 floating shelf ideas will transform how you think about storage and decor.
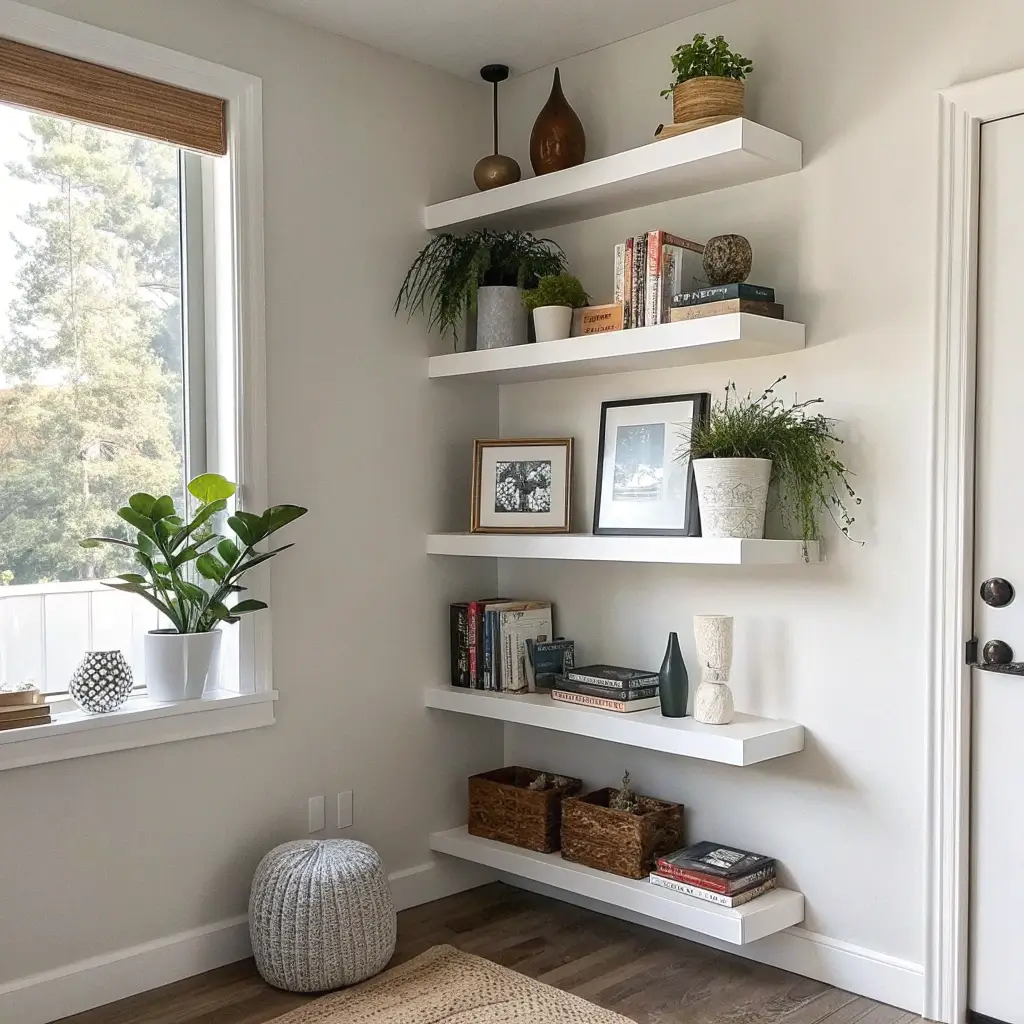
1. Minimalist Floating Shelves for Small Spaces
Small spaces need big solutions, and floating shelves deliver without taking up precious floor real estate. I learned this the hard way after trying to cram a bookshelf into my 400-square-foot studio and realizing I’d created an obstacle course instead of a living space.
Minimalist floating shelves work because they provide storage without visual clutter. You get the function without the bulk, which is basically the holy grail of small space living. My minimalist shelves hold twice as much as my old bookcase while making the room feel more open.
Choosing the Right Size and Placement
Start with thin shelves – we’re talking 1-2 inches thick maximum. Anything chunkier overwhelms small spaces and defeats the purpose. I made this mistake with my first set, buying these massive 4-inch shelves that made my wall look like it was wearing shoulder pads.
Place them at eye level or slightly above for maximum impact. I have three shelves running horizontally across my living room wall, spaced about 18 inches apart. They create a clean line that draws the eye across the room instead of making it feel cramped.
Keep the styling simple – a few books, one small plant, maybe a picture frame. The goal is function with a whisper of personality, not a shout. My shelves hold my everyday essentials while looking intentional rather than cluttered.
Color and Material Choices
White or light wood works best in small spaces because they don’t compete for attention. I went with white shelves against white walls, and they practically disappear while still providing storage. It’s like having invisible organization.
Avoid dark colors unless your walls are also dark. Black shelves on white walls create harsh lines that make small spaces feel even smaller. Save the drama for rooms where you have space to spare.
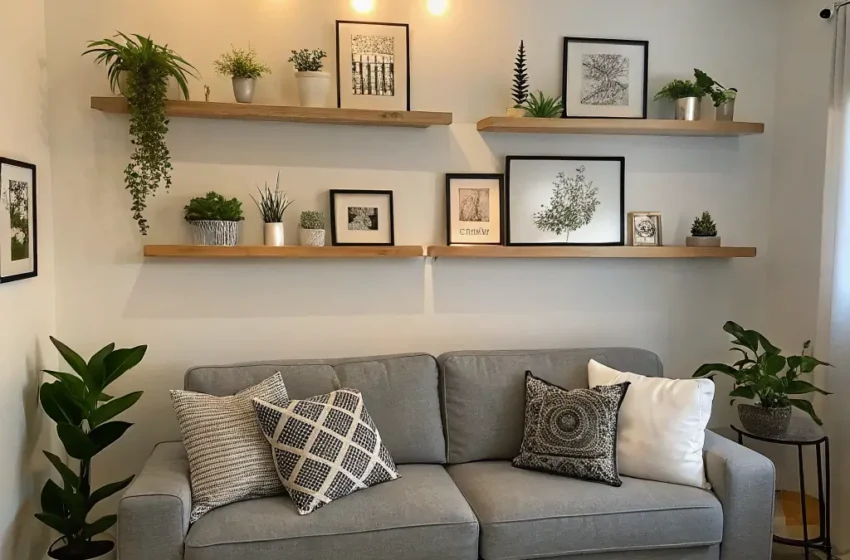
2. Cozy Living Room Floating Shelf Decor
Living rooms need personality, and floating shelves deliver it without eating up floor space. I transformed my boring living room wall into a cozy focal point with three floating shelves styled with books, plants, and personal treasures.
The key to cozy floating shelf decor is mixing textures and heights. You want visual interest without chaos, which sounds easier than it actually is. I spent weeks rearranging my shelf styling until I found the perfect balance.
Creating Visual Balance
Follow the rule of threes – group items in odd numbers for the most pleasing arrangement. I learned this from a design blog, and it actually works. Three books, one plant, five small objects – odd numbers create natural-looking groupings.
Vary the heights of your objects. Stack some books horizontally, place others vertically, add a tall vase next to a short candle. The variation keeps your eye interested and prevents that “everything’s the same height” museum look.
Leave some breathing room. Empty space is just as important as filled space. My shelves are about 60% full, which gives everything room to shine without looking sparse.
Styling Tips That Actually Work
Start with books as your foundation – they’re the perfect backdrop for other objects. I use books to create different height levels, then layer smaller items in front. It’s like creating a stage set for your favorite things.
Add one living element per shelf. Plants bring life and color, but don’t go overboard. One small succulent or trailing pothos per shelf is plenty. I learned this after turning my shelves into a jungle that required daily maintenance.
Include something personal on each shelf. A small photo, a souvenir from a trip, a piece of art you love. These personal touches make your shelves feel curated rather than styled by a stranger.
3. Modern Kitchen Floating Shelf Styling
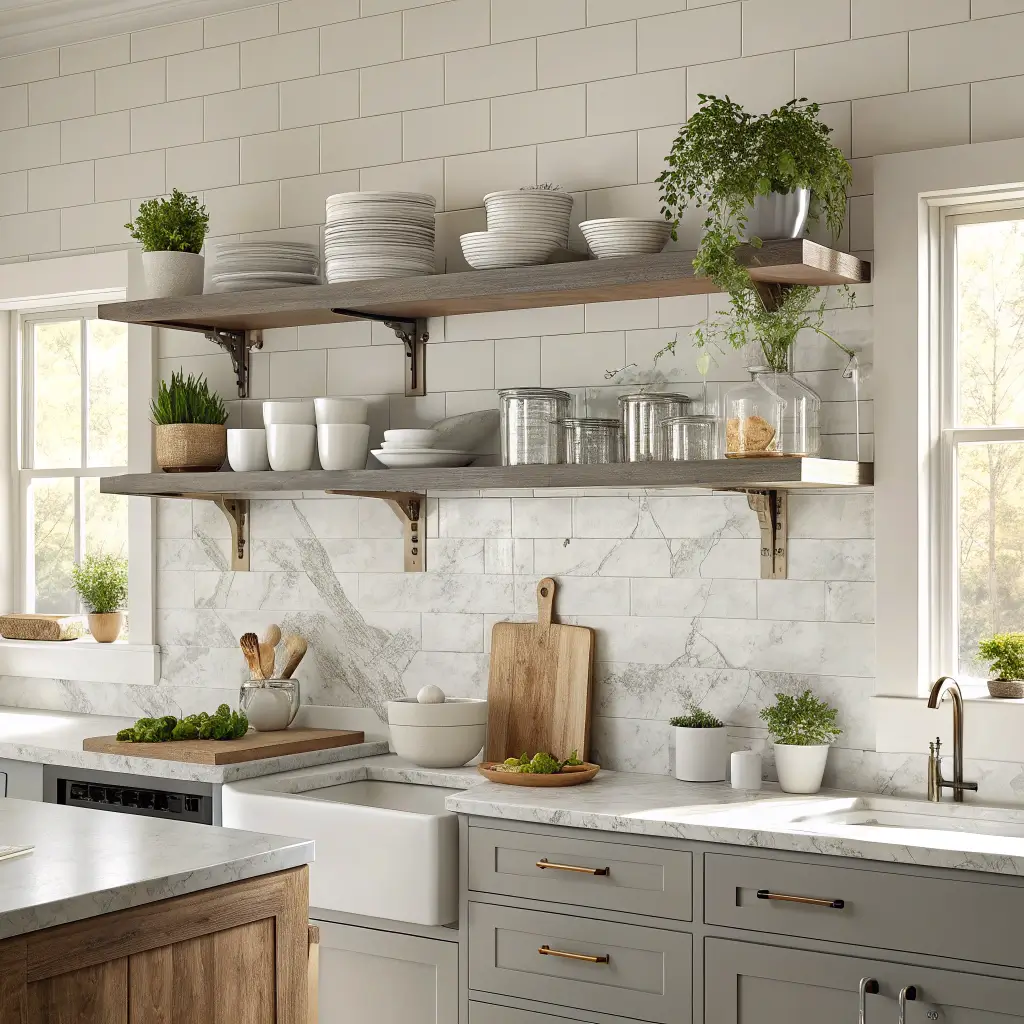
Kitchen floating shelves are controversial – some people love them, others think they’re dust magnets waiting to happen. I’m firmly in the love camp because they’ve solved my small kitchen storage crisis while looking way better than upper cabinets.
The trick to kitchen floating shelves is choosing what to display carefully. Not everything belongs on open shelving, and learning this distinction will save you from a cluttered mess.
What to Display and What to Hide
Beautiful dishes earn shelf space. My white ceramic bowls and vintage glassware live on my floating shelves because they’re pretty enough to be decor. Ugly but functional items stay hidden in cabinets.
Everyday items you actually use work well on lower shelves. I keep my coffee mugs and daily plates on the bottom shelf because I grab them constantly. Pretty but rarely used items go higher up.
Avoid anything greasy or messy near the stove. I learned this after my beautiful olive oil bottles got coated in cooking splatter. Now they live on the far wall, safely away from the action.
Maintenance and Organization
Group similar items together for a cohesive look. All my white dishes live on one shelf, glassware on another. It looks intentional and makes finding things easier.
Invest in matching containers for bulk items. Mason jars aren’t just trendy – they actually keep things fresh while looking good. I store pasta, rice, and coffee beans in matching jars, and they’re both functional and decorative.
Clean them weekly. Yes, open shelving requires more maintenance than closed cabinets. But five minutes of weekly dusting beats the claustrophobic feeling of upper cabinets any day.
Also Read: 10 Chic Floating Shelves Bathroom Ideas for Elegant Spaces
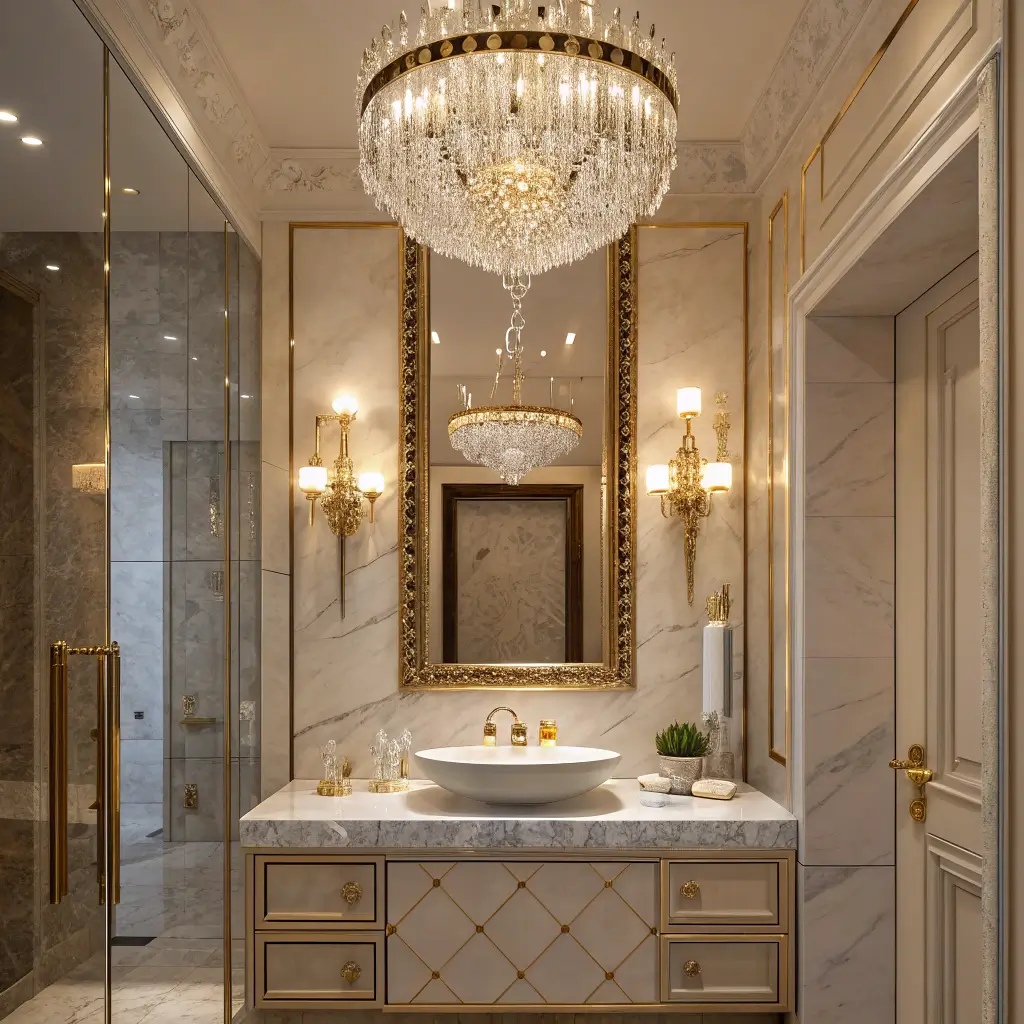
4. Bathroom Floating Shelves for Extra Storage

Bathroom storage is always a challenge, especially in small bathrooms where every inch counts. Floating shelves have saved my sanity by providing storage without taking up floor space or making the room feel cramped.
I installed floating shelves above my toilet and beside my mirror, and suddenly I had places for all those bathroom essentials that used to clutter my counter. Game changer.
Moisture-Resistant Materials
Choose materials that can handle humidity. I learned this the hard way when my first wooden shelves warped after six months of steamy showers. Now I stick with sealed wood, glass, or metal.
Bamboo works surprisingly well in bathrooms because it’s naturally moisture-resistant. My bamboo shelves have survived two years of daily showers without any warping or damage.
Avoid particle board or MDF unless it’s specifically rated for bathrooms. These materials absorb moisture and fall apart faster than you can say “bathroom renovation.”
Smart Storage Solutions
Use baskets or containers to corral small items. Loose toiletries on open shelves look messy, but the same items in a pretty basket look intentional. I use woven baskets for everything from hair ties to extra toilet paper.
Install shelves at different heights for different purposes. High shelves hold items you don’t need daily, like extra towels. Lower shelves keep everyday essentials within easy reach.
Consider corner shelves for awkward spaces. That weird corner by your shower? Perfect spot for a corner floating shelf to hold shampoo and soap.
5. Corner Floating Shelves That Save Space
Corners are the forgotten real estate of most rooms, but corner floating shelves turn these dead zones into useful storage. I have corner shelves in three rooms now, and they’ve added storage without taking up any usable floor space.
Corner shelves work especially well in small rooms where every square inch matters. They utilize space that would otherwise go unused while adding visual interest to boring corners.
Installation Considerations
Corner shelves require different mounting than straight shelves. You’ll need brackets that can handle the unique stress distribution of corner placement. I learned this after my first corner shelf came crashing down with all my plants.
Measure your corner angle before buying. Not all corners are perfect 90-degree angles, especially in older homes. My corner was slightly off, and I had to adjust my shelf accordingly.
Consider the room’s traffic flow. Corner shelves shouldn’t stick out into walkways. I placed mine high enough that even my tall friends don’t bump their heads.
Styling Corner Shelves
Use the corner shelf as a focal point. Since it’s in a corner, it naturally draws attention. I style mine with my prettiest objects – a trailing plant, a small sculpture, and a few favorite books.
Keep the styling simple since corner shelves are smaller than wall shelves. Too many items make them look cluttered and unstable. I stick to 3-5 items maximum per shelf.
Consider the view from multiple angles. Corner shelves are visible from different parts of the room, so style them to look good from various viewpoints.
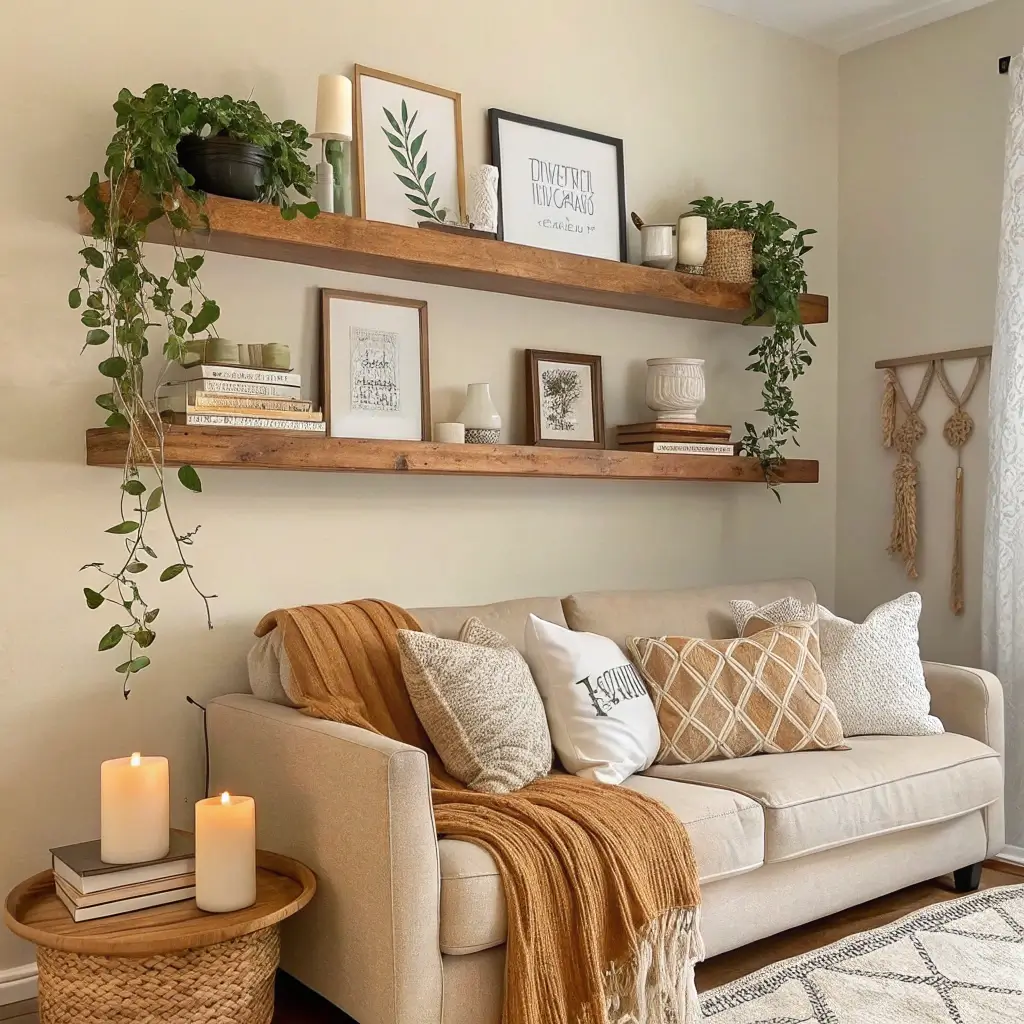
6. Rustic Wood Floating Shelves Ideas
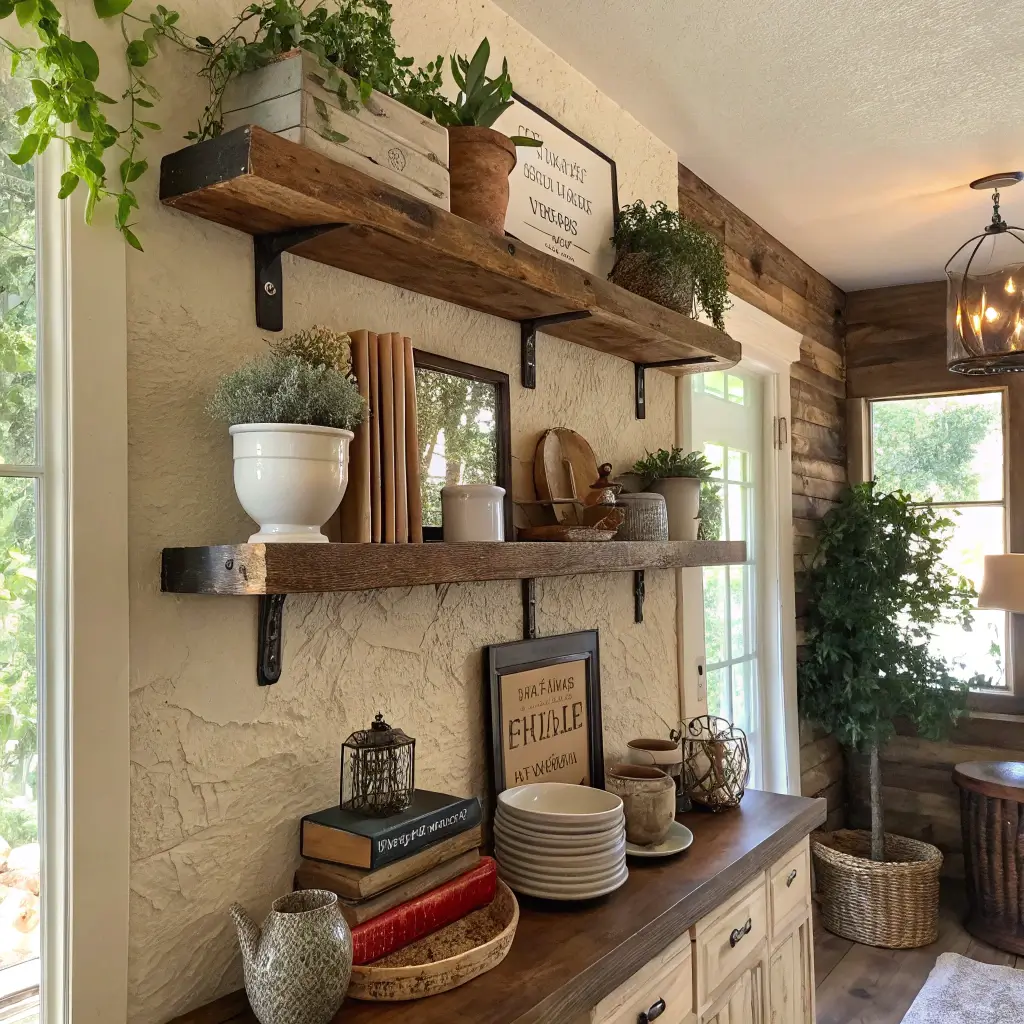
Rustic wood floating shelves bring warmth and character to any room. I installed reclaimed wood shelves in my living room, and they instantly made the space feel cozier and more personal.
The beauty of rustic wood is that imperfections add character. That knot in the wood or slight color variation? It’s not a flaw, it’s personality. My shelves have nail holes and saw marks that tell a story.
Choosing the Right Wood
Reclaimed wood has the best character but costs more. I found mine at a local salvage yard for half the price of new reclaimed wood from a fancy store. Sometimes the best deals require a little hunting.
Pine and cedar work well for DIY rustic shelves. They’re affordable, easy to work with, and develop a beautiful patina over time. My cedar shelves smell amazing every time the room gets humid.
Avoid perfectly smooth, uniform wood if you want true rustic character. The whole point is embracing the natural imperfections that make each piece unique.
Finishing and Styling
Minimal finishing preserves the rustic character. I used a clear sealant to protect the wood without hiding its natural beauty. Heavy stains or paint defeat the purpose of rustic wood.
Style with natural and vintage elements. My rustic shelves hold vintage books, pottery, and plants. Modern plastic items look out of place against the natural wood.
Mix different wood tones for added interest. My shelves are slightly different shades of brown, and the variation adds depth to the wall display.
Also Read: 12 Modern Coffee Bar with Floating Shelves Ideas for Apartments
7. Floating Shelves Above Sofa Wall Ideas
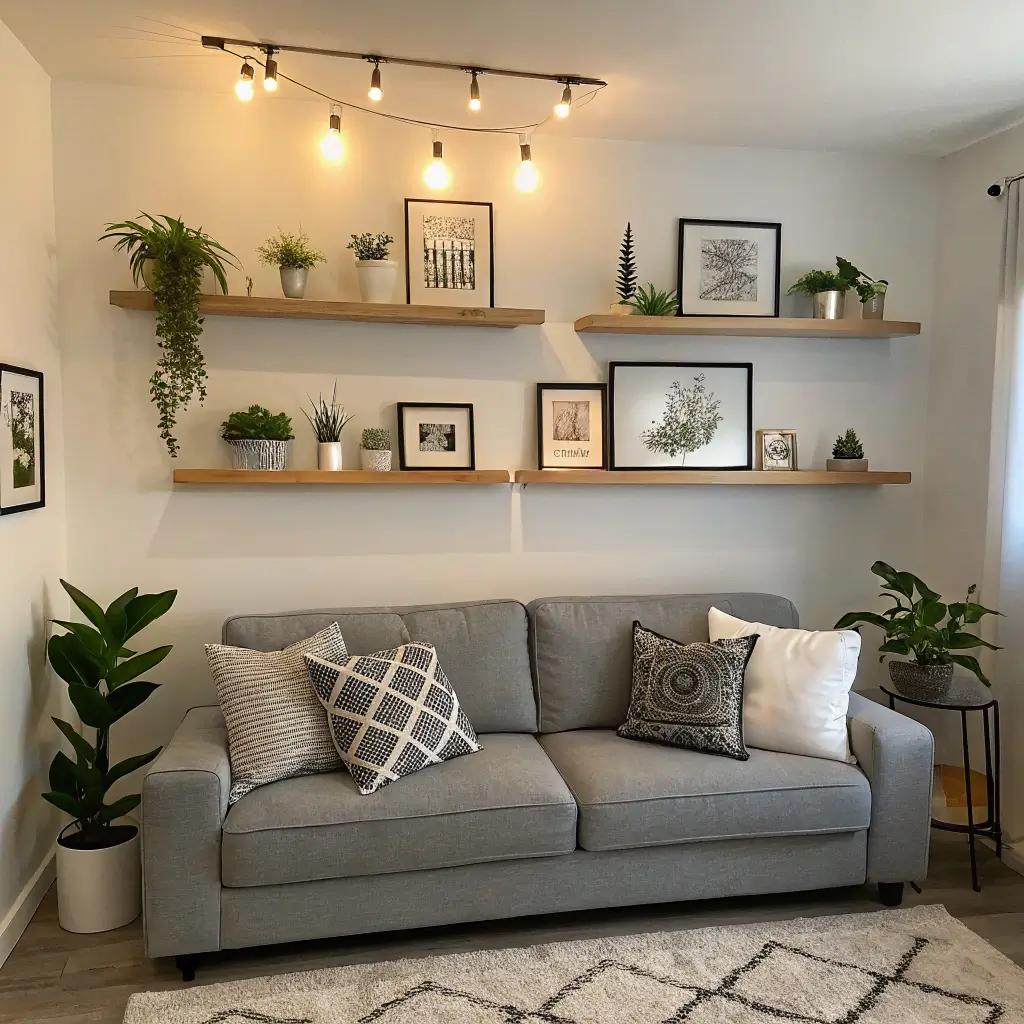
The wall above your sofa is prime real estate for floating shelves. I installed three shelves above my couch, and they’ve become the focal point of my living room while providing storage for books and decor.
This placement works because it’s at the perfect height for both function and visual impact. You can reach the lower shelves while sitting on the sofa, and the arrangement creates a cohesive look with your seating area.
Planning the Layout
Measure your sofa width and make your shelf arrangement slightly narrower. I made my shelves about 6 inches shorter than my sofa on each side, which creates a balanced, intentional look.
Space shelves 12-18 inches apart vertically. Closer spacing looks cramped, wider spacing looks disconnected. I went with 15 inches between my shelves, and it’s perfect.
Consider your ceiling height. High ceilings can handle more shelves, while standard 8-foot ceilings look best with 2-3 shelves maximum.
Safety and Stability
Use heavy-duty brackets rated for more weight than you think you’ll need. These shelves are above where people sit, so safety is crucial. I used brackets rated for 50 pounds even though my shelves hold maybe 20 pounds of stuff.
Anchor into wall studs whenever possible. Drywall anchors work for light loads, but studs provide the most secure mounting. I used a stud finder and marked every stud before installing.
Test the installation before loading the shelves. I hung on my empty shelves to make sure they were solid before adding books and decor.
8. Bedroom Floating Shelves for Nightstand Alternatives

Traditional nightstands eat up floor space and can make small bedrooms feel cramped. Floating shelves beside the bed provide the same function while keeping the floor clear and the room feeling open.
I replaced my bulky nightstands with floating shelves, and my bedroom instantly felt bigger. Plus, I can fit my vacuum under the bed now, which is a surprisingly big win.
Placement and Height
Mount shelves at mattress height or slightly above for easy access. I can reach my shelf while lying in bed, which is perfect for my phone, water glass, and current book.
Leave enough space between the shelf and bed for making the bed. I learned this the hard way when I mounted my shelf too close and couldn’t tuck in my sheets properly.
Consider both sides of the bed if you share it. Matching shelves create symmetry, but they don’t have to be identical. My partner’s shelf holds different items than mine, but they’re the same size and height.
Nighttime Essentials Storage
Keep the shelf minimal – you don’t need much within arm’s reach of your bed. I keep my phone charger, a small lamp, and whatever book I’m reading. Everything else lives elsewhere.
Add a small basket or tray to corral tiny items. Loose change, hair ties, and other small stuff can make floating shelves look messy. A small container keeps everything tidy.
Consider under-shelf lighting for reading. I installed a small LED strip under my shelf, and it provides perfect reading light without disturbing my partner.
9. Floating Shelves with Plants Aesthetic
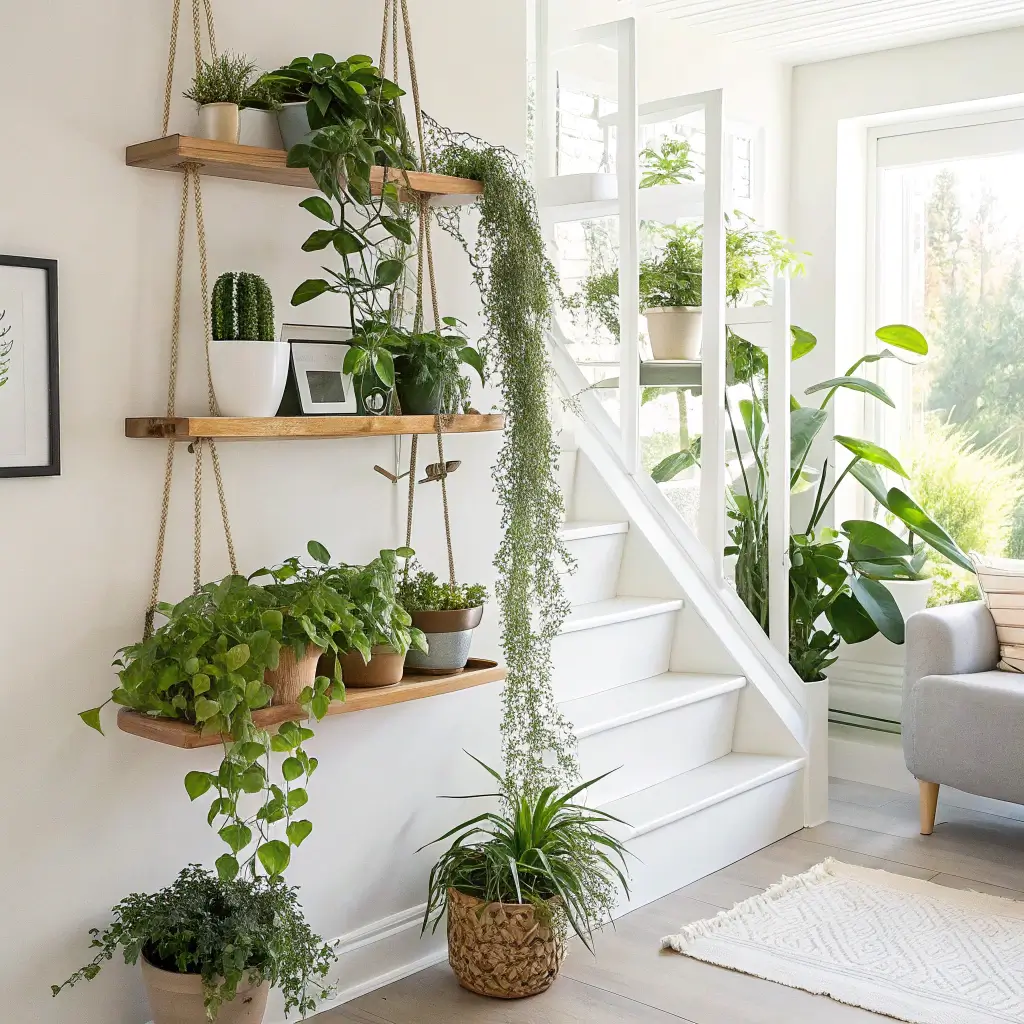
Plants and floating shelves are a match made in design heaven. I’ve turned my living room wall into a vertical garden using floating shelves, and it’s become the most photographed spot in my house.
The key to the plant shelf aesthetic is choosing the right plants and arranging them thoughtfully. Not every plant works on a shelf, and learning which ones thrive in this setup will save you from plant casualties.
Best Plants for Floating Shelves
Trailing plants create the most dramatic effect. My pothos cascades down from the top shelf, creating a living curtain that’s absolutely gorgeous. Philodendrons and string of hearts work similarly well.
Small upright plants work on lower shelves. I have snake plants, small fiddle leaf figs, and various succulents on my lower shelves. They add greenery without blocking the view of trailing plants above.
Consider light requirements when placing plants. My shelves get different amounts of light depending on their position, so I matched plants to their ideal spots rather than forcing them into pretty arrangements.
Maintenance and Care
Water carefully to avoid dripping on lower shelves. I learned this after my top shelf plant dripped onto my books below. Now I use saucers under every plant and water them in place rather than moving them.
Rotate plants occasionally for even growth. Plants naturally grow toward light, so rotating them prevents lopsided growth. I rotate mine every few weeks when I water.
Plan for growth. That tiny pothos will eventually become a trailing monster. I’ve had to rearrange my shelves twice as my plants outgrew their original spots.
Also Read: 10 Creative Floating Vanity Bathroom Ideas for Luxury Bathrooms
10. Floating Shelves for Home Office Organization

Home office organization is crucial for productivity, and floating shelves provide storage without taking up valuable desk space. I installed shelves above my desk, and they’ve transformed my workspace from chaotic to organized.
The beauty of office floating shelves is that they keep supplies visible and accessible while maintaining a clean desk surface. No more digging through drawers to find what you need.
Office Supply Organization
Group similar items together in containers. I use small baskets for pens, paper clips, and other tiny supplies. Everything has a designated spot, which makes finding things effortless.
Keep frequently used items on lower shelves. My daily supplies live on the bottom shelf where I can grab them without standing up. Less frequently used items go higher.
Use vertical file organizers for papers and documents. I have magazine holders on my shelves for different project files. They keep papers organized and easily accessible.
Creating an Inspiring Workspace
Mix functional items with inspiring decor. My office shelves hold supplies, but also a small plant, a motivational quote, and a photo that makes me smile. Work spaces should inspire, not just function.
Keep it minimal to avoid distraction. Too much visual clutter on office shelves can be distracting. I stick to essentials plus one or two decorative items per shelf.
Consider your video call background. If you take video calls from your desk, style your shelves to look professional on camera. My shelves are visible in my video calls, so I keep them neat and purposeful.
Making Floating Shelves Work for You
After installing floating shelves throughout my home, here’s what I’ve learned: they’re not just trendy decor – they’re legitimate storage solutions that can transform how you use your space.
The key is choosing the right style, size, and placement for your specific needs.
Start small if you’re unsure. I began with one shelf in my living room and gradually added more as I saw how useful they were. You don’t need to commit to a whole wall of shelves right away.
Invest in quality brackets and proper installation. Cheap brackets and poor installation will lead to sagging shelves or worse – shelves falling off the wall.
I learned this lesson with my first DIY attempt and now always use heavy-duty hardware.


