10 Easy Stairs Makeover Ideas for a Stylish Transformation
- Stairs Design
 Ben
Ben- 0
- 50 minutes read
You know that feeling when you walk past your stairs every single day and they just… exist? Yeah, I’m talking about those boring, uninspiring steps that scream “builder’s basic” from a mile away. Your stairs don’t have to be the forgotten stepchild of your home (pun absolutely intended).
Look, I get it. You’ve got walls to paint, rooms to furnish, and a million other projects screaming for your attention. But here’s the thing—your staircase is basically a vertical canvas just begging for some love. And the best part? You don’t need to take out a second mortgage or possess superhero-level DIY skills to transform them into something that makes your guests stop and stare.
I’ve spent way too much time obsessing over stair makeovers (my browser history can confirm this), and I’m here to share 10 game-changing ideas that’ll take your stairs from drab to fab. Whether you’re a minimalist at heart, working with a shoestring budget, or ready to go all-out luxury, I’ve got you covered. Let’s transform those steps into something you’ll actually want to Instagram.
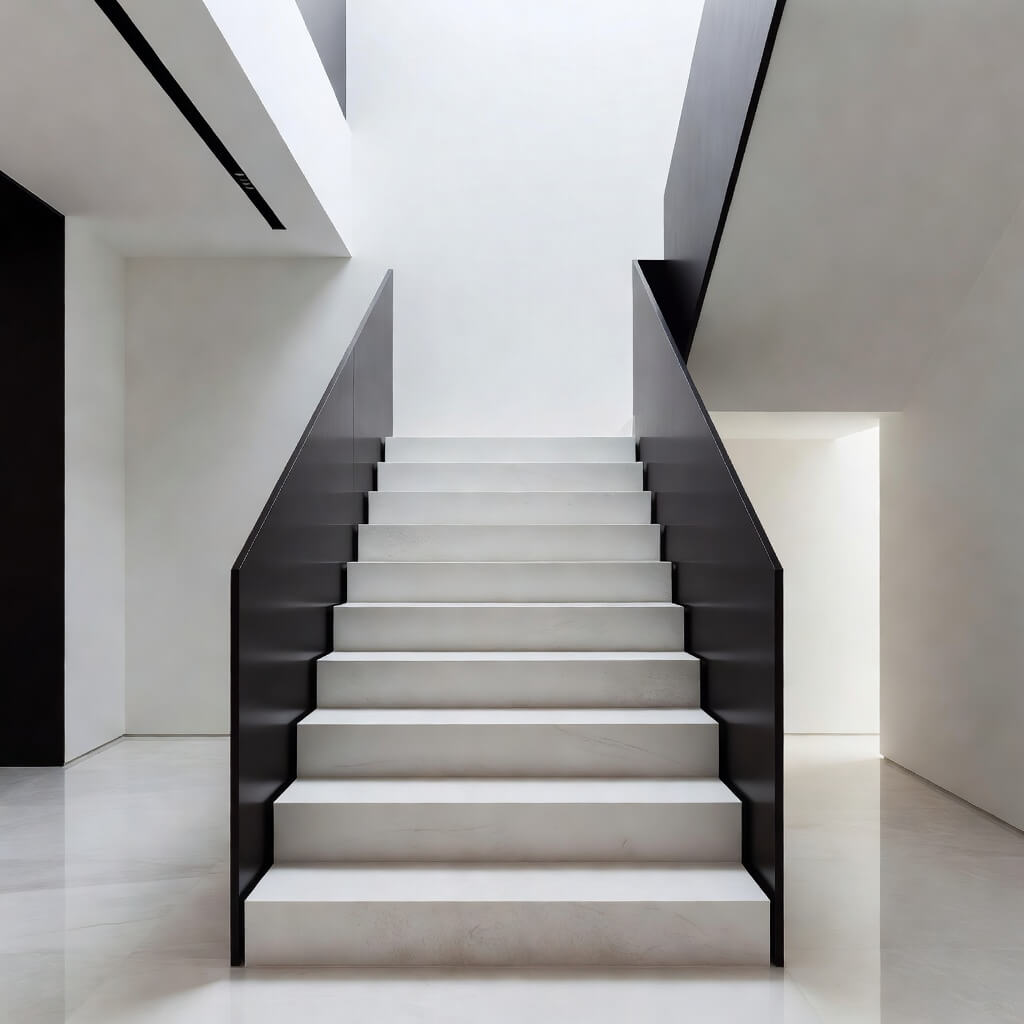
Modern Minimalist Staircase Makeover
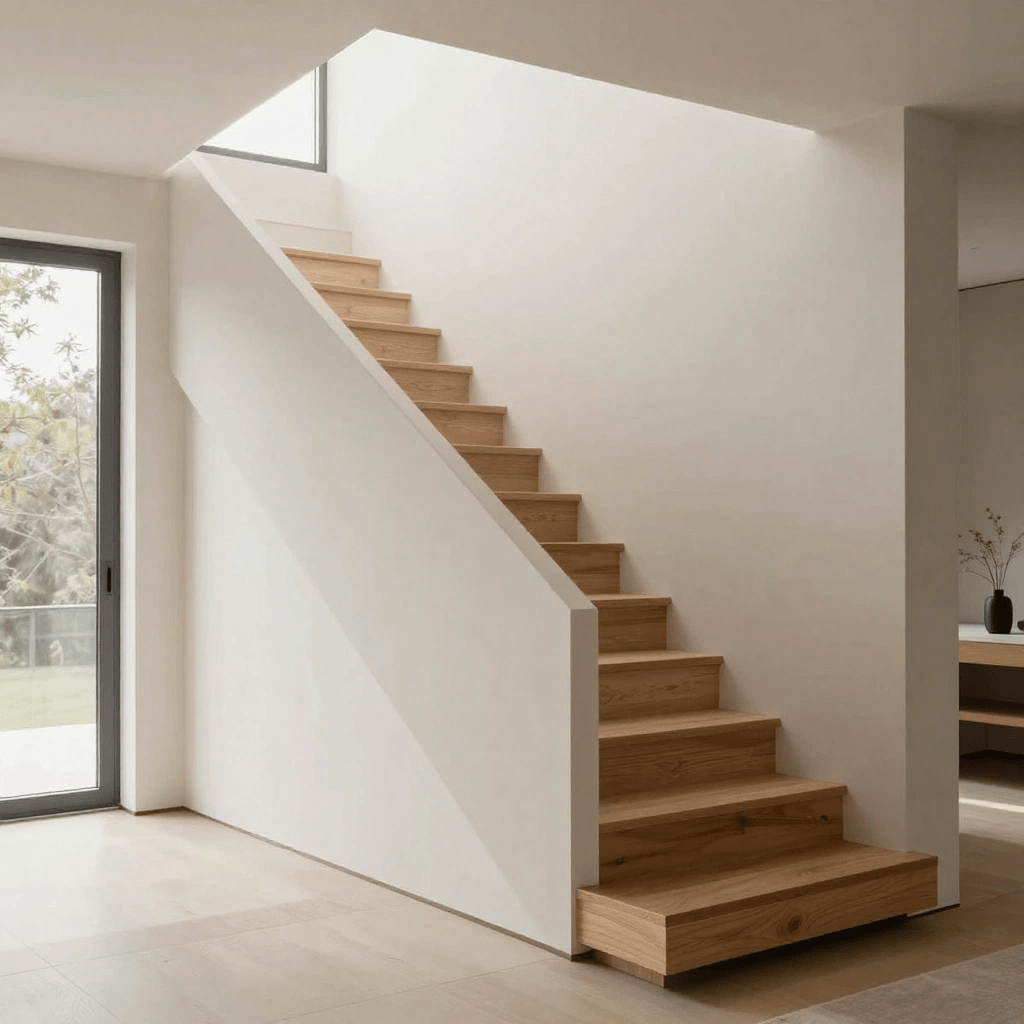
Ever notice how the cleanest, most zen-like homes always have these gorgeous minimalist staircases that look like they belong in an architecture magazine? That’s no accident.
The modern minimalist approach strips everything down to the essentials. We’re talking clean lines, neutral colors, and zero clutter. I fell down this rabbit hole last year when I helped my sister redo her entryway stairs, and honestly, the transformation blew my mind.
The Core Elements
Here’s what makes a minimalist staircase actually work:
- Monochromatic color palette: Think whites, grays, blacks, or soft beiges
- Sleek materials: Glass railings, metal handrails, or simple wood without ornate details
- Hidden storage: Built-in drawers under steps keep clutter invisible
- Open risers: These create an airy, spacious feel that screams modern
Start by painting your stairs in a single, crisp color. White is classic, but charcoal gray or even a soft greige can look absolutely stunning. Remove any outdated carpet runners or busy patterns—they’re the enemy of minimalism.
The railing is where you can really make a statement. Swap out chunky wooden balusters for sleek cable railings or frameless glass panels. I know glass sounds intimidating (and expensive), but hear me out—you can find budget-friendly tempered glass options that don’t require selling your kidney.
The Details That Matter
One trick I learned the hard way? Lighting matters MORE than you think. Install recessed LED strips along the wall or under each step for that subtle, modern glow. It’s functional and looks ridiculously expensive without actually being so.
Keep your walls bare or add one piece of minimalist art. The staircase itself becomes the design feature, and you don’t want to compete with it. Trust me, less is genuinely more here.
Budget-Friendly DIY Stair Riser Upgrade

Okay, real talk—not everyone has a renovation budget that could fund a small country. And you know what? You absolutely don’t need one.
The stair riser (that vertical part between each step) is your secret weapon for a major visual impact without the major price tag. I’ve done this myself multiple times, and each project cost me less than a nice dinner out. No joke.
Paint is Your Best Friend
Grab some quality paint and painter’s tape, and you’re already halfway there. You can:
- Paint each riser a different color for a rainbow effect (bold, but fun in a kid’s play area)
- Create an ombre effect from dark to light as you climb
- Use stencils to add patterns like Moroccan tiles, geometric shapes, or even quotes
- Paint them all black for instant drama against light treads
I once painted my risers with chalkboard paint, and my nieces went absolutely crazy for it. Yeah, you have to clean it occasionally, but the entertainment value? Priceless.
Wallpaper Remnants and Fabric
Hit up your local home improvement store’s clearance section or browse online for wallpaper remnants. You need way less than you think—just measure your riser height and width, and calculate accordingly.
Cut the wallpaper to size, use wallpaper paste or even heavy-duty double-sided tape, and smooth it on. Boom. Instant personality. I found this gorgeous vintage floral wallpaper on clearance for like $10, and it covered all thirteen of my risers with some left over.
Fabric works too, FYI 🙂 Use fabric stiffener or Mod Podge to adhere it. Choose something durable that can handle the inevitable scuffs and bumps.
Contact Paper Magic
This is the ultimate renter-friendly option. Peel-and-stick contact paper comes in every pattern imaginable—marble, wood grain, geometric, you name it. It’s temporary, affordable, and requires zero commitment. I’ve used this in three different apartments, and each time I left, I peeled it right off with no damage.
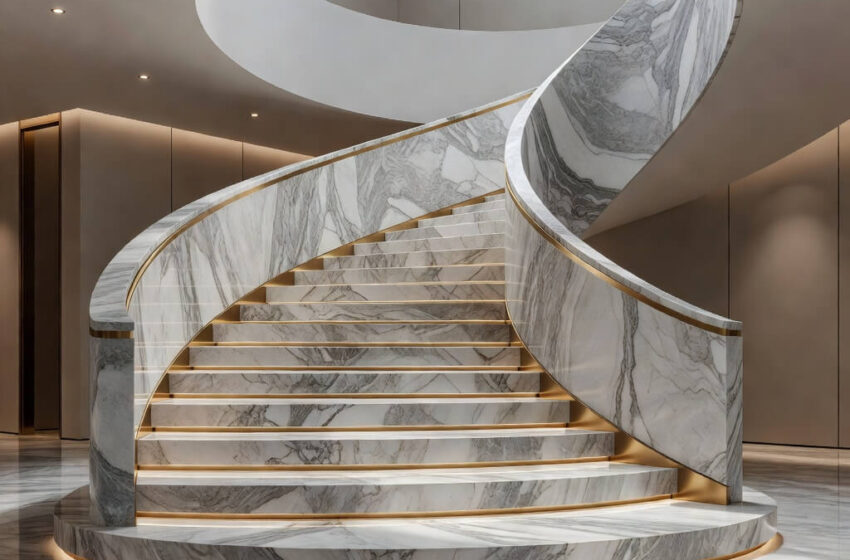
Luxury Marble Look Stair Transformation
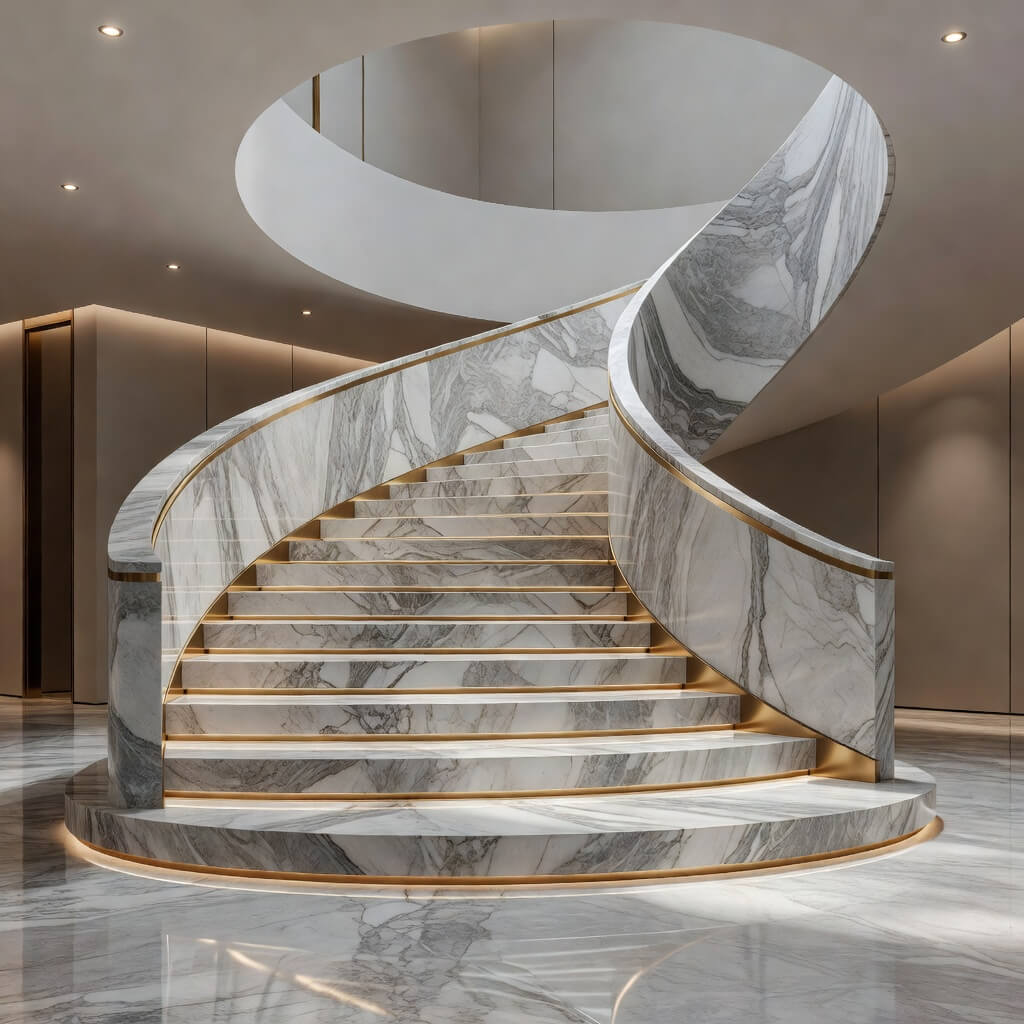
Want to feel like you’re ascending to your own private palace every time you go upstairs? The marble look delivers that high-end vibe without requiring you to actually install real marble (because, let’s be honest, real marble costs more than most cars).
I’m obsessed with this trend. The veining, the elegance, the way it catches light—it’s chef’s kiss.
Marble-Look Tile
Porcelain or ceramic tiles that mimic marble have come SO far in recent years. Seriously, some of them fool even the pros at first glance. You can:
- Install marble-look tiles on your treads for a clean, luxe surface
- Apply them to the risers for a statement wall effect
- Go full-glam and do both (my personal favorite)
The installation requires some skill, I won’t lie. You’ll need tile adhesive, spacers, a wet saw, and patience. But if you can follow YouTube tutorials and take your time, it’s totally doable. I helped my mom do hers over a long weekend, and now her stairs look like something out of a boutique hotel.
Marble Vinyl and Contact Paper
Not ready to commit to tile? Marble-patterned vinyl planks or contact paper give you the look for a fraction of the cost and effort. The quality has seriously improved—gone are the days of obviously fake, plasticky finishes.
Apply these to your risers (easier than treads since they don’t get foot traffic), and pair them with solid painted or stained treads. The contrast between warm wood and cool marble creates this sophisticated, timeless aesthetic.
The Finishing Touches
Add a sleek metal handrail—brushed gold or matte black works beautifully with marble. Keep everything else simple so the marble pattern stays the star of the show. Maybe add a crystal chandelier if you’re really going for that luxury hotel vibe? (Okay, maybe that’s just my fantasy, but a girl can dream.)
Also Read: 10 Simple Basement Stairs Ideas on a Budget Makeover
Rustic Wooden Farmhouse Stair Revamp
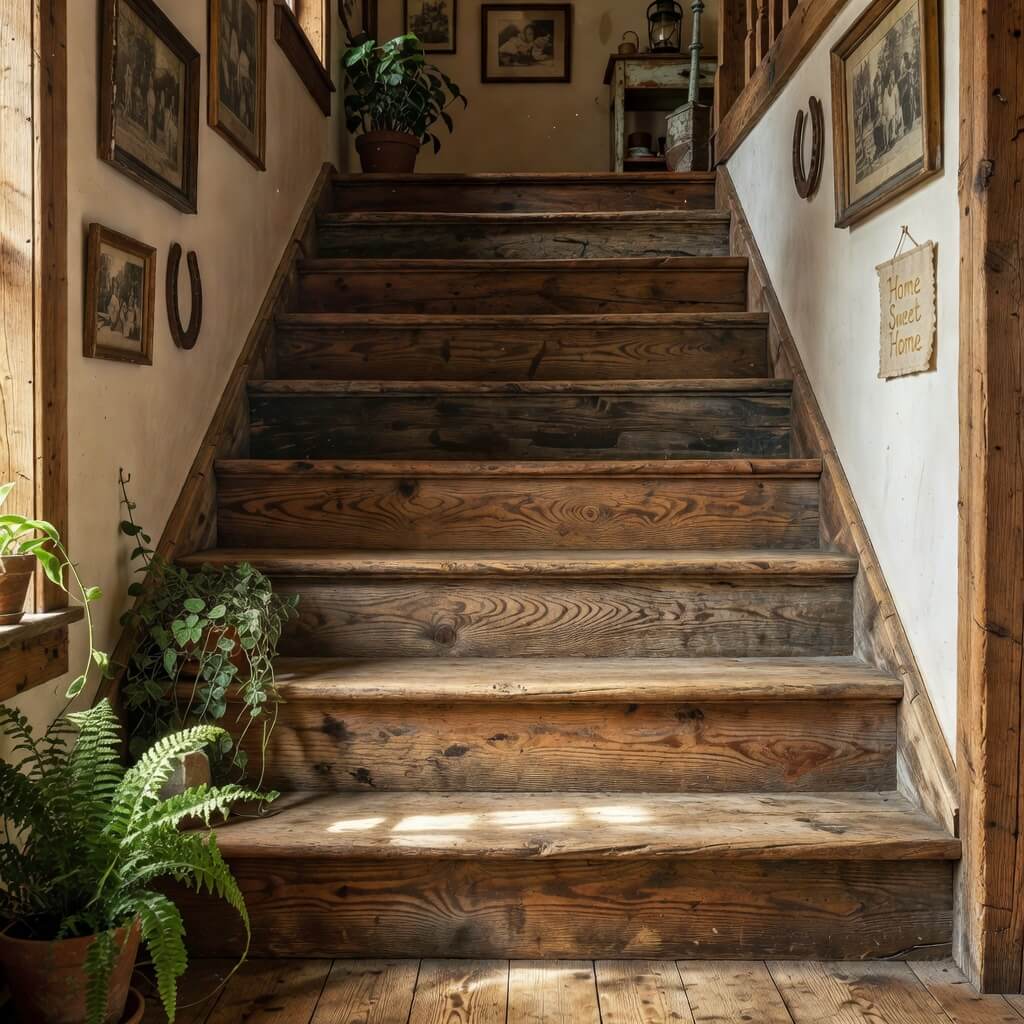
If you’re more “cozy cottage” than “modern mansion,” let me introduce you to the rustic farmhouse stair makeover. This style is like a warm hug in staircase form.
I grew up in an old farmhouse, so this aesthetic hits different for me. There’s something about reclaimed wood, distressed finishes, and that lived-in charm that just feels like home.
Reclaimed Wood Treads
Nothing says farmhouse like weathered, reclaimed wood. You can source this from:
- Architectural salvage yards (my favorite treasure hunt)
- Online marketplaces like Facebook Marketplace or Craigslist
- Specialty lumber yards that sell reclaimed materials
- Old pallets (free, but requires more work to process)
Strip your stairs down to the original wood if possible, or install new reclaimed wood treads over your existing stairs. Sand them down, stain them in warm tones like walnut or hickory, and seal with a matte finish. You want that rustic texture to shine through, not a glossy, modern finish.
White Painted Risers
The classic farmhouse combo? Natural wood treads with crisp white painted risers. This contrast is timeless, bright, and makes even small staircases feel more spacious.
I’ve done this exact makeover twice now, and every single time, it transforms the entire feel of the space. Paint the risers in a durable, semi-gloss white paint that can handle occasional scuffs. You’ll thank me later when cleaning is a breeze.
Adding Character
Here’s where you can really lean into the farmhouse vibe:
- Install a chunky wooden handrail (bonus points if it’s rough-hewn)
- Add wrought iron or black metal balusters
- Display vintage signs, baskets, or mason jar sconces along the wall
- Include a cozy runner in a muted pattern
Don’t go overboard with the “farmhouse” décor, though. You want charming and rustic, not a craft store explosion. Balance is key—choose a few meaningful pieces rather than cluttering every surface.
Bold Painted Pattern Stair Design Ideas
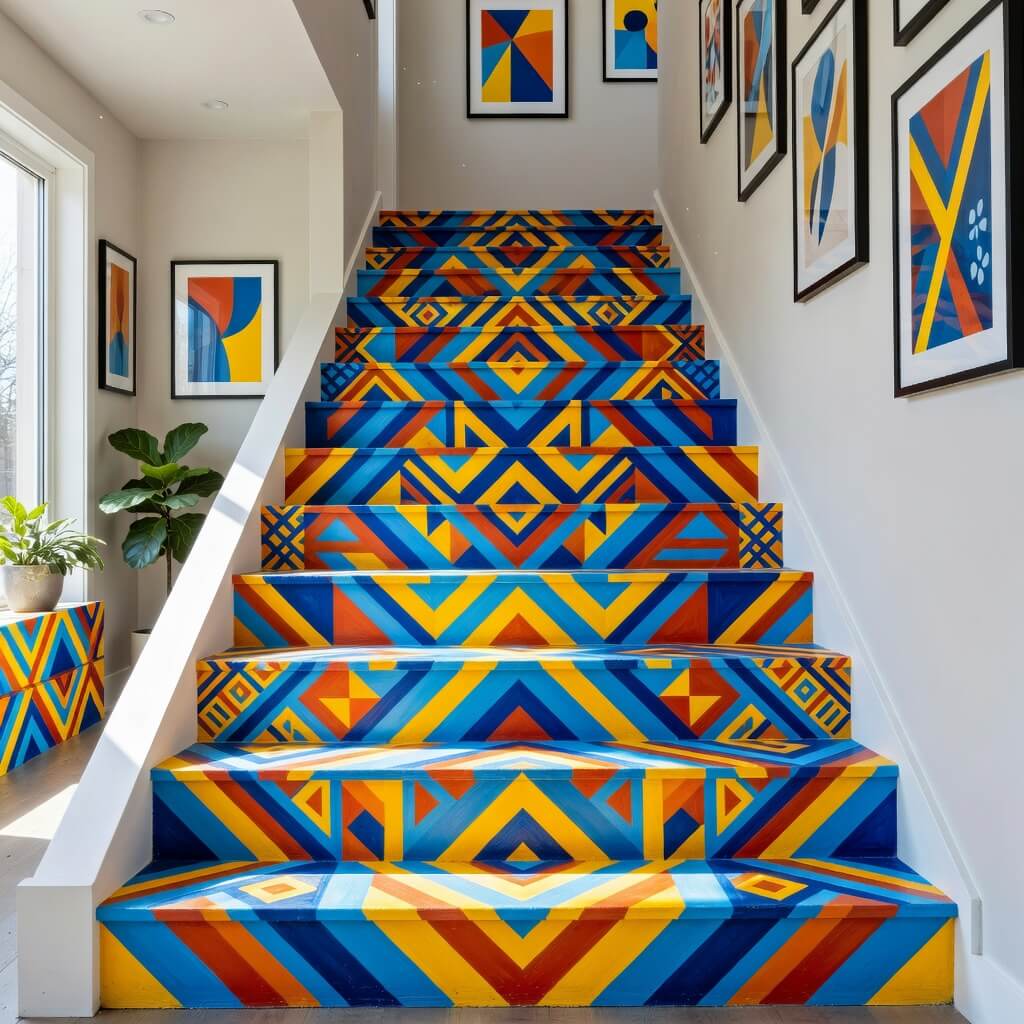
Feeling brave? Want your stairs to become a legitimate conversation piece? Bold painted patterns are where it’s at.
I’ll admit, this one takes some guts. The first time I painted geometric patterns on stairs, I second-guessed myself approximately forty-seven times. But the end result? Absolutely worth the mild panic attack.
Geometric Patterns
Triangles, hexagons, chevrons—geometric patterns add visual interest and modern flair. You can go subtle with tone-on-tone grays or go wild with contrasting colors.
The key to getting clean lines? Quality painter’s tape and patience. Seriously, don’t rush the taping process. Measure twice, tape once, and you’ll avoid wonky lines that haunt your dreams.
I recommend using a small foam roller for even coverage and doing at least two coats. Seal everything with a clear polyurethane to protect your masterpiece from foot traffic.
Striped Stairs
Horizontal stripes can make your staircase look wider, while vertical stripes on the risers create height. Play with color combinations:
- Navy and white for a nautical vibe
- Black and white for dramatic elegance
- Pastel stripes for a playful, cottage feel
- Bold jewel tones for maximum impact
Each riser can be a different color in the pattern, or you can keep treads neutral and go crazy on the risers. There’s no wrong answer here—it’s all about what makes you happy every time you climb those stairs.
Faux Tile Patterns
Want the look of patterned cement tiles without the expense or installation hassle? Paint them. I know it sounds ambitious, but stencils make this incredibly achievable.
Buy or make a stencil of your favorite tile pattern (Mediterranean, Moroccan, or Spanish tiles work beautifully), secure it with spray adhesive, and carefully paint each color. Yes, this takes time. Yes, you’ll need a steady hand. But holy cow, the results look custom and expensive.
IMO, this is one of those projects that looks way harder than it actually is. Start with one riser as a test, get comfortable with the process, then tackle the rest.
Peel and Stick Stair Riser Decoration
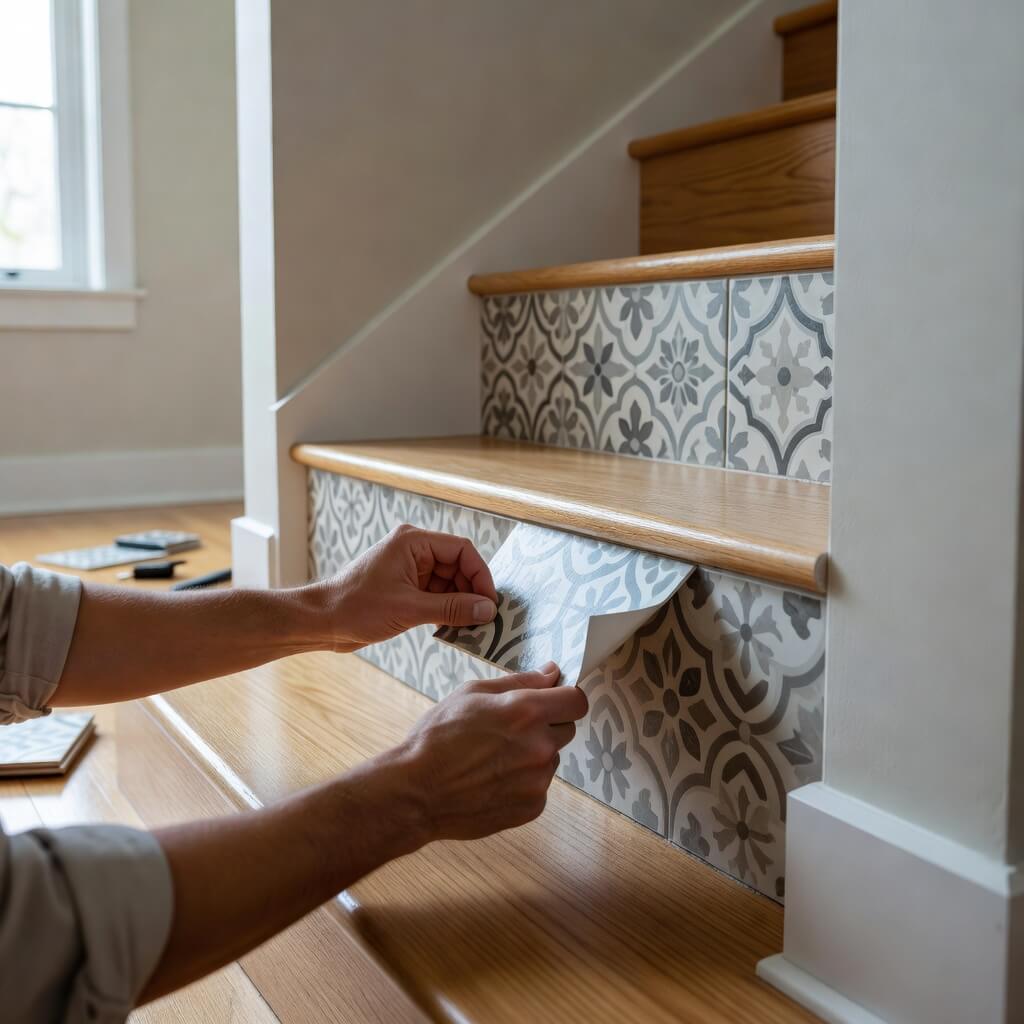
Can we take a moment to appreciate peel-and-stick products? Because honestly, they’ve revolutionized the DIY world.
I’ve used peel-and-stick everything—tiles, wallpaper, floor planks—and they keep getting better in quality. For stairs, they’re an absolute game-changer, especially if you’re renting or commitment-phobic about design choices.
The Beauty of Peel and Stick
Here’s why I’m borderline obsessed with this option:
- Zero permanent commitment: Don’t like it? Peel it off and try something else
- Renter-friendly: No landlord will have a meltdown over this
- Massive variety: Patterns, colors, textures—the options are endless
- Easy installation: If you can measure and use scissors, you can do this
- Budget-friendly: Most options cost less than $2 per square foot
Choosing Your Pattern
The market is flooded with options now. You can find peel-and-stick designs that mimic:
- Moroccan cement tiles
- Wood grain in every finish imaginable
- Marble and stone
- Geometric patterns
- Floral designs
- Abstract art
- Brick or exposed concrete
I recently redid my basement stairs with Mediterranean-style peel-and-stick tiles, and guests constantly ask who installed my “tile work.” When I tell them it’s essentially fancy stickers, their minds explode. The satisfaction never gets old.
Installation Tips
Measure each riser carefully—they might vary slightly in size (thanks, old houses). Cut your peel-and-stick material slightly smaller than your measurements to avoid peeling at the edges.
Clean your risers thoroughly before application. Any dust or grease will prevent proper adhesion, and you’ll be sad when corners start lifting.
Apply from the center outward, smoothing as you go to avoid air bubbles. Use a credit card or squeegee to really press it into place. Some people seal the edges with clear caulk for extra durability, which isn’t a bad idea for high-traffic areas.
Also Read: 10 Gorgeous Stairs Railing Design Ideas Interior Upgrade
Cozy Carpeted Stair Redesign Ideas
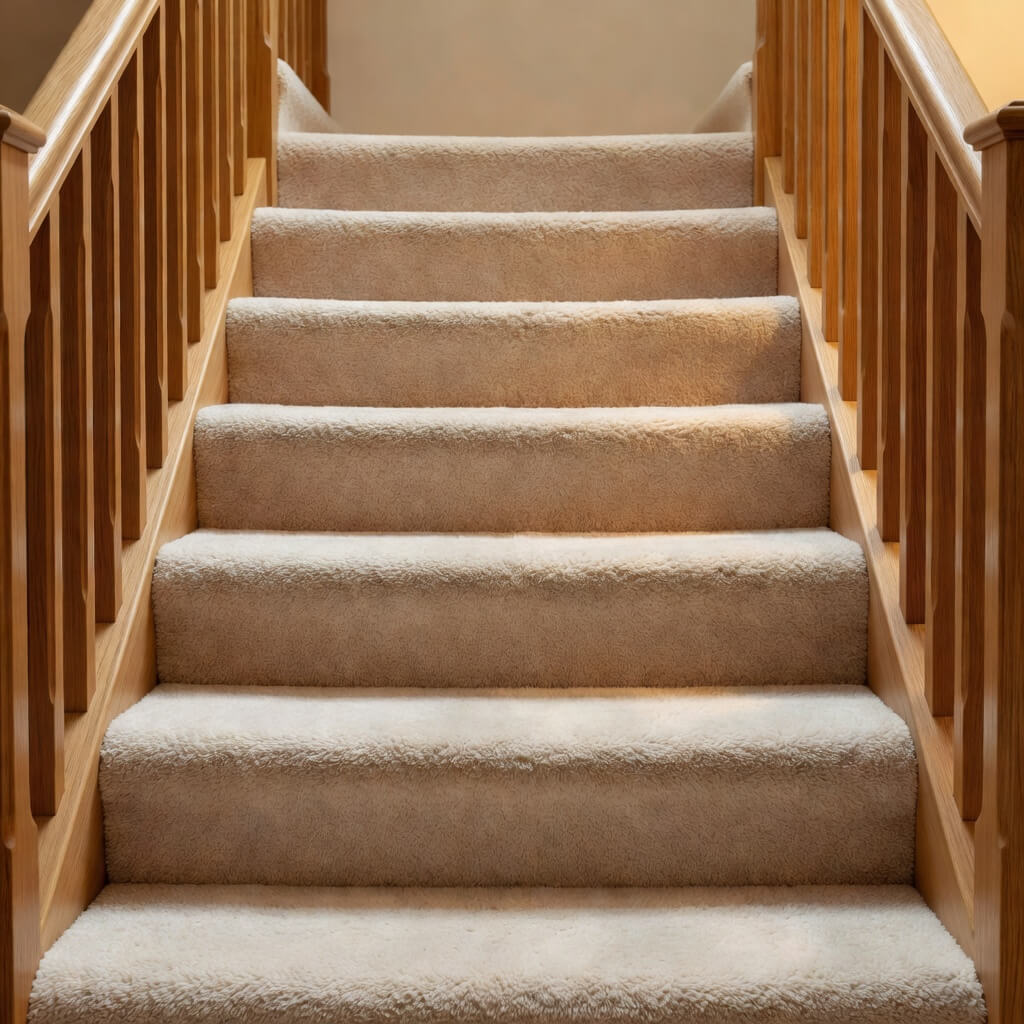
I know, I know—carpet can feel dated. But hear me out. The right carpet, installed the right way, can transform your stairs into a cozy, safe, and stylish feature.
Plus, carpet has some seriously practical benefits. It’s quieter than hard surfaces (game-changer if you have kids or a multi-story home), provides traction, and feels luxurious underfoot. I’ll take plush carpet on cold winter mornings over freezing wood any day.
Full Carpeting vs. Runners
You’ve got options here:
Full carpeting covers the entire stair, tread and riser, in one continuous flow. This creates a cohesive, traditional look and maximizes sound-dampening. Choose low-pile or textured patterns that hide dirt and wear.
Carpet runners leave the edges of your treads exposed, creating a more custom, high-end look. You can show off beautiful wood edges while still getting the comfort and safety of carpet in the center. I went with a runner in my current home, and the exposed wood edges add character I didn’t know I was missing.
Choosing the Right Carpet
Don’t cheap out here. Stairs take serious abuse, and bargain carpet will show wear within months. Look for:
- High-density, low-pile options: They last longer and show fewer footprints
- Stain-resistant treatments: Because life happens, especially if you have pets or kids
- Neutral colors with patterns: They hide dirt like champions (solid light colors are asking for trouble)
I learned this the hard way with a beautiful cream carpet that looked gorgeous for approximately three days before reality set in. Now I swear by patterned options in medium tones.
Style Ideas
Get creative with your carpet choice:
- Bold patterns like geometric or traditional Persian designs add personality
- Natural fiber runners (sisal or jute) bring texture and a casual, coastal vibe
- Deep jewel tones create drama and sophistication
- Striped runners add visual interest without overwhelming
Use stair rods to secure your runner and add a polished, traditional touch. These decorative rods come in various finishes—brass for warmth, brushed nickel for modern, bronze for rustic.
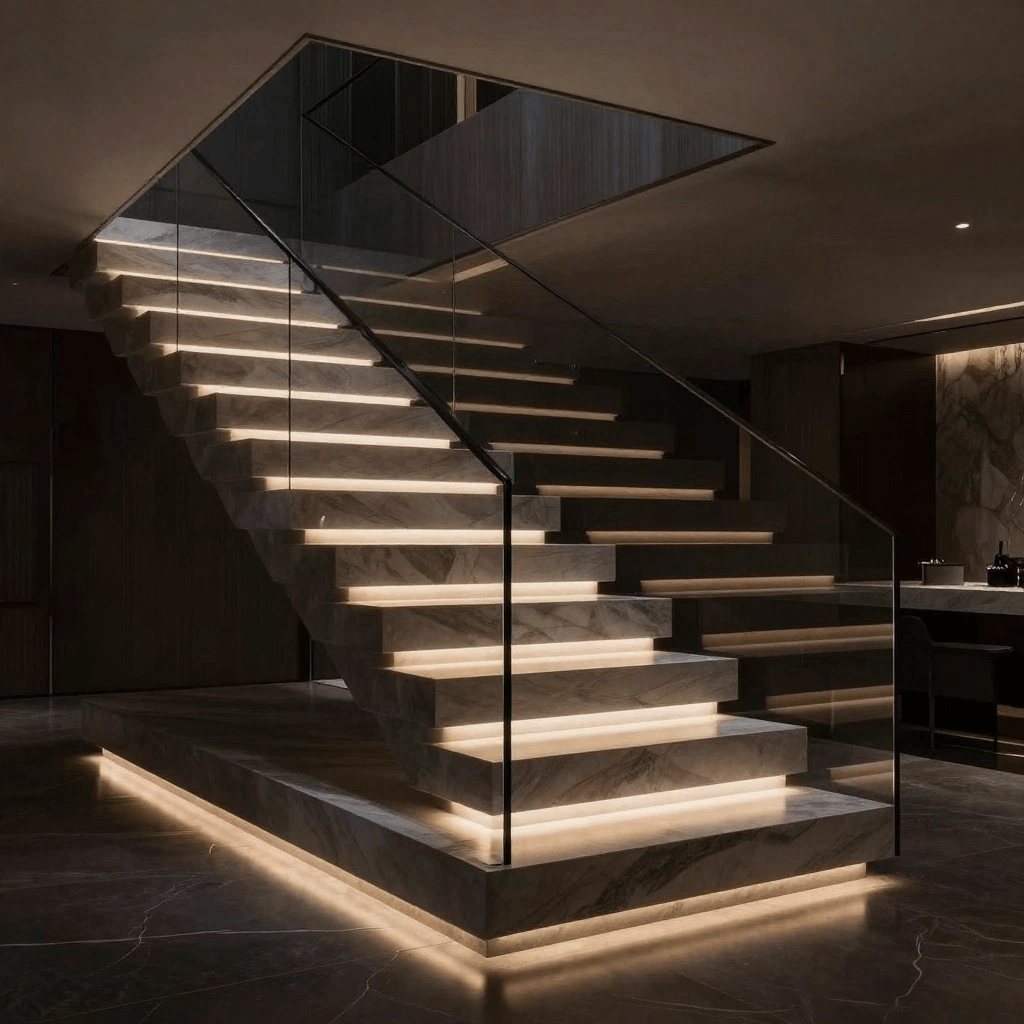
Floating Staircase Modern Glow Makeover
Okay, floating staircases are basically the supermodels of the stair world. They look impossibly sleek, modern, and yes, a bit intimidating to pull off.
The “floating” effect happens when you eliminate traditional risers and visible supports, creating the illusion that each tread hovers independently. Combined with strategic lighting, this creates serious wow-factor.
Is This Doable as a DIY?
Real talk? Full floating staircase installation is serious structural work. You need to understand building codes, weight loads, and proper anchoring. This isn’t a weekend project—it’s a “hire professionals unless you’re a licensed contractor” situation.
But you can create a floating effect with modifications to existing stairs, and that’s where the DIY magic happens.
Creating the Floating Look
If you have open stairs (with risers you can remove), consider:
- Removing risers to open up the staircase
- Installing new treads with hidden mounting brackets
- Adding glass or cable railings to maintain the open, airy feel
- Painting or staining treads in dramatic dark tones for contrast
Check with a structural engineer before removing any structural elements. Safety isn’t negotiable, no matter how gorgeous the design.
The “Glow” Factor
This is where you transform good into spectacular. LED strip lighting installed under each tread creates that modern glow effect that looks absolutely stunning.
You can find:
- Motion-activated LED strips that illuminate as you approach
- Color-changing options for different moods (yes, it’s a bit extra, but also amazing)
- Warm white LEDs for subtle, sophisticated glow
- Cool white for ultra-modern vibes
I installed LED strips under my open treads last year, and now I sometimes walk up and down just to watch them light up like a runway. No regrets. 🙂
Run the wiring through the wall or along the stringer where it’s hidden from view. Most LED strip kits come with everything you need, including adhesive backing and power supplies.
Black and White Elegant Stair Style
Timeless. Classic. Elegant. The black and white color scheme never goes out of style, and on staircases, it creates serious sophistication.
I’ve always been drawn to this high-contrast look. There’s something about the crisp drama that feels both formal and fresh. You can pull this off in multiple ways depending on your existing staircase and skill level.
The Classic Combo
The most popular approach? Black treads with white risers (or the reverse). This creates strong visual lines and makes your staircase a legitimate focal point.
Paint or stain your treads in deep black or ebony. Make sure you use durable floor paint or properly seal stained wood—black shows every scuff mark and scratch if you don’t protect it properly. I learned this the frustrating way.
Paint risers in bright, crisp white. Use a semi-gloss or satin finish that you can wipe clean. The contrast between the dark horizontal and light vertical surfaces creates this gorgeous, rhythmic pattern as the stairs climb.
Adding Pattern
Want to take it up a notch? Incorporate patterns within the black and white theme:
- Black and white patterned tiles on risers (Moroccan, Spanish, or geometric designs)
- Painted checkerboard pattern on treads (bold, but stunning)
- Striped risers in varying widths of black and white
- Damask or toile wallpaper on risers for a more traditional elegance
Keep your railings simple in this scheme—matte black metal balusters with a white handrail, or all-black for maximum drama. Chrome or brass can work too if you want a touch of glamour, but stick to one metal finish throughout.
Styling Around Black and White Stairs
The beauty of this scheme? It pairs with literally everything. Your walls can be colorful, your décor can be eclectic, and the stairs will still look intentional and polished.
Add artwork along the stairwell in matching black and white tones, or go bold with colorful pieces that pop against the monochromatic stairs. Either approach works beautifully.
Also Read: 10 Trendy Black Stairs Ideas for Minimal Home Aesthetics
Creative LED Lit Staircase Upgrade Ideas
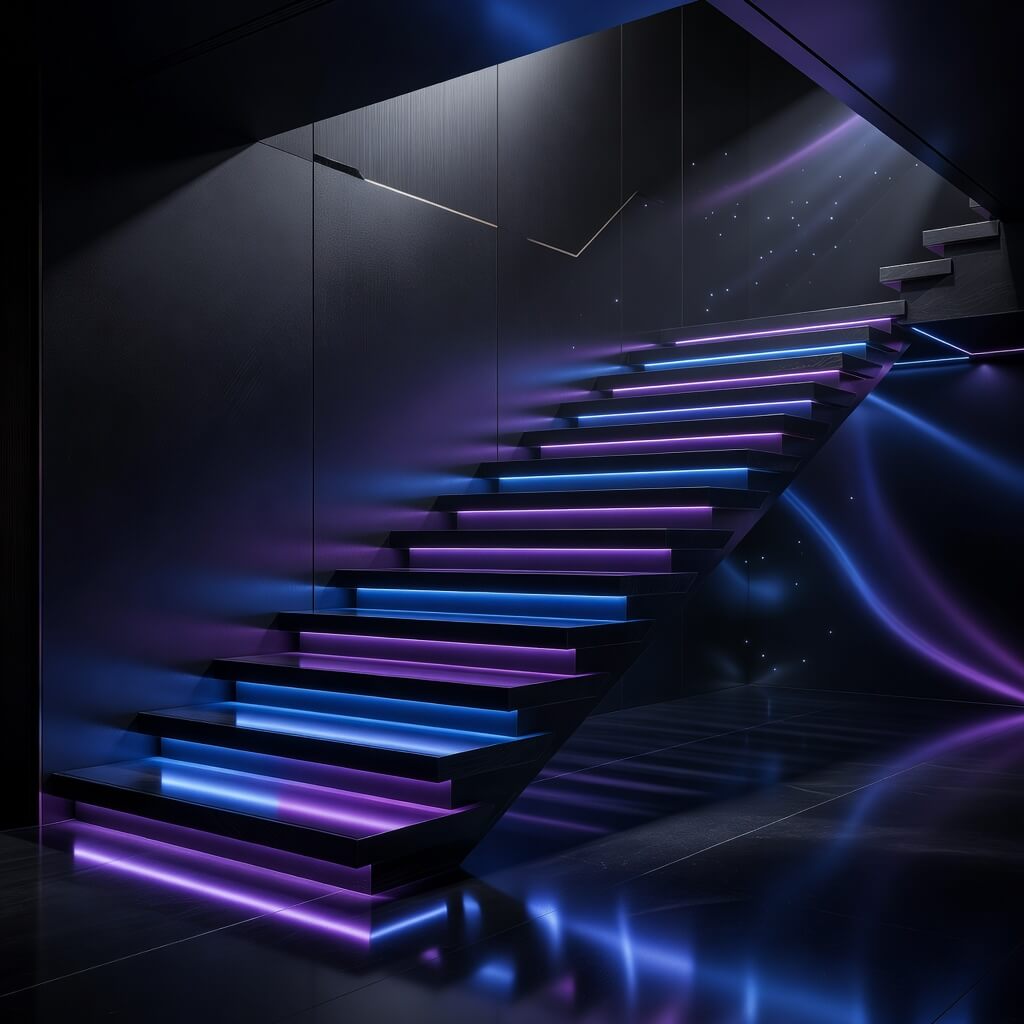
We touched on this with floating stairs, but LED lighting deserves its own spotlight (pun intended). Strategic lighting transforms your staircase from purely functional to genuinely spectacular.
I’ll be honest—I used to think stair lighting was overkill. Then I visited a friend’s house where they’d installed LED strips, and I immediately understood. The ambiance, the safety, the sheer coolness factor… I was sold.
Under-Tread Lighting
Installing LED strips under the nose of each tread creates a soft glow that illuminates the step below. This looks incredible and actually serves a safety purpose—you can see exactly where to step in low light.
The installation is easier than you’d think:
- Measure and cut LED strips to fit the width of your stairs
- Clean the underside of each tread nosing thoroughly
- Peel and stick the LED strips in place
- Connect to a power source and controller
You can hardwire these to your home’s electrical system (hire an electrician) or use plug-in kits that you can install yourself. I went the plug-in route for my basement stairs, and it took maybe two hours total.
Side-Mounted Wall Lights
Install small LED puck lights or recessed lights in the wall beside each step. This creates a modern, gallery-like effect and provides excellent visibility.
These require cutting into your drywall, so they’re more involved than stick-on strips. But the built-in, polished look is worth the extra effort if you’re going for a high-end finish.
Space them evenly along your staircase, typically one light per step or every other step depending on your desired brightness. Choose warm white for a cozy feel or cool white for contemporary spaces.
Handrail Lighting
Here’s something I don’t see enough people doing—LED strips integrated into the handrail itself. Some companies make handrails with channels specifically for this purpose, or you can retrofit your existing rail.
This creates a subtle glow along the entire staircase and doubles as a visual guide in darkness. Plus, it just looks freaking cool. There’s no other way to say it.
Smart Lighting Features
Get fancy with it (because why not?):
- Motion sensors that activate lights when someone approaches
- Timers that turn on automatically at dusk
- Dimmer switches for adjustable ambiance
- Smart home integration for voice control (yes, I talk to my stairs now :/)
- Color-changing LEDs for holidays or moods
The technology has become incredibly affordable. You can set up a complete smart LED stair lighting system for a few hundred bucks, and the installation is straightforward enough for confident DIYers.
Design Considerations
Choose your LED color temperature carefully:
- Warm white (2700-3000K): Cozy, inviting, great for traditional homes
- Neutral white (3500-4100K): Balanced, works with most design styles
- Cool white (5000K+): Crisp, modern, energizing
I prefer warm white for main living areas—it feels welcoming. But I used cool white in my modern basement space, and it perfectly complements the contemporary aesthetic.
Don’t blast your stairs with blinding brightness. The goal is accent lighting and safety, not interrogation room vibes. Most LED kits are way too bright at full power, so plan to use them at 50-70% intensity.
Bringing It All Together
Look, your stairs see more action than probably any other part of your home. You pass them multiple times daily, and guests notice them immediately. So why let them stay boring?
The incredible thing about all these makeover ideas? You can mix and match elements to create something totally unique to your style and space. Want modern minimalism with LED lights? Go for it. Rustic farmhouse with bold painted patterns? Absolutely. Black and white with peel-and-stick tiles? Why not?
I’ve personally tried six of these ten ideas over various homes and projects, and each transformation completely changed how I felt about that space. The stairs went from something I ignored to something I genuinely appreciated. That might sound dramatic, but good design does that—it elevates the everyday.
A Few Final Tips
Before you jump into your stair makeover, keep these things in mind:
Prep work matters. Clean, sand, and prime properly. I know it’s the boring part, but it’s the difference between a makeover that lasts years versus one that starts peeling in months.
Measure everything twice. Stairs have this annoying habit of not being perfectly uniform, especially in older homes. Don’t assume all risers are the same height or all treads the same depth.
Invest in quality materials for high-traffic areas. Your stairs take abuse. Cheap paint, flimsy adhesives, or low-grade materials will show wear embarrassingly fast.
Consider safety always. Non-slip surfaces on treads, secure railings, adequate lighting—these aren’t optional. Beautiful stairs that send you tumbling aren’t a win.
Start with one section if you’re nervous. Test your technique on a few steps before committing to the entire staircase. This is especially smart for complex patterns or new-to-you installation methods.
Your Turn
So here’s my challenge to you: pick one of these ideas and commit to making it happen. Whether you tackle it next weekend or start planning for a bigger renovation down the road, your stairs deserve better than builder-basic boring.
Which style spoke to you? Are you brave enough for bold patterns, or does the classic black and white elegance feel more like home? Maybe you’re already mentally shopping for LED strips and planning your smart home lighting takeover (I see you, fellow tech enthusiast).
Whatever direction you go, own it. Your stairs are about to become the unexpected star of your home, and honestly? It’s about time they got their moment to shine. Happy makeover-ing! FYI, I expect before-and-after photos if you actually do this. I live for that transformation content.
Now if you’ll excuse me, I have some peel-and-stick samples to order. Because apparently, I can never leave my stairs alone for more than six months. But that’s a completely healthy relationship with home improvement… right? Right. :/