10 Genius DIY Grill Station Cheap Ideas for Small Spaces
- Outdoor Ideas
 Ben
Ben- 0
- 39 minutes read
Look, I get it. You’re crammed into a tiny apartment or condo with a balcony the size of a postage stamp, but you’ve got BIG grilling dreams. Maybe you’re sick of watching your neighbor with their massive deck and built-in outdoor kitchen while you’re stuck with a sad little hibachi on the floor. Well, guess what? You don’t need a trust fund or a sprawling backyard to create an awesome grill station that’ll make your space feel like a legit outdoor cooking zone.
I’ve been exactly where you are—living in a shoebox apartment with zero outdoor space but desperately wanting to grill some burgers without my living room smelling like charcoal for three days. So I started getting creative, and honestly? Some of my DIY grill setups turned out WAY better than those overpriced patio furniture catalog nightmares.
Let me walk you through ten killer DIY grill station ideas that won’t destroy your bank account and actually work for small spaces. We’re talking practical, affordable, and actually pretty cool-looking solutions that you can knock out in a weekend.
1. Pallet Wood DIY Grill Station
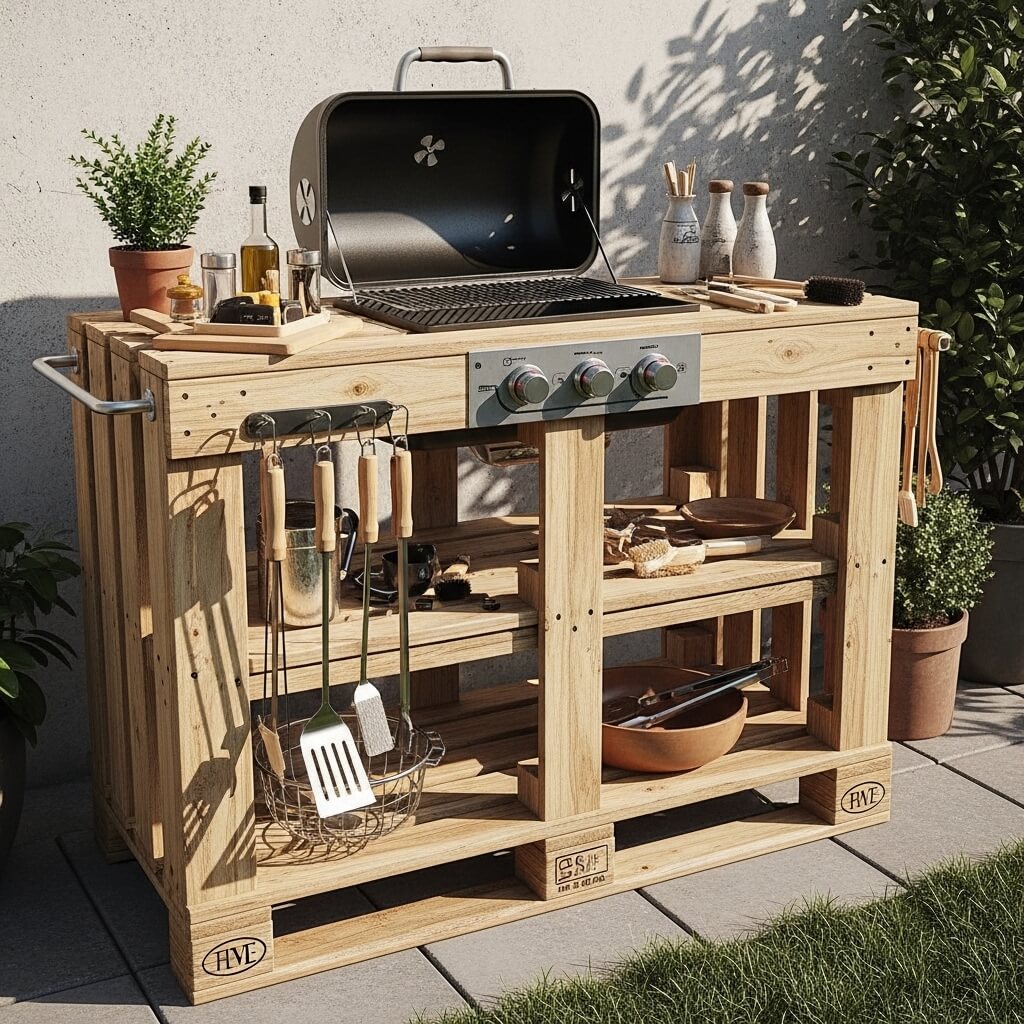
Why Pallets Are Your Best Friend
Okay, so pallets get a bad rap sometimes because every Pinterest project seems to involve them. But here’s the thing—they’re literally FREE in most cases, and they’re perfect for building a compact grill station. I’ve built three different versions over the years, and each one cost me less than thirty bucks in hardware and supplies.
The beauty of pallet wood is that it’s already structured in a way that creates natural shelving. You’re not starting from scratch with raw lumber—the hard part is already done. Just make sure you grab heat-treated pallets (look for the “HT” stamp) and not chemically treated ones. Nobody wants their grilled chicken with a side of mystery chemicals, right?
Building Your Pallet Station
Here’s the basic game plan I follow:
- Find 2-3 sturdy pallets (check behind hardware stores, grocery stores, or construction sites—just ask first)
- Stand one pallet vertically as your back support and work surface frame
- Attach a second pallet horizontally at waist height to create your grill platform
- Add hooks and small shelves from the remaining pallet pieces for tools and supplies
- Seal everything with outdoor wood sealer or paint
The whole setup takes maybe 4-5 hours if you’re taking your time and actually measure twice instead of winging it like I usually do. You end up with a rustic-looking station that has built-in storage, a stable grill surface, and costs almost nothing.
Pro tip: Add casters to the bottom if you need to move it around. I learned this the hard way after dragging my first pallet station across my balcony and leaving lovely scratch marks everywhere. Oops.
2. Cinder Block Budget Grill Setup
The Ultimate No-Tools Solution
Ever wonder why contractors love cinder blocks? Because they’re stupid simple to work with and ridiculously cheap. I’m talking like two bucks per block at most hardware stores. You can create a functional grill station in literally 20 minutes without touching a single power tool.
This setup is perfect if you’re renting and can’t permanently install anything. When you move, you just unstick the blocks and take them with you. Or leave them—they cost so little that you won’t lose sleep over it.
How to Stack Your Station
The basic setup couldn’t be easier:
- Get 8-12 cinder blocks depending on your desired height and configuration
- Stack them in two columns about 2-3 feet apart (match your grill width)
- Lay wooden boards or a metal sheet across the top for your grill surface
- Use the hollow block centers for storing charcoal, lighter fluid, or grilling tools
- Create lower shelves by adding boards between blocks at different heights
I used this setup on my first apartment balcony, and honestly? It worked better than I expected. The blocks are heavy enough that they don’t wobble, even when you’re aggressively flipping burgers. Plus, the industrial look is kind of cool if you’re into that aesthetic.
The only downside is that cinder blocks can absorb moisture and get gross over time. I’d recommend sealing them or at least covering your station when it rains. Learn from my mistakes—moldy cinder blocks are not a vibe :/
3. Small Patio Corner Grill Station

Making Dead Space Work for You
Corners are the Bermuda Triangle of small outdoor spaces—stuff goes there to die and never be seen again. But what if I told you that awkward corner could become the PERFECT spot for your grill station? Mind-blowing, I know.
Corner stations are genius for tiny patios because they utilize space you’re probably not using anyway. I designed one for my buddy’s narrow balcony, and it literally doubled his usable grilling space while actually making the balcony feel bigger. How? Because it eliminated clutter and created a defined zone.
Designing Your Corner Setup
Here’s how to maximize that corner real estate:
- Measure your corner angle (most are 90 degrees, but some balconies get weird)
- Build an L-shaped or triangular base using 2x4s and plywood
- Create a two-tier system: grill on top, storage below
- Add a small side shelf on one or both sides for prep space
- Install a hanging rail on the wall above for utensils
The key is making everything fit snugly into that corner without blocking your walking path. I recommend keeping the front edge at least 24 inches from the corner point so you can actually access your grill without doing yoga poses.
FYI, corner stations work especially well if you can anchor them to the wall (with landlord permission, of course). This gives you extra stability and lets you add vertical storage without worrying about the whole thing tipping over.
Also Read: 10 Luxe Small Beauty Salon Interior Design Ideas on a
4. Foldable DIY Grill Table Station
The Transformer of Grill Stations
This is hands-down my favorite solution for REALLY tight spaces. Picture this: a full-function grill station when you need it, a flat wall surface when you don’t. It’s like furniture Tetris, and I’m here for it.
I built my first foldable station after moving to a place with a balcony so small I could barely fit a chair. But I refused to give up grilling. This design saved my sanity and my BBQ habits.
Construction Basics
Building a fold-down station requires a bit more finesse, but it’s totally doable:
- Create a sturdy table surface using 3/4-inch plywood (around 24×36 inches works great)
- Attach heavy-duty folding brackets to the wall and table underside
- Add a chain or cable support for extra stability when extended
- Install foldable legs on the front edge for additional support
- Attach a small shelf or basket underneath for tool storage
When you’re done grilling, the whole thing folds flat against the wall and basically disappears. It’s like magic, except you built it with your own hands instead of pulling a rabbit out of a hat.
The trickiest part is making sure your brackets can handle the combined weight of the table, grill, and food. I initially cheaped out on hardware and… yeah, let’s just say my first test run didn’t go well. Invest in quality brackets rated for at least 150 pounds. Your burgers will thank you.
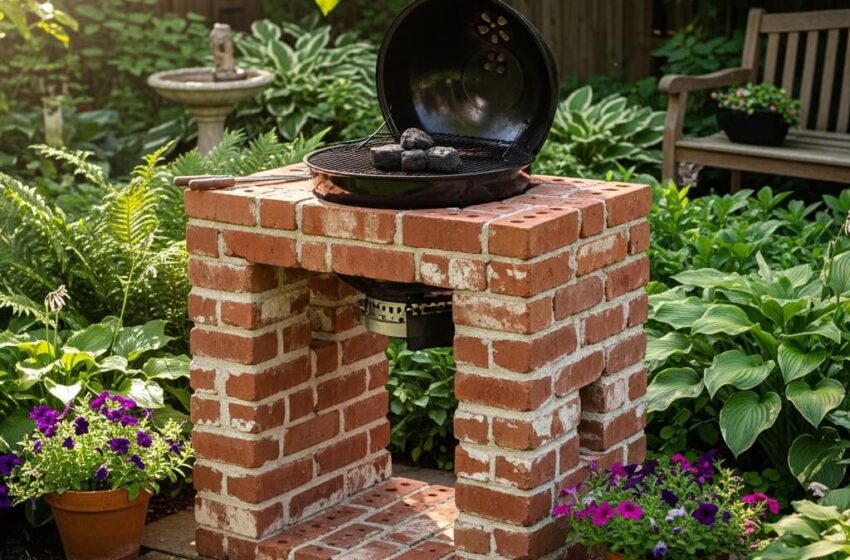
5. Recycled Brick Outdoor Grill Stand
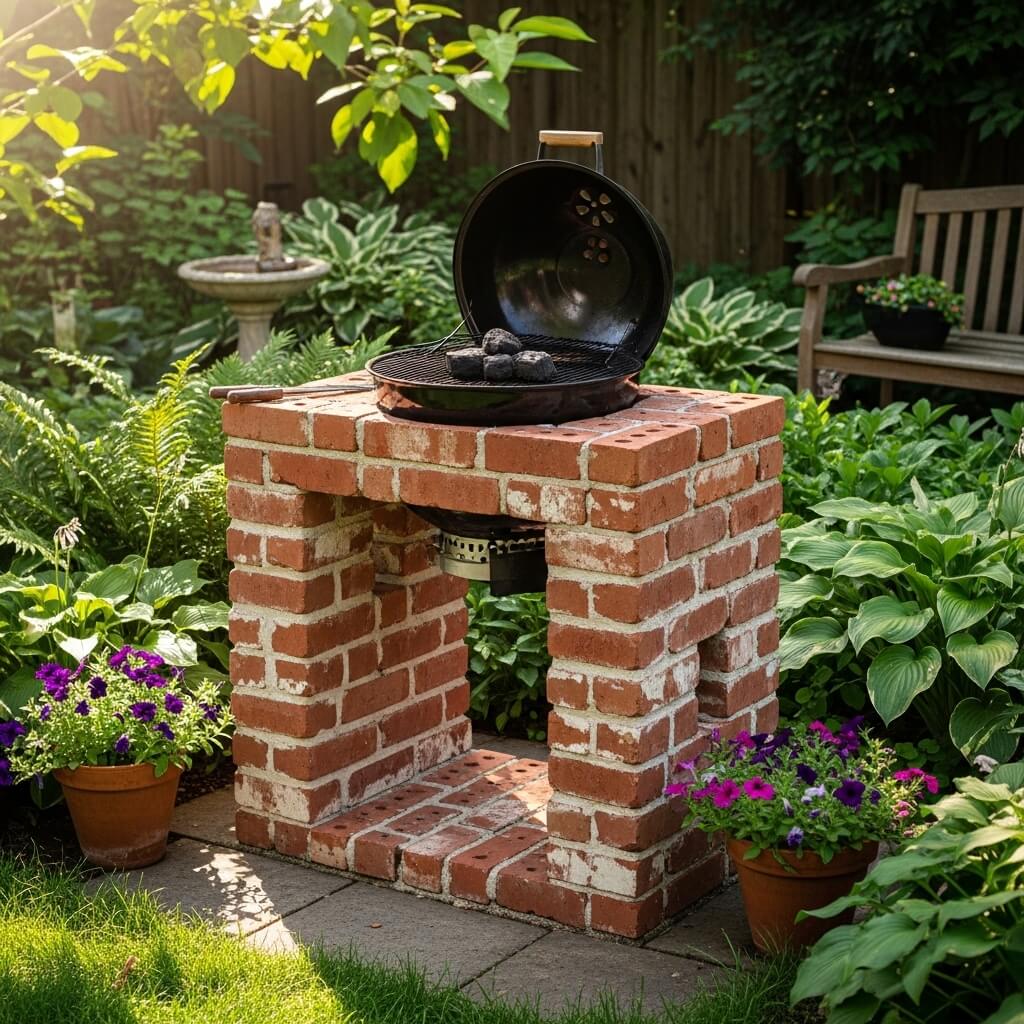
Old-School Charm Meets Functional Design
There’s something incredibly satisfying about building with brick. Maybe it’s because it feels permanent and substantial, or maybe I just like playing with fire-resistant materials. Either way, a brick grill stand is both practical and surprisingly affordable if you know where to look.
I sourced most of my bricks from a demolition site (with permission!) and a few from Facebook Marketplace. People are literally giving away old bricks all the time because they don’t know what else to do with them. One person’s renovation debris is your new grill station!
Stacking Your Brick Station
You don’t need to be a master mason to make this work:
- Collect 40-60 bricks (more if you want extra height or shelving)
- Create a dry-stack design (no mortar needed for temporary setups)
- Build two brick columns as supports, leaving space between for storage
- Top with a concrete paver or metal sheet as your grill surface
- Add a brick backsplash if you’re placing this against a wall for heat protection
The rustic, weathered look of old bricks adds instant character to your space. Plus, bricks are naturally heat-resistant, which means you won’t worry about scorching or damaging your grill station surface.
Here’s a reality check though: brick is HEAVY. Once you build this sucker, you’re probably not moving it around much. Make sure you’re happy with the location before you start stacking. I definitely didn’t think about this initially and spent a very sweaty afternoon relocating 50 bricks because I miscalculated my space. Good times.
6. Compact Balcony Grill Station Idea
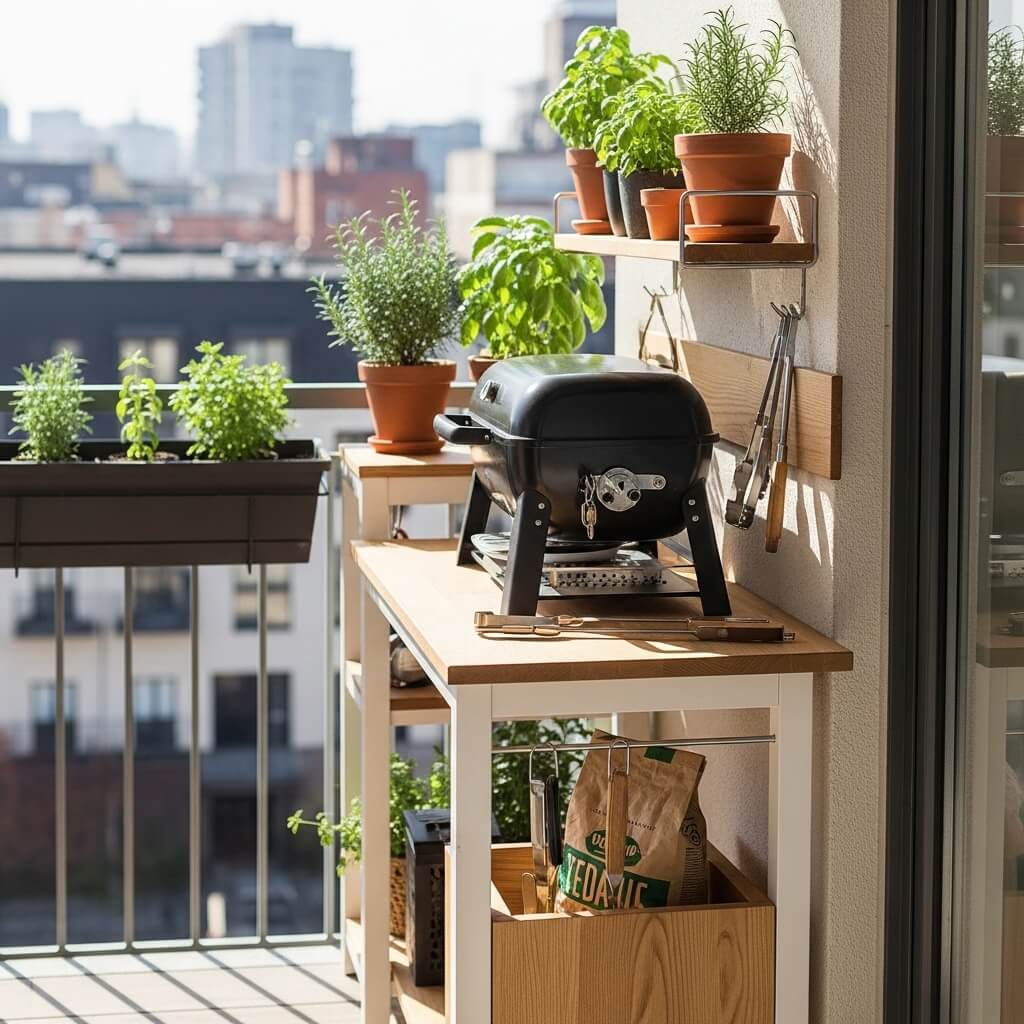
Maximizing Every Square Inch
Balconies present unique challenges—weight limits, wind exposure, limited square footage, and probably some annoying HOA rules. But you know what? Challenge accepted.
I’ve grilled on balconies ranging from spacious to “is this even legal?” tiny. The secret is creating a station that’s vertical rather than horizontal. When you can’t spread out, build up.
Vertical Storage Solutions
Think of your balcony grill station as a skyscraper, not a ranch house:
- Use a narrow rolling cart as your base (12-18 inches wide max)
- Install a pegboard backing for hanging tools, seasonings, and accessories
- Add stackable wire baskets on the side for charcoal, wood chips, or plates
- Include foldable side tables that extend only when you’re actively grilling
- Mount a small cooler underneath for drinks and cold items
The rolling aspect is crucial here. You need to be able to push your station against the wall or into a corner when you’re not using it. I added locking casters to mine so it doesn’t roll away during windy days—because nothing says “bad day” like watching your grill station take a tumble off the balcony.
Also, check your balcony weight limits before going crazy with heavy materials. Most modern balconies can handle a grill setup fine, but if you’re in an older building, verify first. Trust me, explaining to your landlord why the balcony has a suspicious sag is not a conversation you want to have.
Also Read: 10 Sophisticated Luxury Salon Interior Design Ideas to Try Now
7. Rustic Wooden Crate Grill Station
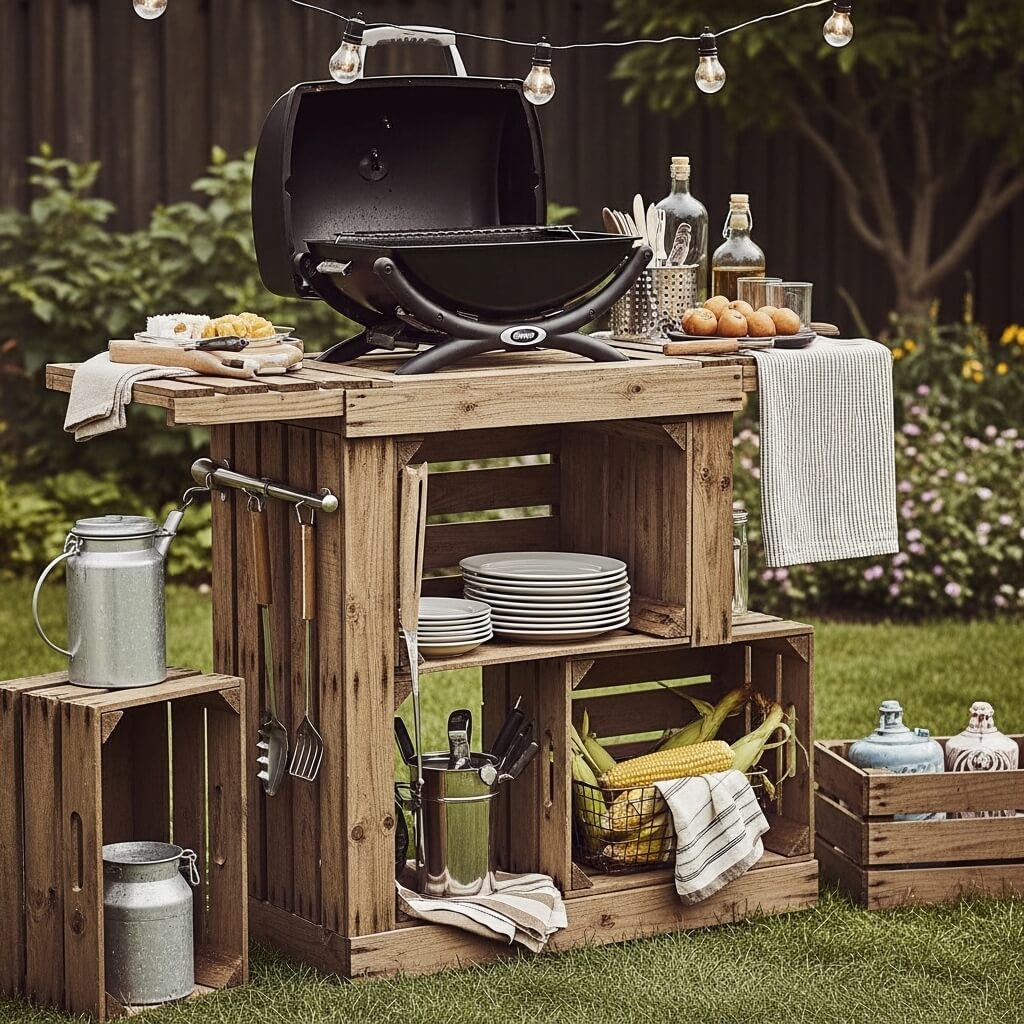
Upcycling at Its Finest
Wooden crates—especially the old wine or produce crates—are absolute gold for DIY projects. They’ve got that farmhouse-chic look everyone’s obsessed with, plus they’re already structured storage units. It’s basically cheating, but in the best possible way.
I scored about a dozen wine crates from a local vineyard that was just tossing them. Some liquor stores and farmers markets will also give them away if you ask nicely. Worst case, you can find them online for pretty cheap.
Assembling Your Crate Station
This design is modular, which means you can customize it to fit whatever weird space you’re working with:
- Collect 4-8 wooden crates of similar size
- Stack them in various configurations: side-by-side, stacked vertically, or mixed
- Secure crates together with wood screws or L-brackets
- Add a wooden top surface across the crates for your grill platform
- Leave some crates open-faced for visible storage (looks cool and functional)
- Seal or stain the wood to protect against weather
The beauty of this setup is how customizable it is. Need more storage? Add another crate. Moving to a new place with a different layout? Reconfigure the crates. It’s like adult LEGOs, but for grilling.
IMO, the rustic crate look works especially well if you’ve got other wood elements in your outdoor space. It creates a cohesive design that doesn’t look like you just randomly threw stuff together (even though you totally did).
8. DIY Grill Station with Storage Shelves
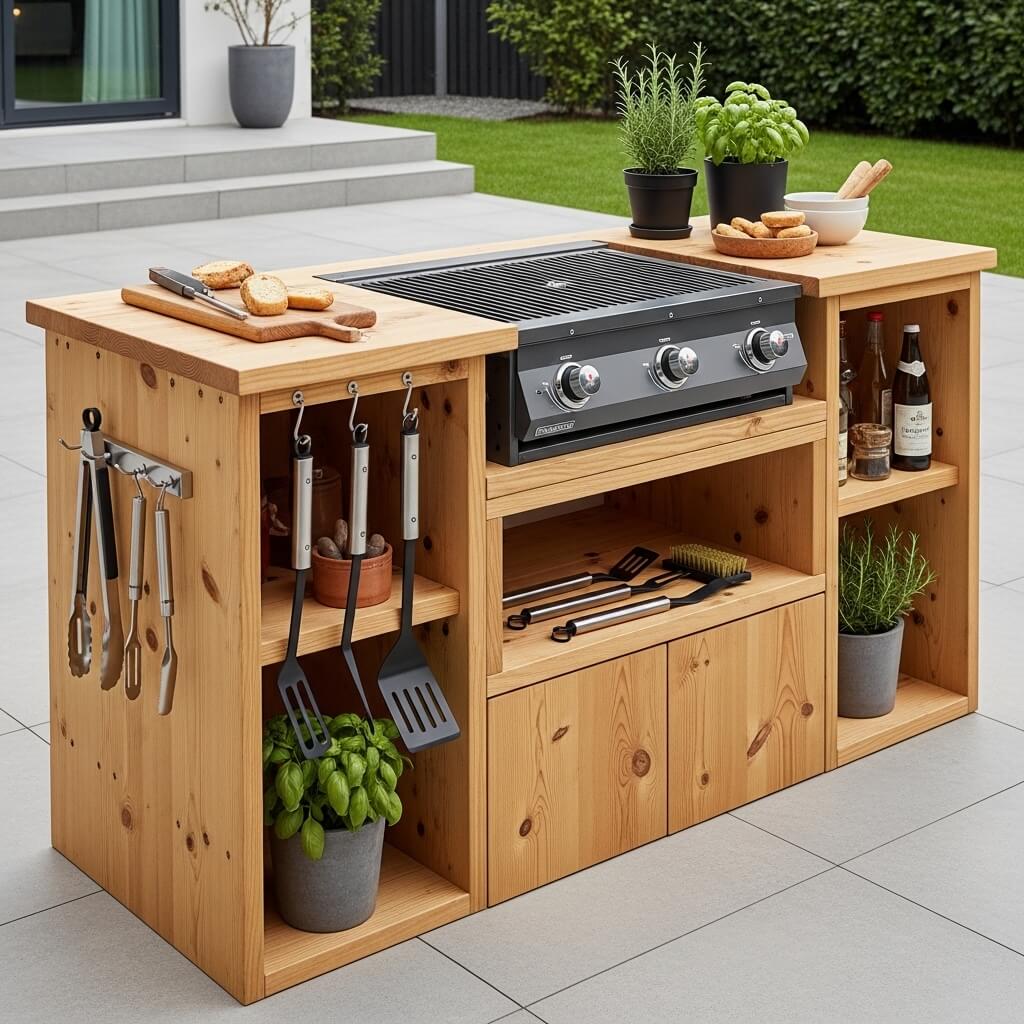
Because Clutter Is the Enemy
Let’s be real—half the frustration of grilling in a small space is dealing with all the STUFF. Tongs, spatulas, charcoal, lighter fluid, plates, seasonings, beer (essential), and whatever else you need. If you don’t have dedicated storage, everything becomes chaos fast.
I learned this lesson the hard way during a cookout where I was literally juggling supplies because I had nowhere to put anything. Never again. A proper grill station with integrated storage changed my entire grilling game.
Building Smart Storage
Your storage strategy should be intentional and accessible:
- Create multiple shelf heights: high for tools, medium for supplies, low for heavy items like charcoal bags
- Add hooks along the sides for hanging utensils and mitts
- Include a drawer or enclosed cabinet for stuff you want protected from weather
- Install a paper towel holder (you’ll use it more than you think)
- Create a designated spot for each category of items
For materials, I typically use pressure-treated lumber for the frame and shelves since it handles outdoor conditions well. The whole build usually runs around $50-80 depending on how fancy you get with hardware and finishes.
The key difference between this and other designs is the emphasis on organization. You’re not just building a table—you’re creating a complete grilling workstation where everything has its place. It’s the Marie Kondo approach to outdoor cooking, and yes, it actually does spark joy 🙂
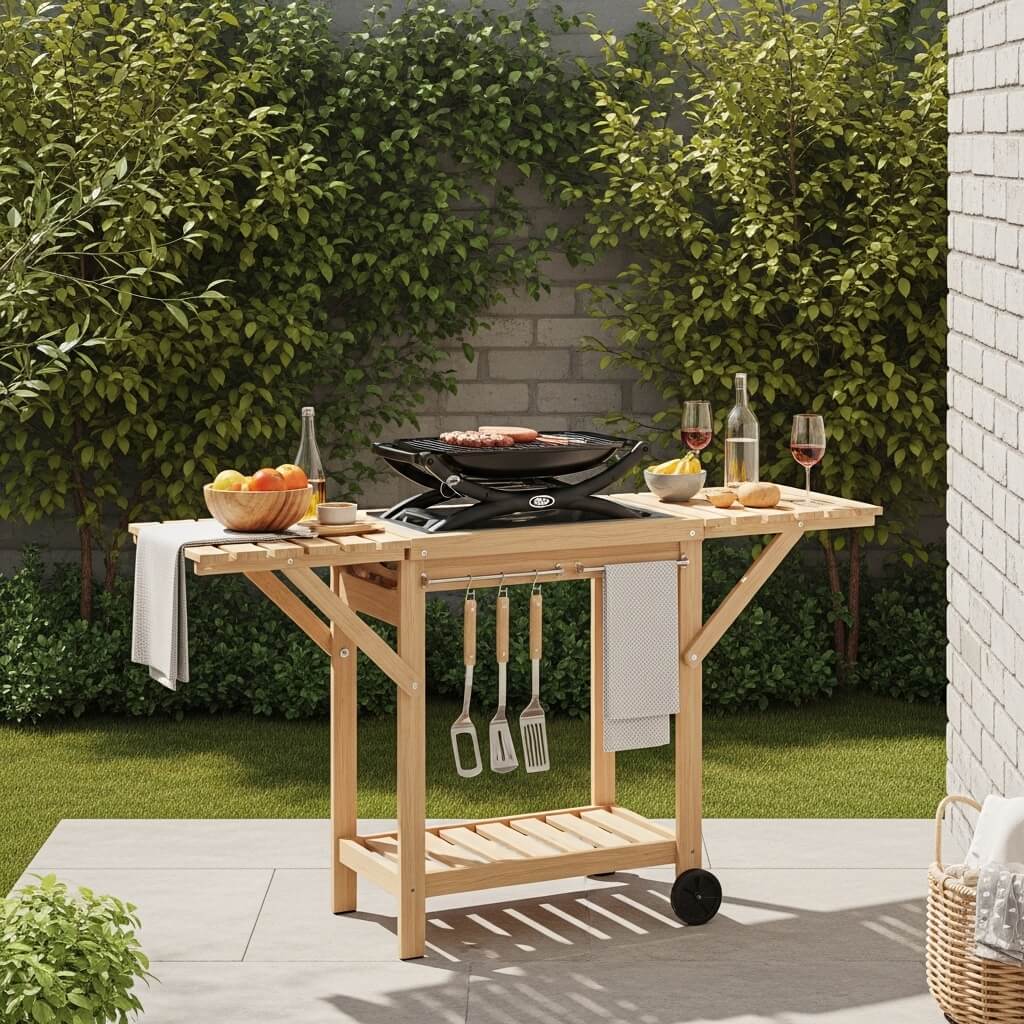
9. Portable Rolling Grill Cart Setup
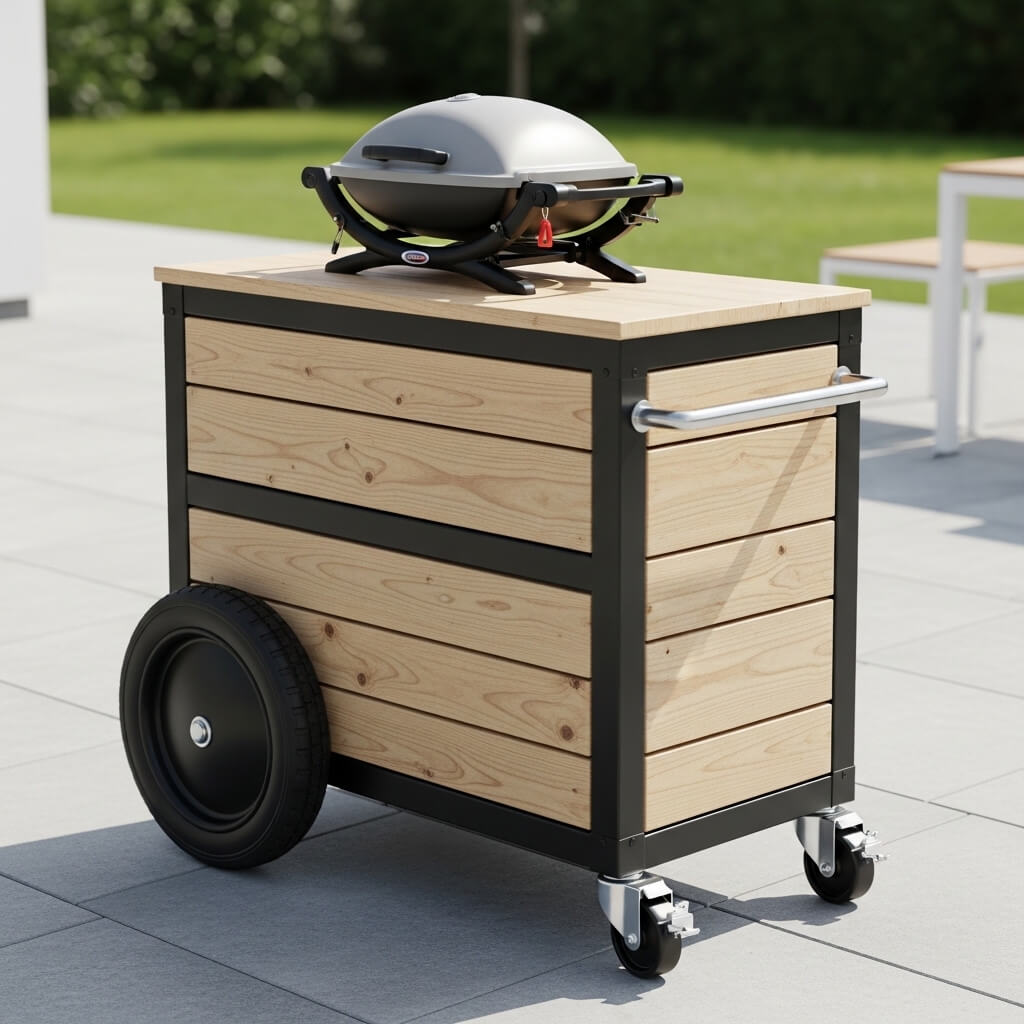
Mobility Is Freedom
Sometimes you need your grill station to be a nomad. Maybe you share your outdoor space with neighbors, or you need to move it for cleaning, or you just like having options. Whatever the reason, a rolling cart setup gives you maximum flexibility.
I’ve used rolling carts in three different apartments, and each time I’ve been grateful for the mobility. Rearranging for parties? Easy. Moving it away from afternoon sun? No problem. Hiding it when your judgmental mother-in-law visits? Done and done.
Cart Design Essentials
Building or modifying a rolling cart requires thinking about stability and function:
- Start with a sturdy metal or wood cart base (Ikea hacks work great here)
- Use locking casters rated for outdoor use and heavy weight (at least 100 lbs capacity total)
- Add a butcher block or stainless steel top for easy cleaning
- Include a lower shelf for propane tank or charcoal storage
- Install a side-hanging basket for quick-access tools
- Consider a towel bar on one end for kitchen towels
The biggest mistake people make with rolling carts is choosing wheels that are too small or flimsy. You need at least 3-inch casters, preferably 4-inch, to handle any bumps or gaps in your patio or balcony. Those tiny furniture wheels are cute but useless here.
Also, locking mechanisms are non-negotiable. You don’t want your cart taking an unplanned journey while you’re flipping steaks. I’ve chased a runaway grill cart exactly once, and that was enough for me to become obsessed with quality locks.
Also Read: 10 Elegant Nail Salon Interior Design Ideas for Luxe Vibes
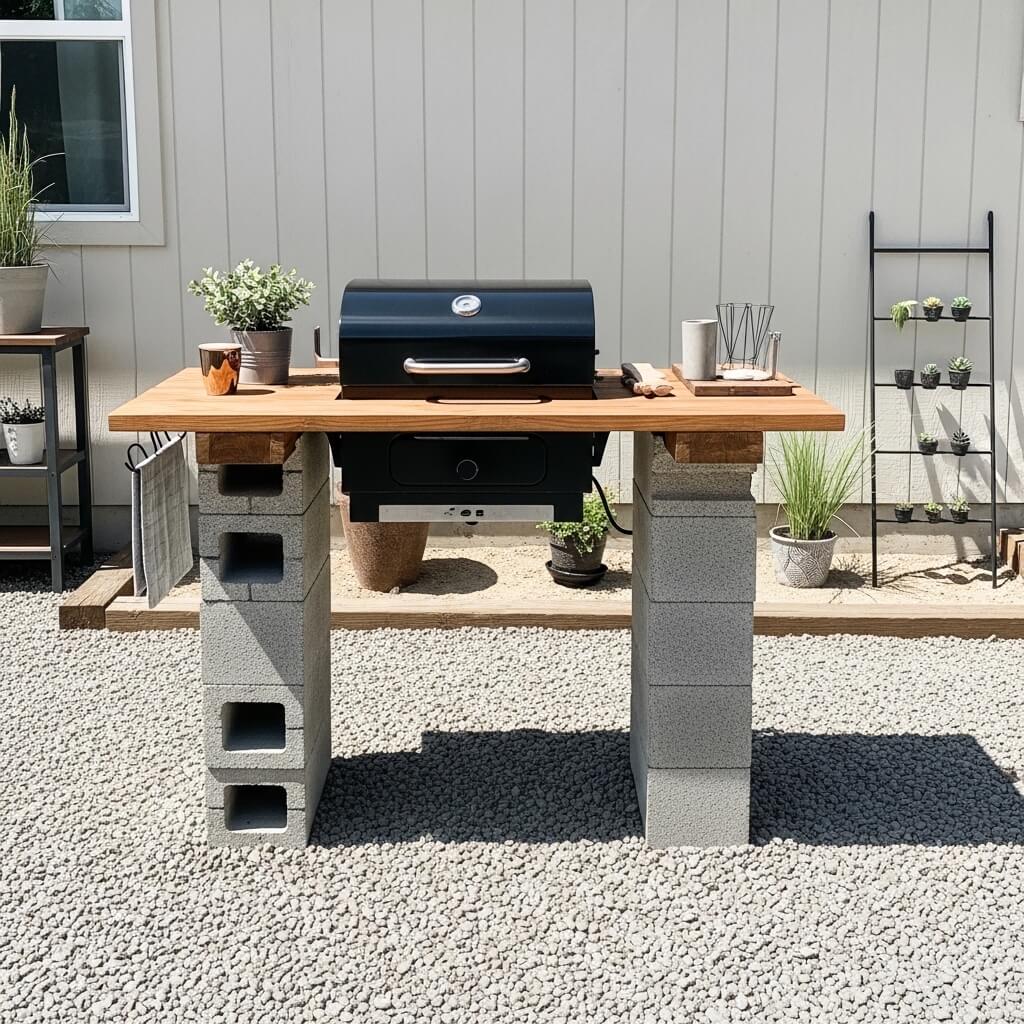
10. Minimal Concrete Block Grill Station
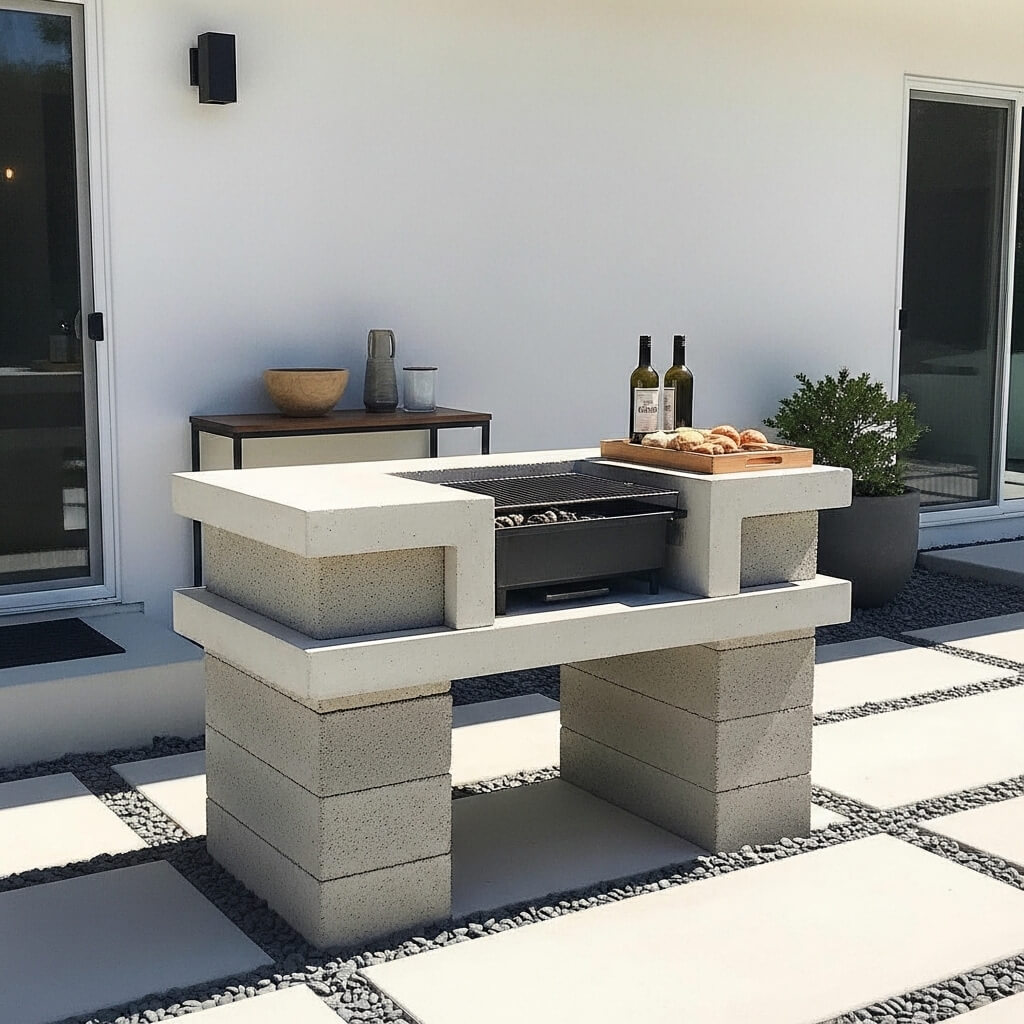
Less Is More (And Cheaper)
This is the zen approach to grill stations. We’re talking absolute minimalism—just enough structure to hold your grill and maybe a couple of essentials. No frills, no excess, just pure function.
I built one of these during a particularly broke summer when my budget for “outdoor furniture” was approximately zero dollars. Turns out, you can create a perfectly functional grill station with just concrete blocks and some salvaged wood. Who knew poverty could be so creative?
Minimalist Build Process
Strip everything down to the essentials:
- Purchase 6-8 concrete blocks (about $2-3 each)
- Arrange blocks in a simple configuration: two stacks for grill support, maybe two more for a side shelf
- Add a wooden plank across blocks for prep space if desired
- Optional: paint blocks with concrete paint for a less industrial look
- Use block holes for utensil storage (those hollow centers are perfect for tongs and spatulas)
The entire project takes maybe 30 minutes to set up and costs under $25. It’s not going to win any design awards, but it absolutely gets the job done. Plus, there’s something honest about the simplicity—no pretense, just grilling.
This approach works especially well if you’re in a temporary situation. Renting for just a year? Don’t want to invest in something permanent? Concrete block minimalism is your answer. When you move, either take the blocks with you or leave them for the next tenant. No guilt, no waste.
The aesthetic is definitely “urban industrial,” which either works for your vibe or it doesn’t. I’ve grown to appreciate the brutalist look, but I totally get that it’s not everyone’s style. Throw some plants around it if you want to soften the concrete jungle feel.
Making Your Small Space Work
Here’s the truth nobody tells you about small-space grilling: it’s not about having less, it’s about being smarter with what you have. Every single one of these DIY station ideas proves that you can create an awesome grilling setup without a massive budget or sprawling backyard.
I’ve personally built or helped friends build variations of all ten designs, and you know what? Each one worked perfectly for the specific space and situation. The pallet station worked great for a friend with a tiny yard. The foldable table saved my sanity during my microscopic-balcony phase. The rolling cart currently lives on my small patio and gets moved around constantly.
Choosing Your Perfect Station
So which design should you go with? Ask yourself these questions:
- How much space do you actually have? Be honest—measure it
- Do you need to move your station regularly? Consider rolling or foldable options
- What’s your actual budget? Some designs cost $20, others closer to $100
- How handy are you with tools? Be realistic about your skill level
- What’s your aesthetic preference? Rustic? Industrial? Modern?
- Do you need maximum storage or minimal footprint?
There’s no wrong answer here. The best grill station is the one you’ll actually build and use, not the one that looks coolest on Pinterest but never makes it past the fantasy stage.
Final Thoughts
Look, I’ve spent years grilling in small spaces, and I can confidently say that limitations breed creativity. Some of my favorite outdoor cooking memories happened on tiny balconies with DIY setups that cost less than a tank of gas.
You don’t need a fancy built-in outdoor kitchen to make amazing food and create great memories. You just need a functional space that works for YOUR situation, whether that’s a corner of a balcony, a small patio, or whatever outdoor space you’ve got.
Pick one of these designs, spend a weekend building it, and then invite some friends over to christen your new grill station properly. Trust me—the burgers will taste better when they’re cooked on something you built with your own hands.
Now stop reading and start building. Those steaks aren’t going to grill themselves!


