10 Clever Small Partition Design Ideas for Tiny Spaces
- Partition Design
 Ben
Ben- 0
- 46 minutes read
You know that awkward moment when you’re standing in your studio apartment wondering how to create some privacy without building actual walls? Yeah, I’ve been there. Living in a tiny space doesn’t mean you have to sacrifice privacy, style, or functionality—you just need to get creative with partitions. I’ve spent way too much time scrolling through design blogs and testing different room divider solutions (some epic wins, some spectacular fails), and I’m here to share what actually works. These aren’t your grandma’s boring room dividers—we’re talking about smart, stylish partition ideas that’ll make your small space feel bigger, not more cramped. Ready to transform your tiny home into a well-organized sanctuary? Let’s get into it.
Sliding Wooden Slat Partition
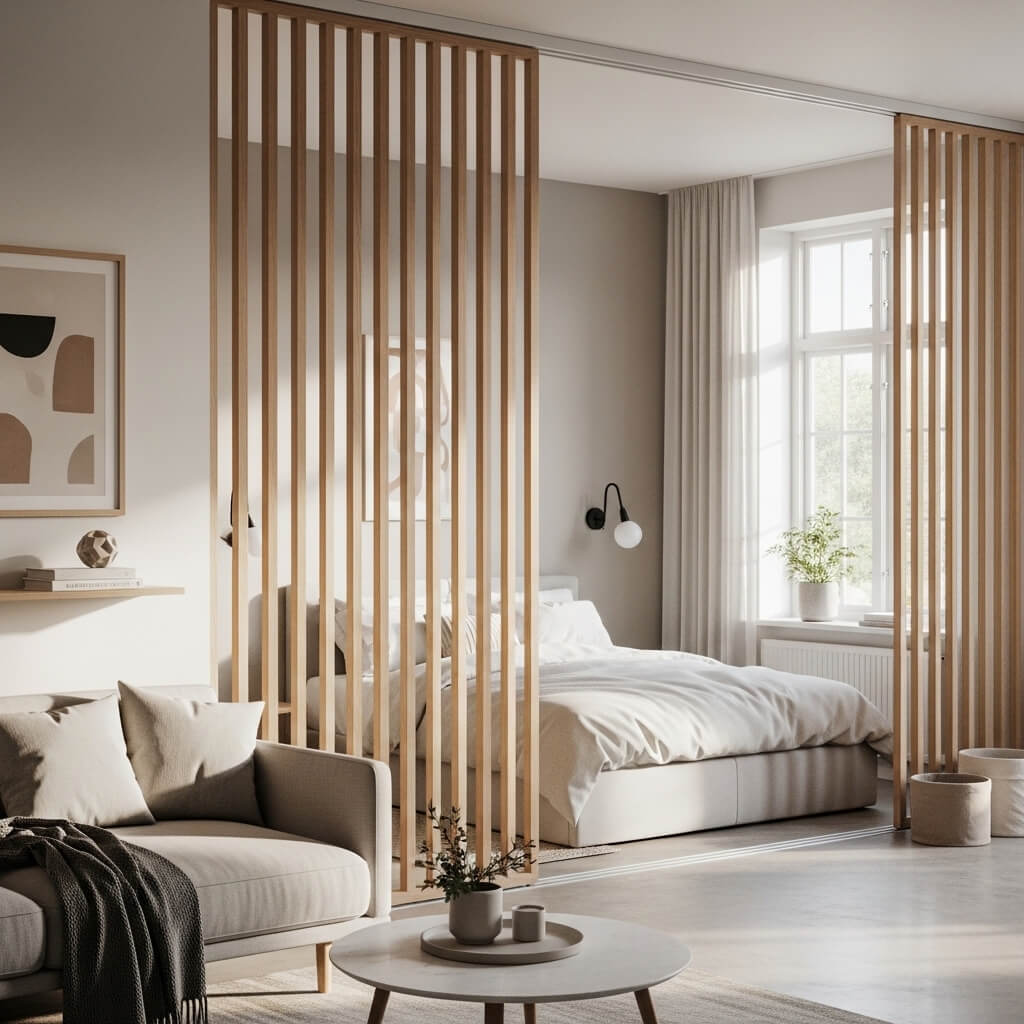
Why This Works So Well
Ever walked into a trendy café and noticed those gorgeous slatted wooden walls that somehow make the space feel both separated and open at the same time? That’s the magic of sliding wooden slat partitions, my friend. I installed one between my bedroom and living area last year, and honestly, it changed everything.
The genius lies in the design itself. Wooden slats create visual separation without blocking light or airflow, which is absolutely crucial in small spaces. You get the privacy you need without that claustrophobic feeling that solid walls tend to create. Plus, the sliding mechanism means you can adjust your space based on your mood or needs—open when you’re hosting friends, closed when you need your beauty sleep.
Installation and Customization
Here’s what I love about this option: you can totally customize it to match your vibe. The slat spacing is completely up to you—wider gaps let in more light and create an airier feel, while narrower spacing offers more privacy. I went with medium spacing (about 2 inches between slats), and it hits that sweet spot perfectly.
Installation isn’t as scary as you might think. You’ll need:
- A ceiling-mounted track system (the sliding hardware)
- Vertical wooden slats (pine, oak, or whatever matches your aesthetic)
- A bottom guide to keep everything stable
- Basic tools and some patience
Pro tip: If you’re renting, look for tension-mounted track systems that don’t require drilling into the ceiling. They’re not quite as smooth, but they work and won’t lose you your security deposit 🙂
Style Versatility
The best part? This design works with practically any interior style. Go for light pine slats in a Scandinavian-inspired space, dark walnut for industrial vibes, or even paint them a bold color if you’re feeling adventurous. I’ve seen people stain theirs in different shades to create an ombre effect, and it looked absolutely stunning.
The sliding wooden slat partition typically costs between $200-$800 depending on whether you DIY or hire someone, plus the quality of materials you choose. IMO, it’s worth every penny for the functionality and style boost you get.
Sheer Curtain Room Divider
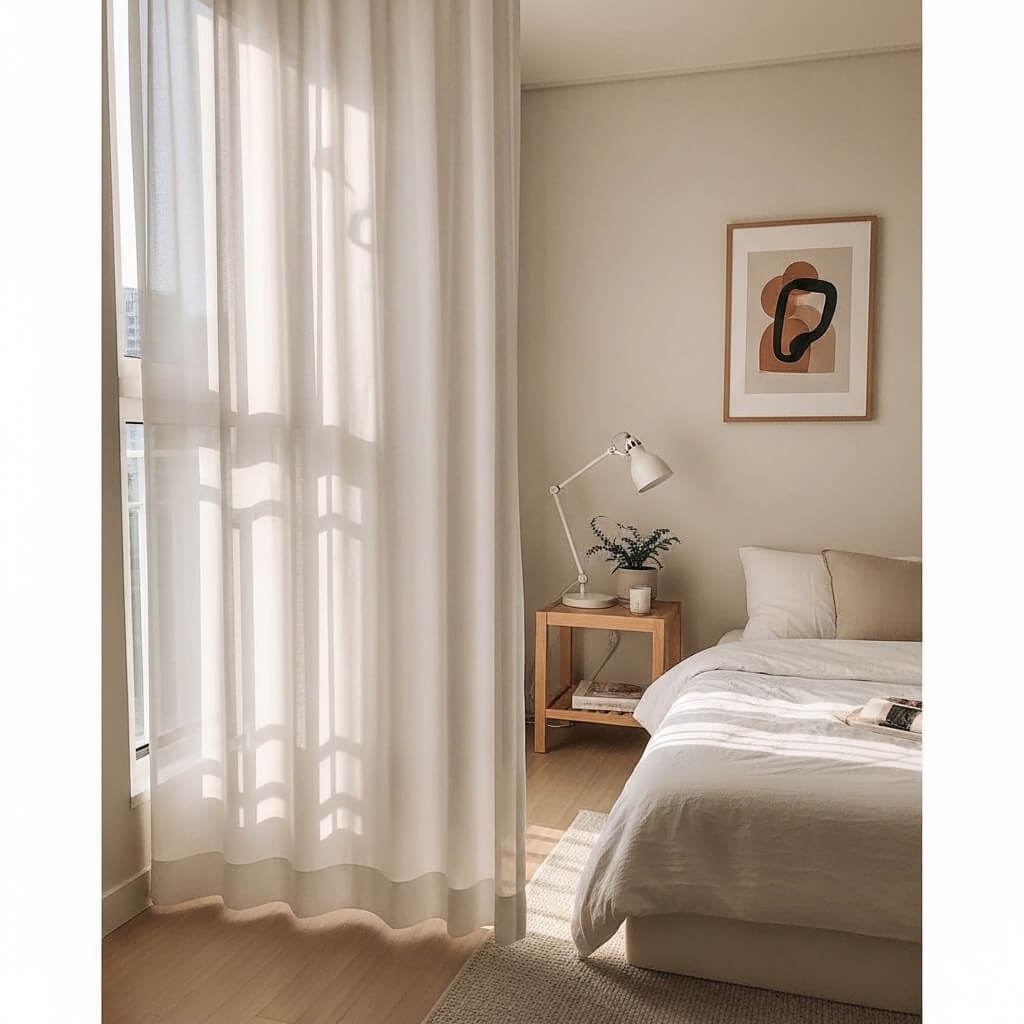
The Softest Solution
Let me tell you about the time I needed a quick fix for separating my workspace from my bedroom. I had exactly $50 and one weekend to figure it out. Enter the sheer curtain room divider—the budget-friendly hero we don’t talk about enough.
Sheer curtains create an ethereal, dreamy separation that’s perfect for tiny spaces because they don’t visually chop up your room. Light flows through them beautifully, and they add this soft, romantic quality that solid partitions just can’t match. Plus, installation takes like 20 minutes tops if you use a ceiling-mounted curtain track.
Choosing the Right Fabric
Not all sheer curtains work equally well as room dividers. You want something with enough opacity to create visual separation but transparent enough to maintain that open feeling. I learned this the hard way after buying super-thin voile curtains that were basically invisible (what was the point, right?).
Look for these characteristics:
- Medium-weight sheer fabrics like linen-cotton blends
- Textured materials that catch light beautifully
- Floor-to-ceiling length for maximum impact
- Neutral colors that won’t overwhelm small spaces (though a pop of color can work if your space is mostly neutral)
Practical Advantages
Beyond looking pretty, sheer curtain dividers offer some seriously practical benefits. Need to quickly open up your entire space for a gathering? Just swoosh them to the side. Want to create a cozy sleeping nook? Draw them closed. They’re also incredibly easy to clean—just toss them in the washing machine every few months.
The cost factor is unbeatable here. You can create a stunning room divider for anywhere from $30 to $150 depending on the quality and length of curtains you choose. I’ve seen people layer multiple sheer panels in different colors for added dimension, and the effect is gorgeous without breaking the bank.
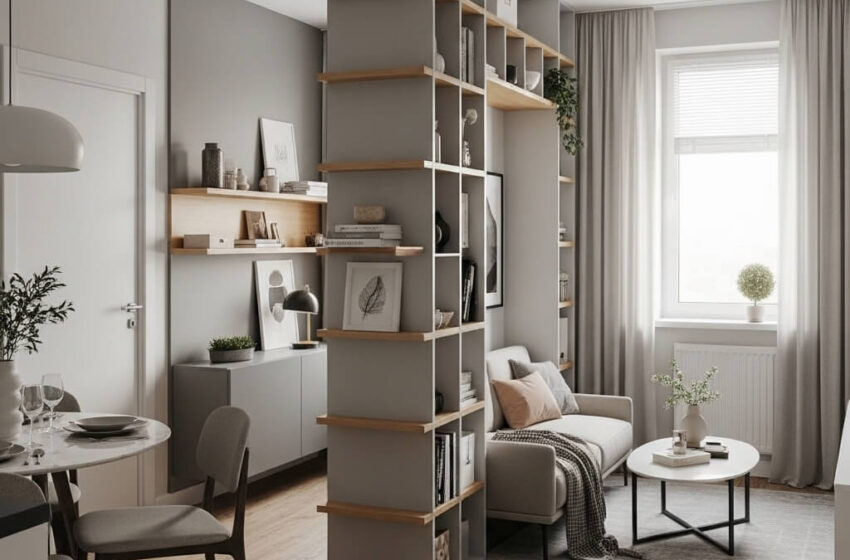
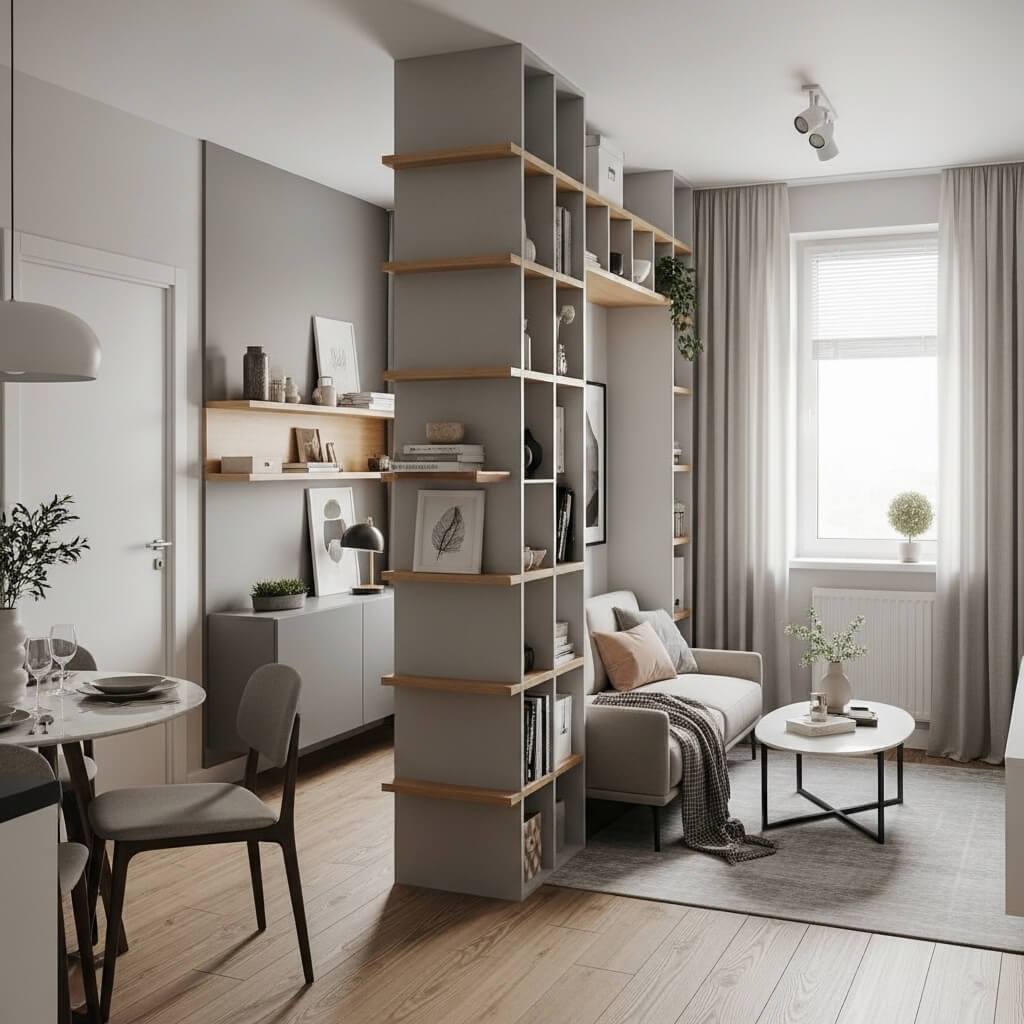
Open Shelf Partition Unit
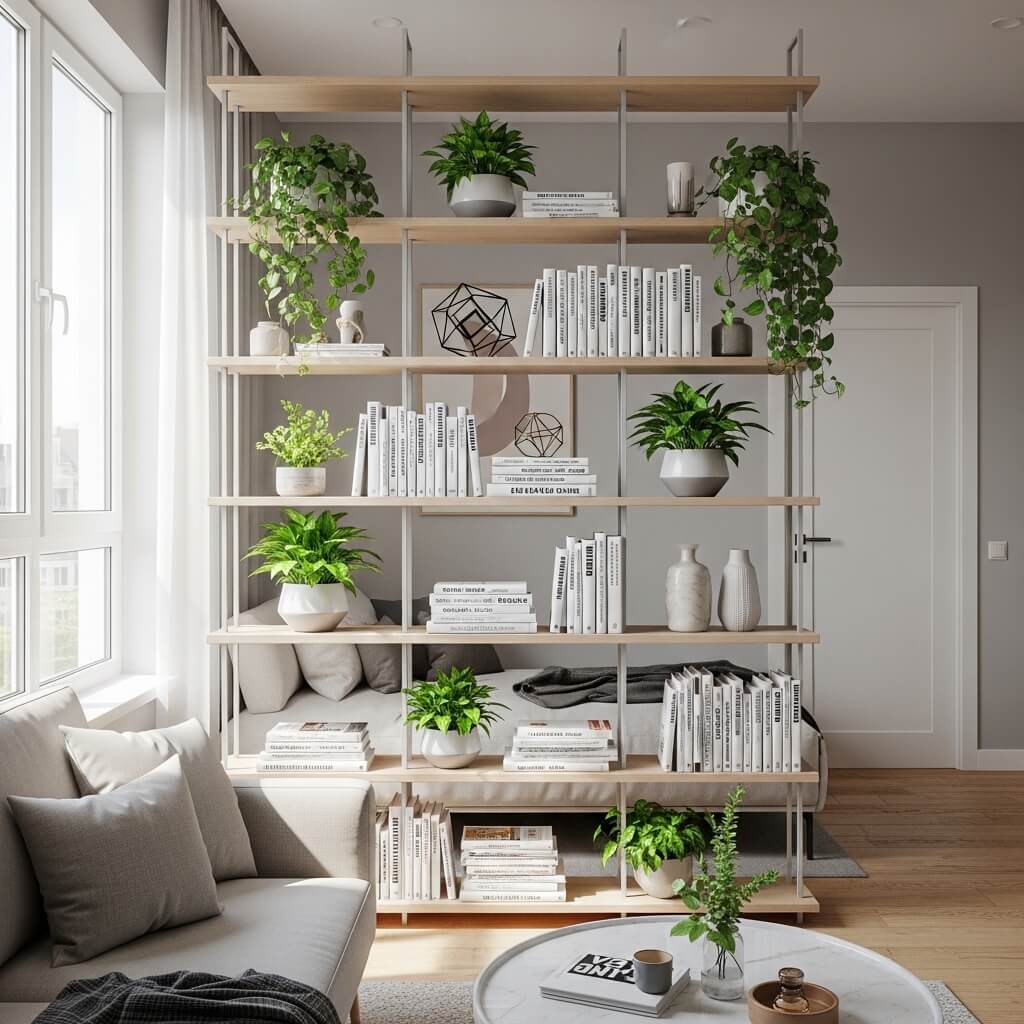
Function Meets Form
Okay, this one’s my absolute favorite because it solves two problems at once—you get storage AND a room divider. Who doesn’t love multifunctional furniture in a tiny space? I use an open shelf unit to separate my entryway from my living room, and it’s become both a functional divider and a showcase for my plant collection.
Open shelving creates boundaries without blocking light, which keeps your space feeling open and airy. You can see through the shelves, but the items on them create enough visual separation to define different zones. Plus, you’re adding valuable storage space, which is basically worth its weight in gold when you’re working with limited square footage.
Strategic Styling
Here’s where it gets fun—how you style your open shelf partition makes all the difference. You don’t want to cram every shelf full of stuff (that’ll just look cluttered and block sightlines), but you also don’t want it looking bare and sad.
My approach:
- Alternate filled and empty shelves for visual breathing room
- Mix open space with grouped items to create interesting focal points
- Use items of varying heights to add dimension
- Include some back-facing books to create small “walls” within the unit
- Add plants (obviously) for life and color
The key is creating enough visual interest to define the space without making the unit feel like a solid wall. Think of it as curated negative space—the empty spots are just as important as the filled ones.
Choosing Your Unit
You’ve got options here, friend. IKEA’s KALLAX series is the go-to budget choice (and honestly, it works great), but you can also find gorgeous vintage units at thrift stores or invest in something custom-built. I went with a mid-century inspired walnut unit from a local furniture maker, and while it cost more ($400 vs. $100 for IKEA), it completely elevated my space.
Consider the height carefully. You want it tall enough to create separation but not so tall that it overwhelms your space or blocks too much light. I recommend something between 5-6 feet tall for most standard ceiling heights.
Also Read: 10 Creative Half Partition Design Ideas for Small Spaces
Folding Screen Divider
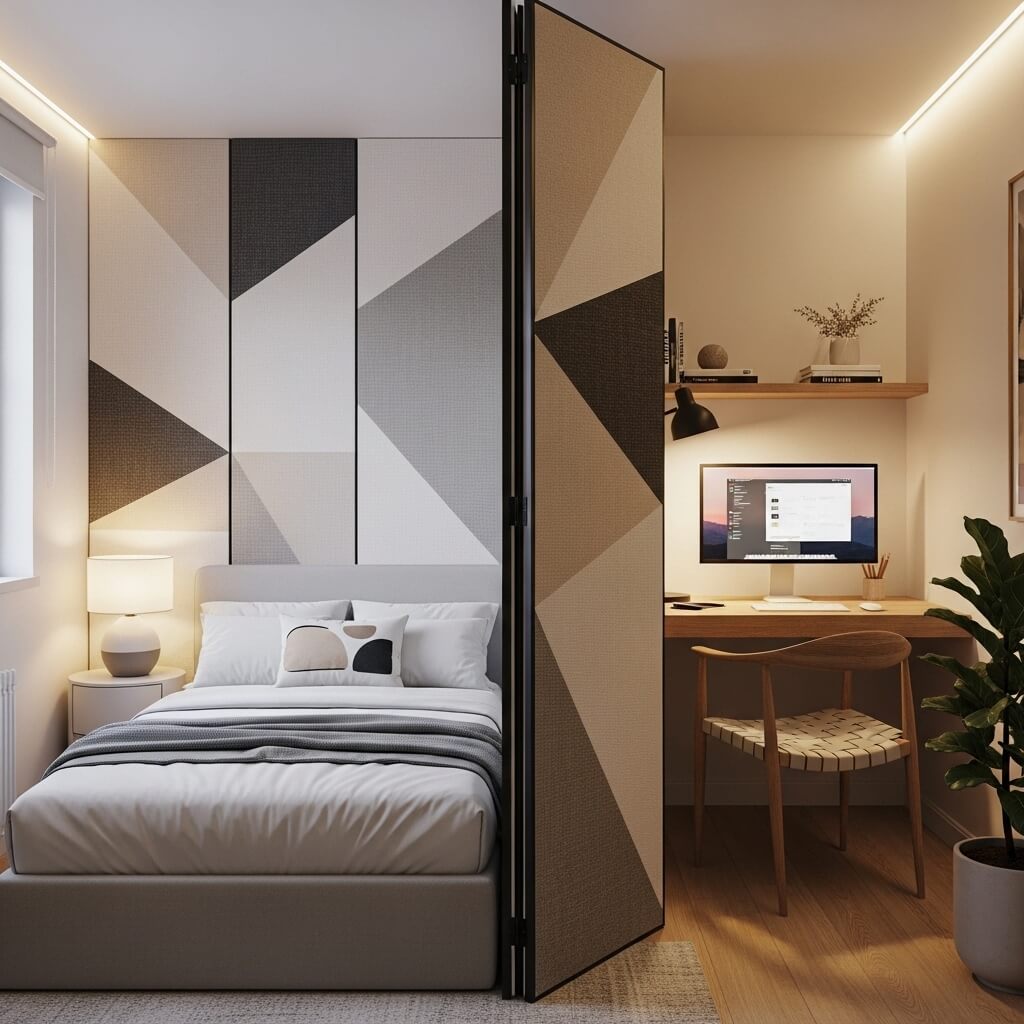
Old School Cool
Folding screens are like the original room dividers, right? But don’t let their traditional roots fool you—modern folding screens are having a major moment, and for good reason. I keep one behind my bedroom door for those times when I need to create a quick changing area or hide my embarrassingly large pile of laundry from video call backgrounds.
The beauty of folding screens lies in their flexibility and portability. Need a partition today but not tomorrow? Fold it up and tuck it away. Want to use it in different rooms for different purposes? Just pick it up and move it. Try doing that with a built-in partition!
Style Options Galore
The variety of folding screen designs available today is honestly overwhelming (in a good way). You’ve got everything from traditional Japanese shoji screens to modern geometric metal designs, from fabric-covered panels to rattan weaves. The style you choose can become a major design statement in your space.
Some popular options:
- Woven rattan or bamboo for bohemian or natural aesthetics
- Fabric-covered panels that you can customize or DIY
- Painted wood for a pop of color or artistic touch
- Metal frames with fabric or acrylic inserts for contemporary spaces
- Carved wood screens for dramatic, traditional elegance
I’ve got a three-panel rattan screen that I scored at a thrift store for $40, and it’s one of my favorite pieces. The natural texture adds warmth to my space, and it creates just enough separation without feeling heavy.
Practical Considerations
Here’s something people don’t always think about: folding screens can be tippy, especially if you have pets or kids (or are just naturally clumsy like me). Look for screens with weighted bases or wider panel widths for better stability. Some even come with small hooks or brackets to secure them to walls if needed.
Height matters here too. You want your screen tall enough to provide privacy when you’re sitting down, but it doesn’t necessarily need to reach the ceiling. Most screens range from 5-6 feet tall, which works perfectly for most applications.
Glass Panel Partition with Black Frame
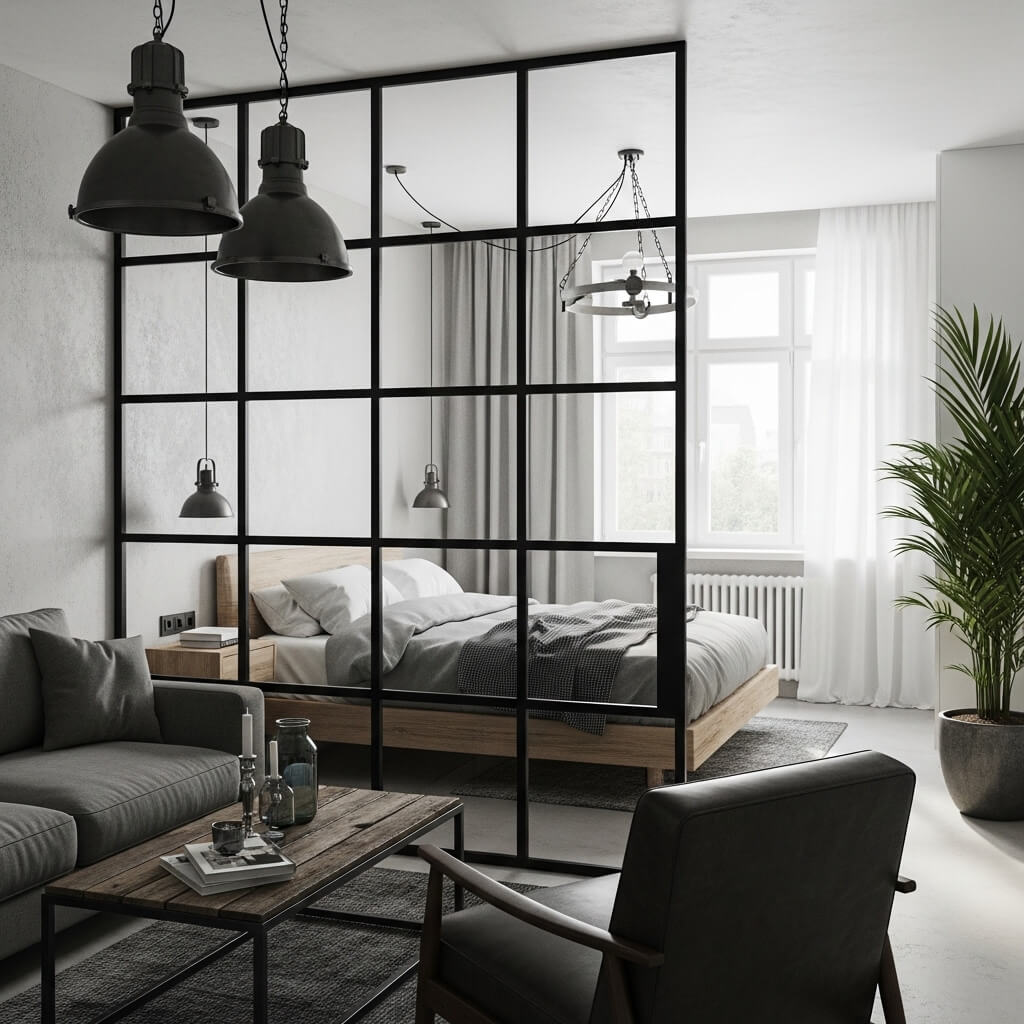
Industrial Chic Meets Functionality
Want to know what partition style makes me weak in the knees every single time? Glass panels with black frames. There’s something about that industrial-meets-modern aesthetic that just works, especially in small spaces where you desperately need light to flow through.
Glass partitions create clear boundaries while maintaining visual continuity, which is basically the holy grail of small space design. You get defined zones without the cramped feeling that solid partitions create. I used a smaller version to separate my home office nook from the rest of my living room, and it makes the space feel intentional and professional without blocking natural light.
The Black Frame Advantage
Let’s talk about why the black frame specifically is such a winner. Black frames create strong, clean lines that define your space with authority. They photograph beautifully (hello, Instagram-worthy home!), and they work with virtually any color scheme or design style. The contrast between the transparent glass and bold black framing creates visual interest without adding visual weight.
You can choose between:
- Grid-style frames (think factory windows) for classic industrial vibes
- Minimal frames with fewer divisions for a sleeker look
- Floor-to-ceiling panels for maximum impact
- Half-height or three-quarter height for a lighter, more open feel
Installation and Cost Reality Check
Real talk: glass panel partitions aren’t the cheapest option on this list. A quality glass partition with black framing typically runs anywhere from $500 to $2000+ depending on size, glass type, and whether you need professional installation (spoiler: you probably do unless you’re super handy).
That said, if you can swing the budget, it’s an investment that seriously elevates your space. Tempered or safety glass is non-negotiable here—regular glass is just asking for trouble. Frosted or textured glass offers more privacy than clear glass while still letting light through, which might be worth considering depending on your needs.
FYI, some companies now offer DIY-friendly versions with lighter-weight materials or modular systems that make installation more manageable. Do your research before committing!
Hanging Plant Divider Wall
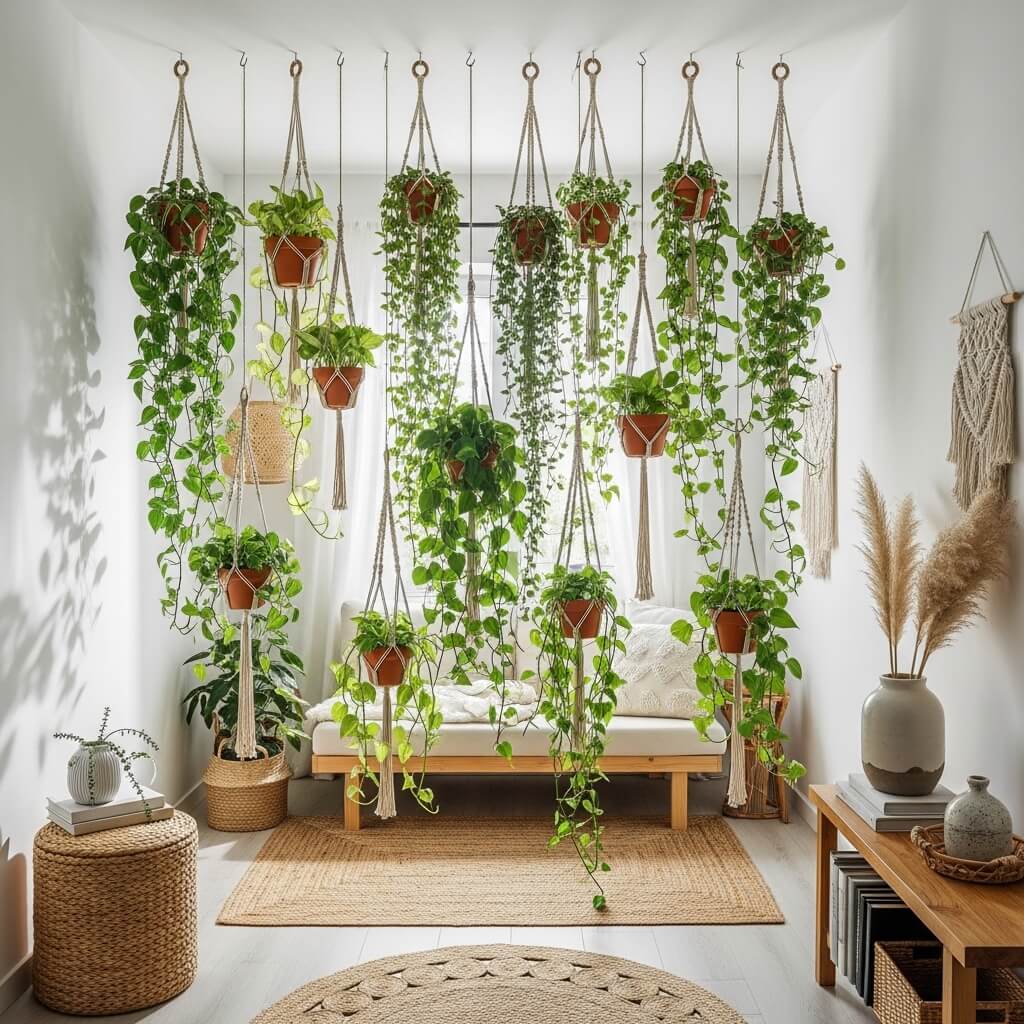
Living Architecture
Alright, plant lovers, this one’s for us. A hanging plant divider wall combines my two favorite things: greenery and clever space solutions. I created one in my studio using a combination of macramé hangers and a ceiling-mounted rod system, and it’s become the most commented-on feature in my entire apartment.
Living plant walls create organic separation that feels fresh, literally and figuratively. They purify your air, add color and life to your space, and create a stunning visual barrier that changes and grows over time. Plus, there’s something incredibly calming about having plants frame different areas of your home.
Creating Your Plant Wall
You’ve got several approaches here depending on your commitment level and ceiling situation. The easiest method uses a ceiling-mounted curtain rod or suspended dowel with plants hanging at different heights. I went with a double-rod system—one closer to the ceiling and one about a foot lower—to create more depth and dimension.
Plant selection is crucial:
- Choose trailing plants like pothos, philodendrons, or string of hearts for maximum coverage
- Mix in different textures with ferns, spider plants, or prayer plants
- Consider light requirements and choose plants that match your space
- Include some faster-growing varieties for quicker coverage
- Add variety in pot sizes and hanger lengths for visual interest
My setup includes mostly pothos (because they’re basically indestructible), a few spider plants (they’re having babies constantly, which is adorable), and one fancy string of turtles that I baby like it’s royalty.
Maintenance Real Talk
Let me be honest: a plant divider wall requires more maintenance than other partition options. You’ll need to water regularly, occasionally trim and propagate, and deal with the inevitable crispy leaf here and there. But if you’re already a plant person, this extra care just becomes part of your routine.
Pro tip: Install your plant wall somewhere accessible for watering. I learned this lesson when I hung plants in a spot that required me to stand on my couch with a step stool to water them. Not my finest design decision :/
The cost here varies wildly depending on whether you already own plants and hangers. Starting from scratch, budget $100-$300 for a decent-sized plant wall including pots, hangers, and the rod system.
Also Read: 10 Trendy Modern Partition Design Living Rooms Ideas for Cozy
Rope Divider Design
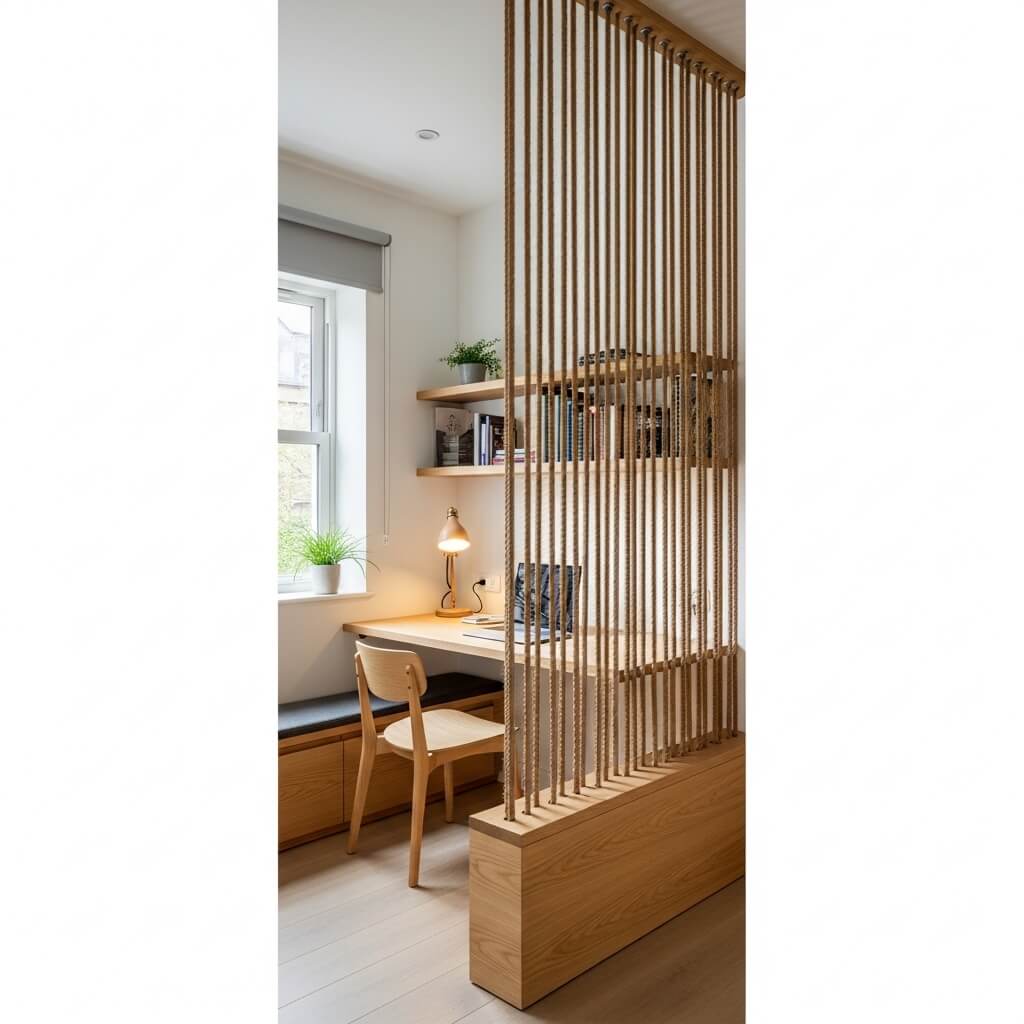
Nautical Meets Modern
Okay, hear me out on this one because rope dividers might sound weird at first, but they’re actually incredibly cool when done right. I first saw this in a beachy café and became obsessed. Rope dividers create soft, textured boundaries that add major visual interest without blocking light or views.
The concept is simple: you suspend ropes vertically from ceiling to floor (or from a frame structure) to create a curtain-like effect. The ropes can hang straight down or you can get creative with knots, wrapping, or weaving patterns. The result is an architectural element that’s part art installation, part functional divider.
Materials and Installation
Natural fiber ropes work best for this application—think cotton, jute, or hemp. I used thick cotton rope (about ¾ inch diameter) for my version, and the texture adds so much warmth to my space. You can play with rope thickness and spacing to control how much visual separation you want.
Installation requirements:
- Sturdy ceiling mounting (this gets heavy, so find those joists!)
- Proper spacing between ropes (I went with 4-inch spacing)
- Bottom weights or anchors to keep ropes hanging straight
- Accurate measuring to ensure all ropes are the same length
The spacing you choose dramatically affects the final look. Closer spacing creates more privacy and a denser visual barrier, while wider spacing feels more open and decorative. I went with medium spacing because I wanted definition without completely closing off the view.
Style Applications
Rope dividers work surprisingly well in various design styles. They’re obvious winners in coastal or nautical themes, but I’ve also seen them rock in industrial spaces (especially with metal pipe frames), bohemian interiors, and even modern minimalist designs when you use clean, simple rope in neutral colors.
You can customize with:
- Different rope colors (natural, white, gray, or even dyed colors)
- Varied thicknesses for dimensional interest
- Macramé knots or patterns for added texture
- Mixed materials like incorporating wooden beads or metal elements
- Ombre effects using different colored ropes
Budget-wise, this is pretty affordable. You can create a rope divider for $50-$150 depending on the size of your space and the rope quality you choose. Just make sure you buy enough—I definitely underestimated on my first attempt and had to order more!
Half Wall Partition with Storage
The Best of Both Worlds
Half walls are genius for small spaces because they define areas without completely closing them off. Add storage to that equation, and you’ve got a seriously hardworking design element. I helped my sister install a half wall partition between her kitchen and living room, and the storage component has become indispensable for her small apartment.
The typical height for a half wall partition sits around 3.5 to 4.5 feet—tall enough to create visual and functional separation when you’re sitting down, but low enough to maintain an open feel and allow conversation and light flow. The storage component usually lives on one or both sides of the wall, adding practical value to the architectural element.
Storage Configuration Options
This is where you can get really creative based on your specific needs. The storage side facing your living area might feature open shelving for books and décor, while the kitchen-facing side could include closed cabinets or drawers. Or flip that scenario based on what works for you—there’s no wrong answer here.
Popular storage configurations:
- Built-in shelving on one or both sides
- Cabinet base with open shelving on top
- Combination of drawers and cubbies for varied storage
- Desktop surface on one side for a workspace
- Recessed niche in the wall itself for décor
My sister went with open shelving on the living room side (styled with plants, books, and her ridiculous candle collection) and a cabinet with countertop on the kitchen side, which gave her much-needed extra prep space. The countertop also serves as a casual eating bar with stools—talk about multifunctional!
Building Considerations
Full disclosure: this isn’t the easiest DIY project on this list unless you’ve got solid carpentry skills. You’re basically building a piece of furniture or a small wall structure, which requires some know-how. Working with a contractor or skilled DIYer is probably wise unless you really know what you’re doing.
Consider these factors:
- Weight distribution and floor support (especially important in upper-floor apartments)
- Electrical needs if you want to add outlets or lighting
- Material choices that match your existing space
- Local building codes if you’re in a condo or rental
Cost varies dramatically based on whether you DIY or hire help, plus material choices. Budget anywhere from $300 for a basic DIY build to $2000+ for professional custom work. It’s an investment, but the added storage and spatial definition often pay off in improved functionality.
DIY PVC Pipe Partition
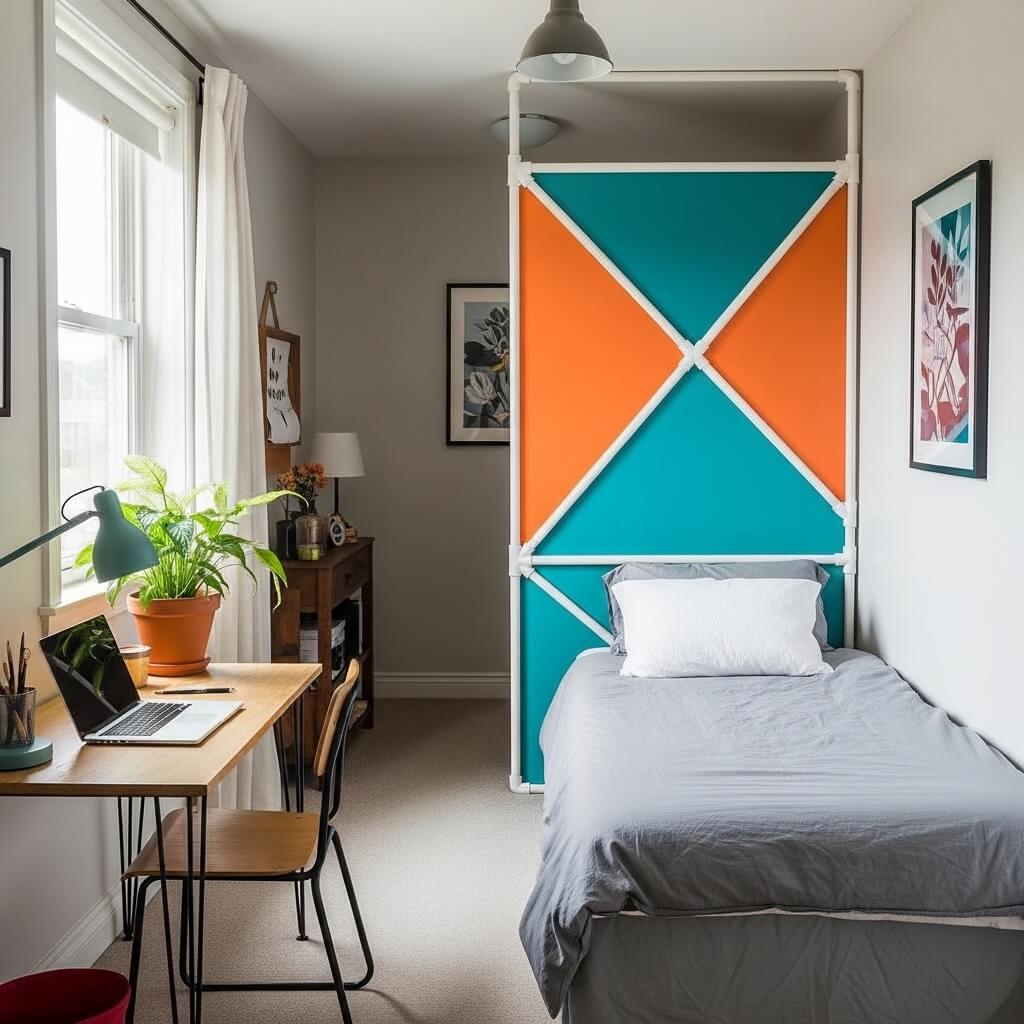
Budget-Friendly and Trendy
Let me tell you about the most surprising partition on this list. PVC pipe partitions sound super industrial and maybe even a bit janky, but when you see them done well, they’re actually pretty amazing. I made one for about $75 total, and it’s become a conversation starter every single time someone visits.
PVC pipe creates strong geometric lines that work brilliantly in modern, industrial, or even bohemian spaces. The white pipes (or spray-painted in any color you want) form a grid or frame structure that you can leave minimal or customize with fabric, plants, or other materials woven through.
Building Your PVC Partition
The construction process is actually pretty straightforward, which is why this project rocks for DIY beginners. You’re basically connecting PVC pipes using corner joints and T-joints to create whatever grid pattern or structure you want. No special tools required—just a PVC pipe cutter (or a hacksaw) and some PVC cement.
Basic building steps:
- Plan your design and measure carefully
- Cut pipes to size (hardware stores often cut for you)
- Dry fit everything before cementing
- Assemble using PVC cement following manufacturer instructions
- Add weight to the base if needed for stability
- Customize with paint, fabric, or decorative elements
I created a simple grid pattern with 1-inch diameter PVC pipes, making rectangular frames about 12 inches wide by 18 inches tall. The whole structure stands about 6 feet tall and 4 feet wide, creating a nice separation between my entryway and living space.
Customization Ideas
The bare PVC structure looks cool in its own right, but you can take it further with customization. I’ve woven macramé cord through mine in some sections and hung small potted plants in others. The structure essentially becomes an armature for whatever creative vision you have.
Try these ideas:
- Spray paint the pipes in metallics, bold colors, or keep them white
- Weave fabric, rope, or cord through the grid
- Hang plants at various heights
- Attach lightweight shelves for small décor items
- String lights through the structure for ambiance
- Clip photos or artwork to create a gallery wall effect
The beauty of PVC is its flexibility—you can completely change the look seasonally or whenever you get bored. Plus, if you move or want to reconfigure your space, you can literally take it apart and rebuild it in a new configuration. Can’t do that with a built-in wall!
Also Read: 10 Luxury Hall Partition Design Ideas for Elegant Homes
Mirror Panel Room Divider
Space-Expanding Magic
Want to know the secret weapon for making tiny spaces feel bigger? Mirrors, friend. Always mirrors. A mirror panel room divider gives you the functional separation you need while visually doubling your space through reflection. I use a three-panel folding mirror screen in my bedroom, and it makes the room feel dramatically larger while creating a private dressing area.
The psychology of mirrors in small spaces is real. They bounce light around, create the illusion of depth, and generally make everything feel more open and airy. When you use mirrors as a partition, you’re solving your space-division needs without sacrificing that crucial sense of openness.
Choosing Your Mirror Partition
Mirror partitions come in several styles, from folding screens with mirrored panels to stationary mirror installations with decorative frames. Safety is paramount here—you absolutely need shatter-resistant or safety-backed mirrors, especially if you have kids or pets. The last thing you want is a broken mirror disaster in your small space.
Style considerations:
- Full mirror panels for maximum reflective effect
- Antiqued or tinted mirrors for vintage or softer vibes
- Geometric or segmented mirror pieces for visual interest
- Framed vs. frameless depending on your aesthetic
- Mirror size and placement to reflect your best features (like windows or artwork, not your messy corners)
I went with antiqued mirror panels in a black frame, which gives that gorgeous vintage feel while still being functional. The slight distortion in antiqued mirrors also helps diffuse reflected images a bit, which feels less stark than crystal-clear mirrors everywhere.
Strategic Placement
Here’s where you need to think strategically. What do you want your mirror partition to reflect? Position it to catch natural light from windows, reflect a beautiful piece of art or a plant corner, or create interesting depth. Avoid placing mirrors directly opposite cluttered areas unless you enjoy seeing your mess multiplied.
I positioned mine to catch light from my window and reflect my styled bookshelf—basically the only corner of my apartment that consistently looks Instagram-worthy. Strategic placement for the win!
Cost-wise, mirror partitions range from about $150 for basic folding screens to $500+ for larger, higher-quality installations. The investment pays off in the space-expanding effect you get, especially in really tight quarters where every visual trick helps.
Conclusion
There you have it—ten partition ideas that actually work in tiny spaces without making them feel like cramped little boxes. The key is choosing a solution that matches both your spatial needs and your personal style. Maybe you’re all about that bohemian plant wall life, or perhaps the sleek industrial vibe of glass and black frames speaks to your soul. Either way, you don’t have to settle for boring or bulky partitions that eat up precious square footage.
I’ve tried most of these solutions myself over the years (perks of moving frequently and having a small-space obsession), and each one brings something unique to the table. The sliding wooden slats offer that perfect balance of privacy and openness, while the sheer curtains give you flexibility on a budget. The open shelving adds storage you desperately need, and the mirror panels make your space feel twice as big. Pick the one that makes sense for your specific situation, or get creative and combine elements from different ideas.
Remember, small space living doesn’t mean you can’t have privacy, style, or well-defined zones—you just need to think a bit more creatively about how you achieve them. Now go forth and partition your tiny kingdom like the space-savvy design genius you are!