10 Stunning Succulent Garden Design Ideas for Small Spaces
- Garden Design
 Ben
Ben- 0
- 33 minutes read
Look, I get it. You’re staring at your tiny apartment balcony, postage-stamp backyard, or that awkward corner in your living room thinking there’s no way you can create a jaw-dropping garden. Well, I’m here to tell you that small spaces and succulents are basically a match made in heaven. These little guys don’t need much room to thrive, and honestly, they’re kind of the overachievers of the plant world—low maintenance but high impact.
I’ve been obsessed with succulents for years now, and let me tell you, my own space is laughably small. But that hasn’t stopped me from creating some seriously cool displays that make visitors do a double-take. Whether you’ve got a balcony rail, a bare wall, or just a sunny windowsill, I’m about to share ten design ideas that’ll transform your compact space into a succulent paradise. Ready? Let’s get into it.
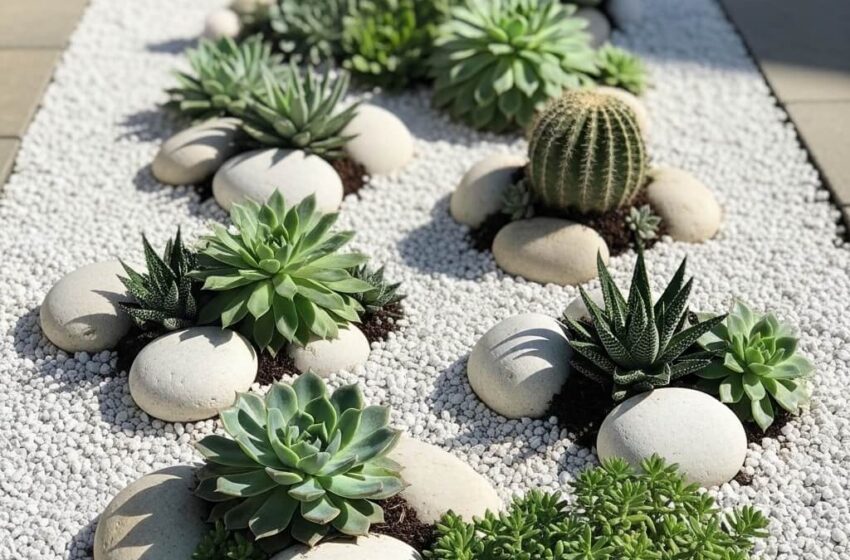
Minimalist Succulent Rock Garden
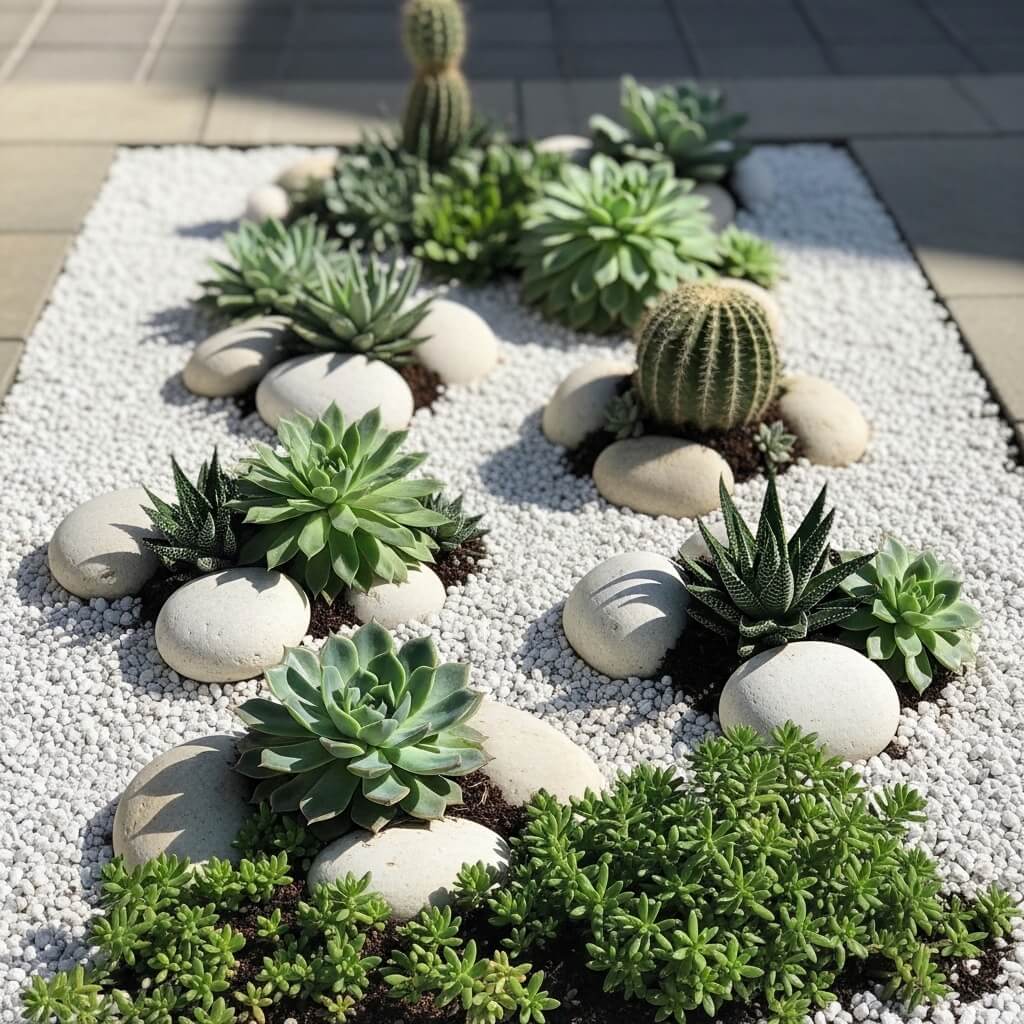
Ever notice how the simplest designs often pack the biggest punch? That’s exactly what a minimalist succulent rock garden does—it strips away all the unnecessary stuff and focuses on clean lines, negative space, and carefully chosen elements.
I built my first rock garden in a shallow ceramic tray (one of those modern rectangular ones), and the beauty of this design is that you can literally create it anywhere. You need three main components: succulents (obviously), rocks or pebbles, and a container. The trick here is restraint—and trust me, that’s harder than it sounds when you’re a plant hoarder like me.
Here’s what makes this design work:
- Choose 3-5 succulent varieties max – I typically go with different textures and heights but stick to a cohesive color palette
- Use neutral-colored rocks – Think white pebbles, black river stones, or natural gray gravel
- Leave plenty of empty space – This is where people mess up; negative space is your friend here
- Arrange in odd numbers – Three echeverias look way better than four, I don’t make the rules
The whole point is creating a zen-like atmosphere where each plant can breathe and stand out. I remember placing mine on my desk, and suddenly my workspace felt like a sophisticated office instead of a chaotic mess (well, at least visually :).
Position your larger succulents first, then work smaller specimens around them. Add your rocks strategically to create visual balance, and boom—you’ve got yourself an Instagram-worthy minimalist garden that requires maybe five minutes of care per week.
Vertical Wall Succulent Garden
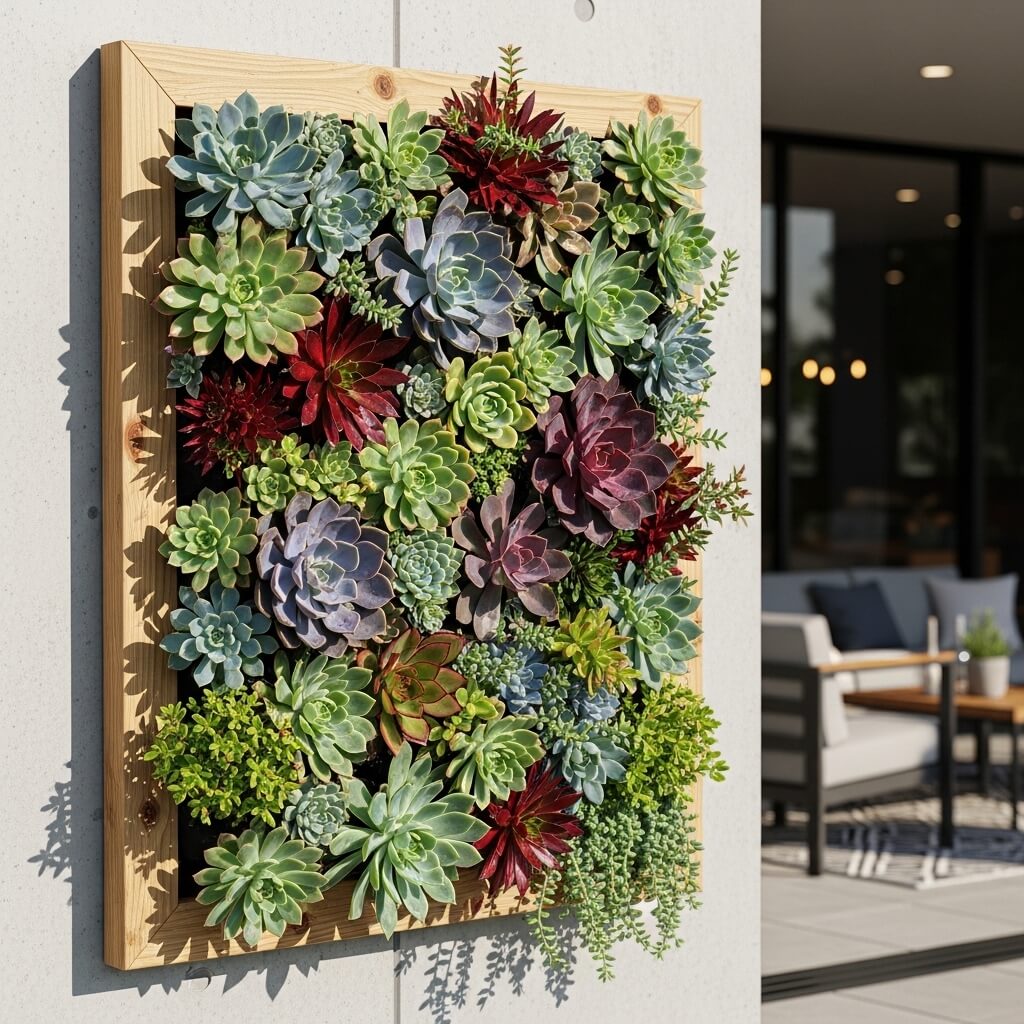
Okay, so you’re telling me you don’t have floor space? No problem. Let’s go vertical, baby! A living wall of succulents is not only a legitimate space-saver but also an absolute showstopper that’ll make your friends insanely jealous.
I installed one in my hallway (which is basically the width of a pencil), and it completely changed the vibe of that narrow space. You can buy pre-made vertical planters, but honestly, I’ve had great success with DIY versions using wooden pallets, picture frames with chicken wire backing, or those specialized succulent wall planters.
What you need to know:
- Drainage is crucial – You’ll need a system that prevents water from streaming down your wall (learned that the hard way)
- Choose drought-tolerant varieties – Sedums, sempervivums, and smaller echeveria species work brilliantly
- Consider the light – Make sure your wall gets adequate light, or invest in a grow light
- Anchor it properly – These get heavy when wet, so don’t skimp on wall anchors
The installation process takes some patience. I typically lay the frame flat, plant everything, and let it establish for about two weeks before hanging it vertically. This gives the roots time to grab hold so your plants don’t fall out when you mount it.
IMO, the vertical garden is the coolest way to maximize space while creating a genuine living art piece. Plus, it’s a fantastic conversation starter when guests come over. “Oh, this old thing? Just my wall garden.” Chef’s kiss
Mini Zen Succulent Garden
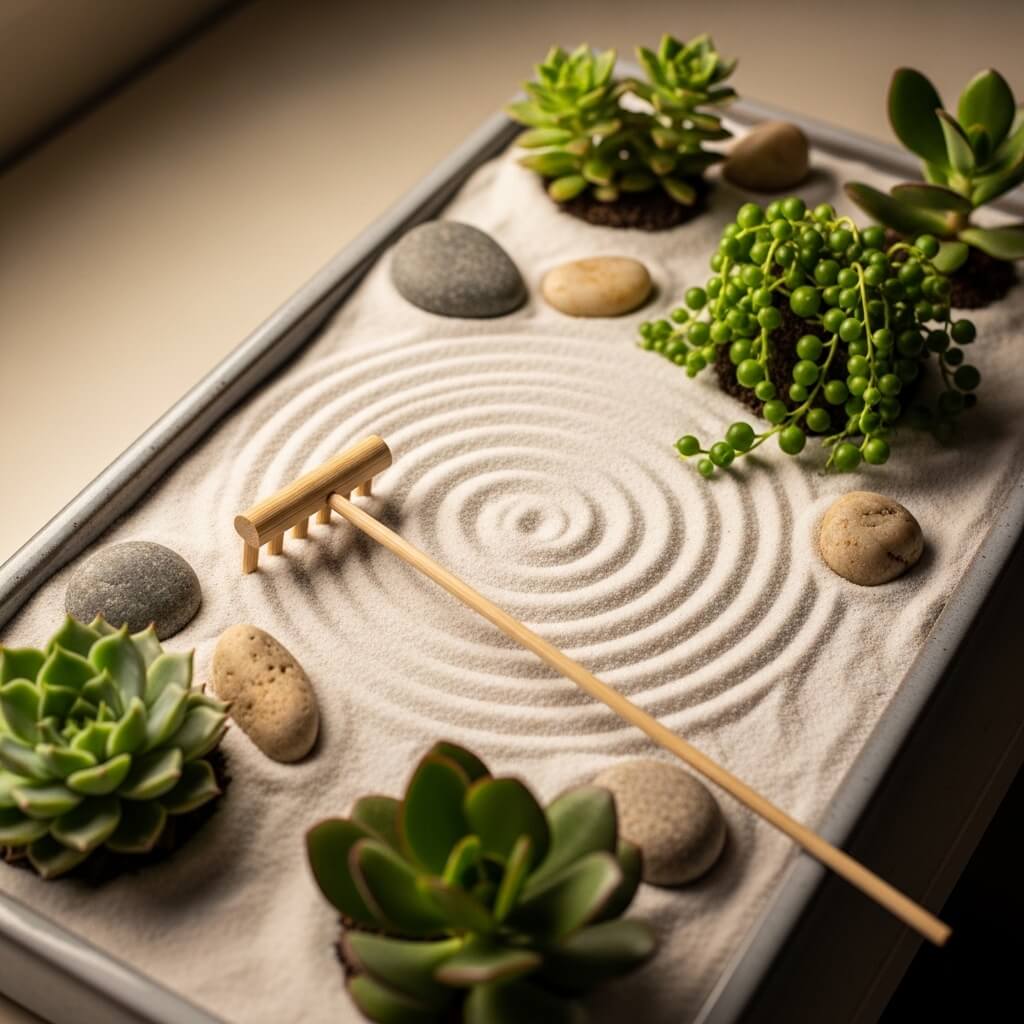
Want to create your own little meditation spot without needing an actual garden? A mini zen succulent garden combines the peaceful aesthetics of traditional Japanese rock gardens with the easy-care nature of succulents.
I keep one on my coffee table, and it’s become my go-to stress relief. There’s something oddly therapeutic about raking tiny patterns in the sand while ignoring my actual responsibilities. You’ll need a shallow container (circular ones look particularly nice), play sand or fine gravel, miniature succulents, small rocks, and a mini rake.
Essential elements include:
- Fine white or beige sand – This represents water in traditional zen gardens
- Carefully placed rocks – These symbolize islands or mountains
- Minimal plant selection – Usually 1-3 small succulents
- A mini rake – For creating those satisfying ripple patterns
- Optional: tiny figurines or a small bridge – But keep it simple and meaningful
The beauty here is the intentionality behind each placement. Unlike other gardens where you might cram in as many plants as possible (guilty), zen gardens celebrate empty space and simplicity. Position your succulents asymmetrically—balance doesn’t mean symmetry in zen design.
I change my sand patterns weekly, sometimes daily when I’m particularly stressed. It’s weirdly meditative, and your plants won’t judge you for it. Choose slow-growing varieties like haworthias or small aloes so you don’t have to redesign constantly.
Also Read: 10 Smart Garden Design Layout Ideas for Easy Planning
Hanging Succulent Basket Display
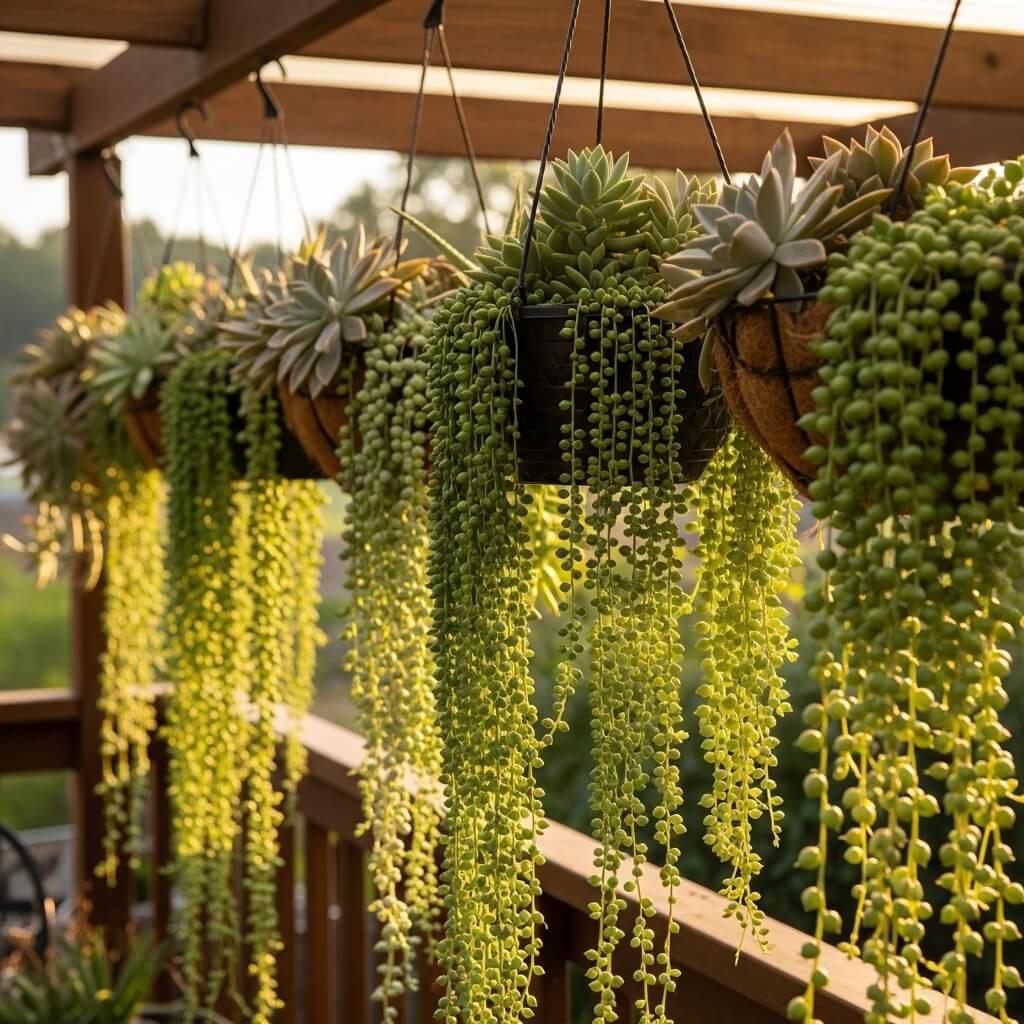
Here’s the thing about hanging baskets: people assume they’re only for trailing petunias or ferns, but succulents absolutely kill it in hanging displays. I’ve got three hanging in my kitchen window, and they’re probably my favorite setup.
Hanging succulent baskets solve multiple problems:
- They utilize unused vertical space
- They keep plants away from pets or kids
- They create visual interest at different heights
- They’re perfect for trailing varieties like string of pearls or burro’s tail
The key is choosing the right container and the right plants. I prefer wire baskets lined with coco fiber or those gorgeous ceramic hanging planters with drainage holes. Whatever you do, make sure it has proper drainage—waterlogged succulents are sad succulents.
For plant selection, mix upright growers in the center with trailing varieties around the edges. My current favorite combo is a central echeveria surrounded by string of pearls and trailing sedums. As the trailing plants grow, they create this cascading waterfall effect that’s absolutely stunning.
Water these less frequently than ground-level plants since they typically get more air circulation and dry out faster. I check mine by sticking my finger in the soil—if it’s bone dry an inch down, I water. Otherwise, I leave it alone. Has this lazy approach worked for me? Absolutely.
Tiered Wooden Succulent Planter

Want maximum plants in minimum space? A tiered wooden planter is your answer. Think of it like an apartment building for succulents—multiple levels, everyone gets their own space, and the vertical design keeps your footprint small.
I built mine using reclaimed wood (okay, fine, I bought a pre-made one because I’m not that handy), and it sits perfectly on my narrow balcony. You can find these in various sizes, from tabletop versions to larger floor models.
Why tiered planters rock:
- Increased growing space – Multiple levels mean more plants in the same floor space
- Visual drama – The height variation creates eye-catching dimension
- Drainage flexibility – Each tier can have different soil mixes if needed
- Easy access – No bending down to tend upper-level plants
When designing your tiered garden, think about color gradients or texture patterns across the levels. I went with cool-toned succulents on top (blues and purples) and warmer tones below (reds and oranges), creating this gorgeous ombre effect.
Place your sun-loving varieties on the upper tiers where they’ll catch the most light, and more shade-tolerant species on lower levels. I learned this after my poor haworthia got sunburned on the top tier—whoops. Rotate the entire planter occasionally so all sides get equal light exposure.
Succulent Fairy Garden Design

Alright, I know what you’re thinking—fairy gardens sound cutesy and maybe a bit much. But hear me out! A succulent fairy garden lets your inner child run wild while creating an absolutely enchanting miniature landscape.
I made one for my niece’s birthday (and then secretly wanted to keep it for myself), and the creative possibilities are endless. You’re basically creating a tiny world where imagination meets horticulture.
Here’s what you need:
- A wide, shallow container – Provides room for your miniature scene
- Small succulent varieties – Sempervivums, sedums, and mini echeverias work perfectly
- Miniature accessories – Tiny houses, furniture, figurines, pathways, fences
- Decorative elements – Small pebbles, moss, tiny bridges, whatever sparks joy
- Well-draining soil – Because even fairies don’t want root rot
The design process is where this gets fun. I typically sketch out a rough plan first (or just wing it, depending on my mood). Create little “zones” with pathways connecting them. Use different textures of succulents to represent trees, bushes, or ground cover in your miniature world.
Pro tip: Don’t overcrowd it. Leave space for your succulents to grow, and remember that the plants are the stars—accessories should enhance, not overwhelm. I position the fairy garden where I can actually see and enjoy all the tiny details, like a bookshelf at eye level.
Also Read: 10 Elegant Mediterranean Garden Design Ideas for Luxury Homes
Modern Geometric Succulent Layout
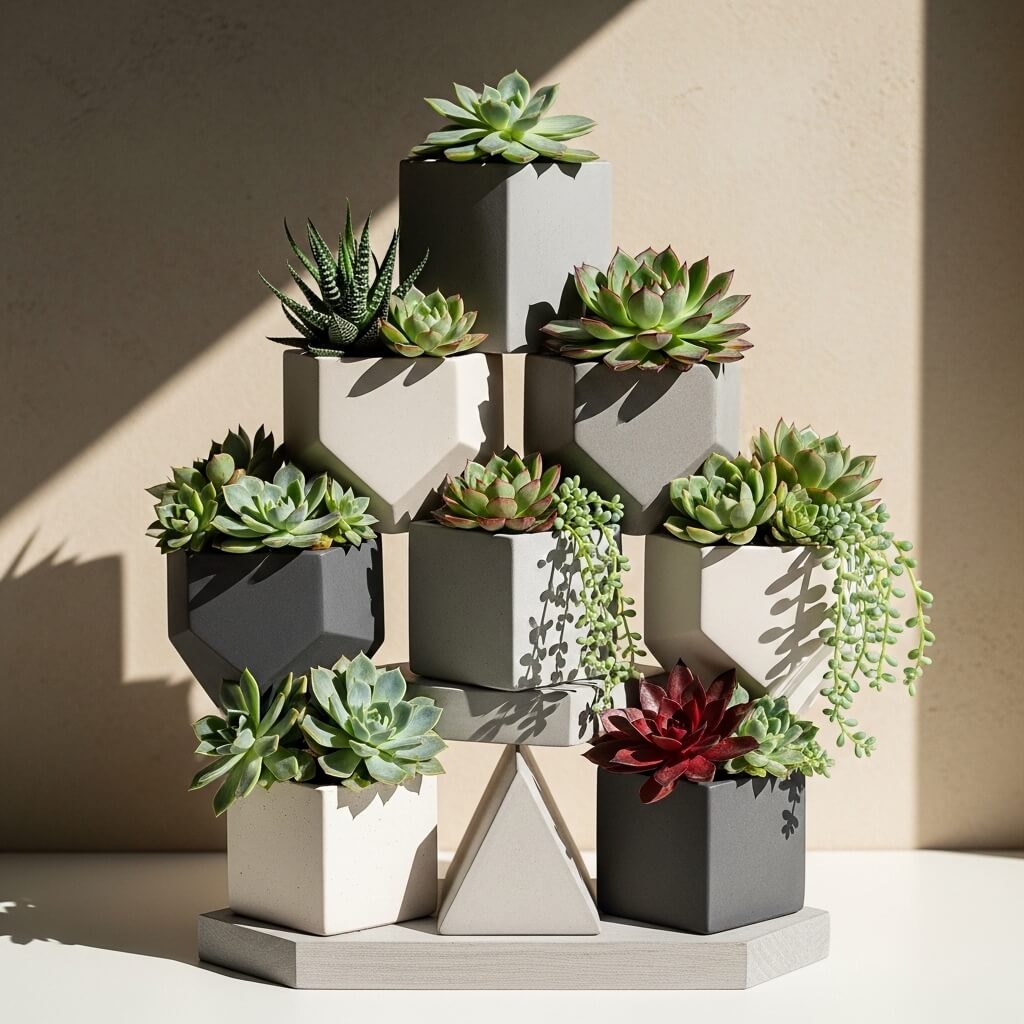
If you’re into clean lines, contemporary design, and that sleek aesthetic, a geometric succulent arrangement will absolutely speak to your soul. I’m talking hexagons, triangles, and those satisfying symmetrical patterns that make your brain happy.
I created mine using a rectangular concrete planter divided into geometric sections using small stones and different colored gravels. The result? A living piece of modern art that looks like it belongs in an upscale design magazine.
Key design principles:
- Symmetry and repetition – Repeat shapes or color patterns for cohesion
- Contrasting textures – Pair spiky agaves with smooth echeverias
- Limited color palette – Stick to 2-3 complementary colors
- Modern containers – Think concrete, sleek ceramics, or brushed metal
You can achieve geometric patterns in several ways. Some people use individual geometric planters (like hexagonal pots) grouped together. Others create sections within a single container using dividers or stones. FYI, I’ve tried both, and honestly, both look amazing—it just depends on your space and style.
The trick is maintaining those clean lines as your plants grow. I’m pretty ruthless about trimming and propagating to keep everything looking sharp and intentional. This isn’t the garden where you let things get wild and leggy—this is the garden that demands discipline (which, let’s be real, is half the appeal).
Rustic Succulent Barrel Garden
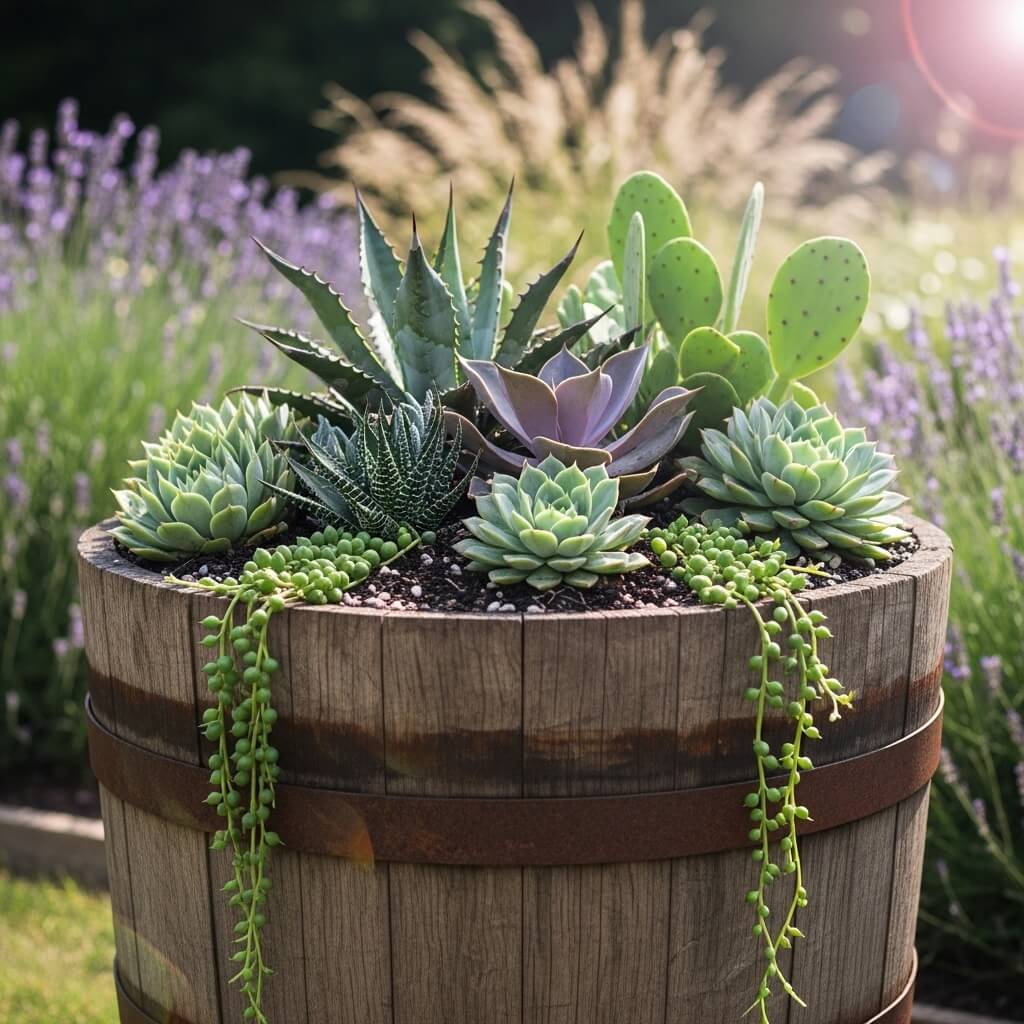
Okay, now let’s swing completely in the opposite direction and embrace some rustic charm. A wooden barrel or half-barrel filled with succulents brings that farmhouse, country-cottage vibe that’s somehow both relaxed and put-together.
I found an old whiskey barrel at a flea market (it may or may not have actually been used for whiskey), drilled some drainage holes in the bottom, and created what’s probably my most complimented planter. There’s something about weathered wood and succulents that just works.
What makes barrel gardens special:
- Natural aesthetic – The wood adds warmth and texture
- Size variety – Available in different dimensions for various spaces
- Drainage-friendly – Easy to drill holes if needed
- Aging beauty – The barrel gets better-looking as it weathers
You can go cottage-style with a mix of flowering succulents and trailing varieties spilling over the sides, or keep it more structured with organized rows of single varieties. I went chaotic and mixed everything—sedums, echeverias, sempervivums, even a small aloe—and the wild abundance totally fits the rustic vibe.
Position your barrel where it’ll get plenty of sun but also where you can appreciate it from multiple angles. I placed mine near my patio door, and walking past it every day genuinely makes me happy. Is that weird? Maybe. Do I care? Not even a little bit.
Balcony Rail Succulent Garden
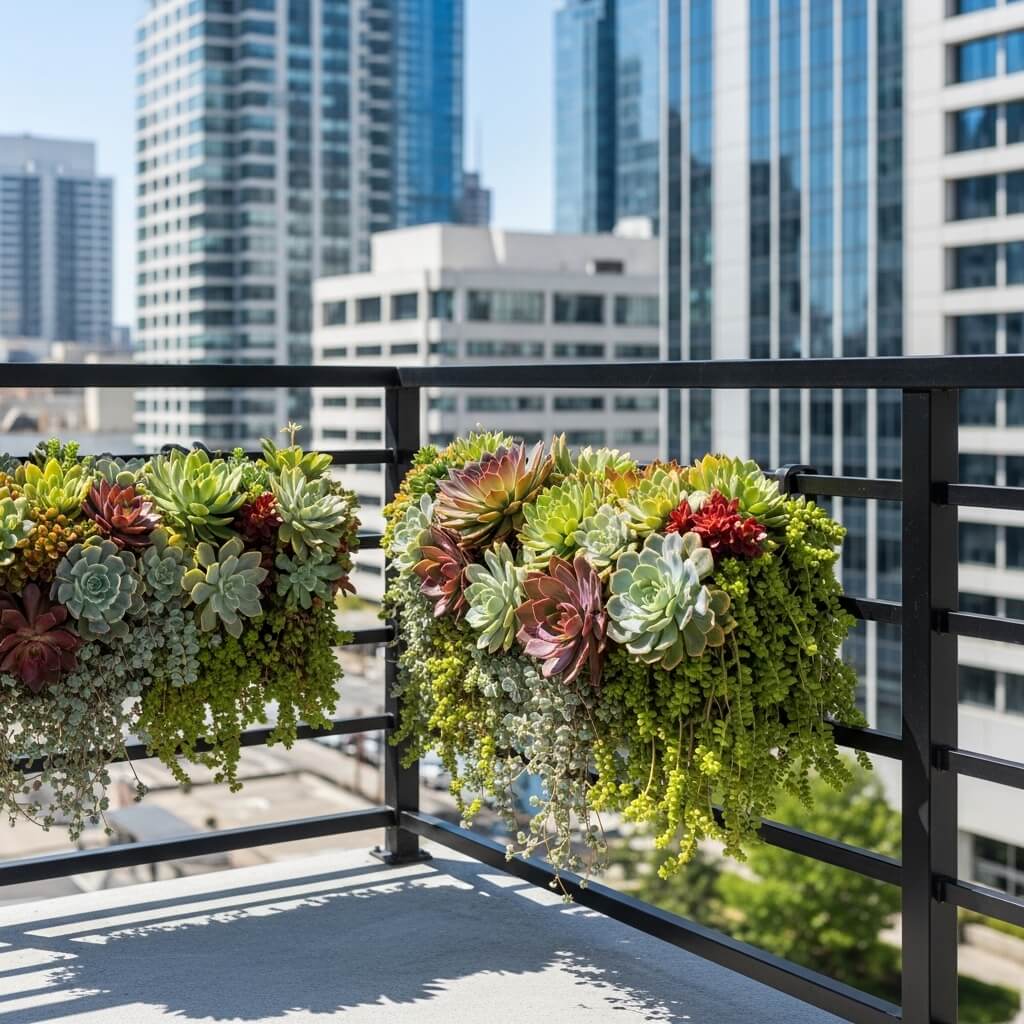
Living in an apartment with a balcony that’s basically a ledge? I feel you. That’s exactly why balcony rail planters are genius—they attach directly to your railing, using space that would otherwise sit empty.
I’ve got four of these hanging on my balcony rail, and they’ve transformed my sad little outdoor space into an actual garden. You can find rail planters specifically designed to hook over standard railings, or get creative with DIY solutions.
Important considerations:
- Weight distribution – Make sure your rail can handle the weight when wet
- Secure attachment – These need to be anchored well or you’ll be gifting your downstairs neighbor some surprise plants
- Wind exposure – Balconies can be windy; choose sturdy containers and stable plants
- Watering logistics – Consider how drainage will work (hint: your neighbors below might not appreciate succulent shower)
I arrange mine in a color gradient from one end of the rail to the other, going from purple-toned echeverias to green sedums to reddish-bronze varieties. The continuous flow of color makes the balcony feel bigger and more intentional.
Choose relatively compact varieties that won’t outgrow the containers quickly. I stick with sempervivums, small echeverias, and sedums—they handle wind well and stay manageable. Water less frequently than you think you need to; the increased air circulation on balconies dries soil faster, but succulents would still rather be dry than soggy.
Also Read: 10 Luxury Zen Garden Design Ideas for Dreamy Calm Landscapes
Succulent Pathway Border Design
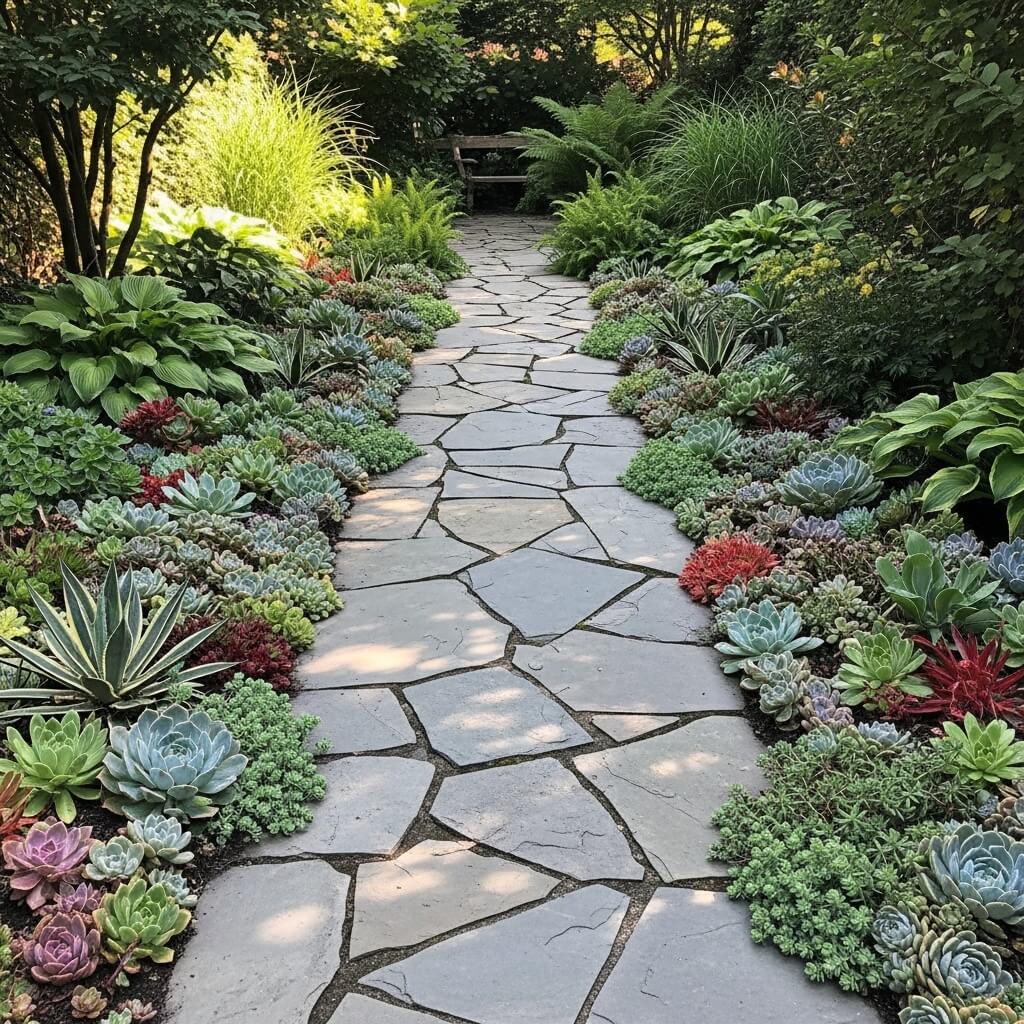
Here’s an idea that works for both indoor and outdoor small spaces: create a succulent pathway border that defines and beautifies your walking areas. Whether you’re lining a garden path, a balcony edge, or even creating a visual “pathway” indoors, this design adds structure and charm.
I used this technique along my narrow side yard (you know, that weird space between houses that serves no purpose?), and suddenly that forgotten area became the prettiest part of my outdoor space. You can use individual small pots lined up, a long trough planter, or plant directly in the ground if you’re lucky enough to have that option.
Design strategies that work:
- Repetition – Use the same variety or alternate between two complementary types
- Height variation – Mix taller varieties with ground-hugging spreaders
- Color theming – Stick to a cohesive color story that complements your space
- Spacing – Leave enough room for growth but keep it feeling intentional
For indoor pathways (like lining a hallway or defining a room transition), I use shallow rectangular planters filled with low-growing varieties like sedums or sempervivums. The key is keeping everything at a similar height so it reads as a border rather than random plant clutter.
Outdoors, you’ve got more flexibility. I’ve seen people create stunning borders using colorful echeverias, architectural agaves, or even a mix of flowering varieties like kalanchoes. The pathway border design is incredibly forgiving too—if one plant doesn’t thrive, you can easily swap it out without disrupting the entire design.
Making It Work: Final Thoughts
Look, the truth about small-space succulent gardening is that you don’t need a sprawling backyard to create something absolutely beautiful. What you need is creativity, a willingness to experiment, and maybe a healthy dose of “I’m doing this anyway” attitude.
I started my succulent journey in a studio apartment with exactly one sunny window. Now I’ve got plants in vertical gardens, hanging from ceilings, perched on rails, and tucked into every corner that gets decent light. Did all my ideas work perfectly the first time? Absolutely not. I’ve killed my fair share of plants through overwatering, underwatering, and general ignorance.
But here’s what I’ve learned: succulents are forgiving, and small spaces actually force you to be more creative and intentional with your designs. Each of these ten ideas solves a specific space challenge while creating something genuinely beautiful. Whether you’re drawn to the clean minimalism of a rock garden, the whimsy of a fairy garden, or the modern edge of geometric layouts, there’s a design here that’ll work for your space and style.
The best part? You can start small. Grab one idea that excites you, get a few plants and supplies, and just start. You don’t need to transform your entire space overnight. I certainly didn’t. I added one design, then another, and before I knew it, I had accidentally become “that person with all the succulents.” And honestly? I’m totally okay with that.
So pick your favorite design from this list, grab some succulents, and create something amazing in your small space. Your future self (and your stress levels) will thank you. Plus, you’ll have some seriously cool eye-candy to show off next time someone visits. And if anyone asks if you have enough plants yet, the answer is always no—there’s always room for one more, right? 😉
Happy planting, friend. Your small space is about to become a whole lot more interesting.