10 Easy Backyard Ideas for Kids Budget Friendly Fun
- Outdoor Ideas
 Ben
Ben- 0
- 38 minutes read
Look, I get it. Your kids are bouncing off the walls, you’ve binged every streaming show twice, and the thought of hearing “I’m bored” one more time might actually make you lose it. But here’s the thing—you don’t need to drop a fortune on some elaborate backyard transformation or turn your yard into a theme park to keep the kiddos entertained. Sometimes the best fun comes from simple, budget-friendly setups that spark their imagination way better than any expensive gadget ever could.
I’ve been down this road myself, trying to figure out how to make our backyard the neighborhood hangout spot without taking out a second mortgage. And honestly? The solutions I found were way easier than I expected. So grab your coffee (or wine, no judgment), and let’s chat about ten backyard ideas that’ll keep your kids busy, happy, and—bonus—tire them out enough that bedtime becomes a breeze.
DIY Backyard Obstacle Course
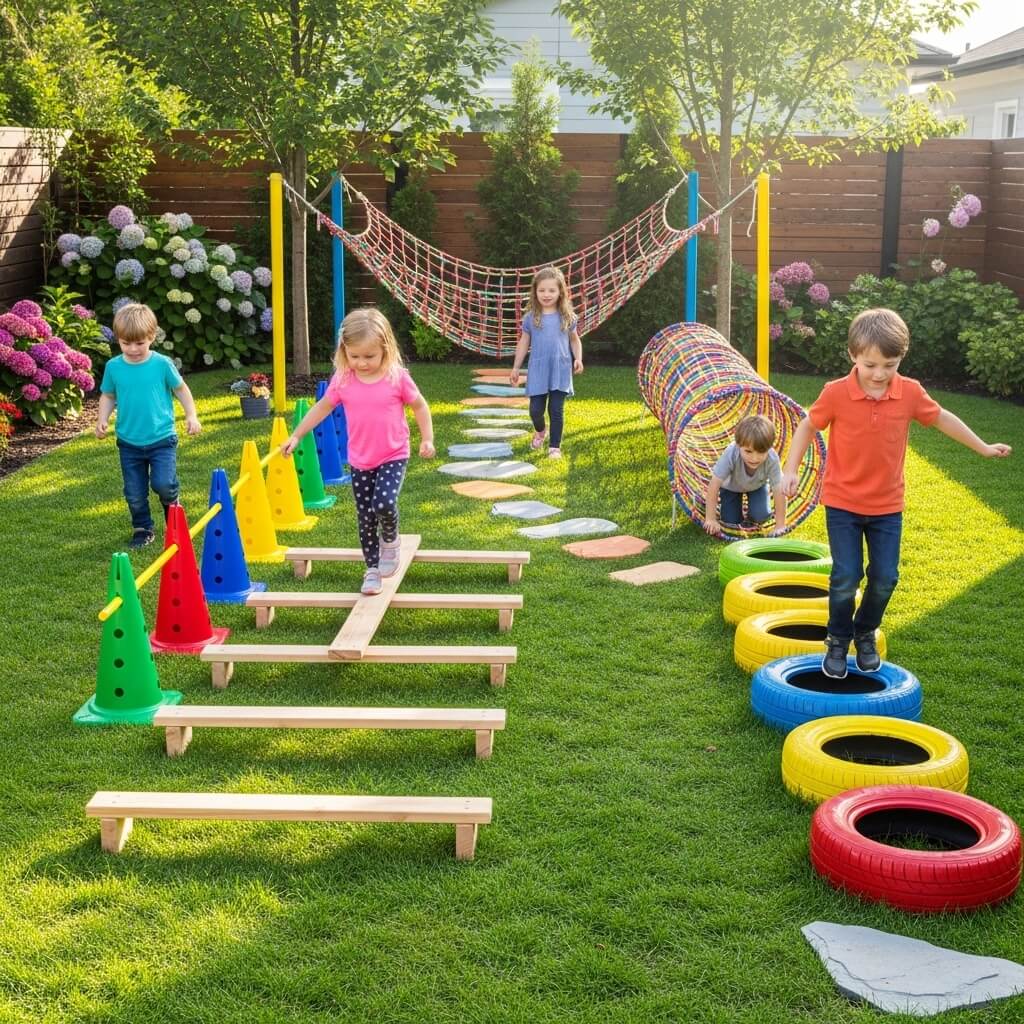
Ever notice how kids will turn literally anything into a challenge? My nephew once spent an hour timing himself running around a single lawn chair. That’s the beauty of kids—they don’t need fancy equipment to have a blast.
Building a backyard obstacle course is ridiculously simple and costs next to nothing. You probably already have most of what you need lying around. Grab some pool noodles, hula hoops, rope, old tires, or even cardboard boxes. Set up stations where kids have to jump through hoops, army crawl under a string tied between two chairs, zigzag around cones (or water bottles), and balance on a wooden plank.
The best part? You can change it up constantly. Kids get bored with the same setup? Move things around, add new challenges, or create a timed race element. I’ve found that adding a stopwatch instantly makes everything 10x more exciting for them.
Here’s what you’ll need:
- Pool noodles (make hurdles or balance beams)
- Hula hoops (jump through or toss over stakes)
- Rope or string (limbo lines or crawl-under zones)
- Old tires or stepping stones
- Cones or plastic bottles for weaving
Pro tip: Get the kids involved in building it. They’ll have just as much fun designing the course as running through it, and it teaches problem-solving skills. Plus, it buys you an extra 30 minutes of peace while they’re planning. Win-win.
The whole setup shouldn’t cost more than $20-30 if you’re buying everything from scratch, but honestly, raid your garage first. You’d be surprised what you can repurpose.
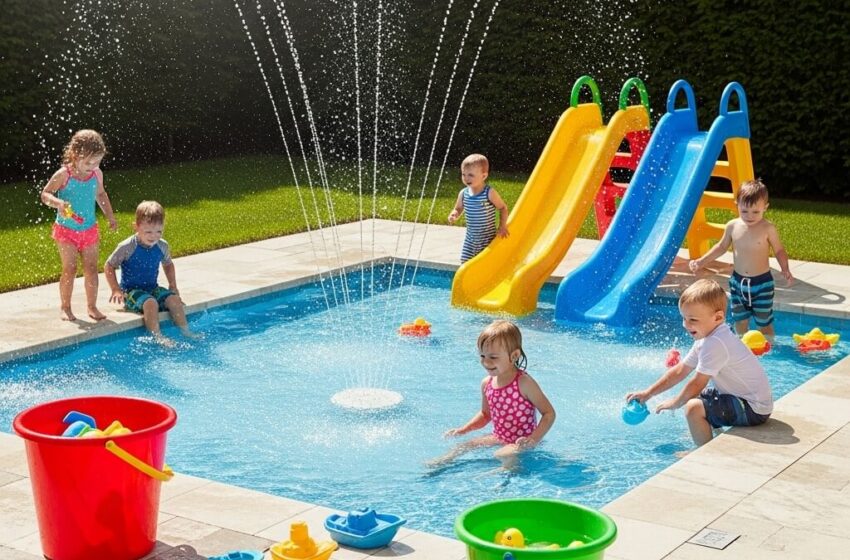
Mini Water Play Zone
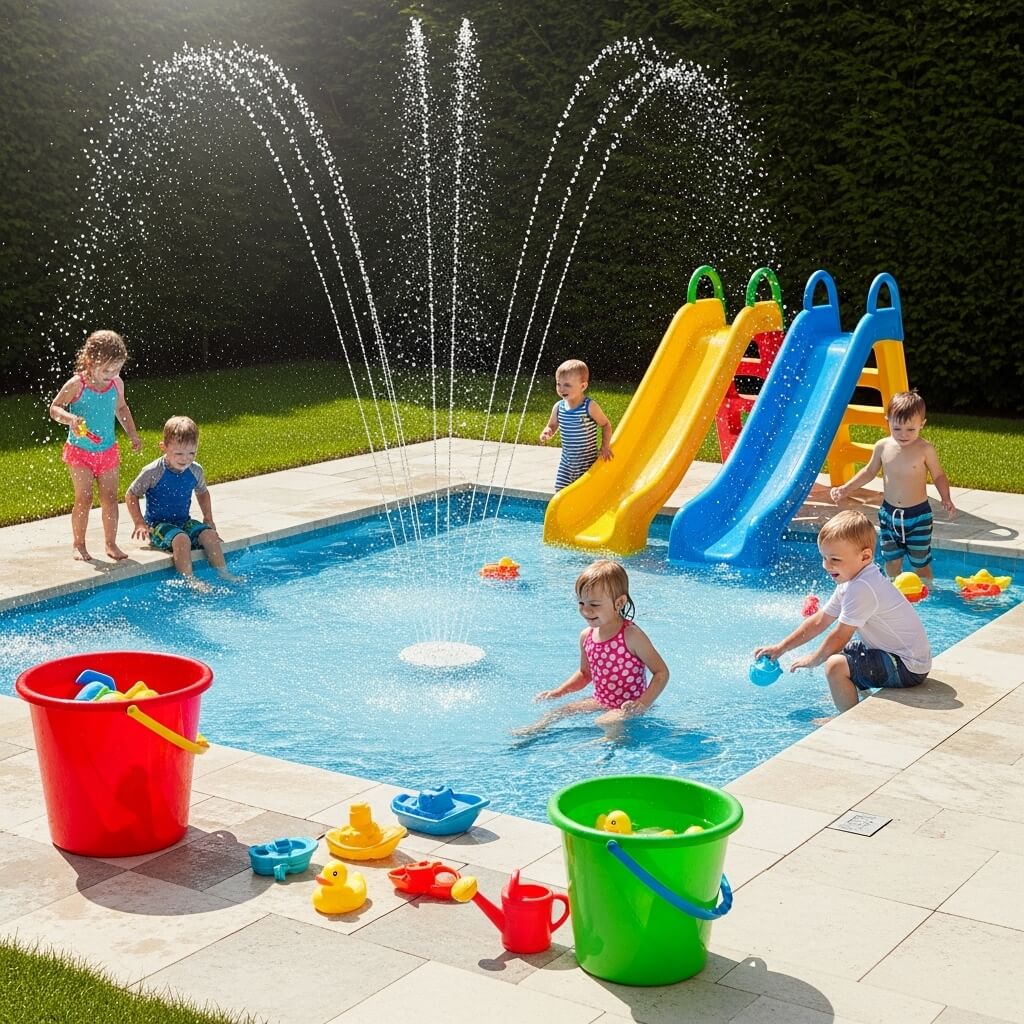
Unless you live somewhere perpetually chilly, water play is basically a summer essential. But here’s the secret—you don’t need an expensive pool or elaborate water table setup. A simple water play zone can be as basic as a few buckets, some plastic cups, and a hose.
I set ours up last summer for under $15, and my kids played in it for hours every single day. We used a large plastic storage bin (the kind you get at any big-box store), filled it with water, and added measuring cups, funnels, sponges, and squirt bottles. That’s it. Simple, effective, and endlessly entertaining.
Want to level it up without breaking the bank? Add these budget-friendly elements:
- Sponge station: Get cheap sponges and let kids “paint” the fence or sidewalk with water
- Ice excavation: Freeze small toys in ice cube trays or containers, then let kids “rescue” them
- Water balloon toss: Classic for a reason
- DIY sprinkler: Poke holes in an old plastic bottle, attach it to the hose, and boom—instant sprinkler
The cleanup is minimal (it’s just water, after all), and the kids stay cool while burning energy. I’ve noticed that water play has this magical calming effect too—even the most hyper kids mellow out a bit when they’re focused on pouring and splashing.
FYI, if you’re worried about wasting water, you can use the same water for a few days if you cover the bin at night, or use it to water plants when you’re done. Guilt-free fun!
Backyard Mud Kitchen Setup

Okay, hear me out on this one. I know “mud kitchen” sounds like you’re intentionally creating a mess, and you’re absolutely right—but it’s the best kind of mess. Kids are basically wired to love getting dirty, and fighting that instinct is like swimming upstream. Embrace the chaos, my friend.
A mud kitchen is exactly what it sounds like: an outdoor “kitchen” where kids can mix dirt, water, leaves, flowers, and whatever else they find into their culinary masterpieces. It encourages imaginative play, keeps them outdoors, and honestly, they’ll be so engrossed that you might actually finish that book you started six months ago.
Building one doesn’t require carpentry skills or fancy materials. I made ours from an old wooden pallet I snagged from behind a furniture store (they often give them away for free). Prop it against a fence or wall, add some hooks for hanging pots and utensils, and set out some basic supplies:
- Old pots, pans, and cooking utensils from thrift stores
- Plastic bowls and cups
- Muffin tins (great for sorting “ingredients”)
- Wooden spoons
- A few buckets for water and mud
You can get really creative with additions like painted rocks for “potatoes,” pine cones for “protein,” and leaves for “garnish.” My daughter once served me a mud pie garnished with dandelions that she insisted was “five-star dining,” and honestly, the presentation was pretty impressive 🙂
The secret to making this work: Set clear boundaries. The mud stays in the kitchen area, and kids hose off before coming inside. We keep a towel and a water bucket nearby for quick cleanups. Problem solved.
Also Read: 10 Affordable Backyard Ideas on a Budget Cozy Setup
Outdoor Chalk Art Station
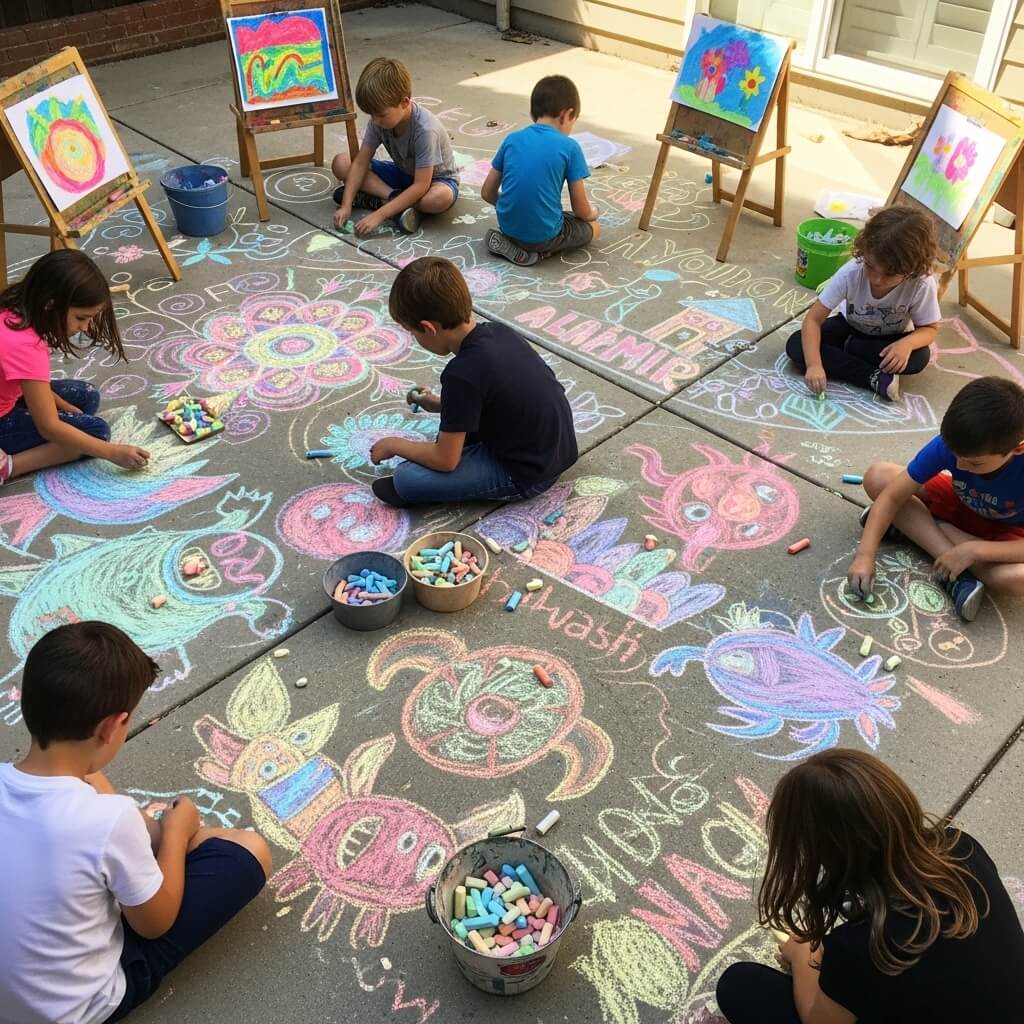
If you think chalk is just for hopscotch, you’re seriously missing out. A dedicated chalk art station is one of the easiest, cheapest backyard setups you can create, and it provides hours of creative entertainment.
All you really need is sidewalk chalk (those big tubs cost like $5-10) and a hard surface—your driveway, patio, or sidewalk works perfectly. But here’s where you can make it extra special without spending much:
Set up a little “art supplies” station using a plastic caddy or bucket to organize the chalk by color. Add some stencils (you can make these from cardboard), spray bottles with water for chalk painting, and sponges for blending colors. Suddenly it’s not just chalk—it’s an art studio.
Ideas to keep it fresh:
- Challenge kids to create a life-size self-portrait
- Draw roads and let them “drive” toy cars on the chalk streets
- Create collaborative murals where everyone adds to the same picture
- Host chalk art competitions with silly categories (best alien, funniest face, most colorful rainbow)
The beauty of chalk is that it washes away with the next rain or a quick hose-down, so there’s zero commitment. Your kids can create a massive dragon one day and a flower garden the next. Plus, it’s mess-free (well, dusty fingers don’t really count as mess, IMO).
I’ve found that even older kids who think they’re “too cool” for chalk will get sucked in once they start creating. There’s something therapeutic about it for all ages.
DIY Tree Swing Corner
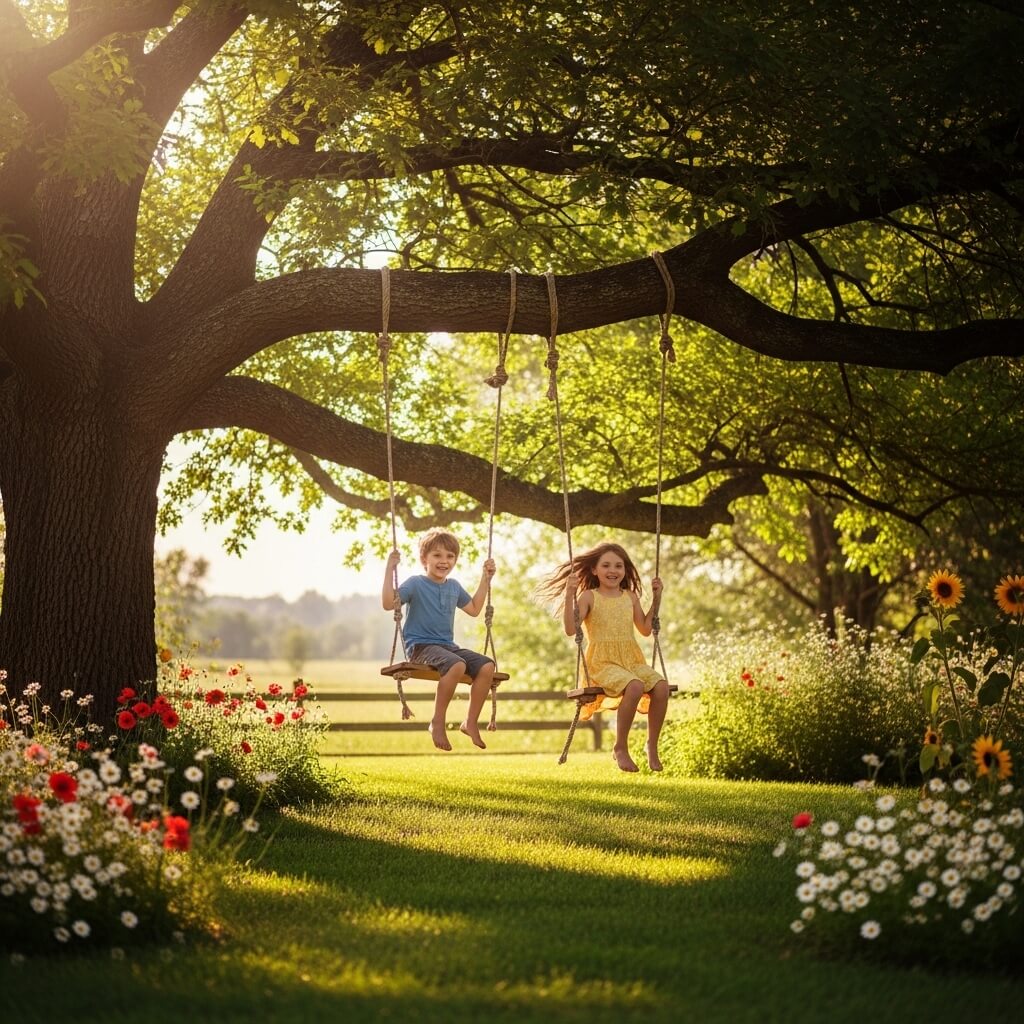
There’s something timeless about a swing. I have vivid memories of spending entire afternoons on the swing at my grandmother’s house, seeing how high I could go without actually achieving flight. Good times.
Installing a tree swing might sound complicated, but it’s actually one of the simplest backyard upgrades you can make. The basic version costs under $30 and takes maybe 30 minutes to set up.
Here’s what you need:
- Strong rope (marine-grade or climbing rope works best—don’t cheap out here since safety matters)
- A wooden board or disc for the seat (or buy a pre-made swing seat)
- A sturdy tree branch (at least 8 inches in diameter, ideally)
- Carabiners or heavy-duty eye bolts
First things first—make sure your tree and branch can handle it. The branch should be healthy, horizontal, and at least 10 feet off the ground. If you’re not confident assessing this, it’s worth having someone knowledgeable take a look. Safety first, adventure second.
For the actual swing, you can go super simple with just a rope with knots to sit on (the OG swing style), or create a seat from a smooth wooden board. Sand it down really well to avoid splinters, drill holes in the corners, and thread your rope through.
Alternative options if you don’t have the right tree:
- Freestanding swing sets can be found used for cheap
- A-frame DIY swing structures (requires more work but totally doable)
- Playground equipment secondhand from Facebook Marketplace
The swing becomes an instant backyard favorite. It’s perfect for solo play, pushing friends, or even just hanging out and chatting. Plus, the rhythmic motion actually helps kids regulate their emotions and energy—it’s like magic for meltdown prevention.
Kids Camping Backyard Setup
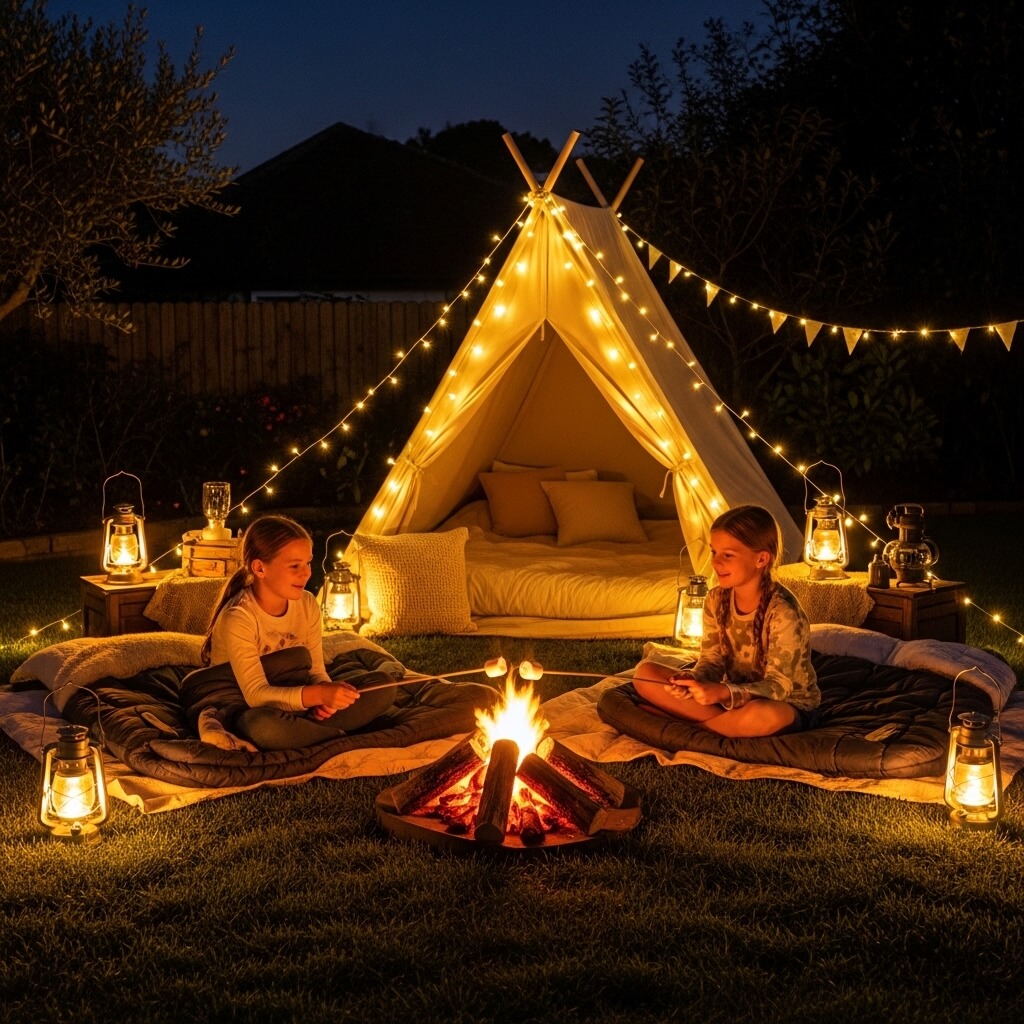
Why spend hundreds on a camping trip when you can create the experience right in your backyard? Backyard camping hits different—it’s got all the fun of “real” camping without the bugs getting quite so aggressive or the bathroom being a sketchy outhouse :/
You don’t need much to make this happen. If you already have a tent, you’re halfway there. If not, you can build a fort using blankets, sheets, and chairs. Kids honestly don’t care—they just love the novelty of sleeping outside.
Here’s how to make it special:
- Set up the tent or fort in the afternoon so kids can “settle in”
- Create a campfire alternative using a fire pit (if you have one) or battery-operated lanterns
- Make s’mores in your oven or microwave if open flames aren’t an option
- Pack sleeping bags, pillows, and flashlights
- Tell stories or read books by flashlight
- Do some stargazing and download a star-identifying app
The first time we did this, I thought my kids would bail and come inside by 9 PM. Nope. They lasted the entire night and woke me up at 5:30 AM asking if we could make “campfire breakfast.” The enthusiasm was real.
Pro tip: Do a trial run during the afternoon first. Let them nap in the tent or just hang out so it feels familiar. That way, when nighttime comes, they’re comfortable and excited rather than nervous.
Total cost if you’re starting from scratch? Maybe $40-50 for a basic tent and some cheap sleeping bags from a discount store. But the memories? Priceless. (Okay, that sounded like a credit card commercial, but you know what I mean.)
Also Read: 10 Budget Dorm Room Ideas for Cheap Cozy Setup
Sandbox Adventure Area
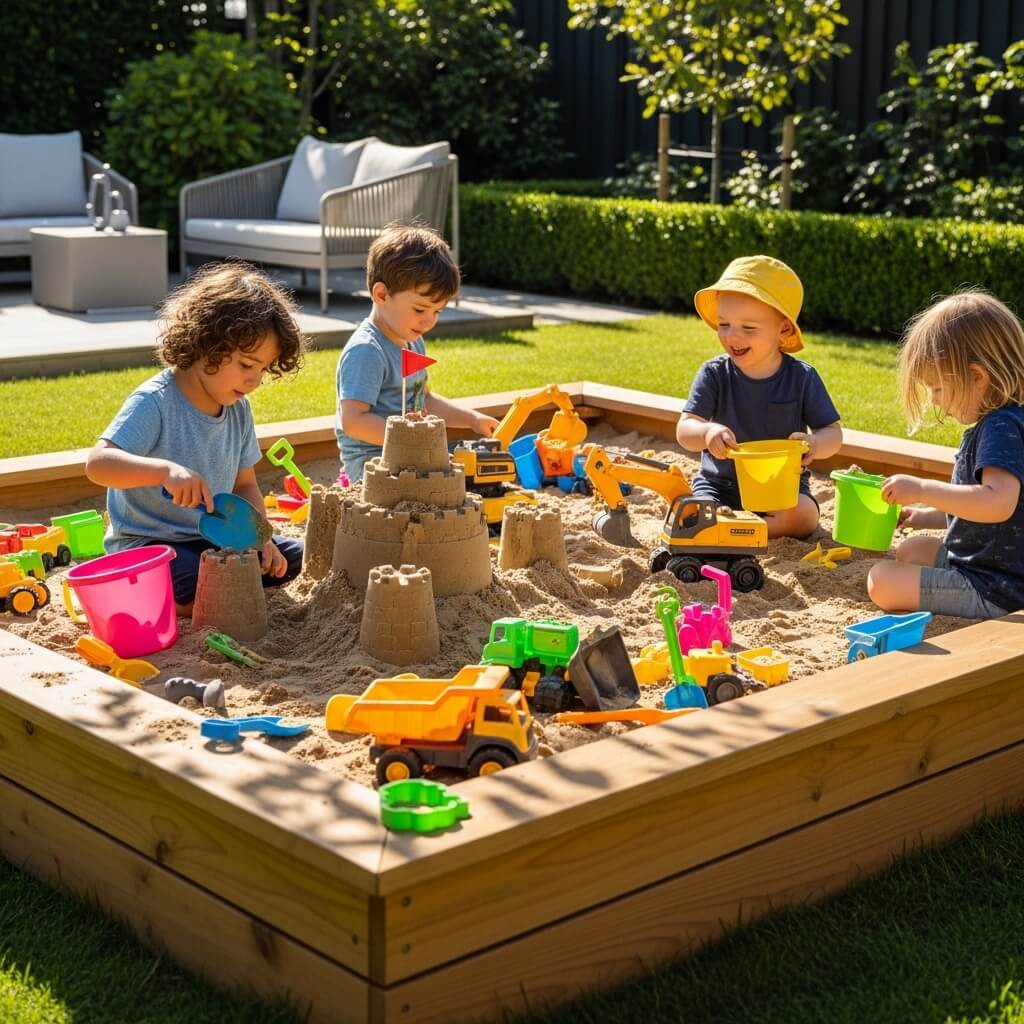
Sandboxes are the unsung heroes of backyard play. Seriously underrated. Kids can dig, build, pour, create, and destroy for hours. It’s like therapeutic play that doesn’t feel like therapy.
Building a sandbox is easier than you’d think. You can go the traditional route with a wooden frame, or get creative with alternatives. I’ve seen people use old tractor tires, kiddie pools (with drainage holes poked in the bottom), or even plastic storage containers for a mini version.
Basic sandbox setup:
- Pick your container (wood frame, tire, or plastic)
- Fill with play sand (NOT construction sand—get the stuff specifically for sandboxes)
- Add tools: shovels, buckets, molds, sifters, toy trucks
- Create a cover to keep animals out when not in use (a tarp works fine)
A simple 4×4 foot wooden sandbox costs about $50-75 in materials if you build it yourself, or you can buy a plastic one for even less. The sand itself runs about $3-5 per bag, and you’ll need several depending on size.
Ways to upgrade the experience:
- Add a “construction zone” theme with toy bulldozers and dump trucks
- Include water nearby for making sand castles that actually hold together
- Hide small toys for a digging excavation activity
- Add kitchen tools like measuring cups and funnels for sensory play
One word of warning—sand gets everywhere. Like, everywhere. We have a designated “sand shoes” that stay outside and a foot-washing station nearby. It doesn’t eliminate the sand migration entirely, but it helps.
The sandbox becomes this little world where kids can be engineers, construction workers, archaeologists, or whatever their imagination dreams up that day. And parents get to sit nearby with coffee. Everybody wins.
Backyard Treasure Hunt Zone
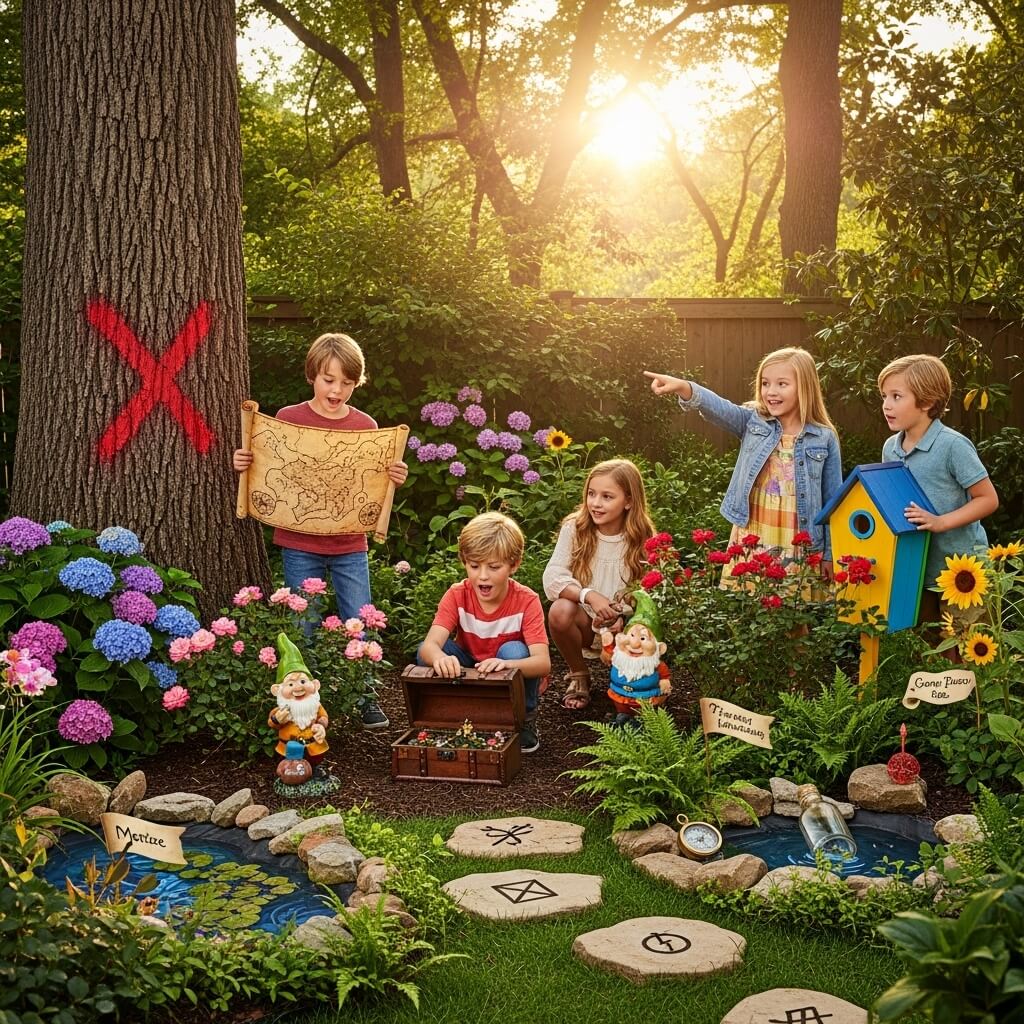
Want to see kids go absolutely bonkers with excitement? Hide stuff and make them find it. Works every single time.
A treasure hunt zone doesn’t require permanent setup—it’s more of an activity you can repeat with different themes and difficulty levels. But creating a designated “hunt area” in your backyard makes it easier to set up quickly whenever you need to entertain.
Here’s how I do it:
Pick a section of your yard (doesn’t need to be huge) and create a simple map. You can draw this on paper, and honestly, the more hand-drawn and “authentic” it looks, the better. Mark trees, fences, or other landmarks.
Then create clues. These can be riddles, directional hints (“take 10 steps toward the big tree”), or picture clues for younger kids who can’t read yet. Each clue leads to the next until they reach the treasure.
Treasure ideas that don’t cost much:
- Small toys from the dollar store
- Coins (they’ll think they’re rich with $2 in quarters)
- Special treats or snacks
- A “treasure chest” (decorated shoebox) with craft supplies
- Homemade certificates for prizes like “stay up 15 minutes late” or “pick tonight’s dinner”
The beauty of treasure hunts is the replayability. You can run the same hunt with different clues, change up the locations, or theme it differently each time (pirate hunt, detective mystery, fairy quest, etc.).
I’ve found that involving siblings or friends makes it even better. They work together, strategize, and the excitement when they finally find the treasure is absolutely worth the 15 minutes of setup time.
Bonus tip: Take photos during the hunt. These always end up being hilarious and some of my favorite memories.
Mini Garden for Kids
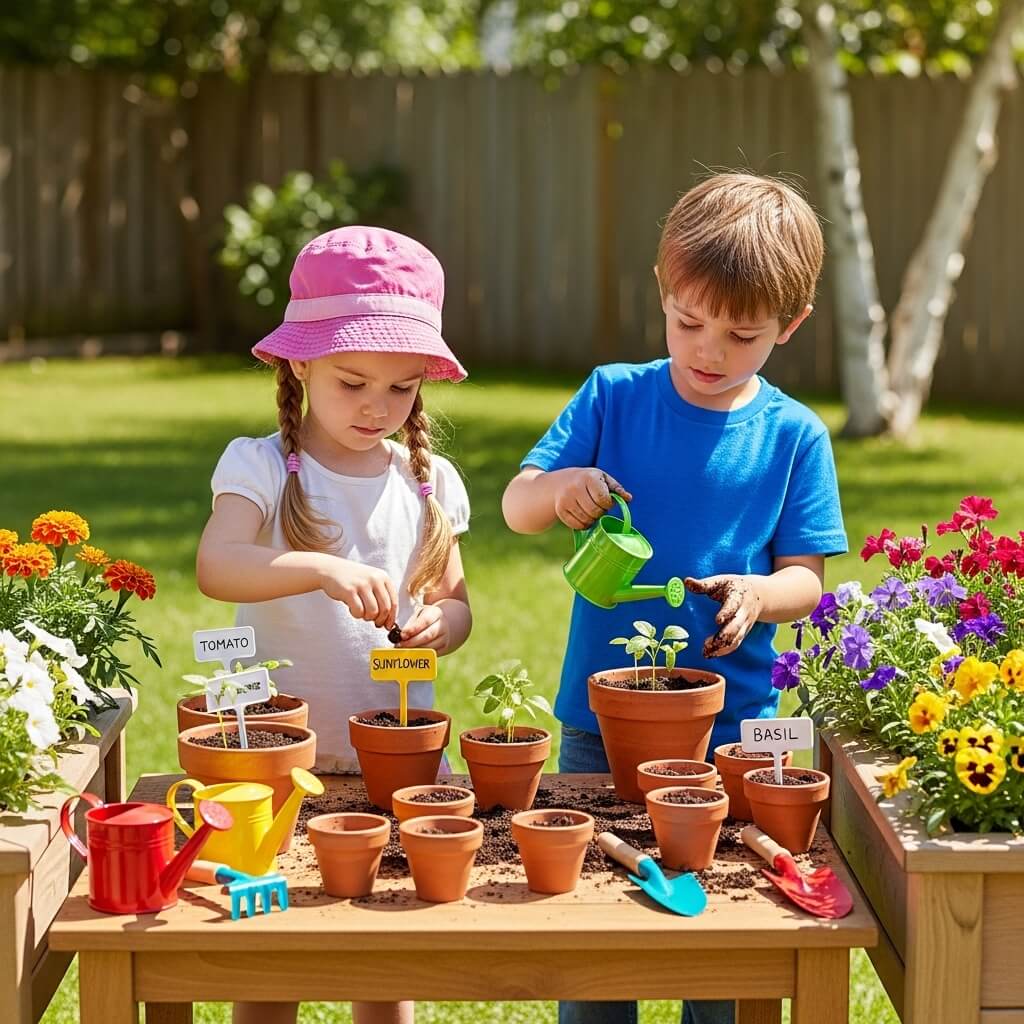
Okay, confession time—I am not a green thumb. I’ve killed cacti. But here’s the thing about kids’ gardens: they don’t have to be perfect. In fact, the whole point is letting kids get their hands dirty, learn about plants, and experience the patience of waiting for something to grow.
A mini garden for kids can be as simple as a few pots on the patio or a small raised bed in the corner of the yard. You’re looking at maybe $20-40 to get started, depending on what you choose to grow.
What works well for kids’ gardens:
- Sunflowers: Grow tall and fast, kids love watching them shoot up
- Cherry tomatoes: Quick results and they can eat what they grow
- Herbs: Basil, mint, and parsley are hard to kill (I’ve managed, but most people succeed)
- Radishes: Grow super fast, so kids see results quickly
- Beans: Fun to watch climb if you give them a trellis
Give each kid their own section or pot so they have ownership. Let them decorate plant markers with paint or markers. We made ours from popsicle sticks, and they’re pretty adorable (if crooked and misspelled).
The real magic happens when that first sprout appears. I’ve never seen kids so excited about a tiny green stem poking through dirt. They’ll check on it daily, water it (sometimes too much—supervise this part), and feel so proud when they can harvest and eat something they grew.
Practical setup tips:
- Start small—a few pots or one small raised bed
- Use quality potting soil (this actually matters)
- Pick a spot that gets good sunlight
- Set up a watering can station nearby
- Accept that some plants will die, and that’s part of the learning
Gardening teaches responsibility, patience, and basic science. Plus, it gets kids interested in vegetables, which is basically parenting sorcery if you can pull it off.
Also Read: 10 Dreamy Backyard Ideas Relaxing Outdoor Oasis
Outdoor Movie Night Setup
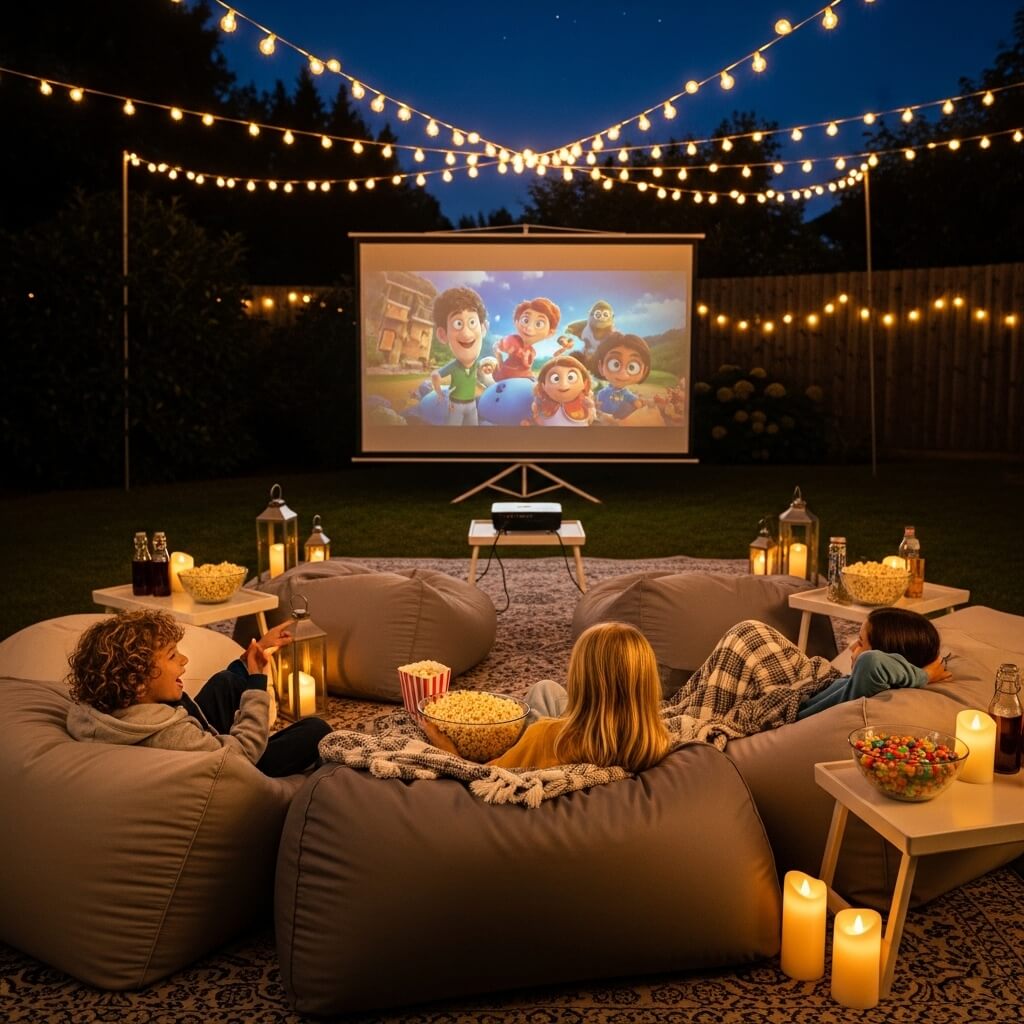
Let’s end with probably the easiest crowd-pleaser on this list—backyard movie nights. There’s something special about watching movies outside under the stars. It turns a regular movie into an EVENT, and kids absolutely love it.
You don’t need a fancy projector setup (though if you’ve got one, great). You can make this work with a laptop, tablet, or even a TV if you have an outdoor outlet. The key is creating the atmosphere.
Basic setup:
- Screen: a white sheet hung on the fence or between two trees works perfectly
- Display device: laptop, tablet, or portable projector (you can get basic ones for under $100 now)
- Seating: blankets, sleeping bags, lawn chairs, or floor cushions
- Snacks: popcorn is non-negotiable, obviously
How to make it special:
- Set up a “concession stand” with movie theater snacks
- Create tickets the kids have to “buy” with chores or good behavior
- String up some fairy lights for ambiance
- Make it a double feature for older kids
- Let kids vote on the movie selection beforehand
We do backyard movie night about once a month during warmer weather, and it’s become this thing the kids actually look forward to and plan for. They’ll invite friends, plan the menu, and debate movie choices for days.
The total investment is minimal—if you already have a laptop and some blankets, you’re basically set. A simple white sheet costs a few bucks. Popcorn kernels and toppings are cheaper than pre-popped. You’re looking at maybe $10-15 per movie night if you’re buying snacks, and much of the setup is reusable.
Technical tip: Test your setup during the day first. Figure out how far the projector needs to be, whether the sound is loud enough, and if you need an extension cord. Nothing kills the vibe like troubleshooting tech problems while kids are getting antsy.
Wrapping This Up
So there you have it—ten backyard ideas that won’t drain your bank account but will absolutely fill your yard with laughter, creativity, and probably some dirt and chaos (the good kind, though).
The thing I love about all of these is that they’re flexible. You can start simple and add to them over time. You can combine ideas (treasure hunt leading to the camping setup, anyone?). And most importantly, you can adjust them based on your kids’ ages, interests, and your yard size.
None of these require you to be particularly crafty, handy, or organized. I’ve implemented every single one of these with varying levels of success, and even the “failures” were fun. That mud kitchen I built? Slightly lopsided. The treasure hunt where I forgot where I hid the final clue? We eventually found it. The first backyard camping trip where we all bailed at midnight and went inside? Still counts as an adventure.
The goal isn’t Pinterest-perfect backyard setups—it’s creating spaces where kids can play, explore, and use their imagination without you having to constantly entertain them or spend a fortune on the latest trending toy that’ll be forgotten in two weeks.
Your backyard doesn’t need to be huge, perfectly landscaped, or worthy of a magazine spread. It just needs to be a place where kids can be kids. And honestly, with a few simple, budget-friendly additions, you might just create the neighborhood hangout spot where all the kids want to be.
Now get out there and reclaim your backyard. Those kids aren’t going to entertain themselves… well, actually, with these setups, they kind of will 😉


