10 Dreamy Backyard Ideas Relaxing Outdoor Oasis
- Outdoor Ideas
 Ben
Ben- 0
- 42 minutes read
Look, I get it—you stare out your window at that sad patch of grass you call a backyard and think, “There’s gotta be more to life than this, right?” Your outdoor space has been begging for attention, and honestly, it deserves better than being the place where you occasionally drag the trash bins.
I’ve spent way too many hours scrolling through Pinterest at 2 AM, dreaming about transforming my own backyard into something actually worth hanging out in. And you know what? I finally did it. Well, parts of it. Okay, I’m still working on it, but that’s the beauty of creating your own outdoor oasis—it’s a journey, not a destination (wow, that sounded way more inspirational than intended).
Whether you’ve got a sprawling lawn or a postage-stamp-sized patch of concrete, there’s absolutely a way to turn your outdoor space into something magical. Let me walk you through 10 backyard ideas that’ll make you actually want to spend time outside instead of just glancing at your yard through the window while you eat cereal in your pajamas.
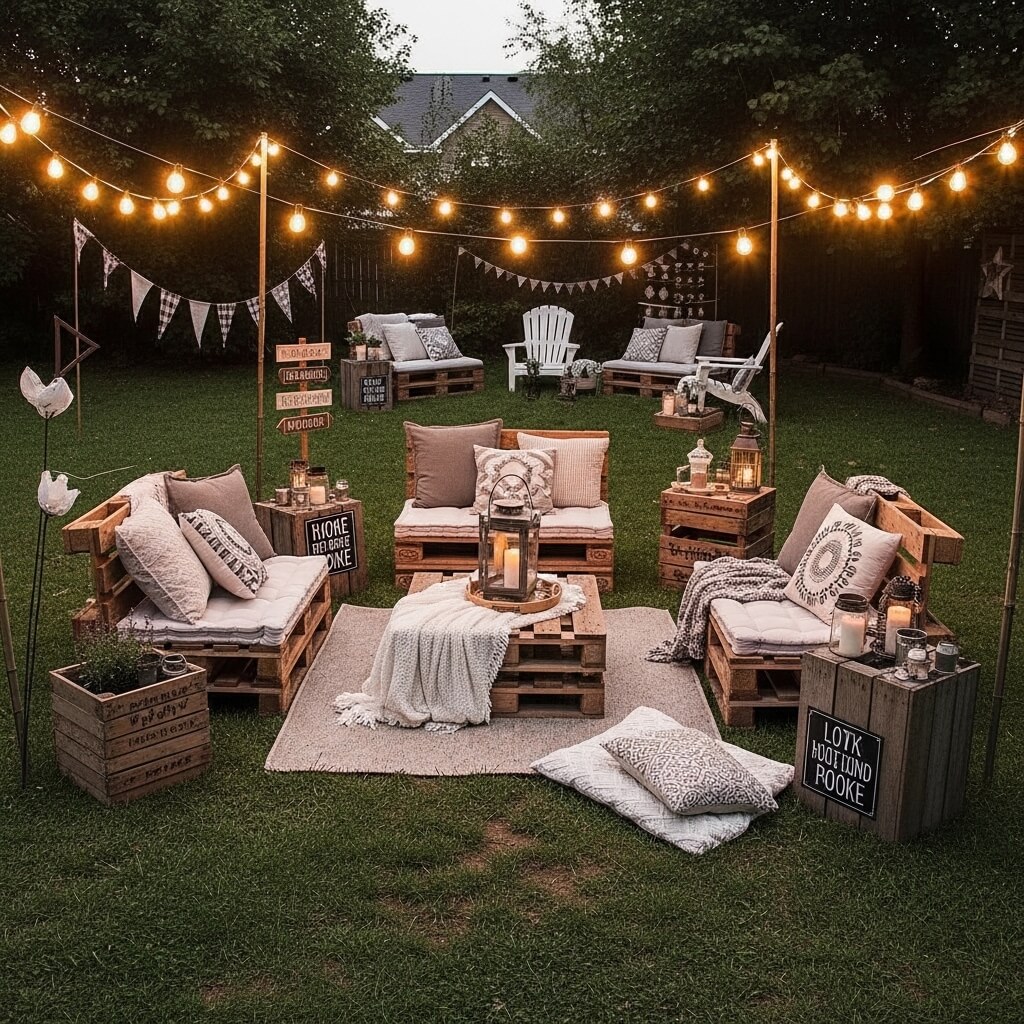
Cozy Boho Backyard Lounge Corner
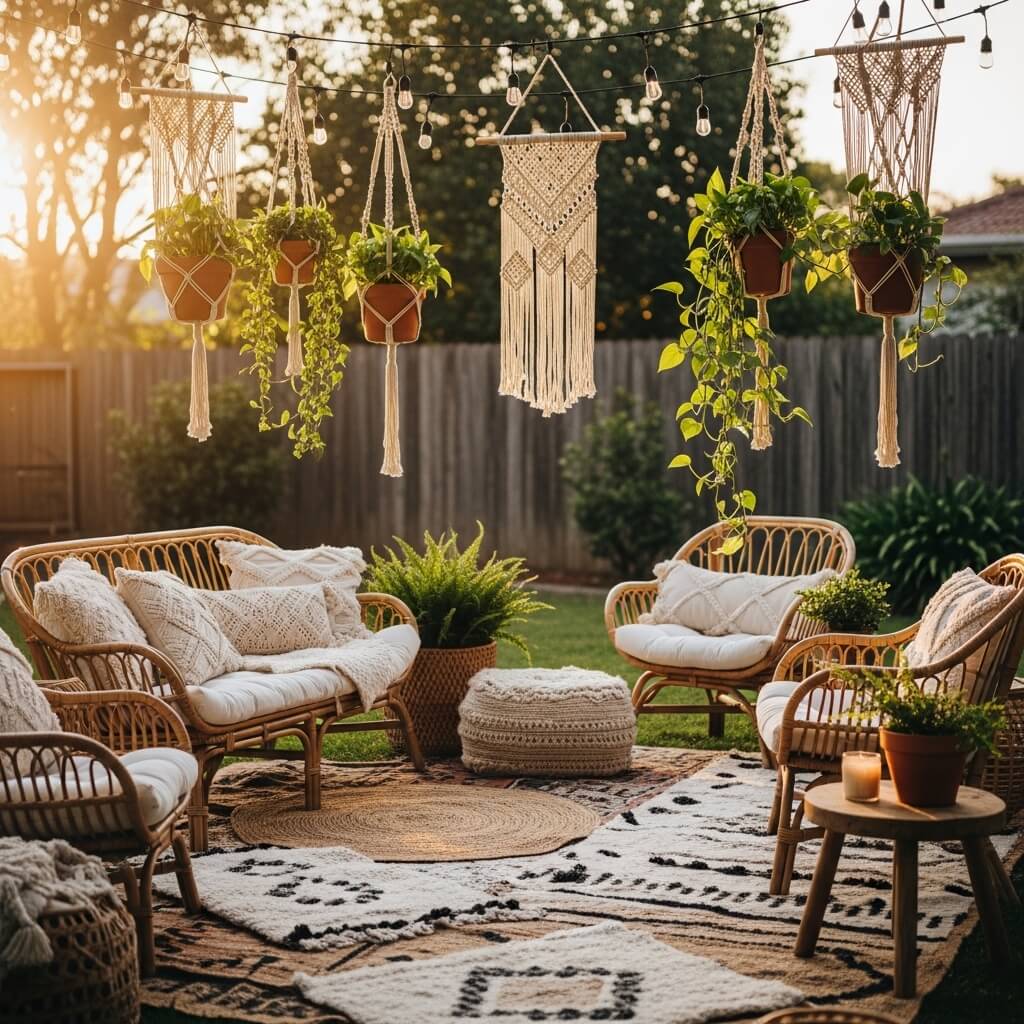
Ever walked into someone’s backyard and immediately felt like you needed to Instagram every corner? That’s the boho lounge vibe, my friend.
The whole bohemian aesthetic is basically about creating this effortlessly chill atmosphere that screams “I’m relaxed and creative, and yes, I probably have a collection of crystals somewhere.” The best part? You don’t need to spend a fortune to pull this off. I started mine with a bunch of mismatched floor cushions I snagged from a clearance sale, and honestly, it’s become my favorite spot to pretend I’m going to read that book I bought six months ago.
Here’s what you need to nail the boho look:
- Layered textiles in earthy tones (think terracotta, cream, mustard yellow)
- Low-seating options like poufs, floor cushions, or those trendy rattan chairs
- A vintage or distressed rug (outdoor-friendly, obviously—learned that one the hard way)
- Macramé everything: wall hangings, plant hangers, maybe even a macramé dreamcatcher if you’re feeling extra
- Tons of plants in mismatched pots
The magic happens when you mix textures and patterns without overthinking it. Throw a Moroccan-style pouf next to a wicker chair, add some fringe pillows, and suddenly you’ve got yourself a space that looks like you hired an interior designer. Spoiler: you didn’t, and that’s the point.
I set mine up in a corner against my fence, which gave it this cozy, tucked-away feeling. Added some string lights overhead (more on those later), and boom—instant retreat. My neighbor literally asked if I was running an Airbnb back there. FYI, the answer was no, but I took it as a compliment 🙂
Making It Personal
Don’t just copy what you see on Instagram. Add pieces that actually mean something to you—that weird ceramic pot you bought on vacation, the blanket your grandma made, whatever. The boho aesthetic is super forgiving, so your “mistakes” actually make it better. That’s not something you hear often in life, so take advantage of it.
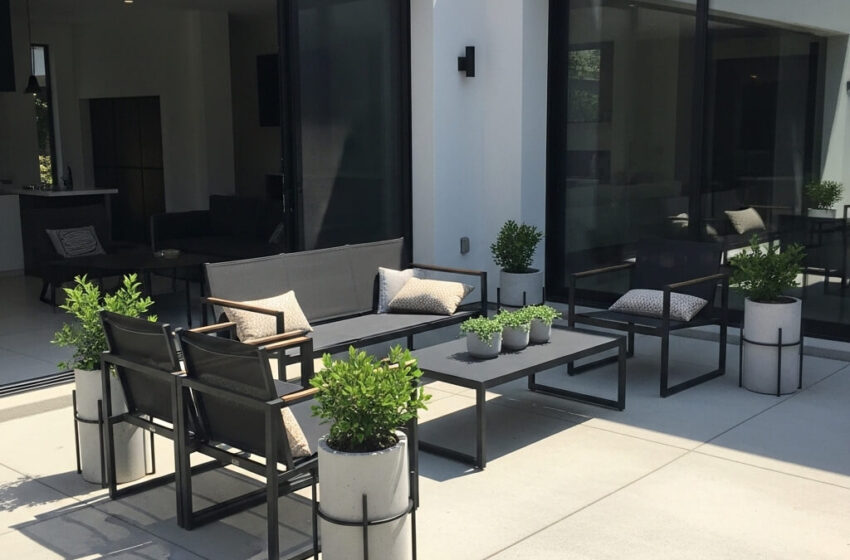
Modern Minimalist Backyard Patio Setup
Okay, so maybe the boho thing isn’t your jam. Maybe you’re one of those people whose desk is always clear and who actually uses a label maker for fun. I see you, and the minimalist patio is calling your name.
The modern minimalist backyard is all about clean lines, neutral colors, and intentional choices. Nothing cluttered, nothing extra, just carefully selected pieces that serve a purpose and look damn good doing it. Think of it as the Marie Kondo approach to outdoor living—does this spark joy? No? Then it doesn’t belong here.
I helped my brother set up his minimalist patio last summer, and watching him stress about whether to go with cool gray or warm gray for his furniture was both hilarious and totally on-brand. He went with cool gray, in case you’re wondering.
Key elements for minimalist perfection:
- Sleek, low-profile furniture in neutral tones (black, white, gray, maybe a soft beige if you’re feeling wild)
- Concrete or large-format tile flooring
- One statement piece—maybe a sculptural planter or a geometric fire feature
- Strategic greenery (think architectural plants like succulents or ornamental grasses)
- Hidden storage to keep everything looking tidy
The trick here is quality over quantity. You’re better off with one really nice outdoor sectional than a bunch of cheaper pieces scattered around. Save up for that investment piece if you need to—it’ll be worth it when your patio looks like it belongs in Architectural Digest.
Also, can we talk about how easy minimalist spaces are to maintain? There’s literally nowhere for clutter to hide. You can’t let things pile up when you’ve only got three carefully selected items out there. It’s like built-in accountability for keeping your space clean.
The Challenge
The hardest part? Resisting the urge to add more stuff. Your aunt will gift you a garden gnome, and you’ll have to politely find a home for it elsewhere. Stay strong. Protect your minimalist vision.
Small Backyard Vertical Garden Oasis
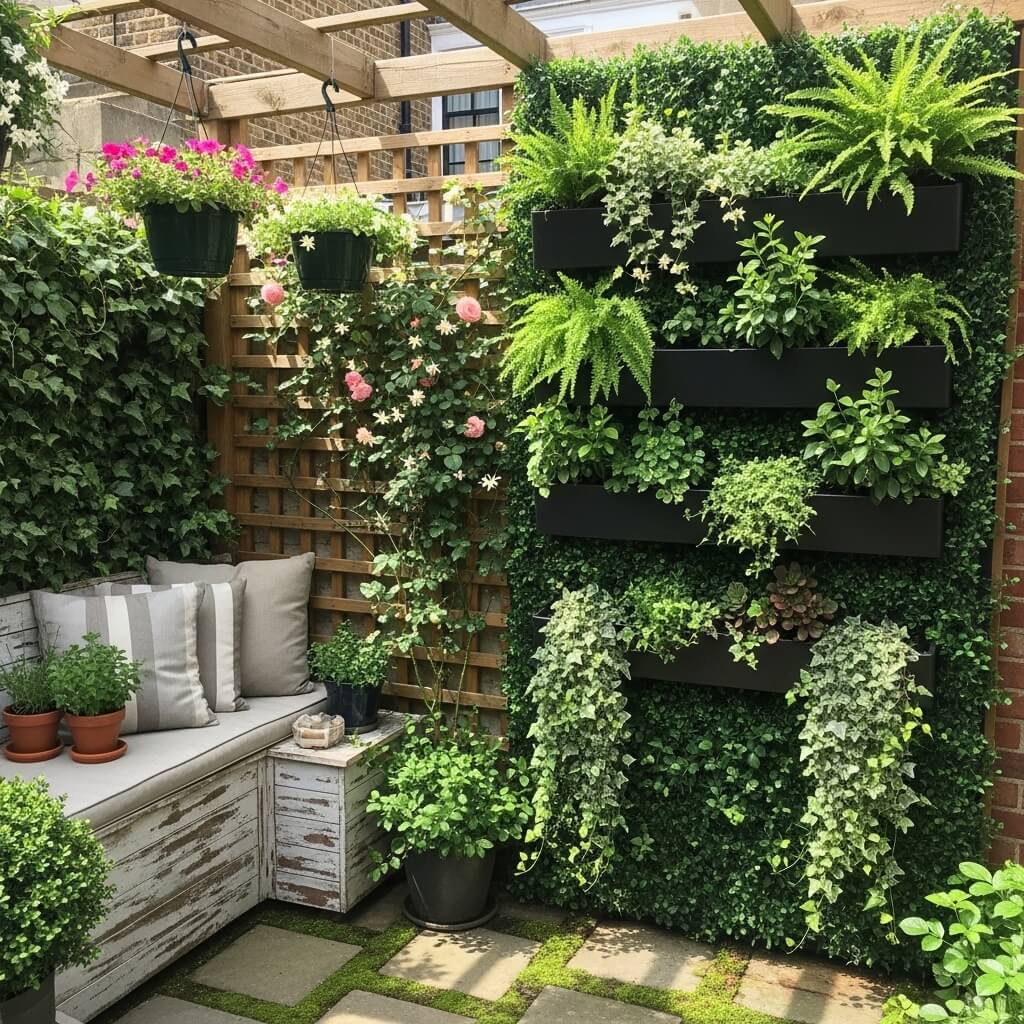
Got a backyard the size of a walk-in closet? Been there, currently living that. Small spaces can actually be total game-changers when you think vertically instead of horizontally.
I live in a place where my “backyard” is basically a narrow strip of concrete that I generously call a patio. But vertical gardening changed everything. Now I’ve got herbs, flowers, and even some strawberries growing up my walls, and it looks intentional rather than desperate.
Vertical garden essentials:
- Wall-mounted planters or pocket organizers (you can find these everywhere from fancy garden stores to, let’s be honest, IKEA)
- Trellises for climbing plants like jasmine, clematis, or even tomatoes
- Hanging planters at different heights to create visual depth
- Tiered plant stands to maximize floor space
- Living walls or moss panels if you’re feeling ambitious
The beauty of going vertical is that you can pack in a ridiculous amount of greenery without sacrificing your actual usable space. I’ve got a little bistro table and two chairs in my tiny patio, and I can still walk around comfortably because all my plants are literally climbing the walls. Your neighbors will wonder how you fit an entire garden back there.
Pro tip: Mix edible plants with ornamentals. There’s something incredibly satisfying about snipping fresh basil for dinner from your wall garden. Plus, it makes you feel like you’ve got your life together, even if the inside of your house tells a different story.
Maintenance Reality Check
Yeah, vertical gardens need watering more frequently than ground-level plants. The soil dries out faster when it’s exposed on all sides. I set up a simple drip irrigation system on a timer, and it’s been a total lifesaver. Otherwise, I’d be out there with a watering can every single day, and let’s be real—that was never going to happen consistently.
Also Read: 10 Inspiring Room Divider Ideas for Dream Home Setup
Budget-Friendly DIY Backyard Makeover
Not all of us have thousands of dollars burning a hole in our pockets for backyard renovations. Some of us are working with what I like to call a “creative budget”—which is code for “I’ve got $200 and a weekend.”
Here’s the truth: You can completely transform your backyard without taking out a second mortgage. It just requires a bit more creativity and a willingness to get your hands dirty. And maybe watch some YouTube tutorials.
I did my first backyard makeover on about $300, and it included building raised garden beds, creating a gravel patio area, and setting up a cute little seating zone. Did everything go perfectly? Absolutely not. Did I accidentally buy the wrong size lumber and have to make a second trip to Home Depot? Obviously. But did it turn out great anyway? You bet.
Budget-friendly transformation ideas:
- Paint or stain an old fence for instant curb appeal
- Use gravel or decomposed granite for affordable ground cover
- Build furniture from pallets (yes, it’s trendy, but it’s trendy because it works)
- Shop end-of-season sales for plants and get them established for next year
- Create pathways with stepping stones or wood slices
- Upcycle containers into planters (old buckets, wooden crates, even boots if you’re feeling quirky)
- String lights are cheap magic—seriously, buy them
The biggest money-saver? Doing the labor yourself. Paying someone else to do landscaping or build structures can easily cost 10 times what the materials cost. Watch tutorials, borrow tools from neighbors (or rent them), and tackle it yourself. The sense of accomplishment when you’re sitting in a space you literally built with your own hands? Priceless. And also a great story to tell at parties.
The DIY Learning Curve
Look, your first DIY project might not be Pinterest-perfect. I built a bench that was slightly lopsided, and I convinced myself it had “character.” But each project teaches you something, and honestly, imperfections make your space uniquely yours. Plus, no one else knows what you were originally going for, so if something doesn’t turn out exactly as planned, just act like it was intentional.
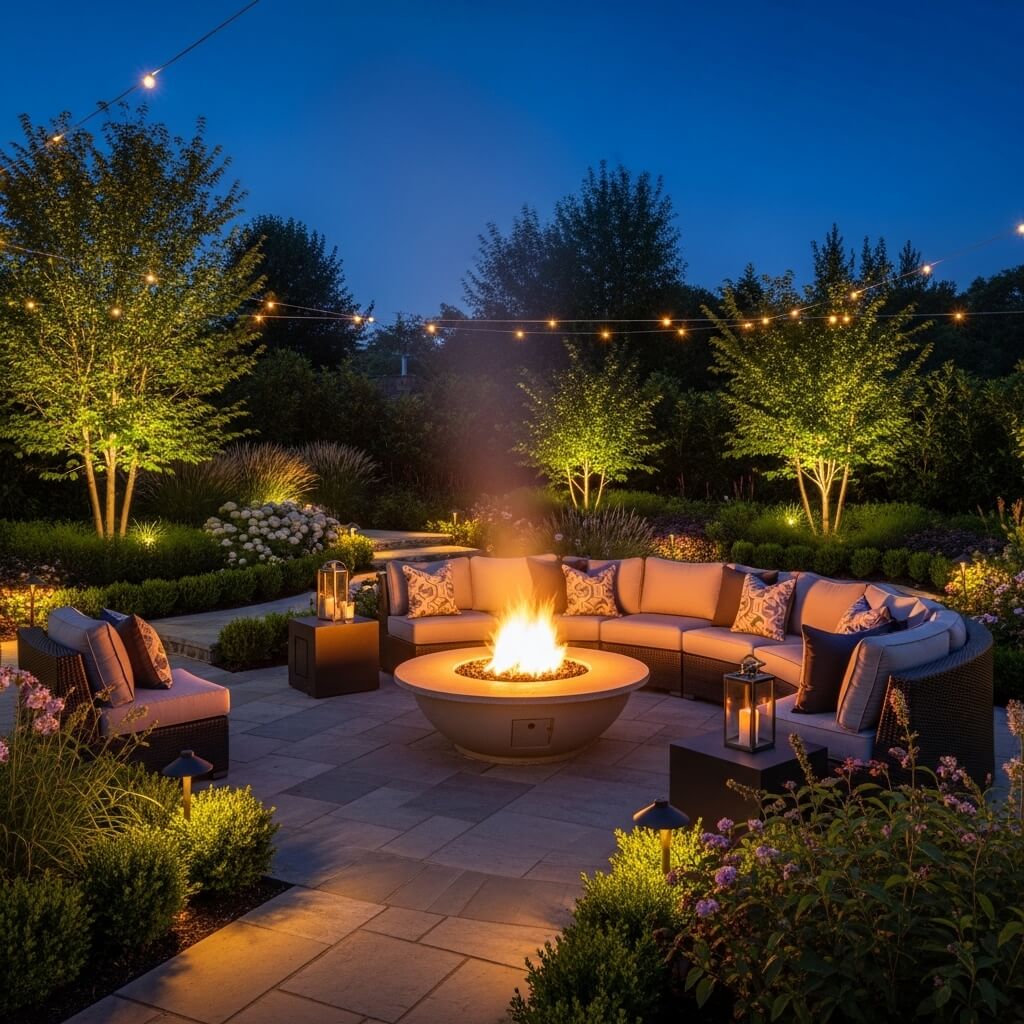
Luxury Backyard Firepit Seating Area
Want to feel like you’re at a fancy resort without leaving your house? A luxury firepit area might just be your ticket to backyard nirvana.
There’s something primal and completely mesmerizing about sitting around a fire. I don’t care how many Netflix shows you’ve got queued up—nothing beats the entertainment value of staring at flames while having actual conversations with real humans. Revolutionary concept, I know.
My friend went all-out on her firepit area last year, and now we basically live at her house during cooler months. She created this circular seating arrangement with deep, comfortable outdoor sofas, added a built-in firepit in the center, and surrounded the whole thing with landscape lighting. It’s the kind of space where you show up for “just one drink” and suddenly it’s midnight and nobody wants to leave.
Elements of a high-end firepit area:
- Quality seating—think deep cushions, weather-resistant fabrics, maybe even built-in benches with storage
- A proper firepit (gas or wood-burning, depending on your local regulations and personal preference)
- Ample seating for entertaining (plan for at least 6-8 people if you’ve got the space)
- Outdoor-rated rugs to define the space and add coziness
- Side tables for drinks (because nobody wants to hold their wine glass the entire evening)
- Ambient lighting around the perimeter
- Maybe a outdoor sound system if you’re feeling fancy
The investment here is real—quality outdoor furniture isn’t cheap, and a good firepit setup can run you several thousand dollars. But IMO, it’s worth it if you actually use your outdoor space. Calculate the cost per use, and suddenly that expensive sectional doesn’t seem so crazy when you’re out there four nights a week.
Gas vs. Wood-Burning
This debate gets surprisingly heated (pun absolutely intended). Gas firepits are clean, easy, and you can control the flame with a switch. Wood-burning gives you that authentic campfire smell and crackling ambiance. I’m team wood-burning for the experience, but I totally get why people choose gas for convenience. There’s no wrong answer here—just different priorities.
Backyard Fairy Light Evening Escape
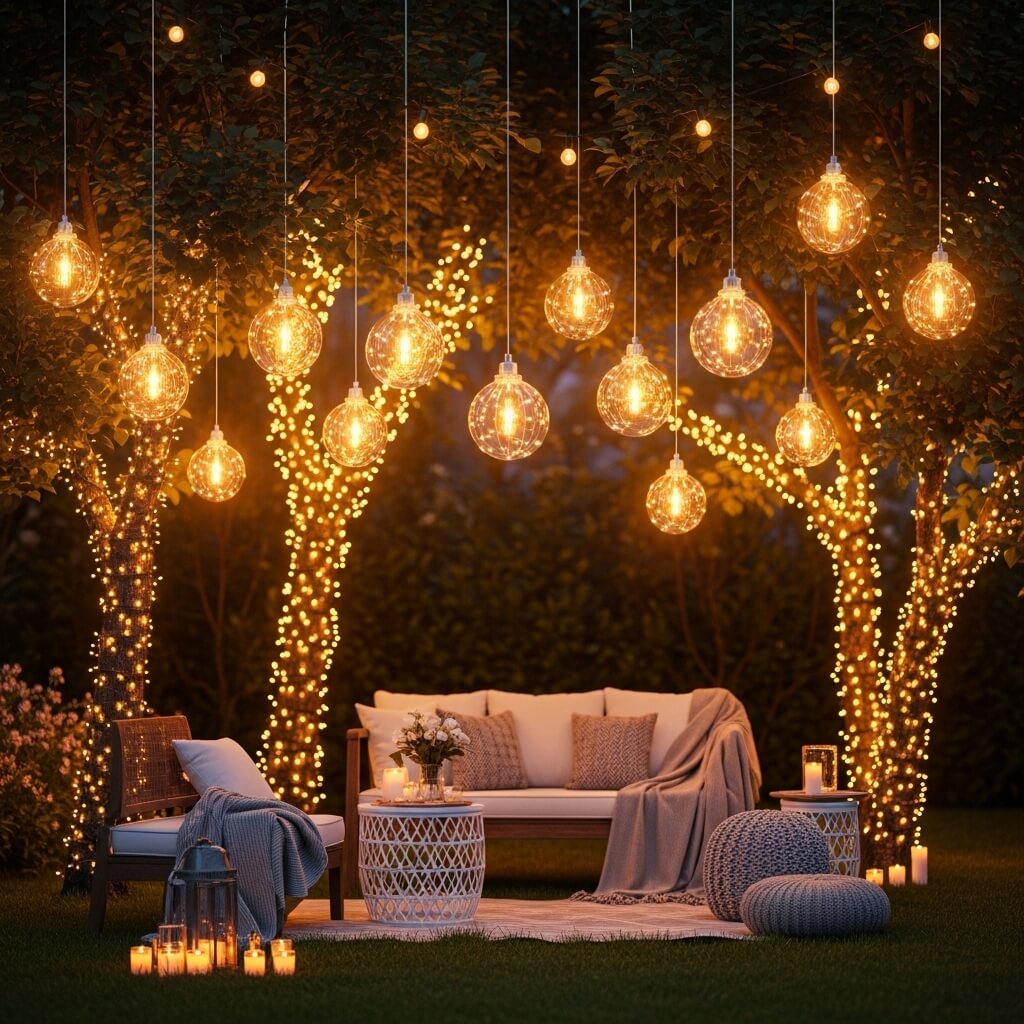
Can we just acknowledge that string lights are pure magic? I don’t understand the physics of why hanging some bulbs makes everything instantly more enchanting, but I’m not questioning it.
Fairy lights, string lights, bistro lights—whatever you call them, they’re the easiest and most effective way to completely transform your backyard’s vibe once the sun goes down. I’ve got them crisscrossing over my patio, wrapped around tree trunks, and draped along my fence. My electricity bill hates me, but my soul loves it.
The key to making string lights look intentional rather than “I just threw these up randomly” is planning your layout. I didn’t do this the first time, and it showed. I had saggy lights, weird gaps, and one strand that was way too low and became a head-bonking hazard. Learn from my mistakes.
String light strategies that actually work:
- Create a canopy effect by running lights in a grid pattern overhead
- Wrap them around pergola beams or posts for architectural emphasis
- Drape them along fence lines to define your space’s boundaries
- Mix different bulb styles (Edison bulbs, globe lights, tiny fairy lights) for visual interest
- Use dimmer switches or smart bulbs for adjustable ambiance
- Make sure your light strings are outdoor-rated (another lesson I learned the hard way)
You don’t need expensive fixtures—Target, Amazon, and even hardware stores have great options. I’ve found some of my favorite string lights at surprisingly affordable prices. The expensive part is sometimes hiring an electrician if you want hardwired options, but plenty of battery-operated and solar options exist for the DIY route.
Setting the Mood
String lights make every evening feel like a special occasion. Eating takeout on paper plates? Doesn’t matter—with the right lighting, it’s basically fine dining. Having friends over for cheap beer? Nope, it’s now an elegant garden party. Lighting is witchcraft, and I fully embrace it.
Also Read: 10 Creative Room Inspo Ideas for a Perfect Aesthetic Look
Japanese Zen Backyard Garden Design
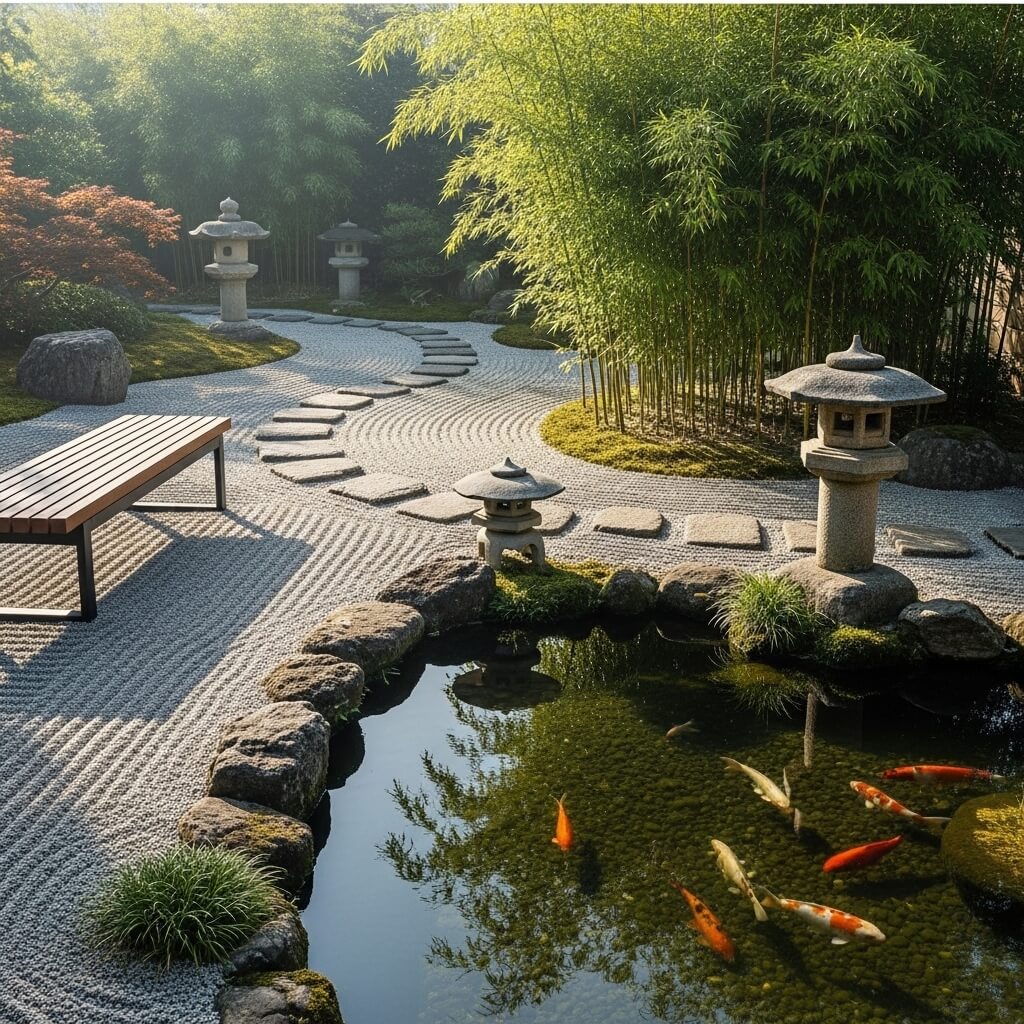
Ever wish you could just… breathe? The Japanese Zen garden aesthetic is basically meditation in landscape form, and it’s perfect if you’re trying to create a genuinely peaceful retreat from everyday chaos.
I visited Japan a few years ago and became completely obsessed with their approach to garden design. Everything is intentional, balanced, and somehow both simple and complex at the same time. When I came home, I immediately started planning a Zen corner in my backyard. It’s not authentically Japanese (I’m not going to pretend it is), but it’s inspired by those principles and it’s become my go-to spot when I need to decompress.
Core elements of Zen garden design:
- Natural materials like stone, gravel, bamboo, and wood
- Carefully placed rocks (yes, rock placement is an art form)
- Raked gravel or sand patterns representing water
- Minimal plant selection focusing on evergreens, Japanese maples, bamboo, and moss
- A water feature—even a small bamboo fountain adds so much tranquility
- Clean, uncluttered spaces with intentional asymmetry
- Natural color palette (greens, grays, browns, blacks)
The philosophy here is about simplicity, natural beauty, and asymmetrical balance. Nothing is forced or overly manicured. You’re trying to recreate nature’s effortless beauty, not control it. Which is honestly a great life philosophy too, but I digress.
Creating a Zen garden requires patience. You can’t rush it. You need to really think about each element’s placement and how everything works together. I spent an embarrassing amount of time positioning three rocks in my space, walking away, coming back, repositioning them, repeat. My partner thought I’d lost it. But when you get it right, you just know.
The Meditative Practice
Maintaining a Zen garden becomes its own form of meditation. Raking the gravel into patterns, pruning plants mindfully, cleaning the water feature—these aren’t chores, they’re practices. At least that’s what I tell myself when I’m out there on a Saturday morning instead of sleeping in :/
Outdoor Dining Backyard BBQ Space
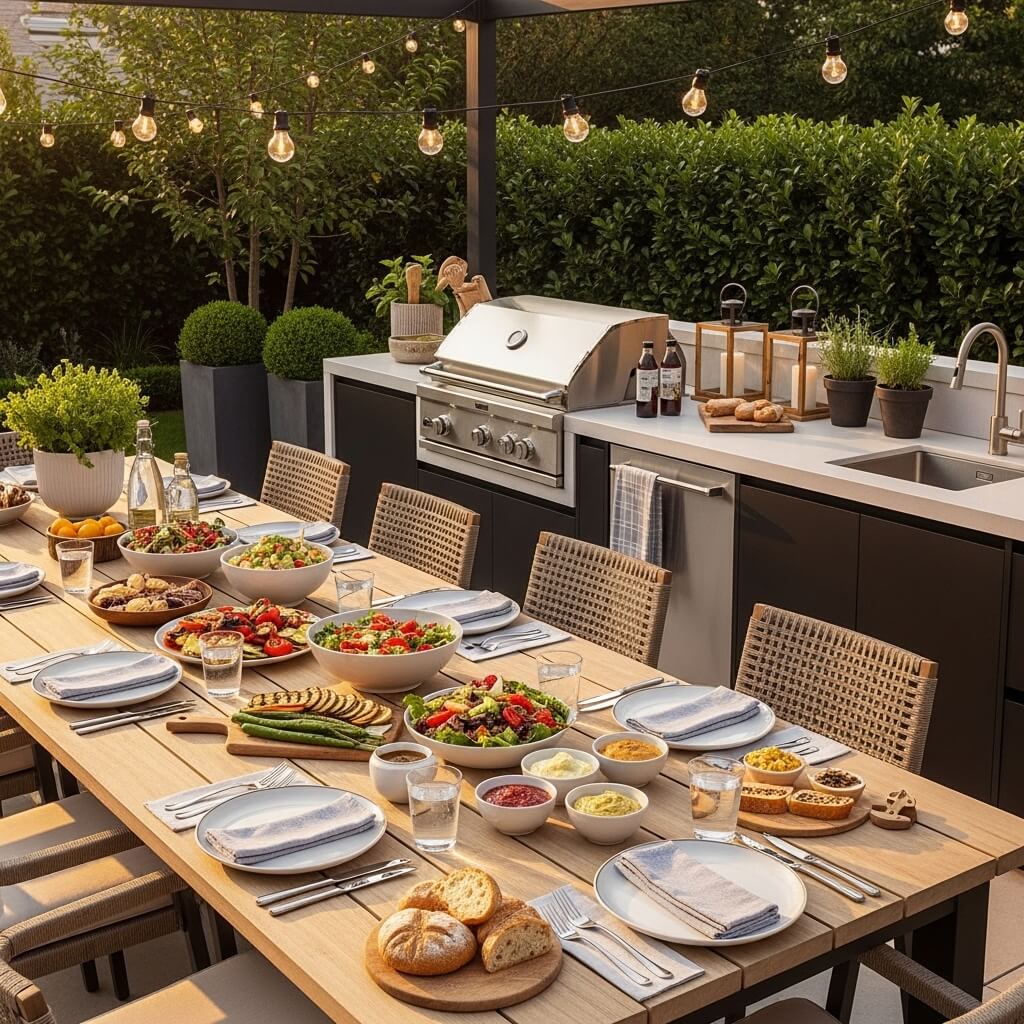
Why eat inside like some kind of cave dweller when you could be dining al fresco in your own backyard?
An outdoor dining and BBQ area transforms your backyard into an entertainment zone. I’m talking about a proper setup where you can grill, prep food, and actually sit down for a meal without balancing plates on your lap or running inside every five seconds for something you forgot.
My uncle built an outdoor kitchen that makes me wildly jealous every time I visit. He’s got a built-in grill, a prep counter, a mini-fridge, and even a pizza oven. Meanwhile, I’m over here with a portable grill and a folding table, but you know what? It still counts as an outdoor dining space, and I’m working my way up.
Creating your outdoor dining zone:
- Invest in a quality grill or smoker (this is your centerpiece)
- Weather-resistant dining table and chairs (size it for your regular crowd plus a few extras)
- Prep space nearby—even a small cart or side table helps immensely
- Storage for grilling tools, utensils, and supplies
- Good lighting for evening meals
- Maybe an umbrella or pergola for shade during day dining
- Outdoor-friendly dishware that doesn’t blow away in the slightest breeze
You don’t need a full outdoor kitchen to make this work. Start with the basics and build from there. I started with just a grill and a table, and I gradually added pieces as I figured out what I actually needed versus what looked cool in pictures.
The beauty of outdoor dining is how it changes the whole vibe of a meal. Food literally tastes better outside—I’m convinced of this. Something about being in fresh air, maybe the slight smoke from the grill, the casual atmosphere… it all just works.
Entertainment Factor
An outdoor dining area isn’t just for family dinners. It’s for weekend BBQs, birthday parties, casual hangs with friends, or even solo meals when you just want to eat outside and scroll through your phone in fresh air. The versatility makes it absolutely worth the investment and space dedication.
Tropical Jungle Style Backyard Retreat
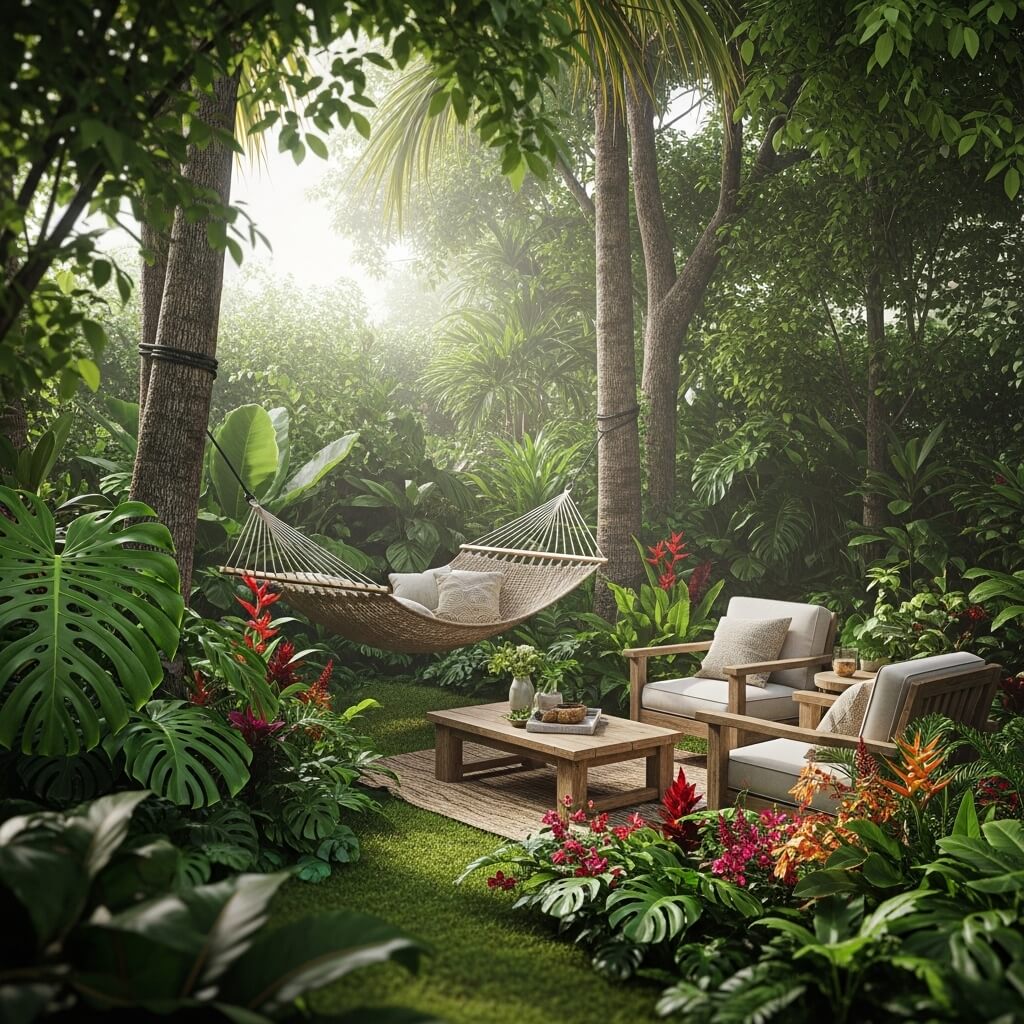
Want to feel like you’re on vacation every time you step outside? A tropical jungle-style backyard brings those resort vibes straight to your home, no passport required.
This style is basically the opposite of minimalism. You’re going for lush, dense, dramatic, and unapologetically over-the-top with the greenery. I tried this style in a small section of my yard, and honestly, it’s become my favorite part. There’s something deeply satisfying about walking into what feels like a different climate zone right outside your back door.
The tropical aesthetic works in way more climates than you’d think. Sure, if you live somewhere that gets snow, you’ll need to either bring plants inside during winter or focus on hardy tropical-looking plants. But the overall jungle vibe is achievable almost anywhere with the right plant selection.
Key ingredients for tropical paradise:
- Large-leafed plants like banana plants, elephant ears, cannas, or bird of paradise
- Layered planting at different heights for that dense jungle feel
- Bold, saturated colors—think hot pink, bright orange, deep purple
- Natural materials like bamboo, teak, and rattan for furniture
- Water features to add humidity and sound
- Maybe a hammock strung between trees (bonus points for a colorful one)
- Tiki torches or lanterns for evening ambiance
Don’t be afraid to cram plants together. The tropical look is all about abundance and lushness. Space things too far apart, and you lose that immersive jungle feeling. I planted my tropical area pretty densely, and watching everything fill in over the season was incredibly satisfying.
Maintenance-wise, tropical plants often need more water and attention than your average landscaping. But many are surprisingly hardy and grow like crazy once established. Research what works in your specific climate—you’d be surprised what tropical-looking plants can actually survive cooler temperatures.
Creating Microclimates
If you live somewhere with questionable weather for tropicals, you can create warmer microclimates in protected areas. Near south-facing walls, under overhangs, or in sheltered corners, temperatures can be significantly warmer than the rest of your yard. Use these spots strategically for your more tender tropical plants.
Also Read: 10 Easy Landscaping Ideas for a Fresh Outdoor Makeover
Family-Friendly Backyard Play & Chill Zone
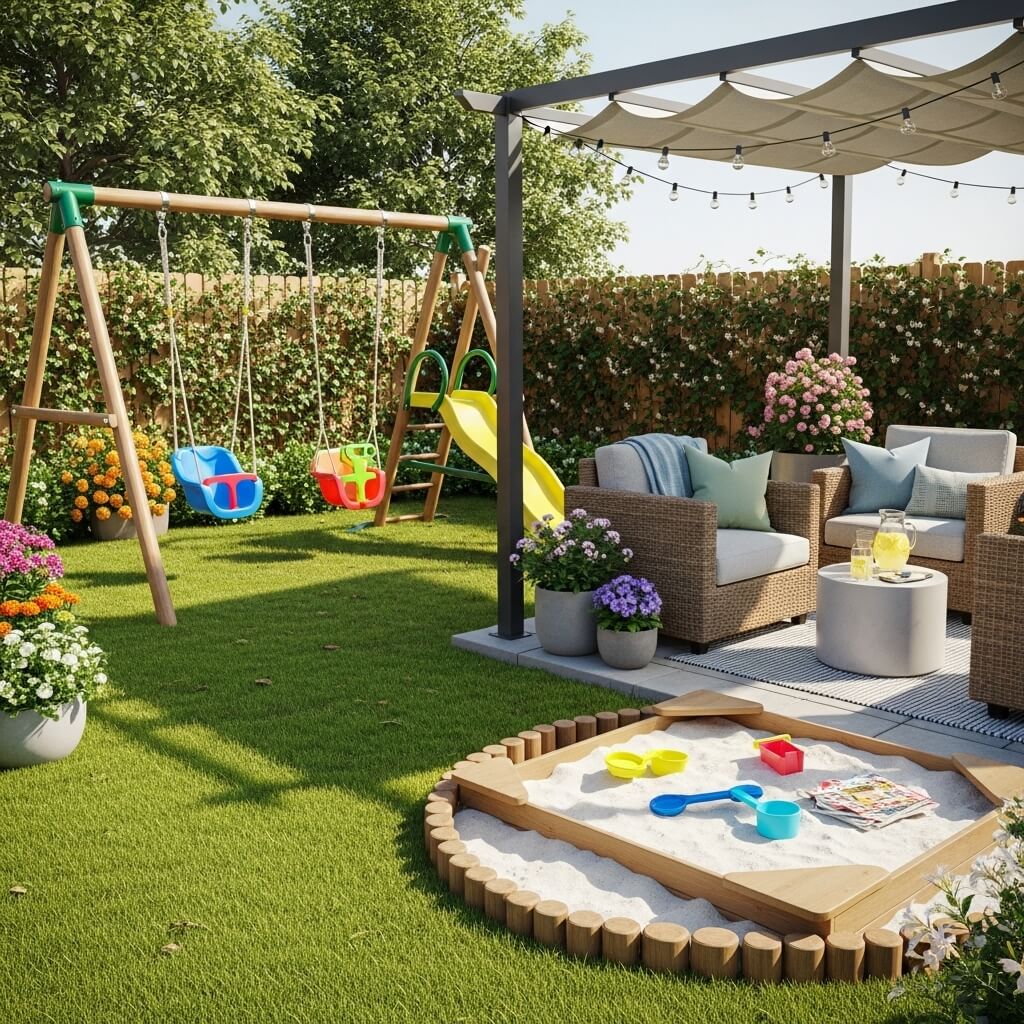
Got kids? Or maybe nieces and nephews who visit? Creating a backyard that works for both active play and adult relaxation is the ultimate challenge, but it’s totally doable.
The key is zoning. You need designated areas where kids can go wild without destroying your carefully curated lounge space. My sister nailed this in her backyard. She’s got a play zone on one side with a swing set, sandbox, and lawn area for running around, and then a separate adult area with comfortable seating and a firepit. The kids have their kingdom, the adults have their sanctuary, and everyone’s happy.
Family-friendly backyard must-haves:
- Durable, washable furniture (because sticky fingers are inevitable)
- A designated play area with appropriate ground cover (mulch, rubber matting, or soft grass)
- Plenty of shade options—kids overheat quickly
- Storage for toys that doesn’t look terrible (trust me, visible toy storage becomes an eyesore fast)
- Adult seating with good sightlines to the play area
- Maybe some creative play elements like a chalkboard fence, mud kitchen, or water play station
- Flexible lawn space for games, sprinklers, or just running around
Don’t sacrifice your entire backyard to kid stuff. They grow up fast (or so everyone keeps telling me), and you’ll want some space that’s designed for your enjoyment too. Create balance between fun and function for all ages.
I love the idea of incorporating natural play elements—logs for balancing, rocks for climbing, trees for hanging swings. These blend into the landscape better than plastic play equipment and honestly hold kids’ attention just as well. Plus, they photograph way better for those Instagram moments when your backyard is looking particularly good.
Growing With Your Family
Design with future needs in mind. That toddler sandbox? It can become a raised garden bed when kids outgrow it. The lawn area for playing tag? It’s also perfect for outdoor movie nights when they’re teenagers. Flexibility is your friend when designing family spaces.
Bringing It All Together
Here’s what nobody tells you about creating your dream backyard: you don’t have to do it all at once, and you definitely don’t have to choose just one style.
My backyard is honestly a weird mix of several of these ideas. I’ve got string lights everywhere (obviously), a small Zen-inspired corner, some boho seating, and way too many plants trying to give tropical vibes. Does it make sense? Not entirely. Do I love it? Absolutely.
The most important thing is creating a space that you’ll actually use. There’s zero point in having a magazine-worthy backyard if you never want to spend time in it. Think about how you actually live, what activities you enjoy, and design around that reality.
Start with one area or one project. Get that right, use it, enjoy it. Then tackle the next thing when you’re ready. I’ve been working on my backyard for three years now, and I’m nowhere near done. But you know what? I use it constantly, and it brings me genuine joy every single day.
Whether you’ve got a huge budget or you’re working with whatever’s left after paying bills, whether you’ve got acres of land or a tiny patio, your outdoor space can become your personal oasis. It just takes some planning, a bit of work, and the willingness to make it your own.
So grab a beverage, step outside, and really look at your backyard. What could it become? What do you want it to be? The potential is there—you just have to unlock it. And hey, if all else fails, start with string lights. They fix everything.
Now if you’ll excuse me, I have some plants to water and a hammock calling my name. Happy backyard transforming!


