10 Relaxing Firepit Ideas Backyard Dreamy Outdoor Retreats
- Outdoor Ideas
 Ben
Ben- 0
- 42 minutes read
Let me guess—you’re standing in your backyard right now, coffee in hand, staring at that sad patch of grass or that weird corner nobody ever uses, and thinking, “This could be SO much better.” Well, friend, you’re absolutely right. And if you’ve been daydreaming about crackling fires, marshmallow roasting, and those Instagram-worthy gatherings where everyone’s laughing under the stars, you’re in the perfect place. I’ve spent more hours than I’d like to admit obsessing over firepit designs, testing layouts, and honestly making some regrettable mistakes (RIP to my first attempt with mismatched bricks :/ ). But here’s the good news—I’m sharing everything I’ve learned so you don’t have to go through the same trial and error. These ten firepit ideas will transform your outdoor space into the retreat you’ve been craving, whether you’ve got a sprawling yard or just a cozy corner to work with.
Cozy Stone Circle Firepit Lounge
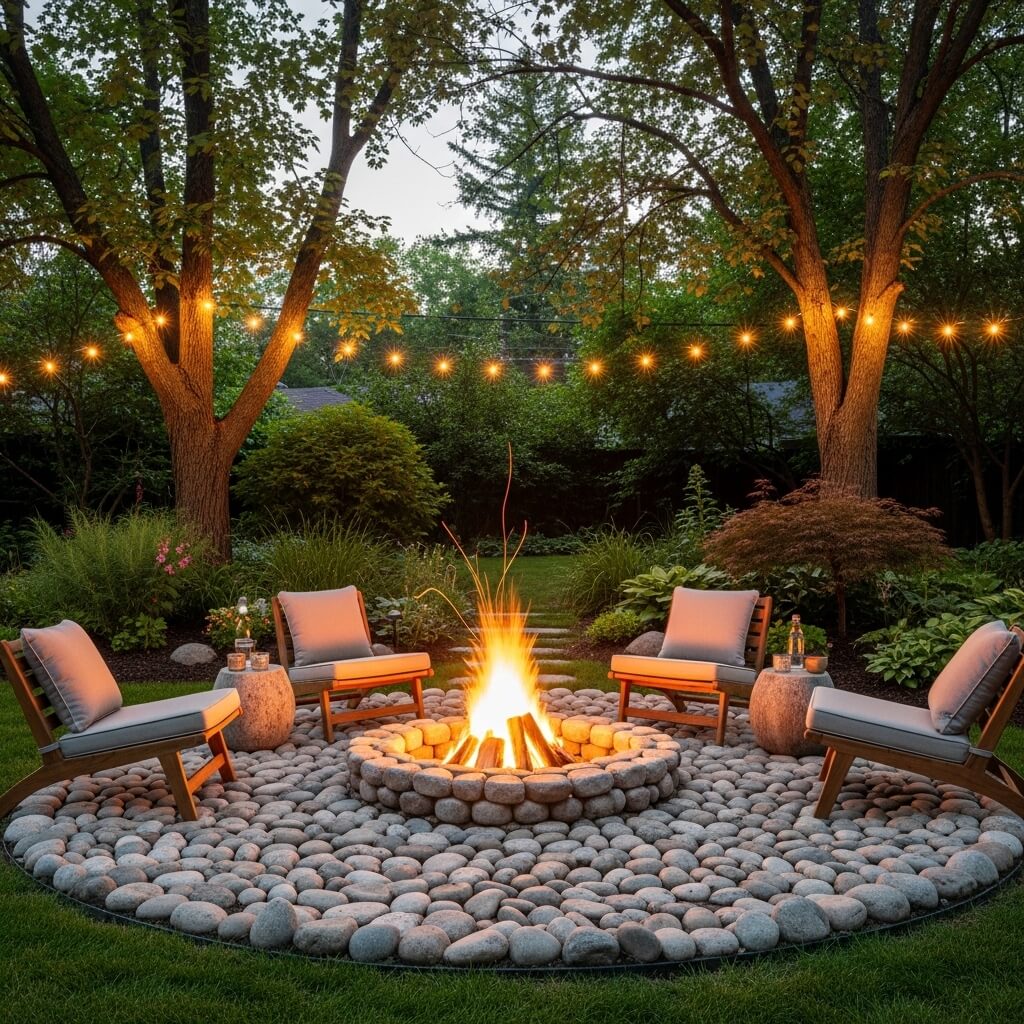
There’s something almost primal about gathering around a stone circle firepit, right? It taps into that ancient campfire vibe while still looking sophisticated enough for your modern backyard. I built my first stone circle firepit about three years ago, and honestly, it became the heartbeat of my outdoor space.
The appeal here is simplicity mixed with permanence. You’re creating a defined space that screams “gather here” without needing fancy technology or complicated installation. Natural stones arranged in a circular pattern create the firepit boundary, while you surround the area with comfortable seating—think Adirondack chairs, weather-resistant sofas, or even those oversized bean bags that everyone secretly loves.
Here’s what makes this design work so well:
- Natural materials blend seamlessly with any landscape style
- The circular arrangement encourages conversation and eye contact
- Stone retains heat beautifully, extending those chilly evenings
- You can customize the size based on your available space and typical crowd
When I built mine, I used fieldstone I collected over several weekends (free materials, FYI!). I arranged them in about a 4-foot diameter circle, leaving gaps for airflow. The surrounding lounge area features gravel underfoot—easier to maintain than grass and it provides excellent drainage when someone inevitably spills their drink.
Pro tip? Position your seating about 5-6 feet back from the fire’s edge. Close enough to feel the warmth, far enough that nobody’s worrying about singed eyebrows. I learned this the hard way during my first fire when my friend’s jacket sleeve got a little too toasty. Whoops.
The magic really happens when you add ambient lighting around the perimeter. Solar-powered landscape lights tucked between the stones create this gorgeous glow that guides people to the space after dark. Add some outdoor throw pillows, maybe a side table or two for drinks, and you’ve got yourself a legitimate outdoor living room.
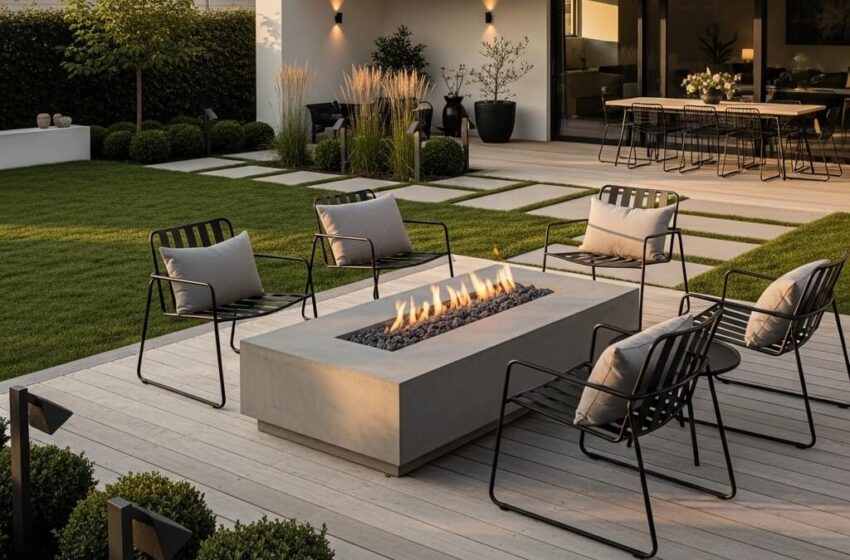
Modern Minimalist Backyard Firepit Deck
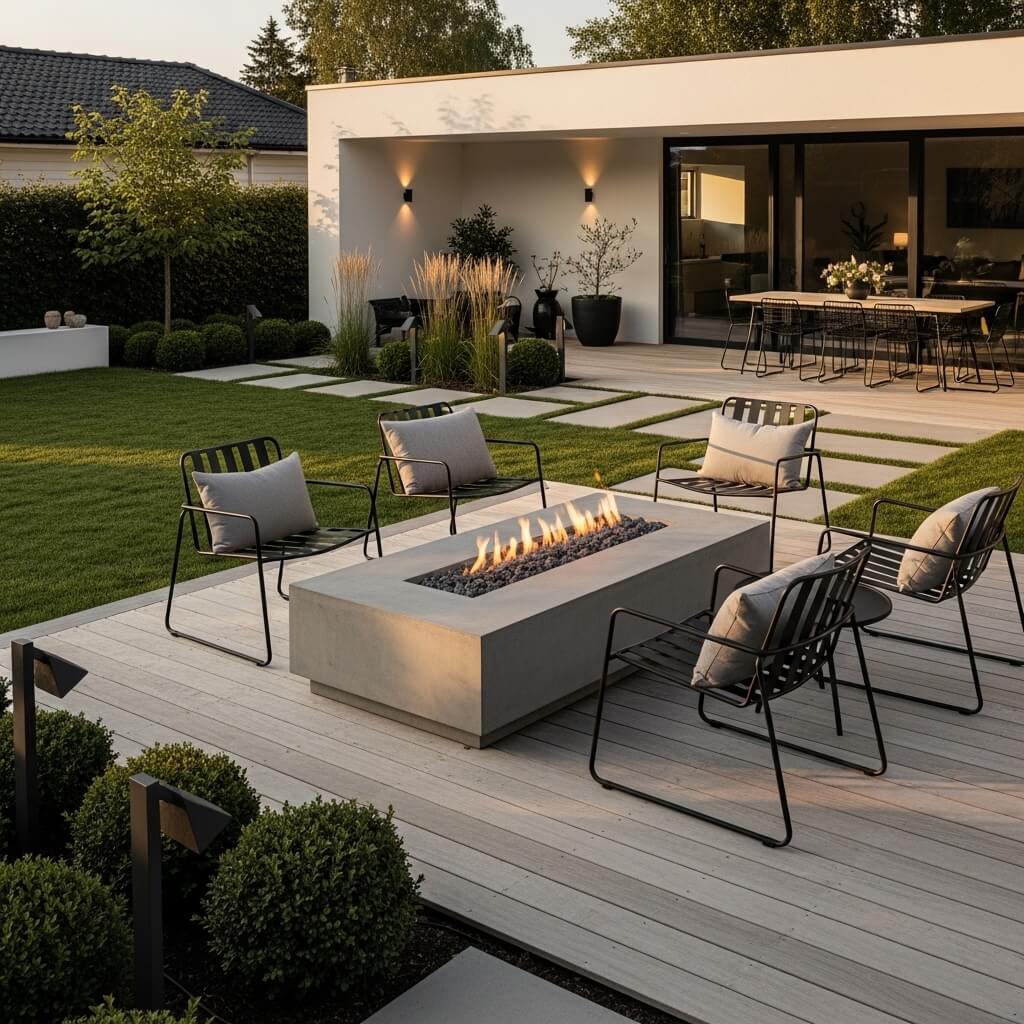
Ever notice how “minimalist” somehow became code for “expensive-looking”? Well, the modern minimalist firepit deck delivers exactly that vibe without necessarily breaking the bank. This setup works particularly well if your backyard aesthetic leans contemporary or if you’re working with limited space.
The key elements here are clean lines, monochromatic color schemes, and intentional negative space. We’re talking sleek concrete or composite decking, a streamlined firepit (often rectangular or square rather than round), and furniture that looks like it belongs in an architecture magazine.
I helped my neighbor install one of these last summer, and the transformation was genuinely jaw-dropping. We went with:
- A low-profile concrete firepit with a stainless steel burner
- Composite decking in charcoal gray that doesn’t require constant maintenance
- Straight-lined outdoor furniture in neutral tones
- Minimal accessories—just a couple of matching planters with architectural plants
The beauty of this approach is that every element serves a purpose. There’s no clutter, no random decorative items fighting for attention. The fire itself becomes the focal point, which is exactly as it should be.
Now, here’s where it gets interesting. Modern minimalist doesn’t mean uncomfortable. We added thick cushions to the seating (in weather-resistant fabric, obviously) and installed a geometric pergola overhead for definition without blocking the sky. The result? A space that photographs beautifully but actually feels inviting, not sterile.
One warning though—minimalist designs show dirt and imperfections more obviously than busier styles. You’ll need to stay on top of sweeping and cleaning. IMO, the trade-off is worth it for that crisp, magazine-worthy look, but just know what you’re signing up for.
Boho Style Firepit with Floor Cushions
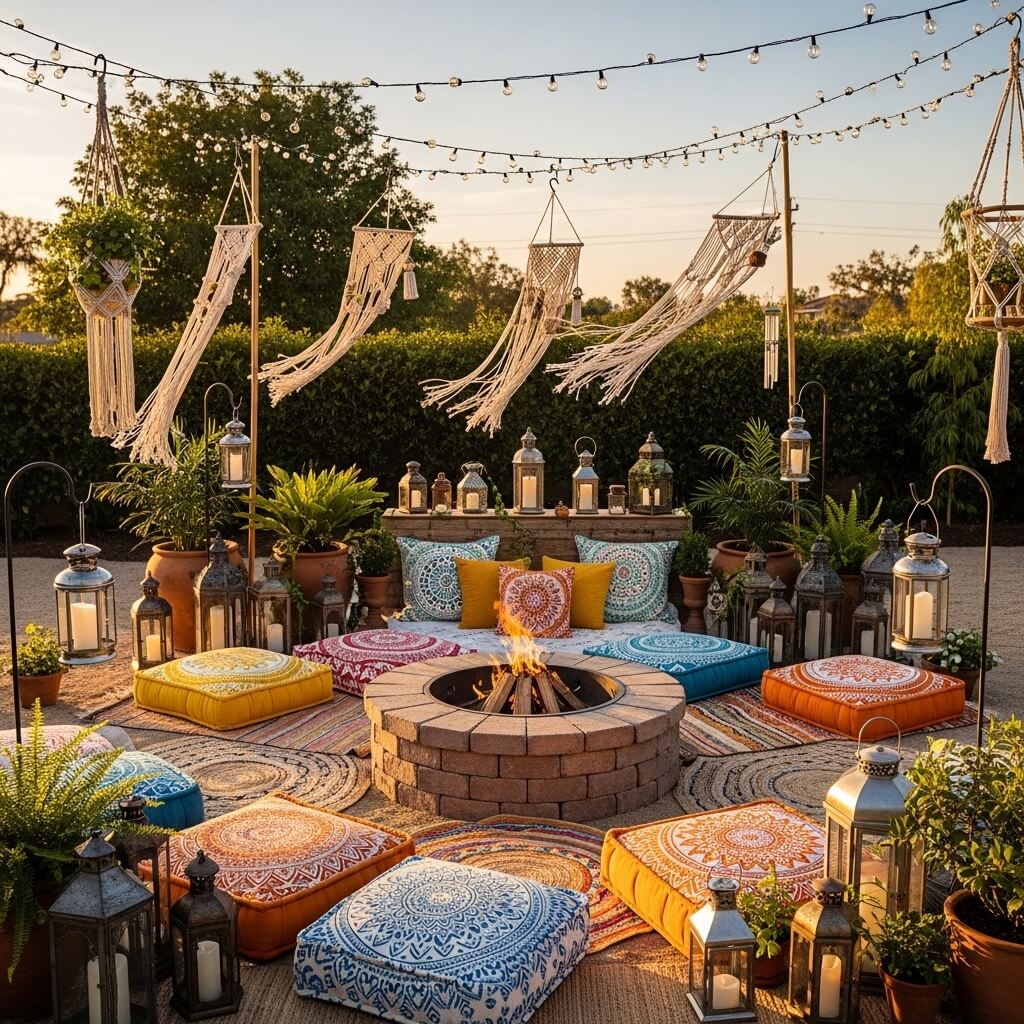
Okay, can we talk about how ridiculously fun boho firepit setups are? If the minimalist vibe makes you feel a bit cold and you’d rather create something with personality, texture, and that “I just threw this together effortlessly” look (that actually takes careful planning), the boho approach might be your soulmate.
This style celebrates color, pattern, and comfort. We’re talking oversized floor cushions, vintage rugs scattered around the firepit area, macramé hanging from nearby trees or posts, and plants—so many plants. The firepit itself can be pretty simple; honestly, the surrounding elements do the heavy lifting here.
I created a boho firepit area in my side yard, and it quickly became everyone’s favorite hangout spot. Here’s what I included:
- A simple metal firepit bowl (nothing fancy, maybe $80 at the hardware store)
- Mismatched floor cushions and poufs in warm colors—think terracotta, mustard yellow, deep purple
- Layered outdoor rugs that define the seating area
- String lights crisscrossing overhead for that magical nighttime ambiance
- Potted plants in varying heights, including some hanging planters
The secret to nailing bohemian style is embracing imperfection and mixing patterns fearlessly. That Moroccan-print cushion next to the striped pouf next to the solid terracotta floor pillow? Perfect. The more eclectic, the better.
I’ll be honest—this setup requires some weather management. I keep all the cushions and rugs in a nearby storage bench when rain’s coming. It’s maybe five minutes of effort, but it extends the life of everything considerably. Small price to pay for a space that makes you feel like you’re at a beachside resort somewhere exotic.
One thing that surprised me? How many people gravitate toward the floor seating. Something about lounging low to the ground around a fire feels incredibly relaxing. Just make sure you’ve got a few traditional chairs too for guests who struggle with getting up and down.
Also Read: 10 Ultimate Backyard Ideas with Pool for Luxury Outdoor Bliss
Rustic Farmhouse Firepit with Wooden Benches
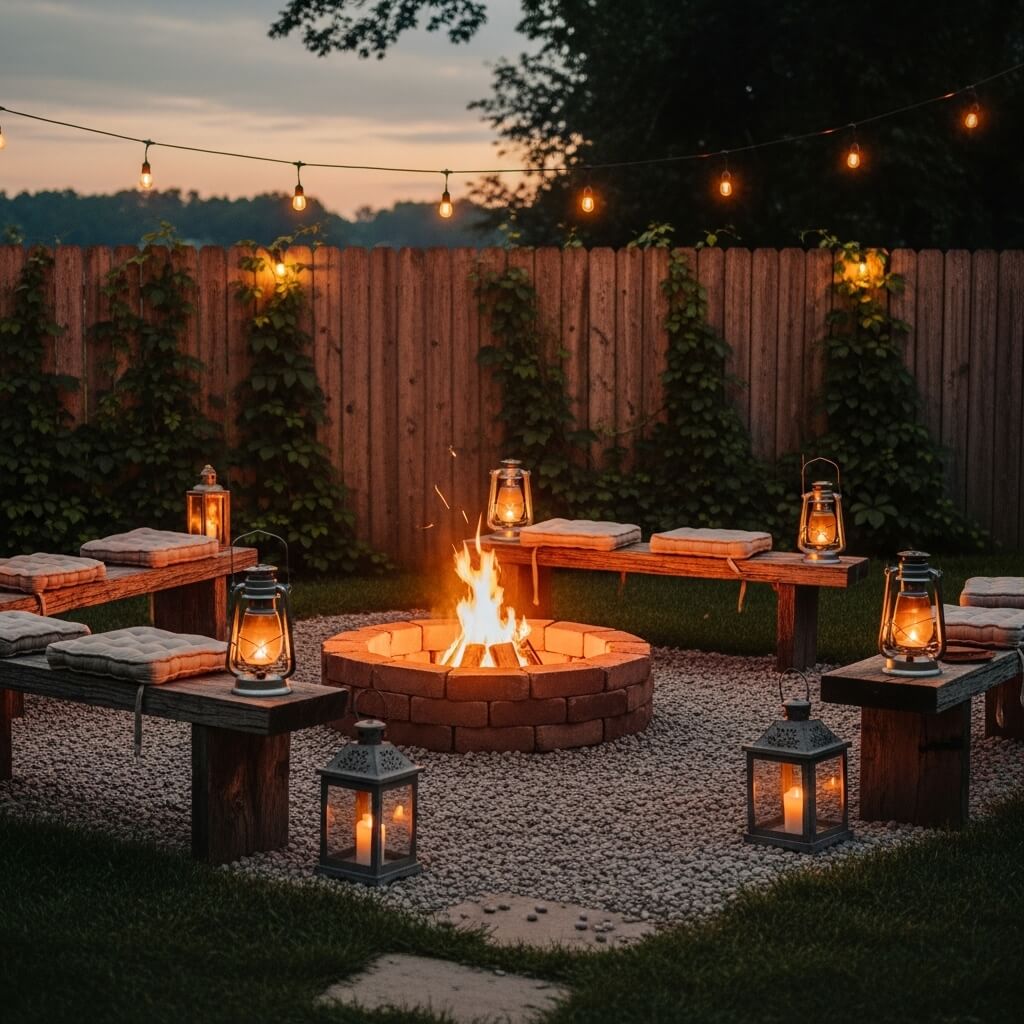
Let’s get real—farmhouse style has been everywhere for the past few years, and you know what? I’m not mad about it. There’s something genuinely comforting about rustic wooden elements, especially when combined with the warmth of a firepit.
This setup channels those countryside vibes with reclaimed wood benches, a classic firepit design, and accessories that feel handmade and heartfelt. Think galvanized metal accents, vintage lanterns, and maybe a farm table nearby for serving s’mores supplies.
The centerpiece of this design is usually built-in wooden benches arranged around the firepit. When I installed this at my parents’ place (their retirement gift to themselves was a backyard makeover), we used rough-cut lumber that we distressed and weatherproofed. The benches form a partial circle, leaving an opening for easy access.
Key elements that make this style work:
- Heavy, substantial wooden benches that look handcrafted
- A traditional circular firepit, often with a steel ring insert
- Natural materials throughout—stone, wood, maybe some wrought iron
- Vintage or vintage-inspired accessories like old milk cans repurposed as side tables
- Warm white string lights or Edison bulbs overhead
Here’s what nobody tells you about wooden benches around a firepit: you absolutely must seal that wood properly. We learned this the hard way after one season when the untreated bench closest to the fire warped dramatically. Now we apply marine-grade sealant annually, and the benches look fantastic years later.
The farmhouse firepit creates this incredibly welcoming atmosphere that makes people want to linger. Add some plaid blankets draped over the benches, a few cushy pillows, and suddenly you’ve got a space that feels like it’s been part of the family for generations, even if you just built it last month.
Luxury Sunken Firepit Seating Area
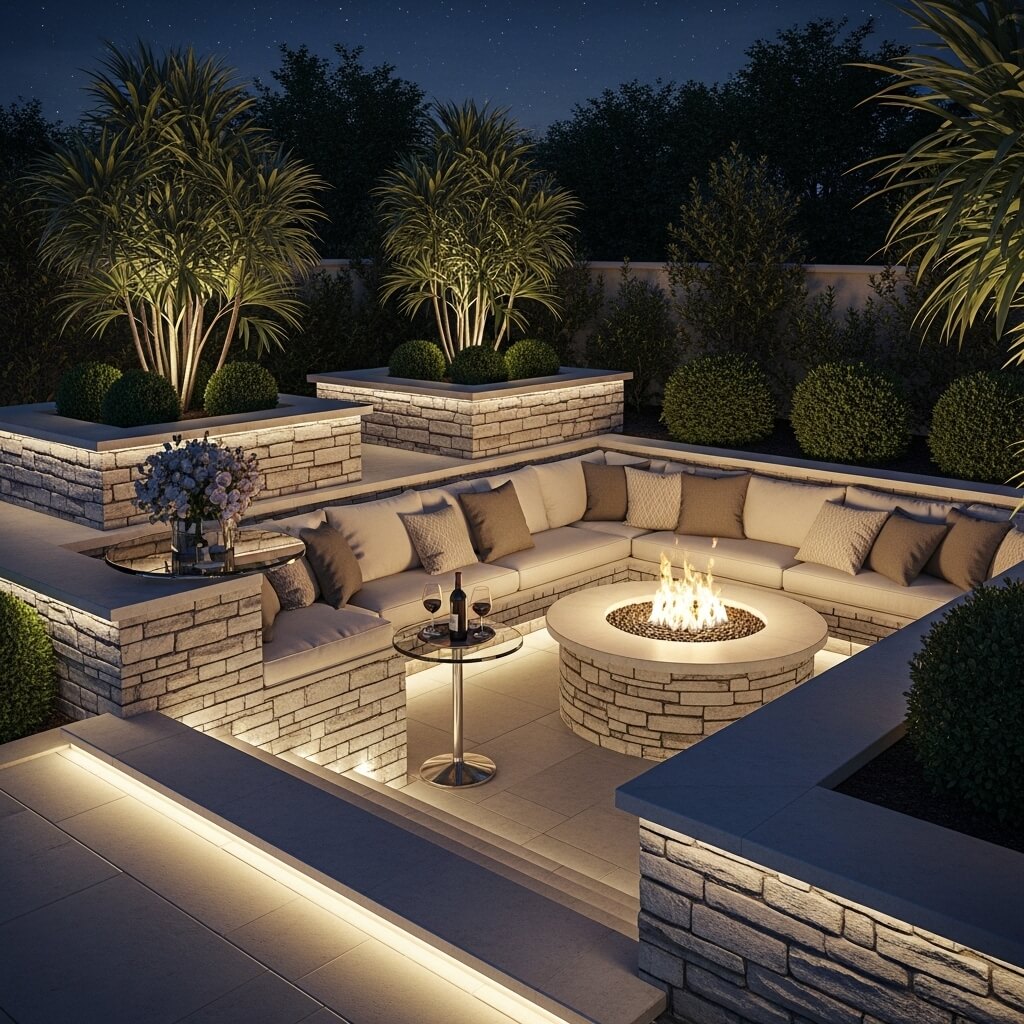
Alright, let’s talk about the showstopper—the sunken firepit seating area. This is the design that makes visitors do a double-take and immediately ask for your contractor’s number. It’s definitely more involved than some other options, but if you’re ready to make a statement and create something truly special, this might be your dream project.
The concept is simple but impactful: you excavate a circular or square area, install built-in seating around the perimeter, and place the firepit in the center. The result is a conversation pit that feels intimate, protected, and undeniably luxurious.
I got to experience this firsthand at a friend’s place (yes, I was insanely jealous), and the difference in ambiance compared to a traditional firepit setup is remarkable. When you’re sitting in that sunken space, you feel cocooned and separate from the rest of the yard in the best possible way.
Here’s what goes into creating this look:
- Proper excavation and drainage planning (seriously, don’t skip the drainage part)
- Built-in bench seating with weather-resistant cushions
- High-quality firepit installation, often gas for convenience and consistent flame
- Landscaping around the perimeter to define the space
- Thoughtful lighting built into the seating walls or surrounding area
The investment here is significant, both in time and money. You’re looking at professional installation unless you’re extremely handy. But the payoff? A backyard feature that literally becomes the property’s selling point.
One aspect I particularly love is how the sunken design naturally shields the fire from wind, making it more practical for breezy locations. Plus, the intimacy factor is unmatched—conversations feel more private, and the space naturally encourages people to relax and stay awhile.
Fair warning: if you’ve got small kids, you’ll need to think about safety barriers or covers when the firepit area isn’t in use. The drop into the sunken space isn’t huge (usually 12-18 inches), but it’s enough to warrant caution.
Small Backyard Corner Firepit Setup
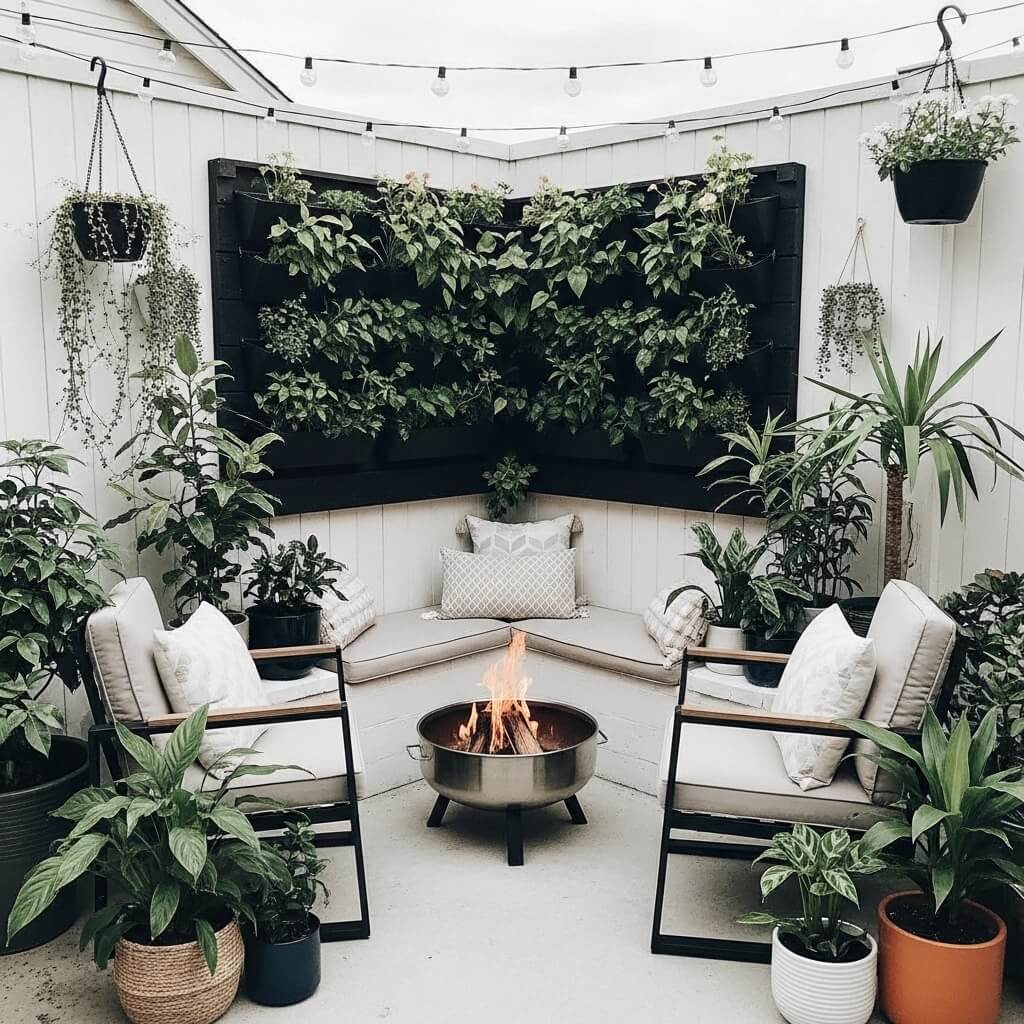
Not everyone’s working with a sprawling estate, and honestly? That’s perfectly fine. Some of the coziest firepit setups I’ve seen were tucked into small corner spaces that made the most of every square foot.
The corner firepit approach is all about strategic placement and smart furniture selection. You’re utilizing a space that might otherwise go unused, transforming it into a functional gathering spot without sacrificing your entire yard.
When I lived in my starter home with a postage-stamp backyard, I created a corner firepit setup that punched way above its weight class. Here’s how I maximized that small space:
- Positioned the firepit in the actual corner, backed by existing fencing
- Used a compact round firepit (about 24 inches in diameter)
- Arranged seating in an L-shape along the two fence lines
- Incorporated vertical elements like wall-mounted planters and hanging lights to draw the eye upward
- Chose multi-functional furniture like storage benches
The trick with small spaces is thinking vertically and avoiding bulky elements. Instead of wide Adirondack chairs, I used sleek metal chairs with cushions. Instead of a coffee table, I had a couple of small side tables that could move around easily.
Another game-changer? Foldable or stackable seating for when you’re hosting a crowd. I kept four folding chairs in the garage that I’d bring out for bigger gatherings, then store away to keep the daily footprint minimal.
You know what surprised me most? How intimate and cozy the small space actually felt. While my friends with huge yards sometimes struggled to create that close-knit gathering vibe, my corner setup naturally brought people together. Sometimes limitations force creativity, and you end up with something even better than if you’d had unlimited space.
Also Read: 10 Easy Backyard Ideas for Kids Budget Friendly Fun
Desert Style Firepit with Gravel Landscaping
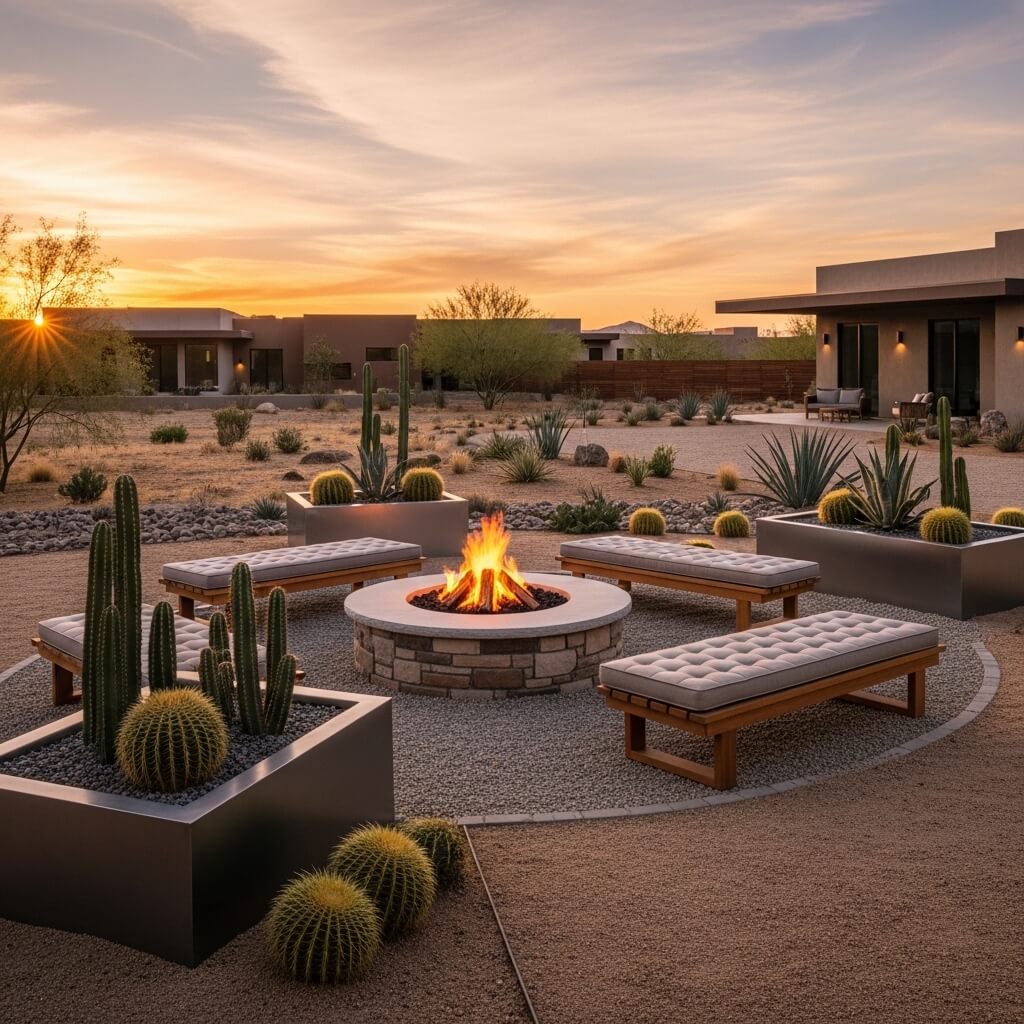
Living in a dry climate or just love that southwestern aesthetic? The desert-style firepit might speak to your soul. This design embraces drought-resistant landscaping, natural materials, and that warm, earthy palette that feels both rugged and refined.
This approach is particularly practical if you’re dealing with water restrictions or simply hate yard maintenance (no judgment—I’m firmly in the “low-maintenance landscaping” camp myself). Gravel, rocks, and desert plants require minimal upkeep while creating a stunning visual impact.
I designed a desert-style firepit area for my cousin’s Arizona backyard, and it perfectly complemented the landscape:
- Decomposed granite or pea gravel base instead of grass or pavers
- Large boulders strategically placed for natural seating and visual interest
- A rustic steel or copper firepit that develops a beautiful patina over time
- Desert plants like agave, yucca, and various cacti in clusters around the perimeter
- Warm-toned furniture in materials like wrought iron or teak
The color palette here is crucial. Think terracotta, sand, rust, deep charcoal, and warm whites. These colors reflect the natural desert environment and create a cohesive, intentional look.
Here’s something I really appreciate about this style: it looks completely intentional even when weather-beaten. That firepit that’s developing rust patches? Character. Those sun-bleached cushions? Perfectly on-theme. Compare that to other styles where weathering just looks neglected, and you’ll understand why desert style has such longevity.
One practical consideration—gravel can scatter, so you’ll want to install some kind of edging to keep it contained. We used steel landscape edging that nearly disappears visually but keeps everything in place. Also, FYI, walking barefoot on gravel is not the vibe, so keep some outdoor shoes handy or add stepping stones to main pathways.
Pergola Covered Firepit Living Space
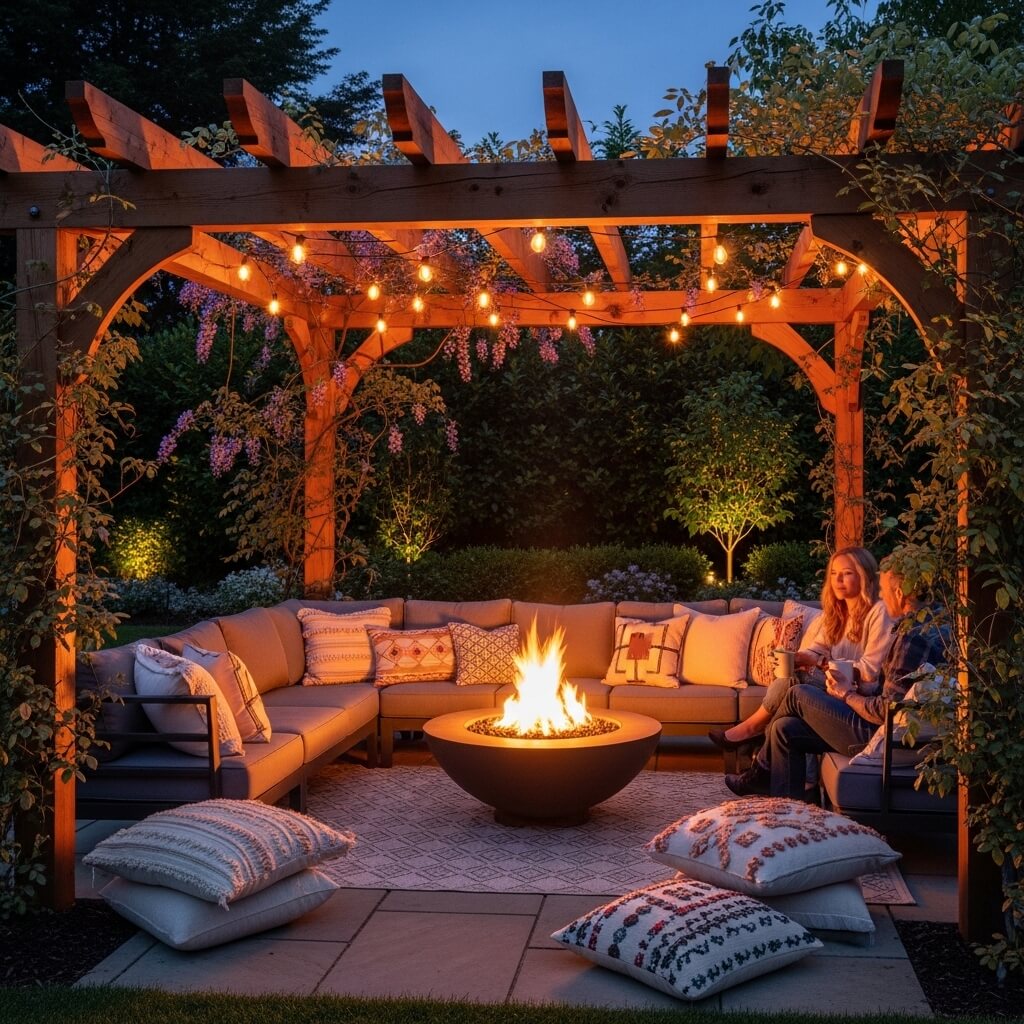
Want the best of both worlds—outdoor ambiance with some protection from the elements? The pergola-covered firepit living space delivers exactly that. This setup creates a defined outdoor room that feels substantial enough for frequent use while maintaining that open-air connection to nature.
A pergola provides structure, shade, and the perfect framework for accessories like hanging plants, string lights, or even outdoor curtains. Position your firepit beneath or adjacent to it, and you’ve created a destination space that works across multiple seasons.
I installed a pergola over my firepit area two years ago, and it genuinely extended my outdoor season by months. Even in light rain, we can still enjoy the fire (with proper precautions, obviously). The overhead structure just makes everything feel more room-like and intentional.
Here’s what makes this combination work:
- Proper spacing between the pergola roof and firepit to allow smoke to disperse (at least 8-10 feet clearance)
- Weatherproof furniture that can stay in place year-round
- Integrated lighting hung from the pergola beams
- Climbing plants or draping fabric on the pergola sides for added privacy
- Outdoor rugs and accessories that define the living space
The style of your pergola can vary wildly based on your overall aesthetic. Modern metal pergolas create that contemporary vibe, while rustic wooden structures lean farmhouse. We went with stained cedar that we left natural—it’s aged beautifully and requires minimal maintenance.
One unexpected benefit? The pergola provides anchor points for all kinds of accessories. I’ve hung everything from string lights to outdoor speakers to plant hangers from those beams. It’s like having a framework for creativity, and you can change up the look seasonally without major effort.
The investment in a pergola is real—you’re looking at several thousand dollars for materials and installation unless you DIY. But it transforms your firepit from a standalone feature into a complete outdoor living room. Worth it? In my experience, absolutely 🙂
Beach Vibe Firepit with Sand & Driftwood Decor
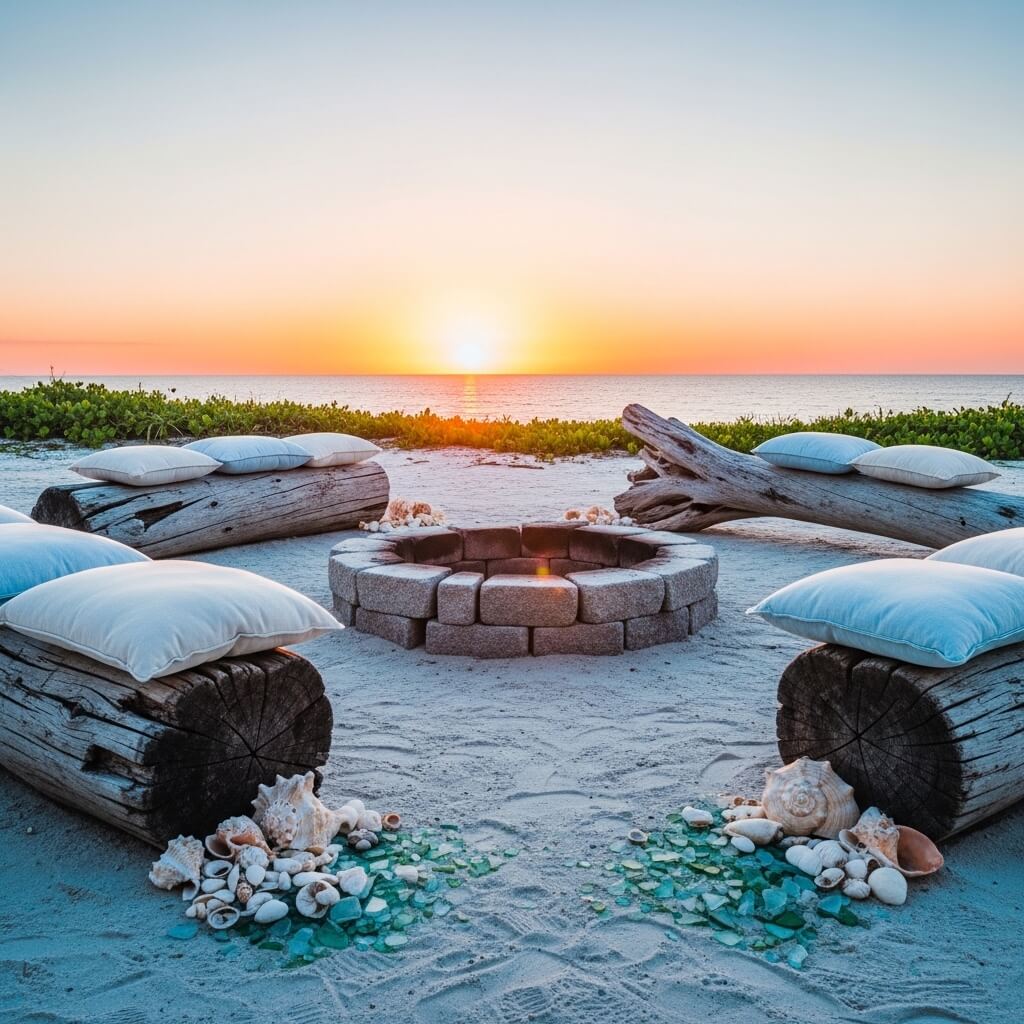
Who says you need to live oceanside to capture that breezy, coastal feeling? A beach-vibe firepit brings vacation vibes straight to your backyard, and honestly, it’s one of the most creative approaches I’ve seen for creating a distinct atmosphere.
This design is all about texture, weathered elements, and that relaxed, toes-in-the-sand feeling. You’re incorporating sandy tones, driftwood accents, and beach-inspired accessories to transport yourself mentally to the coast, even if you’re landlocked.
When I created this look for my sister (she’s obsessed with all things coastal), we went all in:
- A fire pit surrounded by actual sand in a contained area—yes, really!
- Driftwood pieces as both decor and functional elements (side tables, benches)
- Weathered Adirondack chairs in soft blues and whites
- Rope accents on furniture and as decorative elements
- Seashells, starfish, and beach glass scattered throughout
- Nautical lanterns for ambient lighting
Now, let’s address the elephant in the room: Is putting actual sand around your firepit practical? Kind of, actually. We created a contained area about 8 feet in diameter using landscape edging, filled it with sand to a depth of about 3 inches, and it’s held up surprisingly well. Does some sand escape the boundary? Sure. But it’s manageable with occasional sweeping and adding fresh sand annually.
The magic happens when you add thoughtful details. Driftwood isn’t just pretty—it’s functional. A large piece becomes a bench. Smaller pieces clustered together create visual interest. We even found some seriously cool driftwood with holes that we fitted with solar lights—instant art installation.
The color palette here should evoke water and weathered wood: soft blues, sandy beiges, crisp whites, and sun-bleached grays. Resist the urge to add bright, saturated colors—this aesthetic works best when everything feels naturally faded by sun and salt air.
One heads-up: this style requires commitment to the theme. One or two beach elements just look random, but when you fully embrace the coastal vibe, it comes together beautifully. It’s all or nothing, friend.
Also Read: 10 Affordable Backyard Ideas on a Budget Cozy Setup
DIY Budget Brick Firepit Circle Design
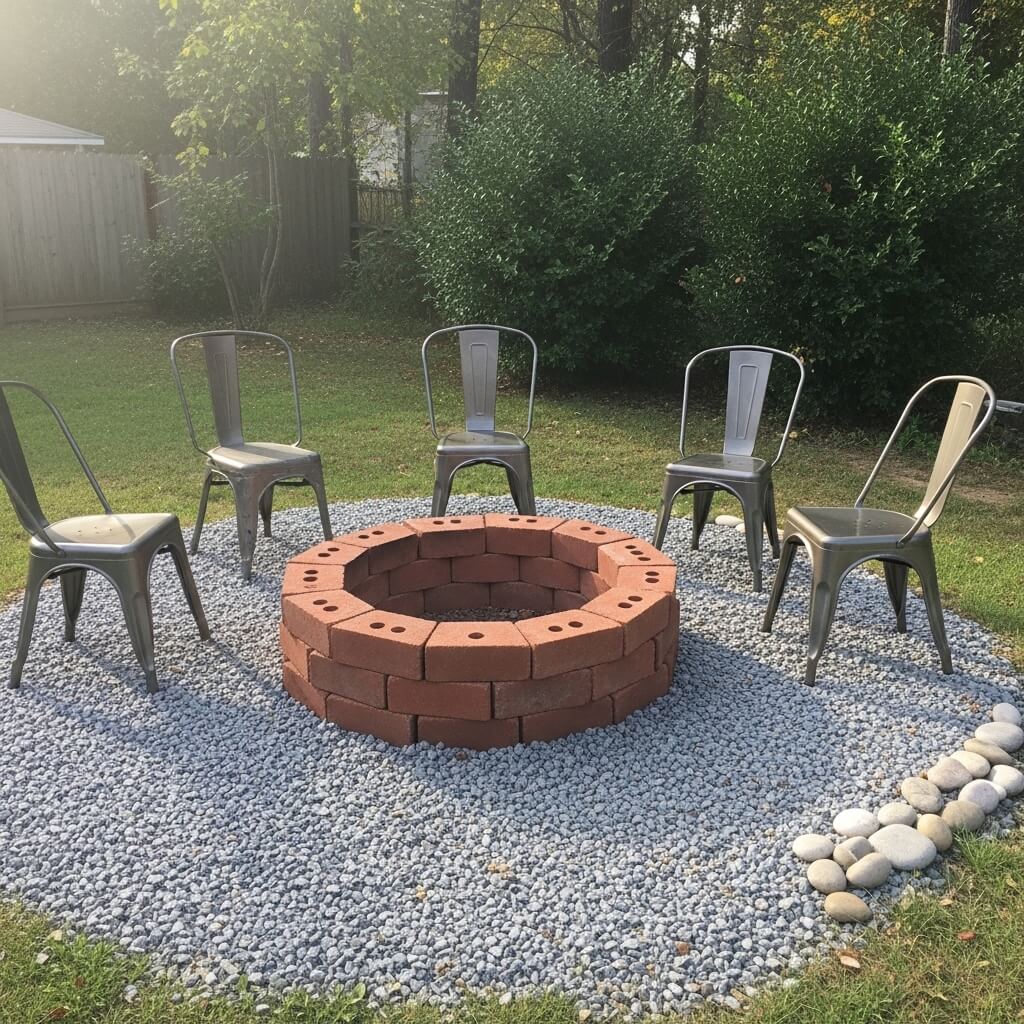
Let’s wrap up with the option that probably brought a lot of you here in the first place—the budget-friendly, DIY-able brick firepit circle. This is where I started my firepit journey, and honestly? There’s something incredibly satisfying about building a gathering space with your own hands without emptying your savings account.
The brick circle firepit is a classic for good reason. It’s accessible, affordable, and delivers that permanent, intentional look without requiring professional installation. I built my first one for under $200, and it’s still going strong six years later.
Here’s your basic supply list:
- Fire bricks for the inner ring (about 25-30 depending on diameter)
- Regular bricks or concrete blocks for the outer ring (another 35-40)
- Construction adhesive or firepit mortar (optional but recommended)
- Pea gravel or sand for the base
- Landscape fabric to prevent weed growth
- Steel firepit ring insert (optional but helpful)
The construction process is straightforward enough for most people to tackle over a weekend. You’ll dig out your circle to about 6-8 inches deep, lay down landscape fabric, add a gravel base for drainage, and then start stacking your bricks in circular layers.
Here’s what I wish someone had told me before I started:
First, make your circle bigger than you think you need. My initial firepit was about 30 inches across, which seemed reasonable until I actually tried to build a fire in it. Cramped. My second attempt at 40 inches was much better for actual functional fires.
Second, invest in fire bricks for the inner ring. Regular bricks can crack and explode when exposed to high heat repeatedly. Fire bricks cost a bit more but handle the heat like champs. Save the regular bricks for the decorative outer ring where they won’t experience extreme temperatures.
Third, slightly tilt your bricks outward as you stack. This creates a subtle bowl shape that contains the fire better and makes the structure more stable. I didn’t do this on my first build, and I was constantly repositioning bricks that had shifted.
The beauty of the DIY brick circle is how easily you can customize it. Want to add a second or third ring for more substantial walls? Go for it. Prefer a square or rectangular shape? Just adjust your brick layout. Want to incorporate different colored bricks in patterns? Let your creativity run wild.
I’ve seen people create gorgeous variations by:
- Mixing brick colors in alternating patterns
- Adding a capstone layer of flagstone or concrete pavers on top
- Building in bench seats as part of the brick structure
- Creating integrated wood storage in one section of the circle
- Adding decorative tile accents between bricks
The surrounding area matters just as much as the firepit itself. I extended pea gravel about 6 feet out from my brick circle, then bordered it with larger landscaping stones. This created a defined space that’s both functional (no grass getting scorched) and attractive.
For seating, I kept it simple and budget-conscious: four Adirondack chairs from the hardware store that I painted a consistent color, plus a couple of tree stumps I repurposed as side tables. Total additional cost? Maybe $150. The whole setup—firepit, base, seating, and accessories—came in under $400.
One final tip from someone who’s been there: check your local regulations before you start digging. Some municipalities have restrictions on open fires or require permits. Also, call your utility company to mark underground lines. Nothing kills the DIY vibe like accidentally severing a cable line. Trust me on that one.
Bringing It All Together
So there you have it—ten completely different approaches to creating that dreamy backyard firepit retreat you’ve been craving. Whether you’re drawn to the natural simplicity of a stone circle, the sophisticated elegance of a sunken seating area, or the budget-friendly satisfaction of a DIY brick build, there’s an option here that matches your space, style, and skill level.
Here’s what I’ve learned after years of firepit obsession: the best design is the one you’ll actually use. That sounds obvious, but it’s easy to get caught up in what looks cool on Pinterest and forget about practical considerations like maintenance, local climate, and how you actually live outdoors.
Think about your typical gathering style. Are you hosting big crowds or intimate groups? Do you want a space for every evening or special occasions? Will you maintain cushions and accessories, or do you need something basically indestructible? Your honest answers to these questions matter way more than following design trends.
And hey, remember that your firepit area can evolve. I’ve redesigned mine three times now, each iteration reflecting changes in my life, budget, and design confidence. That DIY brick circle might be your starting point that eventually transforms into something more elaborate. Or maybe it stays perfect exactly as it is. Both outcomes are totally valid.
The magic of a backyard firepit isn’t really about the design anyway—it’s about the moments that happen around it. The conversations that go deeper than usual. The laughter that comes easier. The way marshmallows taste better when they’re slightly burnt. The fact that everyone lingers just a little longer than planned.
So grab your favorite design from this list (or combine elements from several—rules are meant to be broken!), make a plan, and start creating your outdoor retreat. Your future self, relaxing fireside on a perfect evening, will thank you for taking the plunge. Now if you’ll excuse me, I’ve got a fire to start and some s’mores supplies calling my name.


