10 Smart Garden Design Layout Ideas for Easy Planning
- Garden Design
 Ben
Ben- 0
- 37 minutes read
Look, I get it. You stare at your outdoor space, coffee in hand, wondering how the heck you’re supposed to turn that blank canvas into something Instagram-worthy (or at least not embarrassing when neighbors peek over the fence). Garden design sounds fancy and complicated, like something you’d need a degree for, right? Wrong.
I’ve spent years figuring out garden layouts through trial and error—and let me tell you, the errors were plentiful. But here’s the good news: garden design doesn’t have to be rocket science. You just need some smart layout ideas that actually work for real people with real constraints. Whether you’re working with a postage-stamp-sized yard or a sprawling backyard, these 10 layout ideas will help you plan a garden that’s both functional and gorgeous. Let’s get into it.
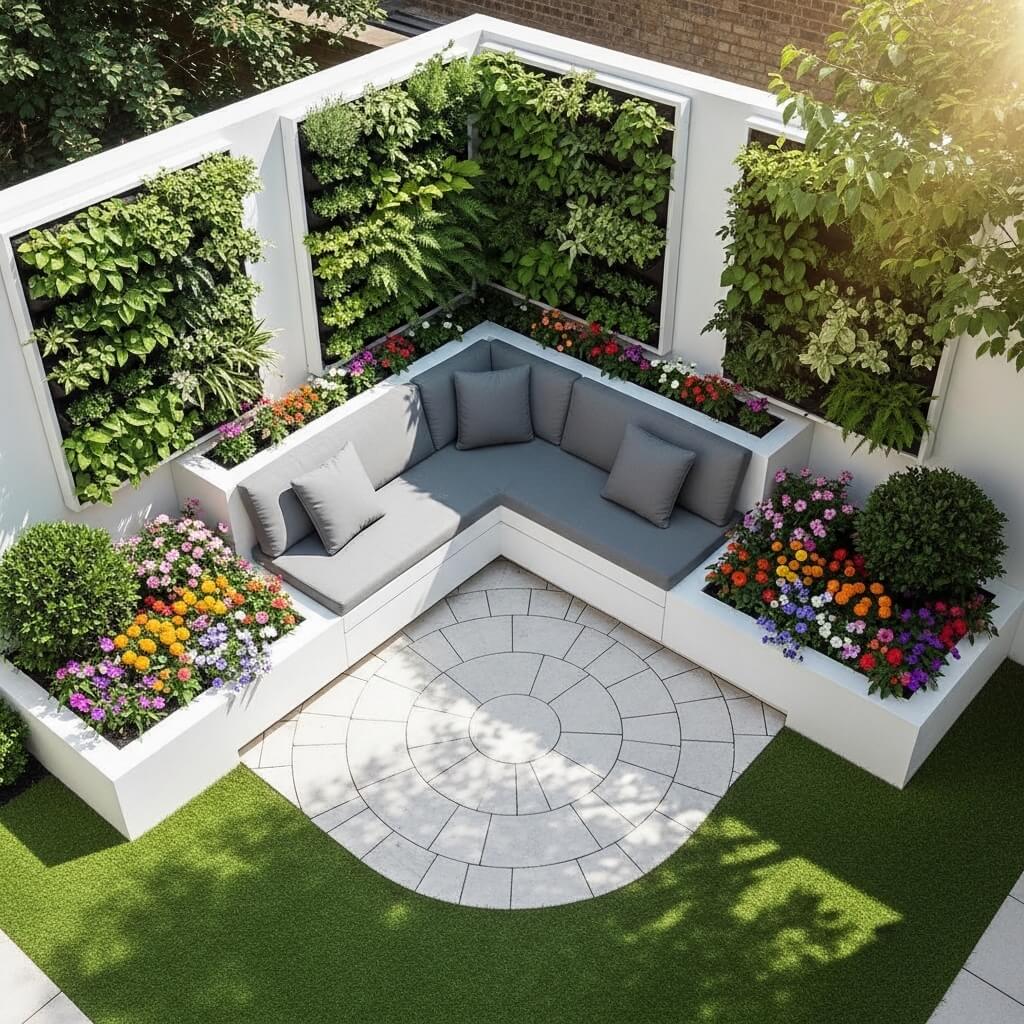
Small Space Zoning Garden Layout
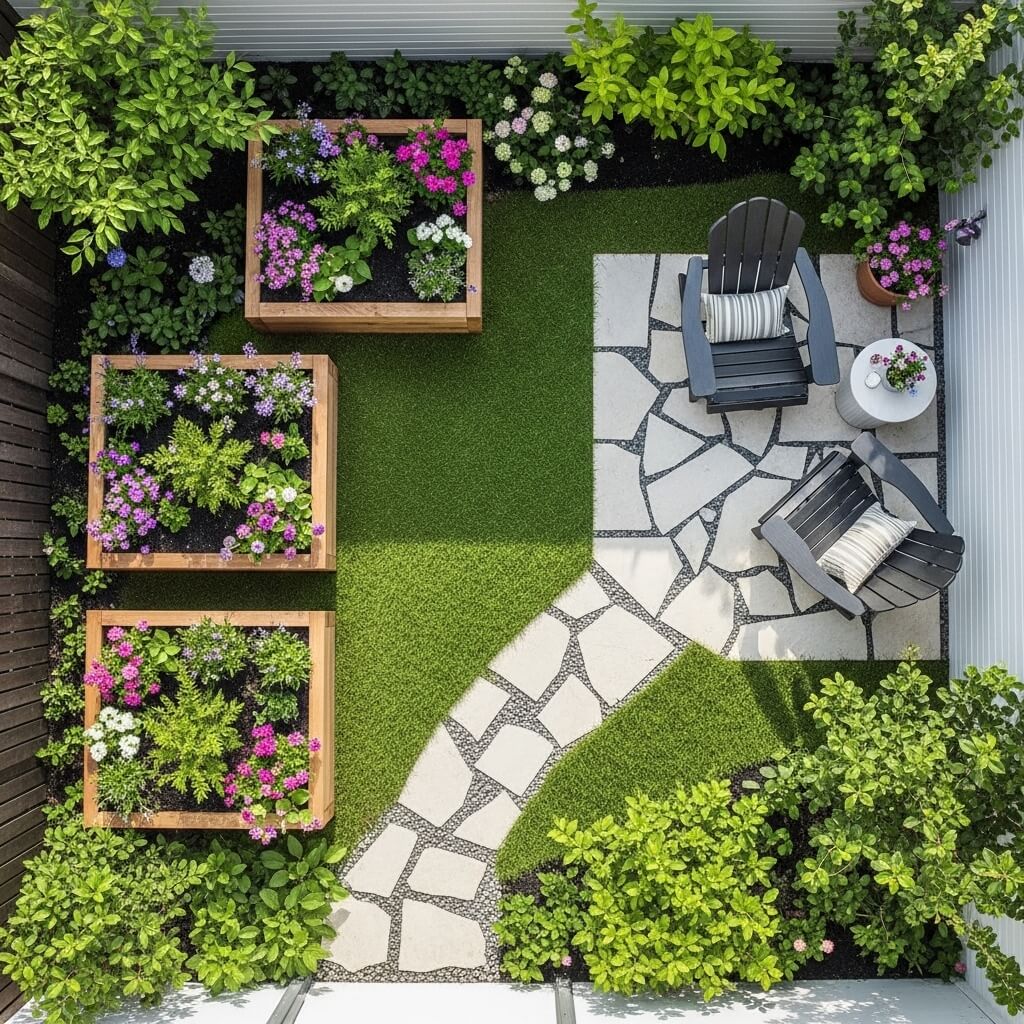
Ever looked at a tiny outdoor area and thought, “What’s the point?” Yeah, I’ve been there. But here’s what blew my mind: small spaces actually work better when you divide them into zones. Sounds counterintuitive, but stick with me.
The small space zoning layout is all about creating distinct “rooms” in your compact garden. You’re not trying to make everything blend together—you’re deliberately separating different functions. Think of it like your apartment: you don’t eat where you sleep (well, hopefully not), and the same logic applies outside.
How to Make It Work
Start by identifying what you actually want from your garden. Do you need a dining area? A spot to grow herbs? Maybe a little reading nook? Write these down because clarity prevents you from cramming everything in and ending up with a mess.
Here’s what works:
- Use vertical dividers: Low planters, trellises, or even different flooring materials mark boundaries without building actual walls
- Create a tiny herb zone: A 2×3 foot raised bed can hold more basil, thyme, and rosemary than you’ll use in a year
- Designate a seating area: Even a single chair with a side table counts as a zone (and gives you somewhere to admire your handiwork)
- Add a feature element: One small water feature or sculpture draws the eye and makes the space feel intentional
I tried this in my first apartment’s balcony—all of 40 square feet—and the difference was night and day. By putting my herbs in one corner, a bistro set in another, and hanging plants along the railing, the space felt like an actual garden instead of a random collection of pots.
The beauty of zoning is that it tricks the eye into thinking your space is bigger than it actually is. Each zone gives visitors (and you) something new to discover, creating depth and interest.
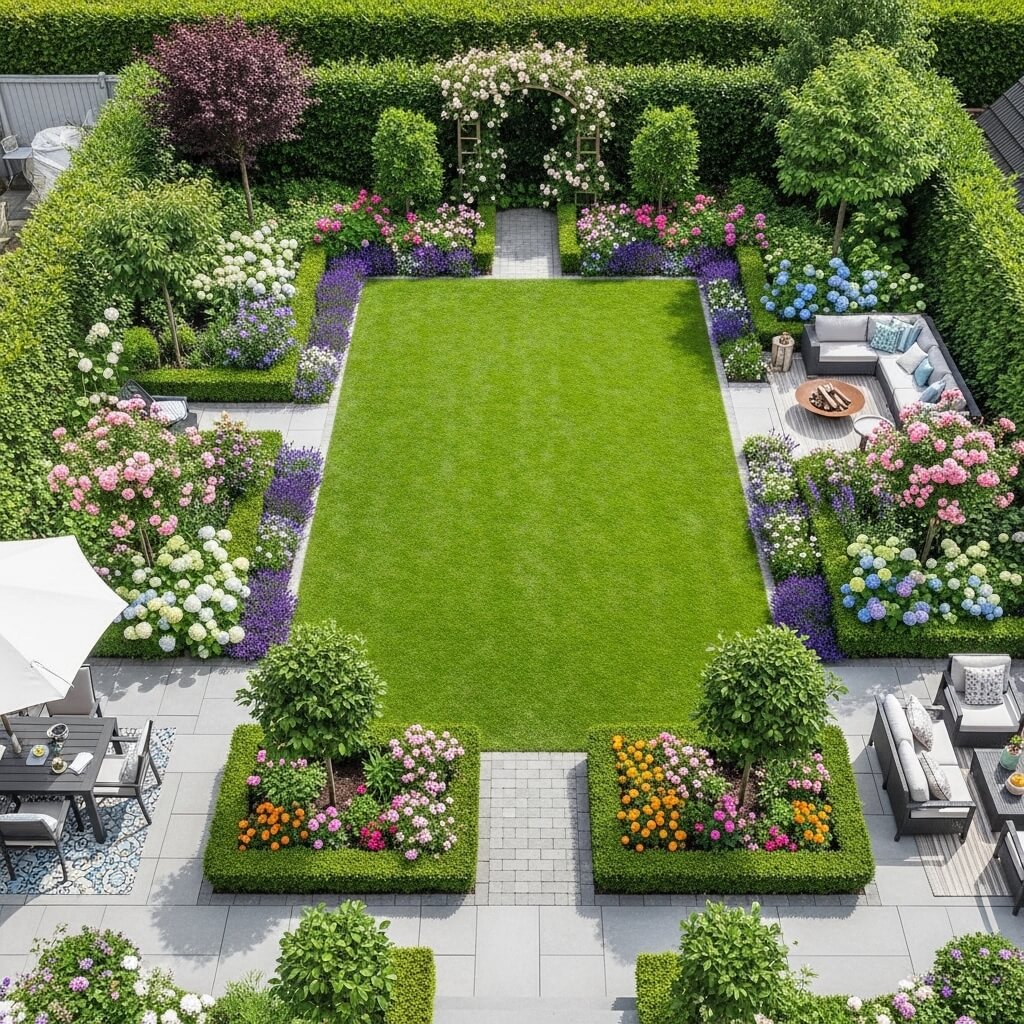
Symmetrical Formal Garden Layout
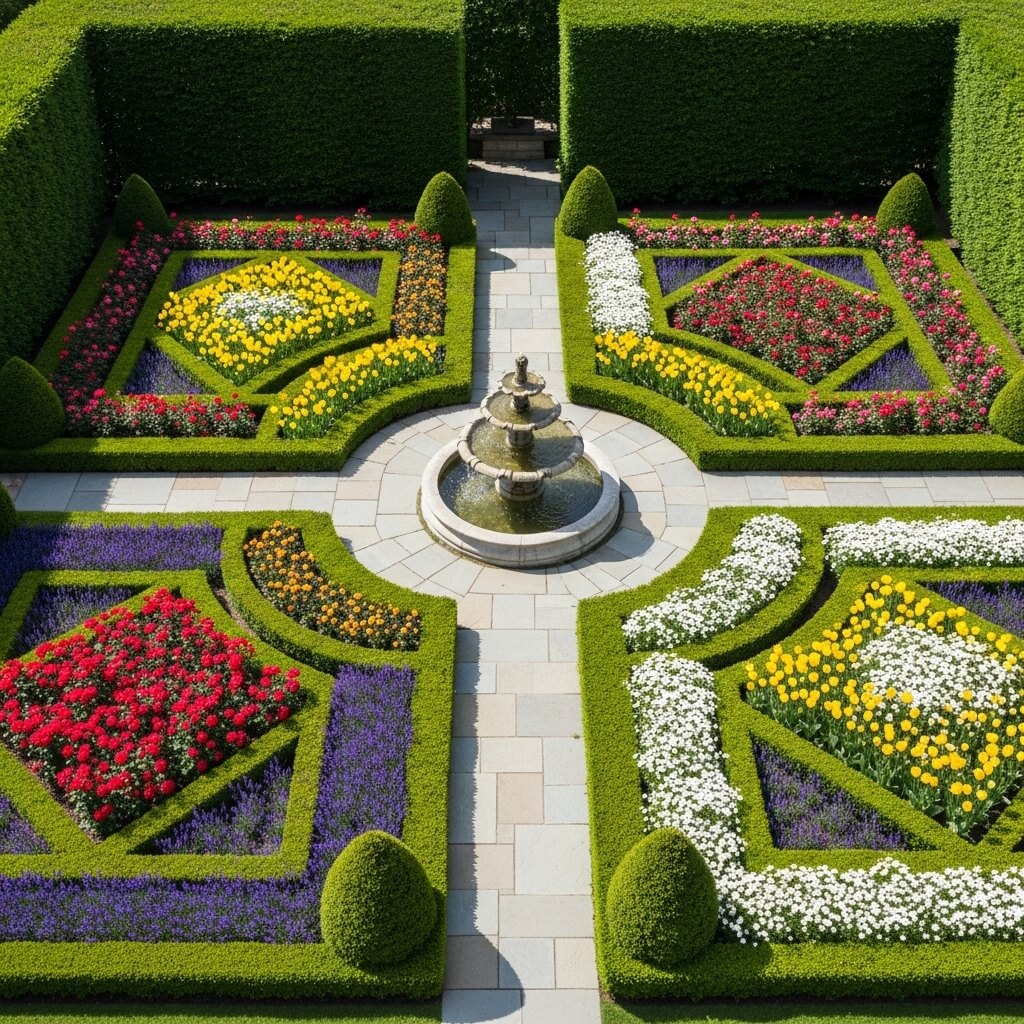
Okay, confession time: I used to think formal gardens were stuffy and boring. You know, the kind of thing you’d see at a museum where you’re not allowed to touch anything. But then I actually created a symmetrical layout, and honestly? It’s incredibly satisfying.
Symmetrical formal garden layouts are like the Marie Kondo of outdoor design—everything has its place, and that order brings a weird sense of calm. This style works phenomenally well if you’ve got a traditional home or if you’re slightly Type-A about organization (no judgment here).
The Basic Blueprint
The concept is simple: whatever you do on one side, you mirror on the other. You create a central axis—usually a path or lawn—and build matching elements on either side.
Key elements include:
- Matched planting beds: Identical beds on both sides of your central path
- Paired focal points: Two urns, two topiaries, two benches—you get the idea
- Geometric shapes: Circles, squares, or rectangles rather than organic curves
- Formal hedging: Boxwood or similar plants trimmed into neat shapes
Here’s what nobody tells you though: you don’t need to go full Versailles to pull this off. A simple setup with two rectangular beds flanking a gravel path to your door creates that formal feel without requiring a grounds crew.
I helped my parents create a symmetrical layout in their front yard, and the maintenance is actually easier than their old “naturalistic” jumble. When everything matches, you immediately notice when something’s off, so you catch problems early. Plus, weeding is weirdly meditative when you’re working in clean lines.
The trick is committing to the maintenance. Formal gardens look amazing when tidy but pretty rough when overgrown, so be honest with yourself about upkeep before going this route.
Modern Minimal Grid Garden Layout
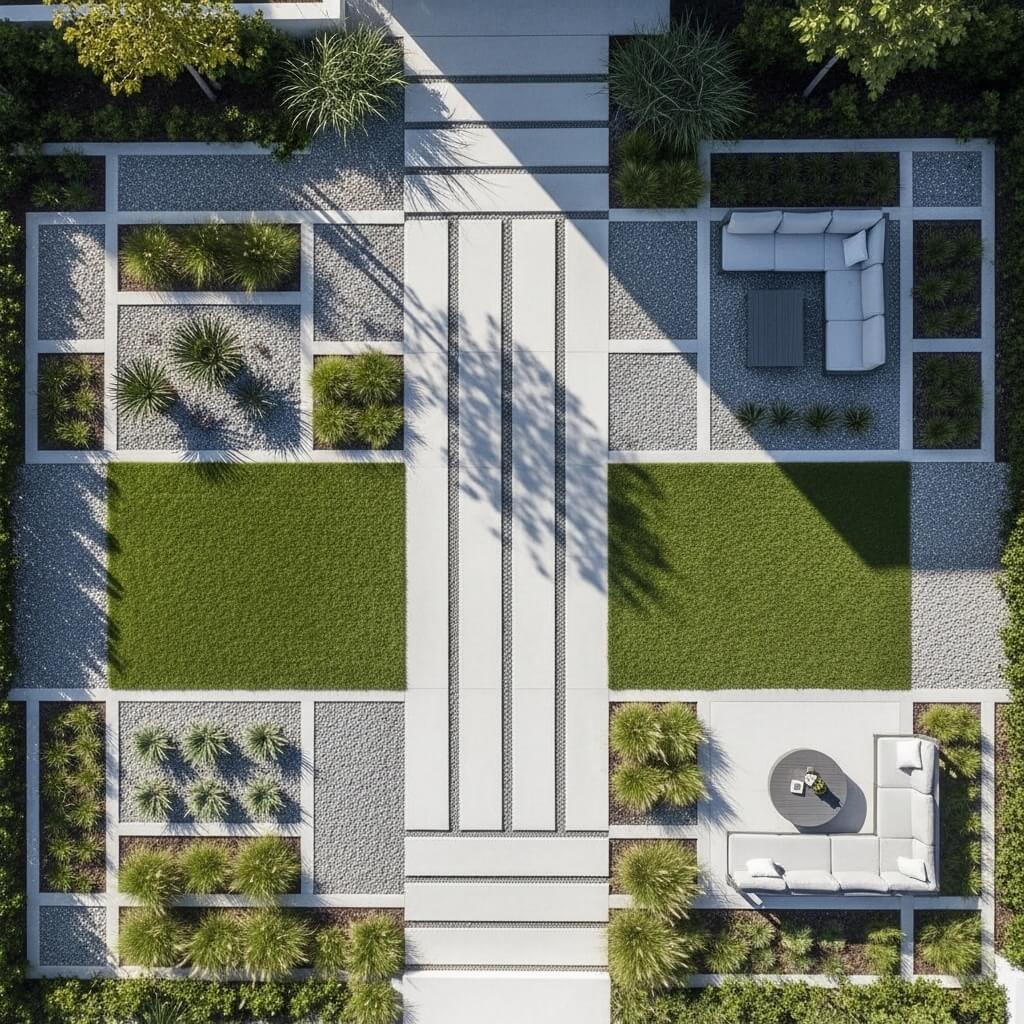
If you’ve ever drooled over those sleek garden photos with perfect squares and ultra-clean lines, you’ve encountered the modern minimal grid layout. This style is for people who appreciate contemporary architecture and think “less is more” isn’t just a saying—it’s a lifestyle.
The grid layout uses geometric precision and negative space to create impact. Instead of filling every inch with plants, you embrace empty areas (usually paving, gravel, or mulch) and use plants as sculptural elements.
Creating Your Grid
The foundation is literally a grid. You divide your space into equal or proportional squares and rectangles, then decide what goes in each section. Some squares get planted, some stay empty, some might have a single specimen plant.
What makes this work:
- Repetition: Use the same plant in multiple grid squares for a cohesive look
- Restraint: Limit your plant palette to maybe 3-5 species total
- Clean edges: Metal or concrete edging keeps everything crisp
- Architectural plants: Think ornamental grasses, sculptural succulents, or specimen trees with interesting forms
FYI, this style photographs like crazy but requires serious edge maintenance. I experimented with a mini version in my side yard, using concrete pavers to create a grid with alternating squares of black mondo grass and white gravel. Looked incredible for about six weeks until the grass started creeping into the gravel :/
Maintenance is the hidden cost of this layout. You need to stay on top of edging and weeding, or the whole effect falls apart. But if you’re into that modern aesthetic and don’t mind regular upkeep, the visual payoff is huge.
Curved Path Natural Flow Layout
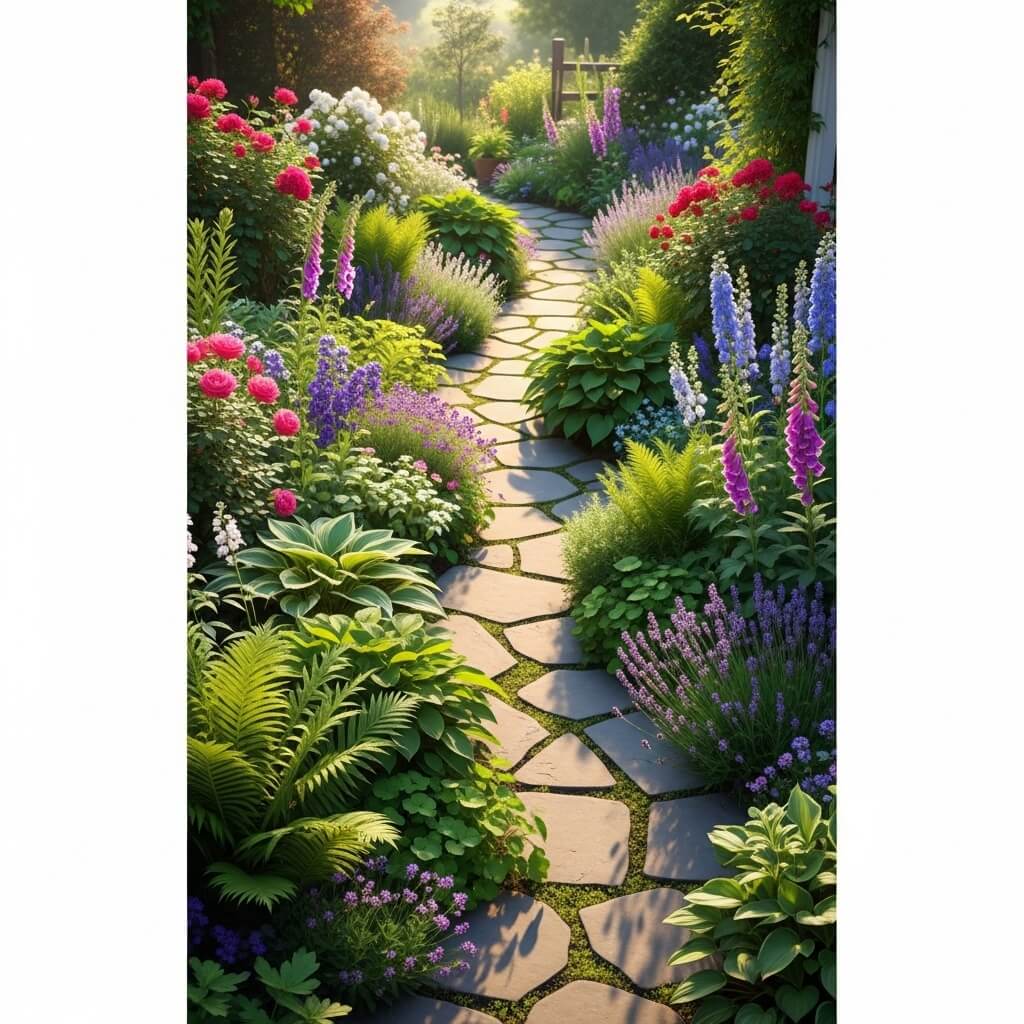
Now we’re talking! After all that formal, structured stuff, let’s look at something that actually mimics how nature works. The curved path layout is basically the garden equivalent of going with the flow—and it’s perfect for people who want their outdoor space to feel relaxed and organic.
Curved paths create mystery and movement in ways straight lines never can. When you can’t see around the bend, you’re naturally curious about what’s there. This makes even small gardens feel bigger because you’re creating a journey rather than showing everything at once.
Designing the Curve
The key is making curves look natural, not random. Nothing screams “amateur hour” like wavy lines that serve no purpose. Your curves should feel like they’re responding to something—wrapping around a tree, flowing toward a focal point, or following natural contours.
Here’s my approach:
- Use a garden hose: Lay it out to visualize the path before committing
- Gentle, sweeping curves: Avoid tight wiggles that look forced
- Wider is better: Narrow curving paths feel claustrophobic; aim for at least 3-4 feet wide
- Plant the curves: Put taller plants on the inside of curves and lower plants on the outside to enhance the flow
I redid my whole backyard with a curved path after years of straight lines, and wow—it completely changed the vibe. Instead of marching from point A to point B, you meander. Guests actually linger in the garden instead of just passing through.
One thing though: curved paths use more material than straight ones, so budget accordingly. That extra square footage of gravel or pavers adds up. But IMO, it’s worth every penny for the ambiance it creates.
Also Read: 10 Elegant Mediterranean Garden Design Ideas for Luxury Homes
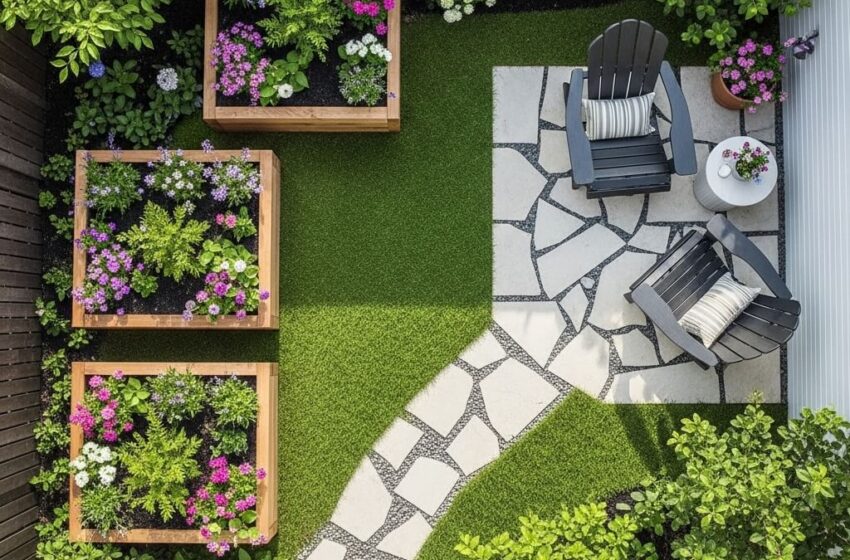
Raised Bed Structured Layout
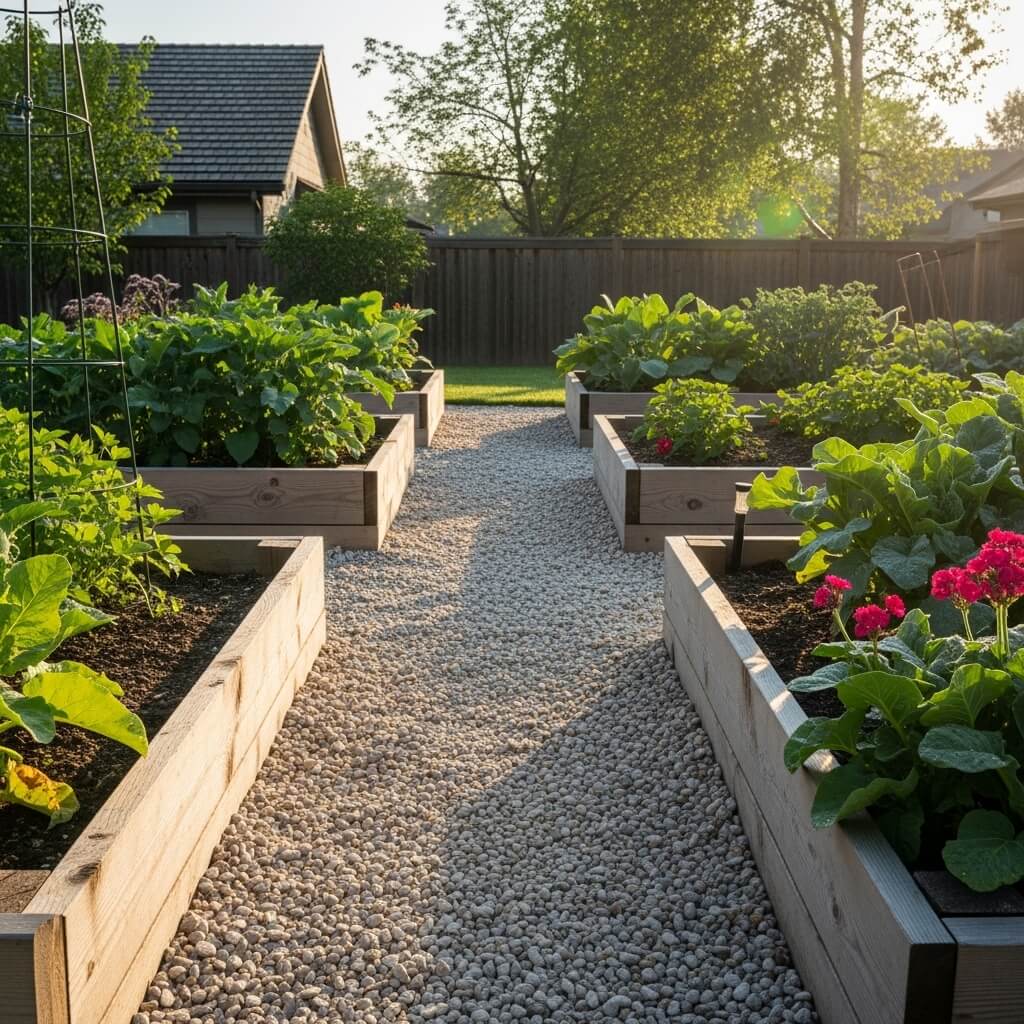
Let’s talk practicality, because not all garden layouts are about aesthetics—some are about making your life easier. Enter the raised bed structured layout, which is basically the workhorse of vegetable gardens and cutting gardens.
Raised beds give you control over soil quality, drainage, and accessibility in ways in-ground planting never can. Plus, they create natural structure and organization even if you’re growing a chaotic mix of plants.
Planning Your Raised Bed Layout
The beautiful thing about raised beds is how modular they are. You can start with one or two and add more as you go. The layout comes from how you arrange these beds and the paths between them.
Smart design considerations:
- Consistent bed size: Standard 4×8 feet beds make planning easier and look cohesive
- Adequate path width: Minimum 2 feet between beds; 3 feet if you use a wheelbarrow
- Logical grouping: Put herb beds near the kitchen, cutting flowers near the patio
- Height variation: Consider 12-inch beds for annual veggies, 18-24 inches for deeper-rooted crops
- Material choice: Cedar looks gorgeous but costs more; composite lumber lasts forever but looks less natural
I built six raised beds in a three-by-two grid pattern, and the symmetry makes the whole setup look intentional even when the plants inside are doing their wild thing. The structure of the beds compensates for the chaos of the plants, which is perfect for someone like me who wants an organized-looking garden without obsessive maintenance.
Plus, raised beds are genuinely easier on your back and knees. After a few years of kneeling on hard ground, I’ll never go back. Your future self will thank you for this investment.
Backyard Garden with Central Lawn Layout
Here’s a classic for good reason: the backyard garden with a central lawn. Some garden snobs dismiss lawns as boring or wasteful, but you know what? A lawn is a functional outdoor room, and there’s nothing wrong with wanting usable green space.
This layout puts a lawn—whether large or modest—in the center, with garden beds forming a border around the perimeter. It’s timeless, versatile, and honestly pretty foolproof.
Making the Central Lawn Work
The lawn serves as negative space, giving your eye somewhere to rest between all the visual interest of the planted borders. It’s also where kids play, dogs run, or you throw down a blanket for a picnic.
Design elements to consider:
- Shape matters: Rectangular lawns feel formal; oval or kidney-shaped lawns feel softer
- Border depth: Deeper borders (4-6 feet) give you room for layered planting
- Edge treatment: A mowing strip between lawn and beds saves major trimming time
- Access points: Create clear paths from the lawn into the garden for maintenance
I’ve got this layout in my current backyard, and it’s honestly the best for flexibility. When we have gatherings, the lawn is perfect for seating or games. When I want to garden, I’ve got substantial beds to work with. It’s the Swiss Army knife of garden layouts—not the most exciting, maybe, but incredibly functional.
One tip: don’t make your lawn bigger than you actually need. Mowing is time you could spend doing literally anything else, so be realistic about how much lawn you’ll actually use.
Patio-Centered Garden Layout Design
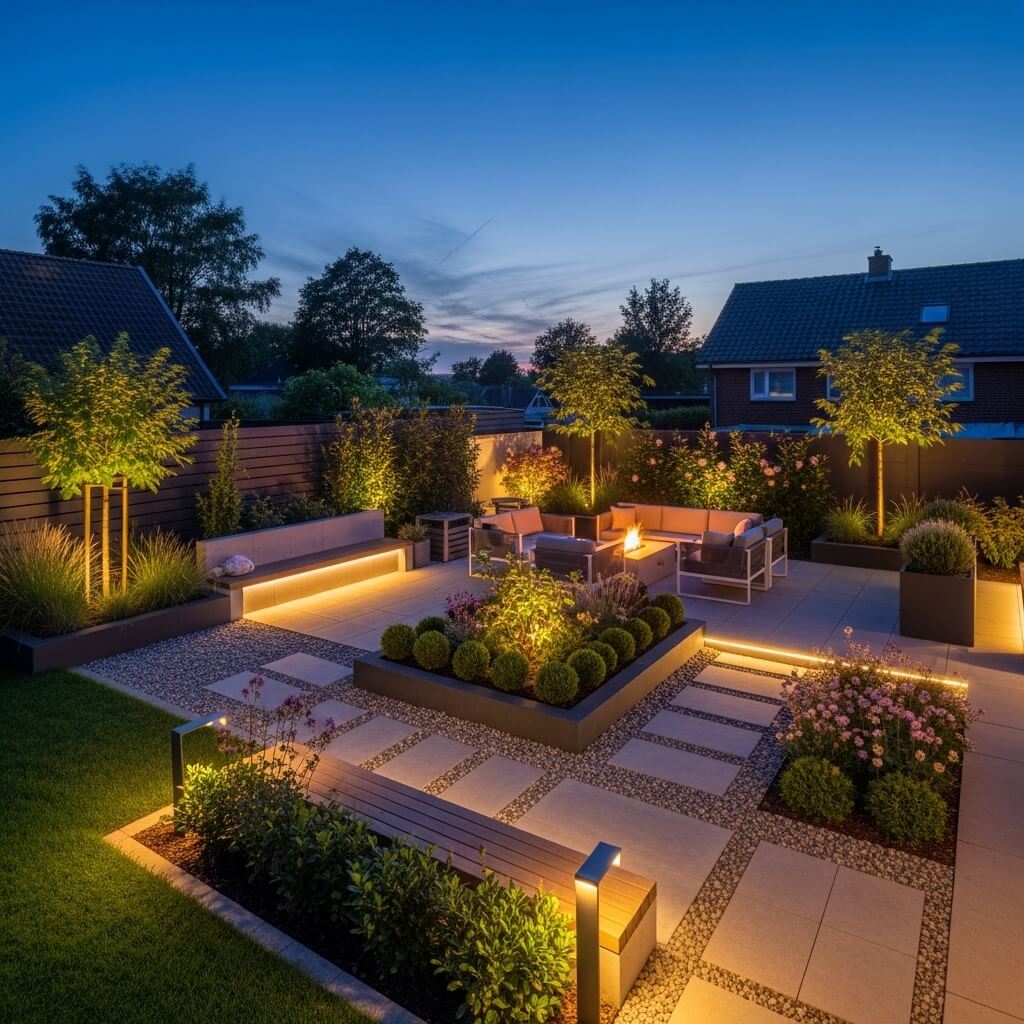
What if you want your garden to feel like an outdoor living room? That’s where the patio-centered layout shines. Instead of the garden being something you view from the house, the patio becomes the destination, and the garden wraps around it.
This layout prioritizes hanging out over wandering around. Your patio is the star, and the planted areas create an intimate, room-like enclosure.
Building Around Your Patio
The size and placement of your patio dictates everything else. Ideally, you want it large enough for your actual furniture and activities—not some token 6×6 square that fits nothing.
Key planning points:
- Size realistically: A dining table for six needs at least 12×12 feet, plus circulation space
- Material choice: Pavers, flagstone, poured concrete, or gravel—each creates a different vibe
- Enclosure: Plant tall shrubs or install screens on at least two sides for privacy
- Lighting: Built-in path lights and overhead string lights extend usability into evening
My sister created a patio-centered garden in her townhouse backyard, and it’s genuinely the best outdoor space I’ve seen. She went with a 14×16 paver patio, surrounded it with raised planters full of scented plants like jasmine and lavender, and added a pergola for some overhead structure. The result feels like a secret garden room.
The mistake people make is building the patio too small or placing it awkwardly. Really think about how you’ll use it before pouring concrete. I’ve seen too many tiny, sun-baked patios that nobody wants to sit on.
Also Read: 10 Luxury Zen Garden Design Ideas for Dreamy Calm Landscapes
Cottage Style Layered Garden Layout
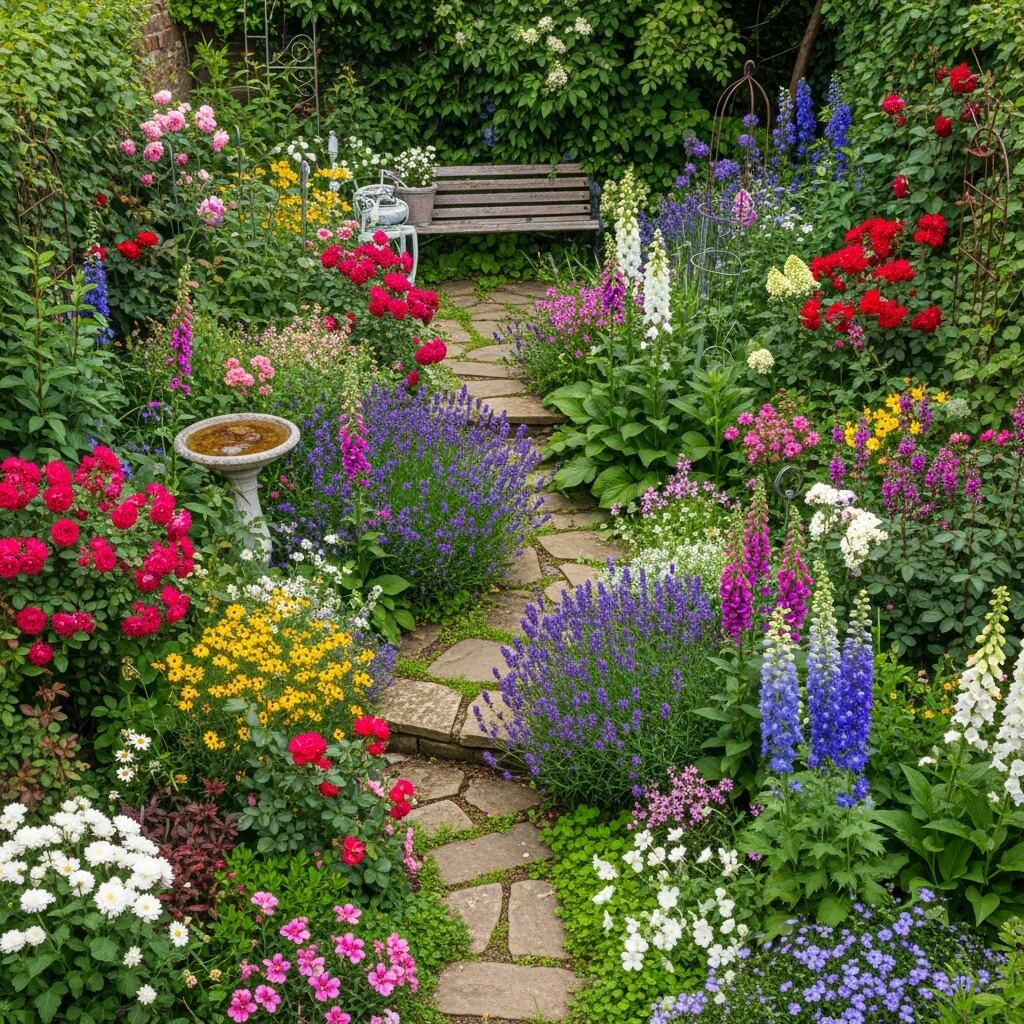
Okay, this is where I get a little swoony. The cottage garden layout is wonderfully chaotic in the best possible way. If formal gardens are about control, cottage gardens are about abundance and charm.
Cottage gardens layer plants in a seemingly random but actually strategic way to create that overflowing, romantic look. You pack in tons of plants, mixing heights, colors, and textures without worrying too much about perfect order.
Creating Controlled Chaos
Here’s the secret: cottage gardens look spontaneous but require planning. You can’t just throw random plants together and hope for the best (I mean, you can, but the results are hit or miss).
The cottage garden formula:
- Layer heights: Tall plants in back, medium in middle, short in front—but let them mingle
- Repeat key plants: Use the same roses, lavender, or catmint throughout for cohesion
- Mix plant types: Perennials, annuals, shrubs, and bulbs all together
- Embrace self-seeders: Plants that drop seeds and pop up randomly add to the casual vibe
- Curved or winding paths: Straight lines feel too formal for this style
I tried creating a cottage-style border along my fence, and it’s simultaneously my favorite and most frustrating garden area. When it’s looking good, it’s absolutely magical—bees buzzing, flowers overflowing, total storybook vibes. When it’s looking rough? It’s a jungle that requires serious editing.
Cottage gardens need regular deadheading and dividing to keep them from becoming actual chaos. But if you love the romantic, abundant aesthetic and don’t mind hands-on gardening, this layout rewards you with nonstop color and texture.
Corner-Focused Compact Garden Layout
Got an awkward corner or small yard that’s basically just corners? The corner-focused layout might be your answer. Instead of trying to create flow across a whole space, you make each corner its own mini-destination.
This approach works brilliantly for small urban gardens, courtyards, or anywhere you’re working with an unconventional shape. You acknowledge the corners instead of fighting them.
Designing Corner Vignettes
Think of each corner as a separate little scene. One might have a seating area, another a water feature, another a specimen plant. The key is making each corner feel complete on its own.
Corner design strategies:
- Anchor with structure: A bench, arbor, or large container gives the corner purpose
- Use vertical space: Corners are perfect for trellises or tall, narrow plants
- Create depth: Layer plants from tallest in the corner to shortest at the edge
- Add lighting: A spotlight or lantern makes the corner a nighttime focal point
My friend has a weird L-shaped yard with multiple corners, and she nailed this approach. One corner has a bench surrounded by shade plants, another has a small fountain with ferns, and the third has a beautiful Japanese maple underplanted with hostas. Each corner draws you in, so you end up exploring the whole space instead of just seeing it all at once.
The beauty of this layout is it works with your space’s quirks instead of against them. Those corners everyone else sees as limitations? You make them features.
Also Read: 10 Beautiful Tropical Garden Design Ideas for Dream Spaces
Multi-Zone Functional Garden Layout

Alright, let’s wrap up with the master class: the multi-zone functional layout. This is for people who want their garden to do ALL THE THINGS—grow food, provide cut flowers, entertain guests, look beautiful, and maybe even support wildlife.
The multi-zone layout divides your garden into distinct functional areas, each optimized for its purpose. It’s basically the small space zoning concept on steroids, scaled up for larger properties.
Planning Multiple Zones
This requires the most upfront planning of any layout we’ve covered. You need to think about sun exposure, access, views, and how zones relate to each other.
Essential zones to consider:
- Vegetable garden: Full sun, near water source, convenient to kitchen
- Ornamental beds: Visible from main viewing points, prioritize curb appeal
- Utility area: Compost, tool storage, potting bench—hidden from main views
- Entertainment space: Patio or lawn for gatherings
- Wildlife area: Wilder section with native plants, maybe a pond
- Cutting garden: Rows of flowers grown specifically for arrangements
I spent months planning my multi-zone garden, mapping sun patterns and traffic flow. I ended up with raised veggie beds near the garage, a formal front border for curb appeal, a patio for dining, and a wilder back section that I’m slowly converting to native plants. Each zone has different maintenance needs, so I can prioritize based on time and energy.
The challenge is preventing the zones from feeling disconnected. You need visual or physical elements that tie everything together—maybe a consistent pathway material, repeated plant varieties, or a unified color scheme in structures.
This layout is definitely the most complex, but it’s also the most rewarding if you actually use your garden for multiple purposes. Why force everything into one style when you can have it all?
Wrapping It All Up
Here’s the thing about garden layouts: there’s no single “right” answer. The perfect layout for you depends on your space, your lifestyle, your aesthetic preferences, and—let’s be real—how much time you want to spend maintaining it.
Maybe you’re drawn to the clean lines of a modern grid, or perhaps the abundance of a cottage garden makes your heart sing. You might need the functionality of raised beds, or maybe you just want a simple lawn surrounded by easy-care borders. All of these approaches work; they just work for different people and situations.
My advice? Start small. You don’t have to redesign your entire garden in one go (unless you’re braver than I am). Pick one area and try a layout that speaks to you. Live with it for a season. See what works and what drives you crazy. Gardens are forgiving—you can always adjust, expand, or completely start over if needed.
And remember, even professional garden designers don’t get it perfect on the first try. I’ve moved plants, rebuilt paths, and completely rethought layouts more times than I can count. That’s not failure; that’s just gardening 🙂
So grab some graph paper (or a garden design app if you’re fancy), measure your space, and start playing with these layout ideas. Your dream garden is absolutely achievable—you just need a solid plan to get there. Happy planning!