10 Cheap DIY Stairs Makeover Ideas That Look Luxurious
- Stairs Design
 Ben
Ben- 0
- 43 minutes read
You know that feeling when you walk past your stairs every single day and cringe just a little bit? Yeah, me too. I used to avoid looking at mine—worn carpet, scuffed edges, and a whole lot of “builder-grade blah.” But here’s the thing: stairs don’t have to cost you a small fortune to look like they belong in a magazine spread.
I spent months researching, experimenting, and honestly making a few mistakes before figuring out which stair makeover tricks actually deliver that high-end look without the high-end price tag. Spoiler alert: most of these projects cost less than a fancy dinner out, and you can knock them out over a weekend. Ready to transform that eyesore into an eye-catcher? Let’s get into it.
1. Peel-and-Stick Stair Riser Makeover
Can we talk about how peel-and-stick products have absolutely changed the DIY game? I remember when these first hit the market, I was skeptical. How could something so easy possibly look good? Turns out, I was very wrong.
Peel-and-stick stair riser decals are basically wallpaper designed specifically for your stair risers (the vertical part between each step). They come in every pattern imaginable—Moroccan tiles, marble designs, geometric patterns, florals, you name it. The best part? You can completely transform your stairs in about 2-3 hours, and the whole project usually runs between $50-$100 depending on how many stairs you have.
Here’s what I learned from my own install:
- Measure twice, stick once. Seriously, measure each riser individually because they’re not always the same height (thanks, old house settling)
- Clean those risers like your life depends on it. Any dust or grime will mess with adhesion
- Use a credit card or squeegee to smooth out bubbles as you apply
- Trim with a sharp utility knife for clean edges
The transformation is instant and dramatic. I went with a blue and white Mediterranean tile pattern, and suddenly my boring stairs became a conversation piece. People genuinely ask if I had custom tiles installed. The answer? Nope, just $65 and a Saturday afternoon.
Pros and Cons
Why it works:
- Zero commitment (you can peel them off if you change your mind)
- Renter-friendly
- Massive variety of designs
- No special tools required
Watch out for:
- Quality varies wildly between brands (read those reviews, folks)
- Not ideal for stairs that get heavy foot traffic from pets with claws
- Can peel at corners if you don’t seal them properly
IMO, this is hands-down the easiest beginner project on this list. If you’ve never done a stair makeover before, start here.
2. Painted Ombre Staircase Transformation
Ever wondered why ombre everything was such a huge trend? Because gradients trick your eye into seeing depth and dimension that wasn’t there before. And when you apply this concept to stairs, magic happens.
I stumbled onto this idea by accident, actually. I was planning to paint my stairs one solid color but ran out of white paint halfway through. Instead of making another trip to the store (lazy? efficient? you decide), I started mixing in small amounts of gray to each subsequent step. The result looked intentional and way more expensive than my $30 paint budget suggested.
Here’s how to create the look:
- Pick your color gradient. Light to dark works beautifully—think white to navy, cream to chocolate brown, or pale pink to deep burgundy
- Number your stairs and calculate how much paint to add at each step to create even gradation
- Start from the top so you’re not trapping yourself (learned that one the hard way)
- Use painter’s tape to keep your lines crisp where the riser meets the tread
- Apply 2-3 coats for durability, especially on treads
The whole project takes a weekend because you need drying time between coats, but the materials cost is ridiculously low. I spent about $40 total on paint, tape, and a couple of foam rollers.
Making It Last
Here’s something nobody tells you: stairs take a beating. If you don’t seal your painted stairs properly, you’ll be touching them up every other month. Use a water-based polyurethane with a satin or semi-gloss finish. It protects the paint and makes cleaning up scuff marks way easier. Trust me on this one—I skipped this step the first time and regretted it within two weeks.
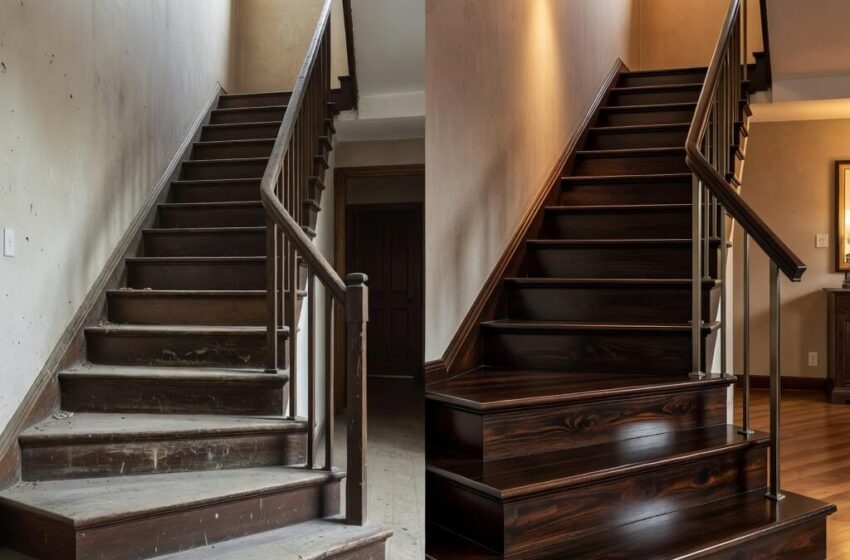
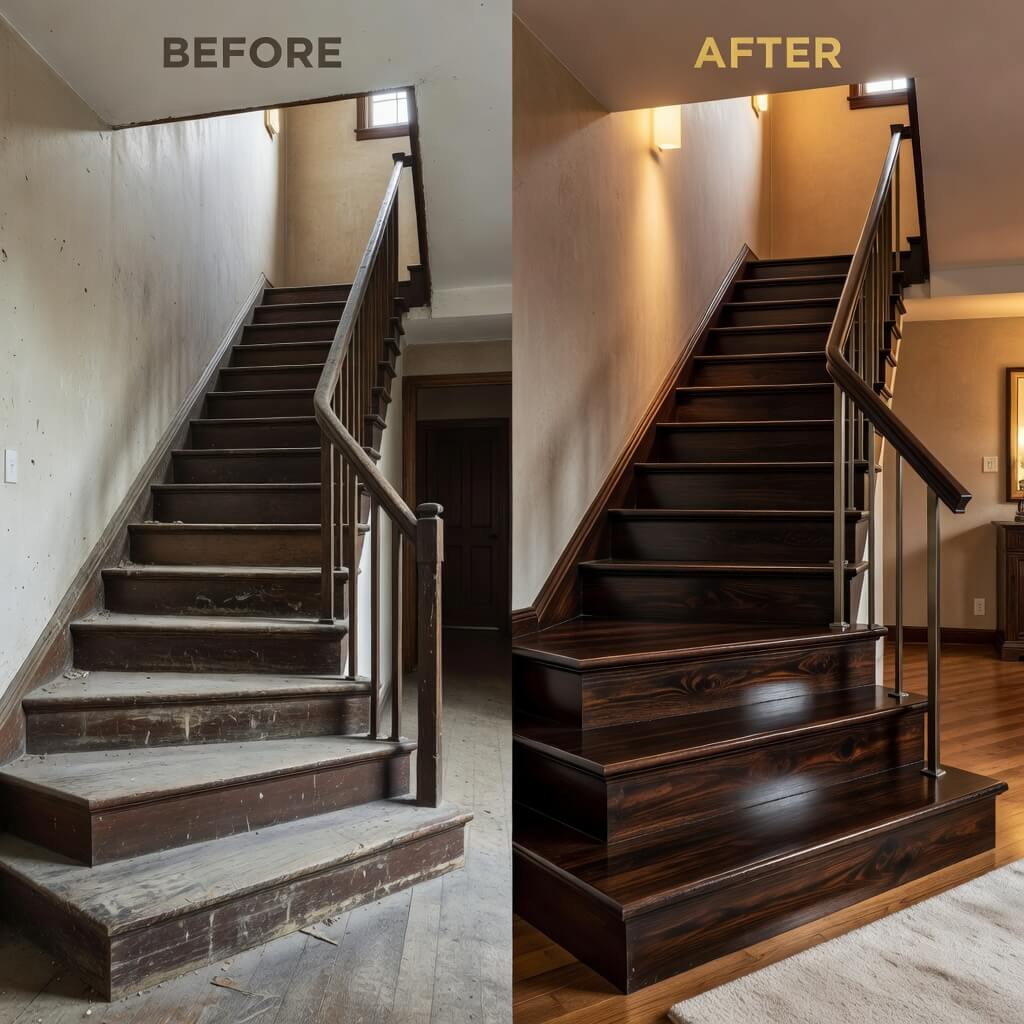
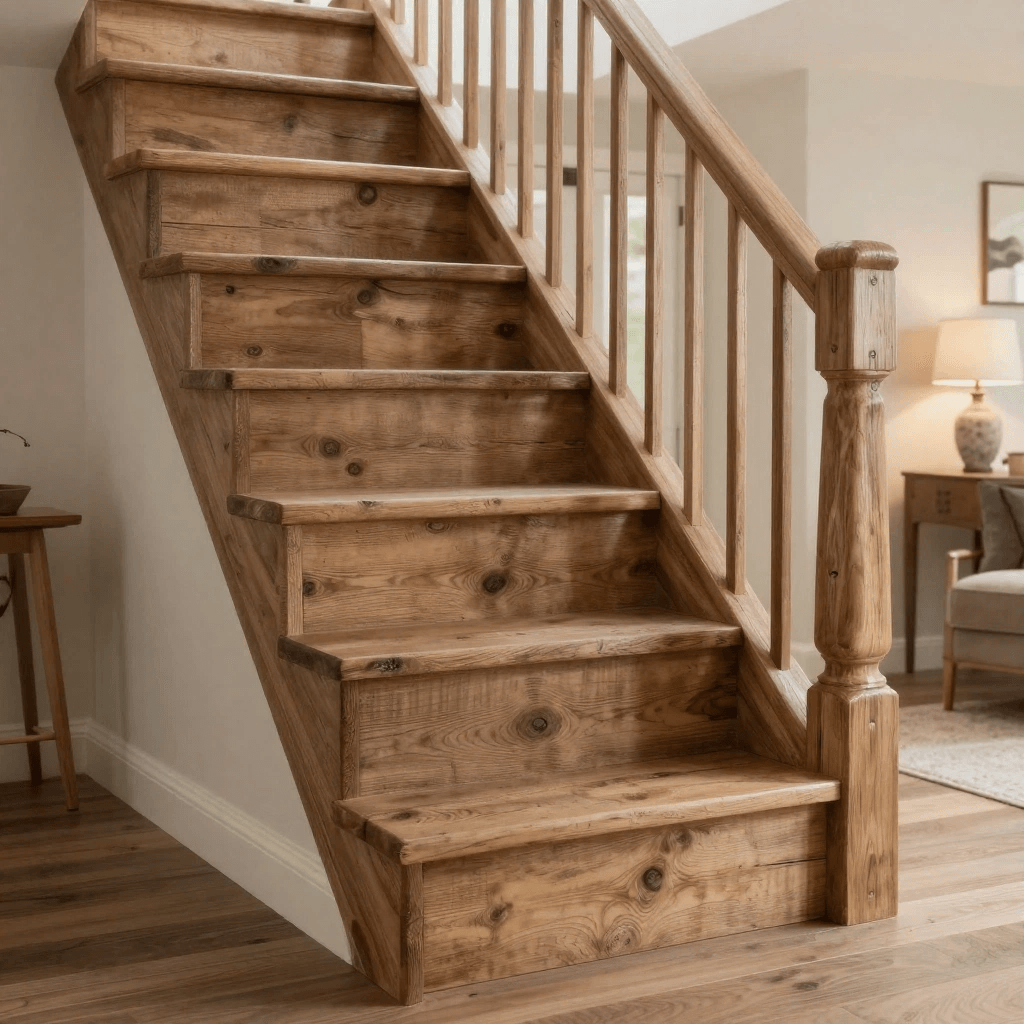
3. Budget Wood Stain Stair Upgrade
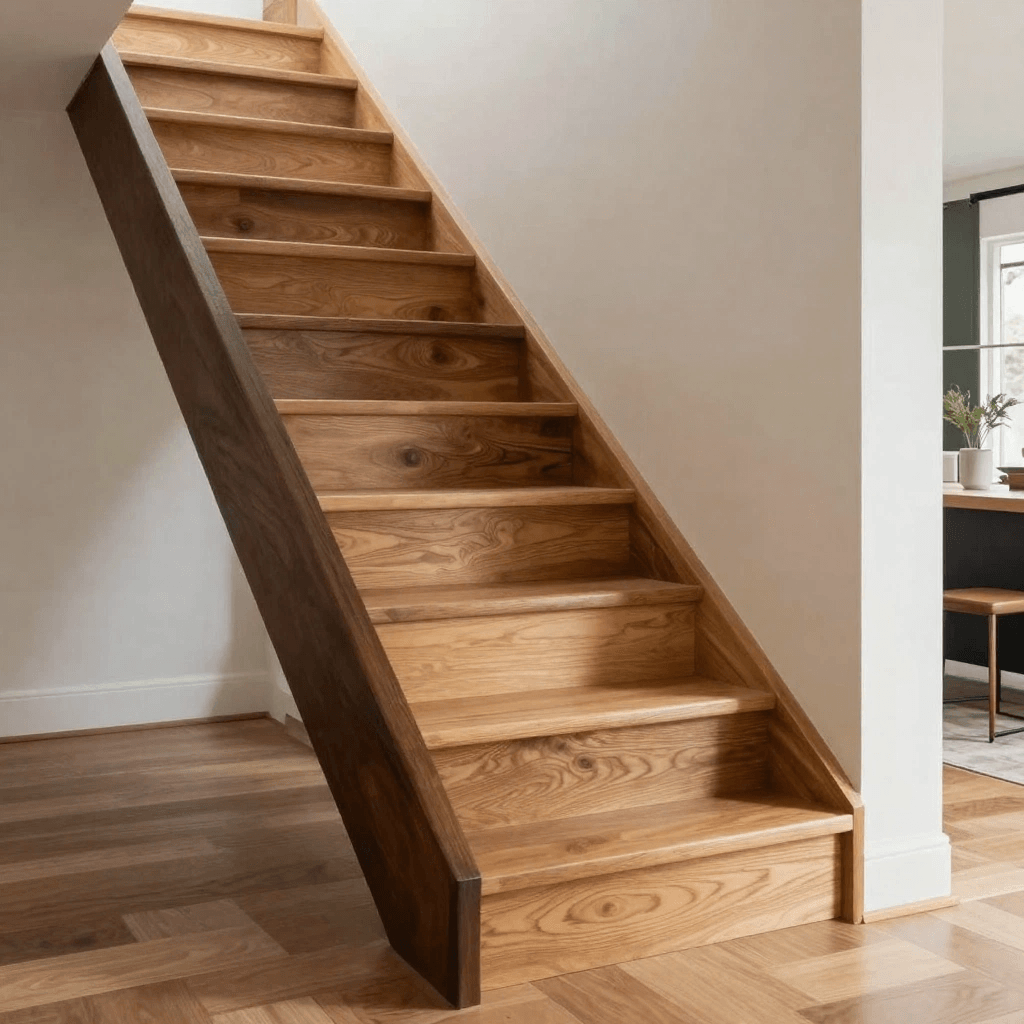
Okay, this one requires a bit more elbow grease, but the payoff is absolutely worth it. If you’ve got old carpet covering what you suspect might be decent wood underneath, you’re sitting on hidden potential.
I yanked up the carpet on my back stairs expecting the worst—maybe some pine boards that would need serious work. What I found was oak. Scratched, stained, nail-holed oak, but oak nonetheless. A weekend of sanding and staining later, those stairs looked like they belonged in a craftsman home.
The process breakdown:
- Remove carpet and padding (wear gloves and a mask because this part is disgusting)
- Pull out all staples and nails with pliers (there will be hundreds, I’m not exaggerating)
- Assess the wood condition. Lots of nail holes? Wood filler is your friend
- Sand everything starting with 80-grit, then 120-grit, finishing with 220-grit
- Vacuum and tack cloth to remove every speck of dust
- Apply wood stain in your chosen color (I went with dark walnut for drama)
- Seal with polyurethane (3 coats minimum for stairs)
Budget-wise, I spent about $80 on supplies: sandpaper, wood filler, stain, poly, brushes, and drop cloths. The rental sander from Home Depot added another $50, but you can do it by hand if you’ve got time and patience (or if you’re looking for an arm workout).
Color Choice Matters
Dark stains hide imperfections better and look super luxurious. Lighter stains give you that beachy, Scandinavian vibe. I personally love mixing stain colors—using a darker shade on the treads and lighter on the risers creates built-in contrast that guides the eye upward. Very designer, very chic. 🙂
Also Read: 10 Ultimate Stairs Tiles Design Ideas for Perfect Homes
4. Modern Black and White Stair Redesign
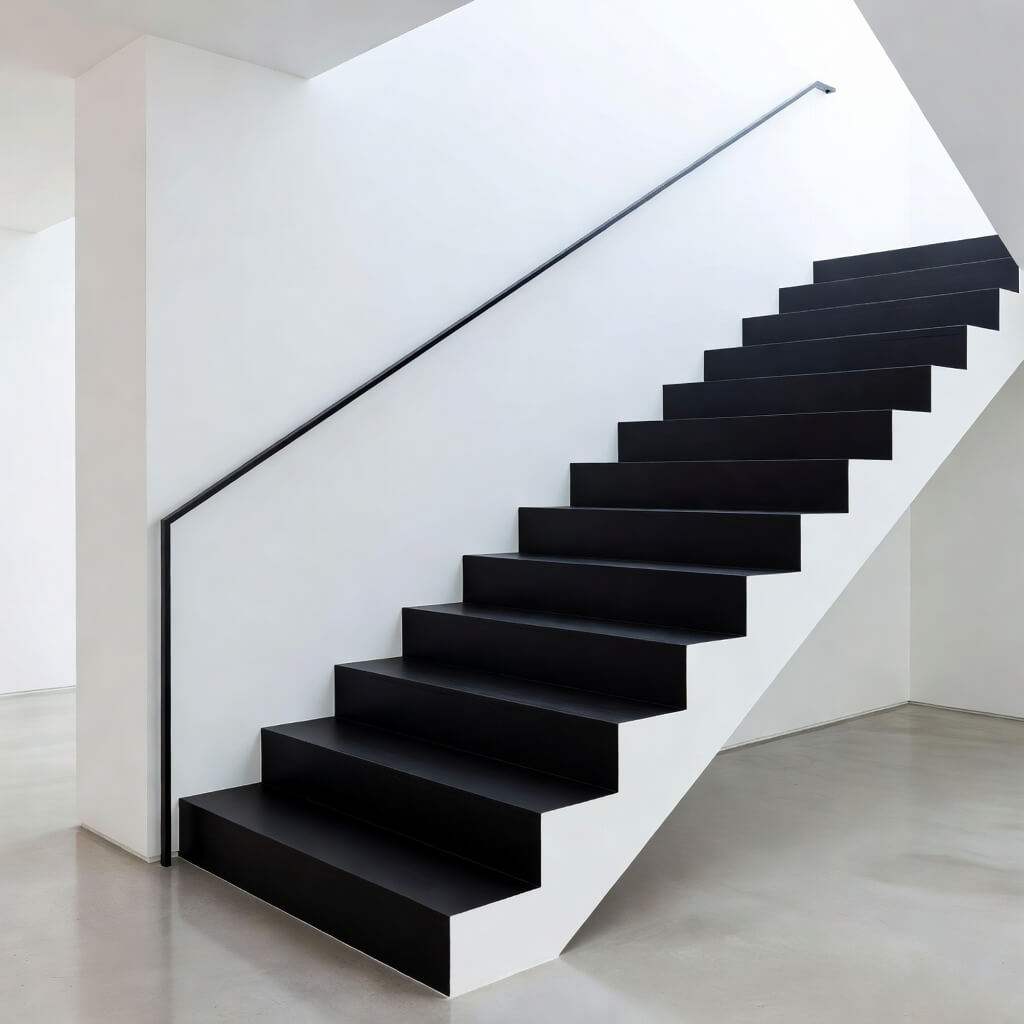
Want to know a secret? Black and white never goes out of style. It’s the little black dress of interior design, and it works especially well on stairs because the contrast is both striking and timeless.
I’ve done this makeover twice now—once on my own stairs and once helping a friend. The combination creates such clean, modern lines that people assume you hired a professional. The reality? It’s just paint and patience.
The classic approach:
- White risers, black treads. This is the most popular combo for good reason—it’s dramatic without being overwhelming
- Use the right paint. Floor paint or porch paint on the treads (they’re formulated for foot traffic)
- Paint the risers first, let them dry completely, then tape them off and paint the treads
- Add non-slip tread strips if you’re worried about the painted surface being slippery (especially smart if you have kids or elderly family members)
I spent around $60 on paint and supplies, and the transformation took one full weekend from prep to final coat. The modern, architectural vibe it created made my 1960s split-level look like it had been featured on a design blog.
Taking It Up a Notch
If you want to get fancy (and I mean fancy), add a painted stripe or border on the treads. I used painter’s tape to create a thin white stripe along the edge of each black tread. That little detail makes it look exponentially more custom and probably added 30 minutes to the whole project. Totally worth it.
5. Carpet-to-Wood Stair Glow-Up
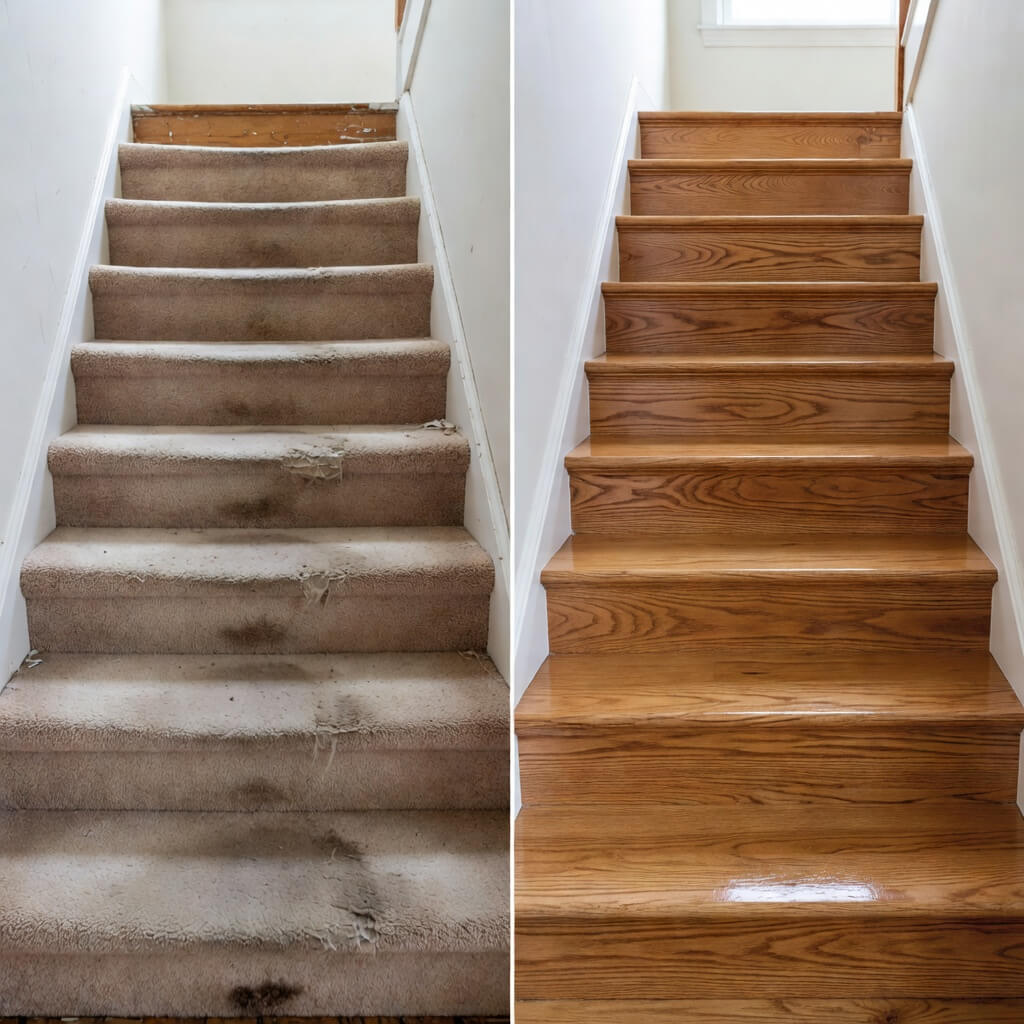
This one deserves its own section because the before-and-after is always the most dramatic transformation you can make. Removing carpet from stairs and revealing (or creating) beautiful wood beneath is like those renovation show moments where everyone gasps.
I tackled this project on my main staircase, and not gonna lie—I was terrified I’d find garbage particle board underneath. But even if you do find subpar wood, you’ve got options. You can paint it, add a runner, or install inexpensive wood treads on top.
Step-by-step reality check:
- Removal phase: Rip up that carpet (therapeutic, honestly)
- Deal with tack strips carefully—they’re spiky and evil
- Clean and assess what you’re working with
- If the wood is good: Sand, stain, seal (see the wood stain section above)
- If the wood is questionable: Paint, add new treads, or get creative with runners
The cost varies wildly here. If you’re just removing carpet and refinishing existing wood, you’re looking at $100-150 for supplies. If you need to add new treads, budget around $300-500 depending on your stair count and wood choice.
The Runner Compromise
Not ready to commit to full wood stairs? A stair runner gives you the best of both worlds. You get the visual of exposed wood on the sides while keeping the cushioned comfort in the middle. I installed one using runner rods (those fancy metal bars that hold the runner at each step), and it genuinely looks like something from a historic estate. Total cost? About $200 for a basic wool runner and rods. FYI, this option is also way easier on your knees if you’re someone who thunders up and down stairs like me.
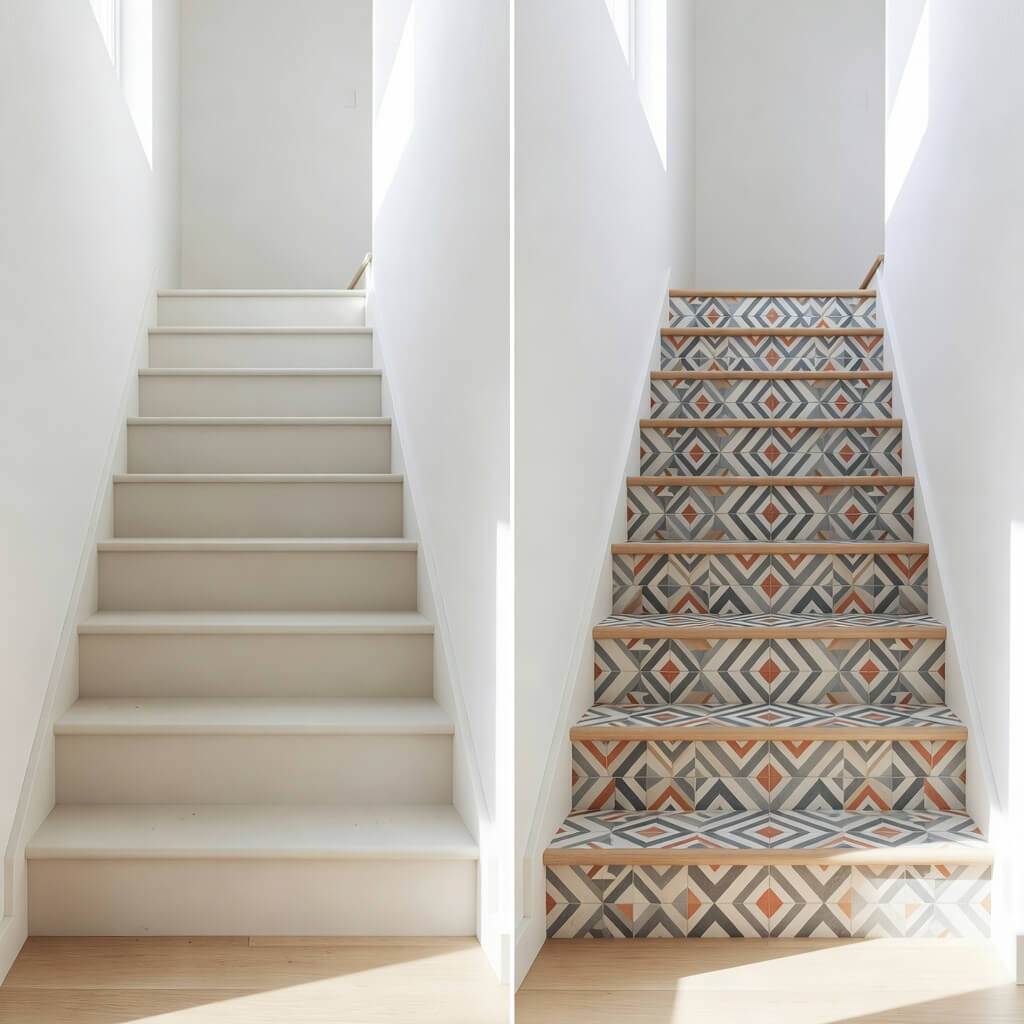
6. Stencil Pattern Stair Riser Makeover
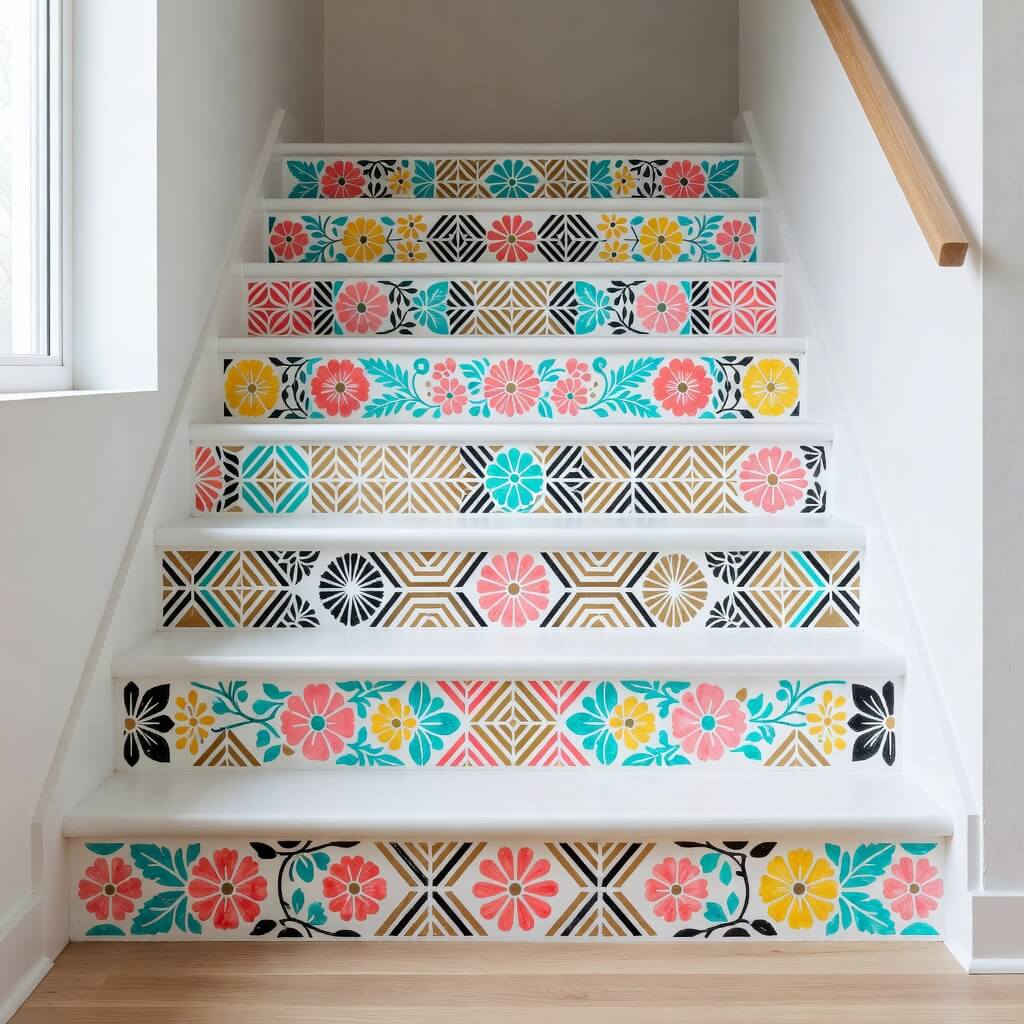
If peel-and-stick feels too easy and hand-painting patterns sounds too hard, stencils are your Goldilocks solution. They give you the custom painted look without needing any artistic talent (and I say this as someone who can barely draw a stick figure).
I discovered the power of stencils when I wanted a specific Moroccan pattern but couldn’t find it in peel-and-stick form. A $12 stencil from Amazon and some leftover paint later, I had exactly the custom look I wanted.
How to nail the stenciled look:
- Choose a stencil pattern that’s not too intricate (smaller details are harder to keep crisp on vertical surfaces)
- Use stencil adhesive spray on the back to keep it from shifting
- Apply paint with a stencil brush or foam roller using a dabbing motion (not brushing)
- Less paint is more—too much causes bleeding under the stencil
- Clean your stencil between applications to keep lines sharp
I painted white risers first, then stenciled a navy pattern over them. Each riser took about 15 minutes, so for my 13-stair run, I spread it over a few evenings while binge-watching Netflix. Total investment? Maybe $30 for the stencil, paint, and brushes.
Pattern Placement Tips
Here’s something I wish someone had told me: you don’t have to center the pattern perfectly on every riser. In fact, letting it run “off the edge” makes it look more like continuous tile work. I stressed about perfect placement for the first three stairs before I realized that slight variation actually looked more organic and less DIY-craft-project.
Also Read: 10 Easy Stairs Makeover Ideas for a Stylish Transformation
7. Minimalist White Staircase Refresh
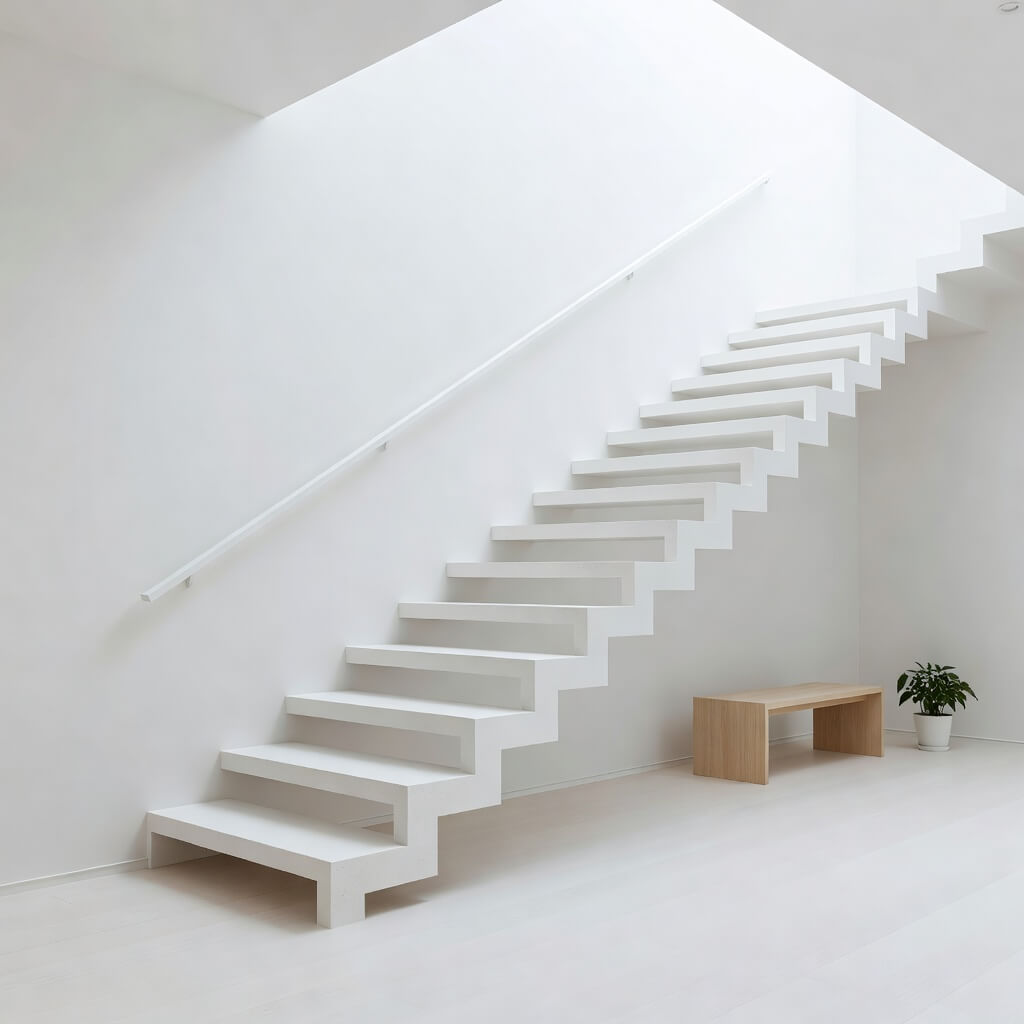
Sometimes less really is more. If your stairs are architecturally solid but just looking tired, an all-white makeover might be exactly what you need. This approach works especially well for small spaces because it reflects light and makes the area feel bigger.
I used this technique on a narrow staircase in a rental property I manage. The stairs themselves were fine—just dated oak with a yellowish varnish. Painting everything crisp white transformed the entire entry from dark and cramped to bright and airy.
The minimalist white approach:
- Paint everything the same shade of white: risers, treads, stringers (the side pieces), spindles, handrails—all of it
- Use different sheens to add subtle interest: eggshell on risers, satin on treads, semi-gloss on trim
- Consider adding texture with a light hand-scraping technique while the top coat is wet
- Keep it pristine with easy-clean paint formulas designed for high-traffic areas
This is probably the cheapest makeover on the list, coming in around $40-50 for paint and supplies. The catch? White shows dirt, so you’ll need to be okay with more frequent cleaning. I keep a Magic Eraser handy for scuff marks, and honestly, a quick wipe-down once a week keeps things looking fresh.
When White Works Best
This look absolutely shines in beach houses, Scandinavian-style homes, or anywhere you’re going for that modern farmhouse vibe. It also makes artwork or decorative elements on stairway walls pop way more than dark stairs do. Just maybe don’t do this if you have muddy dogs or small children with marker access. :/
8. Rustic Farmhouse Stair Makeover
Can we acknowledge that farmhouse style has officially taken over the world? Love it or find it overdone, the rustic wood look is undeniably cozy and adds instant character. And the best part? “Rustic” means imperfections are actually desirable, so this is very DIY-friendly.
I went full farmhouse on my friend’s stairs, and it involved way more distressing and “weathering” than actual construction. We made brand-new wood look like it had been there for decades, and guests genuinely thought she’d uncovered original material during a renovation.
Creating the rustic farmhouse look:
- Start with raw wood treads (or sand existing ones down to bare wood)
- Use a wire brush to raise the grain and create texture
- Apply gray or weathered wood stain unevenly for that aged look
- Whitewash over the stain by diluting white paint with water (50/50 ratio)
- Wipe it back to let the wood grain show through
- Add “wear marks” by sanding high-traffic areas more heavily
- Paint risers white for contrast
- Seal everything with matte polyurethane to keep that non-shiny, authentic vibe
The material cost runs about $100-150 depending on whether you need to add new treads or can work with existing wood. The time investment is moderate—figure on a long weekend if you’re doing a full staircase.
Farmhouse Details That Sell It
Want to really commit? Add shiplap to the stairway wall or swap out your handrail for a chunky, rough-hewn beam style. I’ve also seen people add vintage-style numbered decals to each riser (like old library steps), which is such a sweet touch for about $15 on Etsy. These little details push it from “nice” to “how much did that designer charge you?”
9. LED Light Staircase Upgrade DIY
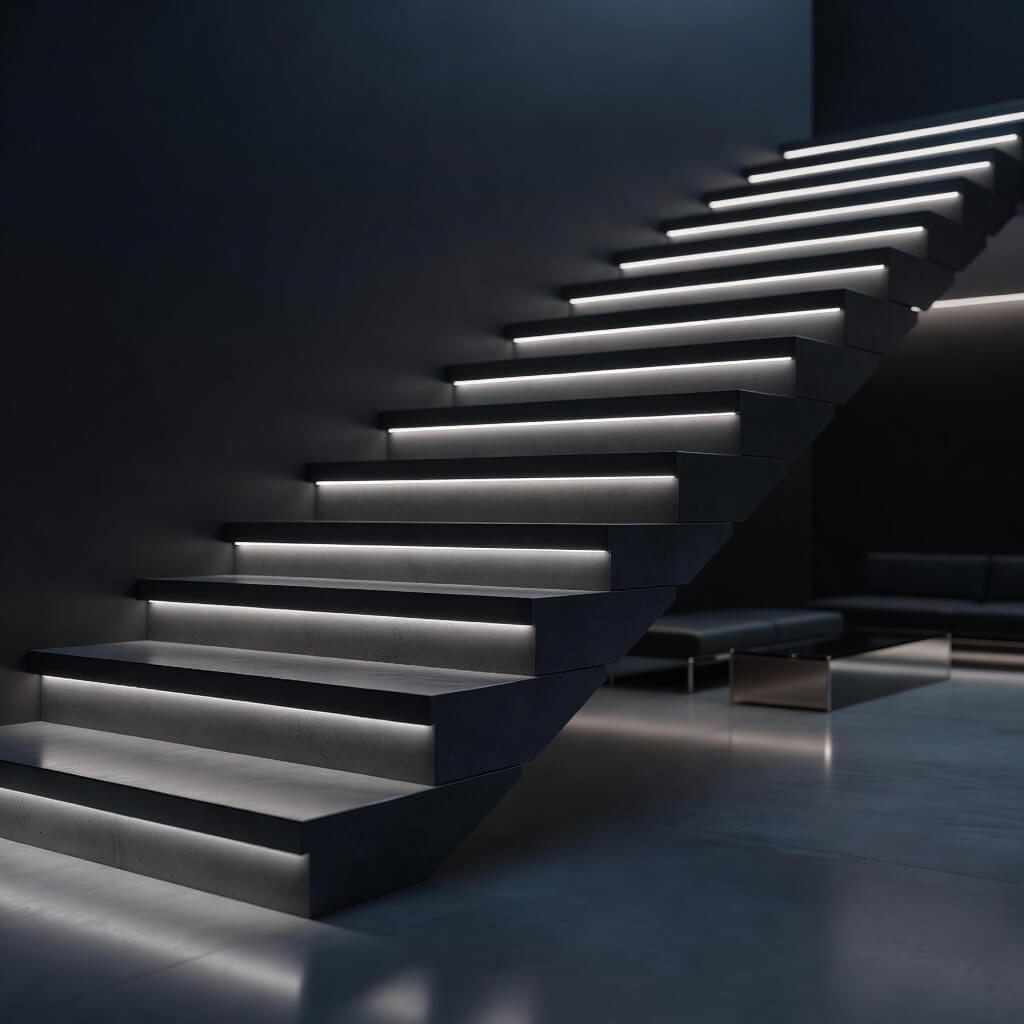
Okay, this one isn’t purely aesthetic—it’s also super functional. But can we talk about how freaking cool stairs look with integrated LED lighting? It’s like living in a sci-fi movie, except it’s actually practical for those midnight bathroom trips where you don’t want to wake up fully by turning on overhead lights.
I installed LED strip lighting under the nosing (the overhanging edge) of each tread, and it completely changed the nighttime ambiance of my home. During the day, you barely notice the strips, but at night? Pure magic.
LED installation basics:
- Choose your LED strips: Battery-operated are easiest but require changing batteries; plug-in are more reliable but need an outlet nearby
- Motion-sensor options are absolutely worth the extra $20—they turn on automatically when someone approaches
- Measure each tread and cut the LED strips to fit (most have cutting marks every few inches)
- Use the adhesive backing or add extra mounting clips for security
- Hide wires by running them along the stringer or behind trim pieces
- Consider warm white vs. cool white (warm feels cozier, cool feels more modern)
I went with a motion-activated, warm white LED system that cost about $80 for my 13-stair run. Installation took maybe 3 hours, and most of that was just carefully measuring and making sure everything lined up before committing.
Unexpected Benefits
Beyond looking awesome, the LED lighting has actually prevented several potential tumbles. My partner no longer fumbles in the dark trying to get downstairs in the morning, and when we have guests staying over, they comment on how safe they feel navigating unfamiliar stairs at night. Plus, it uses virtually no electricity—my system adds maybe $2 to my annual electric bill.
Also Read: 10 Simple Basement Stairs Ideas on a Budget Makeover
10. Small Entry Staircase Space-Saving Makeover
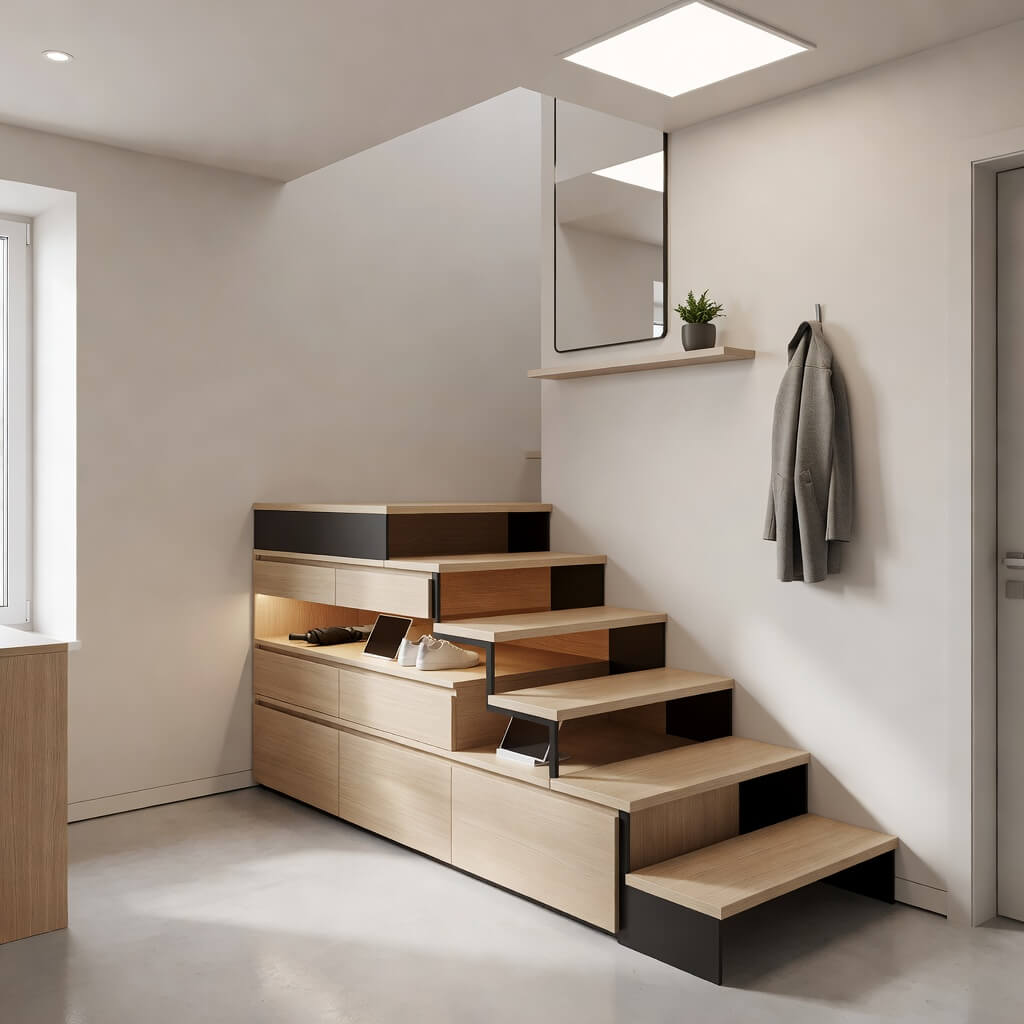
Small entryways with stairs can feel cramped and cluttered, but smart design choices make a massive difference. This isn’t about changing the stairs themselves as much as optimizing the entire space to feel more luxurious despite the square footage.
I tackled this challenge in my own home where the front door opens directly onto a narrow staircase. The space felt like a bowling alley—long, narrow, and not particularly welcoming. A few strategic changes completely transformed it.
Space-maximizing strategies:
- Paint stairs and walls the same light color to eliminate visual breaks that make spaces feel smaller
- Install a sleek, low-profile handrail instead of bulky traditional ones
- Add mirrors strategically to reflect light and create the illusion of space
- Use the area under the stairs with built-in storage or a small bench
- Keep the color palette monochromatic or use only two complementary colors
- Remove carpet (it makes small spaces feel even smaller)
- Install minimalist lighting rather than bulky fixtures
The budget for this varies based on what changes you make, but focusing just on paint and lighting updates, you can transform the feel for under $100. If you want to add under-stair storage, budget another $100-200 for materials.
The Vertical Stripe Trick
Here’s a sneaky designer trick I learned: paint vertical stripes on the stairway wall. Vertical lines draw the eye upward and make ceilings feel higher, which makes the entire space feel larger. I used two shades of light gray—one slightly lighter than the other—for subtle stripes that added dimension without overwhelming the small space. This little detail cost me maybe $20 in extra paint and made a noticeable difference in how spacious the entry felt.
Materials and Tools You’ll Actually Use
Let me save you from the mistake I made on my first project: buying a bunch of specialized tools you’ll never touch again. Here’s what you’ll actually need for most of these projects:
Essential tools:
- Good quality painter’s tape (the cheap stuff bleeds, don’t do it)
- Utility knife with fresh blades
- Measuring tape
- Sandpaper or sanding blocks (multiple grits)
- Paint brushes and rollers (foam rollers for smooth finishes)
- Drop cloths
- Tack cloth for cleaning between coats
- Level (stairs are never as straight as you think)
Materials that matter:
- Primer (don’t skip this, seriously)
- Quality paint (floor/porch paint for treads)
- Polyurethane sealer (water-based dries faster and smells less)
- Wood filler (if you’re working with old wood)
- Degreaser/cleaner (TSP works great)
Total investment in tools if you’re starting from zero? Maybe $150. But you’ll use these for every future project, so it’s worth buying decent quality.
Common Mistakes to Avoid
I’ve made pretty much every stair makeover mistake possible, so learn from my pain:
Don’t skip surface prep. I know it’s boring and time-consuming, but 80% of how your finished project looks comes down to prep work. Clean, sand, prime, repeat.
Don’t paint yourself into a corner. Literally. I spent an uncomfortable hour sitting on an upper landing waiting for stairs to dry because I didn’t think through my exit strategy. Start from the bottom and work up, or do every other stair so you can still navigate.
Don’t cheap out on paint for treads. Regular wall paint on stair treads will chip and wear through in months. Use floor paint, porch paint, or specialty stair paint. The extra $15 saves you from redoing it next year.
Don’t forget ventilation. Stairwells trap fumes like nobody’s business. Open windows, use fans, maybe don’t do this project in January if you live somewhere cold (another lesson learned the hard way).
Don’t rush drying time. I know the paint feels dry after an hour. Wait anyway. Full cure time matters for durability, especially on horizontal surfaces that get foot traffic.
Final Thoughts
Here’s what I want you to take away from all this: your stairs don’t have to be an eyesore you ignore every day. With a weekend and a relatively small budget, you can transform them into something you’re genuinely proud to show off.
I’ve done almost all of these projects at different times, and the confidence boost from successfully completing a visible home improvement is real. Every time I walk up my stairs now, I get a little hit of satisfaction knowing I created that look myself for less than the cost of hiring someone for a basic cleaning.
Start with whichever project speaks to you—whether that’s the instant gratification of peel-and-stick risers or the rewarding work of refinishing wood. You genuinely can’t go wrong as long as you prep properly and take your time. And hey, if it doesn’t turn out perfect? That’s what Pinterest calls “character” and what I call “giving it your best shot.”
The luxury look isn’t about spending thousands of dollars. It’s about thoughtful choices, attention to detail, and a little bit of elbow grease. Your stairs are about to look absolutely incredible, and you’re going to save a ridiculous amount of money in the process. Now grab that paintbrush and show those stairs who’s boss. 🙂