10 Peaceful Japanese Garden Design Ideas for Outdoor Bliss
- Garden Design
 Ben
Ben- 0
- 39 minutes read
You know that feeling when you walk into a space and instantly feel your shoulders drop, your breathing slow, and your mind quiet down? That’s exactly what a well-designed Japanese garden does to you. I stumbled into my first authentic Japanese garden about five years ago during a stressful work trip, and honestly, it changed how I think about outdoor spaces forever.
Look, I’m not saying you need to fly to Kyoto or become a Zen master to create your own peaceful retreat. These ten Japanese garden design ideas will help you transform whatever outdoor space you’ve got—whether it’s a sprawling backyard or a tiny balcony—into your personal sanctuary. Ready to make your neighbors jealous? Let’s get into it.
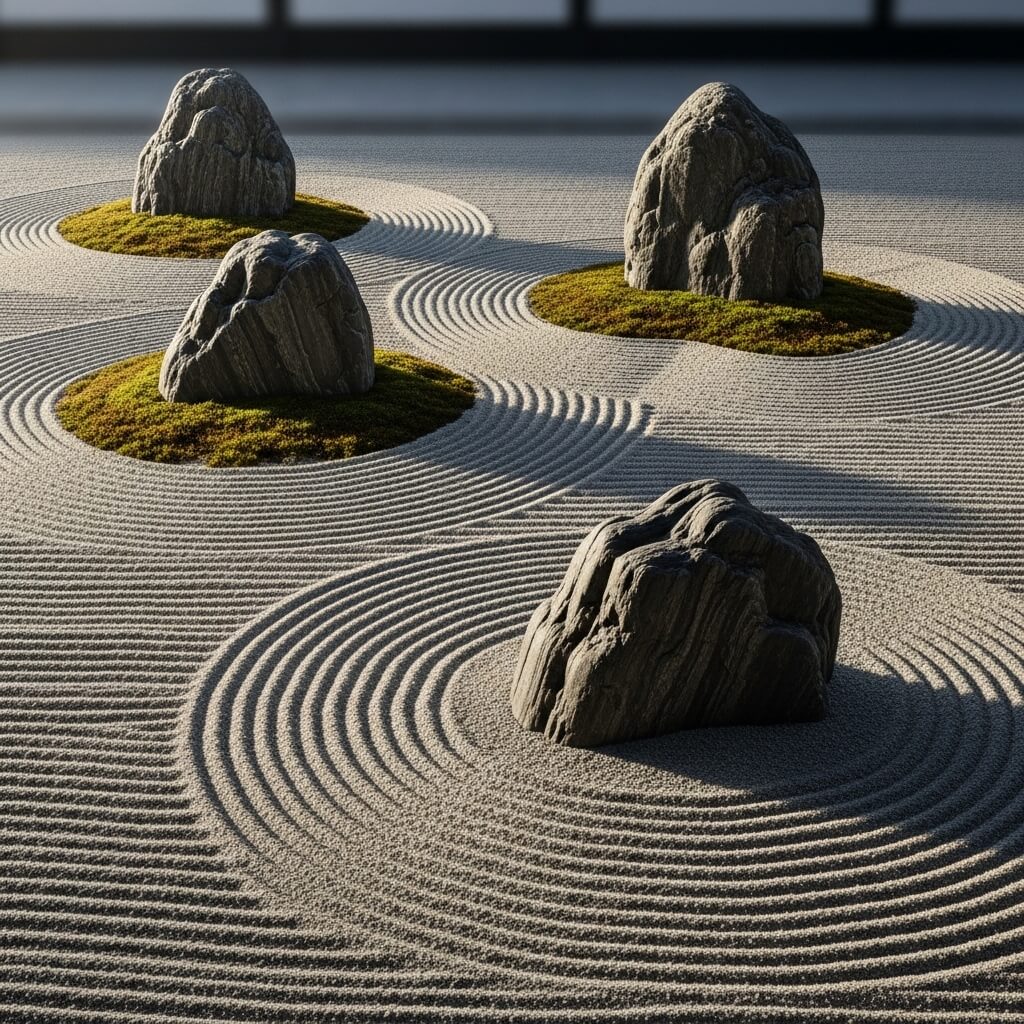
Zen Rock Garden with Minimal Gravel Patterns
Ever wondered why people spend hours raking gravel into perfect lines? Because it’s ridiculously therapeutic, that’s why.
A Zen rock garden, or karesansui if you want to get fancy, strips everything down to the essentials. We’re talking carefully placed rocks emerging from meticulously raked gravel patterns that represent water flowing around islands. No plants, no water features—just you, some rocks, and a whole lot of minimalist beauty.
Here’s what you’ll need to pull this off:
- Clean gravel or sand (white or light gray works best)
- Large statement rocks (3-5 substantial pieces with interesting shapes)
- A proper rake (get one with thin tines specifically for this purpose)
- Edging material to keep your gravel contained
- A level base so your gravel doesn’t pool in weird spots
The beauty of this design? You can fit it into the smallest corner of your yard. I created one in a 6×8 foot section beside my garage, and now I rake new patterns every Sunday morning while my coffee cools. It’s become my weird little ritual, and honestly, it beats scrolling through my phone 🙂
Pro tip: Don’t overthink the rock placement. The Japanese concept of “wabi-sabi” celebrates imperfection and natural asymmetry. Place your rocks in odd numbers (3, 5, or 7), and trust your gut about what looks balanced without being too symmetrical.
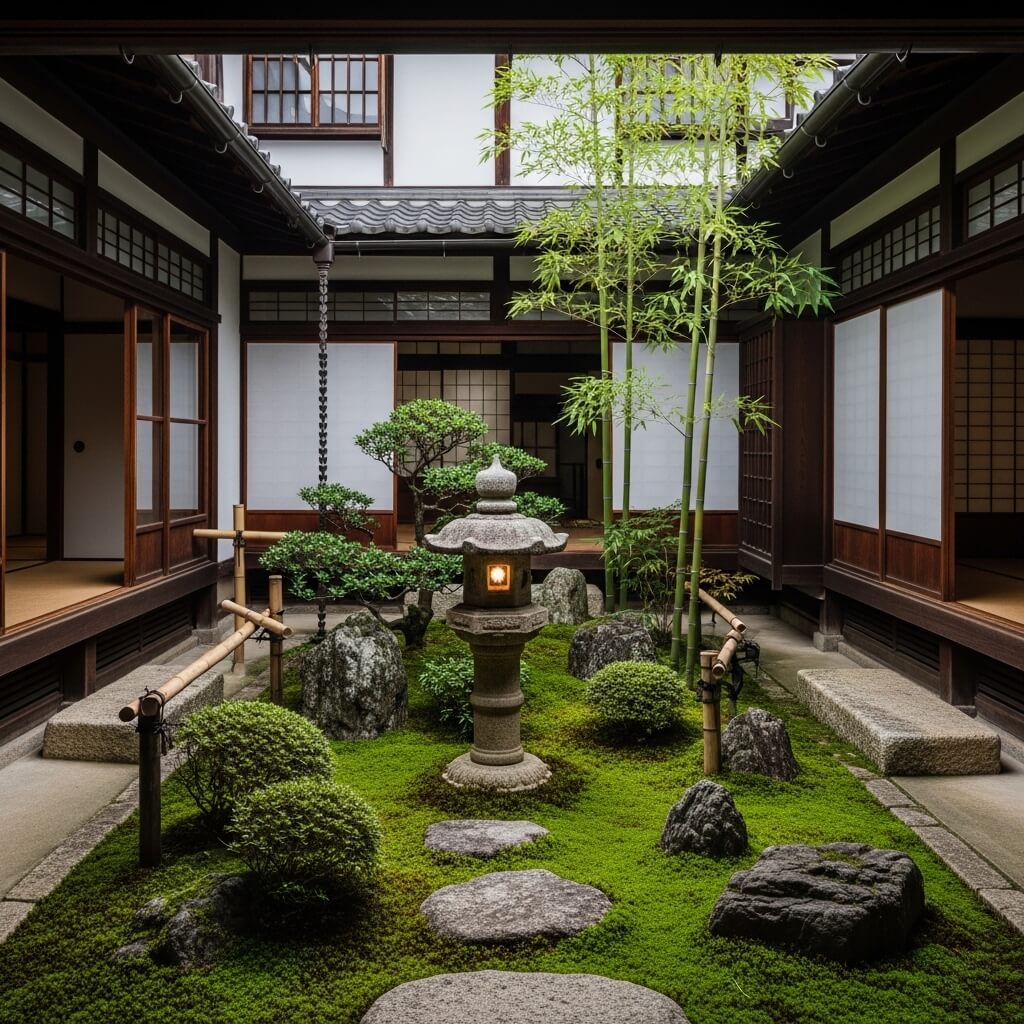
Small Courtyard Japanese Garden with Bamboo Fence
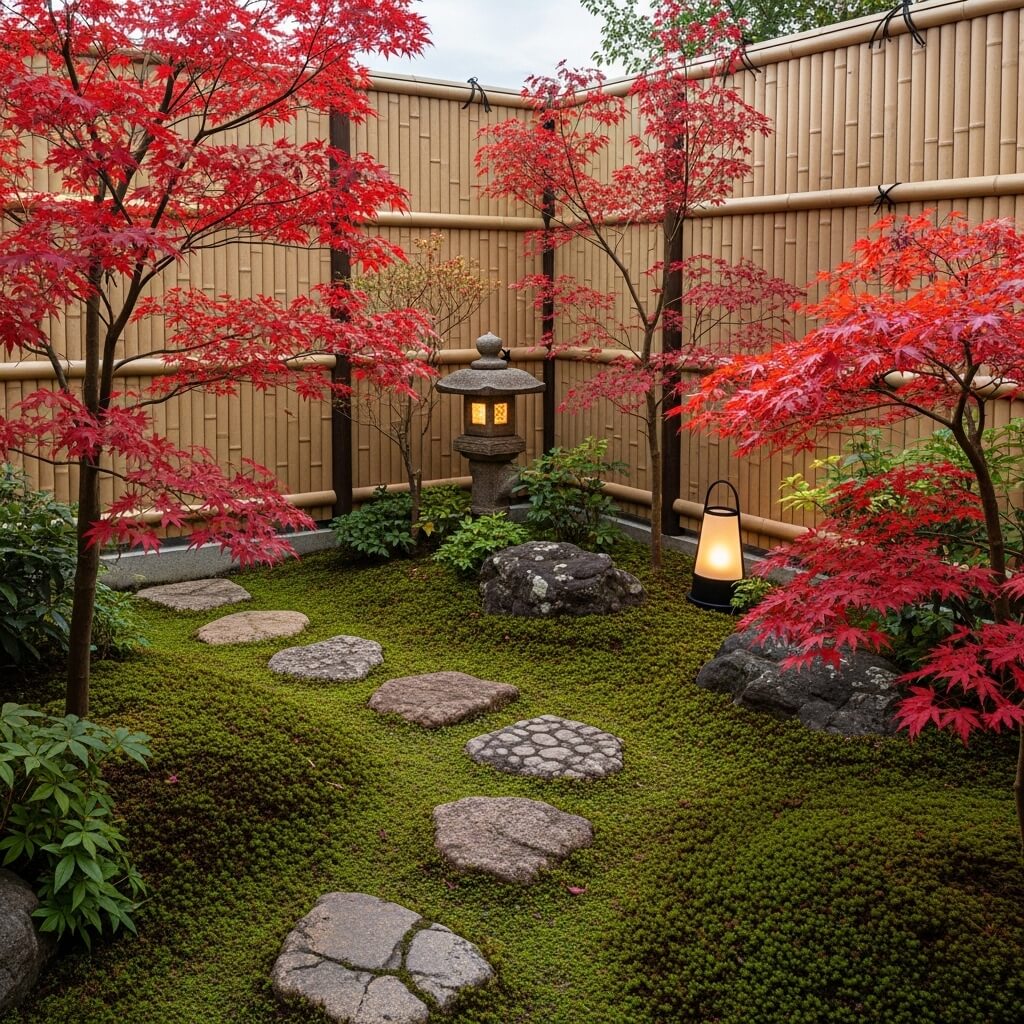
Got a courtyard that currently serves as a sad storage area for random stuff you don’t know what to do with? Yeah, me too—until I transformed mine.
Small Japanese courtyard gardens prove that size doesn’t matter (sorry, couldn’t resist). These intimate spaces use bamboo fencing to create privacy while maintaining that connection to nature that makes Japanese design so special.
Key Elements for Your Courtyard Transformation
The bamboo fence is your foundation here. It creates this amazing boundary that feels solid without being harsh or uninviting. I went with a classic kennin-ji style bamboo fence—it’s got that diagonal weave pattern that looks expensive but isn’t too complicated to install yourself.
Inside your bamboo-enclosed sanctuary, focus on these elements:
- Stepping stones that guide movement through the space
- One or two Japanese maples (they look incredible year-round)
- A small water basin (tsukubai) for that gentle water sound
- Strategic lighting to make it usable during evening hours
- Layered planting with different heights and textures
The trick with small spaces? Vertical interest. I trained some climbing plants along parts of my bamboo fence and added shelves for small potted plants at different heights. This draws the eye upward and makes the space feel larger than it actually is.
Making It Work in Tight Spaces
FYI, if your courtyard is really cramped, steal this idea: I removed half my stepping stones and replaced them with one continuous pathway using decomposed granite. It simplified the space visually and made it feel less cluttered. Sometimes less really is more.
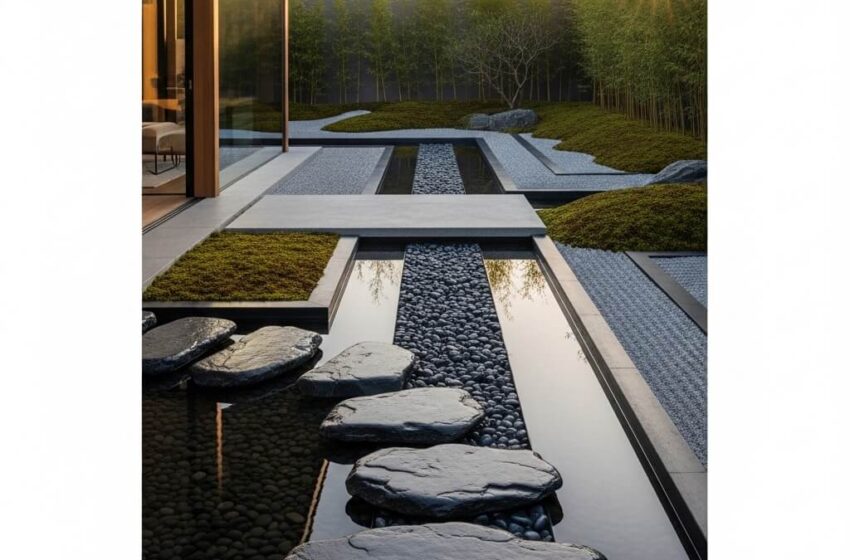
Modern Japanese Garden with Water Stone Pathway
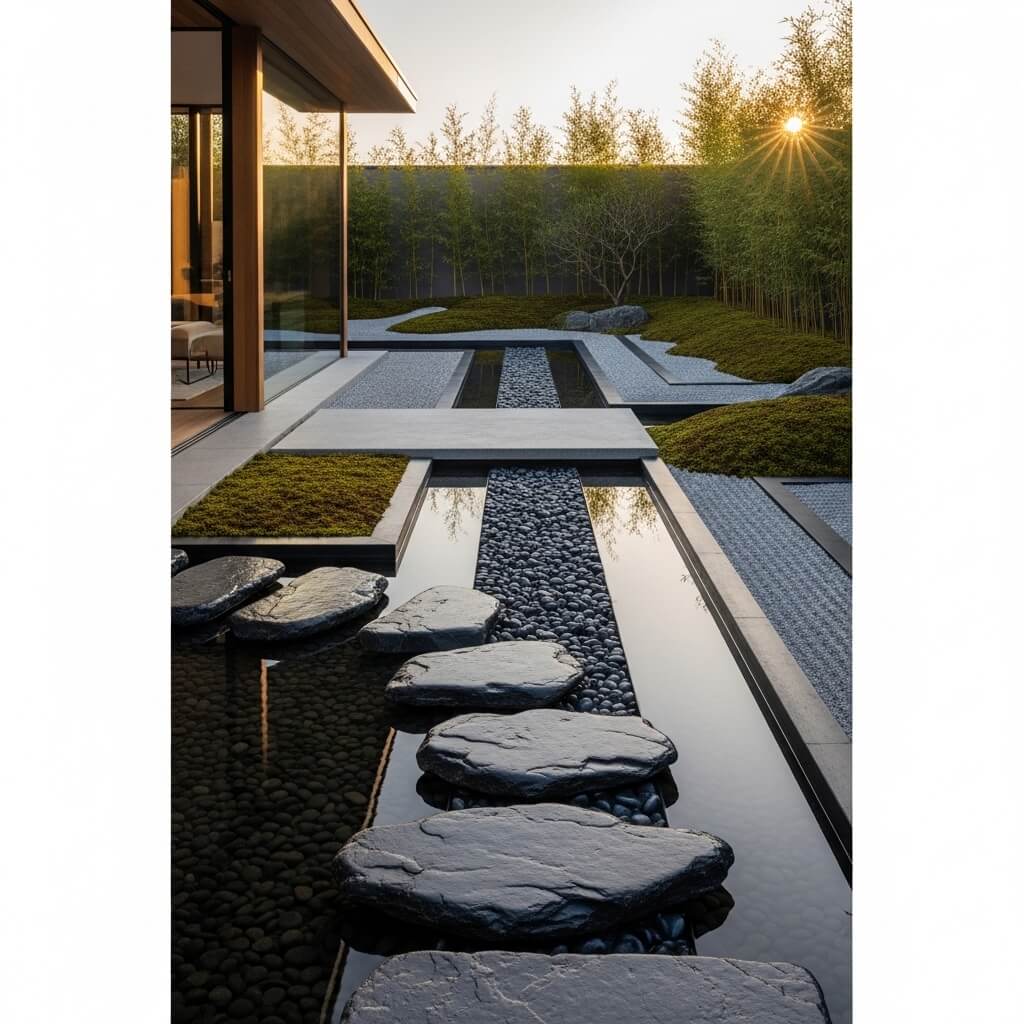
Now we’re getting into contemporary territory, and I’m here for it.
Modern Japanese gardens take traditional principles and give them a sleek, updated twist. The water stone pathway concept blends functionality with that meditative quality Japanese gardens are famous for. Picture this: flat stones creating a path that appears to float over a shallow water feature or sits beside a linear water channel.
This design works beautifully if you’ve got a modern home and want your garden to complement that aesthetic. The clean lines and geometric precision feel fresh without abandoning the peaceful vibe traditional Japanese gardens offer.
Creating Your Water Stone Path
You don’t need a massive budget to pull this off. Here’s how I approached mine:
Step 1: Determine your pathway route and mark it out. Keep it simple—gentle curves or straight lines work better than complicated zigzags.
Step 2: Decide on your water feature. I went with a narrow channel running parallel to my stepping stones rather than having the stones sit IN water (maintenance nightmare avoided).
Step 3: Select uniform stones. Unlike traditional gardens that embrace natural irregularity, modern designs benefit from consistent sizing and color. I used large format bluestone pavers cut into rectangles.
Step 4: Space your stones with intention. I placed mine with equal gaps between them—about 6 inches apart—to maintain that modern, deliberate look.
The water element can be as simple as a recirculating channel made from a preformed liner with a small pump. The gentle sound of moving water is worth the minor electrical setup, trust me.
Also Read: 10 Fresh Roof Garden Design Ideas for Peaceful Escapes
Traditional Tea Garden with Wooden Lantern Lighting
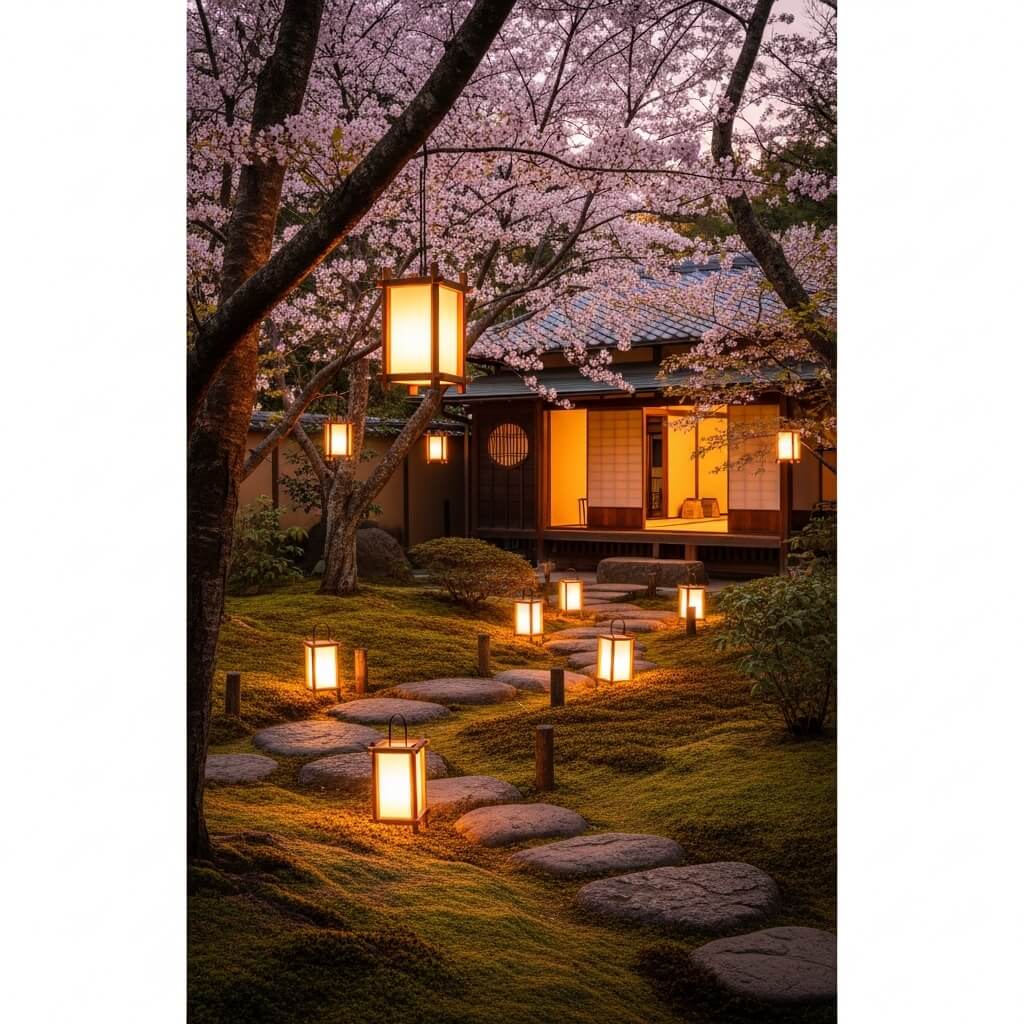
Okay, confession time: I’m slightly obsessed with tea gardens (roji). There’s something about spaces designed specifically for contemplation and tea ceremonies that just gets me.
Traditional tea gardens create a journey—a transition from the outside world to a place of peace and mindfulness. Wooden lanterns (tōrō) aren’t just decorative; they historically guided visitors along the path during evening tea ceremonies.
Designing Your Tea Garden Path
The pathway is everything in a tea garden. It should meander slightly, never revealing the entire garden at once. This builds anticipation and encourages visitors to slow down and notice details.
Here’s what makes a proper tea garden path:
- Stepping stones (tobi-ishi) of various sizes placed in a natural, irregular pattern
- Wooden lanterns positioned at turns or decision points in the path
- Low plantings that brush against you as you walk—creating physical engagement with the space
- A water basin for ritual purification (even if you’re just washing your hands)
- Moss or ground covers between stones instead of bare soil
I installed three wooden lanterns along my tea garden path. Two are the traditional pedestal style (tachi-gata), and one is a snow-viewing lantern (yukimi-gata) positioned near my water basin. The warm glow they cast at dusk is absolutely magical—way better than those harsh solar lights everyone seems to love.
Lighting Considerations
Real talk: authentic stone lanterns are expensive. Like, really expensive. I started with one genuine stone lantern and added two high-quality wooden reproductions. Nobody has ever noticed the difference, and IMO, the wooden ones actually fit the tea garden aesthetic better anyway.
You can wire them for electricity or use LED candles inside. I went electric because I’m lazy and don’t want to mess with changing batteries or dealing with real flames.
Balcony Japanese Garden with Mini Bonsai Arrangement
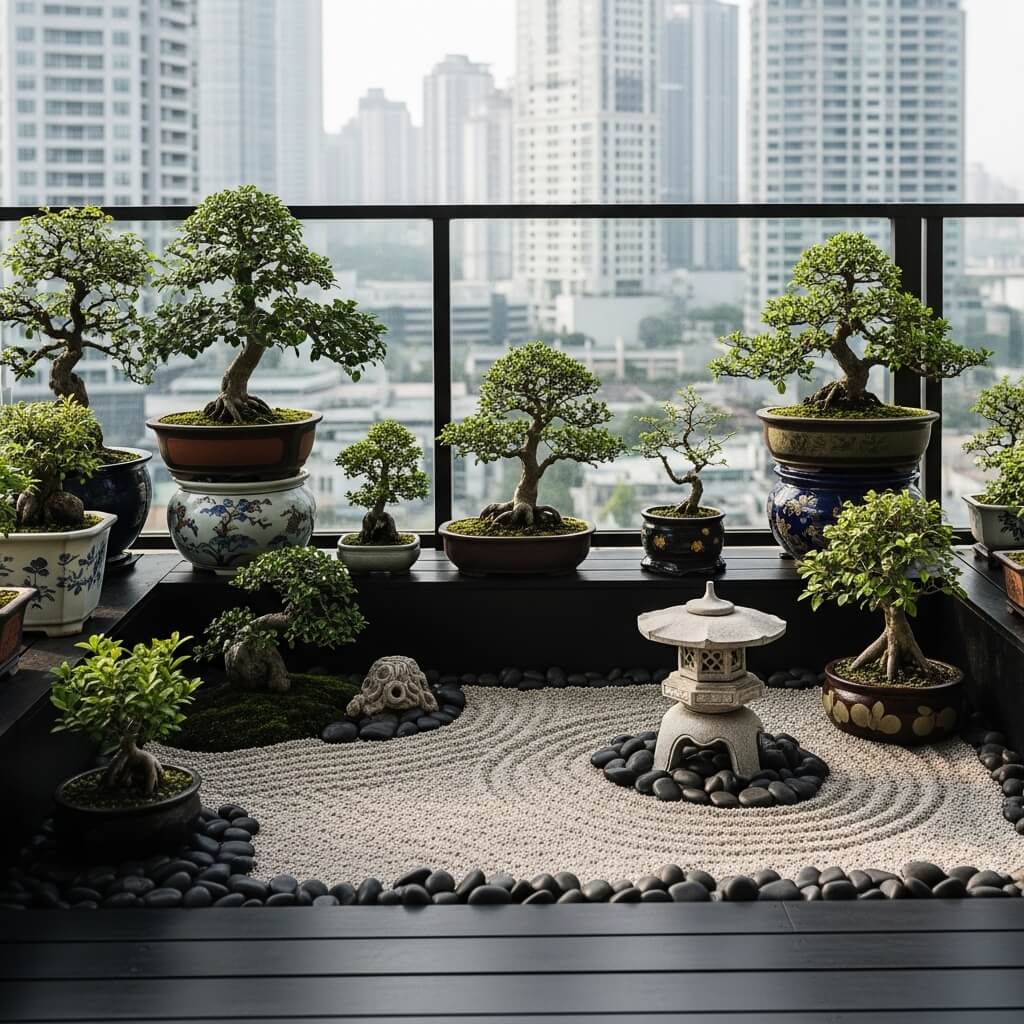
Who says you need a yard to enjoy Japanese garden design? Your balcony is about to become the envy of your entire apartment complex.
I created my first balcony Japanese garden when I lived in a shoebox apartment with a balcony barely big enough for two people to stand on. The mini bonsai arrangement became the focal point, and honestly, it taught me more about Japanese gardening principles than any book I’ve read.
Making the Most of Limited Space
Balcony gardens demand ruthless editing. You can’t include everything, so choose elements that deliver maximum impact in minimum space:
- Three to five mini bonsai trees in complementary containers
- A small bamboo fence panel as a backdrop (creates privacy and authenticity)
- A simple water feature like a small bamboo fountain
- Gravel or small stones as ground cover in containers
- One statement rock or lantern as an accent piece
I arranged my bonsai on a custom-built stepped platform so they sit at different heights. This created depth and made my tiny balcony feel more like an actual garden rather than just some plants in pots.
Bonsai Selection for Beginners
Look, bonsai can be intimidating, but don’t let that stop you. Start with hardy varieties that forgive your inevitable mistakes:
- Japanese maple (stunning color changes)
- Juniper (basically impossible to kill)
- Chinese elm (forgiving and grows quickly)
- Ficus (great for indoor/outdoor transitional spaces)
I killed three bonsai trees before I figured out what I was doing, so don’t feel bad if your first attempt doesn’t make it. That’s part of the learning process, and now I’ve got trees that have been thriving for years.
Forest-Style Japanese Garden with Moss and Stones

This is where Japanese garden design gets earthy and mysterious—and I absolutely love it.
Forest-style gardens (yamagatashiki) mimic the feeling of walking through a Japanese mountain forest. Moss, stones, and shade-loving plants create a lush, green sanctuary that feels cool and serene even on hot days.
Creating Your Forest Garden
The foundation of a forest garden is shade. If you’ve got mature trees or a naturally shaded area of your yard, you’re already halfway there. If not, you might need to create shade using structures or by planting fast-growing shade trees first.
Here’s what transformed my shady, unusable side yard into a magical forest garden:
Moss is your carpet: Forget grass. Moss creates that soft, ancient feeling that makes forest gardens special. I established moss by transplanting patches from other areas of my property and keeping them consistently moist for the first few months.
Stones tell the story: Position larger weathered stones to look like they’ve been there forever. Partially bury them and let moss grow over edges. The goal is to make everything look completely natural and unstaged.
Layer your plants: Start with a canopy (existing trees), add an understory (Japanese maples, dogwoods), then fill in with shade-loving shrubs and ferns. This layering creates depth and complexity.
Add mystery elements: I placed a partially hidden stone lantern deep in my forest garden. You can’t see it from the entrance—you have to explore a bit. These little discoveries make the space more engaging.
Moss Growing Tips
Growing moss successfully requires patience (ugh, I know). But here’s what actually worked for me:
- Test your soil pH (moss loves acidic soil around 5.5-6.5)
- Remove competing plants and weeds first
- Keep it consistently moist for the first 60 days
- Don’t walk on it while it’s establishing
- Accept imperfection—patchy moss looks more natural anyway
The payoff? A carpet of green that needs zero mowing and looks increasingly beautiful as it ages. Worth it 🙂
Also Read: 10 Amazing Front Yard Garden Design Ideas for Dream Homes
Koi Pond Japanese Garden with Wooden Bridge Design
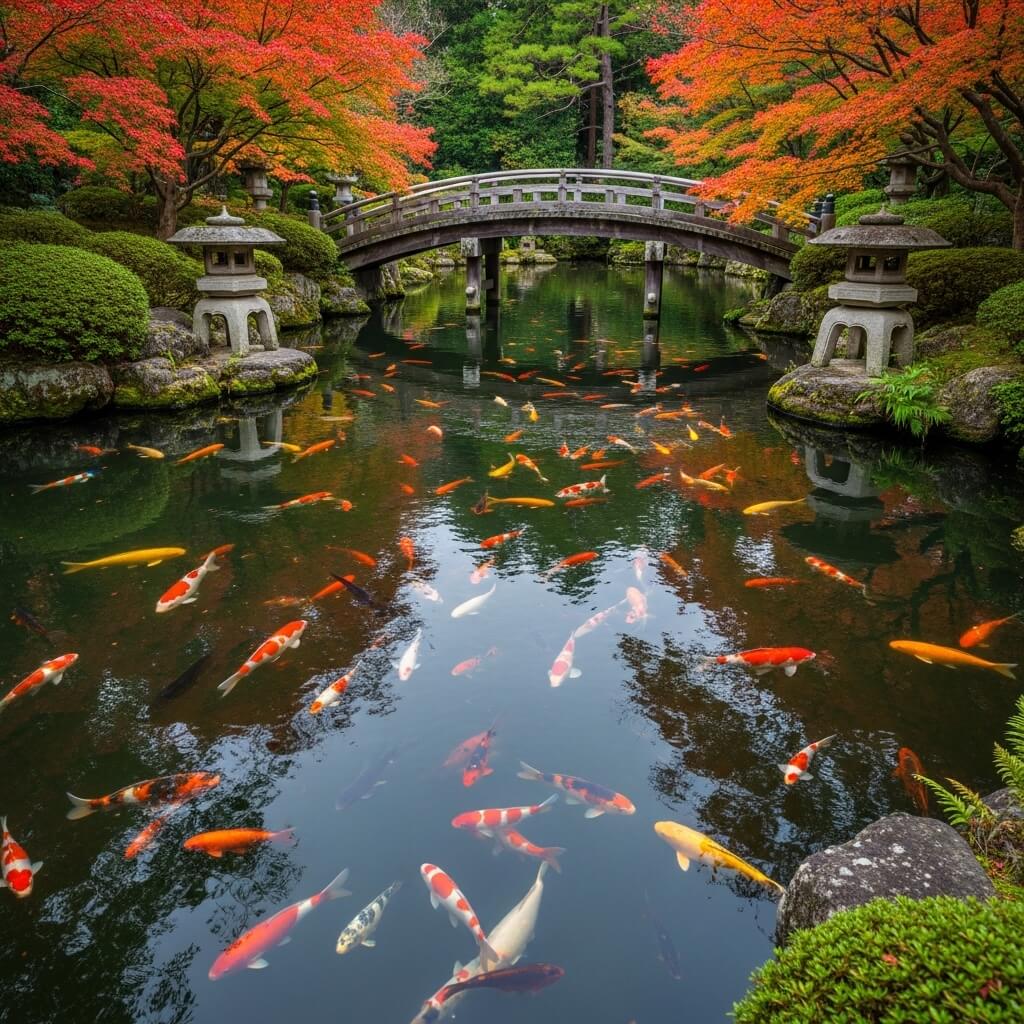
Can we talk about how ridiculously relaxing it is to watch koi fish swim around? Because it’s basically meditation you can do while drinking beer.
A koi pond with a wooden bridge is the statement piece that transforms a nice garden into something truly special. It’s also the most ambitious project on this list, so buckle up.
Planning Your Koi Pond
I’m not going to lie—installing a koi pond is a commitment. I researched for six months before breaking ground on mine, and I still made mistakes. Learn from my pain:
Size matters: Koi need space. My pond is 2,000 gallons (roughly 10×15 feet and 4 feet deep), which comfortably houses eight koi. Don’t go smaller than 1,000 gallons if you want healthy, happy fish.
Filtration is everything: Koi are messy. I installed a combination of biological and mechanical filtration, plus a UV sterilizer to control algae. Budget about 30% of your total pond cost for proper filtration.
Bridge placement: Your wooden bridge should serve a purpose, not just float randomly over water. Mine connects two sides of my garden and provides the best viewing angle for watching the fish.
Wooden Bridge Construction
I built my bridge from pressure-treated lumber with a cedar cap rail for aesthetics. The design is simple: two main beams spanning the pond with perpendicular deck boards and handrails on both sides.
Key features that make it authentically Japanese:
- Curved or arched profile (mine has a gentle arch)
- Natural wood finish rather than paint or heavy stain
- Simple, clean lines without excessive ornamentation
- Sturdy construction (this thing needs to support people safely)
The bridge became everyone’s favorite spot in my garden. People naturally gravitate to it during gatherings, and I often find myself standing there in the morning with my coffee, watching the koi come up for feeding.
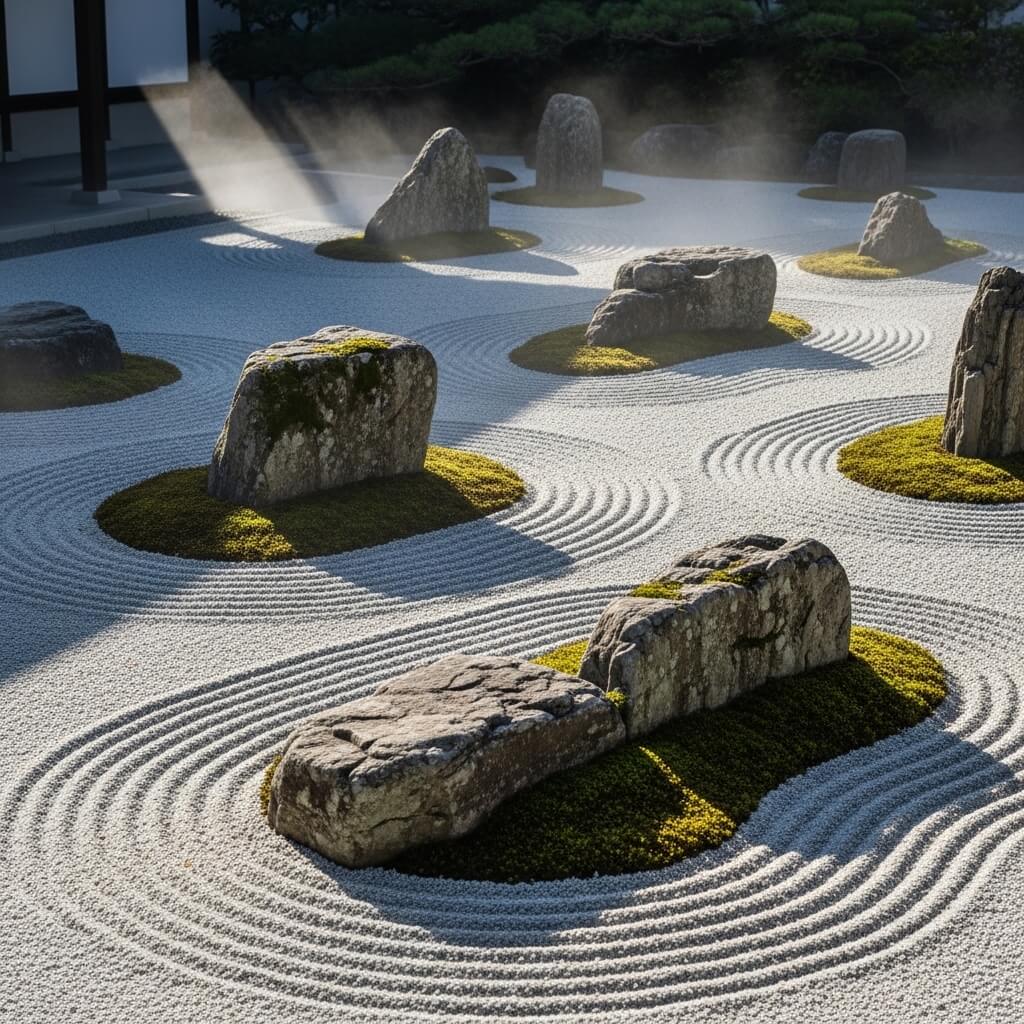
Minimalist Dry Landscape Garden with Raked Sand
If the Zen rock garden was minimalism, this is extreme minimalism—and somehow it still works beautifully.
Dry landscape gardens (karesansui) take the “less is more” philosophy to its logical conclusion. Raked sand represents water, rocks represent islands or mountains, and the negative space becomes as important as the elements themselves.
Designing with Negative Space
This was the hardest concept for me to grasp initially. Western gardens try to fill every space with something—plants, decorations, features. Japanese dry gardens embrace emptiness as a critical design element.
I created my dry landscape garden in a 12×20 foot area, and here’s what I learned:
Choose your focal point carefully: I used three rocks—one large and two smaller ones—positioned in the classic triangular arrangement. That’s it. Those three rocks and endless raked sand.
Raking patterns matter: Different patterns create different moods. I use concentric circles around the rocks (representing ripples) and straight lines in open areas (representing calm water). Changing the pattern weekly keeps the garden feeling fresh.
Borders define the space: I used dark composite edging to create a clean border. This contains the sand and creates a strong visual separation from the surrounding garden.
Maintenance Reality Check
Here’s the truth: maintaining raked patterns requires commitment. Rain messes them up. Leaves blow in. Cats think it’s a fancy litter box (seriously, I had to install a motion-activated sprinkler to solve this problem).
But the maintenance is the point. The act of raking is meditative. I spend 20 minutes every few days re-raking my patterns, and it’s become my favorite way to mentally reset. Some people do yoga; I rake sand.
Japanese Courtyard Garden with Stone Lantern Centerpiece
Stone lanterns (ishidōrō) have been stealing the show in Japanese gardens for centuries, so why not make one the absolute star of your courtyard?
I designed my second courtyard garden around a large yukimi-style stone lantern I found at an architectural salvage yard. Best impulse purchase ever.
Building Around Your Lantern
The lantern sets the tone for everything else. I positioned mine slightly off-center in my courtyard (remember, asymmetry is your friend in Japanese design) and built the rest of the garden to complement it.
Elements that make this design work:
- Gravel surface around the lantern (I used decomposed granite in a warm gray tone)
- Strategic plant placement framing but not crowding the lantern
- Stepping stone path leading to the lantern as a destination
- Low ground covers and moss softening the base
- Simple seating area positioned for optimal lantern viewing
The lantern becomes especially important in the evening. I wired mine with a low-voltage LED light that casts this gorgeous warm glow across the courtyard. It transforms the entire space after dark.
Choosing Your Stone Lantern
Stone lanterns range from affordable concrete reproductions to authentic antique pieces that cost more than my car. I’ve used both, and here’s my honest take:
Concrete reproductions ($200-500): These look great and age well over time. The weathering actually improves their appearance. Perfect for most gardens.
Cast stone lanterns ($500-1500): Higher quality with more detail and better proportions. Worth it if your budget allows.
Authentic antique lanterns ($2000+): Gorgeous and unique, but unless you’re a serious collector, the price tag is hard to justify.
I started with a $300 concrete lantern and gradually upgraded. There’s no shame in beginning with affordable options and improving over time as your garden evolves.
Also Read: 10 Easy Terrace Garden Design Ideas for Fresh Green Vibes
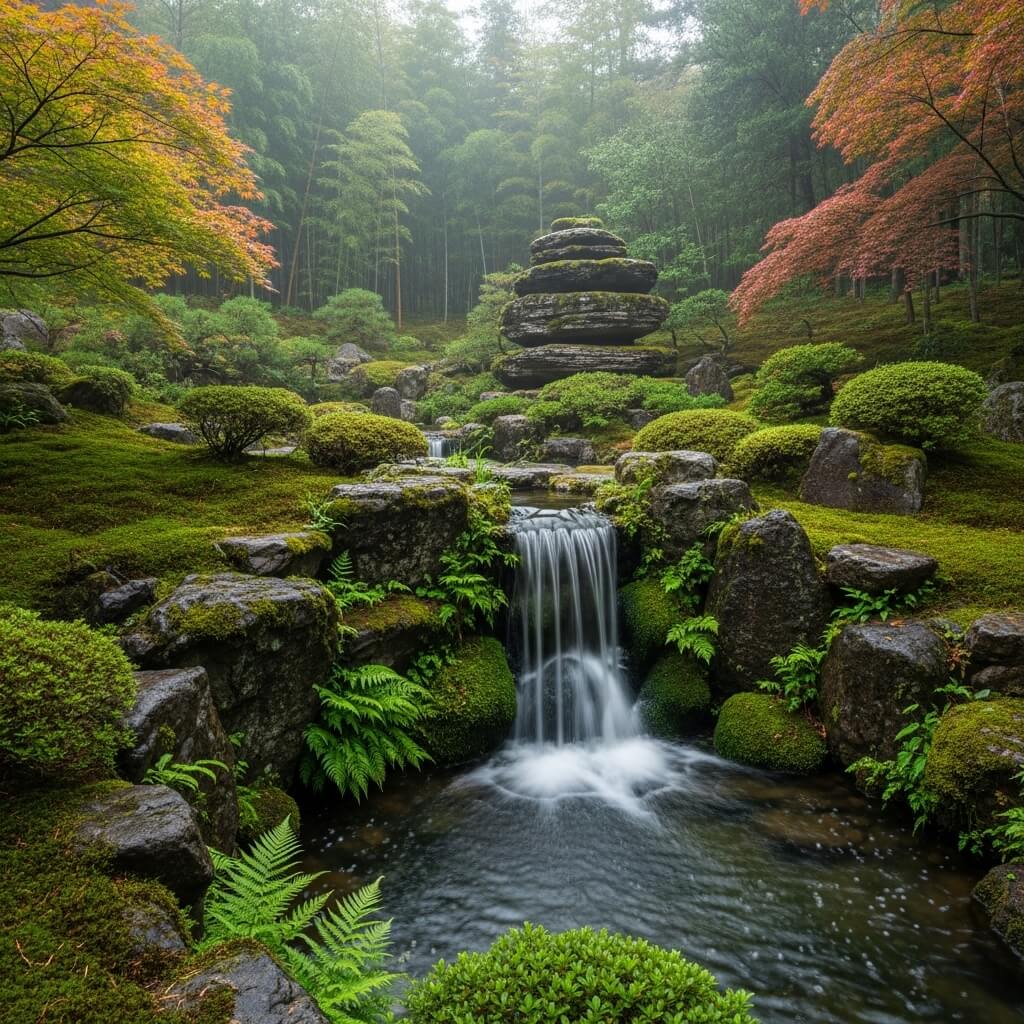
Mountain-Inspired Japanese Garden with Waterfall Feature
Let’s end with something dramatic, shall we?
Mountain-inspired gardens (tsukiyama) use elevation changes, rocks, and water features to recreate the feeling of Japanese mountain landscapes. The waterfall element brings movement, sound, and that irresistible tranquility to your outdoor space.
Creating Elevation and Drama
My mountain garden sits on a naturally sloped section of my property, but you can create artificial hills if your yard is flat. I built mine up using soil excavated from my koi pond (waste not, want not).
The waterfall starts at the highest point, cascades over carefully positioned rocks, and flows into a small pool at the base. The sound is incredible—it completely masks traffic noise from the nearby street.
Here’s what goes into a successful mountain garden waterfall:
Rock selection and placement: Use large, angular rocks that look like they could naturally occur in a mountain setting. I used moss rock with interesting textures and irregular shapes. Stack them to create the waterfall channel, making sure everything is stable and secure.
Water flow control: I installed a pump with adjustable flow. Start with lower flow and increase gradually—you want a peaceful babble, not a raging torrent. My pump is rated for 2000 gallons per hour, but I run it at about 60% capacity.
Naturalistic planting: Think about what grows in mountains—conifers, ferns, grasses, and flowering shrubs that handle rocky conditions. I planted Japanese black pine, autumn ferns, and some hakone grass.
Viewing perspectives: Design your waterfall to look good from multiple angles. I created a small seating area at the base where you can sit and watch the water cascade down.
The Hidden Infrastructure
Nobody wants to see pumps, tubes, and electrical work, right? I buried all my infrastructure and hid the pump housing behind rocks at the base of the waterfall. The power line runs underground from my house to a weatherproof outlet disguised by plantings.
Pro tip: Install a valve system that lets you drain your waterfall for maintenance without emptying the entire pond. Future you will be so grateful when you need to clean things out.
Bringing It All Together
So there you have it—ten completely different ways to bring Japanese garden serenity to your outdoor space. Whether you’ve got acres to work with or just a balcony, these design principles create that peaceful, contemplative atmosphere we all need more of in our lives.
The beautiful thing about Japanese garden design? It’s not about perfection. It’s about intention, mindfulness, and creating a space that brings you peace. I’ve shown you what worked for me, but your garden should reflect your own aesthetic and lifestyle.
Start small if you’re feeling overwhelmed. Maybe that’s just a single stone lantern or a small gravel garden. Gardens evolve over time, and honestly, that evolution is part of the joy. My outdoor spaces have been transforming for years, and I’m still making changes and improvements.
The most important thing? Get outside and create something. Your future self will thank you when you’re sitting in your own peaceful Japanese garden retreat, wondering why you didn’t start sooner. Trust me on this one.
Now stop reading and go rake some gravel or position some rocks. Your outdoor bliss is waiting 🙂